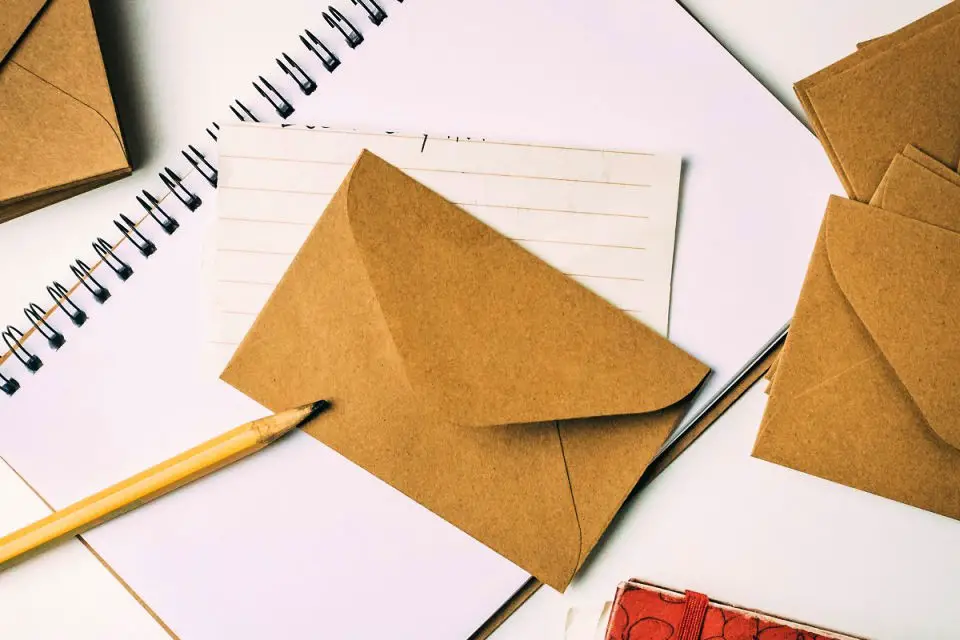
Why Make Your Own Envelopes?
Crafting your own envelopes offers a multitude of benefits that go beyond just the creative fulfillment. Here’s why taking on DIY envelope crafting is a worthwhile endeavor: When you create your own envelopes, you imbue them with a personal touch that shows thoughtfulness and care. You have complete freedom to choose your materials, design, size, and embellishments, allowing for unparalleled customization. This flexibility means your envelopes can perfectly match the occasion, whether it’s a special celebration or an everyday correspondence.Moreover, making your own envelopes can be an eco-friendly choice. By repurposing materials like scrapbook paper, old maps, or wrapping paper, you’re not only creating unique envelopes but also contributing to environmental sustainability.In addition to these benefits, crafting your own envelopes can be a cost-effective option, especially when you need them in bulk for events like parties or weddings. It’s an activity that can be enjoyed alone, with friends, or with family, making it an excellent way to introduce children to the world of crafting, teaching them about shapes, design, and recycling.As you work on your envelopes, you’ll also develop your crafting skills, learn new techniques, and perhaps discover a new hobby. And when you finally seal that envelope and send it off, you’re not just sending a letter or card – you’re sending a piece of yourself.
How to Make an Envelope – Step by Step
Crafting an envelope from the ground up without relying on traditional adhesives or cutting tools presents a sustainable option that also allows for thoughtful customization of your message or gift. This comprehensive guide aims to empower you with a straightforward and accessible approach, making it easier than ever to bring your creative vision to life.
Choosing Your Paper
When starting the creative process, begin by choosing a suitable surface to work on. Opt for a square-shaped piece of paper that balances durability with flexibility, allowing it to be folded as needed. For added personality, consider using patterned or colored paper that reflects your unique style.
Step-by-Step Guide
To create an envelope from paper, start by laying it flat on a surface with one corner pointing towards you, forming a diamond shape. Next, fold the bottom corner up to meet the top corner, creating a triangle with a crease that’s well-defined. This foundation is crucial for the rest of the process.
From this base, take the left and right corners of the triangle and fold them inwards towards the top corner, ensuring they converge at the center. This step should result in a diamond shape with an overlapped top.
Moving on, carefully fold the bottom corner that’s pointing towards you up towards the top, making sure it goes just beyond the previous folds to keep everything in place.
The final stage involves tucking the pointed part of the folded flap into the top folds. This action securely fastens the envelope without requiring any adhesives or tape. All that remains is to make any necessary adjustments to ensure a neat and tidy finish, with all corners and edges folded and tucked in neatly.
Additional Tips
When crafting larger envelopes, it’s essential to utilize a more substantial sheet of paper, maintaining its original square shape to preserve the uniformity of the folding process. Furthermore, feel free to explore diverse paper textures and hues to create unique visual effects and evoke distinct moods within your envelope design.
Video Tutorial
To take your paper envelope-making skills to the next level, I recommend checking out this YouTube video tutorial: How to Make a Paper Envelope Without Tape, Glue, or Scissors. This step-by-step guide is an excellent companion piece to this written guide, offering a visual representation of the folding techniques discussed. By watching it, you’ll gain a deeper understanding of the process and be better equipped to create your own unique envelopes. Not only will you have created a one-of-a-kind envelope, but you’ll also have had fun engaging in a creative activity. This method is perfect for adding a personal touch to your messages or gifts, ensuring that the recipient knows how much thought and effort you’ve put into making their special moment even more memorable.
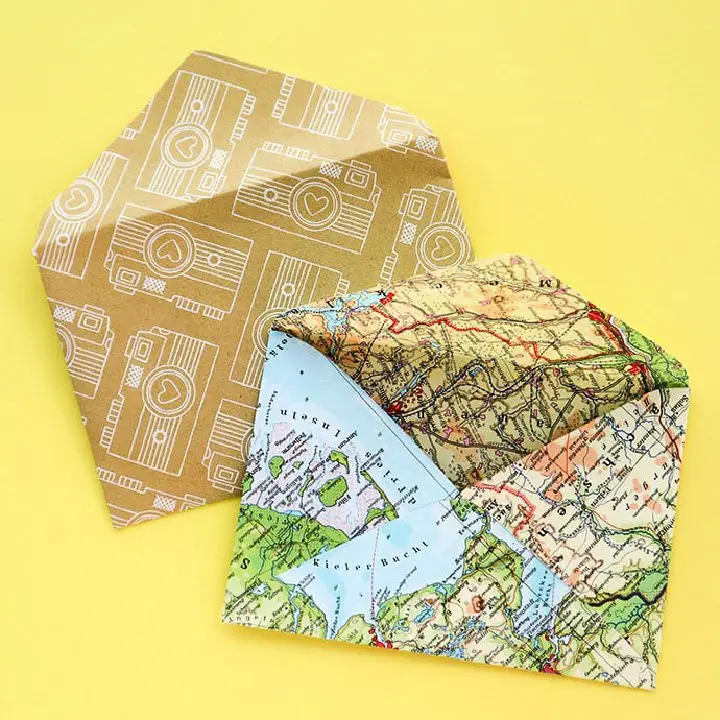
Upcycled Envelopes: A Creative Twist on Recycling
Repurposing Old Maps, Magazines, and Wallpaper
Upcycling is all about giving old items a new lease on life, and crafting unique envelopes from materials like old maps, magazines, and wallpaper is an excellent way to do just that. To turn these discarded materials into eye-catching correspondence holders, follow these simple steps.First, select the perfect material for your project. Old maps with vintage flair, colorful magazine pages, or textured wallpaper can all be used to create one-of-a-kind envelopes. Once you’ve chosen your material, use an existing envelope as a template to guide your design.Start by carefully disassembling the template envelope to lay it flat. This will give you a precise outline to work from. Next, place your chosen material over the template and trace around its edges with a pencil or pen. Cut out the shape along the lines you’ve drawn, taking care not to cut yourself in the process.Once you have your cutout envelope, fold it according to the template’s lines to create the desired shape. Finally, secure the edges with a glue stick or double-sided tape to give your new envelope a sturdy finish.
Why It’s Worth It
By incorporating recycled and reused materials, this approach not only diminishes waste but also infuses a personal touch into your creations. What’s more, it’s an economical way to craft unique gifts or letters without breaking the bank. By utilizing items you already possess at home, you’ll be able to create something special while minimizing your environmental footprint.
Crafting Fabric Envelopes: The Reusable Revolution
Creating Fabric Envelopes
In an effort to reduce waste, fabric envelopes are gaining popularity as a stylish and eco-friendly alternative to traditional paper envelopes. To create your own sustainable solution, follow this straightforward guide:
First, select a sturdy yet foldable fabric, such as cotton, that will withstand repeated use.
Next, cut your chosen fabric to the desired size, leaving an extra inch around each dimension for seam allowance.
To prepare the edges for sewing, fold them inward and iron them flat to make the process easier. Then, sew along the perimeter of the envelope, leaving a small opening at one end for turning it right side out.
Finally, turn your fabric envelope right side out, press it flat to remove any wrinkles, and close the opening by sewing it shut. You can enhance its functionality with buttons, snaps, or Velcro for secure closure.
Benefits of Fabric Envelopes
Embracing reusable and customizable alternatives for envelopes not only adds a thoughtful touch to your correspondence but also reduces waste and promotes sustainability. By choosing products that can be used repeatedly, you’re contributing to a greener planet without sacrificing creativity or personalization. The options available range from upcycled envelopes with nostalgic appeal to fabric-covered choices offering endless possibilities in terms of size, shape, and closure. These innovative solutions not only make your gifts or letters more special but also encourage others to follow suit, creating a ripple effect that benefits the environment.
Creative Envelope Ideas
Adding a personal touch to your correspondence can elevate the emotional impact of your message. By transforming ordinary envelopes into unique and creative expressions, you can convey your thoughts and feelings in a more meaningful way. The process of customization offers countless opportunities for self-expression, allowing you to infuse your communication with a sense of warmth, personality, and individuality. From special occasions to everyday gestures, there are numerous ways to breathe new life into the humble envelope.
Embellishments
Envelopes can be transformed from ordinary to extraordinary with the addition of simple yet effective embellishments. Ribbons, for instance, can be tied around the envelope’s edges or used to create a beautiful bow on the flap. The choice of ribbon color is crucial, as it should harmonize with the envelope itself or the occasion at hand. This added touch instantly elevates the overall aesthetic.Stamps are another versatile tool in an envelope decorator’s arsenal. Rubber stamps with ink can be used to add various designs, while custom-made stamps offer a personalized twist. The resulting look can evoke a sense of nostalgia and handmade charm, making it perfect for special occasions or everyday correspondence.Stickers provide a fun and easy way to bring personality to envelopes. From floral patterns to cartoon characters, stickers can quickly inject life into an otherwise plain envelope. Plus, they serve as a functional sealant for the flap, keeping contents secure.Cutouts from patterned paper or fabric can add a unique dimension to envelopes. By gluing them onto the surface or creating a border around the edges, you can introduce new textures and designs that reflect the occasion or theme. This method allows for endless creative possibilities and is ideal for crafting custom envelopes for special events.
Special Occasions
When it comes to designing envelopes for special occasions, the possibilities are endless. For holidays, incorporate festive elements such as red and green hues for Christmas, pastel shades for Easter, or winter-themed stickers and stamps to capture the essence of the season. The envelope can be transformed into a miniature celebration on paper.Birthday envelopes offer an opportunity to get creative with vibrant colors, balloon designs, and cake-inspired motifs. Take it to the next level by adding the recipient’s name or age in bold letters, making it a truly unique and thoughtful gesture.Wedding envelopes demand a more refined approach. Opt for high-quality paper, subtle color schemes like ivory, cream, or gold, and elegant embossing techniques to convey sophistication. Add a touch of romance with ribbons, lace, or delicate floral patterns. Whatever the occasion, the envelope becomes an extension of your thoughtfulness, making it a meaningful part of the overall experience.
Themed Envelopes
Crafting a harmonious presentation by matching the envelope’s theme with the card or content inside creates a thoughtful gesture. To achieve this, consider incorporating elements that complement the occasion. For instance, when sending a beach-themed card, blue hues, sandy textures, and seashell embellishments can evoke a sense of coastal charm. Similarly, for a nature-inspired card, green tones and leaf patterns can add a touch of serenity. When selecting materials, prioritize high-quality options to ensure your envelope design stands out. Additionally, consider the recipient’s tastes and the occasion to personalize the design and make it truly special.
Advanced Envelope Techniques
Transforming a straightforward letter into a treasured keepsake is as simple as elevating the humble envelope. By mastering innovative design techniques, you can take your correspondence from ordinary to extraordinary, making it a meaningful experience for both sender and recipient.
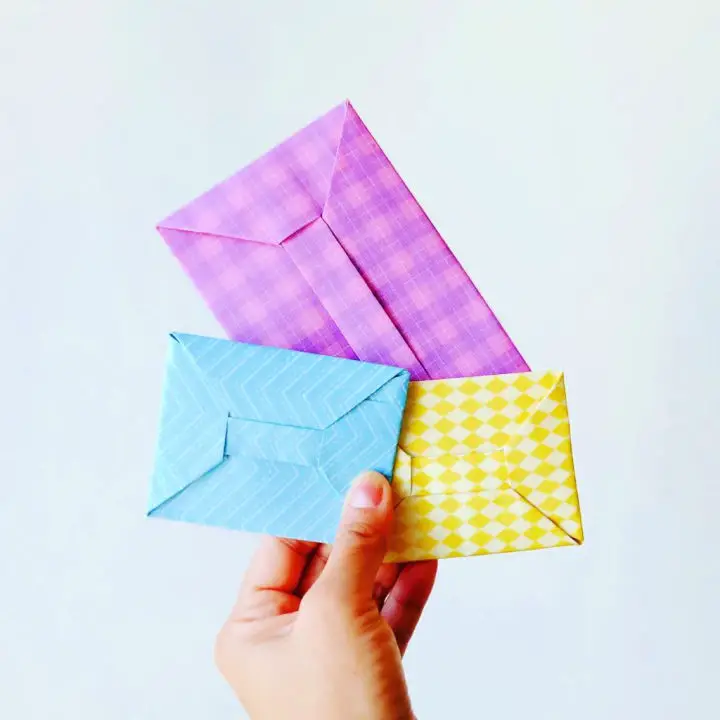
Origami Envelopes
Origami’s versatility extends beyond traditional paper creations, allowing for innovative designs in envelope making as well. By applying intricate folding techniques, you can produce stunning envelopes that make a lasting impression. Here are two lesser-known yet breathtaking origami methods to try:
The Lotus Envelope
This design emulates the beauty of a blooming lotus flower. Begin with a square piece of paper and fold it diagonally both ways before bringing all four corners to the center, essentially creating a compact, symmetrical shape. Flip the paper over and repeat the process, then gently open the flaps to reveal your lotus envelope.
The Heart Envelope
Ideal for expressing love or commemorating Valentine’s Day, this method involves folding a rectangular piece of paper into a heart shape that unfolds into an envelope. Start by folding the paper in half, followed by specific folds that define the heart’s contours. Secure the sides with adhesive and voilà, you have a charming heart-shaped envelope.
Window Envelopes
When crafting a window envelope, it’s essential to make the address written on the letter inside visible, which adds a level of professionalism to the overall design. To achieve this, begin by measuring and carefully cutting out a rectangular hole from one side of your envelope paper, taking care not to compromise its structural integrity.
Next, acquire a piece of clear plastic or a transparent sheet that is slightly larger than the window you’ve created, and apply a small amount of adhesive to secure it to the inside of the envelope, ensuring it covers the hole. This added layer provides a crisp, clean appearance when the envelope is folded and sealed.
Finally, assemble your envelope as usual, taking care to ensure the window remains unobstructed and free from any debris or residue that may compromise its clarity.
Unique Closure Methods
To make your envelopes truly stand out, you can add a unique closure that showcases your personality. One way to do this is by incorporating wax seals into your envelope. To achieve this look, melt special sealing wax over the flap of the envelope and press a seal into the wax before it hardens. This classic and elegant method adds a touch of sophistication to your correspondence.Alternatively, you can create a more whimsical closure by sewing a button onto the front of your envelope and attaching a string that wraps around the button securely. Start by sewing the button in place, then cut a length of string that is long enough to wrap around it comfortably. Attach one end of the string to the back of the envelope and use it to secure the other end, wrapping it neatly around the button.For a more playful approach, consider using decorative tape as your closure method. You can choose from a wide range of colors and patterns to match your personal style. Simply place the tape across the flap and onto the body of the envelope, creating a bold and eye-catching design. This easy and effective method adds a touch of fun to your correspondence.Remember, when experimenting with these unique closures, precision and patience are key.
DIY Envelope Making FAQs
With the rise of digital communication, there’s something endearing about sending handwritten letters and packages. One way to elevate this experience is by crafting your own envelopes. Not only does it allow for a personal touch, but it also gives you creative control over the design and materials used. As you embark on this DIY adventure, here are some frequently asked questions that will help guide you through the process.
What materials do I need to make my own envelopes?
To get started with creating your unique paper art piece, you’ll need a few basic supplies. First and foremost, gather some paper – this could be an old scrapbook page, wrapping paper, or even a vintage map. Once you have your paper, grab a pair of scissors or a craft knife to help you cut it to the desired shape or size. Next, you’ll need something to hold everything together. This is where glue or adhesive tape come in – use them to secure any folds or layers you want to create. If you’re looking for a little extra precision, don’t forget to bring along a ruler to take some measurements and keep your pieces evenly spaced. Finally, if you want to add an extra touch of professionalism to your design, consider using an envelope template as a guide – this can help ensure that your finished piece looks neat and tidy.
How to Calculate the Right Size for Your Content?
When determining the size of your envelope, start by measuring the content you want to enclose. Use a ruler to calculate its length and width. To ensure a comfortable fit without creasing or bending, add at least 0.25 inches (approximately 6mm) around each side of your item. This extra space will help you calculate the minimum size needed for your envelope. For instance, if your content measures 5×7 inches, your envelope should be a minimum of 5.5×7.5 inches. Remember, it’s generally better to err on the side of a slightly larger envelope than one that’s too snug.
How to Choose the Best Paper Weight for Standard Mail?
When selecting paper for DIY envelopes, it’s crucial to consider the weight of the paper as it impacts postage costs and the durability of the envelope during transit. Here are key takeaways: The lightweight options (20-60 lbs or 75-90 gsm) are suitable for everyday correspondence, offering a cost-effective solution for letters or documents that don’t require additional protection. However, they may not withstand rough handling. Medium-weight papers (70-100 lbs or 100-150 gsm) strike a balance between durability and cost, making them ideal for formal correspondence like invitations or greeting cards. For very special occasions or items that need extra protection, heavyweight papers (over 100 lbs or 150 gsm) are the way to go. Keep in mind, using heavier paper can increase postage costs. When it comes to standard mail, consider these tips: Before mailing, check with your local postal service for any specific requirements related to envelope size, thickness, and weight to avoid unexpected postage fees. Additionally, factor in the destination – if you’re mailing something internationally or across long distances, opting for a slightly heavier paper can ensure your envelope withstands the journey.
Can I make an envelope without glue or tape?
Without relying on traditional adhesives, you can create an envelope by harnessing the power of origami. By folding the paper in a specific manner, you can craft a self-contained enclosure that doesn’t require glue or tape to hold together. The straightforward instructions within this article offer a seamless approach to achieving this creative feat.
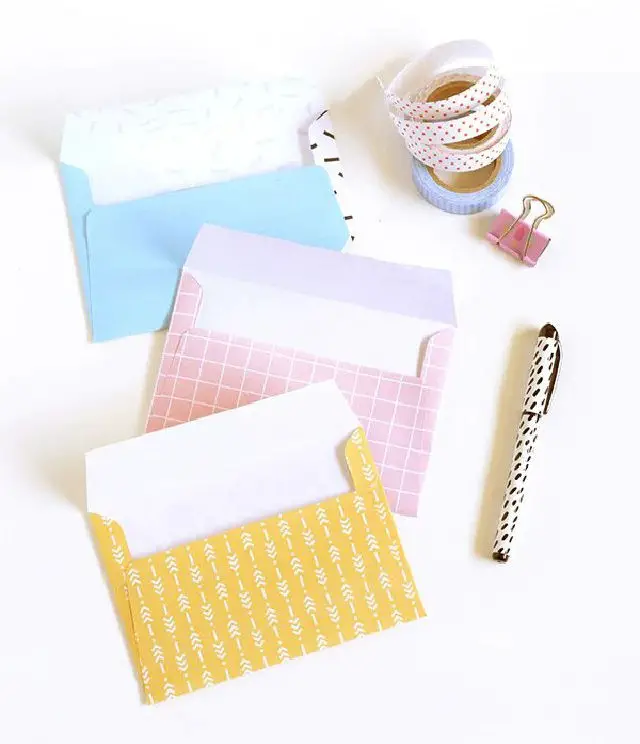
How can I customize my DIY envelopes?
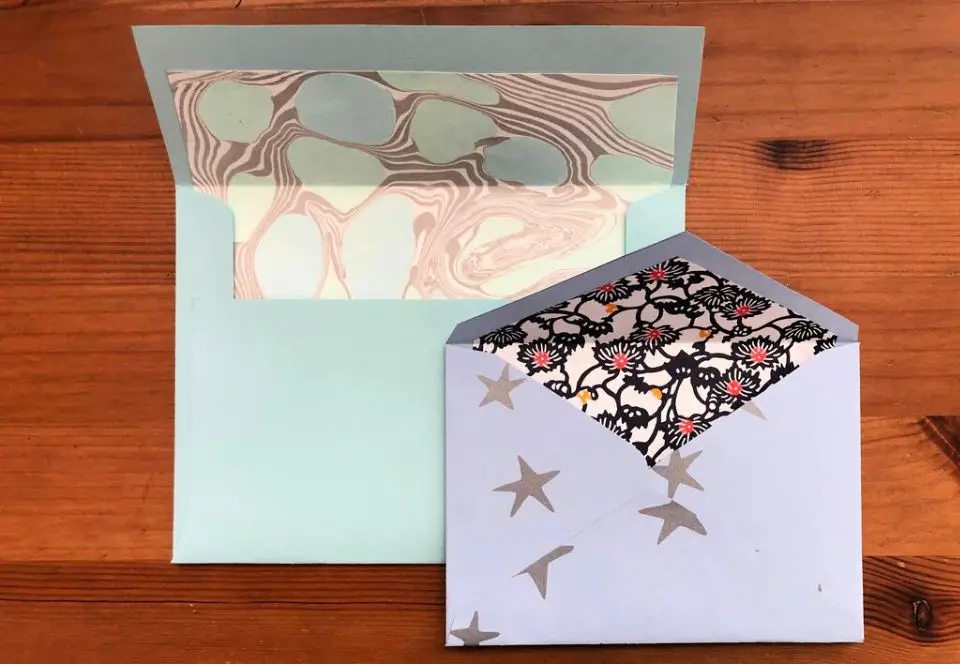
To elevate the humble envelope, consider incorporating various elements to make it truly unique. This can be achieved by selecting from a range of papers, including vibrant colors, eye-catching patterns, eco-friendly recycled options, or even specialty finishes. Additionally, embellishments such as stickers, doodles, or postage stamps can add a playful touch. For an added layer of sophistication, consider inserting liners inside the envelope, which can feature subtle designs or clever quotes. Furthermore, don’t be afraid to think outside the box (or envelope) by experimenting with non-traditional sizes and shapes to create truly one-of-a-kind correspondence.
Are DIY envelopes eco-friendly?
Transforming everyday materials into unique envelopes is not only a creative outlet but also an eco-conscious move. To give your envelopes a sustainable twist, consider the following strategies: By repurposing materials like discarded magazines, scrap paper, and wrapping paper, you’re reducing waste and giving old items a new lease on life. Next, opt for biodegradable adhesives that won’t harm the environment when they eventually decompose. Finally, select decorations made from eco-friendly sources such as soy-based inks or natural fibers to add a touch of sustainability to your envelope-making endeavor.
Can I make envelopes in different sizes?
When crafting custom envelopes, one of the most significant advantages is the ability to create them in any size that suits your specific requirements. To achieve this, begin by determining the dimensions of the item you intend to enclose and tailor your paper size accordingly. Using a template can further enhance efficiency when producing multiple envelopes of the same size, promoting consistency throughout.
How do I ensure my DIY envelope stays closed?
To ensure your envelope remains secure, there are several techniques you can employ. Firstly, consider using adhesive tape or glue to reinforce the inside edges. This provides a physical barrier against prying eyes and unwanted tampering. Alternatively, create a folding flap that tucks neatly into the envelope, effectively locking its contents within. For an added touch of sophistication, seal your envelope with a decorative sticker or wax seal, adding a layer of elegance to your correspondence.
Is it possible to mail DIY envelopes?
To give your correspondence an extra special touch, creating DIY envelopes is a fantastic option. Before you get started, ensure that the size and weight of your envelope comply with postal regulations. Next, use clear handwriting or print the recipient’s address on the envelope. Finally, don’t forget to affix the correct postage. By taking these simple steps, you’ll be able to mail your DIY envelopes just like any other. Making your own envelopes is a great way to add a personal touch to your correspondence and with a little creativity, you can create unique and eco-friendly designs for any occasion.
DIY Envelope (15 Ways to Make an Envelope)
Unleash your creativity and take correspondence to the next level by transforming plain envelopes into works of art. In this exhaustive guide, we’ll explore a wide range of innovative DIY envelope ideas that will inspire you to think outside the box – literally.
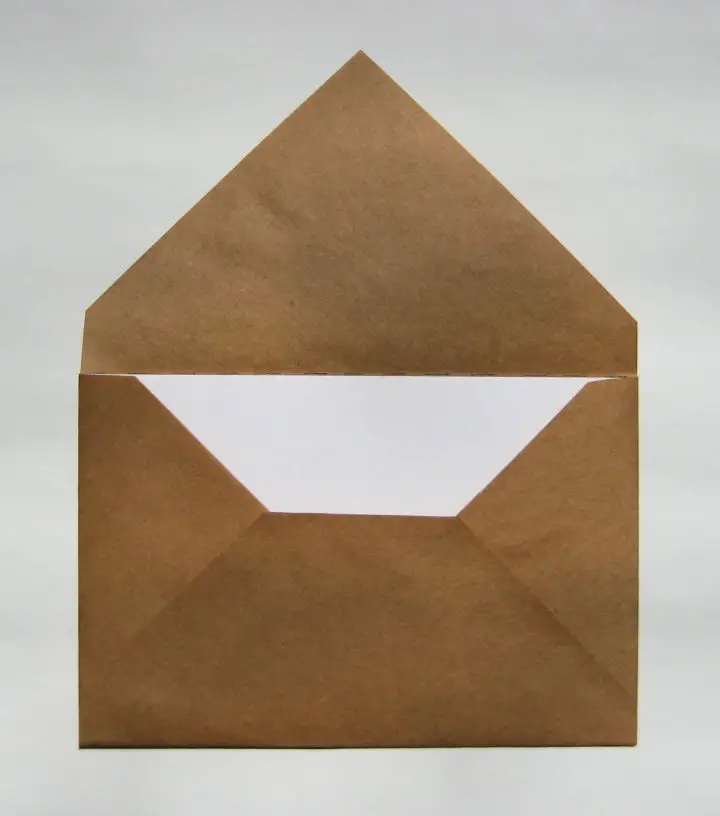
Easy DIY Paper Envelope
Indulge in the whimsy of personalized correspondence by creating your own distinctive envelopes with The Paper Mouse’s comprehensive guide. As National Letter Writing Month approaches, there’s no better way to celebrate than by crafting unique, handcrafted envelopes that reflect your personality. This tutorial provides a step-by-step journey, arming you with the necessary tools and vibrant paper choices to infuse your correspondence with a dash of individuality. From scissors and glue to decorative liners, this process is designed to be both rewarding and enjoyable, allowing you to elevate your letter-writing experience. With every handmade envelope, you’ll have the opportunity to surprise and delight both senders and receivers alike.
Free Printable Patterned Envelope
Transform your gifts with a personal touch by creating customized printable patterned envelopes. These unique additions to your presents can be used for enclosing special notes or gift cards, adding an extra layer of thoughtfulness to your gestures. To get started, you’ll need just a few simple materials: A4 paper, scissors, and glue. With DIY Crafts’ step-by-step guide, you’ll be able to craft your own colorful and one-of-a-kind envelopes in no time. The straightforward instructions ensure that the process is fun and stress-free, allowing you to focus on expressing your creativity. When you’re done, you’ll have a beautiful and meaningful way to present your gifts, sure to leave a lasting impression on your loved ones.
Make an Envelope With Template
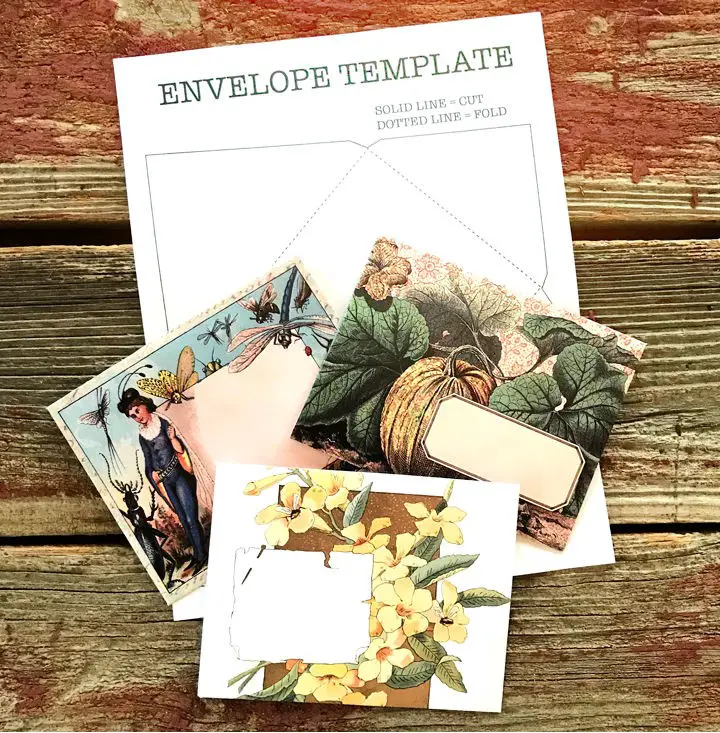
Transforming printer paper into bespoke envelopes is now within reach thanks to The Graphics Fairy’s comprehensive guide. This step-by-step tutorial empowers you to infuse your envelopes with a personal touch, ideal for sending one-of-a-kind greetings, invitations, or simply spreading joy. With Rebecca E. Parsons’ expert tips and tricks at your disposal, the process becomes an enjoyable and intuitive experience. By incorporating The Graphics Fairy’s free A2 DIY envelope template, you’ll gain the skills to craft envelopes that not only reflect your unique style but also convey thoughtful consideration for the recipient.
Homemade Petal Square Envelope
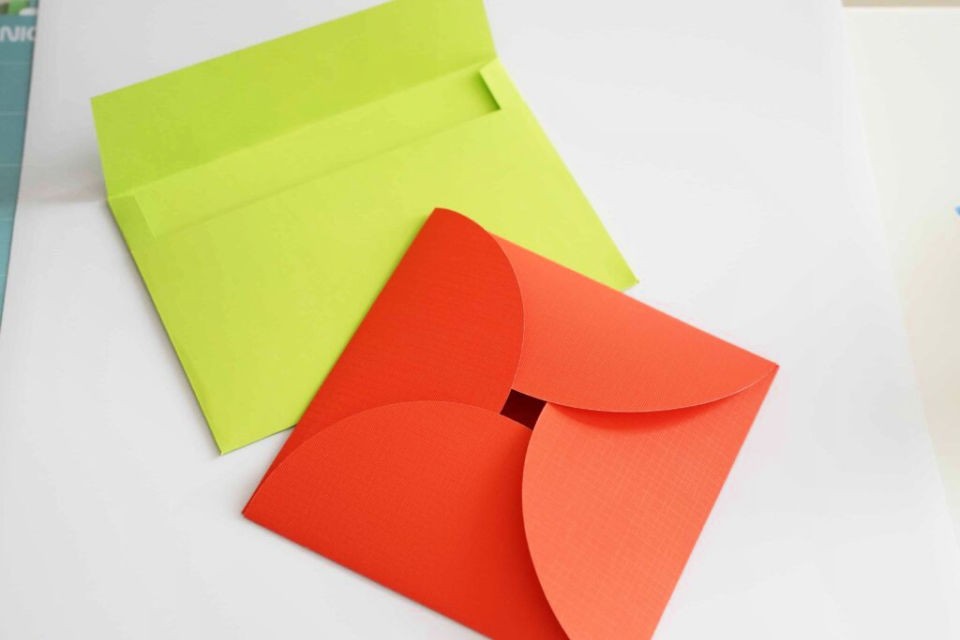
Creating personalized envelopes adds a unique touch to your cards and gifts. Domestic Heights provides a comprehensive guide on crafting various envelope sizes, including A7, A4, square, and long ones. The instructions are easy to follow, and you’ll find free downloadable templates in PDF and SVG formats to help you get started. You can choose to cut the envelopes by hand or with a cutting machine, whichever suits your style. Once you’ve got the basic shape down, learn how to fold, score, and glue them together for a professional finish. To take it to the next level, explore creative embellishments that will elevate your envelope design. This resource is designed to help you enhance your card-giving experience with custom-made envelopes.
DIY Paper Envelopes
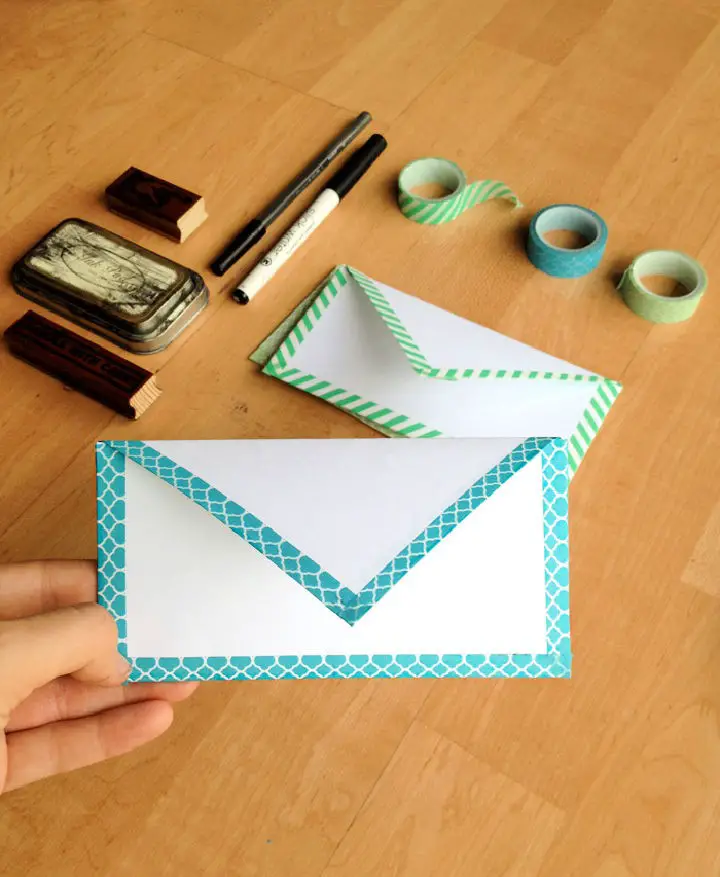
Crafting a DIY paper envelope is a delightful and practical activity that can be completed in under three minutes with Kendra John Designs’ simple guide. To get started, gather just three essentials: a sheet of paper, scissors, and tape – washi tape adds a lovely personal touch. The process involves folding and trimming the paper to create a shape that can be secured into a functional envelope using tape. This charming craft is perfect for creating personalized notes, birthday cards, or even love notes for family members. What’s more, it’s an accessible activity suitable for all crafting levels, thanks to its easy-to-follow tutorial. If you’re keen on crafting various sizes with ease, the guide also offers a helpful tip on using an Envelope Punch Board. With this handy technique, you can add a touch of homemade charm to your correspondence and let your creativity shine.
Making a Mixed Paper Envelope
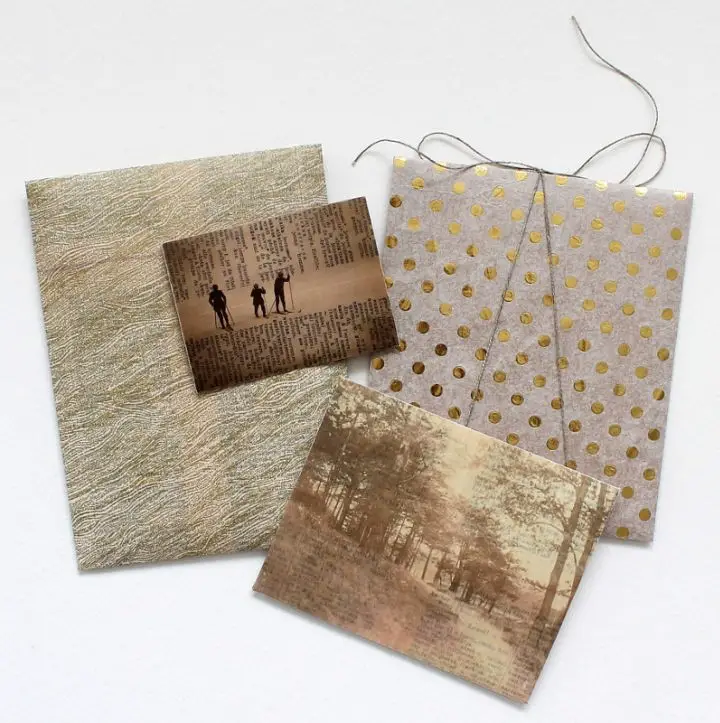
Transform a plain gift-giving experience by crafting an extraordinary mixed paper envelope with asymmetrical flaps, courtesy of Paperiaarre’s comprehensive DIY guide. This innovative tutorial empowers you to create custom-sized envelopes from scratch, combining mixed papers for a distinctive look that adds a personal touch to your gifts or correspondence. With a focus on creativity and experimentation, the step-by-step instructions and accompanying visuals encourage crafters to explore different materials like vellum, tissue paper, and recycled pages. By following Paperiaarre’s accessible and thorough tutorial, you’ll not only develop new skills but also indulge in the delightful process of envelope-making, elevating your crafting experience to a whole new level.
DIY Envelope in Five Simple Steps

To take your correspondence to the next level, why not try crafting your own envelopes? Not only is it a fun and creative activity, but it also allows you to add a personal touch to your letters and cards. With a handmade envelope, you can choose from a wide range of paper types, including standard printer paper for everyday use or vibrant scrapbooking paper for a more decorative touch. Using simple tools like glue and optional embellishments such as stickers, you can create an envelope that’s perfectly sized for your card or letter. By following these five easy steps, you’ll be able to elevate the presentation of your correspondence and make it truly special.
Handmade Envelope for Cards
Transform ordinary handmade cards into extraordinary keepsakes by creating one-of-a-kind envelopes with TeachKidsArt’s easy-to-follow process. This adaptable technique is perfect for cards that don’t fit standard sizes, allowing young crafters to add personal touches using a variety of papers and decorative liners. Simply start with a square piece of paper slightly larger than the card, follow simple folding instructions, and watch your envelope take shape. For an added professional touch, incorporate custom liners into your design. This fun and creative activity not only encourages artistic expression but also teaches fundamental crafting skills, all while providing a sense of accomplishment as you bring your unique creation to life.
How to Do Customizable Envelope
Crafting A2 size envelopes can be an invigorating DIY experience that yields a sense of accomplishment. For those who are new to paper crafting, Instructables offers a step-by-step guide that breaks down the process into manageable tasks, making it accessible to all skill levels. This DIY project is perfect for when you need a one-of-a-kind envelope for a special occasion or find yourself unexpectedly running low at a crucial moment. With this tutorial, you can quickly and easily create custom envelopes that reflect your personal style and add a touch of creativity to your correspondence and invitations.
DIY Gift Card Envelope in 5 Minute
Transform a standard gift card into a thoughtful present with a creative DIY Gift Card Envelope craft from Smiling Colors. By combining scrapbook paper and basic crafting tools, you can add a personal touch to your gift in just 5 minutes. This easy-to-follow guide is perfect for those with minimal crafting experience, making it an accessible way to elevate the presentation of a convenient gift option. Whether it’s for a special occasion or simply to show appreciation, this charming envelope will make the recipient feel valued and thoughtfully considered.
How Do You Make Paper Envelope
With the We R Memory Keepers Envelope Punch Board, crafting custom paper envelopes becomes a seamless experience, imbuing your snail mail with a personal touch. This innovative tool is perfect for creating unique invitations, thank-you notes, or special correspondence. By streamlining the process, it allows you to produce precise and beautiful envelopes in various sizes with ease. The built-in guidelines ensure flawless results, making it an essential tool for paper crafting enthusiasts and anyone looking to elevate their mailing skills. Whether you’re a seasoned crafter or just starting out, this punch board simplifies envelope creation, freeing up time to focus on embellishing and personalizing your mail.
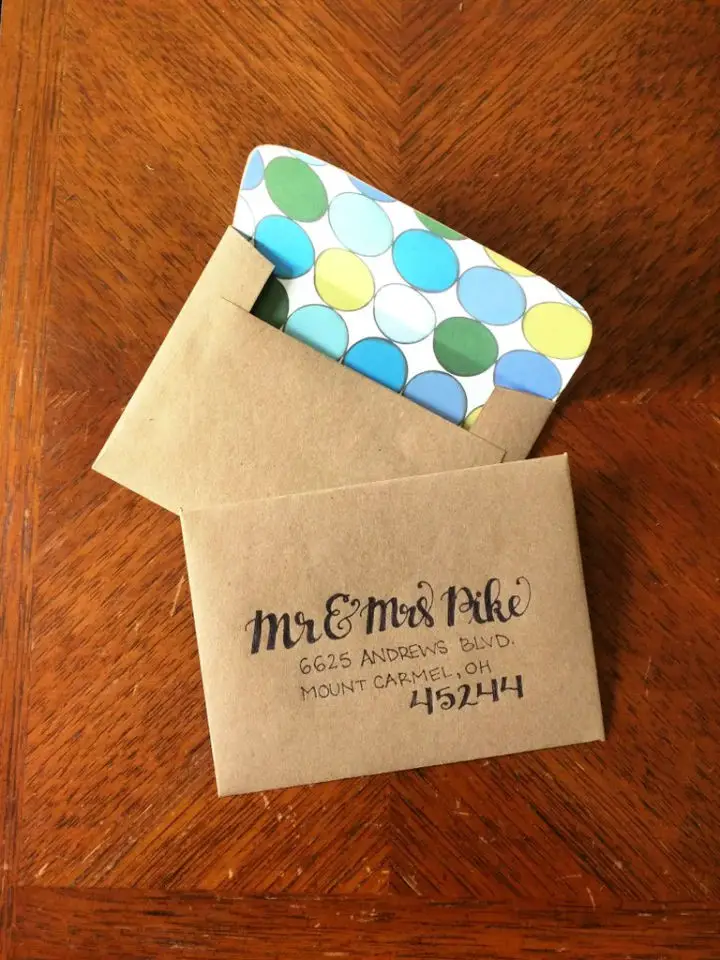
How to Make an Envelope Out of Scrapbook Paper
Elevate your stationery game by transforming ordinary paper into one-of-a-kind, personalized envelopes using this easy-to-follow DIY guide from Spark Letterpress. By repurposing old envelopes as templates and incorporating scrapbook paper pads in various sizes, you’ll unlock a treasure trove of creative possibilities. With simple scoring techniques and design variations like coloring sheet or washi tape embellishments, you can add a unique touch to any occasion – whether it’s a birthday, holiday, or just because. By building a versatile template collection, you’ll ensure that your future paper projects stand out from the rest, reflecting the thoughtfulness behind your gift-giving.
DIY Mini Paper Envelope

With the help of Turquoise Avenue’s tutorial, you can effortlessly create charming mini envelopes that will elevate your paper crafts to the next level. Start by printing out the template at your desired size, then get creative with your scrapbook paper by tracing and cutting out the design. Finally, give the envelope its signature shape by folding the corners as instructed and securing it with a small amount of adhesive. These tiny treasures are perfect for adding a personal touch to greeting cards, scrapbook pages, or festive decorations. Join the DIY crafting fun and discover how these mini marvels can bring a smile to your face and a unique charm to your creations.
Simple DIY Recycle Paper Envelope
Transform your love for recycling and crafting into a unique stationery experience with My Poppet Makes’ free printable template. This eco-friendly guide empowers you to breathe new life into old maps, children’s artwork, or wrapping paper by turning them into personalized envelopes. The result is a charming touch added to your correspondence, showcasing your creative flair. By repurposing materials that would otherwise be discarded, you’ll not only save on stationery costs but also contribute to a more sustainable lifestyle. Follow this easy-to-follow craft and bid farewell to envelope shortages forever.
Make Your Own Origami Money Envelope
Transform your cash gifts with a unique and personalized twist by crafting an origami money envelope using the step-by-step guide from I Try DIY. This innovative approach turns a plain piece of paper into a sophisticated and eye-catching envelope, setting it apart from traditional envelopes. The tutorial is designed to be easy to follow, making it accessible to anyone looking to add a special touch to their monetary gifts. With its clever folds and secure ‘belt’ feature, the finished product is sure to delight recipients and elevate your gift-giving experiences.
Conclusion:
Mastering the art of DIY envelope creation is more than just adding a personal touch to your correspondence – it’s also an opportunity to unleash your creativity and experiment with various designs and materials. As you follow our step-by-step guide on how to create unique envelopes, you’ll not only gain the skills to craft special envelopes for any occasion but also develop a newfound appreciation for the art of envelope-making. With a focus on selecting the perfect paper and adding that extra personal flair, our comprehensive guide has everything you need to take your envelope-making game to the next level. So, if you’re excited about sending a special message wrapped in your own creative envelope, why not give these 15 ways to make an envelope a try? With every fold and flourish, you’ll be creating something truly unique that reflects your personality.
