Embarking on a DIY earring project is an excellent way to express your creativity and make personalized jewelry or thoughtful gifts for loved ones. With numerous easy-to-follow projects available, you can create beautiful, handmade pieces using just a few basic tools and materials. This guide serves as a comprehensive introduction to the world of earring creation, catering to beginners and providing them with the necessary skills to produce stunning results.
By mastering fundamental techniques like wire wrapping and selecting the right materials, you’ll be well-equipped to start your earring-making journey. You’ll learn how to craft simple earrings correctly, appreciate the importance of choosing eco-friendly materials, and discover tips for caring for your creations to ensure their longevity. As we begin this exciting adventure in making unique earrings that reflect your personal style and creativity, you’ll find inspiration and guidance every step of the way.
Why Make DIY Earrings?
Delving into DIY earring projects can be a highly rewarding experience, offering a multitude of benefits that cater to various interests and needs. One of the most significant advantages is the opportunity for personalized fashion. By crafting your own earrings, you have the freedom to design pieces that truly reflect your personal style, whether you’re into minimalist designs or quirky shapes. This creative control allows you to bring your unique vision to life, making it a great way to express yourself.Another benefit of making your own earrings is the cost-effectiveness. Purchasing unique or high-quality earrings can often come with a hefty price tag. By crafting your own earrings, you can expand your accessory collection without breaking the bank. This makes DIY earring projects an excellent option for those on a budget or looking to treat themselves.In addition to personalization and cost-effectiveness, DIY earrings also make unique gifts. Handmade earrings show effort, creativity, and consideration for the recipient’s tastes and preferences. They’re a special way to celebrate birthdays, holidays, or just because moments.Crafting, including making earrings, can also be a therapeutic activity that helps reduce stress. The focus and creativity involved in the process can be a form of mindfulness, offering a relaxing break from daily pressures. This makes DIY earring projects an excellent option for those looking to unwind and find some calm.Furthermore, DIY earring projects provide an opportunity to use sustainable materials or repurpose items you already have at home. Making eco-friendly earrings is a small but meaningful way to contribute to environmental conservation. This not only benefits the environment but also adds a sense of satisfaction to your crafting experience.Finally, each project allows you to learn new techniques and improve your crafting skills. Over time, you’ll gain confidence and may even explore more complex jewelry-making projects. This skill development can be a source of pride and motivation, making DIY earring projects an engaging and productive way to spend your time.
Learn to Make Simple Earrings – The Right Way!
Crafting your own earrings can be a fulfilling and imaginative pursuit. This comprehensive guide will walk you through the straightforward process of creating understated yet sophisticated earrings. Whether you’re a novice seeking an accessible project or a more experienced individual looking to hone their skills, this tutorial is tailored for both groups. Remember that repetition breeds mastery, so don’t hesitate to experiment and refine your technique.
Materials Needed:
To embark on this creative journey, gather the following essential tools and materials: A wire cutter, commonly referred to as a side cutter, will facilitate precise cuts. Chain nose pliers and round nose pliers will prove invaluable for shaping and forming your design. Head pins come in two sizes – 1 inch for basic designs and 2 inches for more intricate wire-wrapped creations. Beads are the focal point of any piece; choose from a variety of options, but Swarovski pearls and bicones are excellent starting points. Finally, ear wires will serve as the foundation for your earrings, allowing you to attach the beads and other components.
Step 1: Basic Earring Design
To begin crafting your bead design, start by threading the selected beads onto a one-inch head pin. A combination of a 6mm Swarovski pearl and a 4mm bicone can add an air of sophistication to your creation. Once you’ve assembled your bead selection, use chain nose pliers to create a 90-degree bend just above the topmost bead, leaving a small margin to prevent cracking or damage to the beads themselves.
Next, trim any excess wire as needed, ensuring that you retain enough length to form a loop of approximately half an inch. This will provide a secure attachment point for your dangle’s ear wire. Finally, employ round nose pliers to shape the wire into a loop by rolling it away from yourself. Be sure to close the loop thoroughly to prevent any unwanted slippage or detachment.
Step 2: Wire Wrapped Loop Design
To create a secure design, start by preparing your materials using a 2-inch ball head pin. Thread one or more beads onto the pin, taking care not to overcrowd it. Next, use your finger to bend the wire just above the top bead, leaving a longer piece for wrapping. This will give you enough room to form a loop and wrap any excess wire. With the wire still in place, use round nose pliers to shape the metal into a circular loop, ensuring it’s centered and even. Once you have your loop formed, switch to chain nose pliers and tightly wrap the remaining wire around the stem below the loop. Aim for two to three neat wraps before trimming any excess and tucking in the end to prevent sharp edges from forming.
Step 3: Attaching to Ear Wire
To complete the earring assembly, start by accessing the open end of the ear wire loop on your chosen earring component. Utilizing chain nose pliers, carefully manipulate this opening to swing it wide enough for the subsequent step. Next, position the earring dangle onto the prepared ear wire loop. Once the dangle is securely in place, use the same pliers to reverse the process and re-close the loop, verifying that it’s fully sealed to prevent any accidental detachment.
Video Tutorial
If you’re looking to learn the ins and outs of creating simple earrings, I recommend pairing this written guide with a step-by-step video tutorial on YouTube. This visual approach will not only supplement the information presented here but also provide an intuitive way to follow along and master the techniques involved. With both the written and visual elements in hand, you’ll be well-equipped to craft your own unique earrings that reflect your personal style and showcase your creativity.
FAQS on Making DIY Earrings
To kickstart or enhance your DIY earring-making journey, we’ve compiled a list of frequently encountered queries that will guide you through the process and help you create one-of-a-kind jewelry pieces.
What basic tools do I need to start making DIY earrings?
Before embarking on the creative journey of crafting your own earrings, it’s essential to have the right arsenal of tools at your disposal. The foundation of any successful earring-making venture begins with a few fundamental essentials:
At the top of this list are wire cutters – also known as side cutters – which allow you to precision-cut wires to the perfect length.
Next, chain nose pliers come into play, providing the necessary grip and leverage for shaping and bending metal components.
Round nose pliers offer additional versatility in crafting and forming various earring designs.
Lastly, don’t overlook head pins or ball head pins, ear wires, which serve as the building blocks of your creations.
Can I make earrings if I have no experience in crafting?
For those new to the world of DIY earrings, there’s no need to feel intimidated. In fact, many projects are specifically designed with beginners in mind. A great way to get started is by tackling simpler designs and gradually working your way up to more complex creations as you become more comfortable with the process.
How do I choose the right materials for my earrings?
When it comes to selecting materials for your project, the style and design you’re aiming for will play a significant role in determining what materials to choose from. A diverse range of options is available, including glass and Swarovski beads, wooden beads, seed beads, metal findings such as head pins, ear wires, and jump rings, as well as specialty items like Cricut veneer, polymer clay, and embroidery floss. To ensure a cohesive look, take into account the color, size, and shape of each material, ensuring that they align with your desired aesthetic.
How do I make sure my DIY earrings are durable?
For a beaded accessory to withstand wear and tear, it’s essential to prioritize durability from the start. This can be achieved by utilizing high-quality materials that are less prone to damage or degradation over time. Furthermore, ensure all loops and connections are tightened securely to prevent loose ends or unraveling. Additionally, apply jewelry glue to any knots or ends as needed to reinforce the structure. It’s also crucial to select a wire thickness that is proportionate to the weight of the beads being used, taking into account factors such as bead size, material, and intended use.
Can DIY earrings be eco-friendly?
When it comes to crafting, opting for sustainable materials can be a game-changer. Consider using recycled beads, natural elements, or repurposing old jewelry parts in your designs. By making this choice, you’ll not only reduce waste but also contribute to a more environmentally friendly approach to crafting.
How do I care for my DIY earrings?
To ensure your earrings remain in pristine condition and continue to sparkle, it’s essential to practice proper care. Start by storing them in a dry area, free from humidity and moisture that can cause damage. Be mindful of direct contact with fragrances, lotions, or any other substances that could potentially harm the jewelry. When cleaning, opt for gentle methods using soft cloths to avoid scratching or damaging the surface. Finally, consider investing in a high-quality jewelry box featuring separate compartments to prevent tangling and keep your earrings organized.
Where can I find inspiration for my earring designs?
The quest for inspiration can take you on a creative journey across multiple fronts. For instance, online platforms dedicated to crafting and social media can be a treasure trove of innovative ideas. The natural world is another rich source, offering an array of colors and shapes that can serve as the foundation for your next project. Fashion magazines and trends can also provide valuable inspiration, while cultural and historical jewelry designs offer a wealth of knowledge and insights. By exploring these diverse sources, you’ll be more likely to stumble upon unique ideas that will bring your creations to life.
Are there any safety tips I should follow while making earrings?
When it comes to ensuring a safe workspace, several essential precautions can be taken. Firstly, consider the physical environment in which you work. This includes maintaining a well-lit and organized space that minimizes tripping hazards and reduces distractions. In addition to a comfortable physical environment, it’s crucial to keep sharp tools and other potentially hazardous objects out of reach of children and pets. Furthermore, take steps to protect your eyes from injury by wearing safety glasses when working with materials that can produce flying debris, such as wire ends. Finally, be mindful of potential allergens, particularly if you’re working with metal components, and take necessary precautions to avoid exposure.
How can I gift DIY earrings attractively?
Elevate your gift-giving experience by incorporating thoughtful presentation techniques that add significant value. Start by using small jewelry boxes or organza bags to create an air of luxury and sophistication. To make it even more personal, include a handmade card or note with a heartfelt message. When customizing the packaging, consider the recipient’s style and preferences to ensure the gift feels tailored to their unique taste. Finally, add a small polishing cloth as a thoughtful touch that shows you’ve put extra effort into making the gift special.
Can I sell the earrings I make?
Transforming your passion for crafting into a profitable venture is a dream shared by many. To successfully turn DIY earrings into a viable business, it’s crucial to consider several key factors. First, conduct thorough market research to understand consumer preferences and pricing dynamics. This will enable you to create a unique brand identity that sets you apart from the competition. Next, leverage online platforms or local craft fairs to showcase and sell your creations. To effectively promote your products online, invest in high-quality photos and detailed descriptions that accurately represent your earrings. With dedication and practice, anyone can develop the skills necessary to turn crafting into a fulfilling source of income.
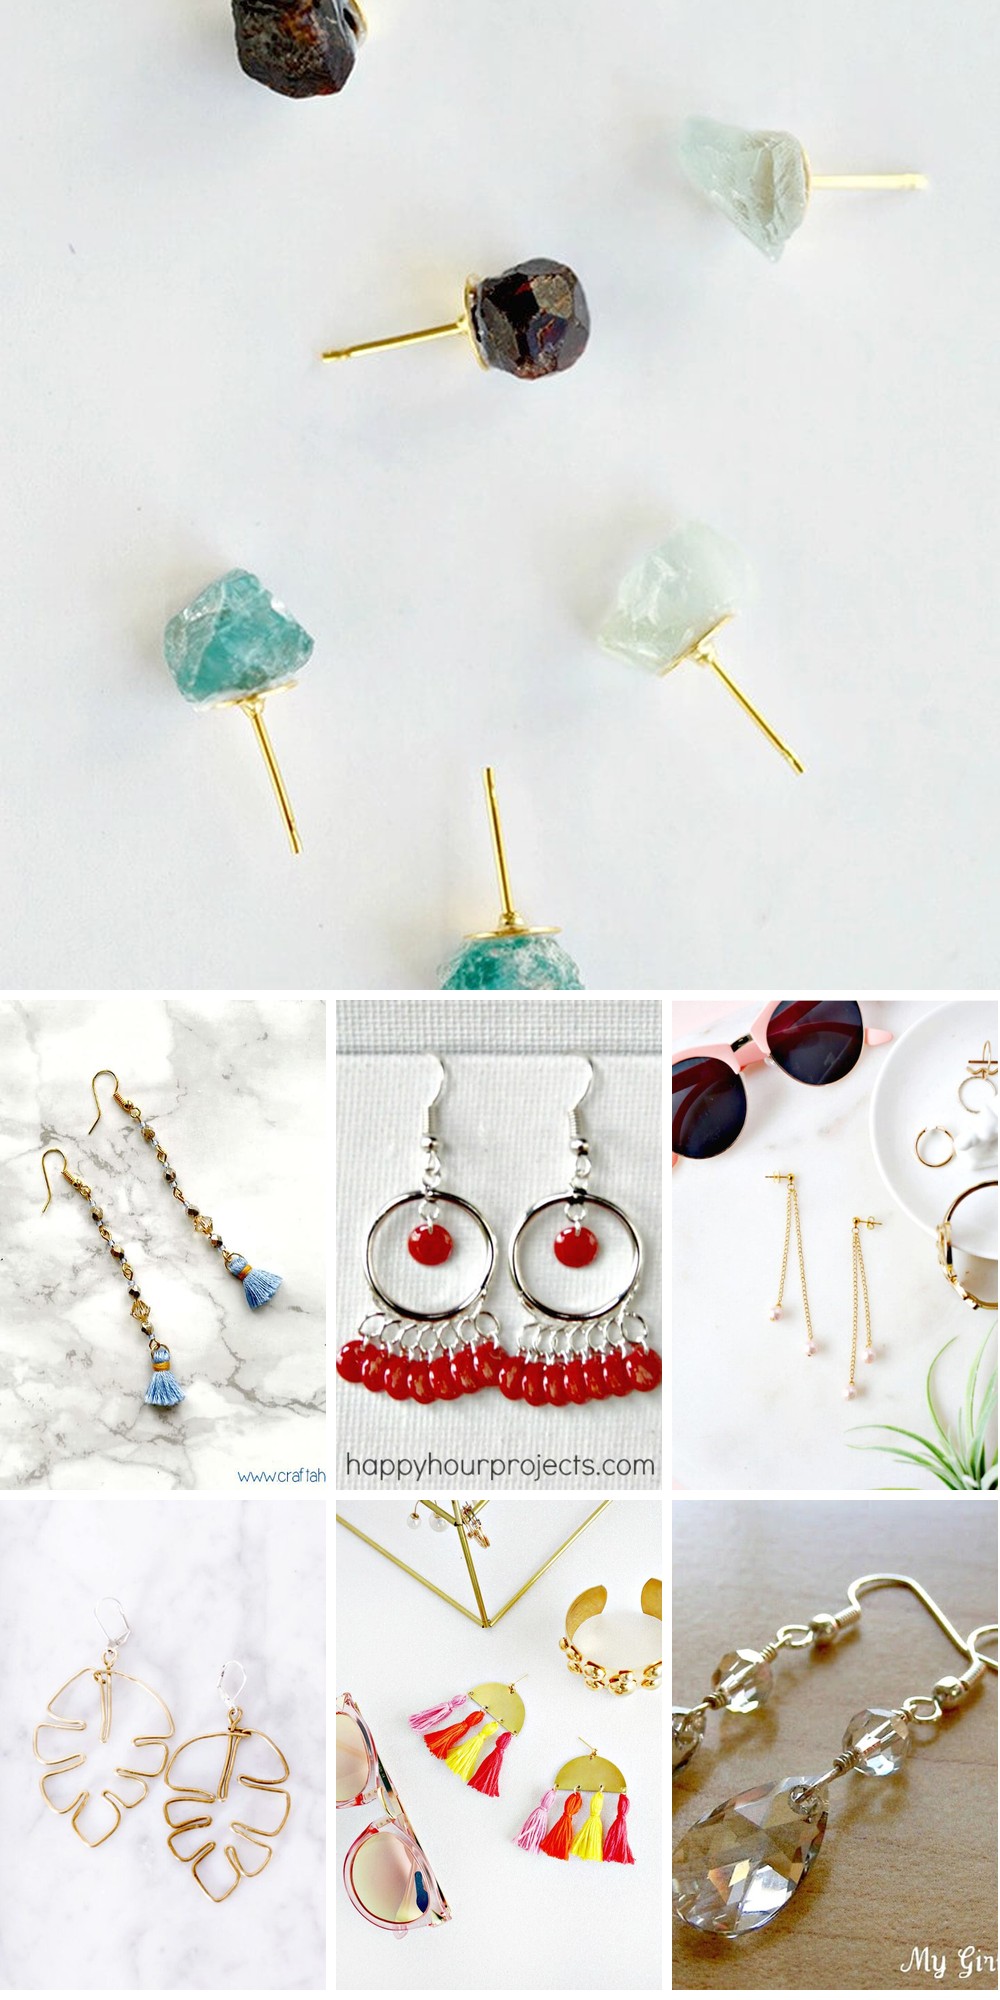
How to Make Earrings: 30 Easy DIY Earrings To Try
Unleash your creativity and bring a touch of personal style to your accessories by crafting 30 simple yet stunning DIY earring designs in the comfort of your own home. This all-encompassing beginner’s guide will walk you through the process of creating unique earrings, perfect for those looking to add a dash of individuality to their wardrobe.
DIY Pinecone Earrings Using Your Cricut
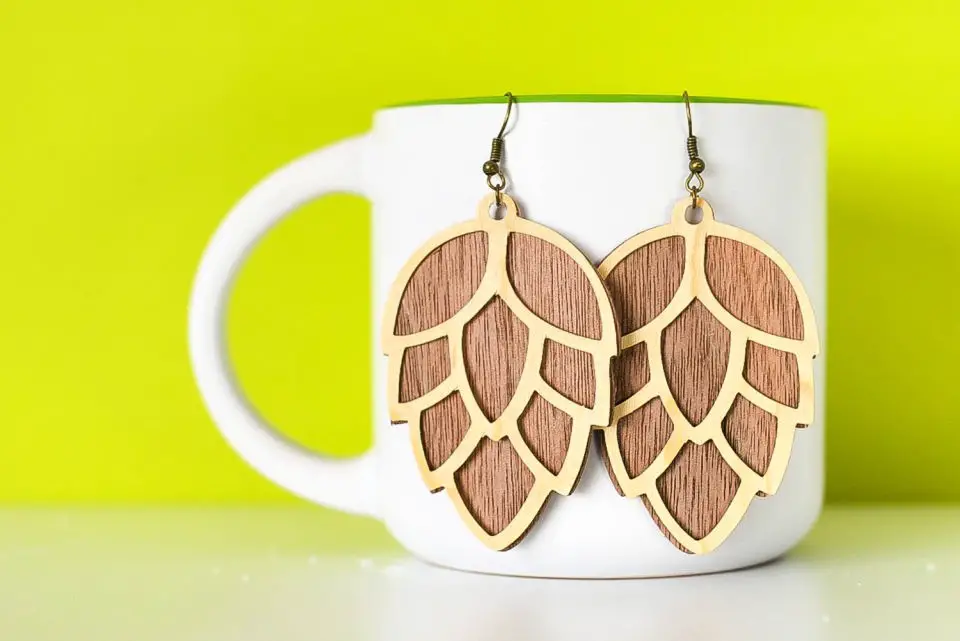
If you’re eager to create one-of-a-kind wooden earrings with your Cricut machine, Hey, Let’s Make Stuff has got you covered. The tutorial offered guides readers through the process of cutting Cricut veneer, resulting in stylish pinecone earrings perfect for holiday gifting or everyday wear. With clear, step-by-step instructions, this guide simplifies the process, allowing even novice crafters to achieve professional-looking results. By emphasizing the use of high-quality wood veneer available in cherry, walnut, and maple, readers learn how to accurately place their material, utilize a Deep Cut blade for precise cutting, and carefully remove the veneer from the Cricut mat to avoid cracking. Once assembled, these charming earrings can be yours in under 15 minutes, making them an ideal DIY project for crafters of all skill levels.
Making Beachy Boho Beaded Hoop Earrings
Transform your summer style into a beachy boho masterpiece by crafting your own Beaded Hoop Earrings using this straightforward guide from Made in A Day. Perfect for enthusiasts of all skill levels, this tutorial combines the freedom of DIY creativity with the satisfaction of wearing a uniquely handmade accessory. Simply gather a few essential materials – including seed beads, wooden beads, and basic jewelry-making tools – and you’re ready to dive into the process. Shaping wire, adding pops of colorful beads, and assembling the pieces will guide you through creating a fashionable pair of earrings that exudes boho chic. Not only is this project a fun creative outlet, but it’s also an affordable way to elevate your wardrobe with effortless flair.
Homemade Brick Stitch Star Earrings
Create enchanting brick stitch star earrings with Craftaholique’s comprehensive tutorial! Master the ladder stitch foundation, precision-decrease and increase techniques, and add the finishing touches to your handmade jewelry. This accessible project is perfect for beading enthusiasts of all levels, as step-by-step instructions and a free pattern guide make it easy to follow along. To get started, gather essential materials like beading thread, earwires, and jewelry glue, and prepare to embark on this creative journey. With patience and practice, you’ll be rewarded with beautiful earrings to wear or gift.
How to Make Beaded Hoop Earrings
For jewelry enthusiasts looking to craft unique pieces, the step-by-step guide on How Did You Make This? offers a comprehensive resource for making stunning beaded hoop earrings. The tutorial features crystal-clear photos and a detailed supply list, providing everything needed to bring these stylish accessories to life. Perfect for adding a touch of flair to any outfit, these earrings boast a trendy ‘travel souvenir’ look that can also help utilize spare beads. As the instructions employ brick stitch, a technique that becomes increasingly swift with practice, beaders can quickly transform their beads into a pair of eye-catching hoop earrings.
How to Make Rhinestone Marquis Drop Earrings
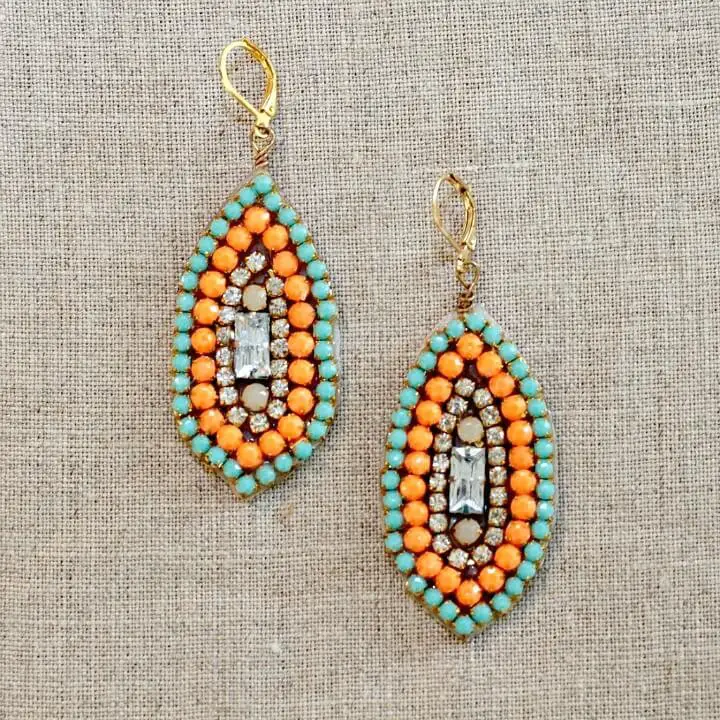
Crafting DIY rhinestone marquis drop earrings can be an enjoyable experience, especially when working with high-quality materials from Doreen beads. Begin by gathering the necessary supplies, including rhinestones, rhinestone chains, earring hooks, and more. Follow a step-by-step approach to assemble your design, using wire cutters and scissors to shape and trim the various components. For added security, rely on E6000 glue to precisely position each piece, resulting in a visually stunning final product. Once complete, attach the earring hooks and carefully trim any excess materials for a polished finish. These handcrafted earrings make for a thoughtful addition to one’s accessory collection or an unique gift option.
Free Crochet Fringe Statement Earrings Pattern
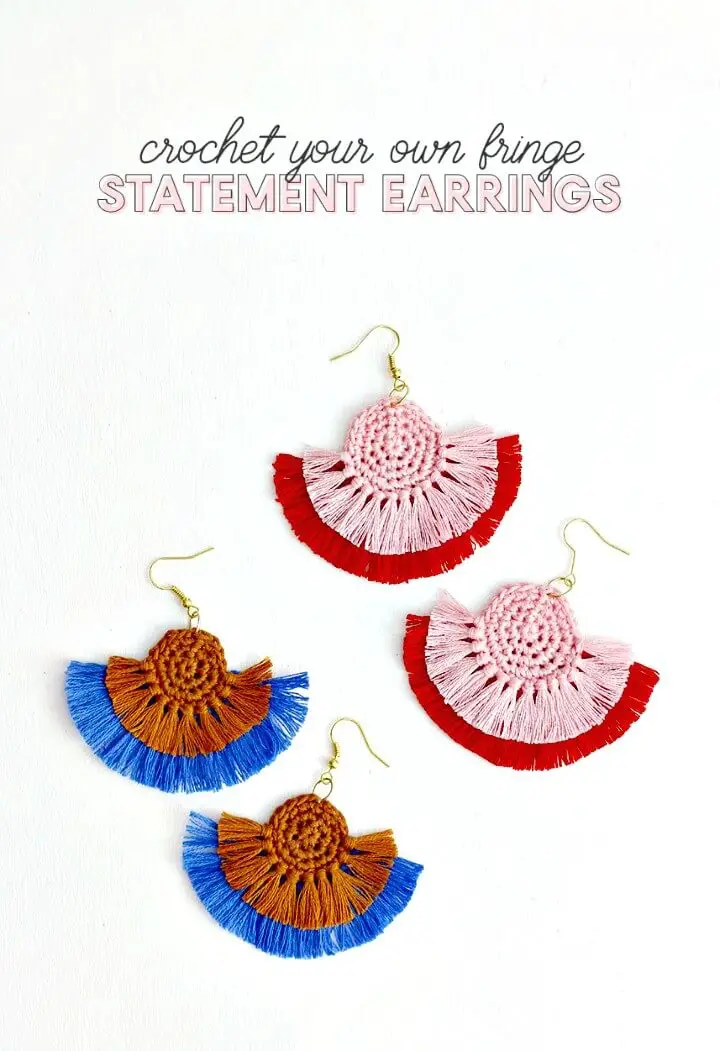
Ready to add some flair to your jewelry box? Crafting enthusiasts will love the DIY Fringe Statement Earrings crochet pattern from Persia Lou, a free tutorial that breaks down each step with precision and clarity. To get started, gather simple supplies like cotton embroidery floss, a crochet hook, scissors, and basic jewelry-making essentials. For an added touch of stability, consider using fabric stiffener, and feel free to express your creativity by experimenting with different hues and beads. With this pattern, you’ll be creating one-of-a-kind, handcrafted earrings that are sure to spark conversations.
DIY Half Moon Tassel Earrings
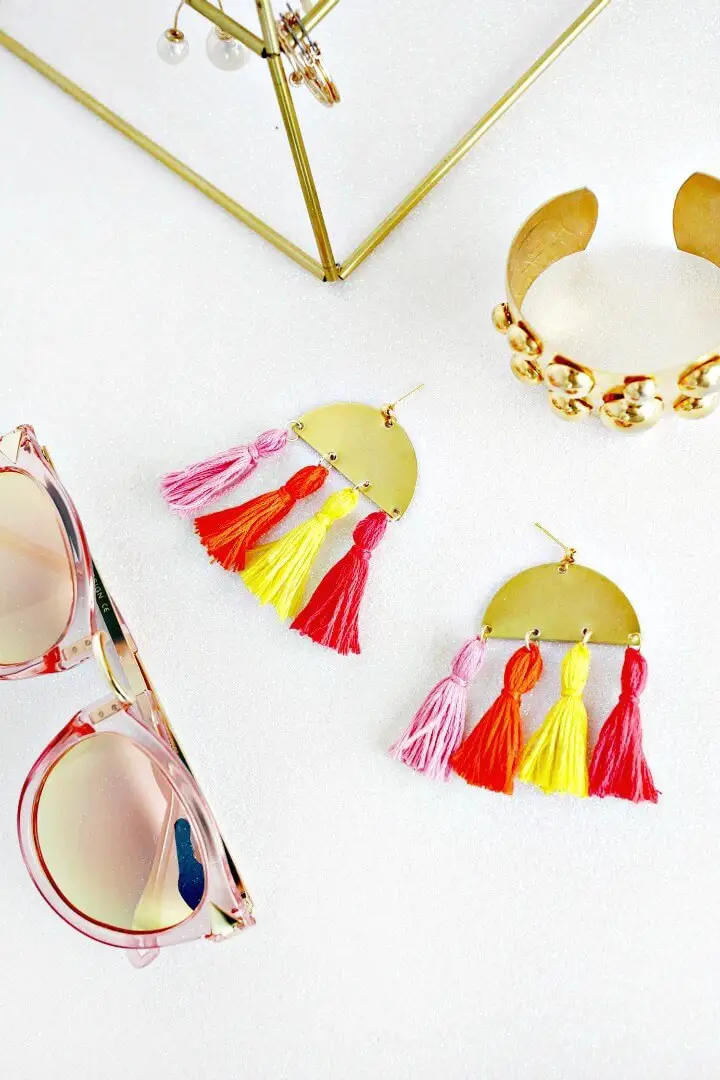
Transform your jewelry collection with a refreshing DIY project that’s perfect for summer. By following the simple steps from A Beautiful Mess, you’ll be able to create vibrant and trendy half moon tassel earrings using just a few basic tools like a metal piercing tool, needle nose pliers, and colorful embroidery threads. The process is easy enough for anyone to follow, allowing you to customize your accessories to match your personal style. Not only will you have the satisfaction of wearing something handmade, but you’ll also be able to tailor these earrings to complement any outfit – whether it’s a sunny day or a night out on the town. So why not get creative and start crafting today? You won’t regret adding a splash of summer to your jewelry collection!
Make Your Own Chain Earrings
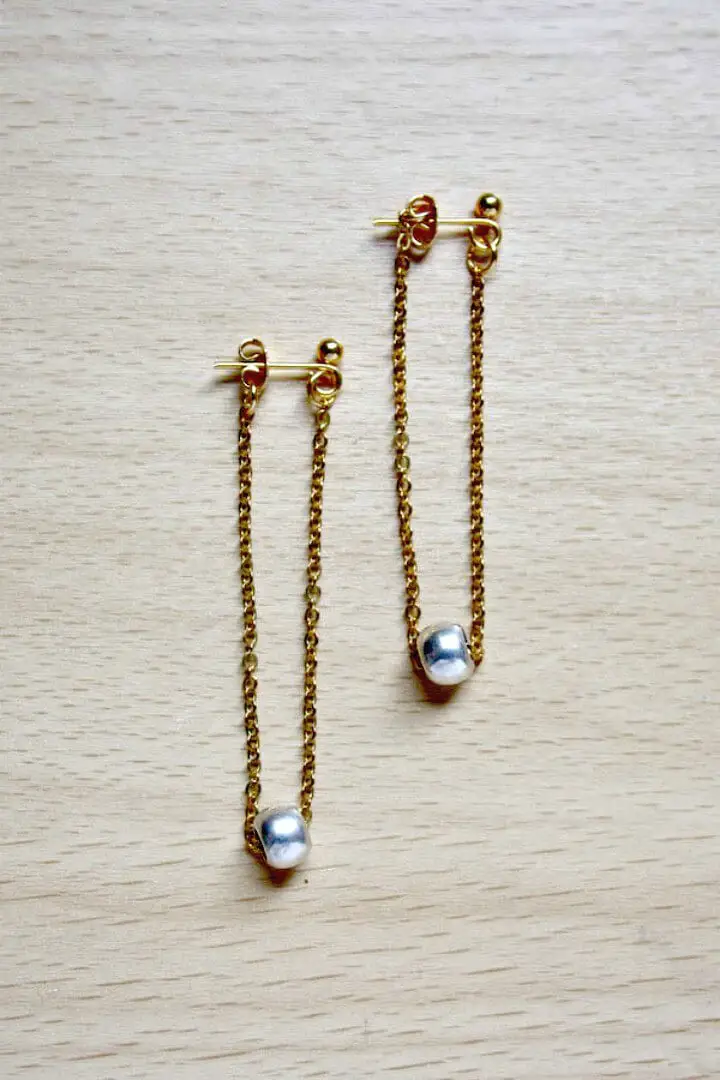
If you’re eager to create unique jewelry that reflects your personal style, crafting chain earrings is an excellent DIY project. This tutorial makes it easy to produce elegant beads and chain earrings with minimal effort. To get started, gather the necessary materials: fine chain, loop stud earrings, butterfly earring backs, large hole beads, and 4mm jump rings. Additionally, you’ll need chain nose pliers and cutters to shape your jewelry. The process is remarkably straightforward – simply attach the chain to the earring loop, add a bead, and secure the ends with jump rings. This project offers endless customization opportunities through different bead colors, allowing you to create one-of-a-kind pieces that showcase your creativity. Whether you’re looking to add a touch of handmade charm to your accessories or simply want to improve your crafting skills, this guide is an excellent resource to inspire and guide you.
Quick DIY Raw Stone Earrings
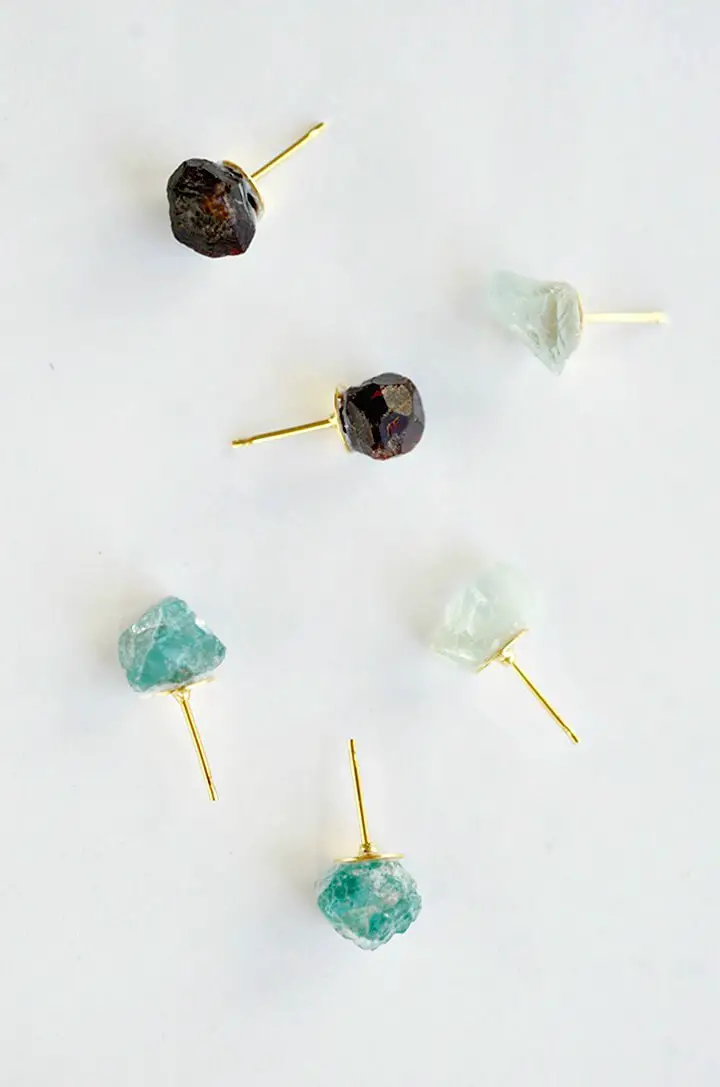
Transforming natural elegance into wearable art, making DIY raw stone earrings offers a thrilling way to personalize your accessory collection. By following the expert guidance of Alice and Lois, you can effortlessly turn stunning minerals like rose quartz and amazonite into chic, handmade studs. With the ease of attaching stones to gold earring studs using E6000 glue, the result is a unique pair of earrings that exudes effortless charm. Perfect for those who appreciate the innate beauty of raw stones and enjoy crafting bespoke jewelry, this project offers endless possibilities for creating one-of-a-kind pieces that impress friends or adorn your own ears.
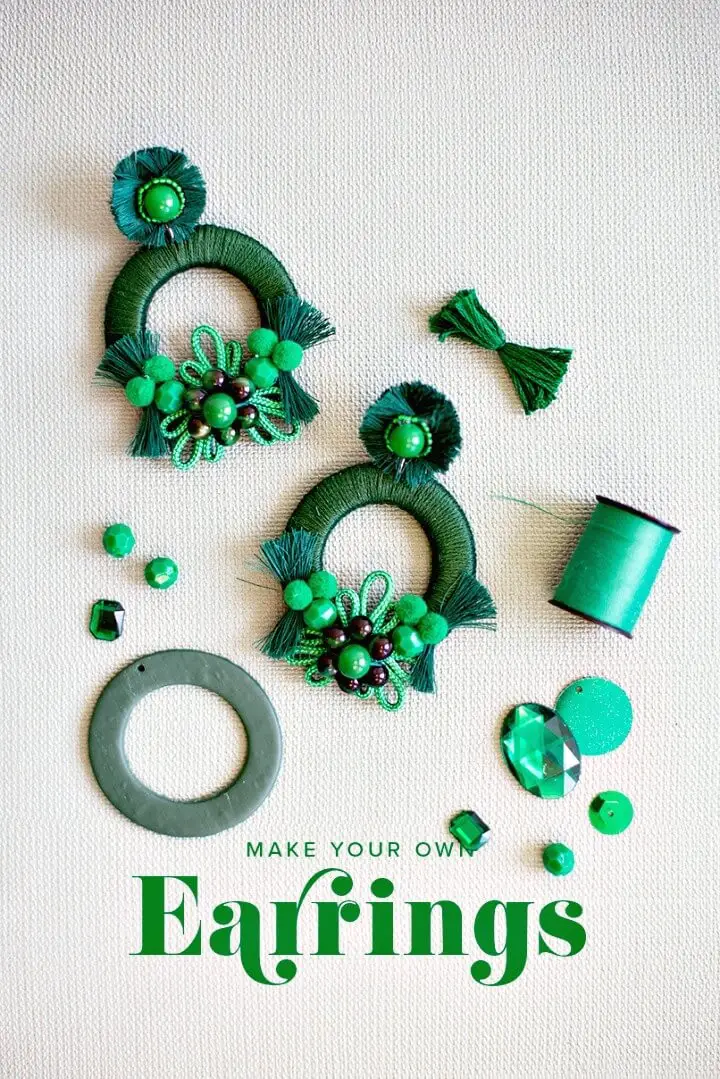
Make Your Own Fringe Earrings
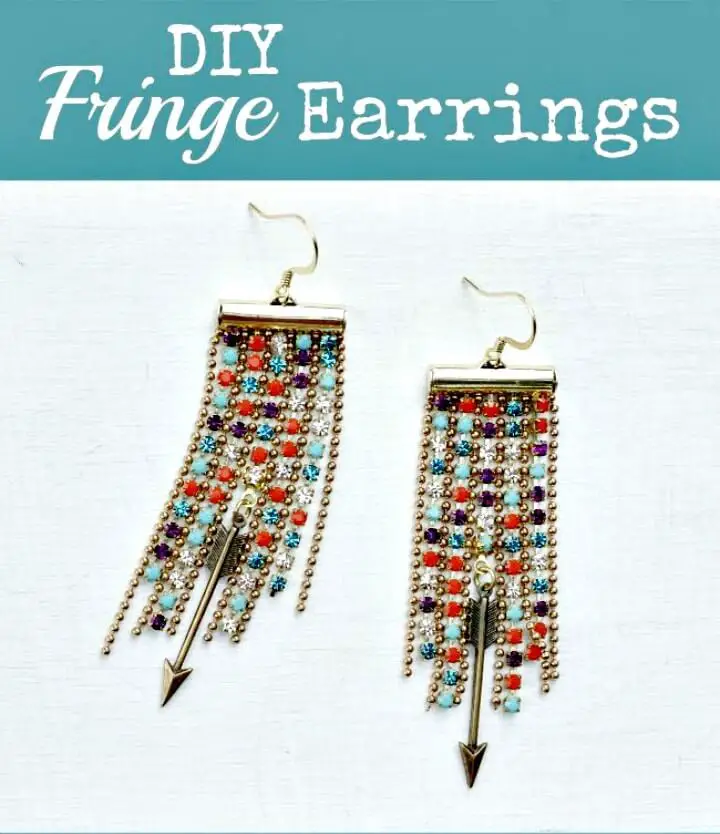
Unleash your creativity by crafting trendy fringe earrings with Candie Cooper’s comprehensive guide. With Beadalon slide connectors, cup chains, and ball chains at your disposal, you’ll be able to create a one-of-a-kind piece of jewelry that adds a touch of elegance to any outfit. The step-by-step instructions make it easy to master techniques such as rolling prongs, attaching charms, and connecting earwires for a polished finish. Whether you’re looking to personalize your accessories or gift a handmade treasure, this DIY guide ensures that you can create eye-catching earrings with ease. For more fun and inspiring ideas, visit Candie Cooper.
Making Seed Bead Earrings
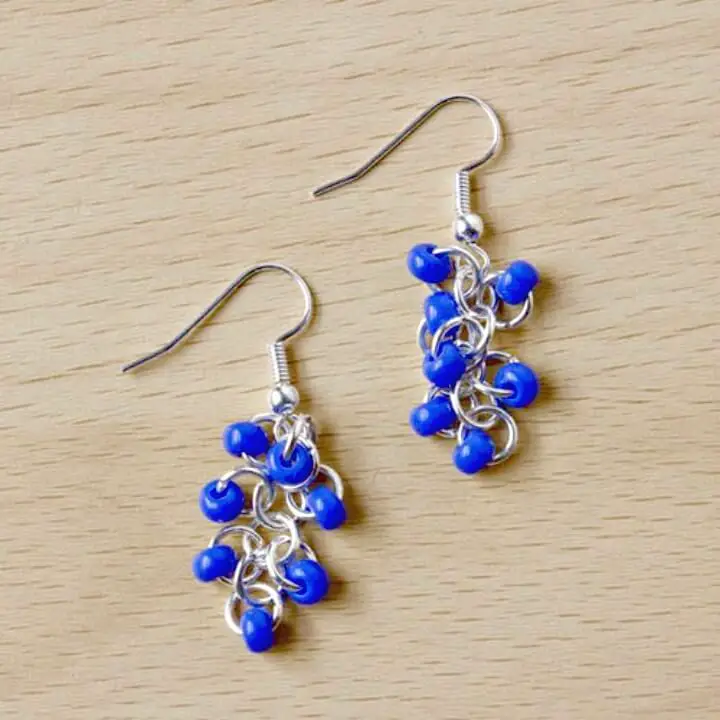
Transform leftover seed beads into stunning earrings with our step-by-step tutorial. This beginner-friendly guide is perfect for those eager to explore the world of jewelry making. With just a few basic materials like seed beads, jump rings, and pliers, you’ll be creating your own unique accessories in no time. From attaching beads to jump rings to adding the finishing touches, this comprehensive guide will walk you through every step of the process. Go ahead and make a matching set or mix it up for a one-of-a-kind look. With our concise instructions and helpful tips, you’ll enjoy crafting these charming earrings and maybe even create a coordinating bracelet or necklace. Get ready to take your skills to the next level and add a personal touch to your jewelry collection.
How to Make Tassel Earrings

Add a dash of creativity to your jewelry collection with Sweet Red Poppy’s comprehensive guide on crafting tassel earrings. With just embroidery floss and basic tools required, this DIY project is perfect for anyone seeking to create unique, budget-friendly accessories that reflect their personal style. From customizing the length to selecting colors that match your aesthetic, every step of this easy-to-follow tutorial is designed to inspire and empower you to produce stunning earrings that exude a touch of individuality. For a detailed tutorial and more craft inspiration, visit Sweet Red Poppy.
Make Your Own Tortoiseshell Statement Earrings
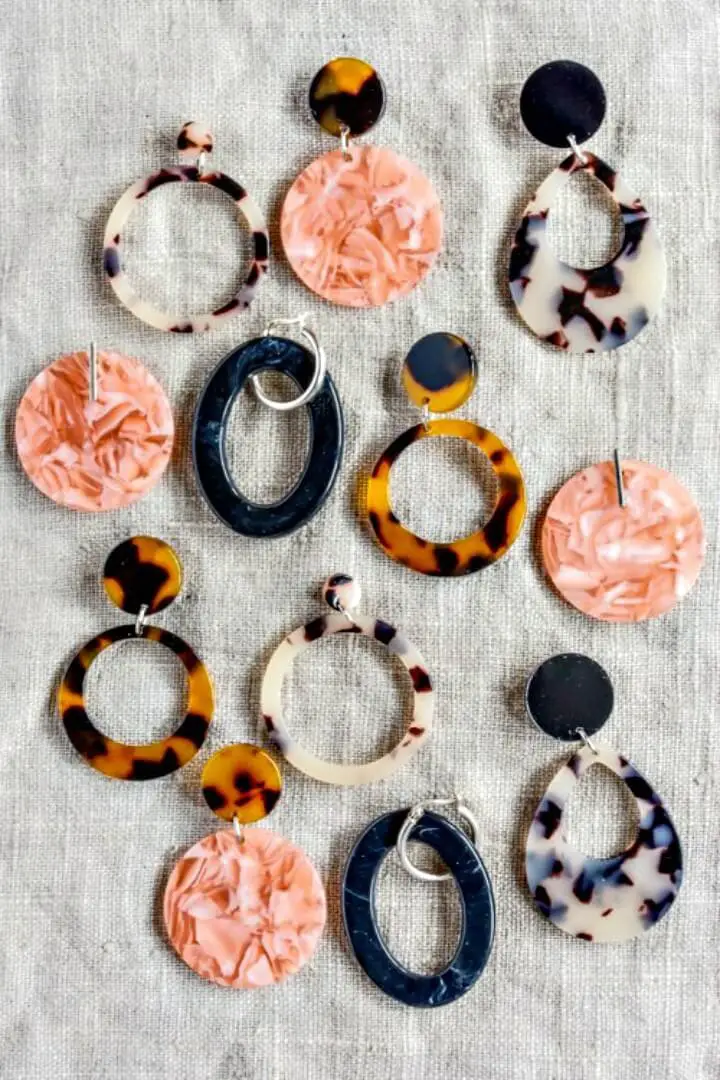
Transform into a fashion icon this season with DIY tortoiseshell statement earrings from DIY in PDX. By crafting your own unique accessories, you’ll seamlessly blend with the latest trends. Our comprehensive guide simplifies the process, guiding you through selecting the perfect acrylic or resin pieces to assembling the earrings with basic tools. Whether you opt for effortless studs or slightly more intricate hoop designs, clear step-by-step instructions guarantee a successful outcome. Embrace the pride of wearing handmade jewelry that adds a personal touch to any outfit. Unleash your creativity and start making your statement earrings today!
Gorgeous DIY Brick Stitch Star Earrings
Craftaholique’s guide on making star-shaped earrings using the brick stitch beadweaving technique provides an immersive learning experience. The step-by-step instructions are meticulously crafted to empower crafters in transforming Miyuki Delicas into beautiful studs or dangle earrings. A crucial aspect of this tutorial is mastering the ladder stitch, increasing and decreasing rows, as well as attaching findings. To successfully complete the project, one will need beads, thread, earring findings, jump rings, pliers, and glue. The clear presentation ensures a seamless crafting experience for those eager to create their own unique handmade jewelry.
How to Make Pretty Chevron Beaded Earrings
To create a show-stopping pair of beaded pillar earrings, follow Craftaholique’s comprehensive tutorial on chevron design. This step-by-step guide is ideal for jewellery making enthusiasts and beginners alike, as it provides a free loom beading pattern to work with. The required materials include Miyuki Delicas beads, beading thread, needle, and a few essential tools. With Hayley’s clear instructions, you’ll effortlessly prepare the cotton cord, thread the beads, and complete your beadwork before transforming it into a lovely pair of earrings. Her expert tips ensure a seamless crafting experience, resulting in a beautiful addition to your accessory collection.
Easy DIY Mixed Media Earrings
Transform your everyday style into high-end fashion with DIY mixed media earring creations. Drawing inspiration from Ranjana Khan’s opulent designs, The House That Lars Built presents a comprehensive guide on crafting show-stopping earrings using an eclectic mix of craft supplies. This step-by-step tutorial delves into the world of polymer clay, vibrant beads, and threads, providing detailed material lists and crystal-clear directions for crafters to follow effortlessly. With these unique pieces, you’ll not only be making a statement but also saving money in the process. As you get creative, prepare to amaze others with your one-of-a-kind designs that exude elegance and sophistication.
How to Make Fruit Earrings
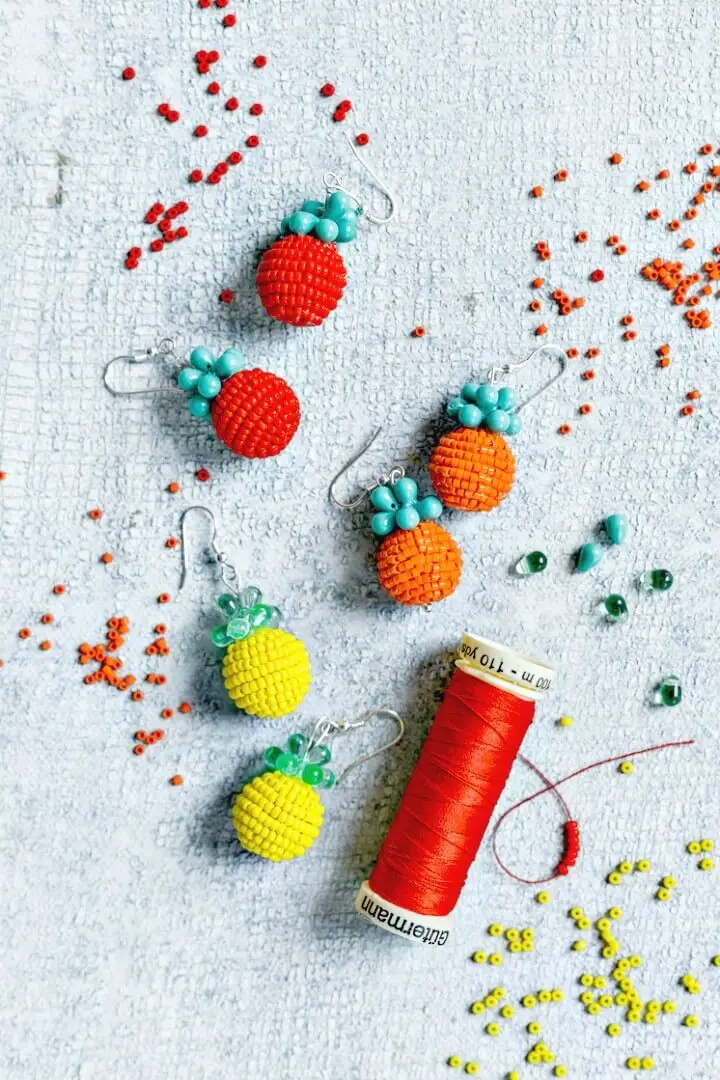
Transform your wardrobe into a vibrant summer haven by crafting DIY Fruit Earrings! This delightful guide from The House That Lars Built provides a step-by-step tutorial on creating whimsical accessories that bring the warmth of sunny days to any outfit. With simplicity at its core, this project uses easily accessible materials such as seed beads, wooden beads, and earring hooks. Add a playful twist to your accessory game with this easy-to-follow guide – it’s sure to brighten up any season! As you follow the clear instructions and helpful tips, you’ll be delighted to create a one-of-a-kind, handmade pair of earrings that will make you want to flaunt or gift them.
Make Dragon Fruit Pom Pom Earrings
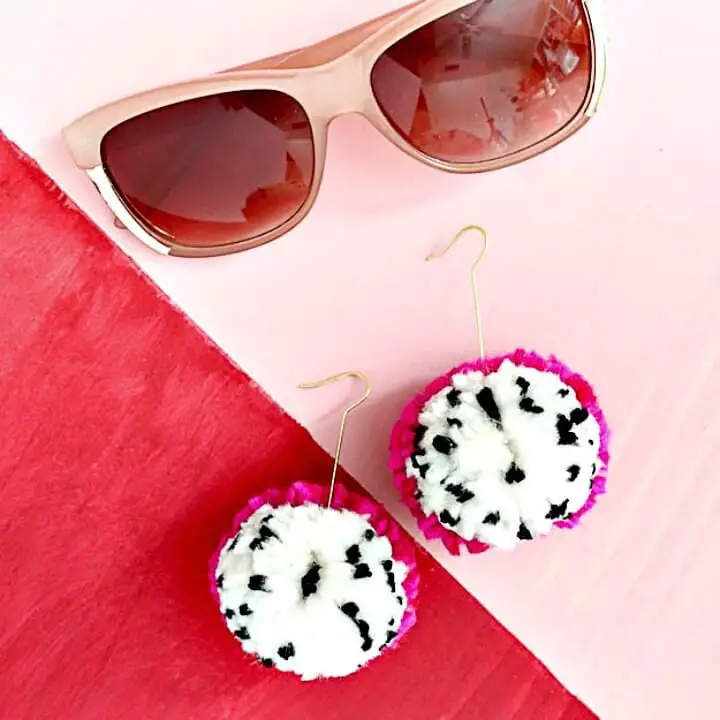
Get ready to add some whimsical flair to your accessory collection! A Kailo Chic Life is thrilled to share a fun and creative DIY project: crafting your own vibrant Dragon Fruit Pom Pom Earrings. This engaging tutorial takes you by the hand, guiding you through each step to create statement earrings that exude summer charm all year round.
From selecting the perfect hues of fuchsia, white, and black yarn to mastering the use of a pom pom maker and pliers, this comprehensive guide ensures a delightful crafting experience. With clear instructions, you’ll shape your unique pom poms into a stunning resemblance of dragon fruit slices, complete with all the necessary finishing touches like ear hooks and jump rings.
Dive into this enjoyable DIY project and infuse your wardrobe with a touch of handcrafted whimsy that’s sure to make you stand out from the crowd.
How to Make Pearl Dangle Earrings
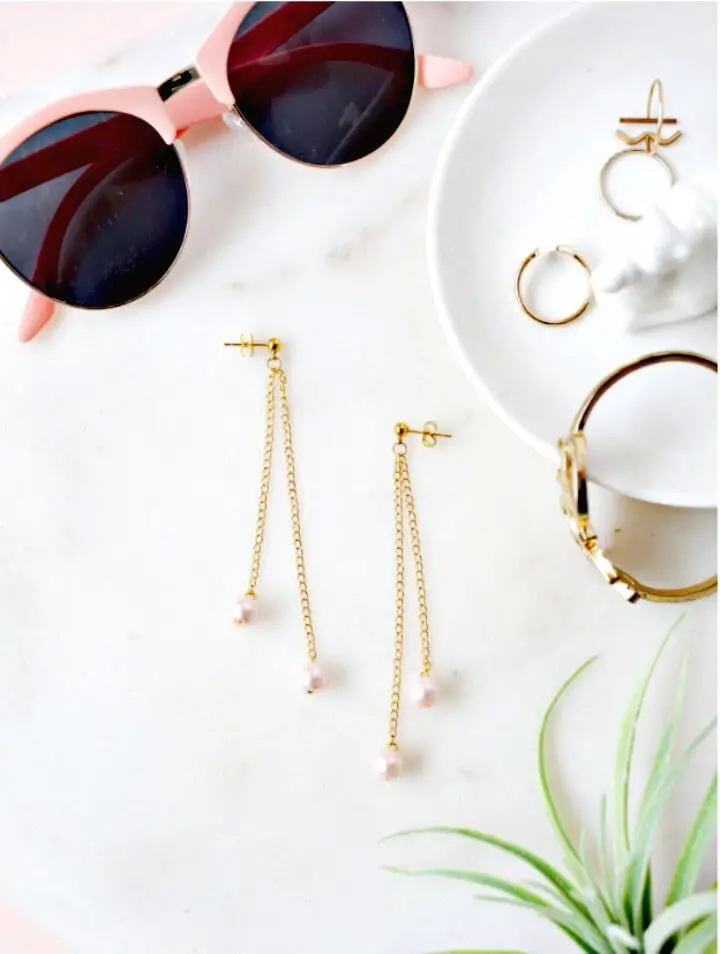
Unleash your creativity and learn how to craft a pair of exquisite gold and pink pearl dangle earrings from A Beautiful Mess’s DIY tutorial. With Laura Gummerman as your guide, you’ll embark on a simple yet rewarding journey to create a unique accessory that exudes elegance and sophistication. This engaging DIY project requires just a few basic supplies and straightforward instructions, making it accessible to anyone who loves jewelry-making or seeking a fun and personal creative outlet. As you work through the steps, you’ll discover how to measure, cut, and attach each component with ease, ultimately yielding a pair of beautiful handcrafted earrings that are perfect for everyday wear, special occasions, or as a thoughtful gift.
Awesome DIY Wood Burned Earrings
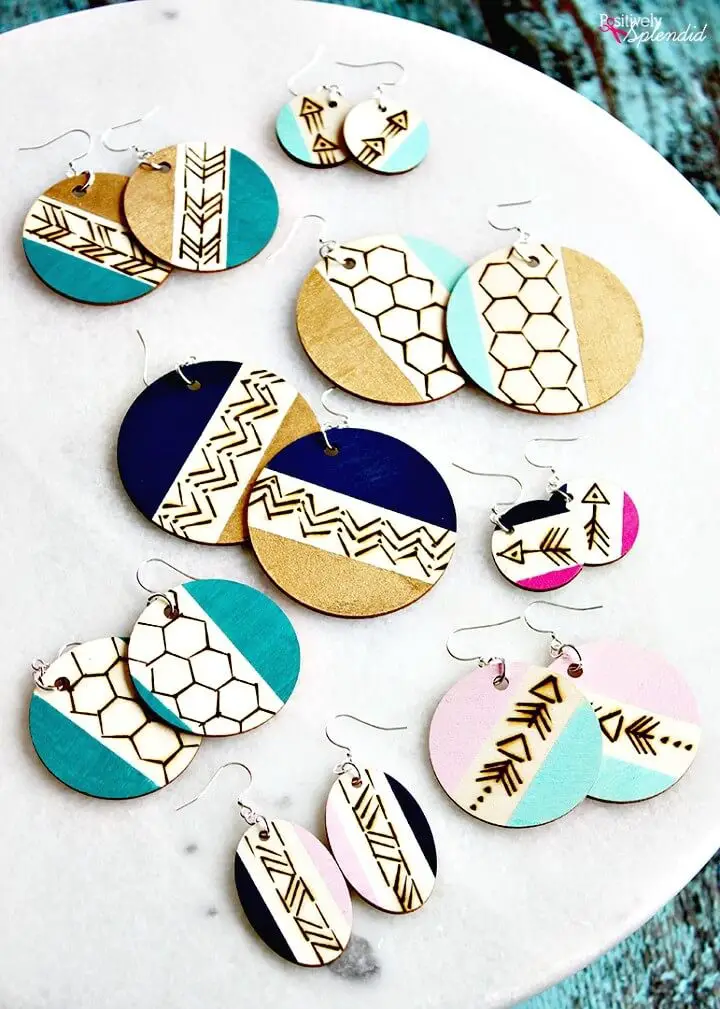
If you’re passionate about crafting unique jewelry, Positively Splendid’s DIY wood burned earrings guide is an absolute must-try. With the ability to transform these handmade accessories into thoughtful gifts in under 30 minutes, this project is perfect for busy creatives. By combining a simple process with easily accessible materials, you’ll be able to create intricate designs using a woodburning tool and add pops of color for a personalized touch. To get started, simply gather some wood tag embellishments, paints, and basic jewelry-making supplies. With step-by-step instructions, your finished earrings will look like they came straight from a high-end boutique. Wear them out and get ready to receive endless compliments on your handcrafted masterpiece.
Handmade Wire Wrapped Crystal Earrings
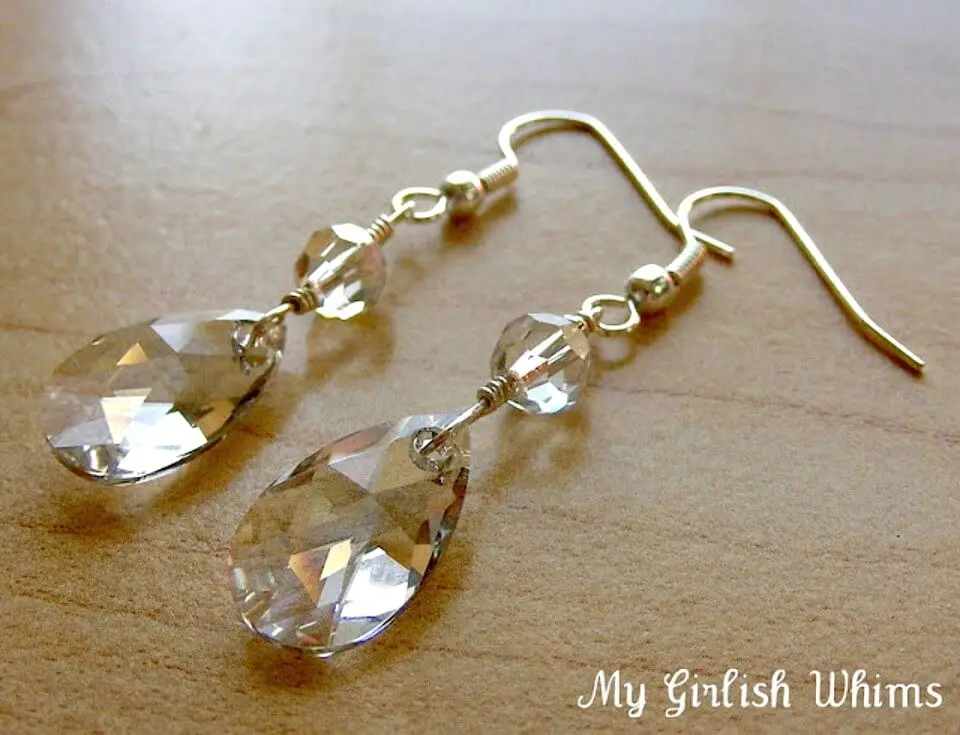
Discover the art of wire-wrapping with My Girlish Whims’ comprehensive guide, designed specifically for jewelry makers seeking both style and durability. This step-by-step tutorial walks you through securing crystal briolettes and round beads within wire, perfect for crafting stunning earrings that make a lasting impression – whether as a unique bridesmaid gift or a treasured addition to your personal collection. With an emphasis on using the right tools and materials, this practical guide also provides valuable insight on when to opt for wire-wrapping over simple loops, empowering you to create jewelry pieces that are not only visually stunning but also built to withstand the test of time.
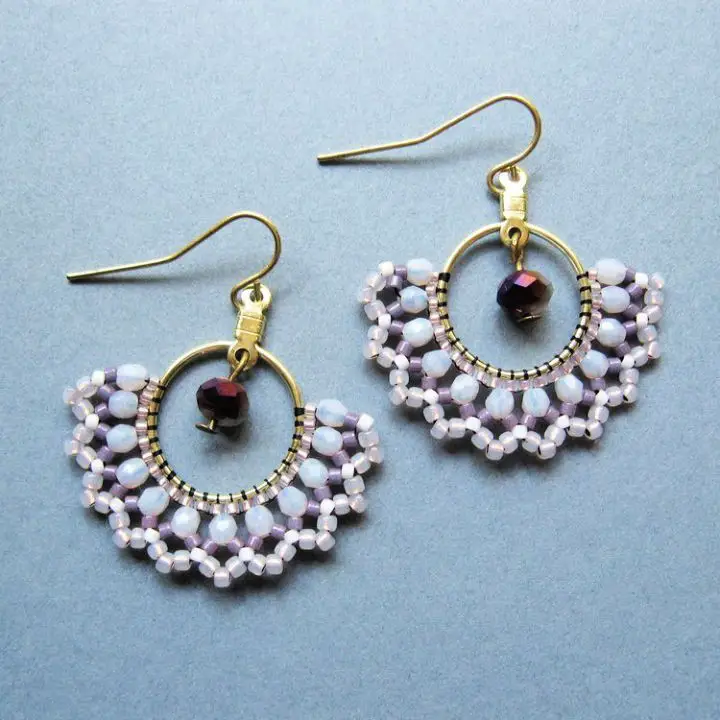
Make Your Own Tangerine Chandelier Earrings
Add a splash of color to your spring wardrobe by creating Tangerine Chandelier Earrings using the straightforward guide on Happy Hour Projects. This quick and satisfying DIY project is perfect for beginners and experienced crafters alike, offering a unique way to elevate their accessory collection in just 10 minutes. With minimal materials such as vibrant Czech beads, earring bases, wires, and jump rings, anyone can create show-stopping earrings that exude handmade charm.
DIY Brass Monstera Leaf Earrings
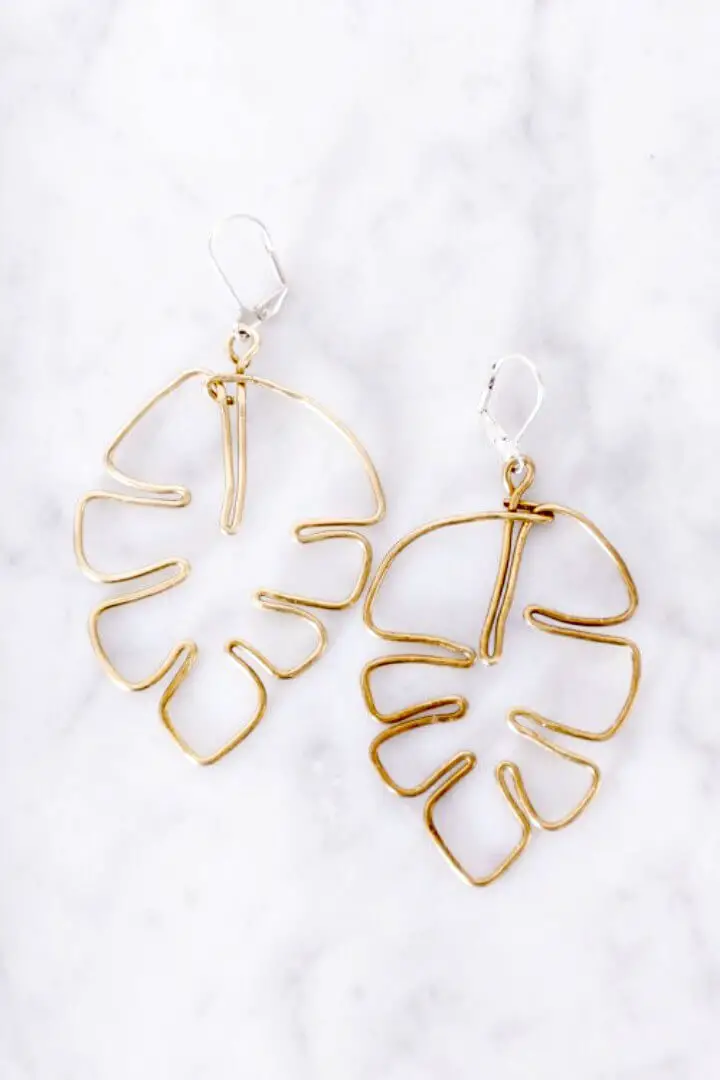
Prepare to infuse your accessories with the essence of tropical paradise by embarking on a DIY adventure with PDX’s comprehensive guide to crafting stunning brass monstera leaf earrings. This engaging tutorial is an absolute delight for both plant enthusiasts and crafty individuals alike, as it seamlessly guides you through each step of the creative process, from shaping brass wire around a convenient template to attaching the earring hooks that bring your masterpiece to life. With its emphasis on clarity and helpful hints, this tutorial makes it effortlessly easy to grasp and follow. As you delve into crafting these striking, nature-inspired earrings, get ready to add a chic touch to your summer wardrobe with unique pieces that are sure to spark admiration.
DIY Mini Tassel Earrings In 30 Minutes
Transform your summer wardrobe with the charm of mini tassel earrings from Craftaholique’s quick and easy tutorial. In just 30 minutes, you can create a pair of unique earrings that exude handmade flair. To get started, gather blue and gold embroidery threads, an assortment of beads, and basic jewellery-making tools. The step-by-step guide simplifies the process, making it perfect for beginners or those looking to add a personal touch to their accessories. With clear instructions, you’ll be able to craft tassels and beaded strands before assembling your one-of-a-kind earrings. Whether you’re enhancing your own collection or crafting a thoughtful gift, these DIY earrings are sure to keep your creativity flowing and your style on point.
Make Your Own Wooden Circle Earrings
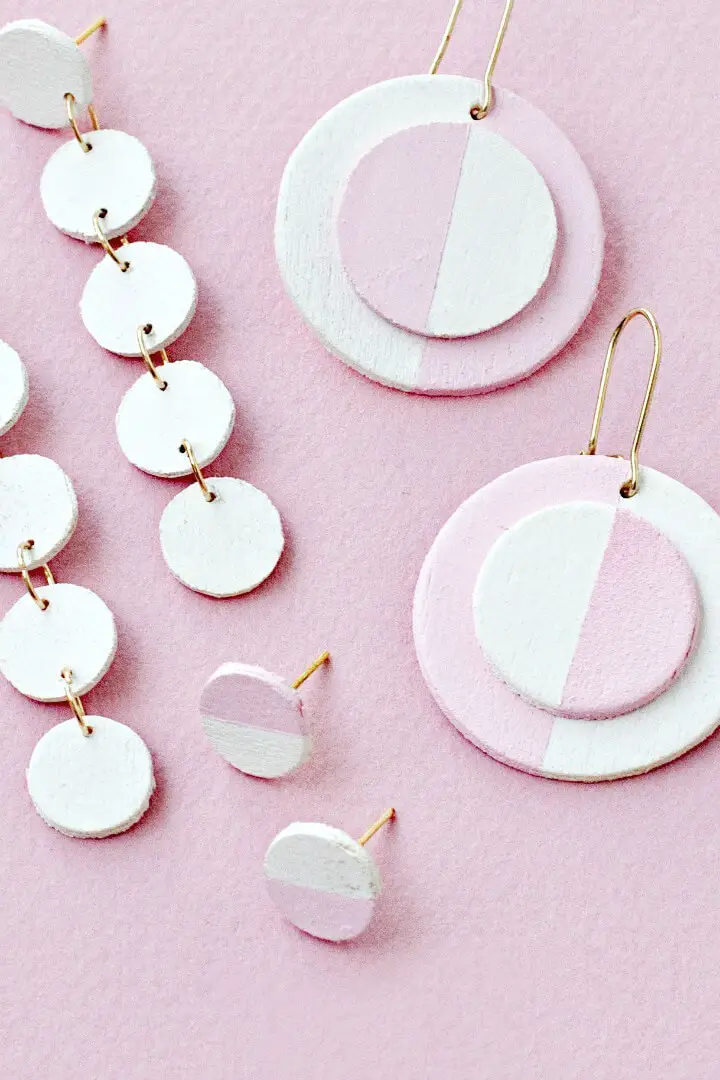
Get ready to unleash your inner crafter with this step-by-step DIY guide on creating trendy wooden circle earrings. Inspired by A Beautiful Mess, Mandi Johnson’s tutorial will walk you through the process of crafting two unique earring designs that seamlessly blend modern flair with the charm of handmade jewelry. With just a few essential supplies – including wooden circles, paint, and earring hardware – you’ll be able to follow along effortlessly and produce a pair of statement earrings that perfectly complement any outfit. The best part? You get to choose your colors and let your creativity shine as you personalize your very own wooden earrings.
Handmade Beaded Angel Earrings
Transform your outfit into a winter wonderland with a pair of charming beaded angel earrings, courtesy of Craftaholique’s easy-to-follow tutorial. With just a few essential materials – think gold tone pins, spacer beads, earwires, angel wing beads, glass pearls, and Swarovski bicones – you can craft these festive accessories in mere minutes. Not only will this DIY project add a touch of holiday magic to your attire, but it also makes for a thoughtful handmade gift. Take a few minutes to indulge in this enjoyable and creative endeavor, and let the joy of crafting elevate your seasonal celebrations.
Making Resin Filled Earrings
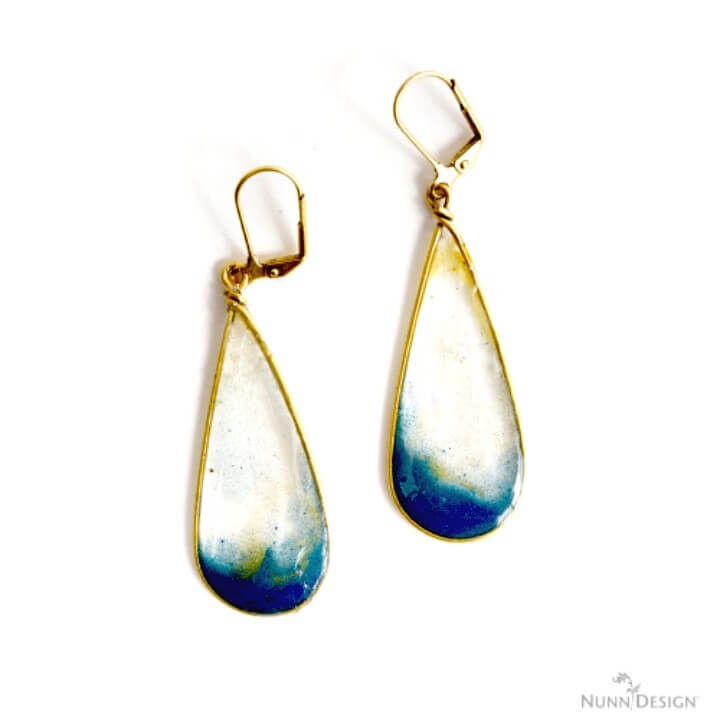
To create breathtaking resin jewelry, Nunn Design provides an exhaustive tutorial that walks you through the process of crafting your own pendants and earrings. The comprehensive guide begins by illuminating the art of flattening wireframes, before delving into the intricacies of mixing and colorizing resin to achieve a desired hue. As you navigate this step-by-step journey, discover how to work with resin like a pro, unlock unique colors using PearlEx Powders, and attain a glass-like finish that’s nothing short of mesmerizing. Whether shaping earrings or pendants, Nunn Design’s expert guidance ensures a successful resin jewelry project, empowering you to unleash your creativity and explore the limitless possibilities.
Paper Quilled Jhumka Earrings With Dangles
Create a unique pair of vibrant paper-quilled earrings with dangles by following the step-by-step tutorial on Honey’s Quilling. This comprehensive guide provides clear instructions and a list of essential materials to help you craft your own lightweight, colorful jhumkas. Perfect for adding a personal touch to your jewelry collection, this tutorial is ideal for crafters looking to try something new and expand their skills. With expert tips on how to evenly punch holes and seal your paper creations, you’ll learn the secrets to assembling a charming pair of jhumkas. For more quilling inspiration, tutorials, and guidance, explore Honey’s Quilling and discover the endless possibilities for your next creative project.
Easy DIY Cascade Dangle Earrings
Transform your jewelry-making skills with this comprehensive guide to crafting stunning cascade dangle earrings from Happy Hour Projects. Perfect for those who appreciate the elegance of handmade pieces, this tutorial is designed to help you create a pair of unique and stylish earrings that can be customized to fit any outfit or occasion. To get started, gather earring wires, chain, jewelry head pins, beads, jump rings, round pliers, and wire cutters. Begin by crafting bead charms, then use precision cutting techniques to segment the chain into staggered lengths. Next, assemble all the components together, following a clear step-by-step process that requires minimal practice to master. With this tutorial, you’ll not only create beautiful earrings but also develop your skills in charm-making and earring assembly, allowing you to personalize your creations with different bead types for endless variations.
How to Make Avocado Toast Earrings
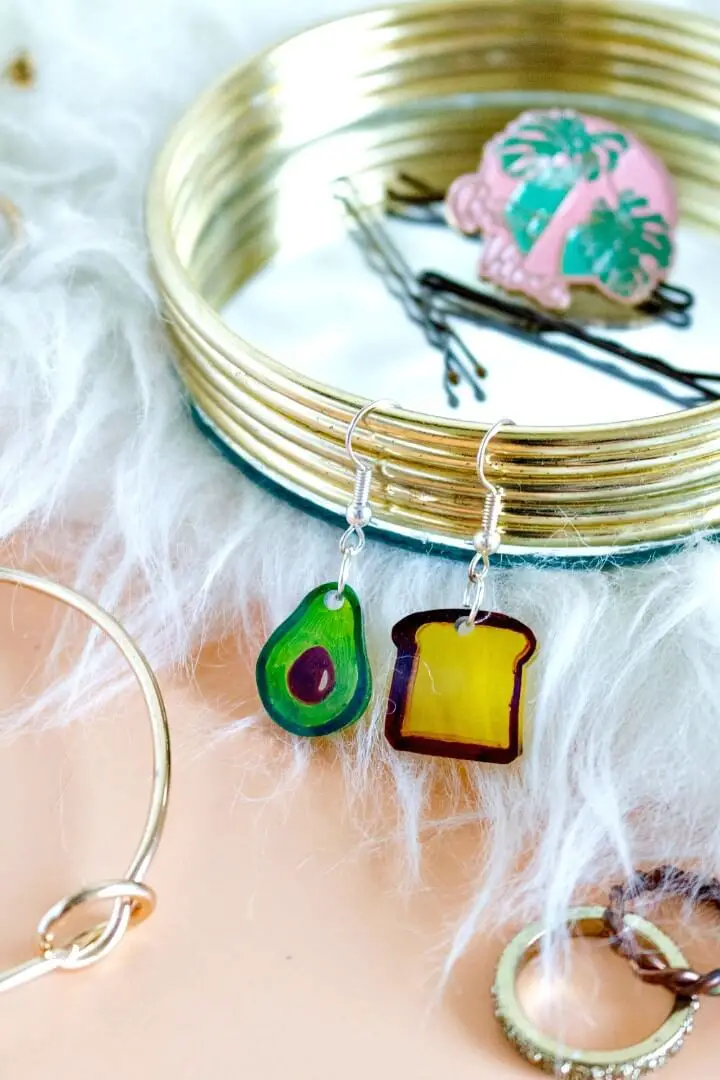
Transform your culinary passion into wearable art with Club Crafted’s comprehensive guide on creating unique avocado toast earrings. Lightweight, shrink plastic, and bursting with personality, these quirky accessories are perfect for showcasing your style. With a straightforward, step-by-step process that includes tracing, coloring, cutting, baking, and assembling, you’ll be delighted to discover how easy it is to create your own jewelry. Not only will you have a new pair of earrings to treasure, but they also make thoughtful gifts for fellow avocado toast enthusiasts. Immerse yourself in the creative experience and craft a statement piece that’s as enjoyable to wear as it is to make, perfect for making memories or gifting to loved ones.
Conclusion
As you’ve explored the world of DIY earrings, you’re now equipped with a newfound sense of creativity and self-expression. Our comprehensive guide has provided you with the necessary skills, techniques, and inspiration to craft your own unique jewelry pieces. From selecting the ideal materials to mastering fundamental designs and ensuring the longevity of your creations, this article has covered all the essential bases. Now, it’s time to put your newfound expertise into practice, as you embark on a rewarding journey of DIY earring making. With your creative juices flowing, you’re ready to bring your imagination to life and craft earrings that truly reflect your personal style.
