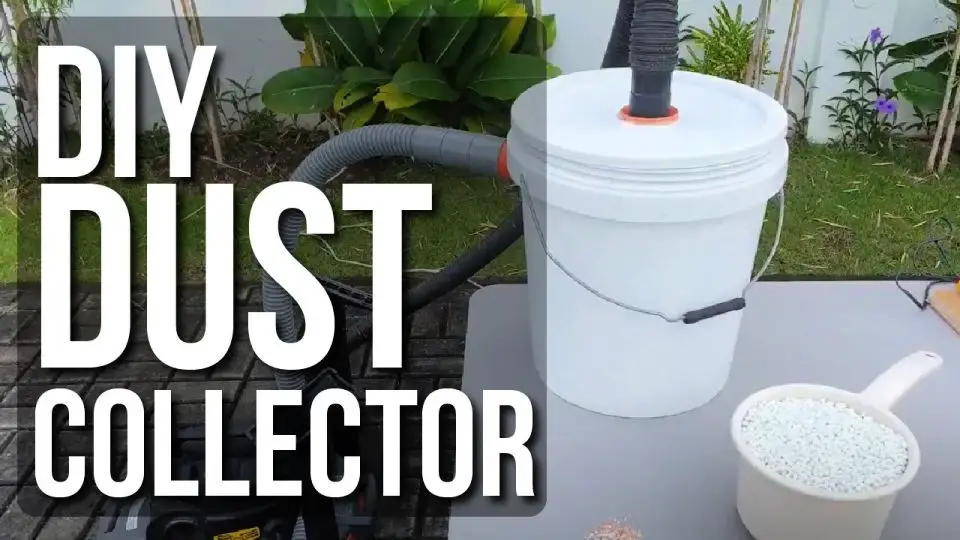
Creating a DIY dust collector is a straightforward way to transform your workshop environment, ensuring it remains clean and safe. With 25 customizable plans at your disposal, finding the ideal solution for your space and skill level has never been easier. These comprehensive guides are designed to help you construct a system that effectively manages sawdust and debris, enhancing your working conditions and safeguarding your health.Rather than relying on store-bought solutions, building a dust collector from scratch offers a unique opportunity to tailor the tool to your specific needs. Our step-by-step plans provide a clear roadmap for success, ensuring you have all the necessary information and resources at your fingertips. Whether dealing with small or significant volumes of dust, our collection has got you covered.In this project, we’ll explore the benefits of creating your own dust collector and provide guidance on how to successfully complete it.
Why Build a DIY Dust Collector?
Opting for a homemade dust collection system can have numerous benefits that extend beyond the realm of mere functionality. When you build a DIY dust collector, you’re not just creating a tool that captures particles and debris – you’re also investing in your health, workspace efficiency, and overall woodworking experience.
For starters, a reliable dust collection system is crucial for maintaining good air quality. By capturing sawdust and fine particles, you minimize the risk of respiratory problems and ensure a healthier working environment. This, in turn, allows you to focus on the task at hand without worrying about the negative effects of inhaling dust.
Beyond health benefits, a DIY dust collector can significantly improve your workspace organization and productivity. With a tidy and well-maintained workshop, you’ll be able to find tools and materials quickly, reducing the time spent searching for them and minimizing the risk of damage or loss.
Another significant advantage of building your own dust collector is cost-effectiveness. Commercial systems can be expensive, but with readily available materials and some creativity, you can create a custom solution that fits your specific needs – all at a fraction of the cost.
Customization is another major perk of DIY dust collectors. Every workshop is unique, and a homemade system allows you to tailor it to fit your space perfectly. Whether you need a compact setup for small projects or a more robust system for larger debris, the options are endless.
And let’s not forget about the sense of satisfaction that comes with building something yourself. Taking on a DIY project like this not only broadens your skills but also gives you a tangible sense of accomplishment – especially when it makes a significant difference in your working environment.
In conclusion, making a DIY dust collector is an excellent way to enhance your woodworking experience. By investing in a homemade system, you’re not just creating a tool – you’re improving your health, workspace efficiency, and overall productivity.
How to Make a Dust Collector
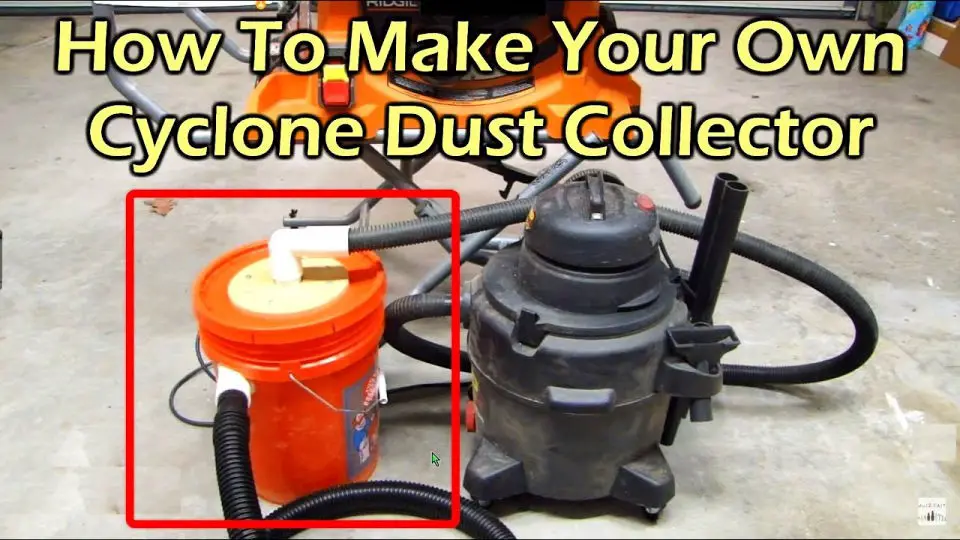
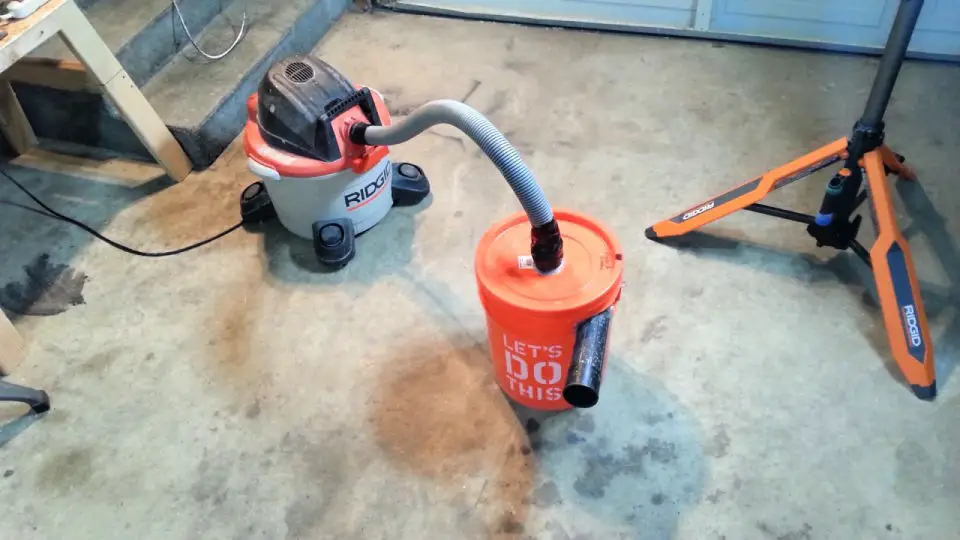
Whether or not you’re a seasoned DIY expert or a skilled woodworker, integrating a cyclone dust collector into your workshop can be a game-changer. This essential tool doesn’t just keep your workspace tidy; it also extends the life of your vacuum filter by reducing the amount of debris that makes its way through the system. In this guide, we’ll be drawing inspiration from Chris Notap’s comprehensive video tutorial to create an efficient and budget-friendly cyclone dust collector using readily available materials.
What You’ll Need:
A collection of essential materials will be required for this project. This includes two Home Depot buckets, which can be used to carry and store various components as needed. Three 1.5-inch straight couplers, one 90-degree fitting, and one 45-degree fitting will provide the necessary connections between pipes. Additionally, three short lengths of 1.5-inch pipe (each measuring 1 and 3/8 inches in length) will be used to create specific pipe configurations. The project also calls for two 2-inch flexible pipe caps, which can help protect and secure exposed ends of pipes. A small sheet metal screw will be needed to fasten certain components together. To facilitate the cutting and shaping of materials, a jigsaw or oscillating saw, utility knife, and drill with a stepper drill bit will be necessary. Finally, tin snips will aid in trimming excess material and achieving precise cuts.
Step-by-Step Guide:
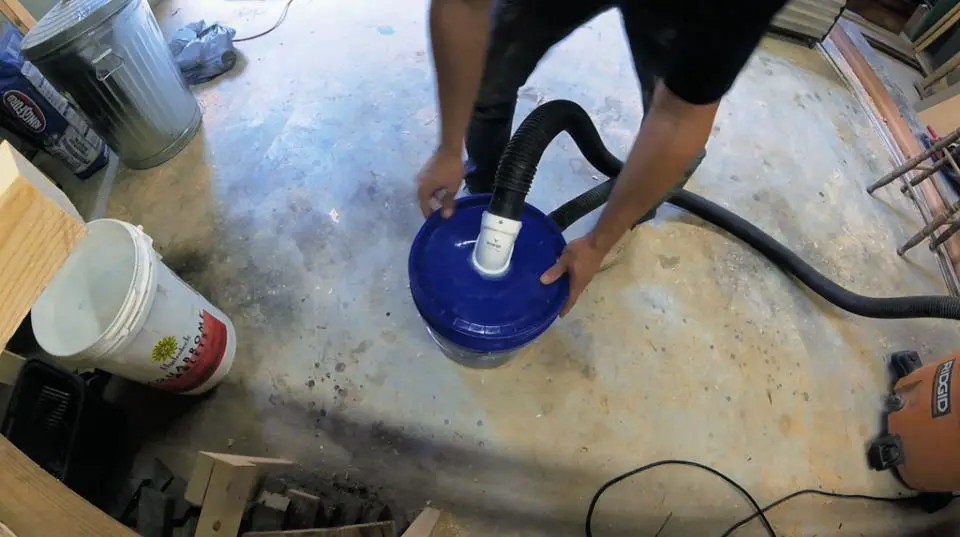
To begin, remove the handle from the first bucket using a jigsaw or oscillating saw. Cut off the top section just underneath the first ring, creating a pedestal-like structure that will serve as the foundation for your cyclone dust collector. Next, use a utility knife to carefully smooth out any rough edges on both the inside and outside of the cut bucket, removing any burrs or debris. This process may take some time, but the end result should be a surface that is free from imperfections.With the first bucket prepared, place the cut top section onto the second bucket, pressing down firmly to create a natural seal between the two. The tapered design of the buckets should allow them to fit together snugly without the need for additional materials.Once the buckets are secured, identify a low spot in the bottom of the first bucket and mark two holes, one for the inlet and one for the outlet. Drill these holes using a drill bit that is slightly smaller than the diameter of your 1.5-inch pipes to ensure a secure fit.Next, insert short lengths of 1.5-inch pipe into the couplers, then fit these assemblies into the drilled holes in the bucket. You may need to use tin snips to adjust the fit, but ultimately you want the pipes to be snug and secure.Moving on, connect the 90-degree and 45-degree fittings, offsetting them slightly as discussed earlier. This small adjustment will help direct the dust downwards, making it easier to capture and contain within your cyclone dust collector.Secure the 45-degree fitting in place using a small screw, ensuring that everything is stable and secure.Finally, modify the flexible pipe caps to fit the end of your vacuum hose using a Dremel tool or other suitable method. These rubber caps will provide a tight seal when tightened with a gear clamp for added security. Once complete, attach your shop vac hose to the central fitting in your cyclone dust collector, ensuring that everything is firmly connected and sealed.
Testing Your Cyclone Dust Collector:
With your homemade cyclone dust collector now set up, it’s time to put its efficiency to the test. Start by feeding a substantial amount of sawdust into the system and pay attention to how much debris makes its way into the vacuum itself. In an ideal scenario, you should see the lower bucket capturing the majority of the sawdust, thereby keeping your vacuum clean and prolonging the life of the filter.
Video Tutorial
To bring the concept of making a simple cyclone dust collector to life, I recommend watching Chris Notap’s step-by-step video tutorial, which provides a visual guide to accompany this written guide. This combined approach enables you to witness the described techniques in action, making the creation process more intuitive and easy to follow.
Crafting a DIY cyclone dust collector offers a cost-effective solution that doubles as an efficient means of maintaining a clean workspace. By following these steps, you’ll be able to construct a functional dust collector that significantly enhances your workshop’s cleanliness and overall efficiency.
Safety Precautions and Gear
When embarking on a DIY dust collection project, prioritizing safety is essential. As you design and operate your system, it’s vital to grasp and implement safety protocols to safeguard yourself from potential risks. By doing so, you’ll not only ensure a safer workshop environment but also enhance the overall experience.
Personal Protective Equipment (PPE)
When working with power tools and equipment, it’s crucial to prioritize personal protective equipment (PPE) to safeguard your respiratory, ocular, and auditory health. Start by investing in a high-quality dust mask or respirator that effectively filters out fine particulate matter, which can cause long-term respiratory issues if inhaled. Ensure the mask fits comfortably and is certified for filtering fine particles. Next, shield your eyes from dust, debris, and other potential hazards with safety goggles that seal tightly around your eyes to prevent unwanted particles from entering. Note that regular glasses won’t suffice, as dust can easily bypass them and cause damage. Finally, consider ear protection such as earplugs or earmuffs if you’ll be working in an environment with high noise levels, as prolonged exposure to decibel levels above 85 can lead to irreversible hearing loss.
Safety Guidelines for Your DIY Dust Collector
To safeguard yourself in the workshop, guarantee that all electrical components are correctly insulated and grounded. When working on DIY projects that involve motors or other parts, verify their safety ratings and compatibility to ensure a secure environment. Additionally, maintain proper ventilation by ensuring good airflow, as even with a dust collector, some particles will remain airborne. Regularly inspect your dust collector for any leaks, clogs, or damaged parts and address them promptly to prevent malfunctions. Be mindful of the capacity of your dust collector and avoid overloading it, which can lead to fires or other issues. Furthermore, stay informed about new safety practices, equipment upgrades, and best techniques in the DIY and woodworking community to continuously enhance your safety.
Choosing the Right Filter Media for Your Dust Collector
When it comes to choosing the right filter media for your dust collector, accuracy is crucial to maintain a safe, efficient, and clean workspace. The type of project or material being worked with can generate various types of dust, necessitating distinct filtration strategies. This guide will delve into the most prevalent types of filter media, including paper filters, HEPA filters, and washable filters, highlighting their key benefits and drawbacks. By understanding the characteristics of each, you’ll be better equipped to select the optimal solution for your specific environment.
Paper Filters
While paper filters have their advantages, they also come with some notable drawbacks. On the one hand, they are generally the most budget-friendly option, making them an attractive choice for hobbyists and small workshops looking to keep costs low. Additionally, they are effective at capturing larger dust particles, such as those produced by wood, which is a significant plus when working on woodworking projects. However, paper filters have a limited lifespan and tend to clog faster than other types of filters, requiring more frequent replacement. Furthermore, their effectiveness in capturing very fine particles is questionable, which can be problematic when working with materials like MDF or hard metals. As such, while paper filters may be a good option for some users, they are not without their limitations.
HEPA Filters
HEPA filters excel in two key areas: efficiency and health safety. On the efficiency front, these filters can capture a remarkable 99.97% of particles as small as 0.3 microns, making them particularly effective at removing fine dust. This capability also makes them an excellent choice when dealing with toxic dusts, such as certain types of metal dust or chemicals, ensuring a safer breathing environment for individuals in the surrounding area. However, HEPA filters do come with some drawbacks. One major consideration is their upfront cost, which tends to be higher compared to other filter options. Additionally, they may require more frequent maintenance checks to ensure they remain clogged-free and functioning properly.
Washable Filters
These washable filters offer a range of benefits, starting with their reusability. Unlike traditional filters that need to be replaced frequently, these can be cleaned and used again, potentially saving you money in the long run. Additionally, they promote an eco-friendly approach by reducing waste. However, it’s essential to consider some limitations. Not all dust types are suitable for this type of filter, as washing may not completely remove very fine or hazardous particles. Furthermore, maintaining their effectiveness requires a regular cleaning commitment to ensure efficiency.
Recommendations Based on Dust Type
When it comes to filtering workshop dust, the type of material and particle size play a crucial role in determining the best filter media to use. For instance, wood dust from sawdust can be effectively handled with paper filters, which are often a cost-effective option for larger particles. However, if you’re working frequently or dealing with finer particles, it’s worth considering a HEPA filter for health reasons. Metal dust, on the other hand, requires even more attention due to its potentially toxic nature and fine size, making a HEPA filter an absolute must. When it comes to general workshop dust that may include a mix of materials and particle sizes, a HEPA filter offers the most versatility and safety. But for less fine dust and more sporadic use, paper or washable filters might be sufficient. Ultimately, prioritizing safety by opting for HEPA filters when dealing with fine or hazardous dust is key. For larger particles and less frequent use, paper or washable filters can get the job done. It’s essential to match your filter media to your workspace and materials for optimal cleanliness.
Maintaining Your DIY Dust Collector
To ensure optimal performance, minimal disruption, and a safe working environment, it’s crucial to regularly maintain and clean your DIY dust collector. A well-maintained system not only prolongs its lifespan but also prevents potential malfunctions or hazards that could compromise air quality and cleanliness. By following this simple schedule and set of guidelines, you can keep your dust collector running efficiently and effectively.
Filter Maintenance
Regularly inspect and maintain your dust collector’s filters to ensure optimal performance and prevent issues from arising. This involves checking for clogs, damage, or wear every month, which can help catch problems before they escalate. If you notice any debris building up on the filters, take a few minutes to clean them out using compressed air or by gently shaking off loose dust particles. Be sure to perform this task outside your workspace to prevent any re-settled dust from causing further disruption.
When it comes to replacing your filters, don’t assume they’ll last indefinitely. Even with regular cleaning, filters will eventually wear out and require replacement. A good rule of thumb is to replace them annually, although the frequency may vary depending on how frequently you use your dust collector and the volume of dust it handles.
Collection Bin Management
When it comes to maintaining your collection bin, a regular cleaning schedule is crucial. The frequency of emptying depends on the specific needs of your project, but as a general rule of thumb, aim to check the bin every week. It’s essential not to wait until the bin is completely full before emptying it, as an overly full bin can significantly hinder the efficiency of your system. To avoid this issue, prioritize regular emptyings. Once the bin has been emptied, make sure to seal it properly to prevent dust from escaping and reduce the overall suction power of the collector.
Hoses and Connections Inspection
Regular inspections are crucial in maintaining the efficiency of your dust collection system. Every month, dedicate time to visually inspect hoses and connections for signs of wear and tear, such as cracks, fissures, or loose fittings. These components serve as the lifeblood of your system, so even the slightest breach can have a noticeable impact on performance. If you notice any compromised connections, take immediate action by tightening them to prevent damage from spreading. In cases where hoses are damaged beyond repair, replace them promptly to ensure seamless suction and prevent dust escape.
Keeping the Exterior Clean
To maintain the overall appearance and functionality of your dust collector, make it a habit to regularly clean its exterior surfaces. Start by mixing a small amount of water with a mild detergent, then dip a soft cloth into the solution and wring it out thoroughly. Gently wipe down all exposed areas, taking care not to apply too much pressure that could damage any moving parts or compromise the machine’s air-tight seal. This simple task will not only keep your dust collector looking its best but also prevent unwanted debris from entering the device and affecting its performance.
A Final Note on Safety
When tackling maintenance or cleaning tasks on your DIY dust collector, it’s crucial to start with a simple yet essential step: disconnecting the device from its power source before proceeding. This emphasis on safety is timeless and particularly important when working with equipment that can pose risks if not handled properly.
By adhering to a regular maintenance and cleaning schedule, you’ll not only extend the lifespan of your DIY dust collector but also safeguard yourself, your work, and your workspace from the hazards associated with dust accumulation. This proactive approach ensures that your machine remains an effective and reliable part of your workshop for years to come.
Understanding Noise Reduction for Dust Collectors
As you set up a dust collection system, it’s essential to consider the noise generated by the equipment. Prolonged exposure to loud decibels can be detrimental to both hearing and overall well-being. By implementing noise reduction strategies, you can significantly enhance your workspace environment without sacrificing the effectiveness of your dust collector. One crucial aspect is finding a balance between minimizing noise levels and maintaining efficient operation. The following practical methods offer valuable insights on achieving this delicate equilibrium.
Employing Soundproofing Materials
By strategically employing specific techniques and materials, it’s possible to dramatically reduce noise levels emanating from dust collectors. One effective approach is to encase the unit in a room or cabinet lined with sound-absorbing materials like mass-loaded vinyl, acoustic foam, or heavy-duty moving blankets. These materials excel at absorbing sound vibrations, rendering them less noticeable.Another tactic for minimizing disturbance is to create barriers that block the sound path between the dust collector and the work area. Dense materials such as plywood, MDF panels, or specialized soundproofing panels can serve as effective barriers, preventing sound waves from escaping and disrupting the surrounding environment.
Strategic Collector Placement
By strategically positioning the dust collector, you can significantly reduce its noise impact on work areas. One effective approach is to place it in a separate room or an isolated area of the workshop, as far away from workstations as possible. This simple adjustment can make a substantial difference in minimizing distractions and improving overall workflow. Additionally, elevating the dust collector above ground level can also contribute to reduced noise disturbance. To further mitigate vibration noise transmitted through the floor, consider incorporating anti-vibration mounts or pads into your setup. These devices absorb vibrations before they have a chance to propagate, ensuring a quieter working environment.
Adding Mufflers to the Exhaust
Exhaust mufflers for dust collectors serve a similar purpose as those in cars – they significantly reduce noise emissions. These devices work by dissipating sound energy as it passes through, without compromising the performance of the dust collection system. A more hands-on approach is to create a custom muffler box using sound-absorbing materials around the exhaust outlet. However, it’s essential to ensure adequate airflow to prevent overheating. This DIY solution can be a cost-effective way to minimize noise while maintaining efficient airflow.
Ensuring Proper Maintenance
A well-maintained dust collector is a key factor in reducing unwanted noise levels. By performing regular checks and maintenance tasks, you can prevent noise pollution from escalating due to common issues such as clogged filters, loose components, and worn-out parts. In fact, addressing these problems can make a significant impact on overall noise reduction. For instance, cleaning or replacing clogged filters as recommended by the manufacturer can eliminate unnecessary rattling sounds. Similarly, tightening any loose screws or fittings can prevent further noise disturbances. Finally, replacing worn-out parts that may be contributing to excessive noise levels is crucial for creating a safer and more efficient work environment.
Creative Upcycling Ideas for Your DIY Dust Collector
When building a DIY dust collector, it’s not just about improving the air quality in your workshop – it’s also an excellent opportunity to get creative with upcycling and repurposing materials. Not only is this approach more eco-friendly, but it can also add a unique touch and save you money. By transforming common items into essential parts of your dust collector system, you’ll not only create a functional piece but also contribute to a reduced waste footprint. For instance, you could upcycle old pallets or wooden crates to create the frame for your dust collector, or use recycled materials like plastic containers or cardboard tubes to build the filter and fan components.
Utilizing Old Plastic Drums
To repurpose an old plastic drum as a dust collection barrel, start by thoroughly cleaning it to remove any residues that could impact your project’s success. Once clean, cut an opening on top for your system’s inlet pipe, ensuring a tight and airtight seal around the connection. Consider enhancing the design with a clear acrylic viewing window, allowing you to monitor the dust level without having to open the drum. This simple modification can be surprisingly effective in keeping track of your collection process.
Repurposing PVC Pipes
When designing a customized ductwork system for your workshop, consider repurposing PVC pipes from plumbing applications. This versatile material can be effectively utilized to create an efficient network for collecting dust.To ensure optimal performance, start by mapping out the layout of your workspace and identifying the location of each tool. This strategic planning will help determine the most efficient route for your ductwork.Installation is a crucial step in this process. Securely attach the PVC pipes from your dust collector to each tool, ensuring that all connections are both secure and airtight to maintain suction power throughout the system.To accommodate tools that require flexibility, such as those that move or change positions, incorporate flexible hose sections between the PVC pipes and machines into your design. This thoughtful consideration will help prevent any disruptions in the flow of dust collection.
Tips for Better Efficiency and Sustainability
When it comes to fine-tuning your upcycled dust collector, don’t overlook the little things that can make a big difference. Start by sealing any gaps or connections using silicone caulk or foam tape – this will not only improve suction but also prevent precious dust from escaping. Regular cleaning is another key aspect of maintaining an efficient system. By designing components to be easily disassembled and cleaned, you’ll ensure your setup stays in top working order. Experimenting with different configurations can help you find the perfect air flow path, even if it means thinking outside the box (or drum, as the case may be). As you repurpose materials like old plastic drums and PVC pipes to create your dust collector, remember that you’re not only saving money but also contributing to a more sustainable future. Your DIY creation becomes a testament to your creativity and eco-friendly values in your workshop.
Customizing Your DIY Dust Collector for Specific Tools
When it comes to woodworking, having a reliable dust collector that can adapt to various tools is crucial for maintaining a clean workspace and extending the lifespan of your equipment. In this context, a customized DIY dust collector setup is an excellent solution. By following these straightforward steps, you’ll be able to tailor your dust collector to different tools like table saws, routers, and bandsaws, ensuring optimal performance and longevity.
Table Saw Dust Collection
To establish a reliable connection with your table saw, begin by measuring the diameter of its dust port. Typically, this measurement falls within the 2.5- to 4-inch range. It’s essential to know the size to ensure a proper fit and prevent any potential dust leaks. If your hose doesn’t match the saw’s port, consider utilizing an adapter available at most hardware stores. Guarantee a secure connection by verifying its snugness. To minimize dust escape from the table saw’s open base, create a simple enclosure using wood or a panel. Be sure to leave an aperture for the collection hose. Finally, seal any crevices around the enclosure and where the hose attaches to the saw using foam tape or silicone caulk. This will guarantee that the collected dust is properly sucked into the collector.
Router Table Dust Collection
When it comes to customizing your router table for optimal dust collection, you’ll want to focus on two key areas: above-the-table and below-the-table solutions.
Above the table, consider attaching a dust collection hood to the fence itself. This can be as simple as a plastic or metal hood connected to a flexible hose that leads back to your main dust collector.
For the area beneath the table, you’ll want to create an enclosure similar to those used on table saws. This will help capture any dust that’s kicked up from below and direct it towards your dust collector. Be sure to include a port for connecting the hose.
Finally, don’t forget the importance of tight connections. Just as with the table saw, make sure all seals and fittings are secure to prevent even a single speck of dust from escaping.
Bandsaw Dust Collection
When it comes to optimizing dust collection for your bandsaw, there are several key areas to focus on. First, consider connecting a hose to the lower wheel housing, where the majority of dust is generated. If your saw doesn’t have a dedicated port, you may need to get creative and create an enclosure around the housing or add a port yourself. Additionally, many bandsaws come equipped with or allow for aftermarket dust ports near the blade guard, which can help capture the dust that escapes upwards during cutting. It’s essential to ensure that any hoses you install don’t interfere with the operation of the saw or its safety features.
General Tips
When setting up a DIY dust collector, consider incorporating flexible hoses into your design. These hoses facilitate tool movement and setup adjustments, streamlining your workflow. Furthermore, quick-release clamps can simplify the process of switching between tools, minimizing downtime and maximizing productivity. To ensure optimal performance, prioritize regular maintenance by inspecting your system for leaks or damage, and address any issues promptly. By securing connections and sealing gaps, you’ll not only maintain cleanliness but also maximize the effectiveness of your DIY dust collector.
Remote Control and Automation for Dust Collectors
When it comes to DIY endeavors, integrating remote control and automation capabilities into your dust collector can have a profound impact on both the ease of use and productivity of the system. One way to achieve this is by upgrading your setup with cutting-edge features that streamline the process and minimize manual intervention.
Remote Control Options
Controlling your dust collector has become more convenient than ever before. The first option is to utilize a smart plug, which allows you to remotely control it via a smartphone app within the range of your Wi-Fi network. This simple yet effective solution lets you turn the system on or off from anywhere in your workshop. Another alternative is to integrate a timer into your dust collector’s operation. This feature is particularly useful for workshops with consistent work hours, as it prevents unnecessary energy consumption by automating the system’s start and stop times.Finally, wireless remote controls specifically designed for workshop equipment like dust collectors offer an additional layer of control. These devices come equipped with a key fob transmitter that you can carry around, allowing you to activate or deactivate the system with the push of a button. This option is ideal for large workshops where the dust collector may be situated at a distance from your work area.
Automation via Smartphone Apps
When it comes to incorporating your dust collector into your woodworking workflow, there are several ways to achieve seamless integration with other smart devices. One approach is to utilize compatible smart plugs or switches that are integrated with popular smart home ecosystems like Google Home or Amazon Alexa. This allows you to control the dust collector using voice commands or through the ecosystem’s app, providing an added layer of convenience and flexibility.
For those who enjoy tinkering with technology, custom automation solutions can be developed using platforms like IFTTT (If This Then That) or Arduino. These platforms enable the creation of customized triggers, such as activating the dust collector when a specific workshop light is turned on, offering a highly personalized and efficient automation experience.
Regardless of your skill level, there are various options available for enhancing woodworking efficiency through remote control and automation. As with any new technology integration, it’s essential to prioritize safety and ensure that all systems are properly integrated and used responsibly.
Troubleshooting Common Issues with DIY Dust Collectors
When utilizing a DIY dust collector, homeowners may encounter recurring obstacles, including blockages, fluid seepage, or inadequate vacuum power. To optimize performance, it’s essential to identify and rectify these common issues.
Clogs in the System
When your air purifier starts to falter, it’s often marked by reduced suction power, unusual noises, or a visible buildup of dust. To get back on track, start by inspecting and cleaning the filters. If they’re clogged with debris, follow the manufacturer’s instructions for maintenance and replacement. Next, investigate any blockages in the ductwork. Use a long, flexible brush or a vacuum with a hose attachment to remove any accumulated dust or debris. Finally, take a close look at the dust collection points to ensure nothing is obstructing their functionality. Regularly cleaning these areas will help prevent future clogs and keep your air purifier running smoothly.
Leaks in the Ductwork
When your air purification system starts to underperform, it’s often accompanied by telltale signs like a noticeable drop in suction power and visible dust accumulating outside the ducts. To tackle this issue, start by identifying the source of the problem. Run your hand along the ductwork to detect any air escaping, or use a smoke pen or incense stick to visually pinpoint leaks in hard-to-reach areas.
Once you’ve located the leak, take steps to seal it using duct tape or a specialized sealant designed for HVAC systems. Be sure to clean and dry the surface before applying the sealant to ensure a strong bond.
To prevent future issues, make regular inspections of your ductwork a priority. Keep an eye out for signs of wear and tear, and address any leaks immediately to maintain optimal performance and efficiency.
Insufficient Suction
If you’re experiencing issues with your dust collection system, two common symptoms are inadequate collection and slow collection rates. To address these problems, it’s essential to identify the root cause. Start by checking for open ports on your dust collector and ensure they’re either closed or capped off. Open ports can drastically reduce suction power, making it difficult to effectively collect dust. Next, inspect the motor and fan components of your system. If either is malfunctioning – perhaps due to overheating or damaged blades – repairs or replacements may be necessary. Finally, evaluate the overall design of your system to determine if it’s adequately sized for your specific needs. You might need a more powerful motor or a different fan configuration to handle the volume of dust being generated.
Preventative Maintenance
To ensure your DIY dust collector runs efficiently and effectively, adopt a routine of regular maintenance. Start by emptying the dust bin as soon as it’s one-quarter full, rather than waiting for it to be fully loaded. This helps maintain optimal suction power and prevents clogs from forming. Additionally, frequently clean filters, even if they appear to be only partially obstructed, to preserve airflow and prevent reduced performance. It’s also crucial to conduct periodic inspections of the entire system, paying particular attention to moving parts that may be prone to wear and tear. By addressing these maintenance tasks in a timely manner, you can identify and rectify common issues before they escalate into more serious problems.
FAQs on DIY Dust Collector Plans
Crafting a custom dust collector for your workshop can be a fulfilling experience, yielding significant benefits in terms of tidiness and productivity. To address some frequently asked queries regarding DIY dust collector designs, let’s delve into the details.
What materials do I need to build a DIY dust collector?
When it comes to building a dust collector, the materials required can differ depending on the specific type you’re aiming to construct. Typically, you’ll need a combination of items such as buckets or a trash can for cyclone-style collectors, PVC pipes and fittings for creating the necessary framework, flexible hose for efficient airflow, a reliable shop vac or blower motor to drive the system, and plywood or MDF for building enclosures or supports to keep everything organized. Additionally, sealants like silicone or foam gasket will come in handy for ensuring airtight connections throughout your design.
Can I build a dust collector without advanced tools?
When it comes to DIY dust collectors, simplicity is often the guiding principle. Most plans can be completed with just basic hand tools and a few power tools like drills and saws. However, it’s crucial to select a plan that aligns with your skill level and the resources you have at your disposal.
How do I choose the right size dust collector for my workshop?
When selecting the right dust collector for your setup, consider several key factors: workspace size, machine count and type, and typical workflow and dust production levels. For compact workshops, a basic shop vacuum paired with a dust separator may be a suitable starting point. However, larger spaces or high-volume operations will likely require more powerful systems capable of handling increased dust loads.
Can a DIY dust collector be as effective as a commercial one?
A commercial-grade dust collector may seem like the obvious choice for heavy-duty use, but don’t underestimate the effectiveness of a well-designed DIY solution. With proper planning and sizing, a homemade dust collector can surprisingly meet the needs of most hobbyists and small workshops. The key to success lies in crafting a system that is tailored to your specific situation.
How often should I empty the dust collector?
When it comes to managing dust in woodworking, the frequency of cleaning depends on several factors, including the level of dust generated by your projects and the capacity of your dust collector. A crucial habit to develop is regular monitoring of the collector before commencing a new project. This involves checking its status and emptying it as necessary to ensure optimal performance and prevent overfilling, which can compromise the effectiveness of the device.
Can I make my dust collector quieter?
To minimize distractions caused by your dust collector, consider implementing several effective noise reduction strategies. One approach is to equip the exhaust system with a muffler, which can significantly attenuate the noise emissions. Alternatively, you could enclose the motor and collector within a sound-dampening enclosure that absorbs or deflects sound waves. Additionally, isolating the collector from the floor using rubber feet or a vibration-ampening mat can help reduce the transmission of vibrations and minimize the overall noise level.
Is it necessary to use a filter with a DIY dust collector?
To safeguard your well-being and maintain a healthy workspace atmosphere, it’s essential to employ a high-quality filter capable of capturing fine dust particles. When selecting a filter, consider its rating in relation to the particle size you’re working with, ensuring an effective barrier against harmful pollutants.
Can I add a dust collection system to an existing workshop?
When it comes to outfitting an existing workshop with a dust collection system, the good news is that it’s entirely possible. While it may necessitate some careful planning to determine the most effective layout and component configurations, the payoff is well worth the effort in maintaining a tidy workspace and breathable air.
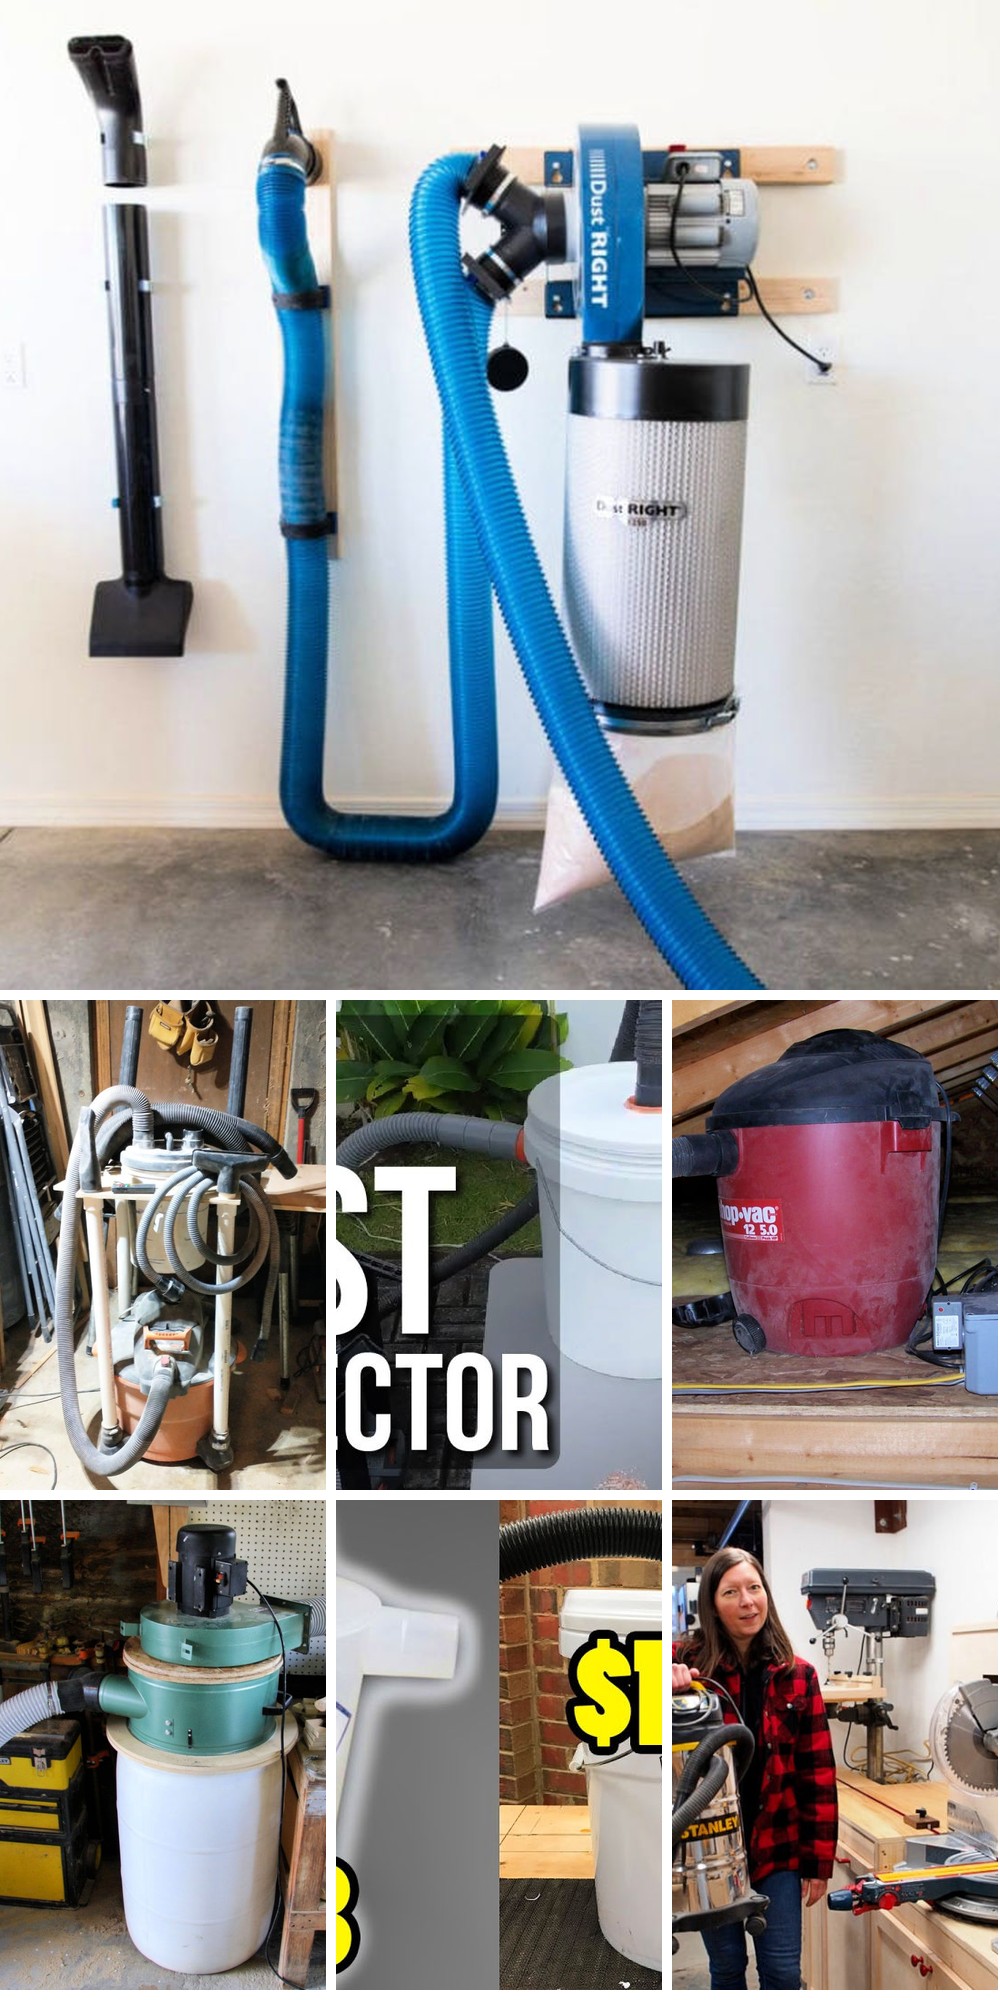
25 Homemade DIY Dust Collector Plans
Improve the air quality and efficiency of your woodworking projects by crafting your own custom dust collectors from scratch. With a plethora of innovative and easy-to-follow DIY designs, you can create up to 25 unique homemade dust collector plans that cater to your specific needs and preferences.
How to Make a Dust Collector
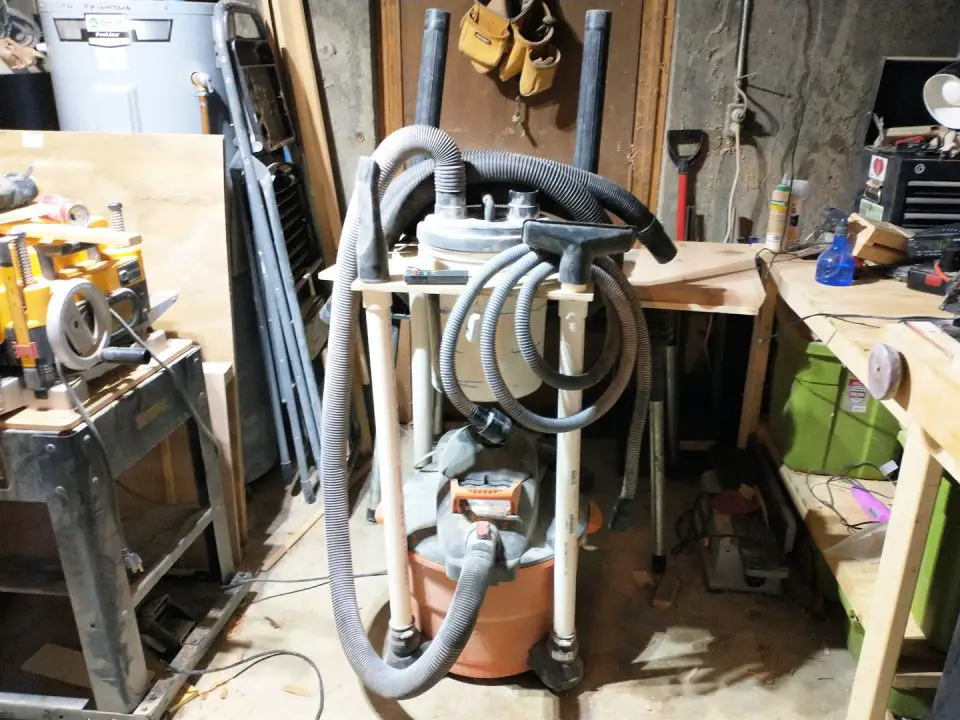
A clutter-free workspace is crucial for both safety and productivity in woodworking. To achieve this, many enthusiasts turn to DIY solutions like building a dust collector that can seamlessly attach to their shop vac. According to Popular Science, creating such a device can be an effective way to capture sawdust, safeguard one’s lungs, and maintain a tidy workshop without breaking the bank on a comprehensive dust collection system.
By following a straightforward, step-by-step approach and utilizing a minimal set of materials, you can construct a sturdy, portable dust separator stand that also doubles as a storage solution for your vacuum accessories. This space-saving addition to any workshop ensures a cleaner environment for all woodworking projects, allowing you to focus on the task at hand.
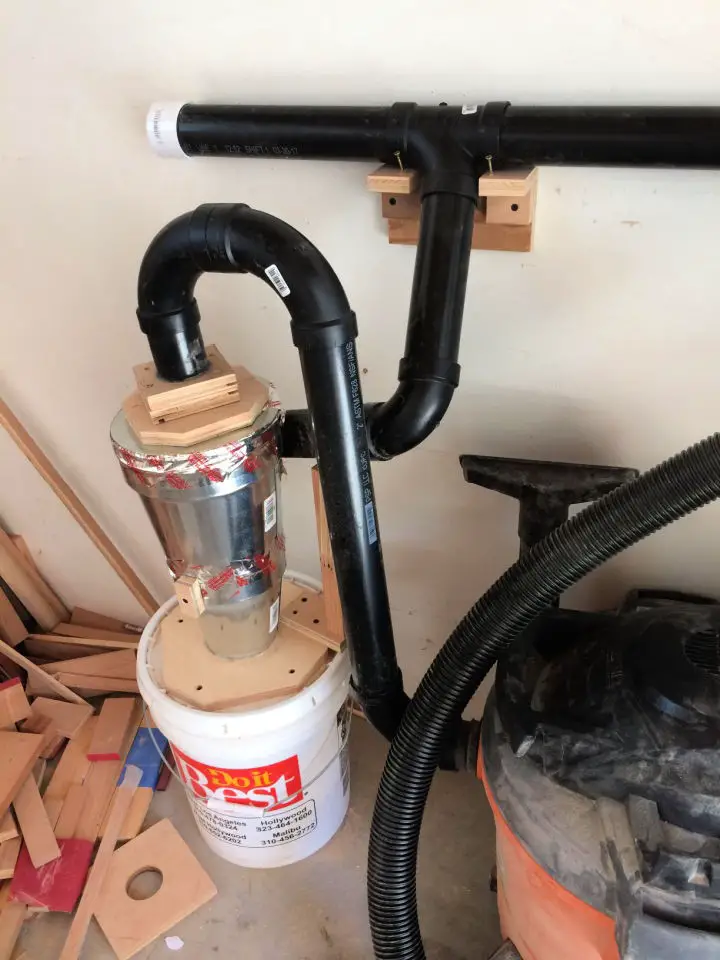
DIY Cyclone Chip Separator for a Dust Collector

For woodworkers seeking to maintain a healthy workshop environment and protect their respiratory health, incorporating a cyclone chip separator into their dust collector setup is an astute move. Fortunately, Instructables offers a comprehensive guide on constructing one’s own separator, yielding a cleaner workspace and improved lung protection from airborne contaminants.
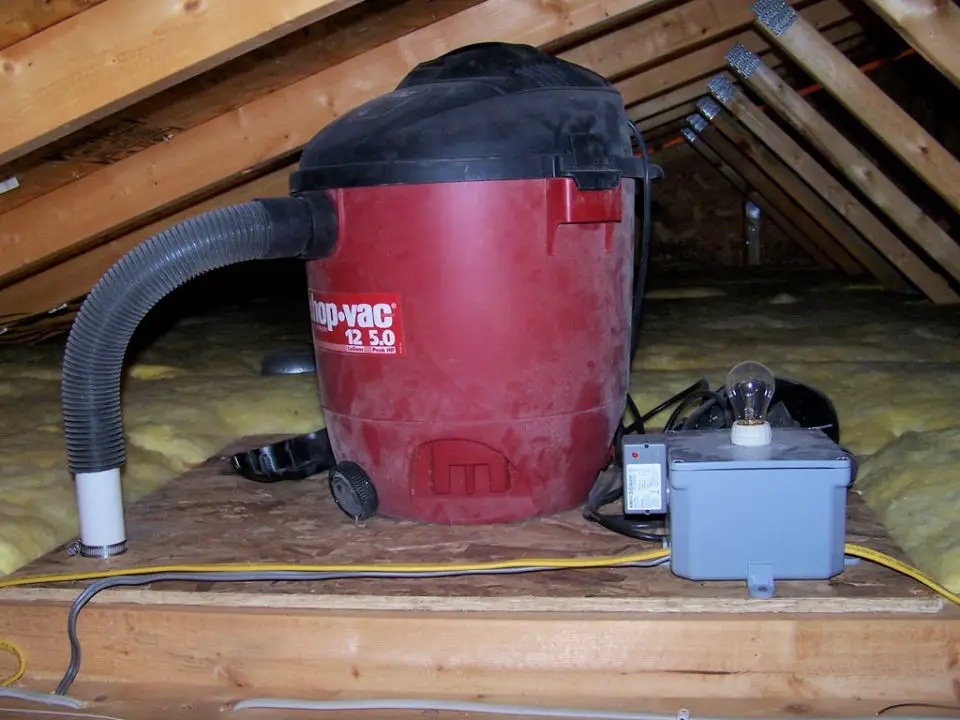
Homemade Small Dust Collector
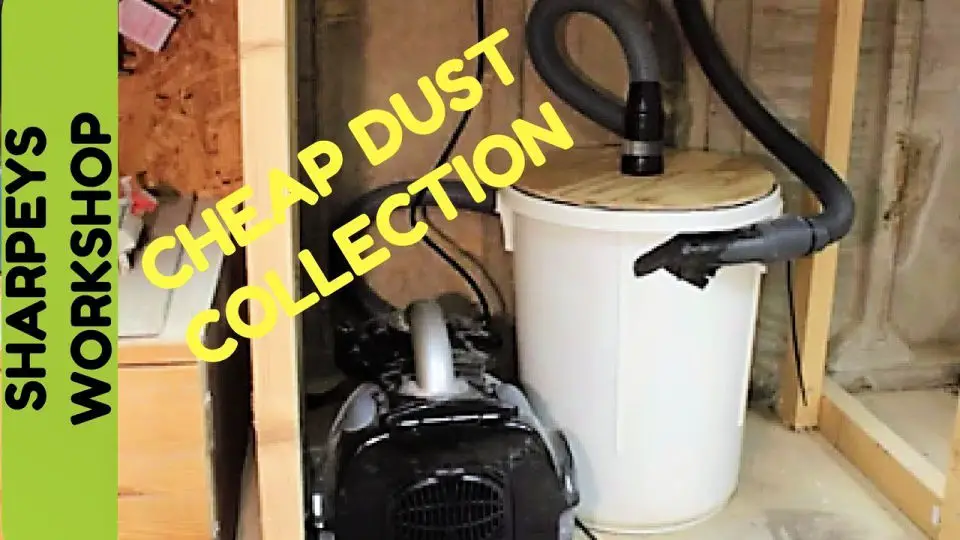
Transforming your workshop with a quieter, more energy-efficient dust collector requires creativity and experimentation. Our guide on crafting a small-scale dust collector using a homemade blower is an engaging and practical journey. By repurposing a motor to design and optimize the blower’s impeller, you’ll gain hands-on experience shaping and balancing the component. The tutorial also delves into constructing a housing that maximizes airflow dynamics, providing valuable insights for DIY enthusiasts seeking to reduce noise and power consumption in their workspace. Join us as we explore the mechanics of this custom-built dust collector, which has the potential to revolutionize your workshop’s environment.
DIY Shop Dust Collection System
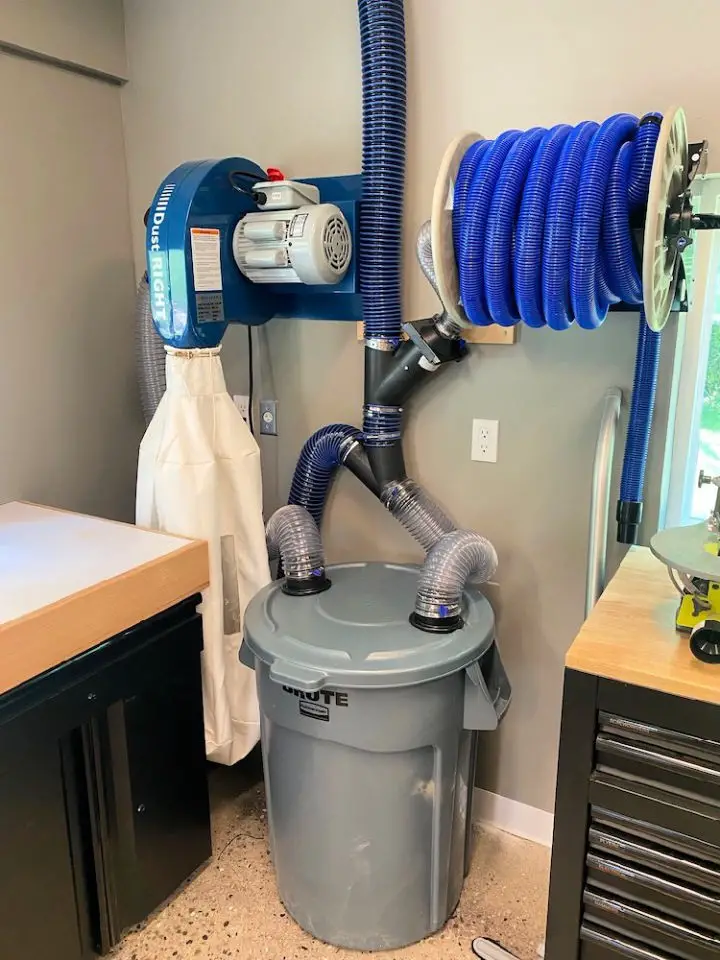
In the pursuit of a tidy and healthy workshop environment, many woodworkers face the persistent problem of sawdust accumulation. To address this issue, Jamison Rantz from Rogue Engineer presents a comprehensive guide on installing a Dust Right unit from Rockler, specifically designed for medium-sized workshops. This flexible system is surprisingly easy to set up, requiring only basic DIY skills and some patience. The tutorial takes you through the creation of a dust separator using an everyday trash can, secure mounting of the wall unit, and clever plumbing with an anti-static duct hose and PVC. For those who value cleanliness and prioritize their well-being, Jamison’s detailed instructions provide a practical solution for managing workshop debris effectively. By incorporating a remote-controlled dust collector and integrating various tools in a thoughtful manner, achieving a dust-free workspace has never been more attainable.
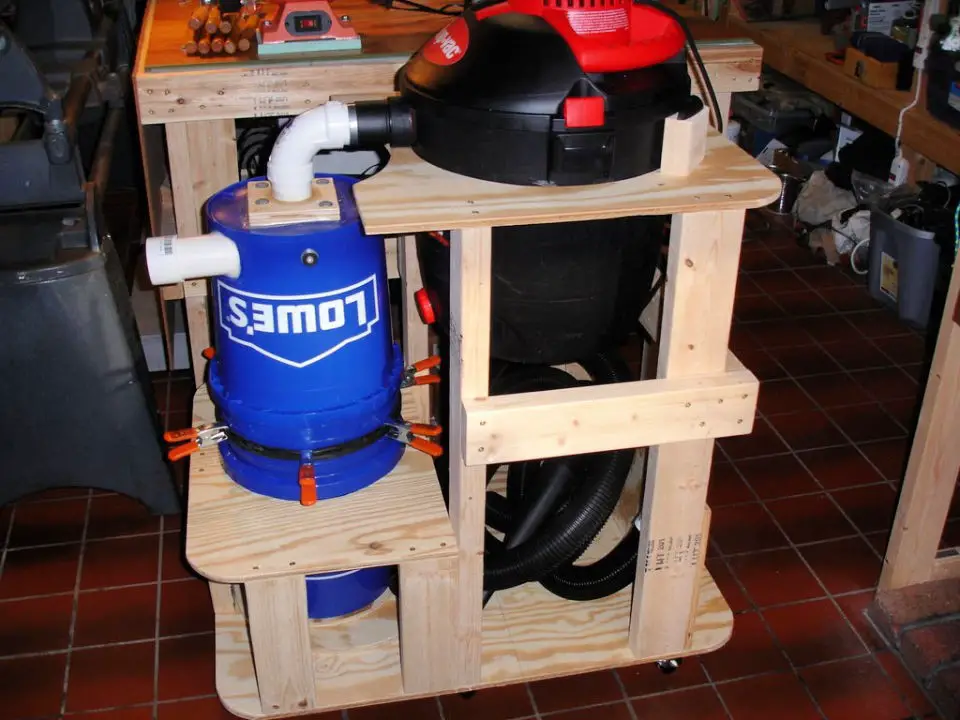
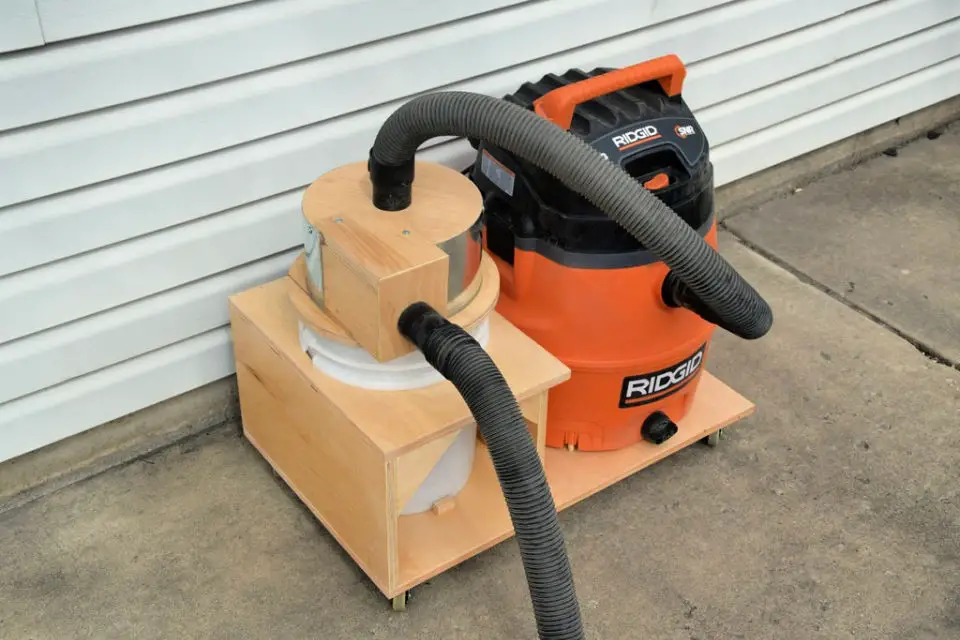
Build a 2 Stage Dust Collector
Transforming a standard dust collector into a two-stage system is a brilliant move for any workshop seeking to optimize air quality and suction power. By integrating a cyclone separator and fine micron filter, you’ll effectively separate larger debris from finer dust particles, keeping your filter clean and lungs protected from harmful airborne contaminants. The addition of these components not only enhances air quality but also increases suction power, resulting in a cleaner and safer workspace. With the help of practical tips and a clear list of materials, setting up this enhanced system can be both straightforward and rewarding.
How to Make a Shop Vac Dust Collector
Transforming your woodworking shop into a cleaner and more efficient space is now within reach with a DIY shop vac dust collector. By following Instructables’ step-by-step guide to creating a system that streamlines hose management and maximizes dust collection capabilities, you can bid farewell to cluttered workspaces and hello to a healthier environment. This practical project is perfect for retirees or hobbyists looking to elevate their workspace game, offering a cost-effective solution to maintaining a dust-free zone. With the guidance of clear instructions and helpful tips, you’ll be empowered to build a custom dust collection system that meets your unique needs and preferences, allowing you to focus on crafting beautiful woodwork with ease.
Making a Cyclone Dust Collector
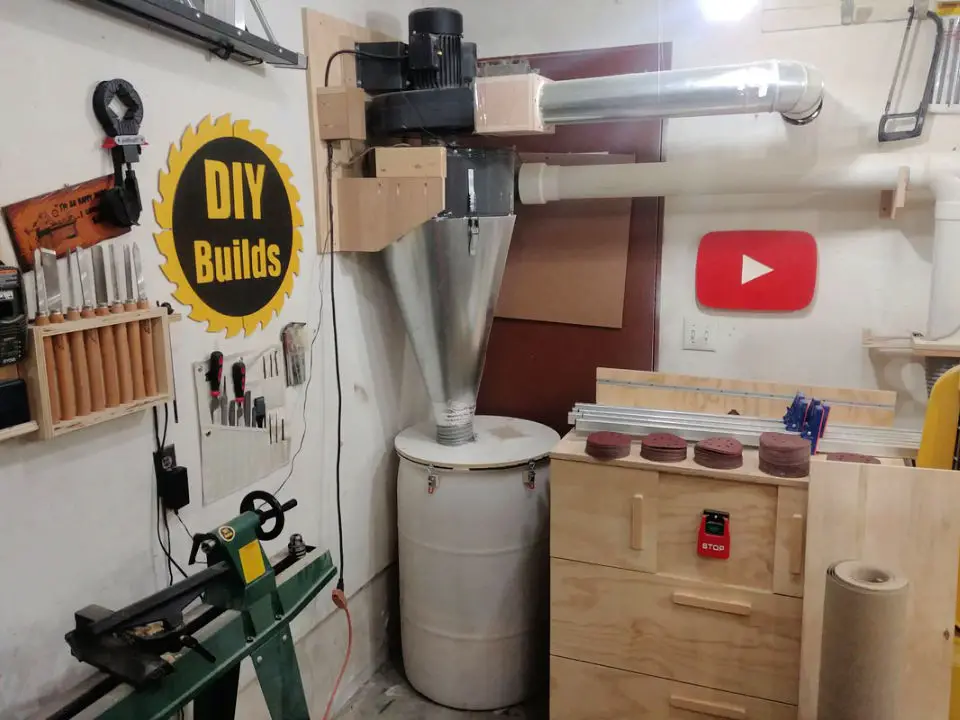
Transform your workshop’s dust management with a cost-effective and efficient 2-stage cyclone dust collector by upcycling a standard 2 hp Harbor Freight dust collector, as demonstrated in DIY builds. This step-by-step guide empowers you to shape and drill sheet metal, apply foil tape for sealing, and craft custom wooden supports. The project also delves into integrating a 55-gallon barrel as a dust bin, guaranteeing a clean workspace and optimal air quality. Perfect for woodworkers seeking to elevate their dust collection setup, the DIY plans and clear instructions ensure a seamless build process, ultimately keeping your environment dust-free and your air quality high.
Simple DIY Cyclone Dust Collector
If you’re looking to get a handle on dust collection in your workshop, Two Feet First has got you covered. Our step-by-step guide takes you through the process of building a DIY cyclone dust collector that integrates seamlessly with your shop vacuum, inspired by Chris notap’s design. This tutorial is designed to be both engaging and easy to follow, ensuring that even beginners can get started without any hassle.
By using common materials and tools, you’ll be able to create an effective system for keeping your workspace clean and your lungs clear of sawdust. With crystal-clear instructions and a helpful video to guide you along the way, this DIY project is perfect for anyone looking to improve their dust management without breaking the bank.
By the end of this project, you’ll be able to keep your workshop tidy and your air quality in check, all while enjoying the satisfaction of having created something with your own two hands.
Easy DIY Dust Collector
If you’re looking to reduce dust in your workshop without breaking the bank, Instructables has a brilliant DIY solution that’s easy to follow. By repurposing your existing shop vac hose and some affordable materials, you can create a clever dust collector that’s as effective as it is budget-friendly. The step-by-step guide is designed to be accessible to DIY enthusiasts of all skill levels, making the process straightforward and stress-free. Not only will this project keep your workspace clean and free from dust build-up, but it’ll also help extend the life of your shop vac’s filter by reducing the amount of debris that passes through it. With this practical approach, you can maintain a cleaner and more efficient work environment without sacrificing any of the fun.
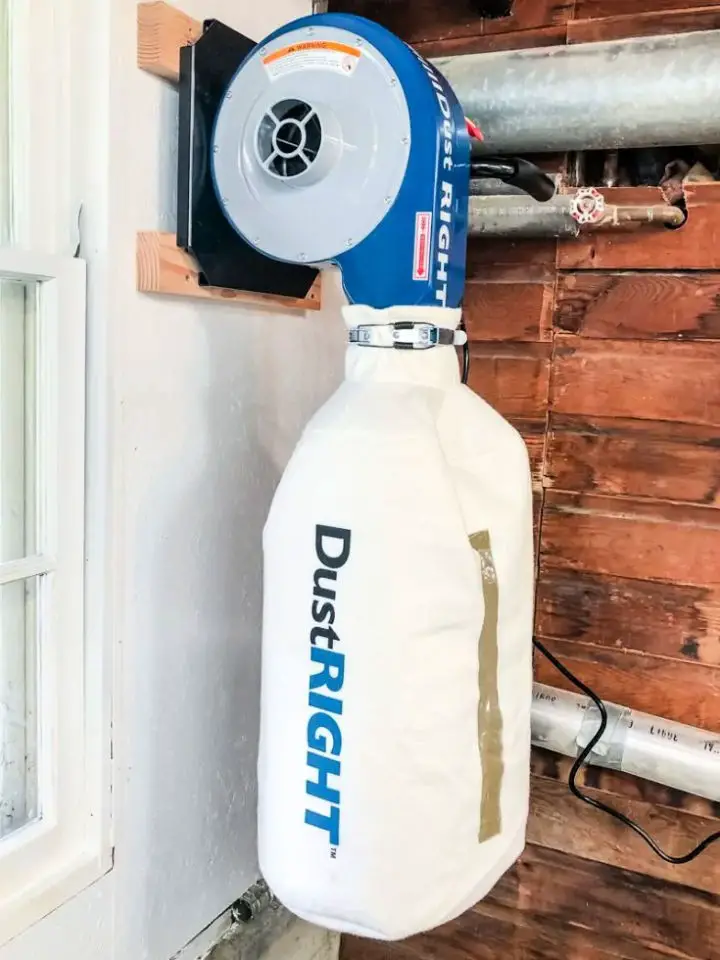
How to Install a Dust Collection System
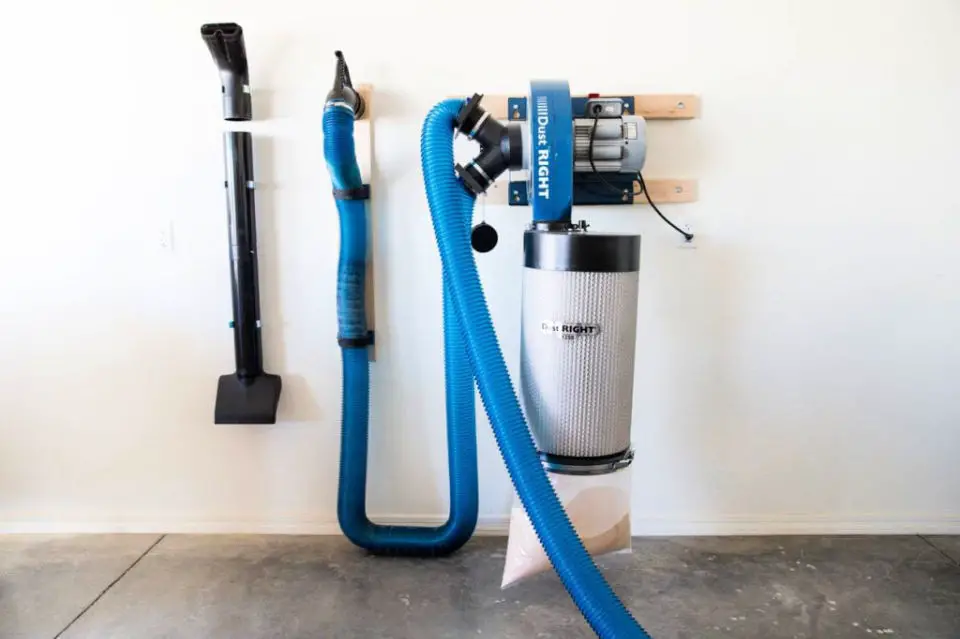
A crucial aspect of maintaining a workshop is installing a dust collection system, which can dramatically enhance cleanliness and efficiency. To make the process more accessible and cost-effective, Addicted 2 DIY offers a comprehensive guide that breaks down the installation into manageable steps. This tutorial covers every essential detail, from choosing the right Dust RIGHT 1250cfm collector to setting up hoses and fittings, ensuring a seamless integration. It also provides guidance on mounting the dust collector, installing the canister filter, and arranging tools for optimal productivity. With clear, concise instructions, you’ll be able to achieve a cleaner workspace that aligns with your passion for woodworking.
Building a Dust Wood Chip Collector
Tackling dust and wood chip accumulation in the workshop is a common challenge many DIY enthusiasts face. Fortunately, a simple yet effective solution exists in the form of a DIY cyclonic dust separator. This practical guide will walk you through the process of creating a reliable and efficient collector using just two buckets, a short length of PVC pipe, some clamps, and a few garage scraps. With minimal cutting and assembly required, you can have your new tool up and running in no time, ensuring cleaner air and clearer work surfaces in your shop.
DIY Dust Collection for Small Shop
Effective dust management is vital for small shops, ensuring a clean environment and safeguarding one’s health. Our comprehensive guide provides actionable solutions for achieving optimal dust control, encompassing upgrades to shop vacs with HEPA filters, implementation of dust cyclone systems, and integration of overhead air filtration units and dust collectors. Moreover, we emphasize the importance of reusable dust masks as a crucial investment for any serious DIY enthusiast or professional. By prioritizing safety and efficiency, our recommendations empower individuals to create a dust-free zone, even in confined spaces. This translates to healthier lungs and a more organized workshop, making it an indispensable resource for anyone seeking to maintain a pristine working environment.
Homemade Compact Dust Collector
Say goodbye to the mess and chaos that comes with emptying your shop vac. Instructables is here to help you revolutionize your workshop’s cleanup process with a compact and efficient dust collector DIY guide. This comprehensive tutorial takes you by the hand, guiding you through the creation of a Thien baffle style dust collector that perfectly fits under your table saw in a small garage shop. Unlike traditional systems that require bags or filters, this innovative design makes emptying a snap, keeping your workspace tidy and organized with minimal hassle. Whether you’re a seasoned woodworker or just starting out, this DIY guide provides everything you need to get started, including a detailed list of materials, tool requirements, and crystal-clear instructions for assembly. Experience the power of a well-managed workshop with this practical and space-saving solution that’s sure to transform your cleanup routine.
Making a Dust Collection on a Budget
If the dusty environment of your woodworking shop is taking a toll on your lungs and your workflow, Lazy Guy DIY has got you covered. The Rockler Dust Right Series offers an affordable solution to keep your workspace clean and your air healthy. This innovative kit transforms your standard shop vac into a robust dust collection system by combining the Dust Right dust separator and clear hose kit. For under $100, you can significantly boost suction power, streamline debris disposal, and breathe easier knowing your shop is now a dust-free zone. By investing in Rockler’s ingenious dust collection accessories, you’ll be amazed at how efficiently your workspace runs with minimal mess.
DIY Cyclone Dust Collector System
For woodworking enthusiasts seeking to optimize their workspace, building a DIY cyclone dust collector system is an innovative approach that yields impressive results. By incorporating a cyclone into your dust collection setup, you can drastically minimize the amount of debris clogging your shop vac’s filter, thereby enhancing its performance and extending its lifespan. This allows for uninterrupted work sessions lasting hours. A notable example of this system’s effectiveness can be seen in a user’s Imgur post showcasing impressive results after a month of use. As a cost-effective and reliable solution for woodworkers, constructing a homemade cyclone dust collector is an attractive project worth exploring.
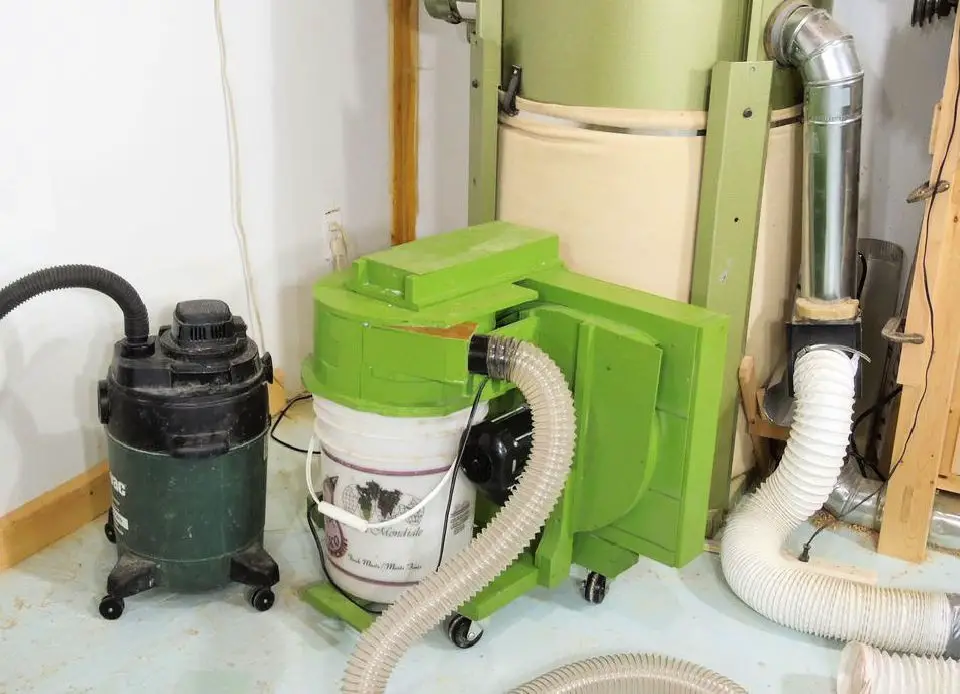
Make Your Own Dust Collector

Revamp your workshop’s dust management with a creative twist from DIY Builds. By modifying a Harbor Freight dust collector, you can create a cyclone separator with an integrated low-voltage relay and switch system. This innovative setup automatically activates the collector when a blast gate opens, ensuring seamless dust collection from multiple tools like router tables, band saws, sanders, and more. A comprehensive guide takes you through the process of creating airtight connections using PVC cement, precision-cutting fittings with a miter saw, and installing a convenient 24VDC relay for circuit control. With clear step-by-step instructions and practical tips, DIY Builds empowers you to build a robust dust collection system that keeps your workspace clean, air quality high, and productivity soaring.
DIY Harbor Freight Dust Collector Mod
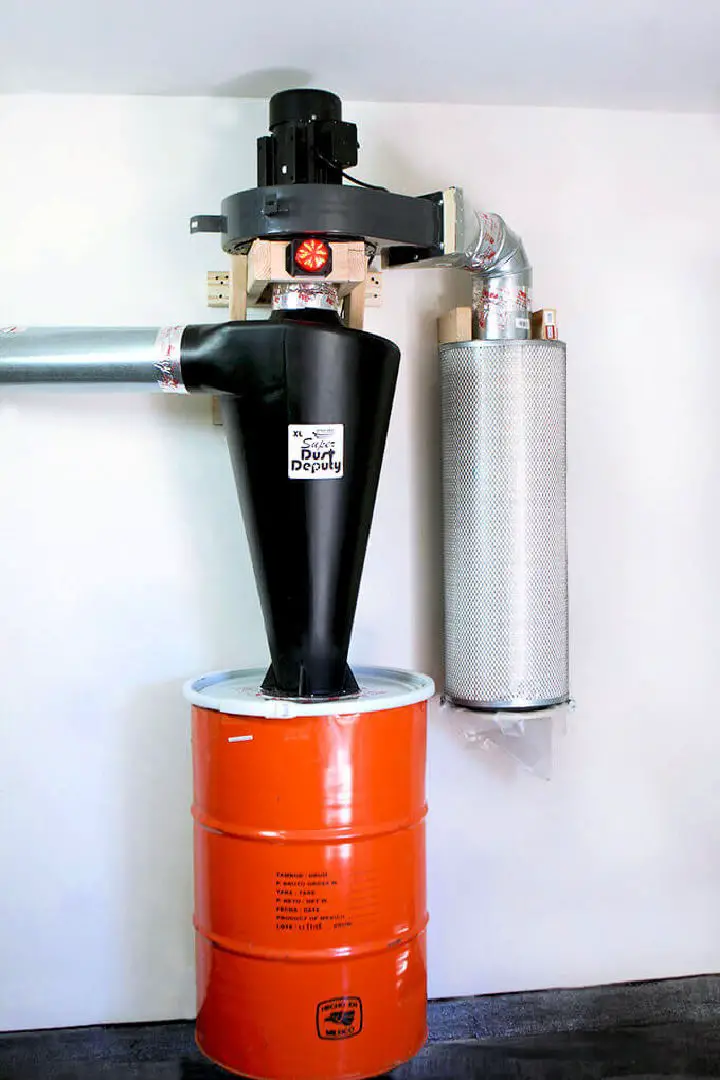
Transform your woodworking shop’s dust collection system with expert guidance from Gray House Studio. In a comprehensive tutorial, Brent showcases the transformative power of the Super Dust Deputy XL from Oneida Air Systems, turning a standard Harbor Freight Dust Collector into a high-performance unit capable of handling multiple tools and keeping your workspace immaculate. By modifying the impeller, adapting the filter, and installing a cyclone separator, you’ll unlock superior dust management and enjoy a cleaner, more efficient work environment. This detailed guide is perfect for woodworkers seeking to elevate their shop experience, offering crystal-clear instructions and valuable insights to make dust collection more effective and unobtrusive.
How to Make a Dust Collector
Embarking on a DIY dust collector project can be an exhilarating experience, especially when guided by a comprehensive tutorial. Vinchero Karpintero’s YouTube video is an invaluable resource for woodworking enthusiasts seeking to streamline their workshop’s cleanliness and air quality. The step-by-step demonstration is effortlessly clear, making it accessible to DIYers eager to tackle dust management effectively. To further illustrate the dust collector’s efficacy, the video features a series of visual tests using foam balls. With its practical approach and concise instructions, this tutorial empowers viewers to assemble their own dust collector, guaranteeing a cleaner workspace for future projects.
DIY Cyclone Dust Collector
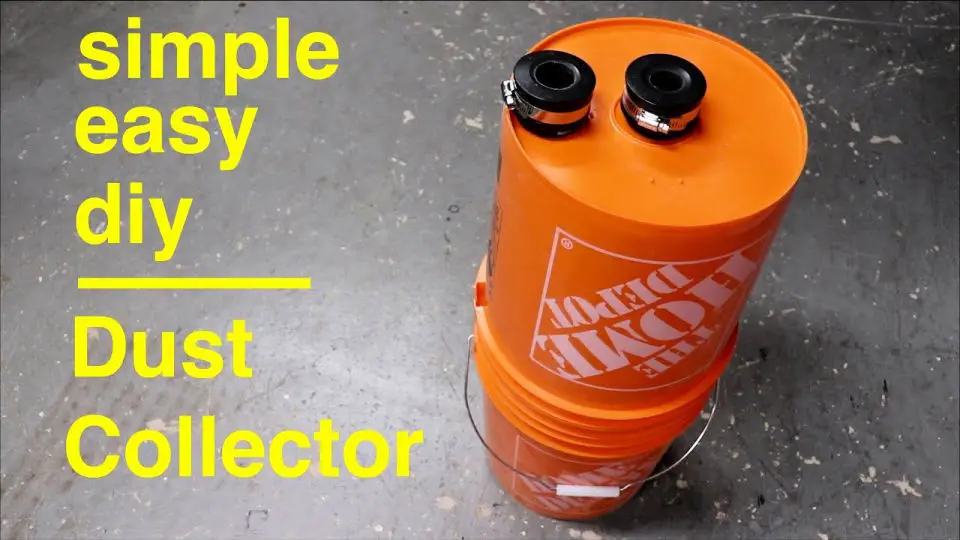
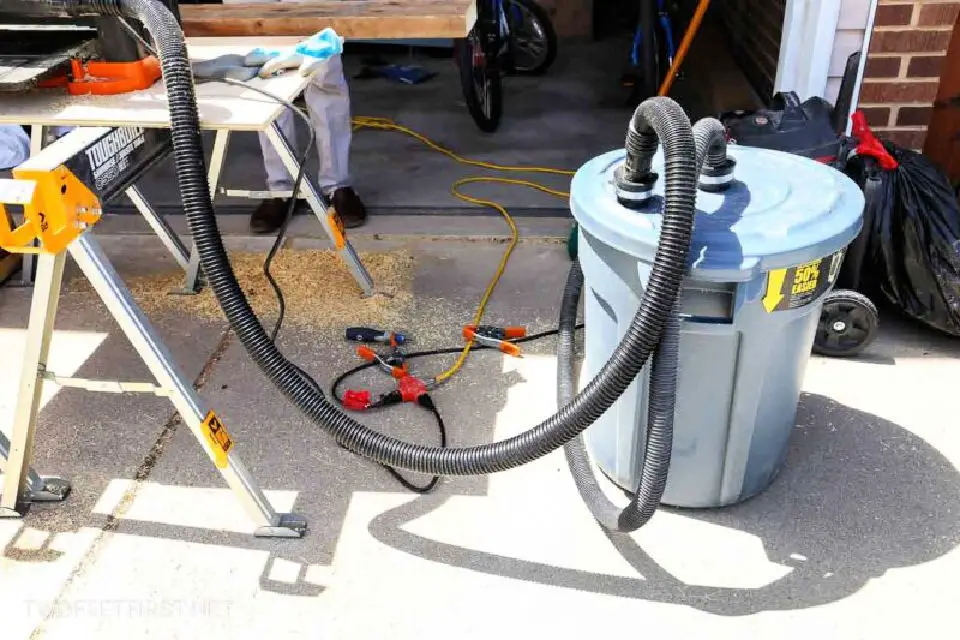
Transform your workshop into a dust-free haven without breaking a sweat or blowing your budget. By repurposing two humble Home Depot buckets and some off-the-shelf plumbing components – think straight couplers and elbow fittings – you can craft a straightforward, low-cost cyclone dust collector that amplifies your shop vac’s capabilities. This DIY endeavour eschews intricate baffle designs in favour of simplicity, ensuring a spotless workspace and extending the life of your vacuum filter. With this inventive solution, you’ll be well on your way to a cleaner, more efficient workshop, where sawdust and debris are kept firmly at bay.
Cheap DIY Cyclone Dust Collector
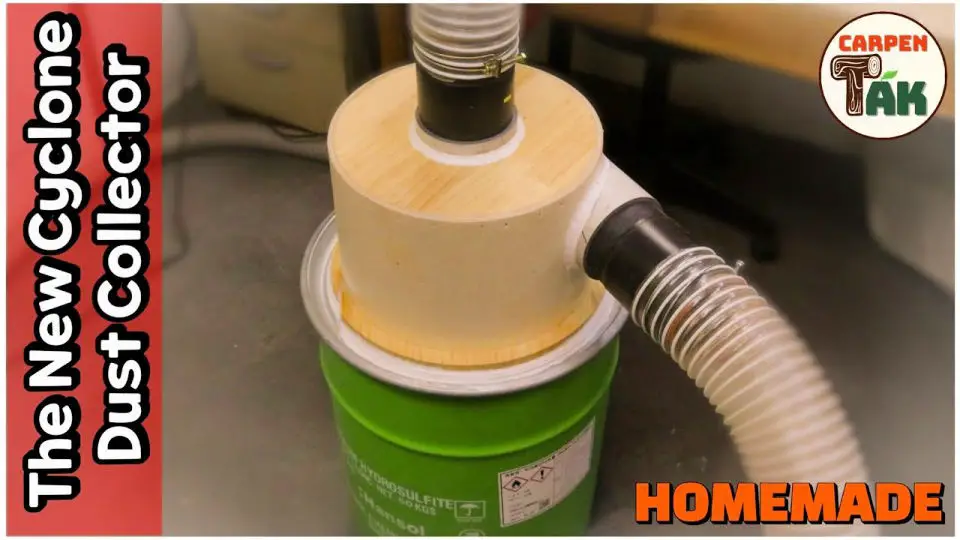
Immerse yourself in a DIY video on YouTube that showcases an innovative approach to creating a highly efficient cyclone dust collector for small woodworking shops. This ingenious homemade solution delivers impressive performance without requiring expensive equipment. The video provides a clear, step-by-step guide, making it easy to replicate the process in your own workspace. Follow CarpenTAK, a seasoned Korean craftsman, as he shares his expertise and creative woodworking tools and jigs. By crafting your own cyclone dust collector, you can elevate your dust management system and maintain a clean and safe shop environment. For additional woodworking tips and project inspiration, explore the channel’s comprehensive library of content.
Creative Dust Cyclone for Under $2

Transform your workshop into a dust-free zone with an innovative DIY project that yields impressive results at a fraction of the cost! This ingenious contraption converts a humble paint bucket and two 45-degree angle PVC pipes into a powerful dust collection system boasting an astonishing 97% efficiency rate. No specialized tools or expertise are required, just a drill, glue gun (or silicone sealant), and a dash of creativity. Perfect for woodworkers seeking to maintain a tidy workspace without breaking the bank, this straightforward guide provides a step-by-step method to build a cyclone dust collector that proves with a little ingenuity, achieving a cleaner workshop is both affordable and deeply satisfying.
How to Make Dust Collector With a Pressure Release Valve

Transform your workshop into a tidy haven by creating a DIY dust collector with an innovative twist: a pressure release valve. Utilizing readily available household items and fundamental tools, this inventive project is ideal for woodworking aficionados seeking to prolong the life of their shop vacuums’ filters. By connecting a vacuum hose to a bucket and establishing a distinctive circulation system, sawdust is effectively trapped at the bottom, maintaining crisp air quality and ensuring your equipment runs seamlessly. A homemade pressure release valve further optimizes performance, preventing suction loss and guaranteeing optimal operation. Follow this step-by-step guide to craft a budget-friendly solution for a cleaner, more efficient workspace, ultimately elevating your crafting experience.
Easy DIY Cyclone Dust Collector
Transform your workshop’s cleanliness and productivity by crafting a homemade cyclone dust collector, utilizing readily available materials like PVC pipe, a Home Depot bucket, and basic tools. This DIY project not only saves you money but also streamlines your workflow, ensuring a tidier and more efficient workspace.
Easy to Make Dust Collector
Transform your workspace’s cleanliness without breaking the bank by crafting a budget-friendly DIY dust collector using everyday items. By combining a low-cost vacuum cleaner with a plasterer’s bucket, you can create an effective miter saw dust capture system. A simple plywood lid ensures a snug fit, while modifications with PVC tape create airtight connections, maximizing suction power. This compact solution costs less than $15 and fits neatly under workbenches, significantly reducing airborne particles. Follow these creative steps to assemble your own dust management system, improving air quality and workshop tidiness without sacrificing functionality or aesthetics. Perfect for DIY enthusiasts seeking practical, cost-effective solutions to enhance their workspace.
Dust Collector in Less Than 20 Minutes With a Bucket
In under 20 minutes, create an astoundingly efficient DIY dust collector/separators using a humble bucket, spare vacuum parts, and some basic tools like a hot glue gun. This ingenious setup is tailor-made for woodworking enthusiasts, dramatically decreasing the amount of dust in your workspace. By cleverly cutting and attaching vacuum hose extensions to a bucket, this homemade cyclone dust separator successfully captures an impressive 99% of sawdust, thereby preserving your vacuum filter’s lifespan. With just a few essential materials – including a bucket with a lid, vacuum hose, and duct tape – this cost-effective solution is within reach. Simply follow this straightforward guide to safeguard your equipment and maintain a spotless workshop environment, leveraging items you probably already have at home.
Conclusion:
In conclusion, the DIY dust collector project offers more than just a practical solution for maintaining a clean workshop – it’s also an opportunity to refine your DIY skills through hands-on experience. As you gather materials, follow the step-by-step guide, and test your cyclone dust collector, each stage brings you closer to achieving a more efficient workspace. This comprehensive article aims to address any doubts or questions about the effectiveness of a homemade design compared to commercial options, as well as provide guidance on customization. Ultimately, implementing a DIY dust collector not only improves air quality but also enhances the overall woodworking experience. With these benefits in mind, there’s no reason to delay – start planning and building your DIY dust collector today to enjoy a tidier, healthier workspace.
