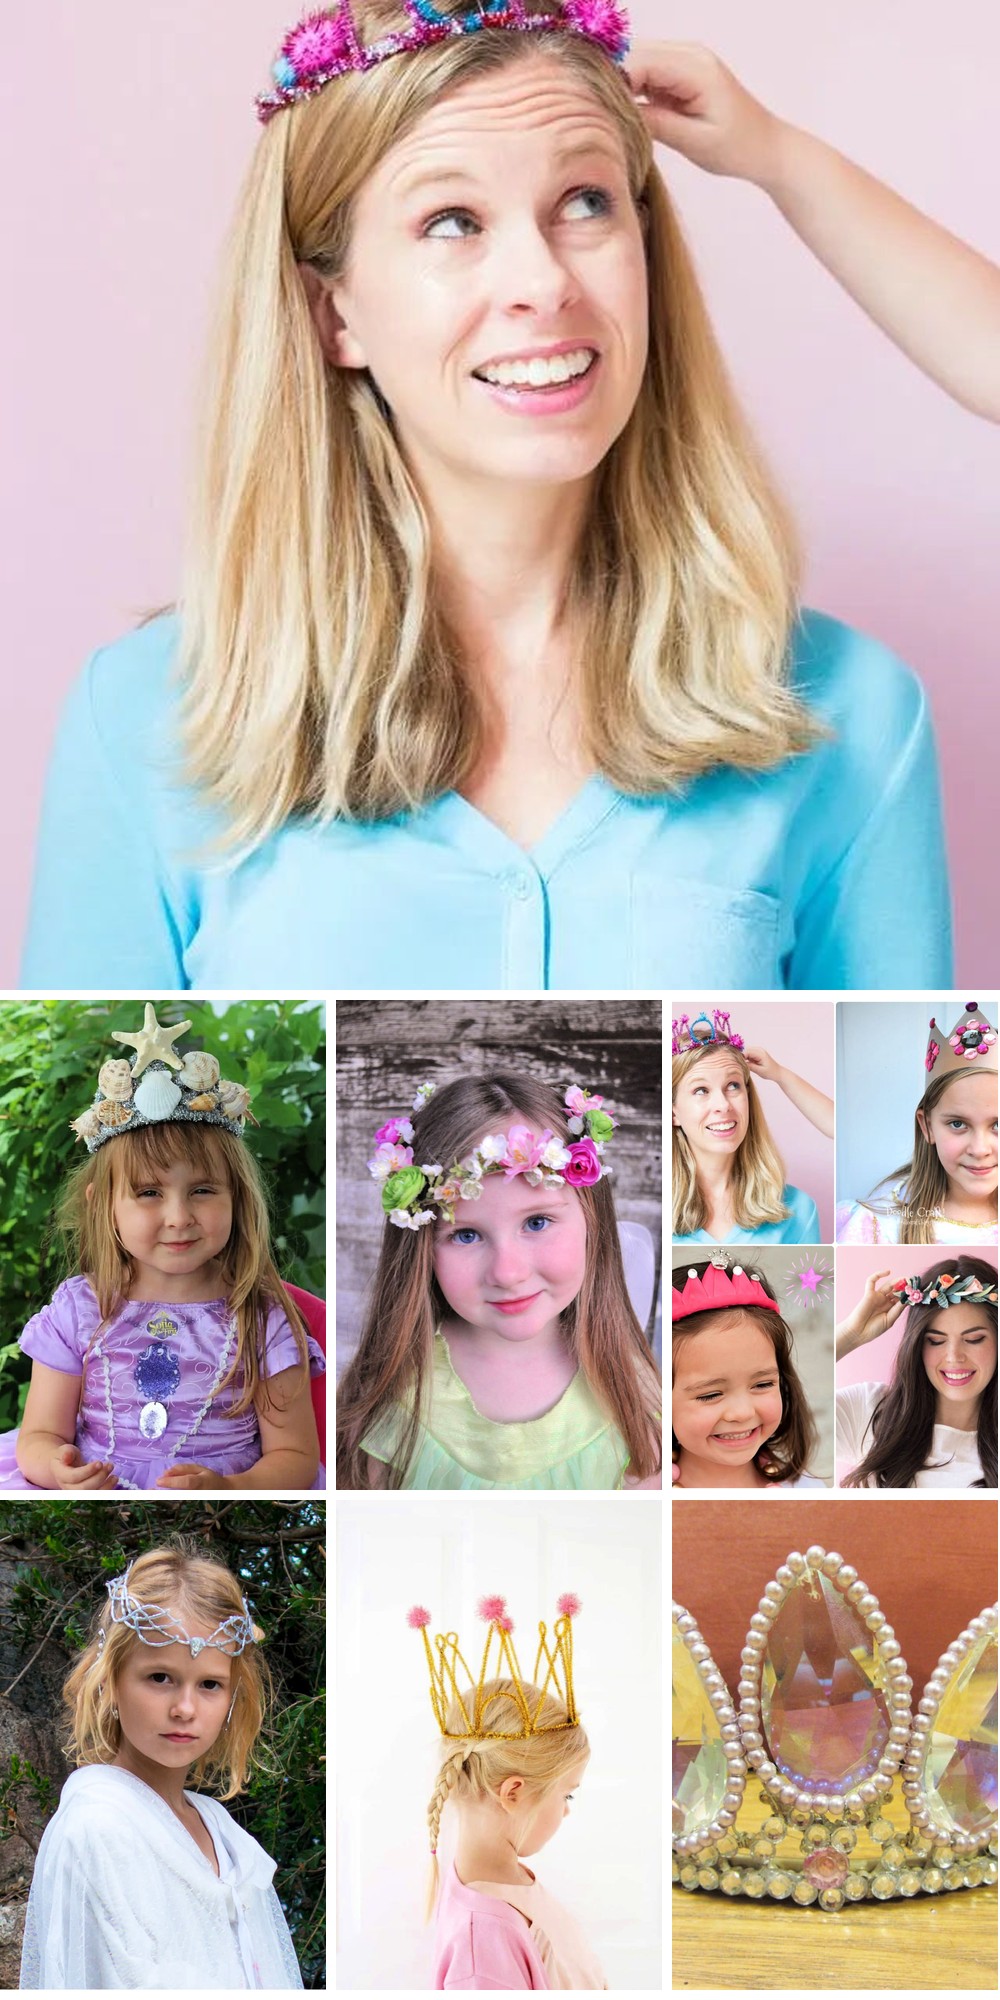
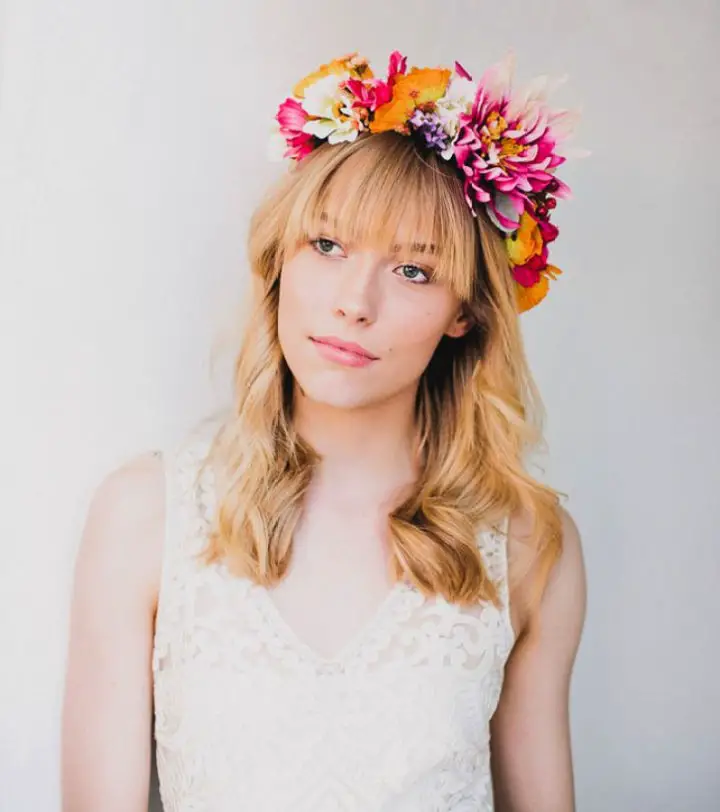
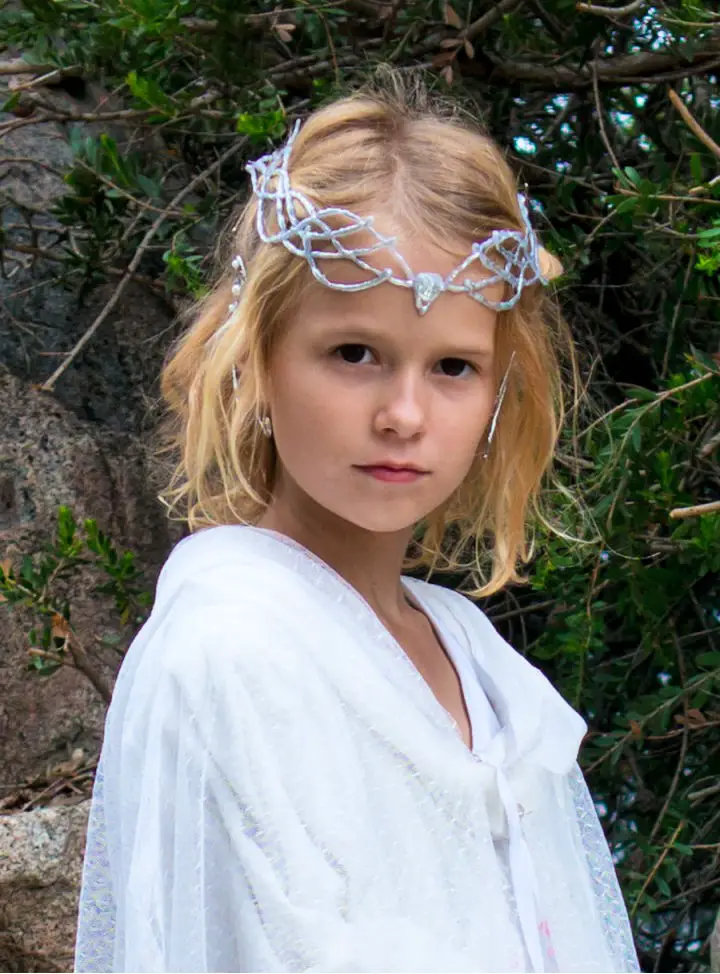
Crafting a DIY crown is an innovative way to express your creativity, offering a range of styles and inspirations to suit various tastes and skill levels. Our comprehensive guide presents 25 unique ideas, delving into the historical and cultural significance of crowns, expert tips, and sustainable material choices. With step-by-step instructions and maintenance advice, you’ll be guided through the process of creating your own masterpiece. Whether you’re a seasoned crafter or just starting out, our DIY crown project is the perfect opportunity to unleash your creativity and produce a truly one-of-a-kind accessory.
Historical and Cultural Significance of Crowns
Throughout history, crowns have served as potent symbols of power, authority, and prestige across diverse cultures and empires. Their significance extends far beyond mere ornamentation, as they often carry rich narratives and profound meanings that reflect the societal values and political dynamics of their time.
The Timeless Emblem of Leadership
Traditionally, crowns serve as a powerful symbol of authority, with their significance extending far beyond the realm of monarchy. Not only do they represent the sovereignty of a monarch, signifying their divine right to govern, but they also hold profound meaning in religious and secular contexts alike. In many faiths, crowns embody spiritual enlightenment and a connection to the divine, while in achievements, they mark milestones of victory and success, often featuring prominently in sports and pageants.
The Artistic and Cultural Journey
Artists have long been fascinated by the symbolism of crowns, depicting them in various mediums such as paintings and sculptures to convey distinct narratives. The iconic accessory has also captured the imagination of writers, appearing in numerous stories and legends where it serves as a metaphor for honor, bravery, or even a curse. Furthermore, in heraldry, crowns are often incorporated into family crests to signify lineage and valor, adding another layer of depth to this ubiquitous motif.
Expert Interviews and Tips on DIY Crowns
Crafting a DIY crown can be an incredibly rewarding experience, allowing you to create something unique and personalized. To help you achieve the desired result, consider these expert-validated guidelines: With attention to detail and a dash of creativity, you’ll be well on your way to crafting a stunning DIY crown that reflects your personal style.
Crafting with Purpose and Creativity
When crafting the perfect event accessory, it’s essential to consider the materials used. Experts recommend selecting materials that harmoniously align with the theme of your gathering. This thoughtful approach will help create a cohesive and memorable experience.
Beyond aesthetics, comfort is also crucial when designing a crown. A beautiful piece of headgear should feel as good as it looks. Ensure the design allows for a comfortable fit and doesn’t cause any discomfort while being worn.
To take your creation to the next level, don’t be afraid to add personal touches. Incorporate elements that reflect your personality or the occasion, making the final product truly unique and meaningful.
Learning from the Masters
To create stunning and meaningful DIY crowns, it’s essential to understand their rich history and master various crafting techniques. By following expert guides and tutorials, you can transform ordinary materials into extraordinary headpieces that not only showcase your creativity but also tell a story about the wearer’s personality. When it comes to upcycling, experts emphasize the importance of using recycled materials to create an eco-friendly crown that not only looks great but also promotes sustainability. Moreover, proper maintenance is crucial to ensure your crown remains in excellent condition for a long time. By storing it safely and handling it with care, you can enjoy wearing your beautiful DIY crown for special occasions or everyday wear.
Material Insights and Sustainable Options
For a sustainable DIY crown, it’s essential to consider the environmental implications of your material choices alongside their aesthetic appeal. A well-curated selection can yield not only a stunning final product but also a reduced ecological footprint. In this regard, we’ll explore the most eco-friendly options for crafting a beautiful and environmentally conscious DIY crown.
Understanding Crown Materials
When it comes to durability and aesthetics, the longevity of your crown hinges on the materials you select. While options like paper, fabric, and plastic each have their own advantages and disadvantages, they also vary in terms of lifespan and visual appeal. Paper, for instance, is a versatile and easy-to-work-with material that may not be as long-lasting, while fabric can provide both durability and a rich look. Plastic, meanwhile, offers a wide range of colors and shapes but raises eco-consciousness concerns. In contrast, opting for recycled or biodegradable materials can lead to a more sustainable approach. Recycled paper or cardboard, for example, can be just as sturdy and paintable as its new counterparts. Similarly, incorporating natural elements like flowers or leaves, along with biodegradable glitter, can add a unique touch without harming the environment.
Choosing Sustainable Materials
When crafting with eco-friendliness in mind, it’s essential to seek out high-quality recycled paper that can withstand the creative process of shaping and gluing. Not only does this reduce waste, but it also allows you to create something truly unique and beautiful. To further emphasize your connection with nature, incorporate natural embellishments such as seeds, dried flowers, or leaves into your design. These organic materials not only add visual appeal, but they also serve as a reminder of the beauty that surrounds us. Additionally, consider repurposing fabric scraps from old clothes or curtains to add texture and color to your crown. This upcycling approach not only reduces waste but also celebrates the potential for transformation and creativity.
Tips for Material Selection
When crafting a DIY crown, it’s crucial to consider the comfort factor of the materials you choose. Prolonged wear can be a concern, so ensure that the fabrics or textures you select are gentle on the skin. Additionally, align your material choices with the theme of the event or costume to create a cohesive look. For earthy themes, natural materials like leaves, flowers, or wood might be suitable, while glamorous events call for shiny fabrics like beads, sequins, or metallic threads.
Don’t be afraid to experiment and mix different textures and colors to create a one-of-a-kind crown. This approach not only yields a unique accessory but also contributes to sustainable crafting practices. By making thoughtful material selections, you’ll not only craft a stunning piece of jewelry but also reduce waste and promote eco-friendliness in your creative process.
How to Make a Crown – Step by Step Guide
Crafting a vibrant paper crown at home is an engaging and straightforward project that can be enjoyed by people of all ages. Whether you’re looking for a fun indoor activity, a unique party favor, or just a creative outlet, this step-by-step guide will walk you through the process of creating your own colorful paper crown using minimal supplies and maximum imagination.
Supplies Needed:
To create a vibrant and engaging visual representation of your ideas, you’ll need just a few basic supplies. Start by gathering multiple sheets of colorful paper, which will serve as the foundation of your design. In addition to these sheets of colored paper, you’ll also require some glue to bring everything together. If you’re looking to add an extra layer of customization to your final product, consider having a pair of scissors on hand to trim and shape your paper as needed.
Step 1: Prepare Your Paper
To create a visually striking and intricate crown, start by gathering various shades of colored paper. You can opt for a single hue or mix and match different colors to add depth and dimensionality. Next, fold each sheet of paper in half lengthwise, ensuring crisp creases that will help you shape the individual ‘petals’ of your crown. This simple step will lay the foundation for a stunning and one-of-a-kind accessory.
Step 2: Fold the Paper
To create the foundation of your origami design, start by folding the paper in half lengthwise. Next, fold the top layer down along the crease you just made, and then fold each corner inward towards the center. This will form the base of a triangle shape at the bottom of the paper. The key is to make sure these folds are sharp and precise, much like when crafting the initial folds for a paper airplane.
Step 3: Repeat the Folding
As you continue folding, it’s crucial to maintain consistency in the shape and dimensions of each paper. This uniformity will enable seamless connections between the folds when assembling the final product.
Step 4: Make the Crown Shape
To create the crown, start by applying a small amount of glue along the edge of one triangular paper, then carefully attach it to an adjacent triangle. Continue this process, linking each triangle together in a continuous chain, gradually increasing the circumference as needed, until you achieve the desired shape.
Step 5: Customize Your Crown
Elevate the majesty of your crown by incorporating bespoke embellishments. Delight in creative freedom as you cut out diamond shapes from a variety of colored papers or utilize stickers and sequins to add a touch of whimsy. Strategically place these decorations at the tips or around the base of the crown, allowing the regal essence to shine through.
Step 6: Finalize the Crown
To complete your masterpiece, first secure the connected ends of the paper strips by applying generous amounts of adhesive. This will create a sturdy and cohesive circle. Allow the bond to set for several minutes before handling the finished crown.
Video Tutorial
A fun and easy way to bring out the monarch in you is by creating a paper crown. For a step-by-step visual guide on how to make one, check out this helpful video tutorial from DIY Kids Craft: Make a Paper Crown Tutorial. The combination of written instructions and visual guidance makes it easier to grasp folding techniques and brings the craft to life. With just a few basic supplies and simple steps, you can create your own colorful and customizable paper crown perfect for playtime, parties, or royal-themed celebrations.
Occasion-Specific Designs
When it comes to creating custom crowns for special events or milestones, the possibilities are endless. You can tailor your design to match the theme, tone, and style of the celebration, making each piece a unique reflection of the occasion. To incorporate occasion-specific designs into your DIY crown project, consider the following tips:
Design Ideas for Every Occasion
When it comes to crafting unique headpieces, consider offering elegant designs featuring pearls and lace for wedding celebrations. For birthdays, suggest playful and vibrant options using materials like felt and sequins that match the birthday person’s personality. Music festivals are another great opportunity to create bohemian-inspired crowns with flowers, ribbons, and other whimsical elements, allowing readers to express their individuality and flair.
Customization Tips
To take your DIY crown game to the next level, encourage readers to get creative with personalization. Suggest they match their crowns to their outfit or the event’s theme, adding an extra layer of flair to their overall look. For added durability, offer practical tips on how to construct a crown that can withstand wear and tear throughout the event. It’s also essential to prioritize comfort, reminding readers to ensure their crown is gentle against their skin, especially for longer events. By showcasing user-generated content and unique designs, you’ll not only enhance your DIY crown post but also foster a sense of community among crafty enthusiasts.
Maintenance and Storage Advice for DIY Crowns
To preserve the sentimental value of your DIY crown, proper maintenance and storage are crucial. By following these guidelines, you can ensure your crown remains in great condition and is treasured for years to come.
Keeping Your Crown Pristine
To maintain the integrity of your crown, begin by cleaning it gently with a soft brush or cloth to remove any dust or debris that may have accumulated since its last wear. When choosing a cleaning method, be cautious not to expose your crown to harsh chemicals, which can potentially damage delicate materials. In fact, avoid using any chemicals altogether and instead opt for a gentle, chemical-free approach.Once cleaned, store your crown in a cool, dry environment, away from direct sunlight, as this can cause colors to fade and materials to weaken over time. To provide optimal protection, consider placing it in a sturdy box or bag that will prevent the crown from being crushed or bent.
Longevity Tips
To preserve the integrity of your handmade crown, it’s crucial to keep it away from moisture. This is especially important if your crown features natural elements like flowers or foliage. If applicable, take the time to dry these components first. A moisture-free environment will prevent mold and deterioration, helping your crown remain in top condition. In addition to avoiding moisture, regularly inspect your crown for signs of wear and make any necessary repairs. By staying proactive, you’ll be able to extend its lifespan and enjoy it for years to come.
FAQs About DIY Crown
Discover the simplicity of creating a DIY crown from scratch. Our FAQ guide is designed to address all your burning questions, providing you with a step-by-step roadmap to crafting a stunning and unique piece that reflects your personal style.
What materials are best for making a DIY crown?
When selecting materials for your project, prioritize a combination of durability, visual appeal, and user-friendliness. While paper, fabric, and plastic remain common options, don’t overlook more sustainable alternatives such as recycled paper or natural embellishments that not only benefit the environment but also add unique character to your creation.
How can I make my DIY crown stand out?
Elevate your crown game by incorporating distinctive embellishments that showcase your personal style or tie in seamlessly with the occasion’s aesthetic. Beads, sequins, and LED lights are all viable options to add a dash of flair, while carefully curated color palettes and patterns can further amplify the impact.
Can I make a DIY crown if I’m not crafty?
To get started, don’t worry if your first designs aren’t perfect – there are numerous straightforward tutorials online that walk you through each stage of the process. Begin with a simple design, then gradually move on to more intricate ones as your skills and confidence grow.
What’s the best way to size a DIY crown?
To determine the correct size for your headpiece, measure the circumference of your head at the point where you envision the crown sitting comfortably. Consider adding an extra inch to accommodate any overlap that may occur when closing the piece, whether through the use of a fastening mechanism or adjustable ribbon ties. This will ensure a secure and comfortable fit.
How do I attach decorations to my crown securely?
When it comes to securing heavier decorative elements within your DIY wreath, it’s essential to employ a robust fastening method that can withstand the weight and potential movement of these components. A reliable adhesive like hot glue or craft glue can provide a strong bond, but for more substantial items, consider supplementing this with an internal reinforcement system. This might involve threading wire or thread through the base of the crown to create a sturdy anchor point, ensuring your decorative elements remain securely in place.
Are there any quick DIY crown ideas for kids?
For an effortless yet creative activity, kids can transform plain crowns into regal headpieces by using pre-cut templates to create their own paper masterpieces. Alternatively, they can take it up a notch by decorating pre-made foam crowns with vibrant stickers and markers, unleashing their imagination and artistic flair.
How can I make a floral crown last longer?
To ensure your flower crown remains vibrant and fragrant throughout the celebration, opt for fresh, high-quality blooms. Store them in the refrigerator until you’re ready to adorn yourself with them. If you prefer a more durable and long-lasting option, consider silk flowers as a beautiful keepsake.
What are some eco-friendly alternatives for crown materials?
When it comes to reducing waste, one effective approach is to opt for eco-friendly alternatives that can be easily decomposed or recycled. Consider seeking out biodegradable materials, such as paper products, natural fiber-based goods, or even repurposing items you already have at home. This not only helps minimize the environmental impact of your purchases but also encourages creative problem-solving and resourcefulness.
How do I store my DIY crown after wearing it?
To ensure the optimal preservation and quality of your item, store it in an environment that is characterized by a consistent temperature between 60°F to 70°F (15°C to 21°C) and relative humidity levels below 50%. Additionally, it’s essential to shield your item from direct sunlight, which can cause fading or discoloration. To maintain its original shape, place the item flat or on a specialized head-structured holder.
Can I make a DIY crown for a special occasion like a wedding?
Crafting a regal and refined crown requires more than just a collection of luxurious materials – it’s about embracing your creative spirit and allowing yourself to have fun with the process. While lace, pearls, and semi-precious stones can undoubtedly elevate the occasion’s formality, the true key to success lies in your ability to think outside the box and let your imagination run wild.
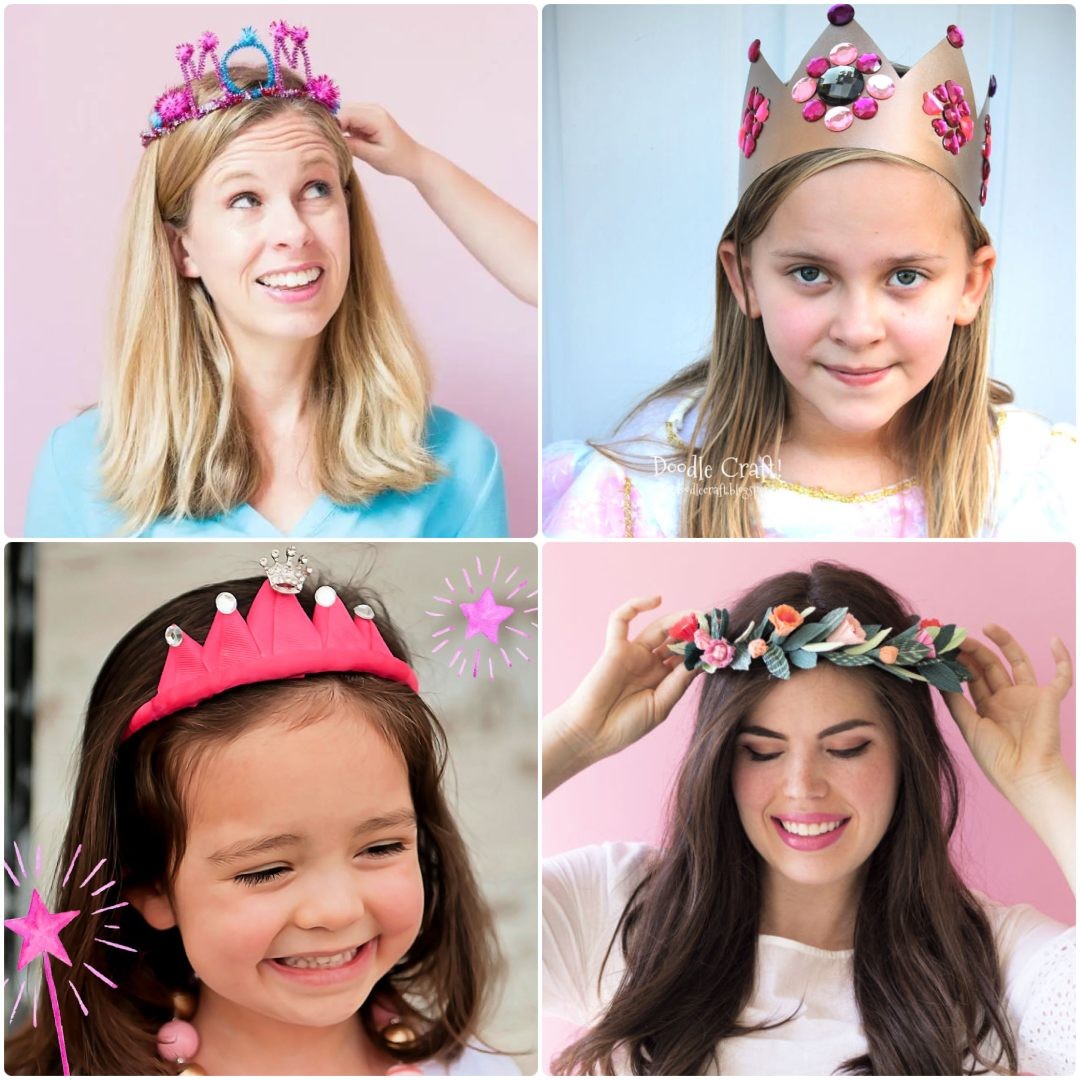
25 Creative DIY Crown Ideas to Make at Home
Transform your creativity into wearable art with an array of 25 innovative DIY crown designs that can be crafted in the comfort of your own home. Whether you’re looking to elevate a special occasion or simply express yourself, these unique crowns offer endless possibilities to get creative and make something truly remarkable.
How to Make a Crown for Mom
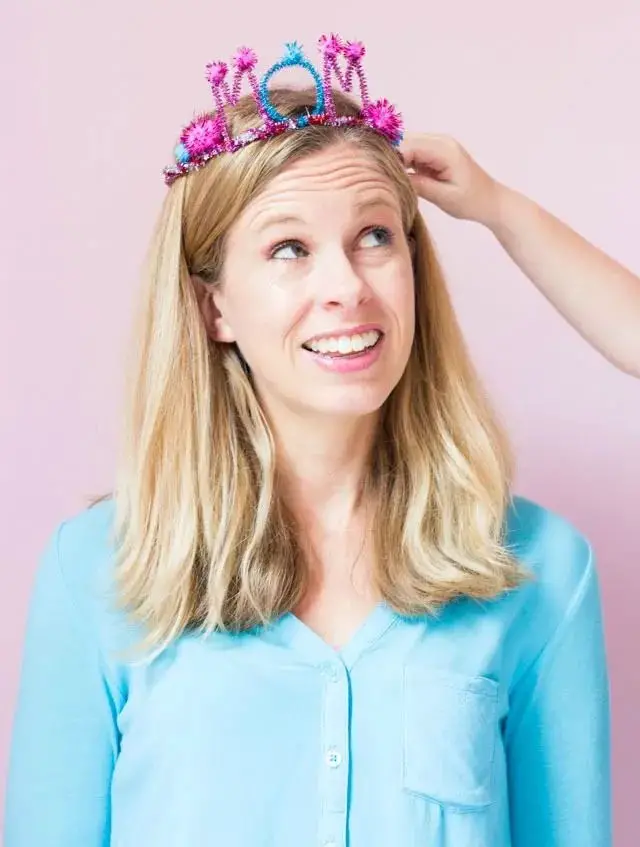
Create a one-of-a-kind Mother’s Day gift by crafting a DIY crown together with mom or the kids. This handmade treasure is sure to make mom feel like royalty, and it’s surprisingly easy to make. Simply start by twisting two chenille stems into a circle, then braid three longer ones together to form the base of the crown. Add some personalized flair by shaping additional chenille stems into letters that spell out ‘MOM’, securing them to the base with a little creativity and some hot glue. Finish it off by adding some sparkly pom-poms for an extra touch of glamour. The end result is a truly special and unique gift that mom will treasure on her special day.
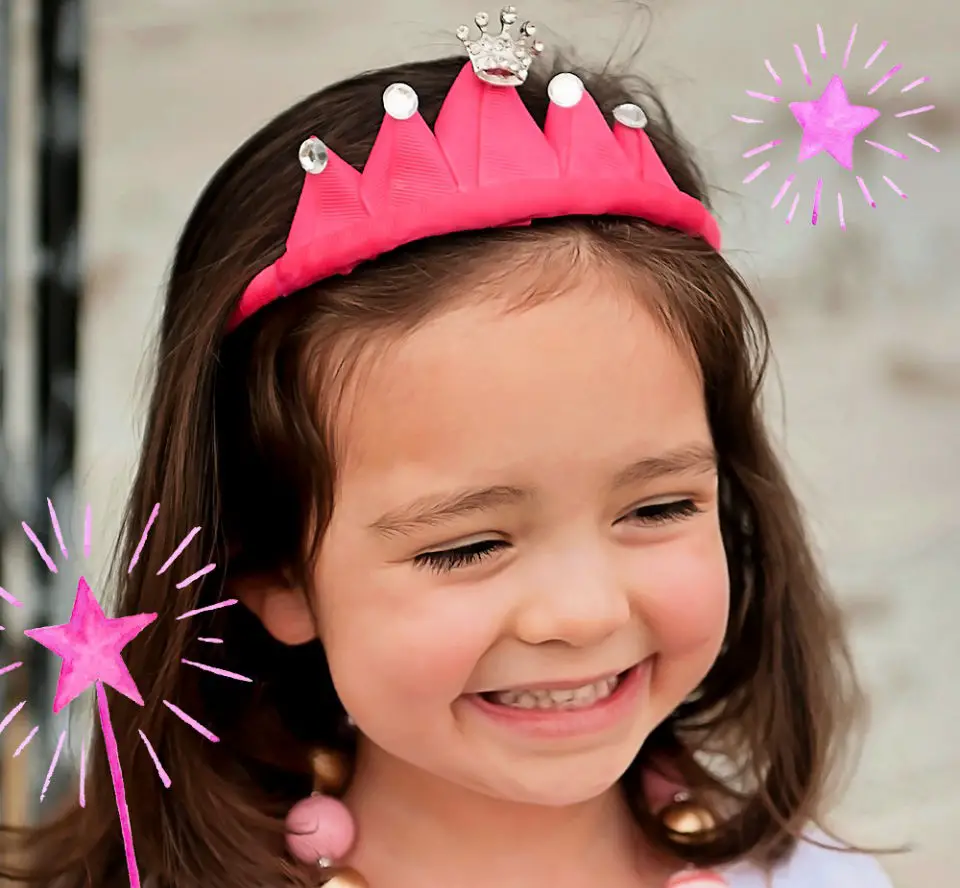
Handmade Princess Crown
Transform your little princess’s imaginative play with these intricately designed DIY crowns, crafted with gold glitter ribbon for a touch of sparkle without the mess. Unlike flimsy plastic alternatives, these regal creations are built to withstand hours of dress-up and play, thanks to their durable design. While a Cricut Maker can make the project easier, it’s also achievable by hand. Simply download the crown template, cut the glitter material, and secure it to a soft, flexible white headband using hot glue. The clever tabs ensure a secure fit, keeping the crown in place during playtime. Your child will adore wearing this crown for special occasions like birthday parties or simply as a way to add a touch of whimsy to their imaginative play.
Making a Pipe Cleaner Crown
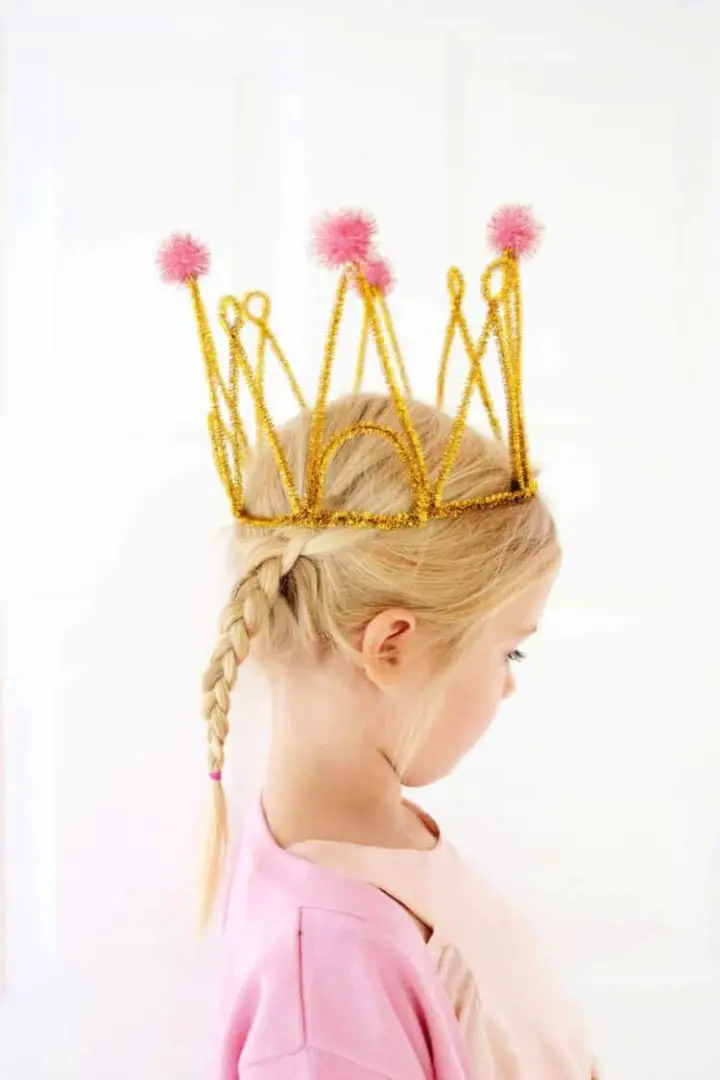
Get ready to shine with a DIY pipe cleaner crown that’s perfect for any occasion! With just a few simple materials – colored pipe cleaners and a glue gun – you can create a sparkly, adjustable crown that’s sure to delight kids and adults alike. This craft is great for birthdays, showers, or as a fun photo booth prop. Kids will love getting creative and helping with the project, making it an excellent way to encourage imagination and self-expression. Pipe cleaners are incredibly versatile and affordable, making them a fantastic addition to your craft supplies. The possibilities are endless – from spooky Halloween designs to Disney-inspired masterpieces. Just remember that pipe cleaners aren’t the most durable material, so it’s best to display your crown on a table or shelf to keep it looking its best for as long as possible. Let your child’s imagination run wild with this delightful and easy DIY craft!
DIY Paper Crown for Birthday Party
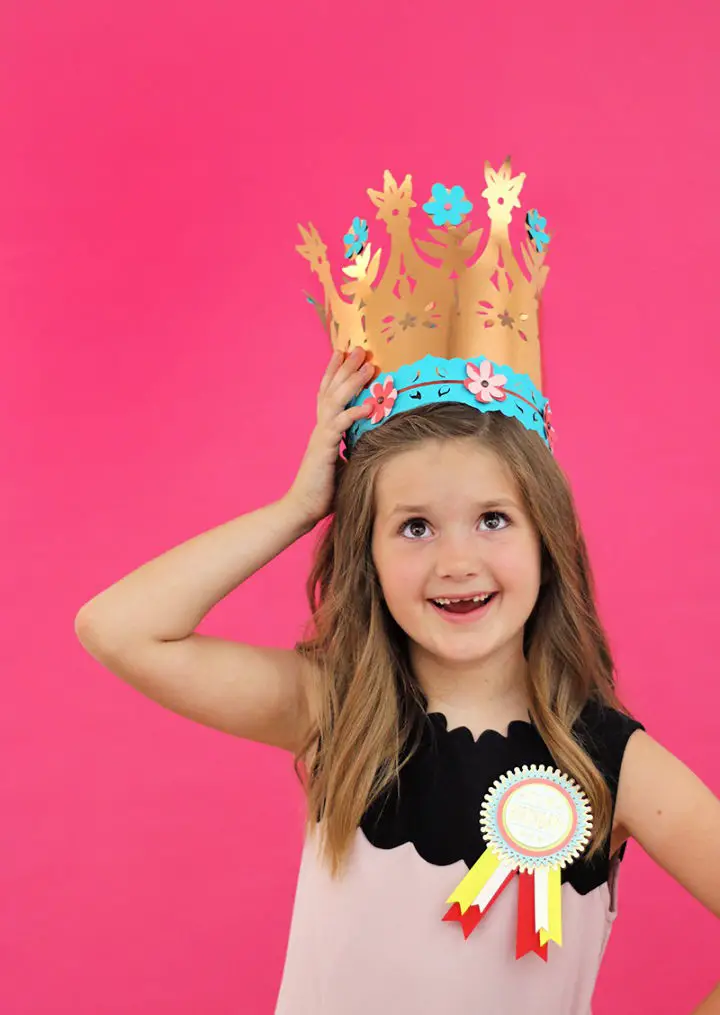
Create an unforgettable birthday celebration for your child by crafting a one-of-a-kind DIY paper crown. This step-by-step guide will walk you through the process of making a custom crown using colored cardstock, basic crafting supplies, and even offers downloadable templates in two sizes to suit your needs. If you’re fortunate enough to have an electronic cutting machine, it’ll simplify the process, but don’t worry if not – sharp scissors and a craft knife will do the trick. Simply cut out the crown and band pieces, then glue them together to form a long strip, securing the band to the last of the crown. And just like that, your base crown is complete! The real fun begins with decorating – add rhinestones, glitter, or washi tape to give it a personalized touch and make it truly unique for your child’s special day. Let your imagination run wild and create an unforgettable birthday experience with this project.
Make Your Own Silk Flower Crown
Transform your garden party into an enchanting affair by crafting a show-stopping silk flower crown. With endless customization options, you can create a unique piece that exudes elegance and charm. To get started, gather your supplies – including silk flowers, floral wire, floral tape, and scissors. Begin by shaping the wire around your head to form the foundation of your crown. Trim the flower heads and secure them to the frame using floral tape, ensuring they all face forward in harmony. As you build upon this base, add medium-sized blooms followed by statement flowers and fillers, carefully filling any gaps with additional blooms to achieve a lush, full appearance. Finally, reinforce any loose elements to ensure your masterpiece remains intact. This stunning flower crown is perfect for a spring or summer celebration, allowing you to reign supreme like the queen of the garden.
Cool Ribbon Princess Crown Headband
Transform into royalty with this enchanting handmade DIY ribbon princess crown headband. Using a grosgrain-wrapped hard headband and 7/8 inch ribbon, craft a stunning accessory fit for a princess. Start by cutting and folding the ribbon to create points for the crown, securing them with hot glue. For a sleek finish, seal the edges using a lighter. Position the largest point at the center of the headband, then attach the remaining points on either side. Add a touch of elegance by securing the points in place with a strip of ribbon along the bottom edge. To take it to the next level, adorn the points with rhinestones for an added flourish.
How to Make Mermaid Tiara at Home
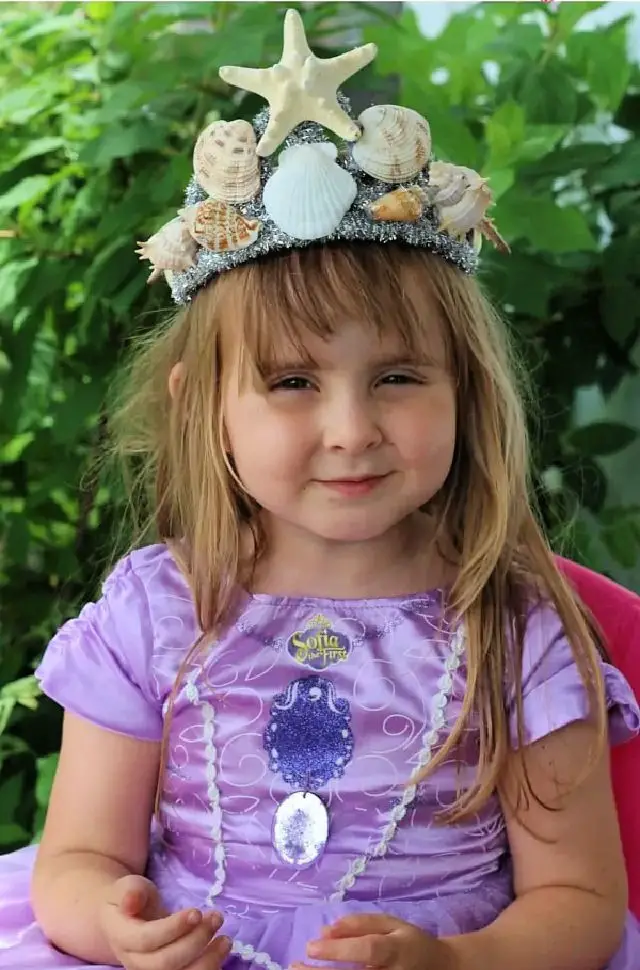
Transform your little one’s creative spirit into a sparkling work of art with this DIY Mermaid Tiara project! With just a few simple materials like pipe cleaners, hot glue sticks, and seashells, you can turn a plain plastic crown into a regal mermaid tiara that’s truly fit for a queen. By following our easy step-by-step guide, your child will have a blast wrapping the tiara with colorful pipe cleaners and attaching the seashells to create a one-of-a-kind masterpiece that they’ll be proud to call their own. Whether it’s for a Halloween costume, a beach trip, or a magical day at Disney, this mermaid tiara is sure to make your child feel like royalty.
Easy-to-Make Flower Crown for Kids
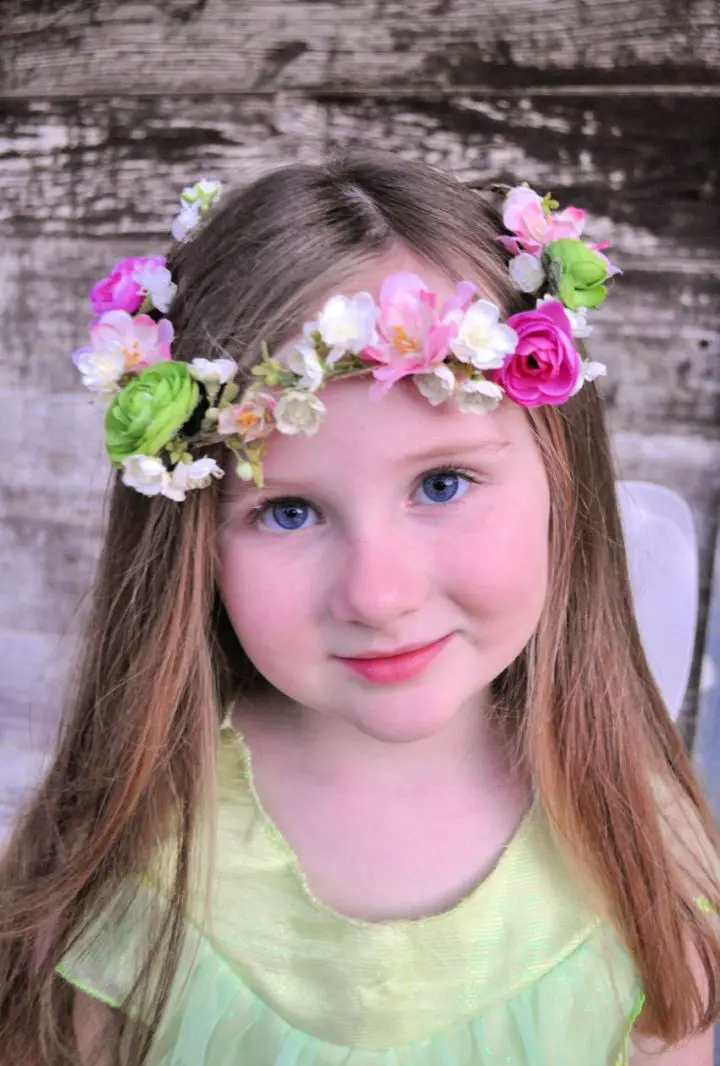
Bring out your child’s inner fairy with a whimsical DIY flower crown that’s as easy to create as it is adorable! This craft project is perfect for kids’ costume parties, bohemian-inspired outfits, or simply adding a touch of magic to their everyday look. Start by wrapping twine around the desired head size, creating a comfortable and natural base. Then, secure the small flower strands with glue, weaving in additional blooms and stems as you go. With just a few minutes of effort, your little fairy princess will be donning a radiant floral crown that’s sure to bring a smile to her face and a twinkle to her eye.
DIY Galadriel Crown Using a Glue Gun
Transform ordinary materials into extraordinary accessories using our DIY crowns guide. Let your creativity shine by crafting a captivating Galadriel-inspired crown using nothing but a glue gun, Deco Foil transfer sheets, and some sparkle! This step-by-step guide provides everything you need to create an elegant crown that complements any elf costume or cosplay perfectly. With the right materials and affiliate links, you can elevate your Galadriel costume to new heights and add an extra touch of magic with a jewel and bobby pins.
DIY Queen Crown for a Princess
Unleash your child’s inner royalty by transforming them into a majestic queen with this easy DIY king crown project. Start by obtaining a plastic strip from your local dollar store, which will serve as the foundation for your regal headpiece. To create the crown’s unique spikes, draw uneven shapes on the strip and carefully cut them out. Next, use a strong adhesive to bring the spikes together, forming the crown’s structure. Once the glue is dry, give the crown a luxurious gold makeover by spraying it with paint and allowing it to dry before adding additional coats as needed. For an added touch of glamour, incorporate plastic rhinestones into the design using hot glue. With these simple steps, you’ll be able to create a stunning crown fit for a queen that your child will love wearing. So why not join in on the fun and get crafting today?
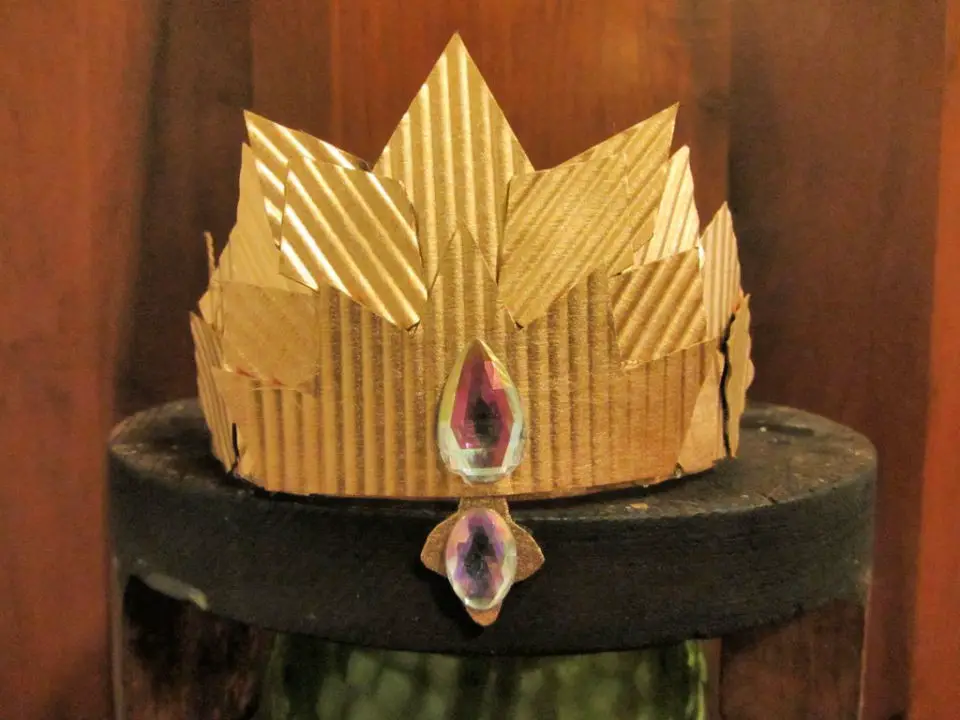
Easy DIY Cardboard Paper Tiara
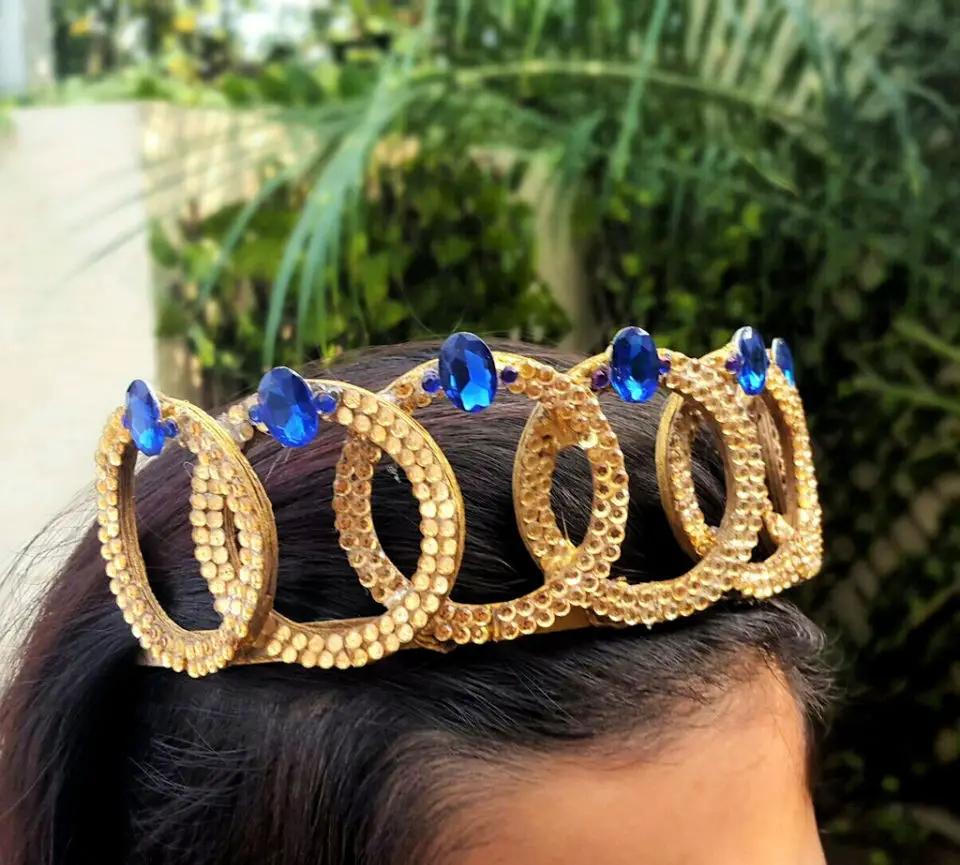
To create a one-of-a-kind DIY cardboard paper tiara, begin by collecting a range of materials including cardboard, white glue, hot glue, gold spray paint or acrylic paint, and an assortment of stones – such as gold and dark blue iron-iron stones or alternative options. Sapphire blue crystal stones can also be used to add a touch of luxury. Additionally, you’ll need a metal hairband, super glue, and some creativity. Start by applying white glue to a cardboard ring and stacking another ring on top, repeating the process until you have ten rings in total – though feel free to adjust this number based on your desired tiara design. Allow the rings to dry completely before decorating them with gold and dark blue stones as well as sapphire blue crystal stones for an added touch of elegance. Once your rings are decorated, attach them to the metal hairband using hot glue, securing them further with super glue for durability. Finally, give your tiara a regal finish by spraying or painting it with gold paint. With these simple steps and some imagination, you can craft a unique cardboard paper tiara perfect for any special occasion.
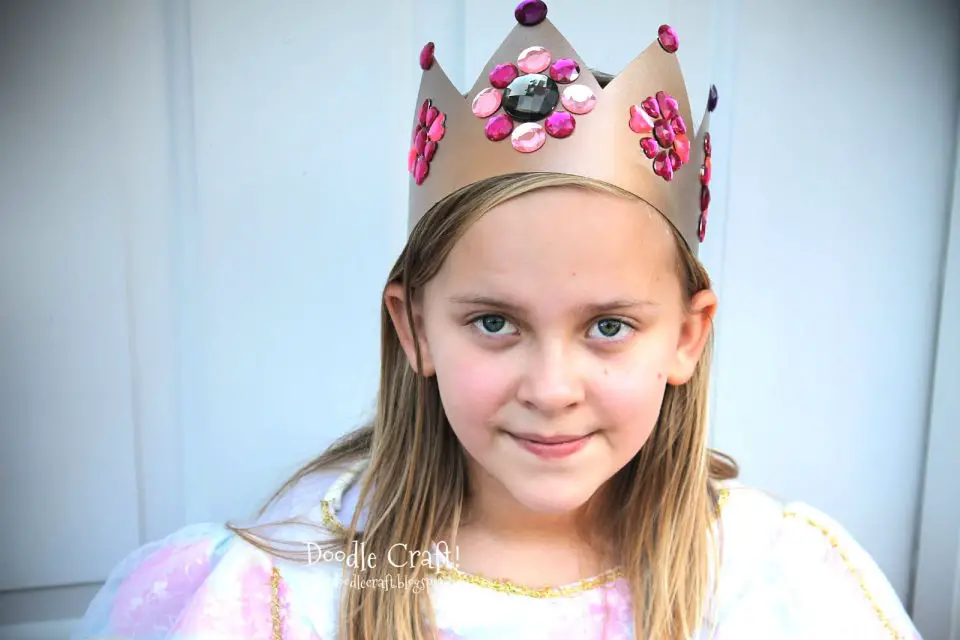
Make Your Own Princess Paper Crowns
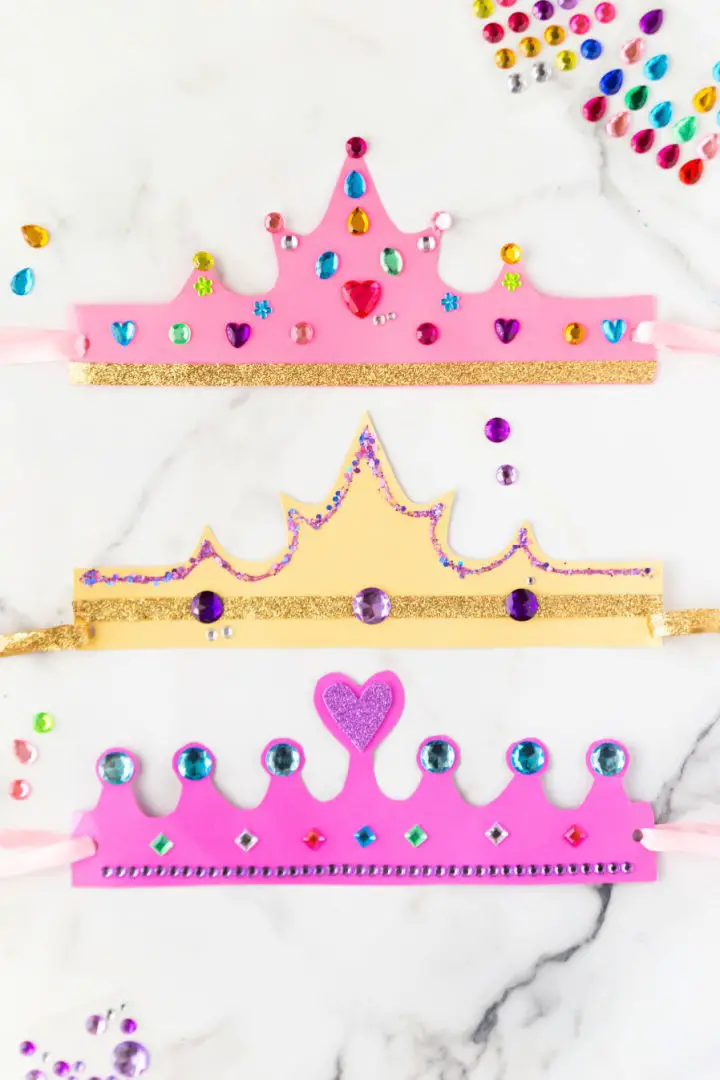
Let your imagination run wild and create stunning DIY crowns that will make any princess feel like royalty. With our easy-to-follow guide, you can craft breathtaking headpieces for princess parties, festive events, or even everyday dress-up play. Simply print and cut out the crown shape on colored paper using our provided template. Then, unleash your child’s creativity by decorating the crowns with a variety of materials like markers, crayons, adhesive gems, and rhinestones. Add a touch of elegance with a long ribbon threaded through the punched holes on the sides of the crown, and you’re ready to rule the kingdom in style. These versatile DIY crowns are perfect for slumber parties, dress-up play, or any occasion where creativity and fun come together. So why wait? Get inspired and start making your own princess crowns today!
Free Felt Tiara Sewing Pattern
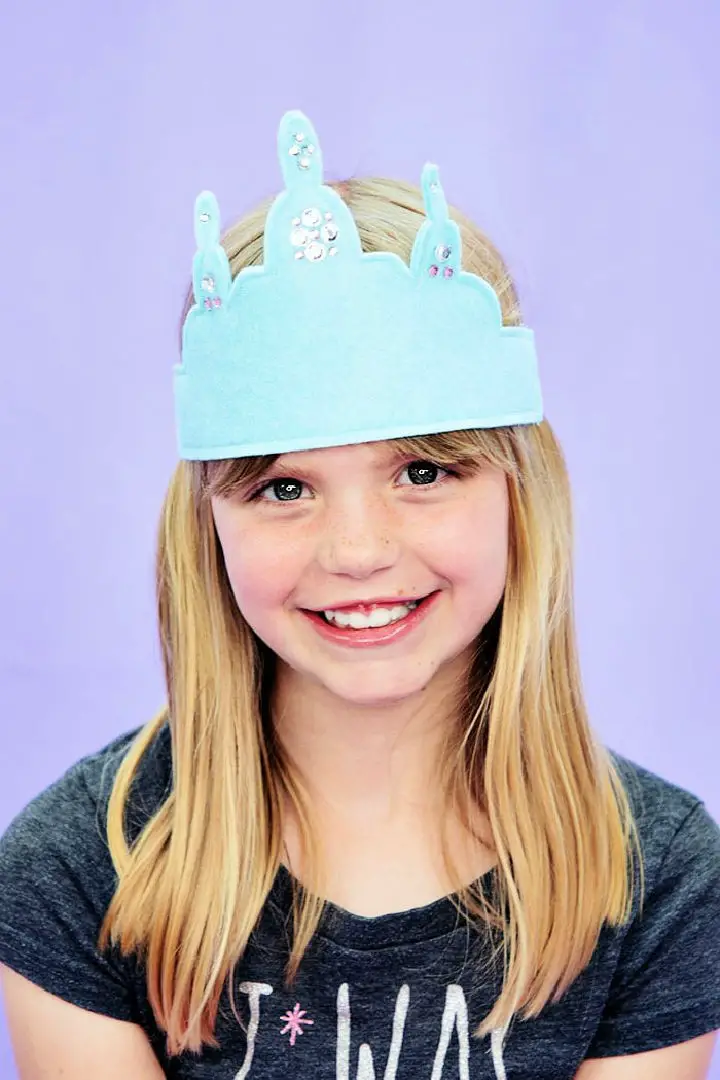
Transform your little one’s imaginative play into a regal experience with this delightful DIY tiara tutorial. This project is perfect for crafting enthusiasts of all skill levels, offering endless possibilities for customization using various materials like felt, craft foam, cardboard, or cardstock. The tiara can be easily folded flat for storage, making the felt version a convenient choice. Gather your materials, including a 12 by 12 piece of felt, iron-on interfacing, fold-over elastic, crystals or jewels (optional), and essential sewing tools.
Cut out the crown pieces using the provided pattern, then bring the tiara to life by sewing or using a glue gun. Add a touch of elegance with desired embellishments like HTV, embroidery, or beads. Finally, attach the elastic strips to make the tiara wearable, allowing your child’s inner royalty to shine.
DIY Real Daisy Flower Crown
To create a charming daisy chain crown using real flowers, follow this easy DIY tutorial that requires no special materials other than the flowers themselves. This guide is perfect for making not only crowns but also necklaces or bracelets by combining flower stems in a simple braiding technique that can be easily taught to kids. When selecting flowers, opt for those with soft and flexible stems like daisies, dandelions, or other non-endangered wildflowers. Begin by crossing three flowers together and start braiding by alternating the stems. Continue adding more flowers as you go along to achieve your desired length. Finish the crown by braiding the remaining ends together and tucking them in. Wear your beautiful flower crown with pride and let your creativity flourish!
How to Do Elsa Frozen Tiara

Elevate your style with a DIY Elsa-inspired frozen tiara that’s sure to make you feel like royalty. This easy-to-follow guide will walk you through the process of creating a breathtakingly beautiful headpiece reminiscent of Frozen’s iconic princess, Elsa. To get started, gather your materials: waxed paper, a glue gun, metallic gold spray paint, blue faceted aqua-colored beads, wire cutters, floral wire, a plastic hairpiece comb, scissors, and a Xacto knife. You’ll have the option to either sketch out your tiara design on a reference photo, ensuring symmetry and attention to detail, or use the provided PDF template for added convenience. Whichever method you choose, secure it to waxed paper or felt, depending on your preference, and begin crafting your masterpiece. With these simple steps, you’ll be well on your way to creating a stunning tiara that’s sure to turn heads and make you feel like an ice queen.
Homemade Spider Crown Tutorial
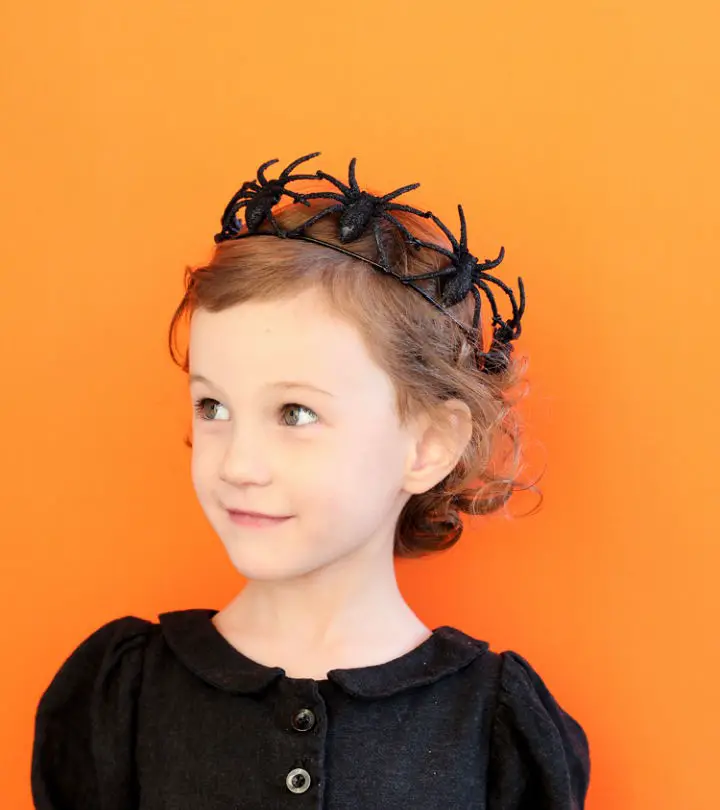
Transform your Halloween look with this DIY spider crown that adds a touch of magic to any costume or festive attire. This versatile accessory can be worn to complement various getups or as a standalone celebration of the holiday season. Crafted using black 12-gauge wire, black tape, large plastic spiders, and hot black glue, this spider crown is a simple yet striking project that’s sure to turn heads. Start by creating a wire crown that fits comfortably on your head, then attach the spiders using hot glue, connecting their legs to add strength and stability. Whether you’re dressing up for a party, heading to work, or handing out treats, this arachnid-inspired crown will make you feel like royalty. So why not embrace your spooky side with this fun and easy Halloween project? Get ready to cast a spell of style and sophistication!
DIY Perler Bead Crown for Kids
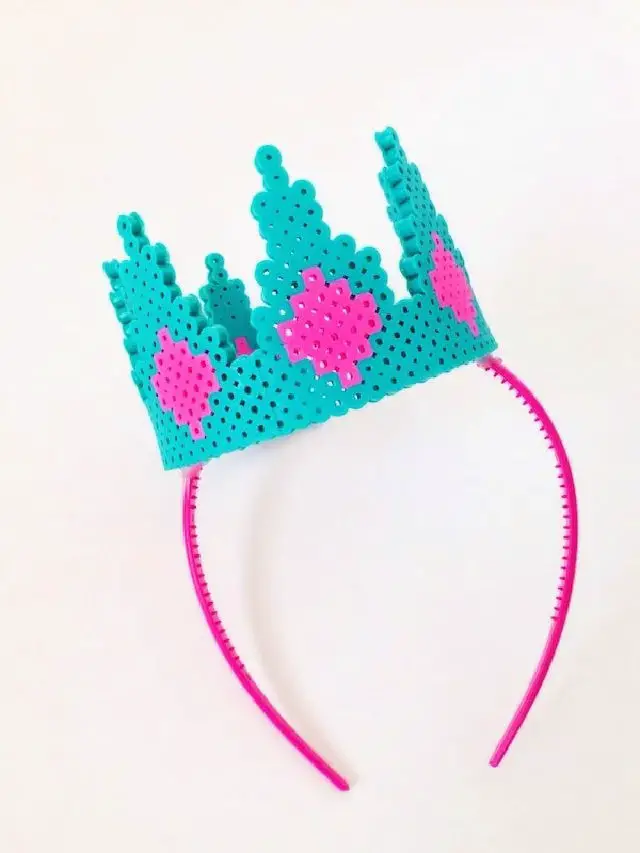
Unleash your inner artist and create a unique perler bead crown fit for royalty! This DIY project is perfect for kids’ parties, dress-up play, or simply adding a touch of magic to their daily routine. With minimal skill required, you’ll need a large perler bead board, parchment paper, an iron, a tin can, tape, a headband, and your favorite glue to bring this imaginative masterpiece to life.
Start by designing the pattern on the bead board, then use heat to fuse the beads together. Next, shape the crown around the tin can, securing it with tape as you go. Allow the design to cool before gluing it onto a headband and voila! You’re ready to reign supreme.
These crowns also make fantastic party hats or princess accessories. Give this engaging craft a try and keep the kids entertained all summer long.
How to Make a Paper Flower Crown
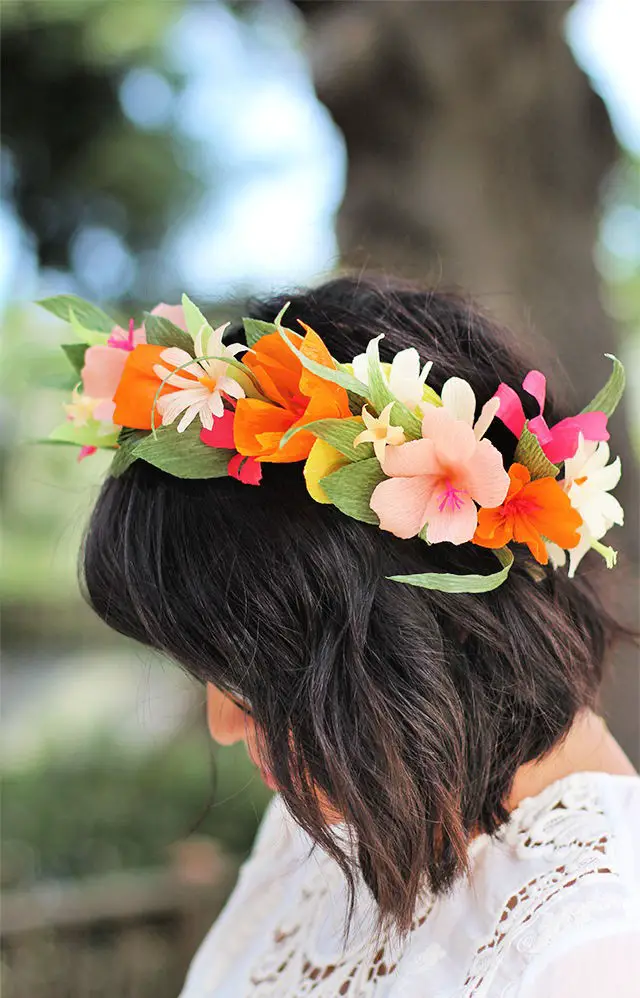
Transform yourself into a one-of-a-kind royal by crafting an extraordinary DIY paper flower crown that’s fit for a queen! This comprehensive guide will walk you through the process of creating a larger-than-life, show-stopping version of the crown perfect for weddings, festivals, or Midsummer celebrations. With high-quality crepe paper in an array of colors, wire, glue, and optional beeswax, you’ll be able to craft intricate flowers like daisies, poppies, bell flowers, and delicate leaves that seem almost lifelike. The added wax coating provides a realistic touch and durability, ensuring your crown remains a treasured accessory for years to come. Complete with a customizable closure, this crepe paper flower crown is the perfect accompaniment to any special occasion. Join us on this creative journey as we delve into expert tips and tricks, allowing you to unleash your inner artist and let your imagination run wild!
Making a Pipe Cleaner Tiara Crown in 10 Minutes
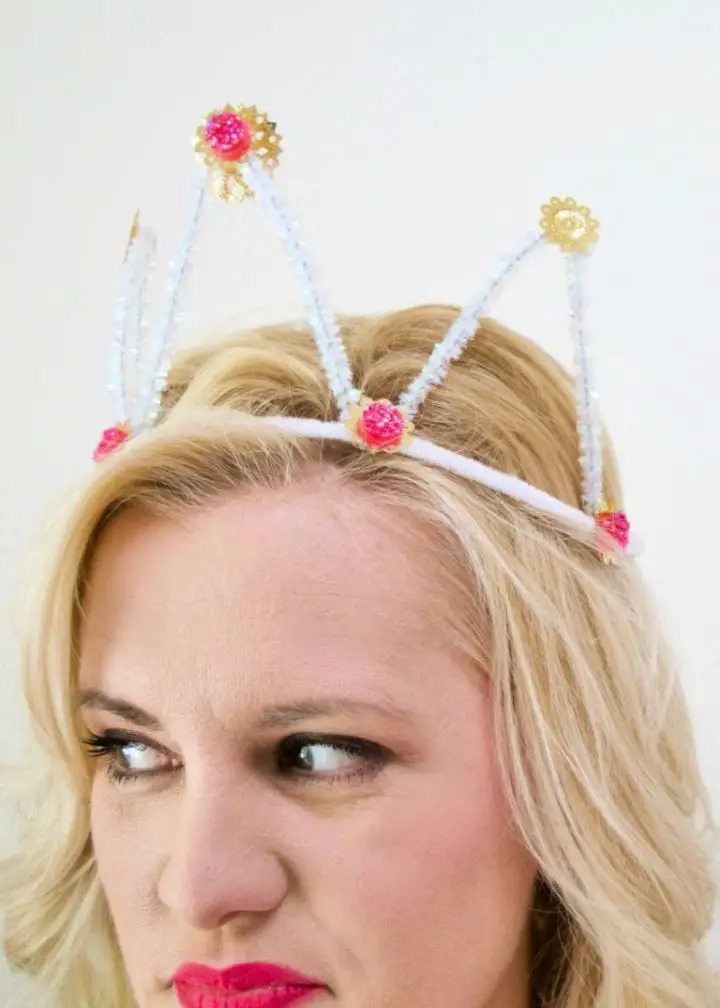
Crafting a dazzling DIY pipe cleaner tiara crown requires minimal supplies and mere minutes of your time. With a simple setup of smooth white and sparkly pipe cleaners, scissors, a hot glue gun, sequins, and gemstones, you can create an impressive headpiece in no more than 10 minutes. Begin by shaping the smooth pipe cleaners into a circular base for the crown, followed by molding the sparkly ones into pointed shapes that secure to the foundation using hot glue. Embellish your masterpiece with sequins and gemstones to give it an extra touch of glamour. This tiara crown is ideal for any occasion – whether you’re watching the royal wedding, hosting a princess party, or simply want to feel like royalty while tackling daily tasks.
DIY Paper Spring Floral Crown

As spring awakens, let your creativity flourish by crafting a breathtaking DIY paper floral crown. This delightful project adds a whimsical touch to any special occasion. By combining stem wire, floral wire, crepe paper in various hues, and a hot glue gun, you can create a stunning crown adorned with delicate buds, flowers, and leaves. The step-by-step guide walks you through building the crown base, crafting paper floral elements, and adding them to the final piece. For an extra layer of elegance, you can even paint patterns on the leaves and buds. Whether you’re preparing for a celebration or simply seeking to embody the spirit of spring, this project brings a touch of nature’s beauty to your overall ensemble.
Creative Glinda Tiara
Transform your space into a whimsical kingdom with this DIY Glinda-inspired tiara. By combining thin cardboard or cardstock, scissors, a downloadable pattern, a headband, hot glue, a paper crimper, and gold metallic spray paint, you can craft a magical accessory that’s sure to delight. If you’re feeling extra fancy, add some iridescent rhinestones for an added touch of sparkle. Optional gold ribbon details can also be incorporated to further elevate the design. With materials readily available at most craft stores, this project is surprisingly budget-friendly, costing between $5-$25 depending on your existing supplies. In just 30 minutes, you’ll have a show-stopping tiara that’s perfect for any aspiring fairy princess or simply as a unique accessory to add some magic to your everyday look.
Simple Paper Crown Craft for Kids
Transform your classroom into a royal realm with this fun and easy DIY paper crown craft! This engaging project is perfect for preschoolers, kindergarteners, and toddlers to unleash their creativity and imagination. With just a few simple materials – A4 colored craft paper, scissors, pencils, stickers, and sticky tape – you can bring the magic of royalty to your little ones. Simply draw a zigzag line down the center of the paper, cut along the line, attach the two sides using tape, and let the decorating begin! Your students can add their personal touch with stickers, jewels, or other embellishments to make their crowns truly unique. Finally, use tape or a stapler to transform the crown into a circle that fits comfortably on their head. As you watch your little ones become kings and queens in their imaginative world, remember to enjoy the process and let their creativity shine!
How to Make a Rapunzel Tiara
Bring fantasy to your little princess’s world with this enchanting DIY Rapunzel tiara that will leave her beaming with delight. This project requires minimal effort but yields maximum results, perfect for Halloween or spontaneous dress-up play. With a budget-friendly cost of around $30, you can easily recreate this masterpiece using materials from your local craft shop. Start by gathering the essentials: a plastic tiara, silver rhinestones, large teardrop crystals, pliers, gold spray paint, floral wire, lavender pearls, a fishing line, and a needle. For an added touch of glamour, consider adding large pink, teal, and white pearls to create an extravagant crown that will make your little one feel like royalty. Follow the simple steps outlined in this guide to bring your creative vision to life and watch your child’s eyes light up with wonder.
Make Your Own Party Tiara
Transform your child’s birthday celebration or princess-themed party into an enchanting experience with this DIY tiara project. Using a Cricut machine, markers, and glitter glue, you can create a stunning, custom-made headpiece with vibrant colors and a touch of sparkle. To secure the tiara in place, attach it to a hair clip using a Xyron tape runner. This fun activity is an excellent way to bond with your little ones while creating personalized party accessories that will be treasured for years to come.
How to Make a Paper Crown Without Glue
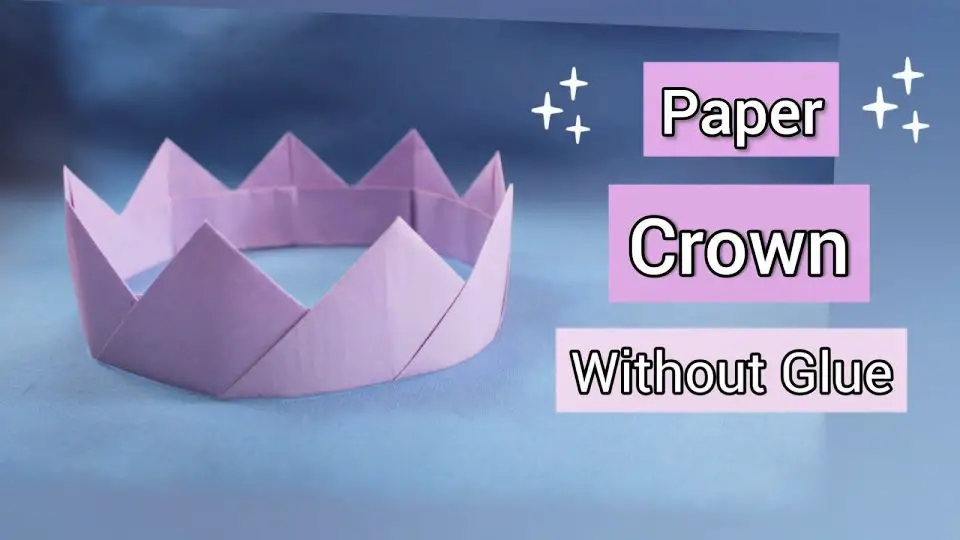
Embark on a regal adventure without the need for adhesives by crafting a majestic DIY paper crown. This straightforward tutorial requires minimal materials and is designed for all skill levels, making it an ideal creative activity or a playful addition to any costume. By following our step-by-step guide and utilizing basic folding techniques, you’ll be able to create your very own paper crown with ease. For added visual guidance, we’ve included a video tutorial that makes the process even more intuitive. As you proudly don your homemade crown, let your imagination soar and get ready to make a statement!
Conclusion:
Embracing the art of DIY crown-making unlocks a world of creative possibilities that harmoniously blend traditional significance with modern flair. This treasure trove of 25 innovative ideas offers a comprehensive guide, featuring expert insights, material recommendations, and eco-friendly options to inspire your crafting endeavors. By following this step-by-step journey, you’ll not only gain the skills to craft a bespoke crown for any occasion but also cultivate your personal touch and creative voice. As you embark on this DIY adventure, you’ll find yourself surrounded by an array of possibilities: from creating a one-of-a-kind piece for a special event to understanding the best materials and techniques for crafting a masterpiece that will be treasured for years to come. So, gather your supplies, let your imagination run wild, and get ready to reign supreme with your very own handcrafted crown creation.
