Creating a homemade clock is an engaging process that combines creativity with functionality, allowing you to design a timepiece that truly reflects your unique style. Whether you’re looking for a decorative piece for your home or office, or seeking inspiration for a thoughtful gift, mastering the art of clock-making can be both enjoyable and fulfilling. This comprehensive guide aims to equip you with the knowledge and inspiration to embark on your clock-creating journey.With a clear and concise approach, we’ll take you through the essential materials and tools needed, as well as each step involved in crafting a wooden clock from scratch. From carefully selecting and preparing the wood to installing the clock movement, every phase is designed to be straightforward and manageable, making it accessible to crafters of all levels. By following this guide, you’ll gain the confidence and skills necessary to bring your DIY clock ideas to life.
Why Make Your Own DIY Clock?
When you make your own DIY clock, you unlock a range of benefits that extend far beyond having a unique timepiece in your home. The advantages of DIY clock-making are multifaceted and offer a refreshing change from the mass-produced options available in stores.
One of the most significant perks is personalization. By crafting your own clock, you have complete creative control over every aspect – design, size, color, and more. This allows you to create a piece that perfectly harmonizes with your home’s décor and reflects your unique personality.
Another significant advantage is cost-effectiveness. Many designer clocks sold in stores can be quite expensive, but DIY clocks enable you to use affordable materials and repurpose items you may already have on hand, saving you money in the process.
Moreover, completing a DIY project brings a profound sense of accomplishment. Every time you glance at your handmade clock, you’ll feel proud knowing that it’s a direct result of your creativity and effort.
DIY clock-making also offers an eco-friendly alternative to traditional clock purchases. By using reclaimed wood, old bicycle wheels, or thrifted items, you can reduce waste and give materials a new life – a truly sustainable practice.
Furthermore, DIY projects like clock-making can be a wonderful bonding experience when shared with friends or family. Working together on a project can strengthen relationships and provide quality time to spend with loved ones.
Lastly, every DIY project is an opportunity for personal growth and skill-building. Whether it’s learning new woodworking techniques, improving your painting skills, or mastering different tools, making a clock can enhance your overall crafting abilities.
In conclusion, embracing DIY clock-making not only adds a touch of uniqueness to your space but also enriches your life with personal growth, sustainable practices, and meaningful experiences.
How to Make a Clock
Sharpening your woodworking skills while going green – that’s what making a DIY wooden clock from scrap wood is all about! With this beginner-friendly guide, you’ll embark on a step-by-step journey to craft a functional and visually appealing timepiece using reclaimed wood pieces. Whether you’re just starting out in the world of woodworking or looking to repurpose leftover materials, this project has got you covered.
Materials and Tools Needed
The collection of tools and materials required to complete the project includes a variety of woodworking essentials. These include scrap wood, which can be used for test cuts or as a base for small projects, as well as wood glue for bonding different pieces together. In terms of power tools, a miter saw is necessary for making precise angled cuts, while a planer helps to flatten and smooth out wood surfaces. A chisel is also essential for removing small amounts of material and creating joints, whereas a sander with both 80-grit and 180-grit sandpaper can be used to smooth out the wood to a high finish. For measuring and marking, a ruler or measuring tape and pencil are necessary. The router is used in conjunction with two specific bits – a 35mm forstner bit for making precise holes and a flush trim bit for trimming the edges of boards. In addition to these tools, double-sided tape can be used to hold pieces together temporarily, while epoxy provides a strong bond between different materials. A drill with various drill bits is also necessary for drilling precise holes. Finally, light oak stain and Danish Oil are used to enhance the appearance of the finished product.
Steps to Make the Wooden Clock
To craft a wooden clock, follow our comprehensive guide:Firstly, select 30-centimeter wide scrap wood pieces and cut them into ten strips using a miter saw. Ensure each strip is flat and uniform by planing the two opposite faces. This will provide a solid foundation for your clock.Next, arrange the strips side-by-side, ensuring they’re flush and applying wood glue along one edge of each strip. Press the strips together, forming a 30-centimeter square, with the glued edges facing downwards towards the clamping setup’s back fence. Allow the glue to dry overnight before proceeding.Once the glue has dried, use a chisel to remove any hardened glue residue and then re-plane the surfaces for a smooth finish. Sand the entire piece using 80-grit sandpaper followed by 180-grit for a finer texture.To prepare the clock face, mark the center of your wooden square by measuring and drawing the diagonals. Use a router with a 35mm forstner bit to create a recess for the clock movement, ensuring the circle is centered before routing. If necessary, route from both sides due to limited bit depth.For finishing touches, use a router with a round-over bit to soften the clock face’s edges and follow up with additional sanding if needed. Apply a light oak stain to achieve your desired color, allowing it to dry before applying Danish oil for protection. This will provide a beautiful, natural finish to your wooden clock.Finally, measure and drill the hole for the clock movement shaft at the center of the clock face. Check the length of the shaft against the wood’s thickness and, if necessary, recess the clock movement into the back piece to ensure sufficient protrusion for attaching the clock hands. Secure the clock movement using epoxy if needed, then attach the clock hands according to your kit’s instructions.
Video Tutorial
While the written guide provides a comprehensive roadmap for creating a DIY wooden clock, watching the accompanying YouTube video can further enhance your understanding by offering a visual representation of the techniques discussed. This multimedia approach allows you to learn through multiple channels, making it easier to grasp complex concepts and stay engaged throughout the process. As you follow the steps outlined in the guide and demonstrated in the video, you’ll not only craft a functional timepiece but also develop your woodworking skills and take pride in the finished product, which combines form and function with a unique blend of functionality and aesthetic appeal.
DIY Clock Project: Ensuring Your Safety
When tackling the rewarding DIY clock project, it’s vital to balance creativity with caution. To ensure a successful and enjoyable experience, consider these fundamental safety guidelines:
Protective Gear
When embarking on a DIY project or working with power tools, it’s crucial to prioritize personal protective equipment (PPE) to ensure your safety and well-being. This includes eye protection, such as wearing safety goggles or glasses to shield your eyes from flying debris when cutting or drilling. Similarly, gloves are essential for safeguarding your hands from sharp edges and potentially harmful chemicals found in paints or glues. Furthermore, if you’re working with loud power tools, don’t forget to protect your hearing with earmuffs or earplugs to prevent long-term damage.
Proper Ventilation
When working with materials that emit hazardous fumes, such as spray paints, adhesives, or solvents, take necessary precautions to minimize exposure. This includes relocating your workspace to a well-ventilated area, ideally one with open windows or doors to allow fresh air to circulate freely. If possible, consider taking your project outdoors where natural ventilation can provide an added layer of protection.
Safe Handling Practices
Before embarking on any DIY project, it’s essential to lay the groundwork for a safe and successful experience. Start by thoroughly reading labels and instruction manuals that come with tools or materials. This will help you understand proper usage and recommended safety precautions, allowing you to avoid potential hazards. Additionally, maintaining an organized workspace is crucial, as clutter can lead to accidents waiting to happen. Make sure all tools are safely stored when not in use, and keep your workspace tidy at all times. Furthermore, be mindful of your surroundings, particularly if you’re working in a shared space. This awareness will help prevent accidents involving bystanders or other objects that could interfere with your project. By following these essential safety precautions, you’ll not only complete your DIY clock project successfully but also do so without compromising your well-being.
Customization Options for Your DIY Clock
Infusing your personal touch into a DIY clock project allows you to create a one-of-a-kind masterpiece that mirrors your style. Two key areas where you can inject creativity are color palette and numerical/indicator design. The choices you make in these areas will significantly shape the overall aesthetic of your timepiece, making it an authentic reflection of your taste.
Color Choices
A DIY clock’s color palette has the power to significantly impact its aesthetic appeal and harmony with its surroundings. To create a unique and captivating timepiece, consider these three distinct approaches: A monochromatic scheme, where various shades of a single color are used, can produce a sleek, modern look perfect for minimalist or contemporary decor. Alternatively, you could opt for contrasting colors that are opposite each other on the color wheel, such as blue and orange, which will add vibrancy and visual interest to a room. For a softer, more calming effect, pastel hues like light pink, baby blue, or mint green can create a soothing ambiance, making them ideal for bedrooms or nurseries. Finally, metallic colors like gold, silver, or bronze can add a touch of luxury and sophistication, perfect for formal spaces or as a statement piece.
Numerals and Markings
The way you choose to display numbers on your clock is not only a reflection of its visual appeal, but also plays a significant role in determining its readability and overall character. With this in mind, here are some unconventional ideas to consider:For a classic touch, opt for Roman numerals, which exude timeless sophistication. This style works particularly well with traditional decor, adding an air of elegance to any room.Alternatively, you could take a minimalist approach by using simple line markings or none at all. This clean and modern aesthetic suits contemporary interiors perfectly, emphasizing simplicity and ease.Why stop at numbers, though? Use symbols that hold personal significance to you or your family. This could include stars, hearts, or even small icons representing your passions or hobbies.If you’re feeling crafty, consider using mixed media materials for your numerals. Think of incorporating buttons, fabric cut-outs, or small objects glued to the clock face. This approach adds texture and visual interest, transforming your clock into a true showstopper.Ultimately, when it comes to customizing your DIY clock, let your creativity be your guide. By thoughtfully selecting colors and numerals, you can create a timepiece that truly reflects your personal style.
Troubleshooting Tips for DIY Clock Making
While creating a custom clock can be a fulfilling project, it’s not uncommon to encounter a few common issues along the way. Despite careful planning, problems like misaligned clock hands, paint smudges, and uneven surfaces can arise. To ensure your clock-making experience is as seamless as possible, we’ll cover the solutions to these common problems so you can focus on enjoying the creative process.
Misaligned Clock Hands
When a clock’s hands become stuck or misaligned, it can be frustrating and affect its overall accuracy. One potential culprit is an overly tight nut that holds the hands in place. To resolve this, ensure the nut is secure but not so tight that movement is restricted. Another possibility is incorrect alignment of the hands themselves. Gently press them towards the clock face to eliminate any sticking or overlapping issues. It’s also crucial to verify that they’re not touching each other or the clock face itself. Furthermore, weak batteries can cause the hands to move sluggishly or cease moving altogether. In this case, replacing the battery with a new one may be the solution.
Paint Smudges
When your DIY clock face is marred by accidental smudges or drips of paint, a swift and gentle response can resolve the issue. If the paint is still wet, use a damp cloth to wipe away the excess, taking care not to spread the stain further. For dried-on smudges, employ fine-grit sandpaper to lightly sand the area until the imperfection disappears. Once the affected region is smooth again, touch up the spot with additional paint. To prevent such mishaps in future projects, consider employing masking tape to protect areas you don’t want painted, thus safeguarding your work from unwanted smudges.
Uneven Surfaces
If your clock isn’t sitting pretty due to an uneven backing or wobbling on a table, there are several ways to tackle the issue. First, assess if the surface is merely slightly off-kilter. If that’s the case, use sandpaper to level it out, starting with a coarser grit and gradually moving to a finer one for a silky finish. For more minor unevenness, especially when the clock is intended to sit on a surface, try sticking felt pads to the bottom. These can compensate for small imperfections.
On the other hand, if the problem lies in wall hanging, double-check that your mounting hardware is properly installed. Sometimes, adding a tiny bumper pad to the back of the clock can be just what’s needed to balance it out. Remember, DIY projects require patience and attention to detail – don’t rush, and if you hit a snag, take a step back to reassess and apply these troubleshooting tips. With persistence and the right approach, your DIY clock will not only be a one-of-a-kind decorative piece but also a testament to your problem-solving skills.
Maintenance and Care for DIY Clocks
To ensure your DIY clock continues to perform flawlessly, it’s essential to prioritize regular maintenance and attention. By implementing a few simple habits, you’ll be able to keep your timepiece running accurately and efficiently, even after years of use. Start by cleaning the clock’s mechanisms every 6-12 months, using a soft-bristled brush or cloth to gently remove any debris that may have accumulated. This will help prevent corrosion and ensure all moving parts continue to function smoothly. Additionally, consider applying a thin layer of silicone-based lubricant to the gears and other components to reduce friction and maintain optimal performance.
Battery Replacement
When it comes to DIY clocks, knowing when to replace batteries is crucial for keeping them accurate. Typically, batteries need replacement every 1-2 years or whenever they start losing time or stop working altogether. Here’s a step-by-step guide to help you replace the battery in your clock.First, open the back compartment of your clock by unscrewing the panel or sliding it open. Take note of any screws or clips that might need attention when reassembling the clock later on. Once inside, identify the type of battery used (usually AA or AAA) and ensure you have a replacement ready.Next, carefully remove the old battery, paying attention to its orientation so you can correctly insert the new one. Gently place the new battery in, aligning the positive (+) and negative (-) ends just like the old one was positioned. Secure the back panel, and set the correct time on your clock. Finally, test it out to ensure it’s functioning properly.
Dust and Cleaning
To keep your clock running smoothly and looking its best, it’s essential to maintain a dust-free environment. Dust can accumulate on the clock’s surface and hinder its performance if left unchecked. To prevent this, regular dusting is crucial to ensure the clock remains in optimal working condition.When cleaning your clock, use a soft, dry cloth to gently wipe down the surface. Avoid using water or harsh cleaning solutions unless the clock is specifically designed to be water-resistant. If you do need to use a damp cloth, make sure it’s only slightly moist and avoid getting any moisture into the internal mechanisms of the clock.By following these simple cleaning tips, you’ll be able to keep your clock in great condition while also preserving its appearance.
Adjustments
To keep your DIY clock running smoothly, you’ll need to periodically adjust its hands to maintain accuracy. This process is straightforward when done correctly. Start by accessing the clock’s mechanism, whether that means opening the front or back of the device, depending on its design. Once inside, gently maneuver the hour and minute hands into their correct positions, using a light touch to avoid damaging them. If your clock has adjustment knobs at the back, you can utilize these instead, eliminating the need for a full disassembly. After making any necessary adjustments, verify that the clock is keeping accurate time by monitoring it over several hours. Regular maintenance tasks like battery replacement, cleaning, and minor repairs will not only keep your clock functioning properly but also ensure it remains an attractive addition to any room.
DIY Clock Ideas FAQs
Embarking on a DIY clock-making adventure can bring a sense of accomplishment and creative fulfillment. To set the stage for success, let’s address some common queries that may arise as you begin this journey.
What materials do I need to make a DIY clock?
To bring your DIY clock project to life, you’ll require some fundamental materials. The clock mechanism kit is a must-have, typically including the clock hands and movement. Your chosen face material, such as wood, concrete, or recycled items, will depend on the design you envision. You may also need to add decorative elements, like paint, decals, or wood stain, to give your clock some extra flair.
In terms of tools, a drill is usually necessary for drilling holes and assembling the clock mechanism. If you plan to customize the clock face with paint or stain, you’ll need those supplies as well. Depending on the material you’re using for the clock face, you may also need to use sandpaper to smooth out any rough edges. In some cases, a saw might be necessary if you’re working with a more substantial material.
Ultimately, the specific materials and tools needed will depend on the unique design and materials you choose for your DIY clock project.
Can I make a clock without woodworking skills?
While many DIY clock projects may seem intimidating due to the complexity of their designs, there are numerous options available that can be accomplished without extensive woodworking expertise. In fact, creative alternatives such as incorporating everyday materials like concrete, paper plates, or even embroidery hoops into your design can be an excellent way for beginners to get started and develop their skills.
How do I choose the right clock movement kit?
When selecting a clock movement kit, two primary factors come into play: the thickness of your clock face and the desired style of hands. To ensure seamless hand movement, it’s crucial to find a kit with a shaft length that corresponds to the thickness of your clock face. This will guarantee that the hands glide effortlessly across the clock face, giving you a clean and precise time-keeping experience.
What are some creative ideas for DIY clock faces?
When it comes to crafting one-of-a-kind clock faces, creativity knows no bounds. Think outside the box and repurpose everyday objects that would otherwise end up in the trash. Old records, vintage books, and discarded bicycle wheels can be transformed into distinctive timepieces. For a more organic approach, consider using natural materials like slices of wood, driftwood, or even a sturdy leaf. But why stop there? Household items like plates, embroidery hoops, and canvas can also be upcycled to create unique clock faces that reflect your personal style.
How can I customize my DIY clock?
Customizing your clock can be a fun and creative way to make it blend seamlessly with the surrounding decor. One approach is to give the clock face a fresh coat of paint or stain that matches the colors and hues of the room. Alternatively, you can get creative with stickers, paint, or even attach small objects like buttons or beads to add visual interest and personalize the timepiece. For a more themed approach, you can incorporate decorations that fit the style of the room, such as playful elements for a nursery or kitchen-themed accents for a culinary space.
How do I ensure my DIY clock works correctly?
To ensure optimal performance, start by securing the clock mechanism to the clock face with utmost care. The hands must be firmly fixed to the mechanism to prevent any movement restrictions. Moreover, verify that the clock hands are not in contact with each other or the clock face, as this could impede their rotation. Additionally, make sure you’re using a new battery and confirm its proper insertion into the clock’s power source.
Can DIY clocks be a good gift idea?
A handmade clock stands out as a thoughtful and deeply personal present, allowing you to infuse it with meaning and significance tailored to the recipient’s style or the occasion being celebrated. This personalized approach makes it an unforgettable and one-of-a-kind gift. By thoughtfully addressing common concerns and considerations, you’ll embark on a rewarding journey of creativity and craftsmanship, regardless of whether your handmade clock is for yourself or someone else.
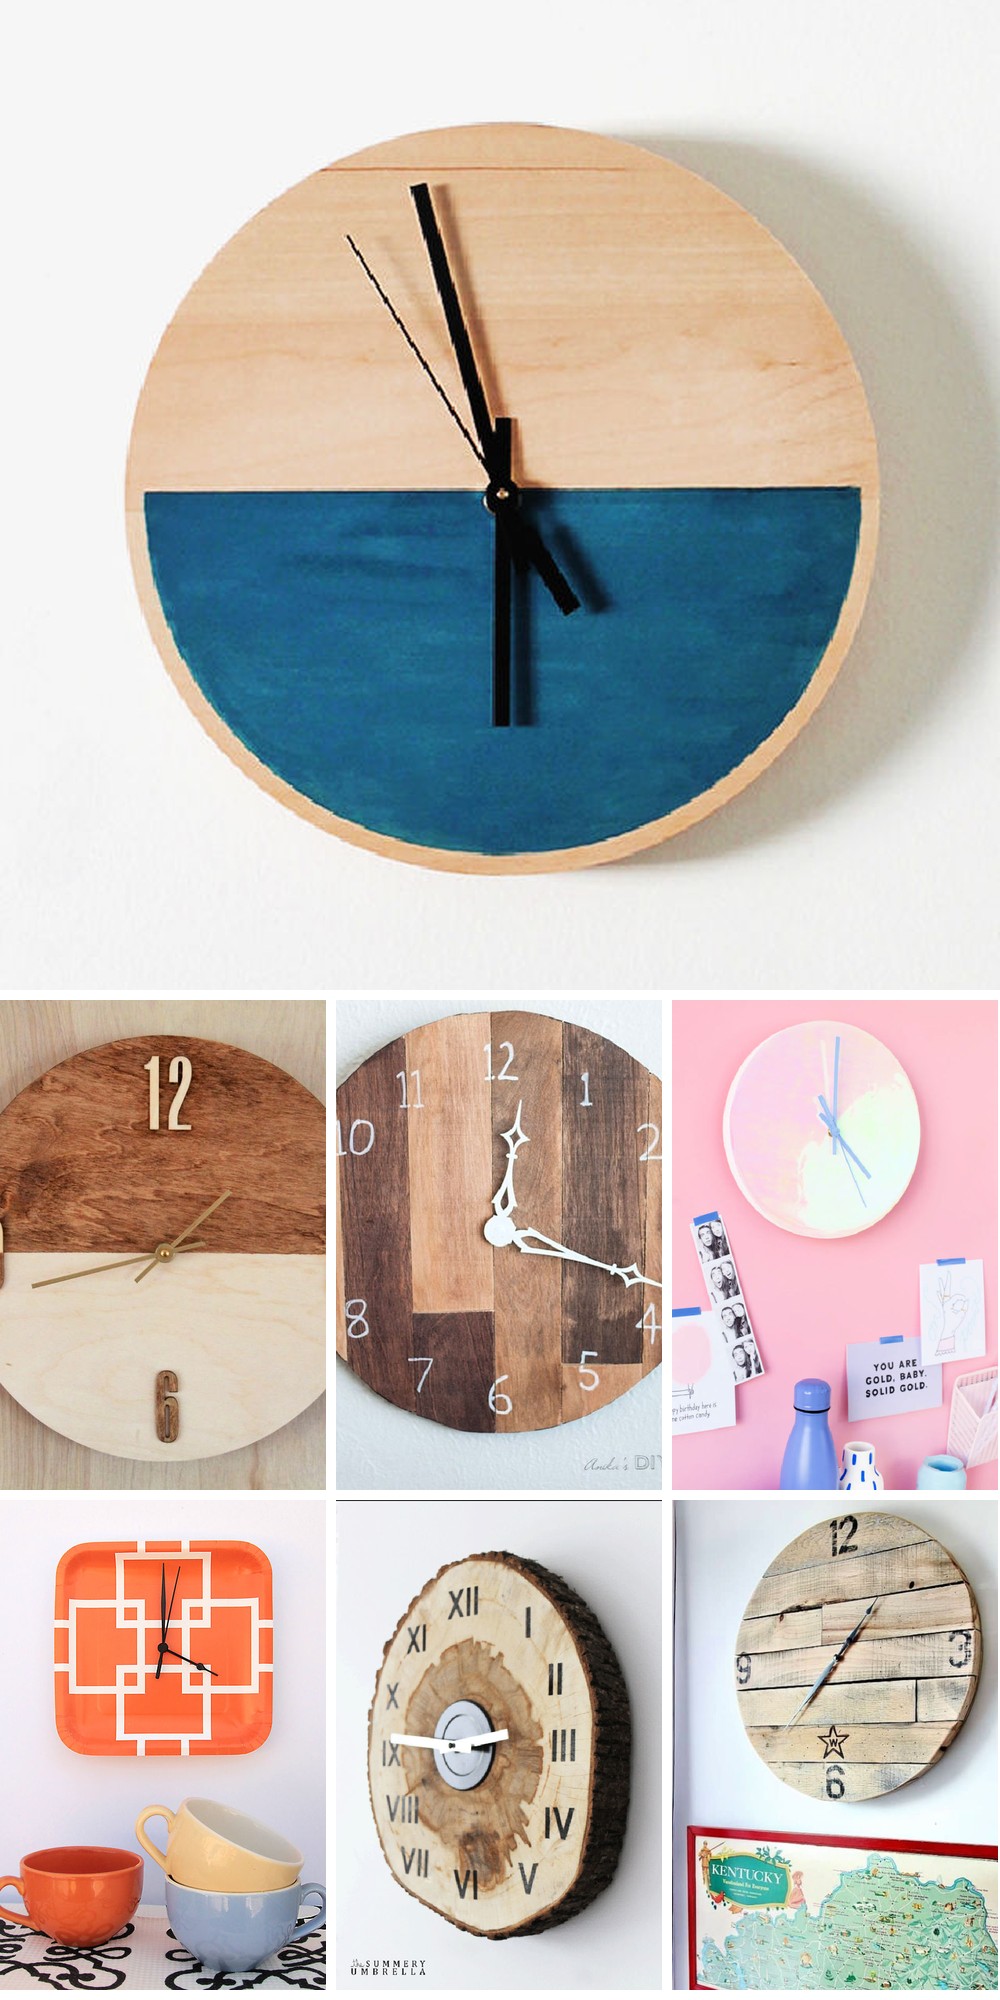
25 Homemade DIY Clock Ideas (How to Make a Clock)
Immerse yourself in a world of creativity as you explore an astonishing array of 25 DIY clock ideas that will transform the art of timekeeping into a personalized masterpiece. With these innovative projects, you’ll uncover the secrets to crafting your very own distinctive timepiece from the comfort of your home.
Easy DIY Sliced Cake Wall Clock
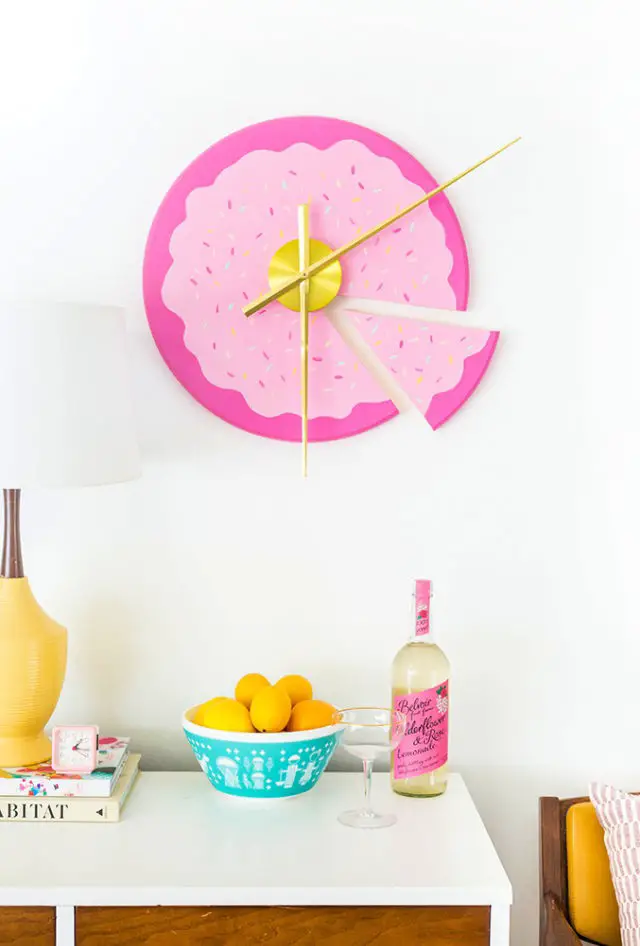
Looking to add a dash of whimsy to your home decor? A DIY Sliced Cake Wall Clock is the perfect project for those who love unique and playful creations. With its clear instructions, this tutorial by Dream Green DIY guides you in transforming a simple wood round into a colorful timepiece that mimics a slice of cake. To bring your design to life, you’ll need basic tools like a jigsaw, along with paint and a clock mechanism. The process involves sanding, priming, and painting each piece to create the illusion of cake and icing, complete with sprinkles for a charming finish. Once completed, hang it up in a child’s room, kitchen, or bakery to infuse a sweet touch into your space. With this project, you’ll not only have fun but also watch your creativity tick along as you bring this delightful clock to life.
Modern Handmade Chic Plywood Clock
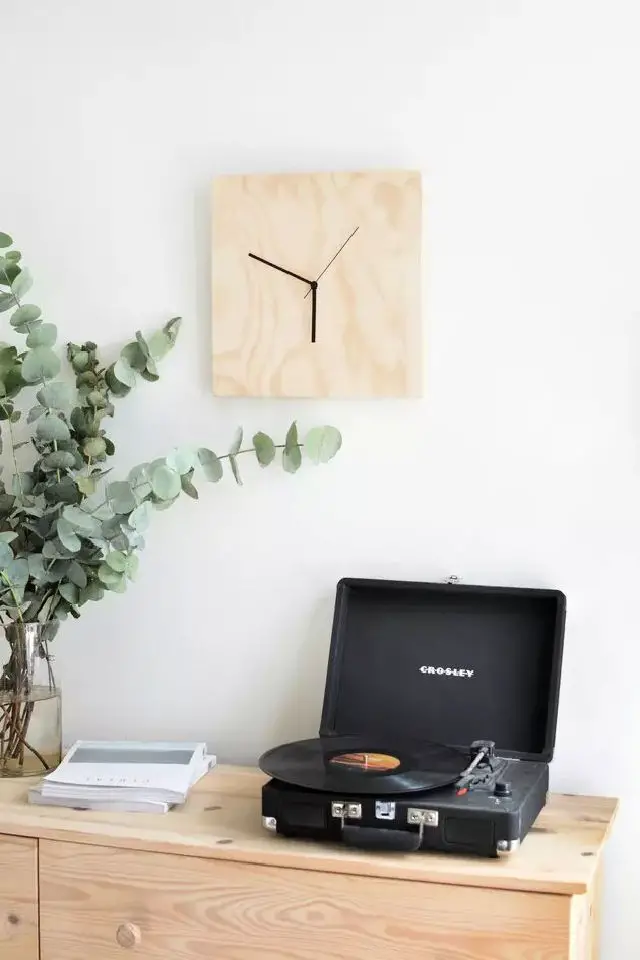
Unleash your creativity with these DIY clock ideas that showcase your personal style. One unique option is crafting a sleek Scandinavian-inspired plywood clock using Hunker’s easy-to-follow guide. Perfect for crafty individuals, this project requires only the most basic tools – a jigsaw, power drill, and wood glue. To get started, simply cut and sand a plywood square to create the clock face, then drill a central hole to accommodate the clock mechanism. Next, secure the mechanism, attach battens for a seamless wall fit, and add a hook for hanging. Finally, assemble the clock arms and insert a battery to complete this chic timepiece that adds a modern touch to any room. With its quick completion time, it’s an ideal weekend project to tackle.
How to Make a Mid-Century Wall Clock
Combine modern charm with classic design by creating a DIY Mid-Century Wall Clock that serves as both functional decor and conversation starter. With Sugar & Cloth’s step-by-step guide, you can craft a unique timepiece using simple materials like wood rounds, stain, clock movements, and dowel caps. The straightforward process makes it an ideal weekend project, allowing you to personalize the stain color and add metallic paint for a truly one-of-a-kind piece that reflects your taste and complements any room. By making your own wall clock, you’ll enjoy the satisfaction of creating something beautiful at a fraction of the cost found in stores.
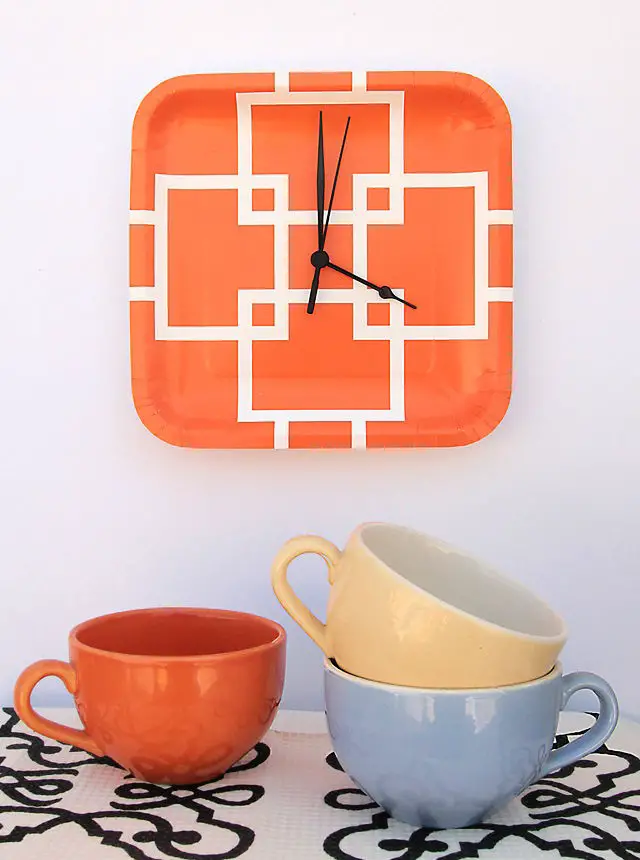
Adorable DIY Colorblock Wall Clock
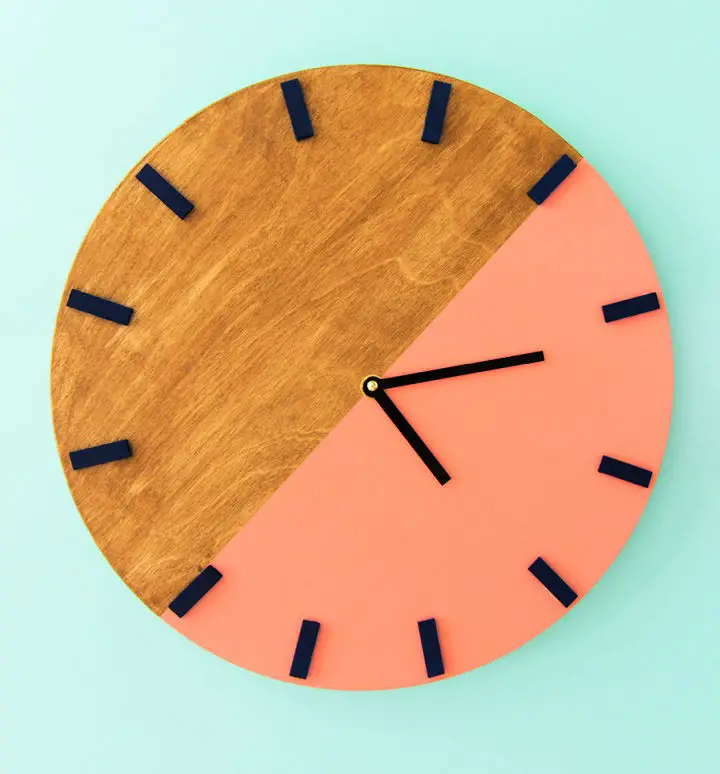
Transform your living space with a dash of creativity by crafting a distinctive color block wall clock inspired by Oliver Bonas’ eclectic designs. With Sarah Hearts’ straightforward guidance, you can create a one-of-a-kind timepiece that harmoniously blends with your home’s décor. Simply gather basic materials like a wood clock panel, paint, and a clock mechanism, then follow the step-by-step instructions to stain, paint, and assemble this functional yet striking wall accessory. This DIY project is ideal for crafters of all levels, as it requires no specialized skills, making it an accessible way to infuse your home with a personal touch.
How to Build a Concrete Clock
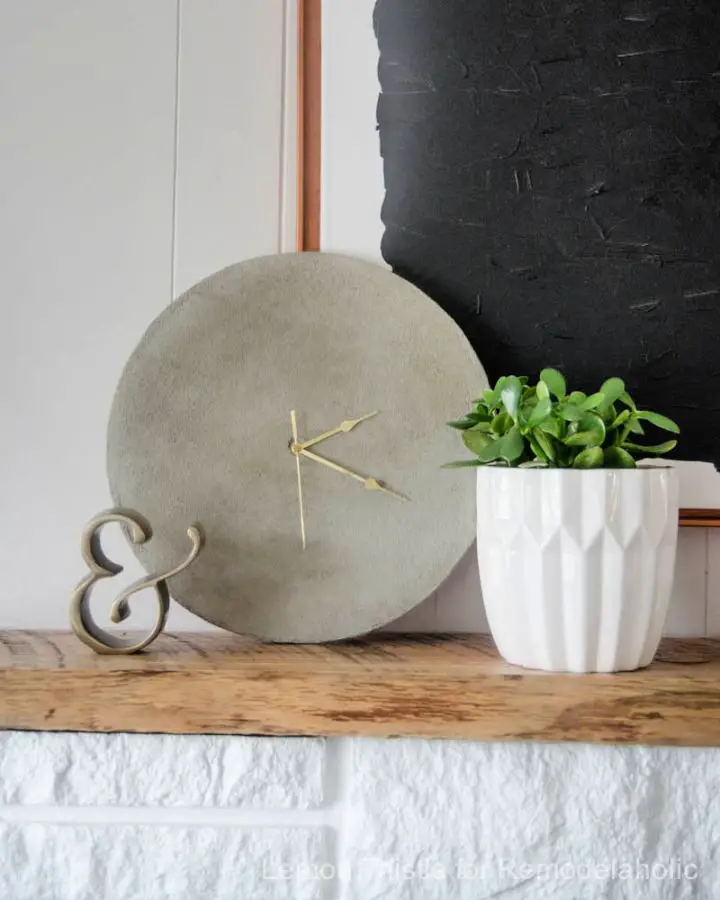
Looking to inject a modern industrial vibe into your space without breaking a sweat? Look no further! Our DIY Concrete Clock tutorial is here to guide you through a mess-free and surprisingly simple process. By leveraging a wooden round as the foundation and a clever mortar repair kit, we’ve eliminated the need for complex molds, making it accessible to anyone with a willingness to get creative. Simply mix, apply, and smooth the mortar over the wood, let it dry, and secure the clock mechanism with some reliable construction adhesive. This project is perfect for those who appreciate a hands-on approach to home decor, as it yields a functional timepiece that’s sure to be a statement piece in your entryway or mantel. With easy-to-follow steps and minimal fuss, you’ll be ticking away in no time.
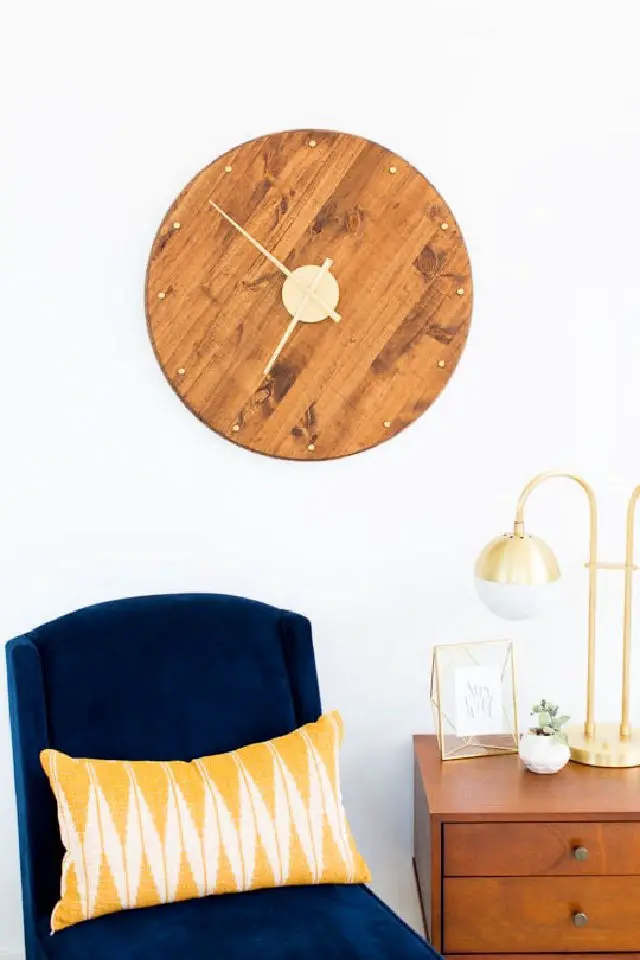
Build Your Own Wooden Clock
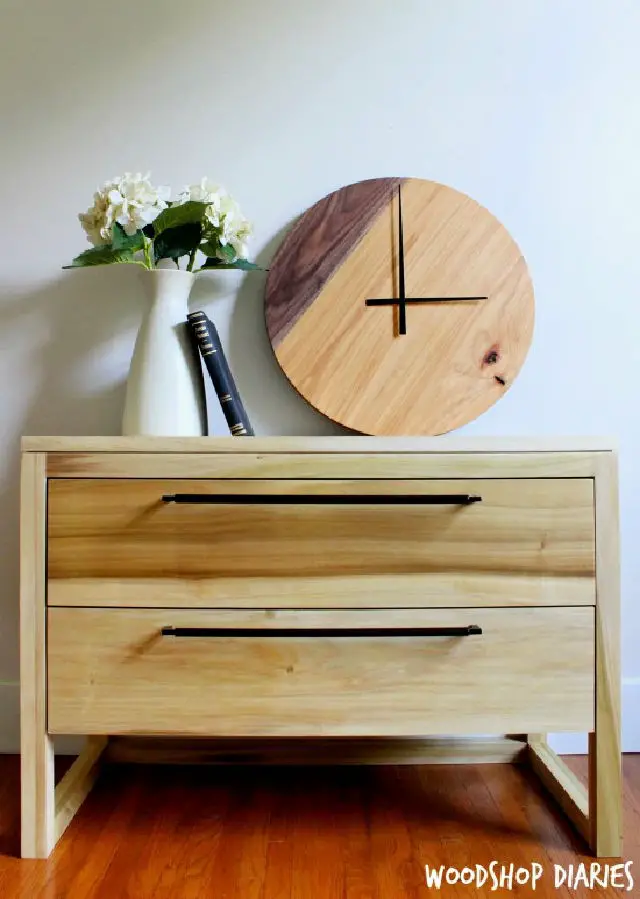
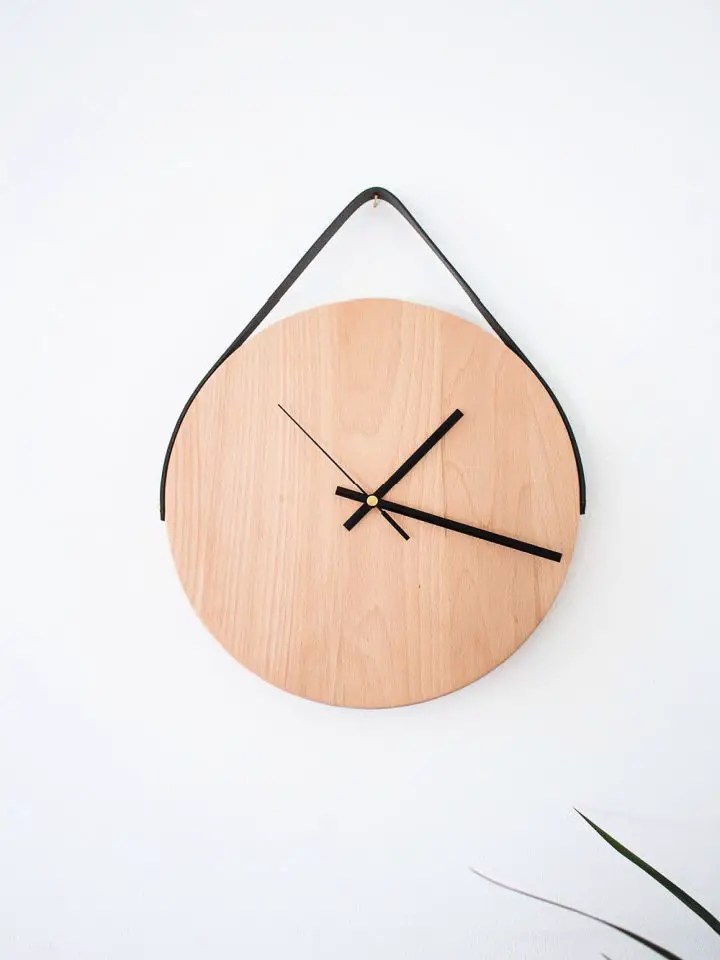
Transform your home decor by infusing it with the warmth of nature through elegant wooden clock designs. For those who appreciate woodworking and the personal touch that comes with a handcrafted creation, this DIY modern wall clock is an ideal project to tackle. With basic materials such as wood boards, a miter saw, wood glue, and a clock kit at your disposal, you’ll be guided through a step-by-step process of cutting, gluing, and assembling the clock’s components. Finish it off with a sleek coat of Danish oil for a refined appearance. Whether displayed on a wall or a shelf, this DIY wooden clock is poised to become a charming focal point in any room. To embark on this creative journey, explore the comprehensive tutorial available at Woodshop Diaries and start building your own timeless piece today.
Mid-Century DIY Esque Starburst Clock
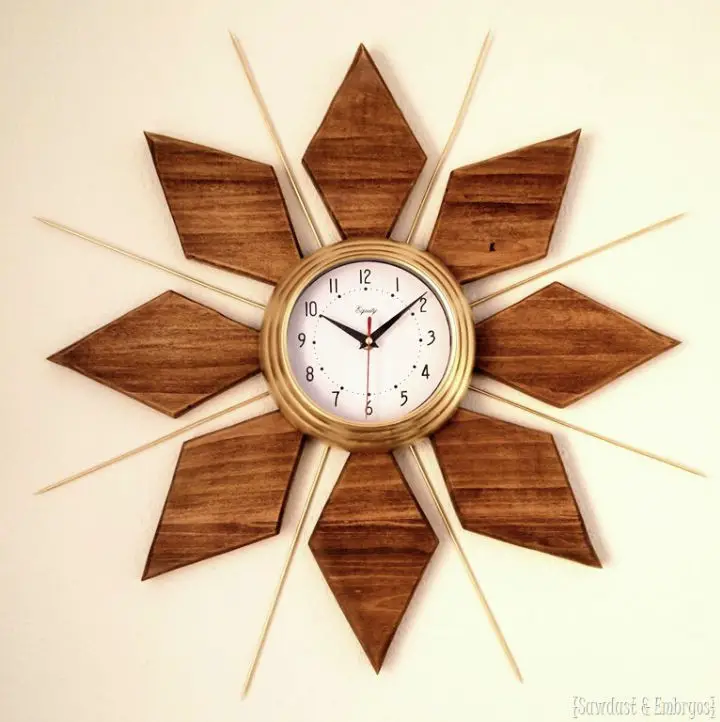
Immerse yourself in the charm of Mid-Century Modern design by creating a stunning Starburst Clock inspired by Reality Daydream’s tutorial. Bethany Sy masterfully breaks down the process into easy-to-follow steps, making it an inviting experience for crafty enthusiasts. The project’s clarity and concision ensure that even novice DIYers can successfully execute each step. As you navigate the selection of materials to the finishing touches, you’ll be captivated by the transformation unfolding before your eyes. With this creative endeavor, you’ll not only add a touch of vintage flair to your space but also express your personal style in a unique and cost-effective way.
Homemade Pallet Wood Clock
Elevate your walls with unique DIY wall clock ideas that bring an artistic touch to any room. For a rustic charm, try repurposing old pallet boards into a one-of-a-kind clock, inspired by Thistlewood Farm’s creative tutorial. KariAnne Wood’s step-by-step guide makes the process seamless, from disassembling pallets to attaching precision clock hands. With basic tools and materials like wood adhesive, plywood, and a jigsaw, you’ll craft a functional piece of art that adds an industrial flair to any space. The satisfaction lies not just in telling time, but in showcasing your DIY skills and creating a personalized masterpiece.
Making a Wood Clock Using Scrap Plywood
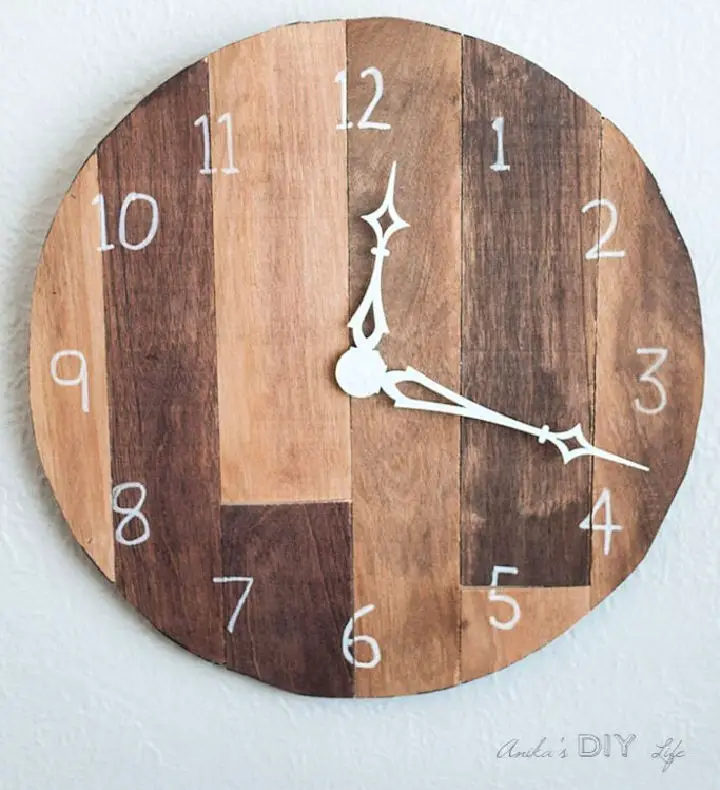
Create a one-of-a-kind wall clock using scrap plywood with Anika’s DIY Life’s easy-to-follow tutorial. With a simple combination of a wall clock kit and basic tools, you can craft a customized timepiece that injects a personal touch into your home decor. The step-by-step guide takes you from cutting the base to attaching the clock mechanism, making it perfect for DIY enthusiasts seeking creative outlets. As an added bonus, the project allows for customization options, including staining or painting the wood for distinct looks. A fun and practical way to breathe new life into materials, this woodworking project is both rewarding and functional.
DIY Embroidery Hoop Clock for Kids
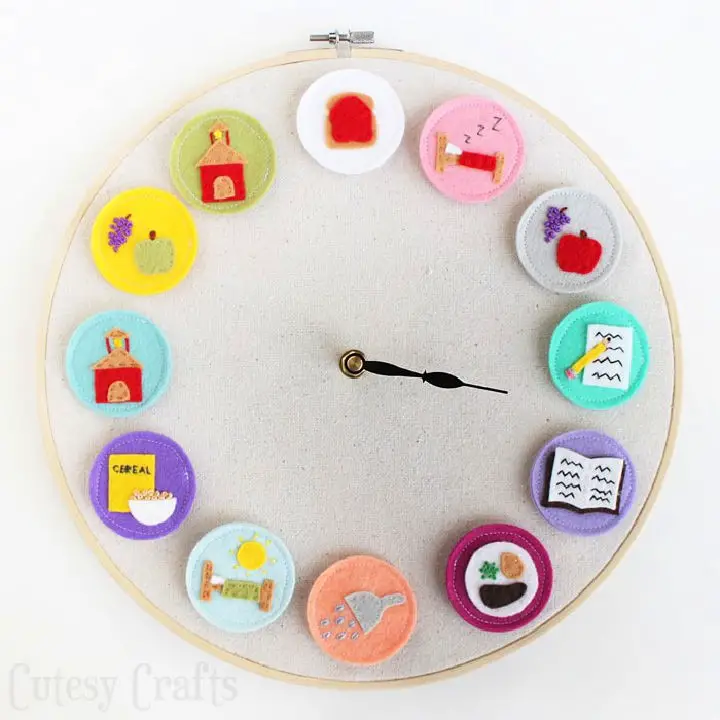
Bring fun and functionality to your child’s daily routine with a DIY clock project from Cutesy Crafts! This engaging activity helps kids develop an understanding of schedules and time management by creating a customizable clock featuring interchangeable activity pieces secured with Velcro. To make it, you’ll need an embroidery hoop, canvas drop cloth, and a clock kit from your local craft store. The design’s flexibility ensures the clock adapts to your family’s unique routine, while simple instructions keep assembly stress-free. This homemade time-telling tool not only teaches kids about time but also reduces the frequency of ‘what time is it?’ questions. For the complete tutorial and free patterns, visit Cutesy Crafts and discover how learning time can be an enjoyable experience for your little ones.
How to Make a Color Block Clock
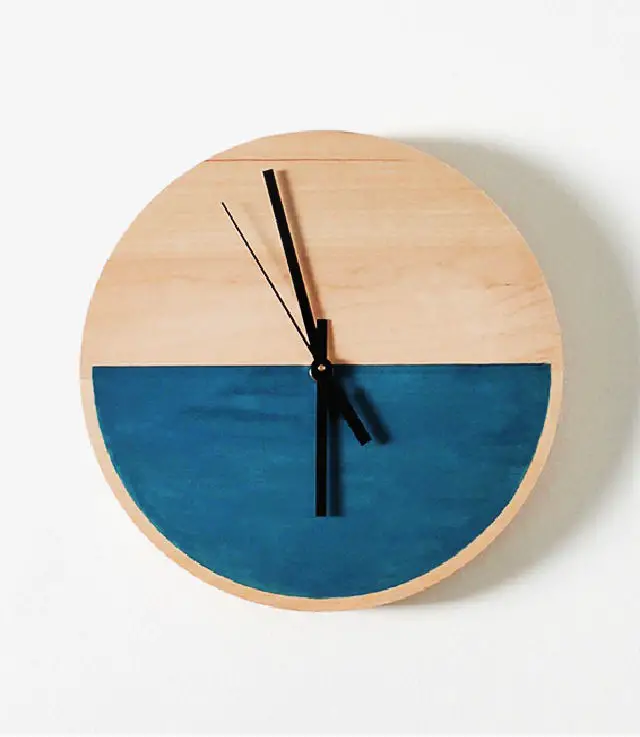
Add a dash of personality to your home decor with this easy DIY project from Almost Makes Perfect. To create a one-of-a-kind color block clock, gather just a few essential supplies: a wooden clock base, a clock kit, acrylic paint, and some basic materials. Begin by smoothing out the clock face with a bit of sanding for a sleek finish.
Next, employ painter’s tape to define crisp lines, and add an artistic flourish by tracing a semi-circle around your design. Mix water into your paint to achieve a subtle wash effect, then carefully apply the color around the traced shape. Once dry, remove the tape and assemble the clock kit. Voila! You’ll have a distinctive timepiece that doubles as a thoughtful handmade gift.
Make Your Own Bicycle Wheel Clock
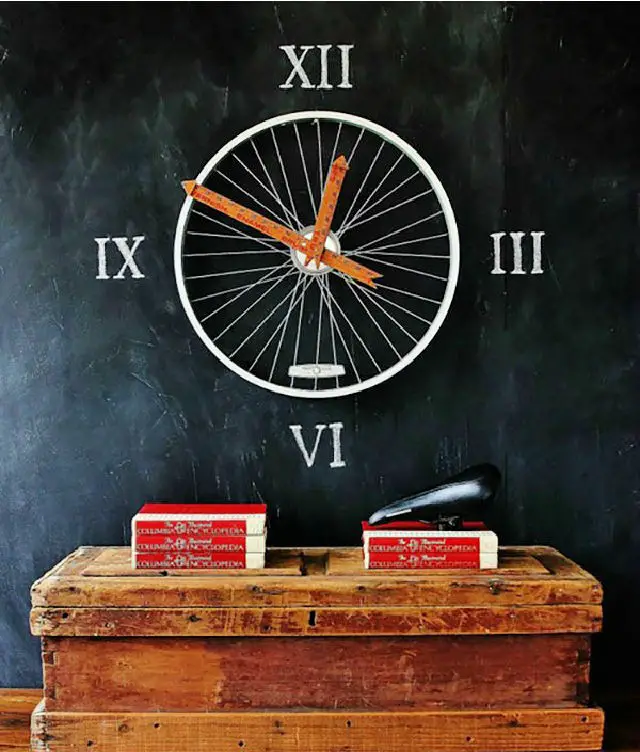
Immerse yourself in the fusion of traditional craftsmanship and modern aesthetics by exploring wooden clock designs. A unique opportunity arises when transforming an old bicycle wheel into a charming and functional piece of home decor. This DIY bicycle wheel clock tutorial, courtesy of Kari Anne at Thistlewood Farms, provides a comprehensive step-by-step guide to create a one-of-a-kind timepiece. With minimal supplies such as a bike wheel, paint stick, can lid, weights, and a clock kit, you’ll craft a distinctive clock featuring vintage yardstick hands. The tutorial delves into the process of attaching and balancing these hands, allowing for personalization with Roman numerals on a chalkboard background. This upcycling project not only adds a creative twist but also injects a quirky touch to any room. By following these instructions, you’ll embark on a satisfying DIY adventure, resulting in a beautiful and functional clock that will become the centerpiece of your home.
DIY Roman Numeral Clock Tutorial
Transform a simple wooden round into an elegant Roman numeral clock with ease by following Ashley Basnight’s comprehensive tutorial on Handmade Haven. This step-by-step guide takes you through the process of selecting the right size round, painting, and applying a Roman numeral decal to create a stylish timepiece that will enhance any wall. With clear instructions on how to personalize your clock using additional letter stickers and the correct technique for peeling them off after painting, this DIY project is not just about crafting a clock – it’s about adding a touch of sophistication to your home decor. Whether you choose to add clock hands or customize the design to fit your personal style, this tutorial sets you up for a successful and enjoyable crafting experience.
How to Build a Driftwood Clock
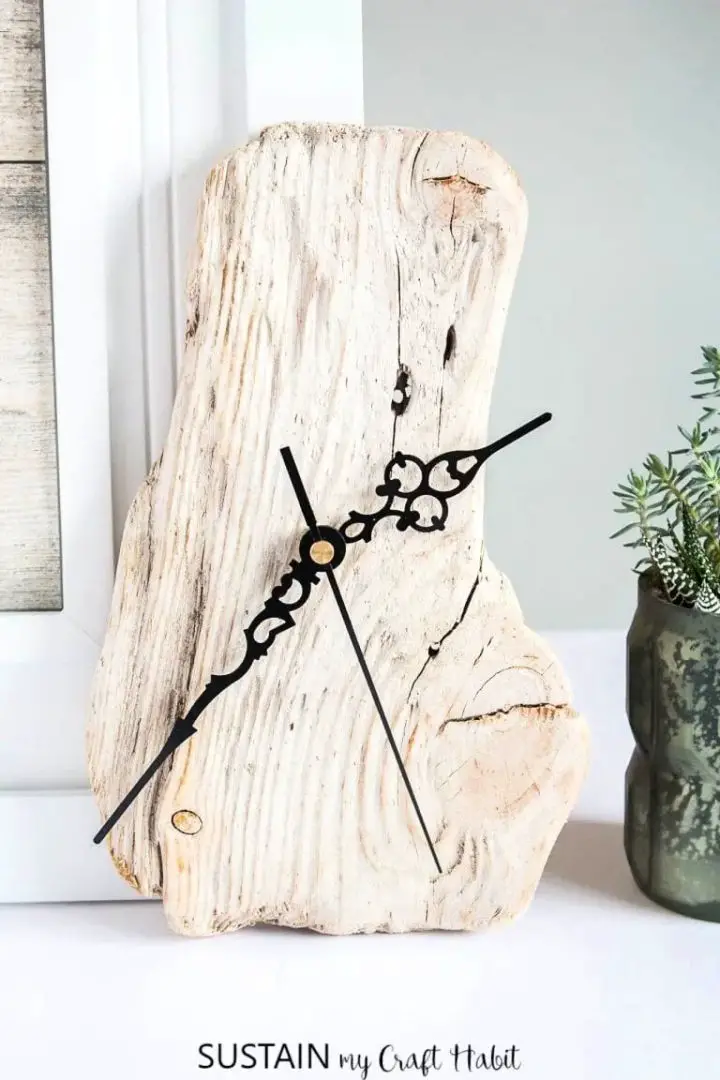
Transforming driftwood into a rustic clock is a creative way to bring the outdoors in. Sustain My Craft Habit offers a comprehensive tutorial on making this charming timepiece, walking you through every step from preparing the weathered wood to assembling the functional clock. With their clear instructions, anyone with a passion for DIY projects can turn a piece of driftwood into a unique and practical clock that adds a touch of nature-inspired charm to your home decor. Not only will you have a one-of-a-kind creation, but you’ll also enjoy the satisfaction of crafting something with your own hands.
Building a Stained Plywood Wall Clock
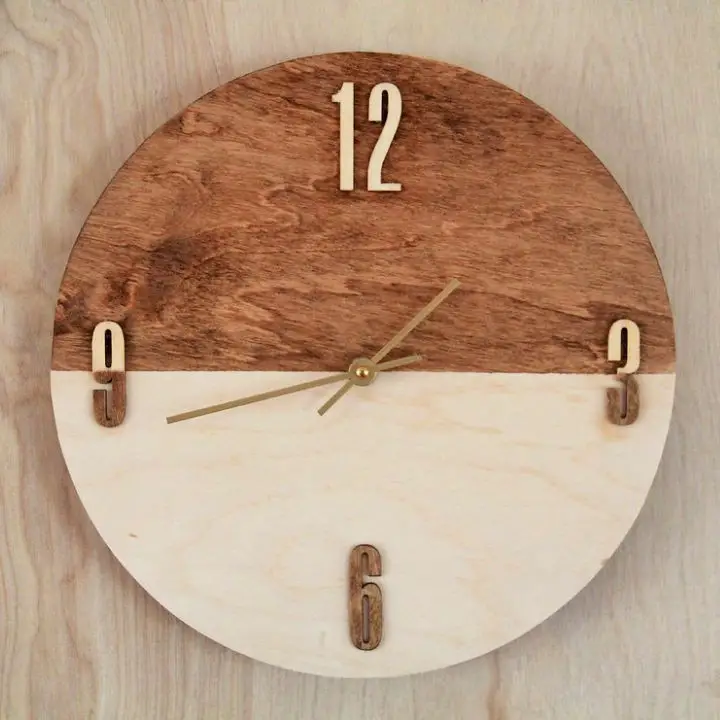
Create a one-of-a-kind timepiece with this straightforward DIY stained plywood wall clock project. Begin by choosing a round plywood panel and smoothing out the edges with sandpaper for a seamless finish. Use painter’s tape to section off the clock face, then apply your preferred stain to one side, resulting in a striking two-tone effect. Next, drill a central hole for the clock mechanism according to its specifications. To add some visual interest, stain the wooden numbers to match and attach them to the clock face using Mod Podge. Once dry, seal the surface and numbers with wax, carefully wiping away any excess residue. Finally, follow the instructions provided with your clock kit to install it correctly. With these simple steps, you’ll be able to craft a unique and personalized wall clock that can instantly elevate the ambiance of any room.
Quick and Easy DIY Paper Plate Clock
Transform your home decor with a delightful paper plate clock in just minutes! Following the simple DIY instructions from Creative Jewish Mom, you can create a personalized timepiece using only a dinner-sized paper plate and a clock movement kit. Begin by pinpointing the center of the plate and making a hole. Next, insert the clock mechanism, attach the hands, and secure it with hot glue or double-sided tape. This budget-friendly and entertaining project is perfect for crafting unique gifts or adding a personal touch to your walls. Feel free to experiment with different designs to give your timepiece a fresh look that’s as much fun to make as it is to display!
Giant Reclaimed Wood Clock From an Electrical Reel
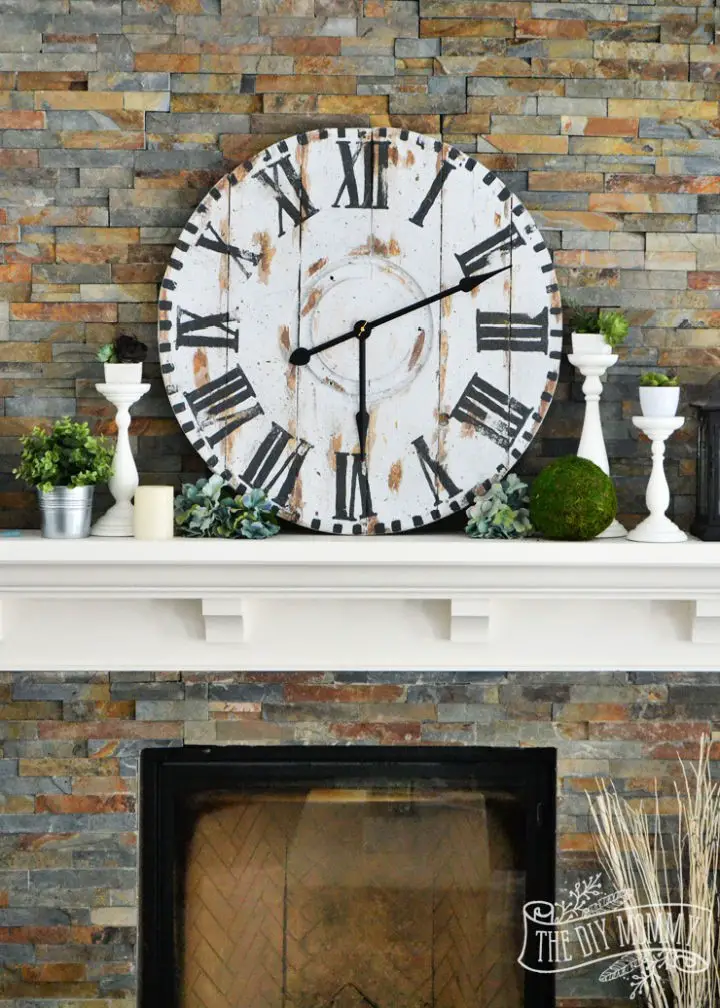
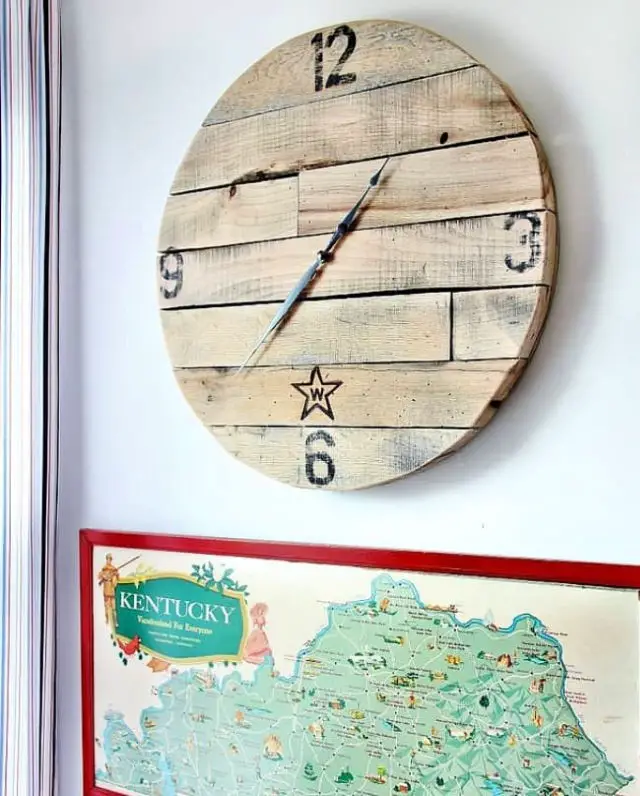
Elevate the ambiance in your living space by infusing a rustic charm through creative wooden clock designs. By repurposing an old electrical reel into a show-stopping oversized timepiece, you can effortlessly transform your mantel into a warm and inviting focal point. The DIY Mommy’s step-by-step guide serves as the perfect starting point for this project, which expertly combines reclaimed materials and Fusion Mineral Paint to create a vintage-inspired clock that exudes timeless elegance. As you follow along with Christina Dennis’s creative process, you’ll gain valuable insights into distressing techniques and painting methods, making it an accessible endeavor for DIY enthusiasts of all skill levels. To get started, gather the necessary materials – including a wooden electrical reel, paint, and a clock kit – and let The DIY Mommy guide you every step of the way, providing inspiration for further wood-themed projects to keep your crafting journey engaging and fulfilling.
Redo the Thrifted Clock With Step by Step Guide
Transforming a thrift store find or an orphaned pot lid into a one-of-a-kind clock is not only an eco-friendly endeavour, but also a minimal-time commitment. By repurposing these overlooked items, you can create a stylish timepiece that elevates the ambiance of any room. To get started, simply gather a suitable pot lid, a clock mechanism whose hands align with your desired design aesthetic, a screwdriver for precision, and some duct tape to provide added security. With the provided photo tutorial as your guide, carefully detach and reattach the clock’s inner workings. Once complete, you can breathe new life into the old clock frame by transforming it into a creative photo display. Hang your finished masterpiece and bask in the warm, gentle ticking that adds character to any space.
Unique DIY Embroidered Basket Clock
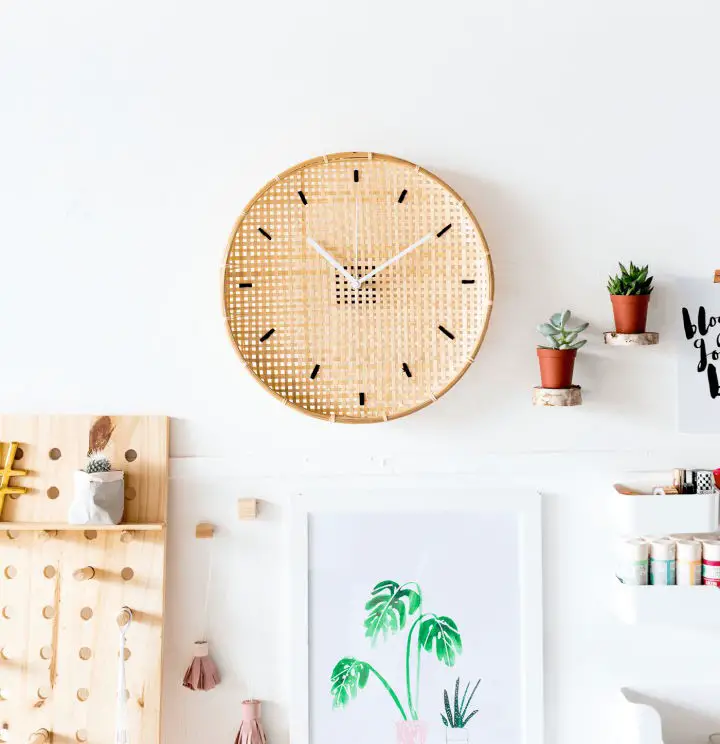
Transforming your living space with a touch of handmade charm is just a craft project away. For woodworking enthusiasts, making a unique DIY clock that combines functionality with personal style is an ideal pursuit. Start by repurposing a simple basket from IKEA and add a dash of embroidery for hour markers. This straightforward process requires only a few basic materials: the basketball-turned-basket, embroidery floss, a needle, and a clock mechanism. With these humble components, you can craft a timepiece that’s both practical and visually appealing, adding a natural, cozy vibe to your decor. Perfect for reducing phone-checking habits and enhancing productivity, this handmade clock is a stylish step towards a more focused environment.
How to Make a Holographic Clock
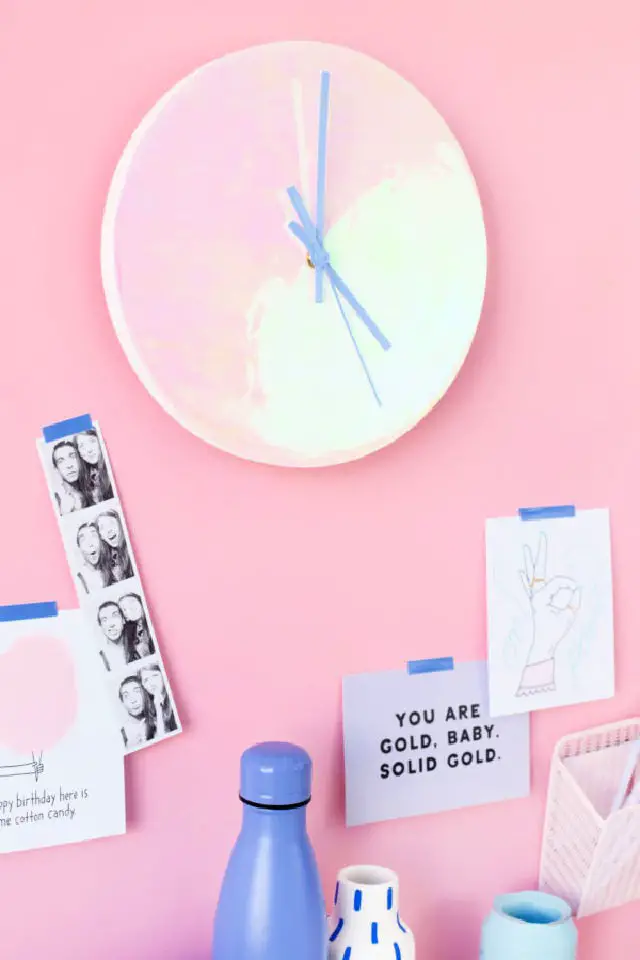
Ready to inject some futuristic charm into your home decor? Look no further! A DIY holographic clock, courtesy of Studio DIY, is an exciting project that’s surprisingly easy to bring to life. With step-by-step guidance, you’ll upcycle a plain wood clock base and holographic vinyl into a show-stopping timepiece. Begin by refinishing the clock base with sandpaper, followed by a fresh coat of paint to create a sleek backdrop. Once dry, multiple layers of high-gloss decoupage glue will prime the surface for the vinyl’s arrival. Apply the vinyl carefully, eliminating bubbles for a seamless finish. Complete the look by attaching painted clock hands, and you’ll have a one-of-a-kind masterpiece perfect for craft enthusiasts seeking to make a statement in their space.
Pretty Handmade Wood Clock
Elevate your timekeeping game with innovative clock ideas that will spark creativity and amazement. One such inspiration is Holly Gagnon’s DIY Wood Clock project on Ribbons & Glue, which cleverly combines the timeless appeal of circles with the Ruby Rock-It East Coast Collection’s distinctive patterns and motifs. To create this personalized masterpiece, paint a Walnut Hollow base and use a Silhouette to cut out decorative elements, carefully centering your design around the AM/PM lettering and clock times on the patterned paper. This hands-on activity is not only an engaging way to spend time but also offers the chance to win the entire Ruby Rock-It collection by sharing it with Paper Issues. To get started, grab your Art Minds Clock Kit and unleash your creativity to craft a one-of-a-kind timepiece.
Beginner-Friendly DIY Wall Clock
Transform your space into a cozy haven by incorporating the natural warmth of timber through these DIY wood clock projects, perfect for a relaxing weekend activity. From The Lovely Drawer, learn how to upcycle an ordinary wooden chopping board into a sleek minimalist wall clock using basic tools and simple techniques. Our comprehensive guide makes it easy to add a touch of sophistication to any room without denting your wallet. Embark on this creative journey and stay tuned for more budget-friendly yet stylish home decor inspiration.
How to Build a Chalkboard Clock
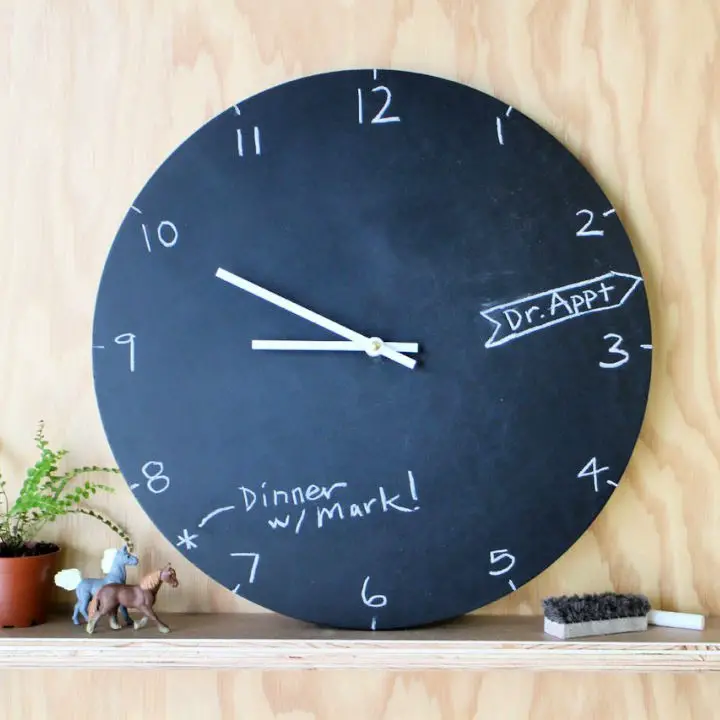
Elevate the art of timekeeping by crafting a one-of-a-kind chalkboard clock, as cleverly outlined on Instructables. This innovative DIY project seamlessly blends the classic appeal of analog clocks with the versatility of a writable surface, making it an ideal spot to jot down important reminders or schedule appointments. By following a clear and detailed step-by-step process, you’ll gather essential materials, cut wood pieces, and skillfully assemble a functional timekeeper that’s as unique as your personal style. The meticulous sanding, painting, and priming steps ensure a smooth, erasable chalkboard finish that invites creativity and customization. As much a statement piece as it is a practical tool, this clock not only keeps you punctual but also adds a touch of personality to any room, making it an exciting project to tackle!
Building a Farmhouse-Style Clock

Transform your living space into a cozy retreat by crafting a rustic farmhouse clock, inspired by The Vanderveen House’s creative guide. Begin by dismantling an old wooden electrical cable reel, sanding it down to create a smooth canvas for your masterpiece. Next, infuse the reel with a rich, dark hue through staining, capturing the essence of authentic farmhouse charm.
To add a touch of personal flair, apply custom vinyl numbers and layer on a coat of milk paint, imbuing your clock with a classic yet bespoke aesthetic. Whether you’re seeking to inject character into your home or create a one-of-a-kind gift, this DIY project is sure to delight.
As you work through the process, relish in the satisfaction of crafting something truly unique and beautiful from scratch.
Free Wood Slice Clock Plan
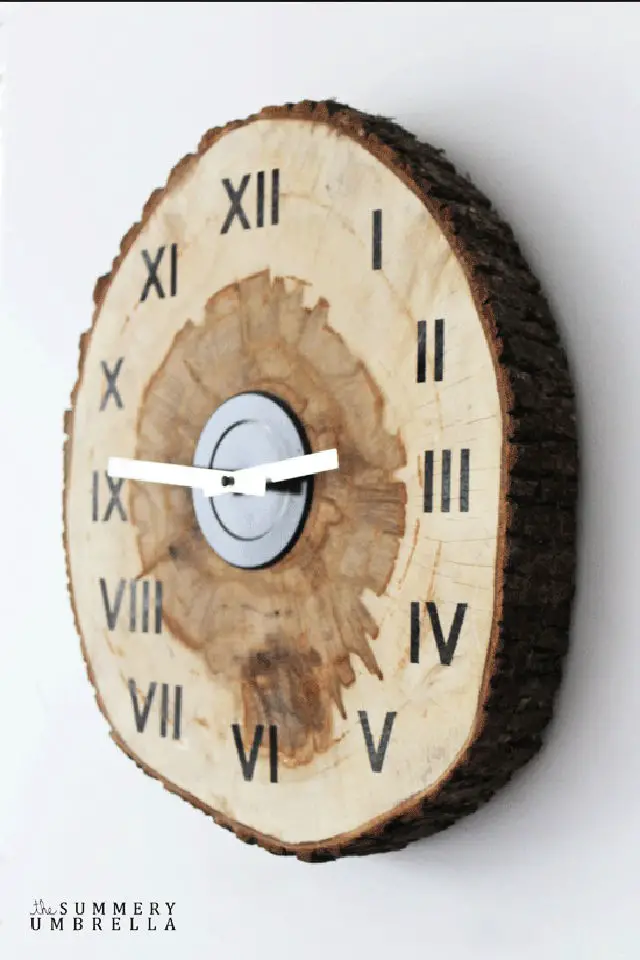
Transforming your living space into a cozy retreat with rustic charm is now possible through a simple DIY wood slice clock project. Linda Zahora-Cathcart’s clear instructions guide you through the process of disassembling an existing clock, preparing your wooden slice, and reassembling the clock mechanism. You’ll learn how to add a personalized touch by incorporating Roman numerals and finishing with clock hands. This unique home accessory is perfect for adding a natural element to your decor, and can be easily customized to fit your personal style. Start creating your own stunning addition to your home today.
Conclusion:
In conclusion, embarking on a homemade DIY clock-making journey not only allows you to infuse your space with a personal touch but also presents a chance to unleash your creativity and showcase your craftsmanship. This comprehensive guide has provided the foundation for your project, covering the necessary materials and tools as well as step-by-step instructions for crafting a wooden clock. Furthermore, addressing frequently asked questions has equipped you with the confidence to take on your clock-creating endeavor. With no limits on design possibilities, let your imagination be the guiding force as you bring 25 unique DIY clock ideas to life.
