Why Choose Burlap for Your DIY Ideas?
Burlap is often overlooked as just another fabric, but it’s truly a game-changer in the world of DIY projects. This versatile, durable, and eco-friendly material brings a unique rustic charm to any craft or decor endeavor. Here are some compelling reasons why incorporating burlap into your projects is an excellent choice:
Sustainability: Burlap is made from jute, a plant that requires minimal water and pesticides, making it an attractive option for those looking to reduce their environmental footprint. By choosing burlap, you’re supporting sustainable practices and contributing to a more eco-friendly craft industry.
Durability: Its robust nature makes burlap an excellent choice for projects like tote bags, table runners, and outdoor decorations. Withstand wear and tear without worrying about your crafts falling apart quickly.
Versatility: Whether you’re aiming for a shabby chic, rustic, or farmhouse look, burlap fits right in. Its natural color and texture make it adaptable to various themes and purposes, allowing you to create unique pieces that reflect your personal style.
Cost-Effectiveness: Burlap is an affordable material, making it ideal for large projects or when crafting on a budget. You get the rustic aesthetic without breaking the bank.
Ease of Use: Burlap is relatively easy to work with. Cutting, sewing, or gluing, it caters to crafters of all skill levels. Its forgiving nature means minor mistakes won’t ruin your project.
Incorporating burlap into your DIY projects not only adds a unique touch but also reflects a mindful approach to crafting. Its benefits extend beyond aesthetics, offering a practical, sustainable, and accessible option for creative endeavors.
How to Get Started with DIY Burlap Crafts & Decor Projects
As crafters, embarking on a DIY burlap adventure is an exhilarating experience that combines the charm of rustic elegance with limitless creative possibilities. With its impressive durability, eco-conscious appeal, and user-friendliness, burlap is an ideal material for both seasoned artisans and newcomers alike to work with. To kick-start your own journey into the world of DIY burlap crafting, here’s a comprehensive guide that will walk you through each step, helping you unlock the full potential of this versatile fabric.
Understanding Burlap and Its Benefits
When embarking on DIY projects, it’s essential to consider the benefits of burlap as a material choice. One key advantage is its eco-friendly nature, derived from the jute plant and thus gentle on the environment. Additionally, burlap boasts remarkable durability, making it an excellent option for projects ranging from tote bags to outdoor decor. Its versatility also shines through, effortlessly adapting to various design themes such as rustic, farmhouse, and shabby chic. Furthermore, burlap is a budget-friendly choice, providing a cost-effective solution for crafters operating on a limited budget. Moreover, its ease of use makes it an accessible material for crafters of all skill levels, allowing individuals to focus on their creative vision rather than wrestling with the fabric’s quirks.
Gathering Your Materials
To begin with burlap crafting, you’ll need to gather some essential materials. At the foundation of your creative endeavors lies the burlap fabric itself, which can be sourced from most craft stores in a range of sizes and colors. In addition to this primary component, you’ll require a few other fundamental tools: sharp scissors for making precise cuts, a glue gun and accompanying glue sticks for bonding burlap and any decorative elements, as well as sewing supplies like a needle and thread or a sewing machine if you plan on incorporating stitching into your craft. Finally, don’t forget to stock up on decorative embellishments such as lace, buttons, twine, or any other materials that spark your creativity.
Choosing Your First Project
Start with small yet rewarding projects that help build your confidence in crafting. A great place to begin is by tackling simple, hands-on projects like creating burlap bows, flowers, or utensil holders. These beginner-friendly endeavors are perfect for adding a touch of rustic charm to gifts, decorations, or even your dinner table setup.
Step-by-Step Guide to Your First Burlap Project
To get started, let’s create a simple Burlap Bow by cutting a strip of burlap fabric into a manageable size. A good starting point is a 2-inch wide and 18-inch long piece. From there, fold the burlap strip back and forth to form loops, holding the center tightly in place. Next, secure the center of the bow using a piece of twine or a small strip of burlap, ensuring it’s snug and secure. Once the center is tied off, fluff out the loops and tails of the bow until you’re satisfied with its appearance. Finally, use your hot glue gun to attach the finished bow to your project, and feel free to add any additional embellishments like buttons or lace to give it a personalized touch.
Tips for Success
Embracing creativity, don’t be hesitant to experiment with various techniques and add personal touches. Even if your initial project doesn’t quite meet your expectations, remember that it’s all part of the learning process. Burlap is an incredibly forgiving material, allowing for mistakes to be easily corrected, while also being budget-friendly. Furthermore, take advantage of online resources such as tutorials and guides to fuel your imagination and discover innovative approaches.
Conclusion
Embarking on DIY burlap crafts and decor ventures is an exhilarating experience, offering a unique blend of eco-friendliness, durability, and adaptability. With its natural charm and versatility, burlap is an ideal choice for crafting enthusiasts looking to create a variety of projects. Begin with straightforward undertakings, gather your necessary supplies, and allow your imagination to unfold as you craft with abandon.
DIY Burlap Crafts & Decor FAQs
Embark on a journey of creative expression as you tackle DIY burlap crafts and decor, armed with the knowledge of frequently asked questions that will guide you every step of the way, from project conception to completion.
What is burlap, and why is it popular for DIY projects?
Crafted from the fibers of jute plants or sisal, burlap is a sturdy fabric renowned for its earthy aesthetic, remarkable durability, and environmentally responsible production process. This eco-friendly material has become a staple in DIY projects, particularly those with a rustic flair, as it seamlessly blends into farmhouse, shabby chic, and other decorating styles.
Can burlap be painted, and if so, how?
When it comes to transforming burlap into a masterpiece, painting is a great option. To achieve the best results, opt for acrylic paint or fabric paint. Begin by choosing your design method: use a stencil or freehand it with confidence. Next, apply the paint using a sponge or brush in gentle, even strokes. This will help prevent bleeding and ensure a smooth finish. Once the paint is dry, you’re ready to incorporate it into your project, knowing that the burlap’s unique texture has been beautifully enhanced.
How do I prevent burlap from fraying?
To minimize fraying when working with burlap, consider these techniques: One effective method is to utilize pinking shears to trim the material. The zigzag edge created by the shears can help prevent fraying in its tracks. For added security, apply a thin line of clear fabric glue or fray check along the cut edges and allow them to fully dry before proceeding. If your project permits, adding a small hem around the edges can provide an extra layer of protection against fraying.
Is burlap machine washable?
When it comes to washing burlap, it’s crucial to exercise caution to ensure the fabric remains intact. For machine washing, use cold water and a gentle cycle to prevent damage. To further minimize the risk of fraying, consider placing the burlap in a laundry bag or pillowcase during the wash process. Post-wash, air dry by laying the burlap flat or hang it up to avoid any potential shrinkage.
How do I iron burlap to remove wrinkles?
To iron out wrinkles from burlap, start by setting your iron to its linen or high heat setting. As a precautionary measure, place a damp cloth between the hot plate and the fabric to prevent damage. Work carefully and methodically to smooth out the wrinkles, ensuring you don’t inadvertently scorch the burlap in the process. With gentle pressure and attention to detail, you should be able to remove any unwanted creases from the burlap’s natural texture.
Can burlap be used for outdoor projects?
While burlap is indeed suitable for outdoor projects due to its rugged nature, it’s essential to note that it isn’t entirely weatherproof. Prolonged exposure to moisture or sunlight can cause the material to degrade over time. To ensure a longer lifespan, consider treating your burlap with a fabric protector spray specifically designed for outdoor use. This simple step can help maintain the integrity of your project and withstand the elements.
How do I add decorative elements to burlap?
To give burlap decorative flair, consider the following creative approaches. For instance, use a hot glue gun to securely fasten embellishments like lace, buttons, or ribbons. Alternatively, employ a needle and thread for a more durable attachment method. You can also incorporate iron-on transfers or stenciling with fabric paint to add unique designs. By embracing these ideas, you’ll be well on your way to crafting beautiful, functional, and one-of-a-kind burlap pieces that bring rustic charm to your home or event. Whether you’re a seasoned DIY enthusiast or just starting out, the possibilities for enhancing your space are truly endless.
15 Best DIY Burlap Crafts & Decor Projects
Unleash the rustic charm of your home by exploring 15 innovative DIY burlap craft and decoration projects that will leave you in awe. Whether you’re a seasoned crafter or just starting out, these inspiring ideas will guide you to create stunning burlap masterpieces that elevate your interior design.
DIY Burlap and Lace Candle
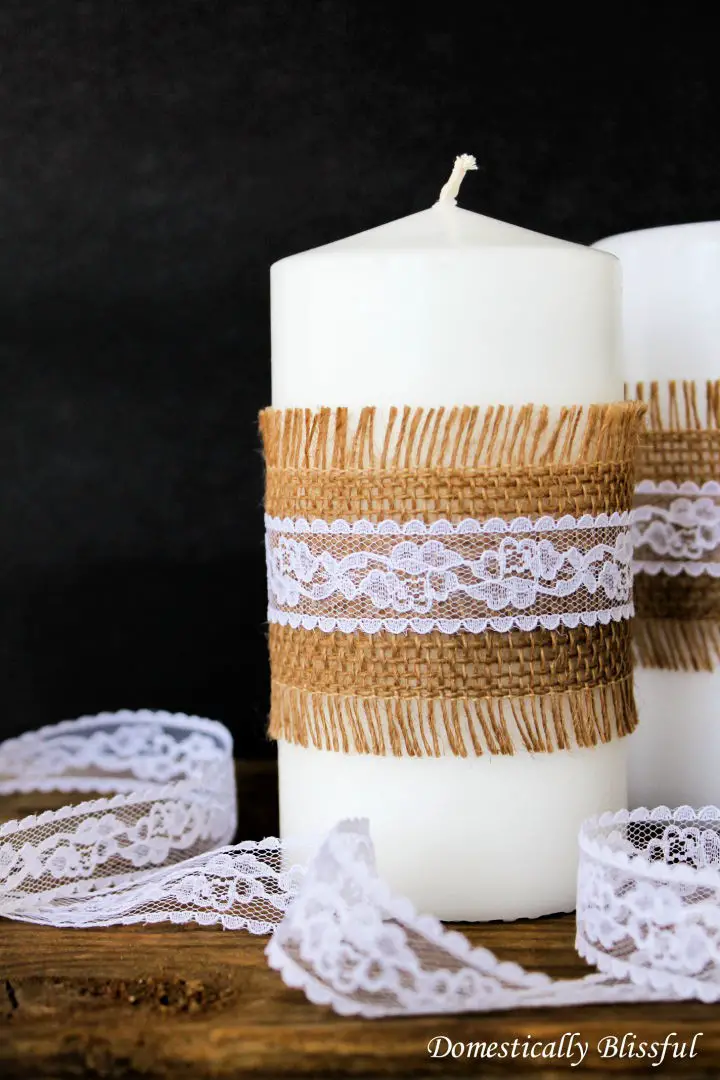
Transform ordinary white candles into charming, shabby chic masterpieces by wrapping them in strips of burlap and lace using hot glue. These unique centerpieces are perfect for adding a romantic ambiance to weddings, dinner parties, or enhancing your home decor without breaking the bank. A clever technique ensures your creations remain beautiful while providing a genuine flickering flame – simply insert a tea candle into the melted well of the original candle. Take it to the next level by personalizing your candles with embellishments like buttons, twine, or burlap flowers. This easy-to-execute craft yields stunning results, making it perfect for anyone looking to add a handmade touch to their events or living space.
Make a Flower Wreath Made From Burlap
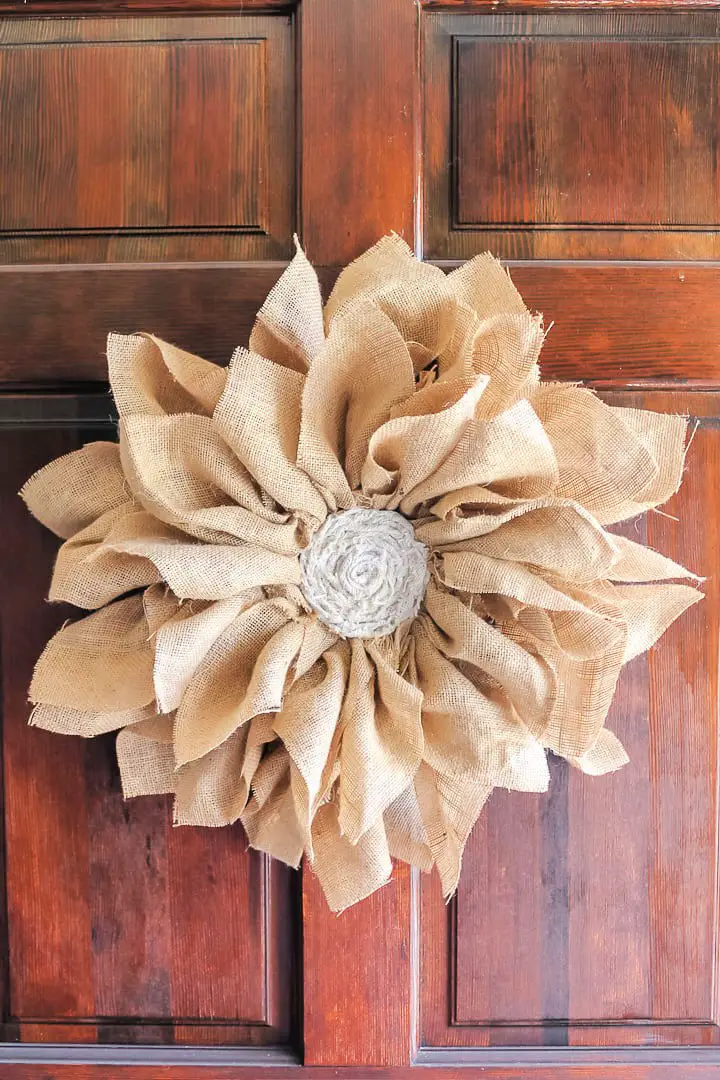
As the seasons transition, breathe new life into your home with a charming DIY flower wreath crafted from rustic burlap. By following Angie Holden’s guide on The Country Chic Cottage, you’ll discover a creative and effortless way to infuse your space with farmhouse elegance. With a clever twist, you’ll transform an old wood plate or charger and coaster into the foundation of your wreath, adding texture and depth. This tutorial is designed to walk you through the process of creating a beautiful floral decoration, featuring a harmonious blend of white and natural burlap hues. Clear instructions ensure a successful and enjoyable crafting experience. Whether adorning your front door or gracing your wall, this burlap flower wreath will become a delightful addition to any décor. Gather your hot glue gun, scissors, and ruler, and embark on this rewarding project today!
Hello Pumpkin Burlap Wall Art for Fall
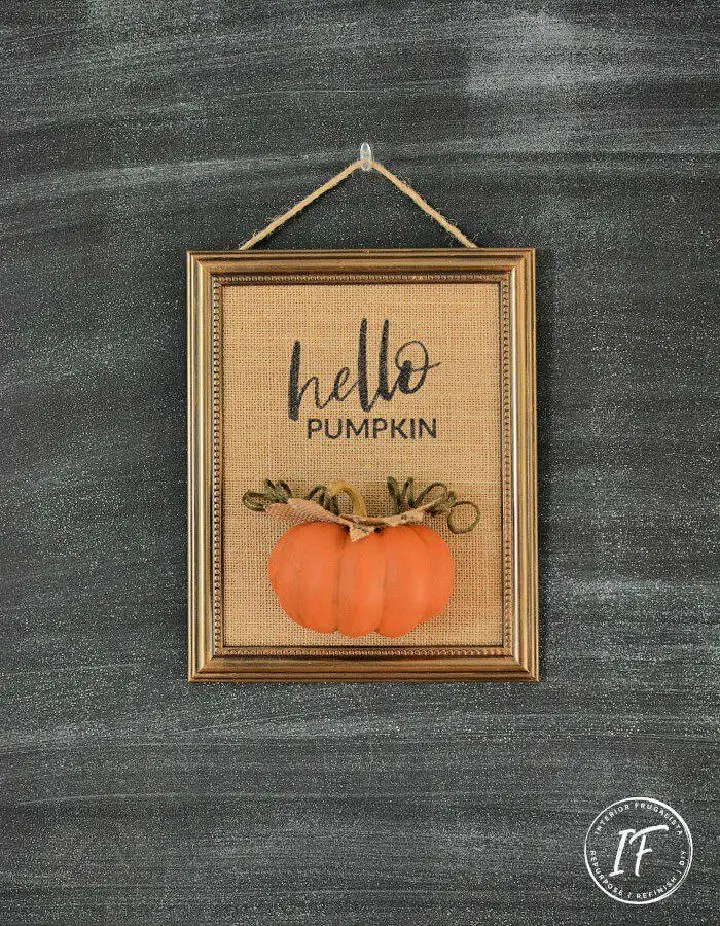
Transform a simple picture frame into a stunning piece of Hello Pumpkin burlap wall art, exuding rustic charm and perfect for home decor. This budget-friendly and creatively rewarding DIY project is ideal for adding autumn warmth to your space. With a comprehensive tutorial from Marie-Interior Frugalista, you’ll learn how to select the right materials, paint a styrofoam pumpkin for a realistic look, print on burlap fabric for a personalized touch, and assemble your creation for a festive display that’s sure to delight both you and your guests.
How to Make a Trendy Burlap Tote

Transform a plain burlap tote into a stylish accessory perfect for teachers, students, or anyone who loves unique additions. This DIY project requires just an iron-on transfer and a few simple steps, making it an ideal Teacher’s Appreciation gift or everyday essential bag. Simply download a pair of glasses clipart and print it onto iron-on transfer paper to create a custom design that’s both hip and functional. Add a pop of color by wrapping a vibrant scarf around the handle for a finishing touch. Whether you embellish with washi tape or keep it simple, this tote bag is sure to turn heads and become a go-to accessory for carrying your must-haves.
Make Your Own Burlap Flowers
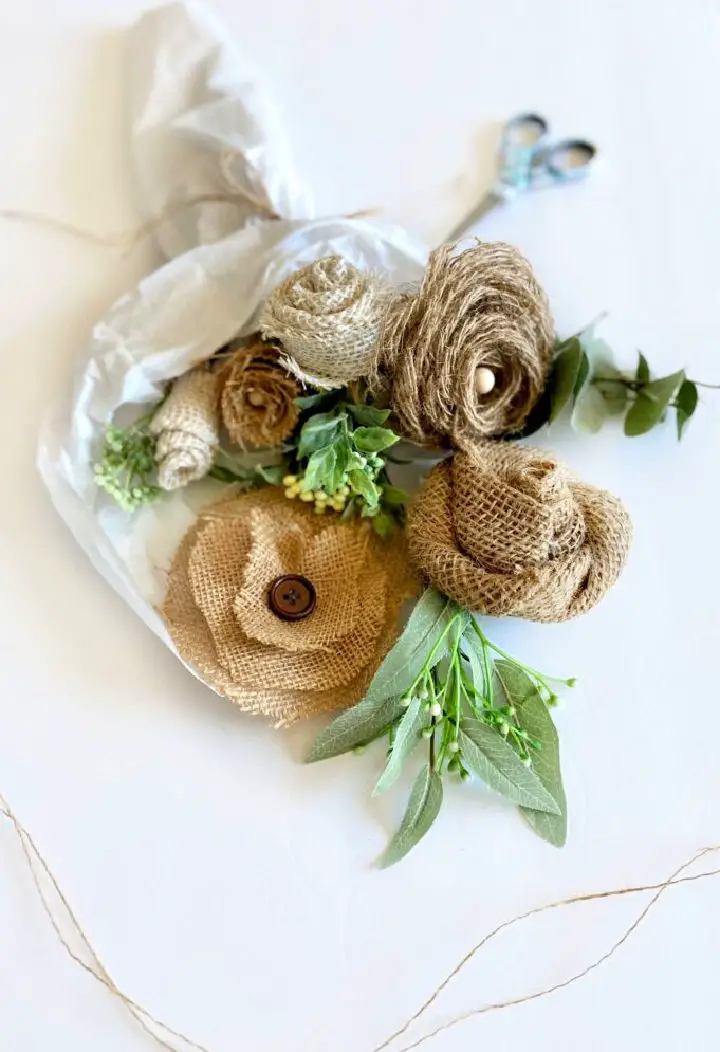
Learn the art of creating charming burlap flowers with Hootshack’s comprehensive DIY guides. These step-by-step instructions are ideal for adding a touch of rustic elegance to your home decor, elevating gifts, or crafting one-of-a-kind floral arrangements. To get started, you’ll need just a few simple supplies: burlap ribbon or fabric, hot glue, scissors, and optional embellishments. With these basics at hand, you’ll be creating beautiful burlap blooms in no time.As you explore the world of burlap flowers, discover a range of styles to master, from lush loopy flowers to delicate rosettes and rolled designs. Hootshack’s expert tips will help you achieve the best results for each unique design. Whether you’re looking to add a personal touch to wedding decorations, gift wrapping, or cozy home accents, burlap flowers offer a versatile crafting experience that’s sure to delight.
Homemade Burlap Silverware Holder
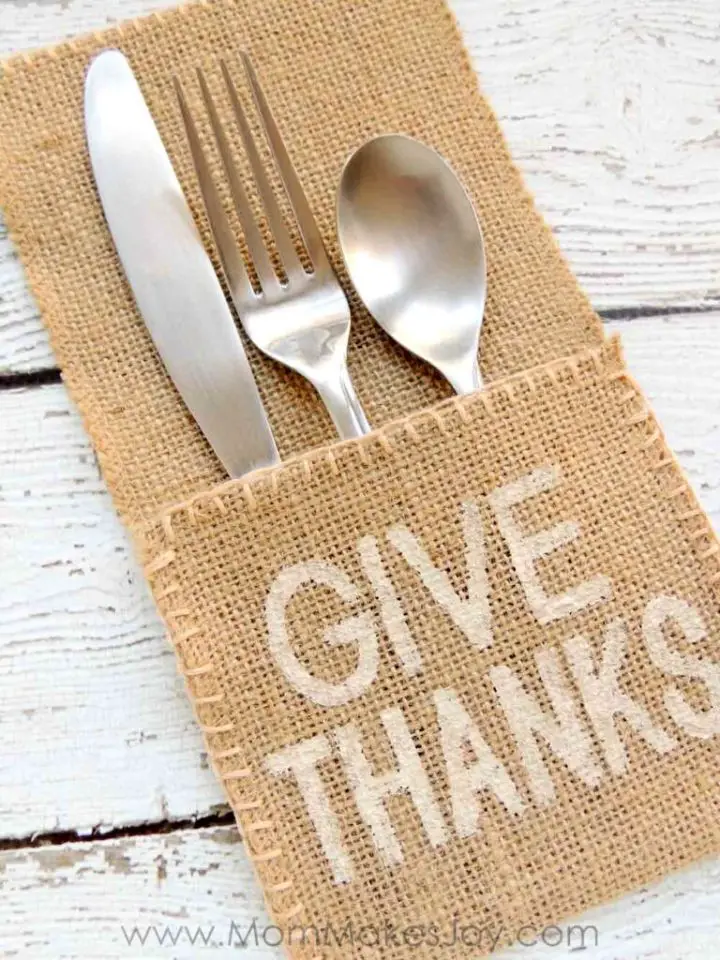
Add a touch of rustic charm to your dining table with these DIY burlap utensil holders, perfect for Thanksgiving or any festive gathering. This project is ideal for crafters of all skill levels, with options for both sewing and no-sew enthusiasts. With basic supplies like burlap ribbon, embroidery floss or hot glue, and paint, you can create a lovely utensil holder that’s sure to impress your guests. Follow the easy steps to cut, fold, and decorate your burlap into a charming table accessory that elevates your table setting while showcasing your crafting skills.
Handmade Burlap Coffee Bag Ottoman
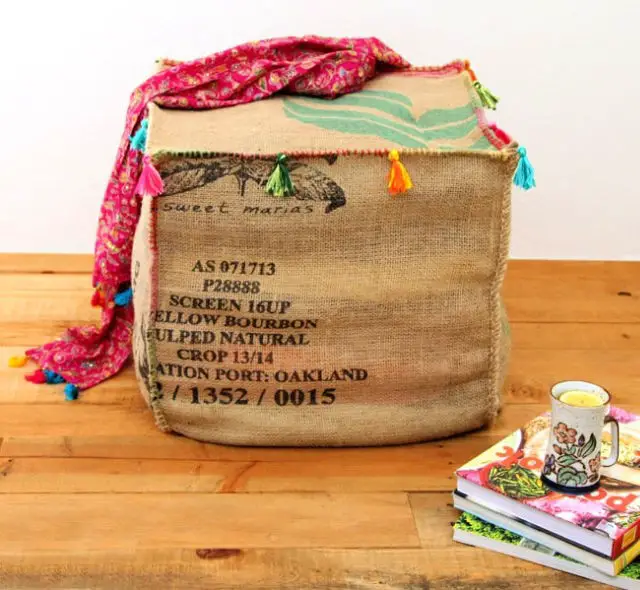
Transform your home into a haven of comfort and charm with a one-of-a-kind DIY burlap coffee bag ottoman, brought to life by the vibrant colors of a rainbow. This multifaceted piece serves as both a stylish seating option or side table, while also providing practical storage space. The crafting process is designed to be effortless, requiring only a single burlap coffee bag, minimal sewing, and everyday tools. Ananda’s step-by-step guide empowers even the most novice crafters to produce beautiful results with ease. Add a touch of handmade whimsy with the inclusion of tassels, and the ottoman becomes a delightful addition to any room, exuding a bohemian essence. Perfect for both indoor and outdoor settings, this eco-friendly choice can be easily folded away when not needed. By embracing your creativity and adding a personal touch, you’ll bring a unique charm to your living space with this innovative DIY project.
Make Your Own Burlap Bow
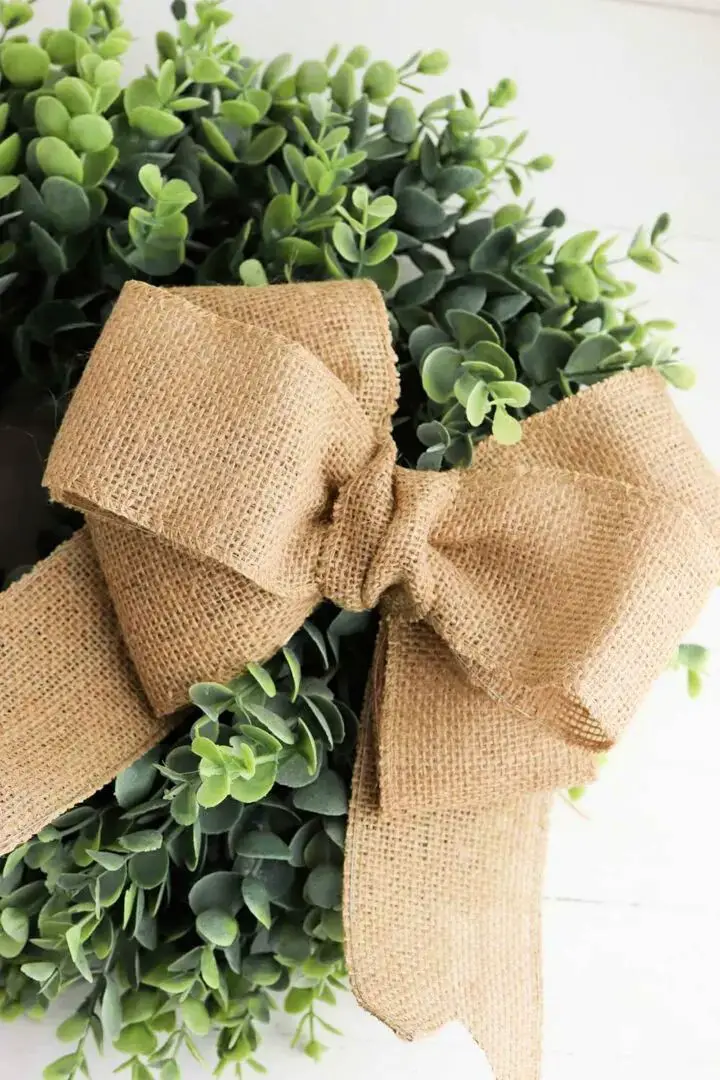
Crafting a burlap bow is a straightforward and budget-friendly way to infuse a rustic charm into your decor. With just a few essential materials – including burlap ribbon, twine, a hot glue gun, and scissors – you can create an endearing bow in no time. This DIY endeavour proves perfect for elevating wreaths, Christmas trees, and gift wrapping. By following the simple, step-by-step instructions on Single Girl’s DIY guide, you’ll master the art of measuring, cutting, looping, and securing the ribbon to craft a stunning bow. Not only will this project save you money, but it also allows you to put your personal touch on your decorations, giving you a sense of accomplishment as you bring beautiful bows to life for any occasion.
DIY Painted Grain Sack Burlap Vase
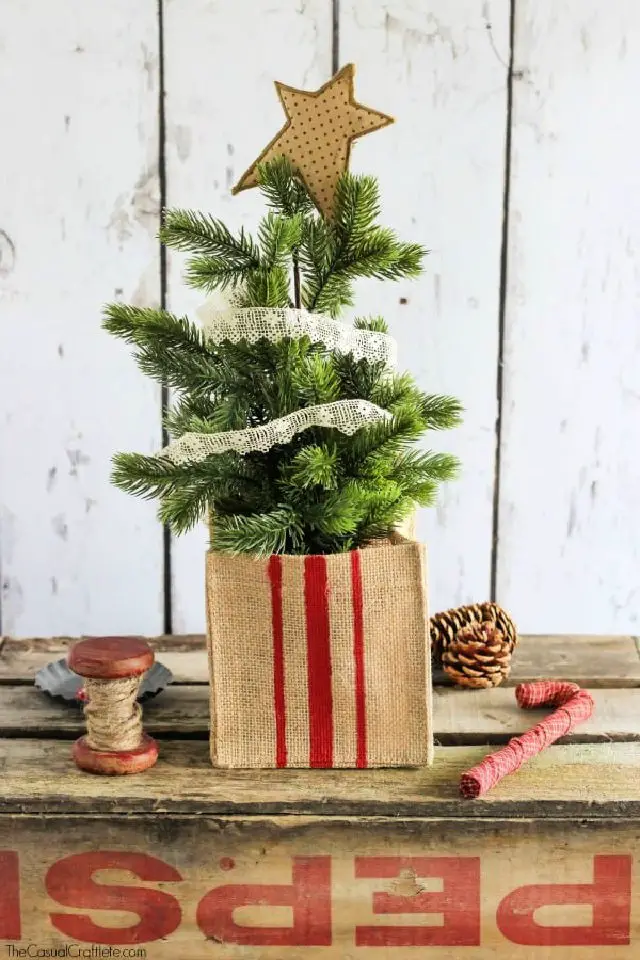
This Christmas, bring a touch of rustic charm to your home decor by transforming a premade burlap vase into a beautiful painted grain sack vase with Purely Katie’s easy-to-follow guide. This unique craft is perfect for showcasing small ornaments, miniature trees, or even floral arrangements, adding a warm and inviting ambiance to any room. To achieve the classic grain sack look, you’ll need just a few simple materials: paint, tape, and a foam brush. By following Purely Katie’s step-by-step instructions, you can create a one-of-a-kind display piece that incorporates vintage flair into your holiday decorations, making your home a cozy retreat for the season.
Brass Lamp Makeover With a Burlap Lampshade
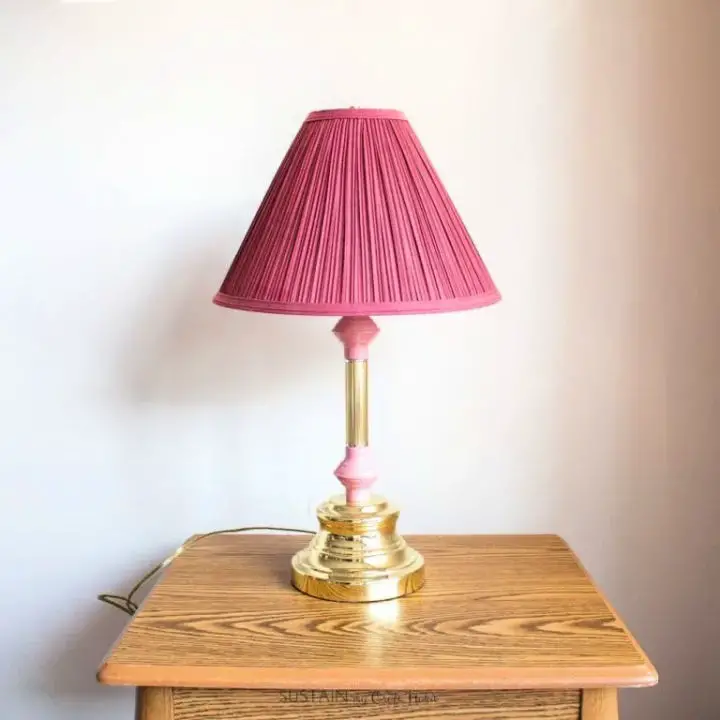
Bring a touch of rustic modern charm to your space by giving an old brass lamp a fresh makeover. A simple DIY project, courtesy of Sustain My Craft Habit’s Jane and Sonja, shows you how to transform a dated lamp into a stylish piece using just spray paint and burlap ribbon. With their step-by-step tutorial, even those new to DIY projects can confidently update their decor and breathe new life into their bedroom or living area with a customized lamp that reflects their unique style. Not only will this project save you money compared to buying new, but it’ll also give an old item a second chance at being treasured.
DIY Scrap Fabric and Burlap Spring Flower
Transform your DIY projects with the timeless charm of burlap crafts. At Manda Panda Projects, we’re passionate about breathing new life into leftover materials. This spring flower tutorial showcases a unique way to repurpose scraps from your craft stash. By combining an old corkboard, vibrant fabrics, burlap ribbons, and natural elements like sticks, you’ll create a one-of-a-kind, eco-friendly flower that adds a touch of whimsy to any space. The beauty of this project lies in its versatility – feel free to adapt the instructions using your available materials. With clear, step-by-step guidance, even the most novice crafter can produce a charming spring flower that radiates joy and warmth. This tutorial embodies the spirit of sustainability and creativity, inspiring you to give new purpose to craft leftovers and elevate your DIY game.
Making a Fringed Burlap Table Runner
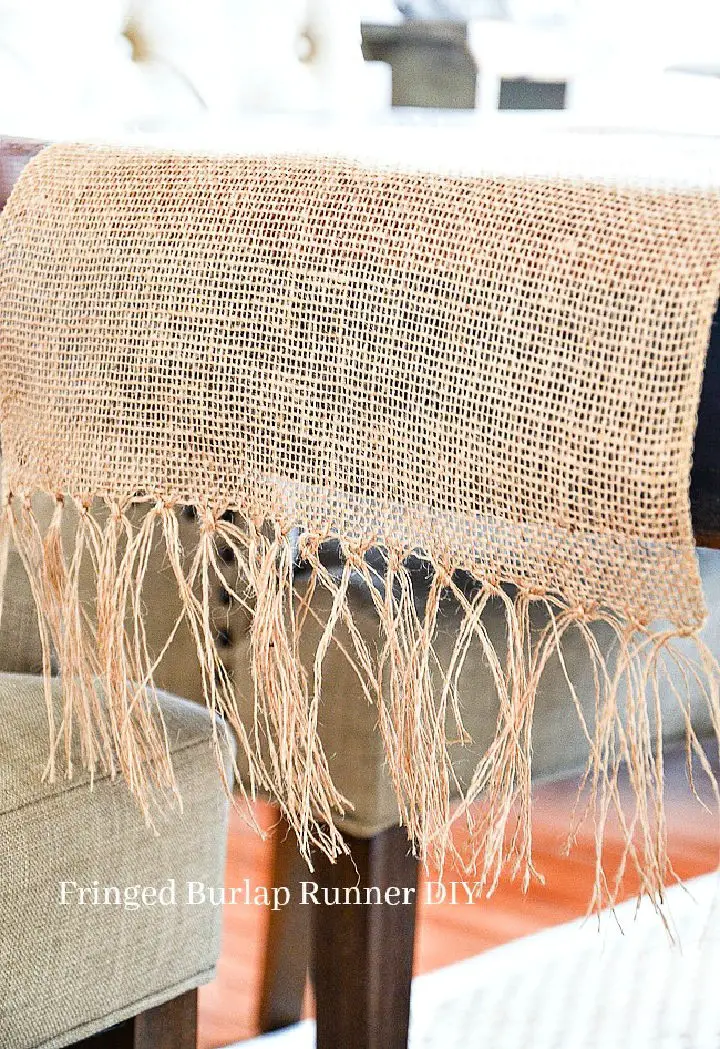
Transform your dining table with a charming fringed burlap table runner that exudes rustic charm. With StoneGable’s comprehensive DIY guide, you can create this unique accent in under 30 minutes. Simply measure and cut the burlap to fit your table, then use an easy-to-master formula to determine the length of fringe needed. Follow the straightforward instructions to tie knots and form a delightful fringe, turning plain burlap into a beautiful addition for your home.
DIY Burlap Pumpkin Centerpiece
Looking to infuse your home with the cozy charm of Autumn? Inspirations by D presents a straightforward guide on transforming an old pumpkin into a stunning burlap centerpiece. This DIY project seamlessly blends rustic and elegant elements, making it perfect for the fall season. By repurposing readily available materials such as burlap fabric, faux leaves, and pinecones, you’ll create a harvest-inspired table decoration that’s sure to elevate your dining space. The step-by-step tutorial provides clear instructions on cutting, arranging, and gluing the fabric, making it accessible for crafters of all skill levels. This project is not only simple and budget-friendly but also offers an enjoyable experience with a beautiful outcome that brings warmth and coziness to your home, perfect for the holidays.
Easy DIY Burlap Napkin Rings

Elevate your DIY game with a charming burlap project – crafting unique napkin rings! With its rustic texture and earthy vibe, burlap is the perfect addition to any spring or summer gathering. By repurposing thrifted or dollar store napkin rings, scraps of burlap, a hot glue gun, jute twine, and some paint, you can create delightful accessories that add a personal touch to your table settings. Simply customize the colors to match your theme, follow easy steps to assemble your creations, and get ready to impress your guests with one-of-a-kind napkin rings that exude a homemade charm. Perfect for those who love adding a handmade element to their dining experience, this project is sure to become a staple in your crafting repertoire.
DIY Burlap and Drop Cloth Gift Bag
Bring a touch of rustic charm to your gifts with DIY burlap and drop cloth gift bags. This unique project, shared by Jamie on So Much Better With Age, is perfect for those who appreciate the beauty of natural textures. To get started, you’ll need some basic supplies: burlap, a drop cloth, twine, a sewing machine, and a few other essentials. The tutorial will guide you through each step, from cutting the fabric to adding your personalized touch with a stamped message. Not only is this a thoughtful way to package gifts, but it also makes for a lovely hostess gift during the holiday season. With these easy-to-follow instructions, you’ll be able to craft a one-of-a-kind gift bag that will be treasured by your loved ones.
Conclusion:
In conclusion, embarking on a journey of 15 DIY burlap crafts & decor projects allows you to create one-of-a-kind, rustic pieces that not only elevate your home’s aesthetic but also make thoughtful gifts. The unique characteristics of burlap – its versatility, durability, and natural charm – make it an ideal material for crafting enthusiasts seeking to add warmth and texture to their DIY endeavors.
As you explore the world of DIY burlap crafts, we hope you’ll find inspiration in understanding the benefits of using this versatile material, selecting the perfect project, and executing it with ease. Remember that each project not only hones your crafting skills but also infuses your decor with a personalized touch. So, why wait? Start your DIY burlap crafts & decor projects today and transform the ordinary into something extraordinary!
