What do you need to decoupage?
To get started with decoupage, you’ll need a few basic supplies: an item to decorate, a design or pattern to choose from – think vases, furniture, or even boxes – adhesive glue or Mod Podge, paintbrushes (one or multiple depending on the level of detail), scissors or a craft knife for trimming any excess material, and some sandpaper to smooth out rough surfaces. You can also take it up a notch by adding embellishments like beads, sequins, or other decorative elements to give your piece an extra boost of personality! Before you begin, make sure both the object and decorations are clean, dust-free, and perfectly smooth – then get ready to unleash your creativity and have fun with the process!
Is Mod Podge and decoupage the same thing?
While it’s common for people to use the terms ‘Mod Podge’ and ‘decoupage’ interchangeably, they’re actually two distinct concepts. Decoupage is a creative process that involves attaching cut-out pieces of paper or fabric onto an object, creating unique designs and textures. Mod Podge, on the other hand, is a specific type of adhesive designed specifically for decoupage projects. It’s available in various finishes, including glossy, matte, and sparkly, making it an indispensable component of any decoupage endeavor.
What is the best material to use for the decoupage?
While decoupage can be applied to a wide range of surfaces, the ideal canvas is typically a smooth, sealed wood or metal surface. Additionally, acrylic paint and water-based varnish are popular choices for achieving a strong bond between the adhesive and the material being decorated. For an added layer of protection and longevity, some crafters opt to apply a polyurethane sealer over their decoupage creations, further enhancing the overall durability of the finished piece.
Is it easy to decoupage?
Decoupage is an accessible craft that can be mastered with basic skills and simple materials. To get started, you’ll need scissors, glue, a workspace, and decorative paper. As you hone your skills and build confidence, you can create stunning pieces with decoupage techniques. Begin with smaller projects like making cards or crafting simpler designs before tackling larger items. Online tutorials and tips are plentiful to help you refine your craft and enjoy the process.
What is Mod Podge use for?
Mod Podge is a multi-purpose adhesive that offers a range of creative possibilities. Its versatility lies in its ability to seal and protect a variety of materials, including paper, fabric, wood, photos, and more. Whether used solo or combined with other adhesives, Mod Podge forms the perfect foundation for mixed-media art projects. With its waterproof properties, rapid drying time, and glossy finish, this adhesive is an ideal choice for a wide range of craft endeavors. Furthermore, Mod Podge can be employed to add a vintage flair to decoupage projects, allowing artists to achieve a unique, one-of-a-kind aesthetic. Overall, Mod Podge stands out as a reliable and user-friendly adhesive solution that is perfect for any craft project seeking to add an extra layer of protection, durability, and visual appeal.
Is Mod Podge a sealant or a glue?
Mod Podge is a multi-faceted creative tool that offers a unique blend of adhesive, sealant, and finisher properties. Its water-based formula allows it to be used on a wide range of surfaces, including paper, fabric, glass, wood, and ceramics. As an adhesive, Mod Podge provides a strong bond between materials, making it ideal for crafting and DIY projects. Additionally, its protective layer serves as a sealer or varnish, safeguarding your creations from wear and tear while also adding a durable finish. The versatility of Mod Podge lies in its ability to create distinct decorative effects, from matte to glossy finishes, making it an essential tool for any crafter’s arsenal.
Does Mod Podge make things waterproof?
When it comes to making items waterproof, Mod Podge is a versatile material that’s often overlooked. With its ability to create a protective sealant layer, it prevents water or moisture from penetrating the surface. When applied correctly, this adhesive can withstand both indoor and outdoor conditions, remaining durable for years without showing signs of fading or cracking due to weathering. Its ease of use and effectiveness make it an excellent choice for crafting projects that require a waterproof finish.
Can Mod Podge be painted over?
When you’ve finished applying your initial layer of Mod Podge, the surface is primed and ready for acrylic paint. To achieve optimal results, use a foam brush to apply thin, even layers, allowing each coat to dry completely before adding more or varnishing. This technique ensures a smooth, professional finish.For intricate details, it’s crucial to work with a very thin brush, applying several thin coats of paint rather than a single thick layer. Once the painting is complete, seal your work with a layer of varnish for added protection and durability.By mastering this process and combining it with creative decoupage furniture ideas, you can produce stunning pieces that boast a high-quality finish.
What is best to decoupage furniture with?
When it comes to decoupage furniture, two primary materials stand out for their effectiveness: paper and fabric. Paper offers a sleek, even surface ideal for simple designs, whereas fabric allows for more complex patterns and textures. Regardless of the material chosen, an adhesive and sealer are essential components to ensure the design remains intact over time. To provide an extra layer of protection, consider applying a varnish after sealing, adding an extra barrier against wear and tear. By focusing on meticulous preparation and attention to detail, you can successfully create stunning results with either paper or fabric.
Can you seal painted furniture with Mod Podge?
Mod Podge is often touted as a versatile crafting tool, but its applications extend far beyond the realm of scrapbooking and decoupage. One of its most overlooked uses is sealing painted furniture, creating a protective barrier that shields against scratches, spills, and fading. This all-in-one adhesive, sealer, and finish dries quickly to a clear, non-tacky finish, offering lasting protection for hand-painted or decoupaged pieces. Whether you’re looking to preserve the vibrant hues of a newly refinished dresser or protect a vintage side table from everyday wear and tear, Mod Podge is an excellent solution that can help keep your furniture looking its best for years to come.
What does Mod Podge do to wood?
Mod Podge is a versatile sealant that can be applied to wood to provide a shield against scratches and scuffs, while also rendering the surface waterproof. This unique product not only protects the wood from damage but also enhances its natural beauty by imparting a glossy finish. When used correctly, Mod Podge can be relied upon to maintain the integrity of your wooden projects for an extended period.
How do you do decoupage on furniture?
Transforming ordinary furniture into a work of art is as simple as incorporating the decoupage technique. Before applying any design elements, prepare the surface by sanding it down to create a smooth canvas. Next, select vibrant paper prints that align with your desired aesthetic and secure them to the furniture using a suitable adhesive like glue or varnish. To ensure longevity, seal the design with multiple coats of a protective finish. With these straightforward steps, you can elevate your furniture’s visual appeal through decoupage, making it truly one-of-a-kind.
What kind of paper can you use to decoupage furniture?
When it comes to decoupage furniture, selecting the right paper is crucial for a professional-looking finish. Opting for acid-free, archival quality tissue paper is essential, as it offers a perfect balance between being thin enough to allow adhesives to penetrate and strong enough to provide a smooth finish. Moreover, ensure that you use high-quality, non-toxic adhesives and sealants to guarantee the longevity of your project. To complete the look, choose colors and patterns that harmonize with the piece of furniture you’re working on, allowing for a cohesive and visually appealing outcome.
How do you seal decoupage on furniture?
When sealing decoupage on furniture, begin by applying several thin layers of clear acrylic sealer or varnish using a brush. Start in the center and work your way outward, allowing each coat to dry completely before adding more. After the final coat has dried overnight, the piece is ready for use. For added protection, consider applying a layer of paste wax as well. Alternatively, you can apply a polyurethane or lacquer varnish over the decoupage to provide a comprehensive seal and safeguard against damage. To achieve this, apply light coats, allowing each one to dry before adding more. Once complete, lightly sand with fine grit sandpaper and wipe clean to ensure a smooth finish.
What is best to decoupage furniture with?
To create stunning decoupage designs on furniture, start by selecting acid-free paper materials like tissue paper, wrapping paper, or scrapbooking paper. Ensure the chosen adhesive is residue-free and suitable for decoupage, such as a dedicated medium or glue. Once the project is complete, apply a sealant to protect the artwork from wear and tear. For optimal results, use light- to medium-weight papers, like wrapping paper, tissue paper, napkins (provided they’re lignin- and acid-free), old book pages, or fabric cutouts. For added drama, consider using decal papers and foils. Before commencing, ensure the surface is meticulously clean, dry, and free of dust.
Can you decoupage fabric on furniture?
Transforming old furniture into stunning pieces has never been easier! With decoupage, you can give new life to worn-out surfaces by applying fabric or patterns of your choice. This creative technique requires minimal effort, as all you need to do is cut out your desired design and adhere it to the surface using a suitable adhesive. Before getting started, ensure the substrate is smooth and free of any imperfections by lightly sanding it down. The end result is nothing short of breathtaking, adding a touch of elegance and uniqueness to your furniture.
DIY Decoupage Table Top With Wallpaper
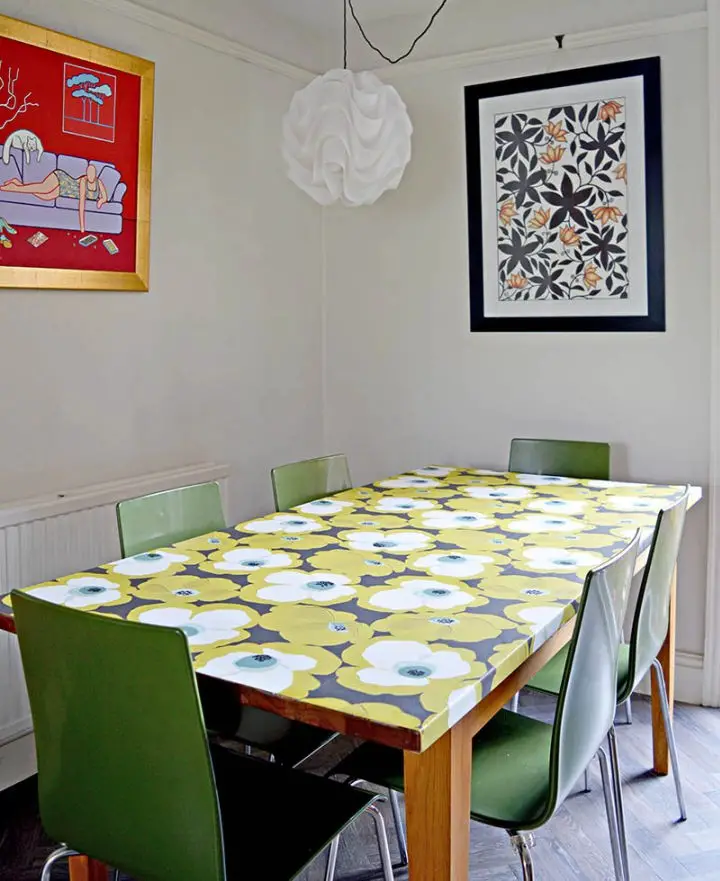
Want to give your home a fresh new look without breaking the bank? Try your hand at this easy DIY decoupage tabletop project! Start by selecting a stunning wallpaper design that complements the surrounding decor. You’ll also need some essential supplies, including wallpaper paste, a bowl for mixing, and a few specialized tools like a paste brush, smoothing brush, rotary cutter, and wallpaper scissors. To finish off your masterpiece, apply a clear coat of indoor varnish to seal in all your hard work. With just a few simple steps and some basic materials, you can achieve a beautiful decoupage tabletop that will add a touch of elegance to any room.
Cool Homemade Decoupage Dresser
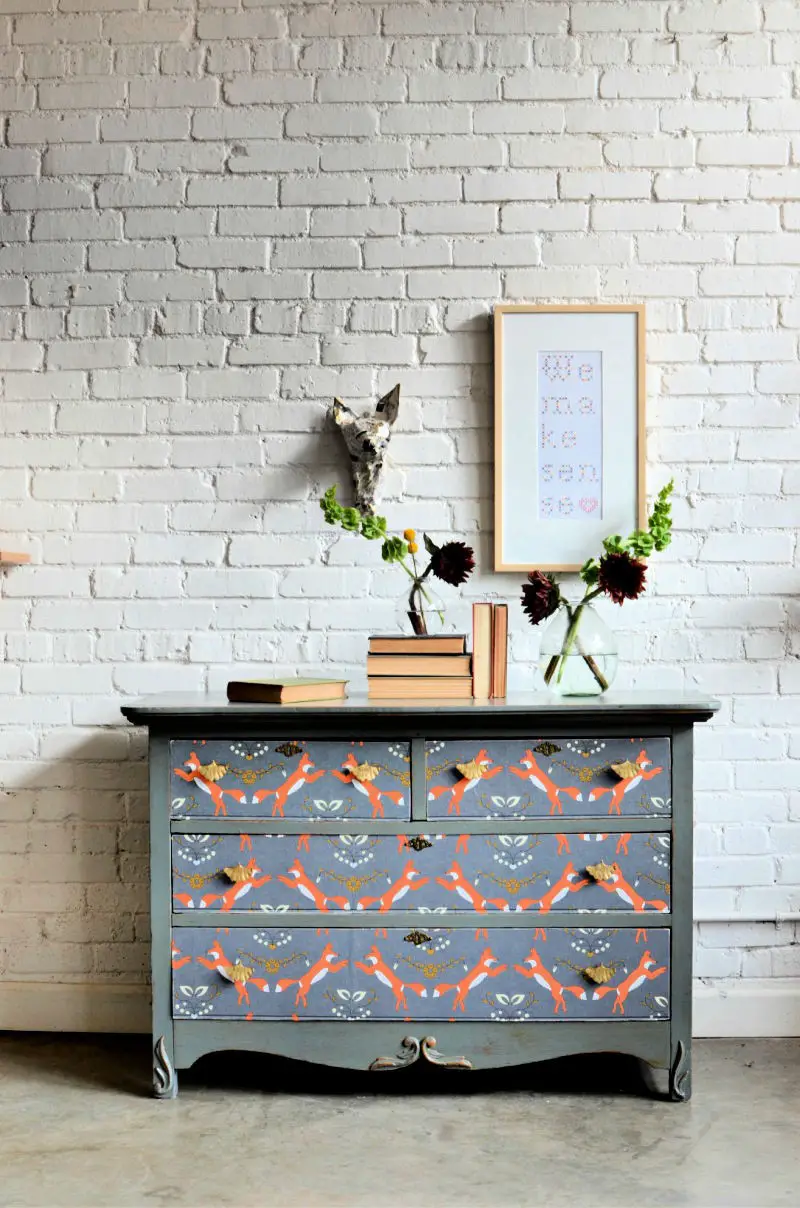
Get ready to be enchanted by this whimsical decoupage dresser makeover that’s reminiscent of a fairy tale! To achieve this magical look, gather your trusty supplies: wallpaper designs, a craft knife, shop towels, frog tape, paint, paintbrushes, foam rollers, Mod Podge, and a few other creative tools. With these essentials at hand, you’ll be well on your way to crafting a decoupage dresser that’s as charming as a winter wonderland.
Easy Floral Decoupage Bookcase with Napkins
Transforming a vintage bookcase into a stunning, floral-textured piece is a creative and rewarding DIY project. To achieve this look, start by gathering cute floral napkins and apply them to the bookcase using Mod Podge. Once the adhesive has dried, paint the entire structure white to give it a fresh and modern appearance.
Making a Marble Paper Filing Cabinet
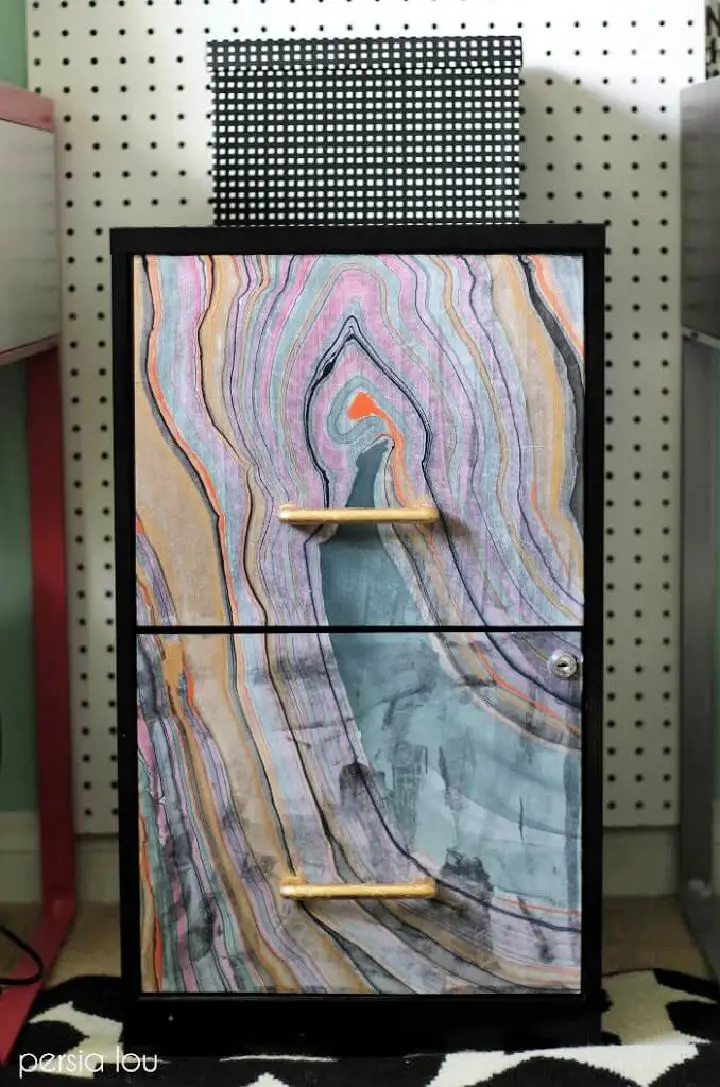
Transforming a vintage filing cabinet into a stunning piece of art is not only possible but also incredibly rewarding. The unique texture and aesthetic appeal of marble paper make it an ideal medium for adding some artistic flair to your old cabinet. To give your filing cabinet a makeover, start by covering the exterior with marble paper. This can be achieved by simply applying adhesive to the surface and then placing the paper on top. Once in place, use a foam brush to smooth out any air pockets or wrinkles. For an added touch of luxury, consider adding gold leaf or metal leaf decoupage to create a sophisticated and eye-catching design. To protect your new artwork from wear and tear, apply a coat of metal leaf sealant once the adhesive has dried. With these simple yet effective steps, you can turn your old filing cabinet into a true masterpiece.
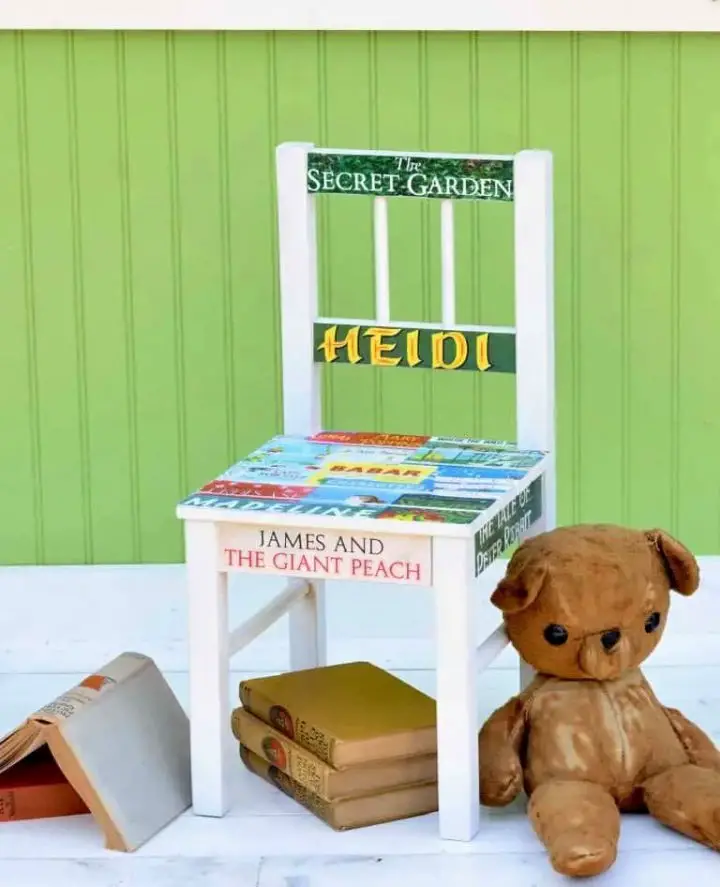
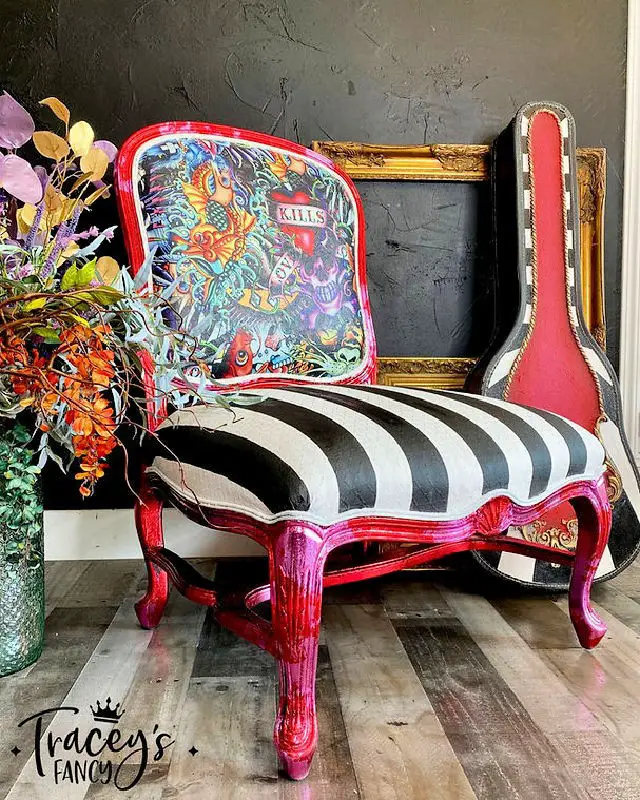
Handmade Decoupage Chair With Favorite Book
DIY Decoupaged Fabric Table Makeover
Get ready to be amazed by this stunning thrift store table transformation! To achieve this sleek and sophisticated look, start by gathering your essential materials: fabric of your choice, Americana Decor Maxx Gloss or Decoupage in Gloss for added sheen, a trusty paintbrush, scissors, and a large sheet of butcher paper. With these simple yet effective tools at hand, you’re just one step away from giving your thrift store find a luxurious makeover.
How to Make IKEA Moppe Map Drawers
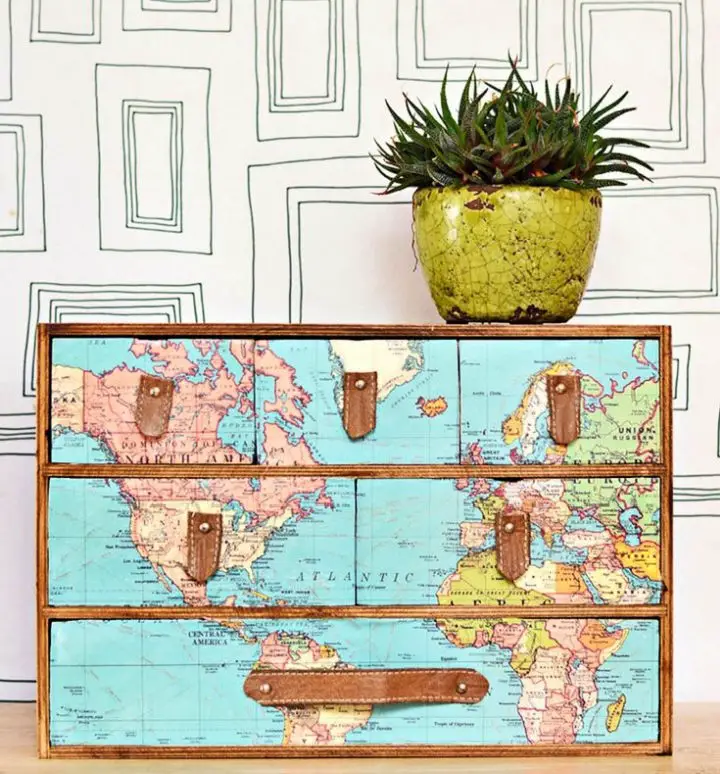
Revamp your IKEA Moppe with a creative twist! By combining a few clever materials and tools, you can transform this ordinary piece of furniture into an extraordinary work of art. Start by acquiring an IKEA Moppe, some dark-colored furniture wax, Mod Podge, a cutting board, a rotary cutter, a leather strap, and upholstery pins along with a hammer. With these materials at your disposal, you’re ready to unleash your creativity and give the Moppe a unique makeover that’s sure to turn heads.
DIY Decoupaged Palm Leaf Gold Table
The enchanting combination of decoupage and palm gold leaf on this table is nothing short of captivating. The thrill of giving a piece of furniture a decorative makeover is unmatched, as it has the power to transform your space in a matter of hours. With just a few simple supplies and some creative flair, you can recreate this look using palm leaves and turn an ordinary piece into an extraordinary work of art.
How to Decoupage on Wood Furniture
The nostalgia of inheriting old wood furniture pieces from loved ones is a unique experience many of us can relate to. Whether it’s a family heirloom or a vintage find, these timeless treasures often hold sentimental value and become an integral part of our homes’ charm. However, as much as we adore them, they may not always seamlessly blend with the rest of our furniture. The good news is that with a little creativity and some clever styling, it’s entirely possible to bring these treasured pieces into modern harmony.
Elegant Decoupage Chairs With Map on a Budget
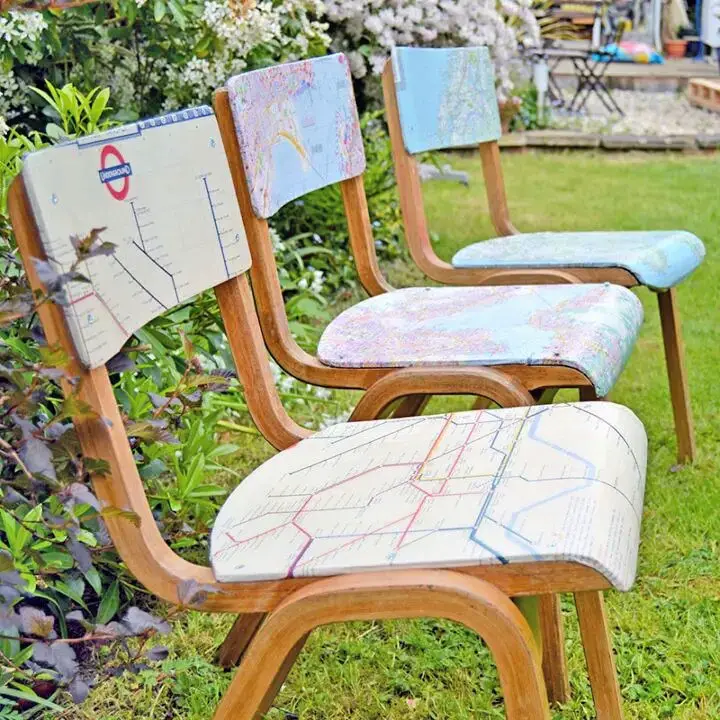
Imagine a statement piece that effortlessly elevates your room’s aesthetic – enter these stunning map chairs. Their unique blend of vintage charm and modern flair has the power to completely transform the ambiance. To achieve this look, you’ll need some basic DIY tools like old school chairs, maps, mod podge, sandpaper, a brush for glue, scissors, waterproof varnish, and a screwdriver. With these materials at your disposal, you’re just one creative step away from creating a showstopping focal point that will leave everyone wanting more.
DIY Decoupaged Coffee Table With Art Book
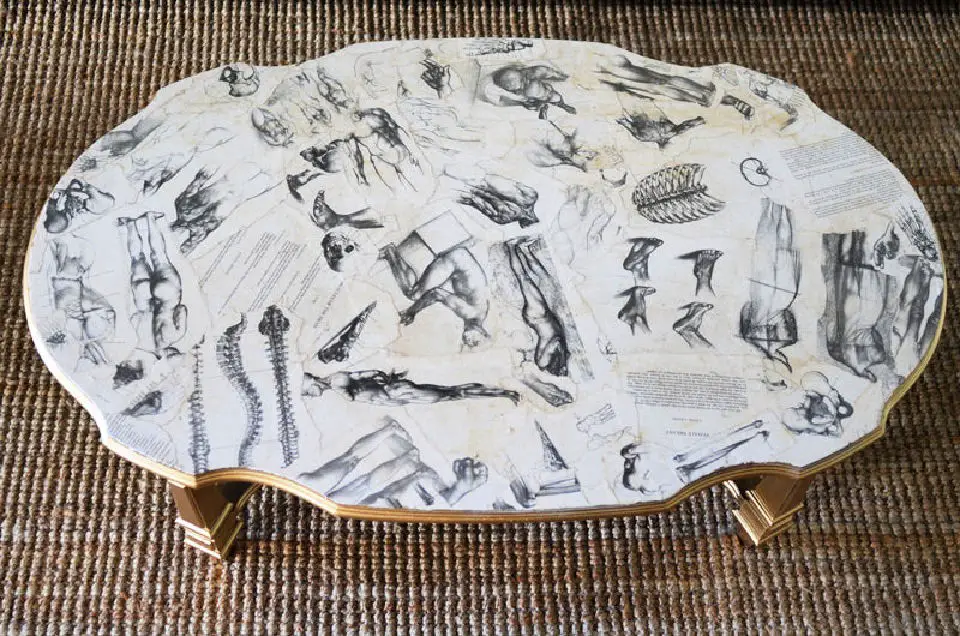
Give your outdated furniture a unique makeover by incorporating tactile elements and visual interest. A creative approach is to affix black and white anatomical diagrams of the human body to the tabletop, then add a touch of sophistication by painting the legs a rich golden hue. For a comprehensive guide on how to achieve this look, follow along with our step-by-step tutorial at mrkate.
Make a Floral Napkins Decoupage Desk
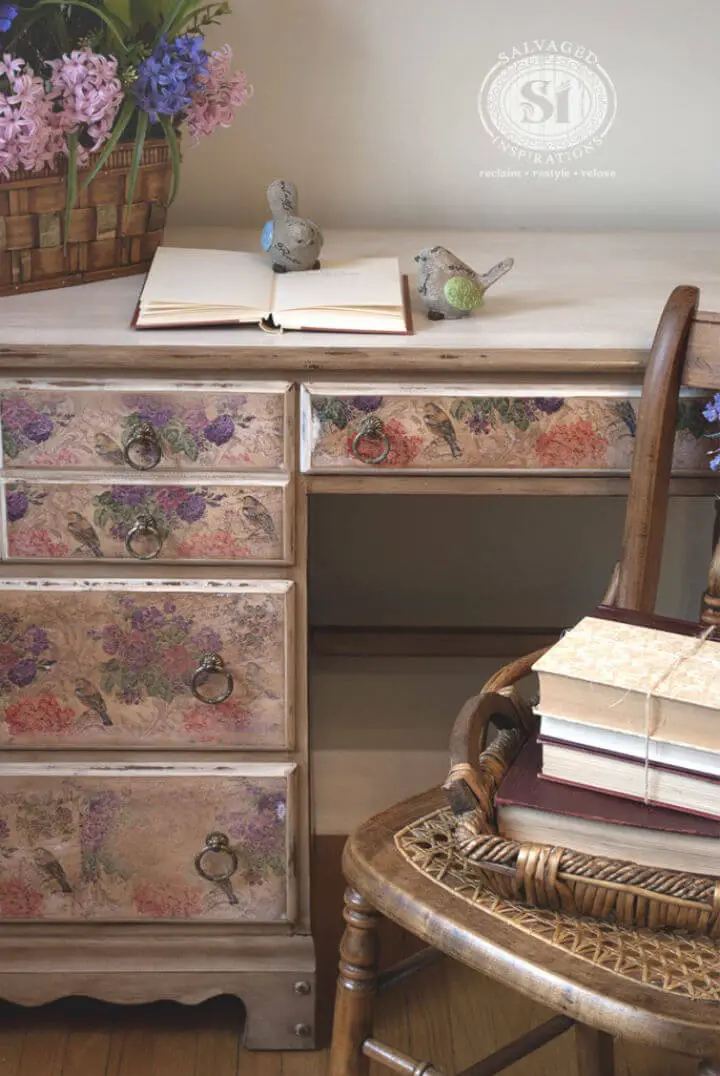
The piece of furniture in question exudes a charming French country flair, courtesy of its clever transformation. The process begins with the use of floral bird napkins, which are then paired with an old-fashioned technique involving snow milk paint. A gentle sanding of the drawers is necessary to prepare them for this unique finish. Once the surface is smooth, mod podge is employed to transfer the napkin designs onto the desk, resulting in a salvaged piece that embodies rustic elegance.
Handmade Decoupage Kids Table With Map – IKEA Hacks

Transform your child’s desk into a unique piece of art by repurposing an old map! Start by obtaining the mirror image inkjet printed map, which can be easily obtained online or at a local print shop. Next, apply a layer of Mod Podge Matt Finish to the surface of the map using a glue brush. Allow the first layer to dry completely before adding additional coats for optimal adhesion. Once the map is fully coated, use a sponge and water to smooth out any wrinkles or air pockets that may have formed during the drying process. To add an extra layer of protection and enhance the overall appearance of the hack, apply a thin layer of clear furniture wax using a soft cloth. Finally, bring the entire piece together by painting it with blue chalk paint and adding white accents for visual interest. To finish the look, use a chalk paintbrush to create subtle texture and dimension.
Unique DIY Coffee Sack Cat Litter Cabinet
The rustic charm of a vintage cabinet is elevated by the addition of a distressed coffee sack design. To create this unique look, you’ll need to gather a few simple materials: a cabinet or painted dresser, burlap coffee bean sacks, decoupage medium (such as Mod Podge), scissors, and craft paint in a color that complements the burlap. For an added touch of elegance, use small paint rollers to add subtle texture to your design.
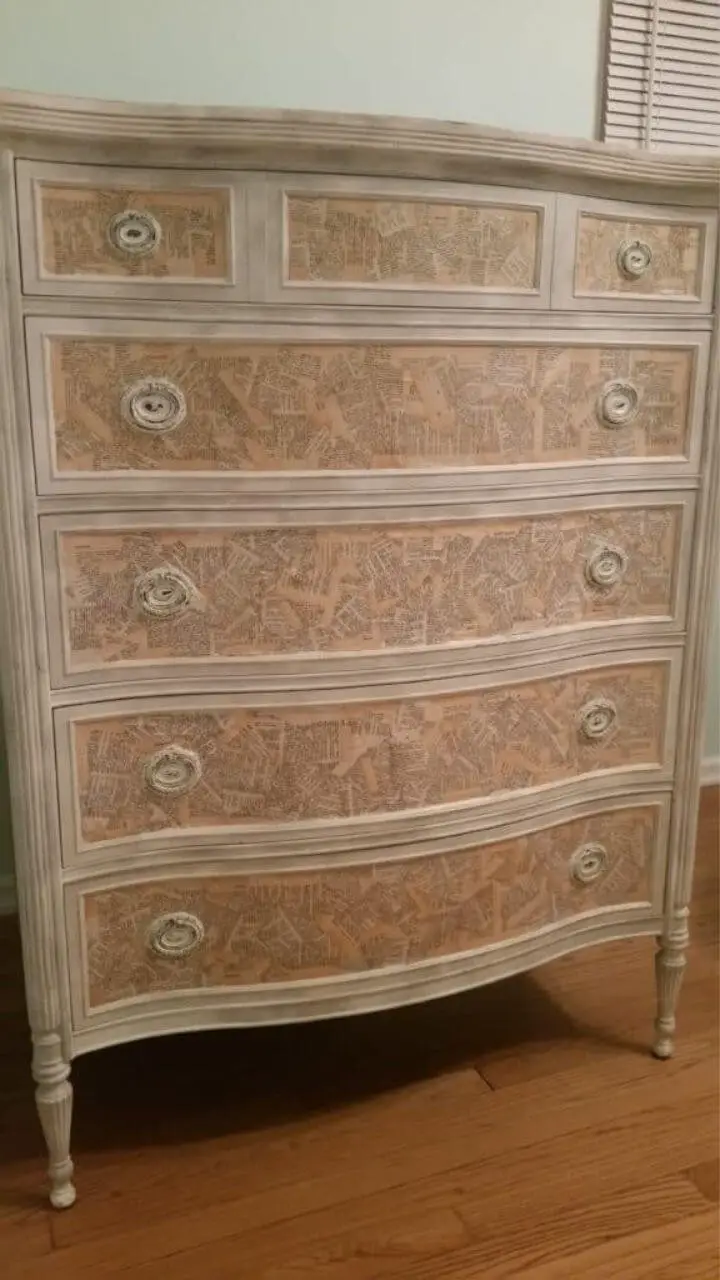
How to Decoupage a Dresser – Step by Step

To give an old dresser a fresh makeover, follow these steps: Start by preparing the surface for painting by applying masking tape to create crisp lines and protect any areas you don’t want to paint. Next, use latex paint to cover the entire dresser, choosing a color that complements your desired floral design. Once the paint is dry, cut kraft paper into strips and decoupage botanical prints onto the dresser using water-based glue sealant. Add some extra flair by attaching double-sided tape to the back of the prints and adding them to the dresser’s drawers or doors. Finally, use a pencil and ruler to create a simple border around the edges, and voila! Your old dresser is now transformed into a beautiful floral piece.
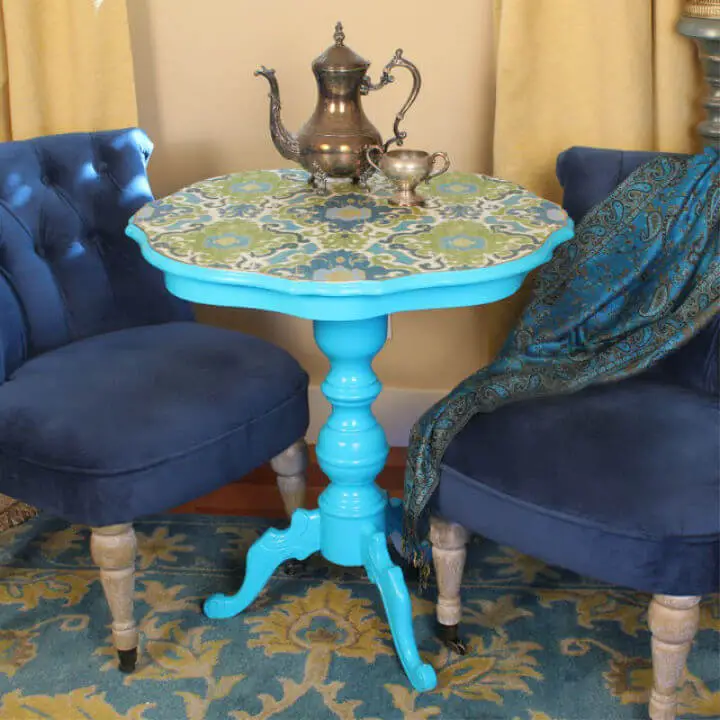
Beginner-Friendly DIY Decoupage Table
Making a Decoupage Dresser With French Fabric
Give a vintage makeover to an outdated dresser by applying a stunning French decoupage cover. Select a fabric that resonates with your personal style, then gather the necessary tools: an X-acto knife for precise cuts, Mod Podge for adhering the design, graphite chalk paint and white chalk-style paint for creating a subtle texture, gold paint for added elegance, polyurethane for a durable finish, beeswax for a soft sheen, and stencils to add intricate details. With these materials, you’ll be well on your way to transforming an ordinary dresser into a one-of-a-kind piece that exudes French charm.
Gorgeous Decoupage Fabric Chairs
How to Decoupage Furniture at Home
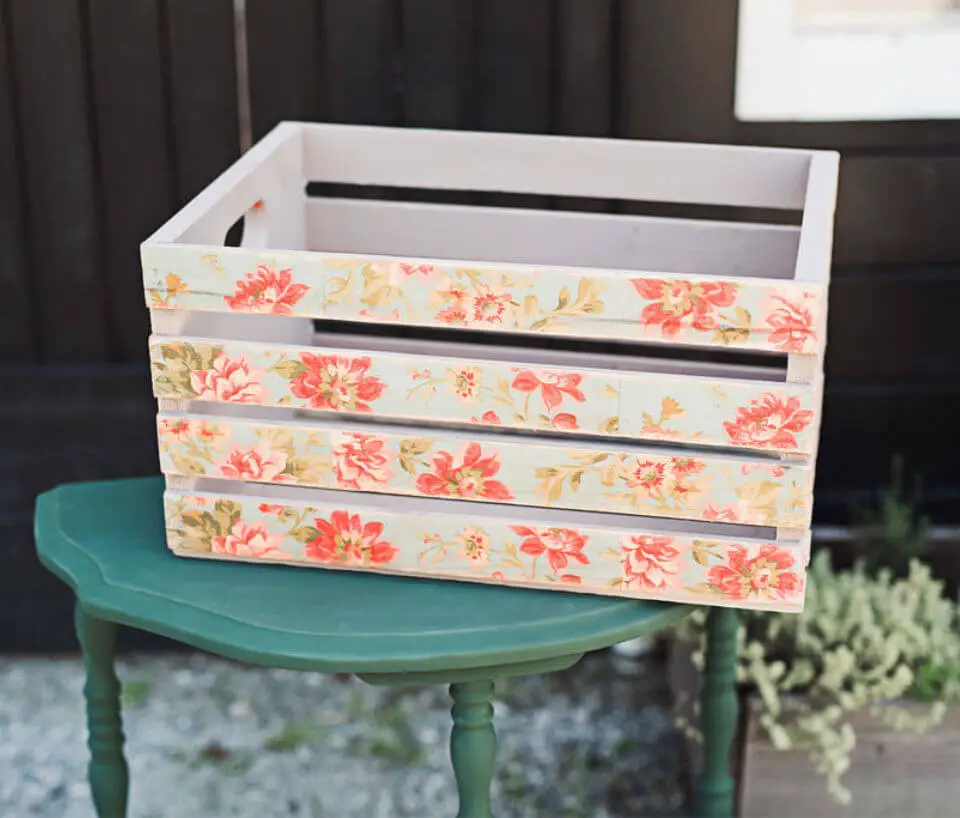
Consider that old crate collecting dust in your garage, seemingly destined for the landfill. Think again! With a little creativity and some carefully chosen decoupage material, you can breathe new life into this forgotten item. Simply cut it to size, ready to be transformed through the magic of decoupage. For a step-by-step guide on how to bring your crate back from the brink, check out the tutorial at Instructables.
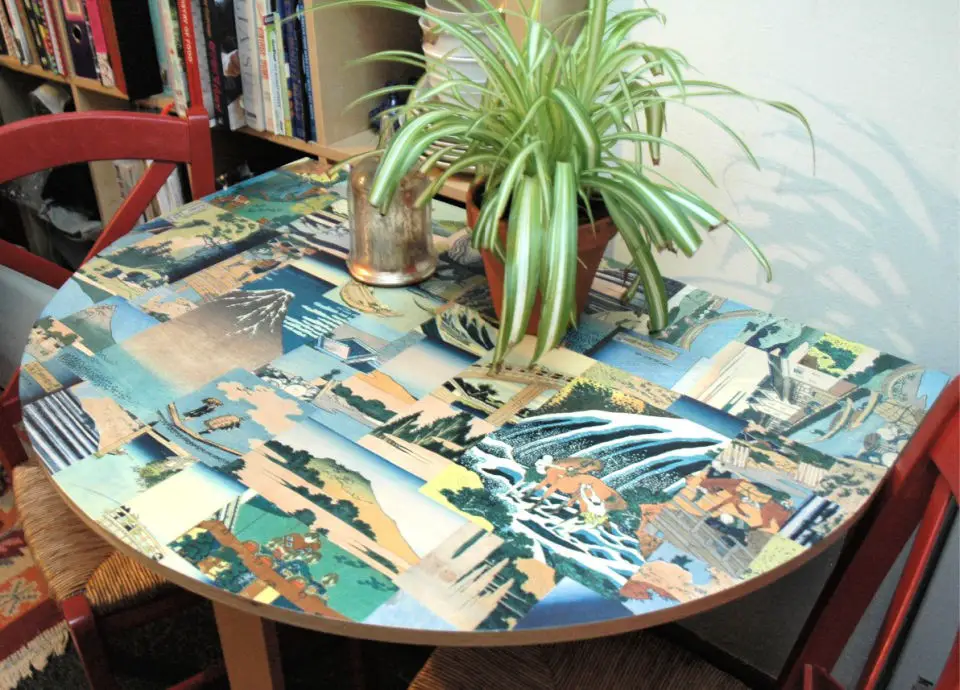
DIY Patchwork Decoupage Table
Transforming a table into a stunning piece of decoupage furniture is a great way to give your decor a unique touch. By choosing your favorite scrapbook paper, you can easily elevate the table’s aesthetic with just a few quick steps. Simply apply mod podge to the surface and adhere the paper, allowing the sealant to dry before revealing your beautifully restored table.
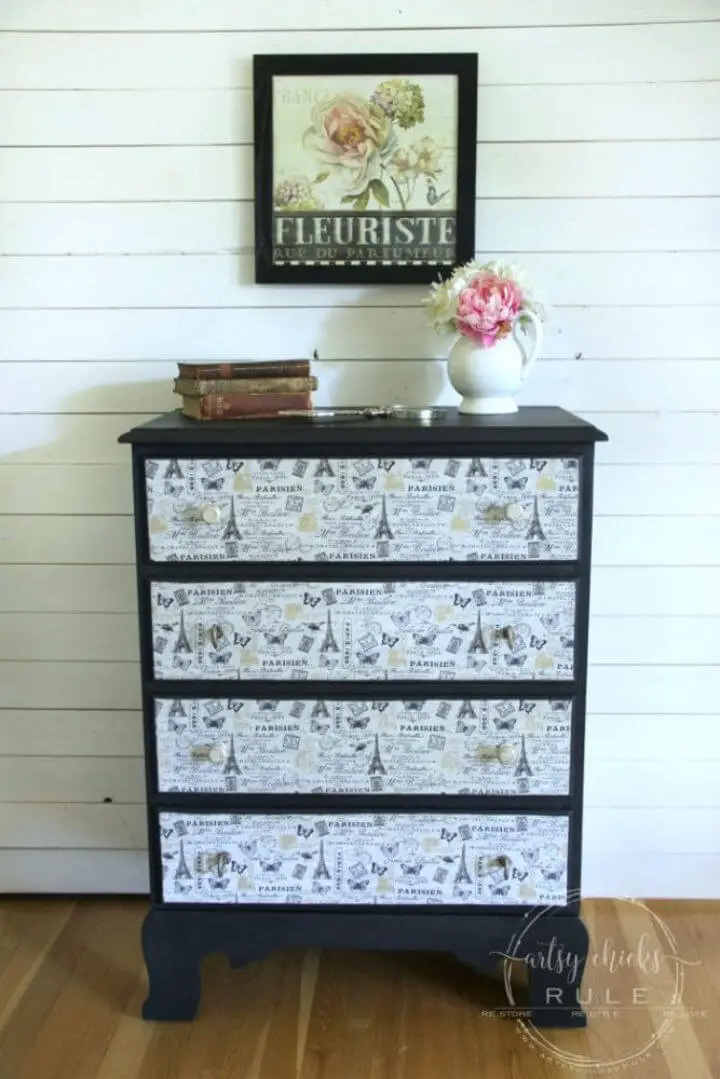
Beautiful DIY Photo Decoupage Dresser
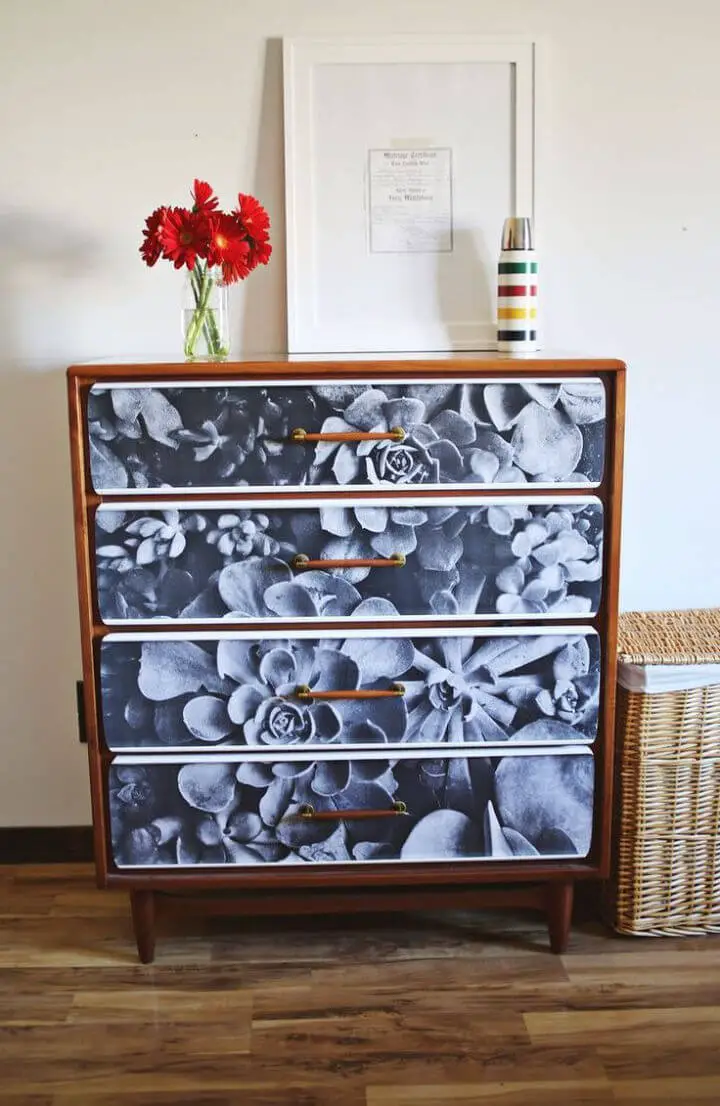
Discover the charming world of decoupage with this delightful technique. To create your own masterpiece, start by obtaining a blueprint copy of your favorite photo – perhaps one that captures a beautiful floral touch like the one seen here. You’ll also need some essential materials, including scrap paper, royal coat decoupage finish, foam brushes, and an X-acto knife. With these tools at your disposal, you’re ready to unleash your creativity and bring a unique piece of art into being.
Decoupage a Chair With Written Instructions
Give your furniture a pop of color without the commitment of painting it! The floral chair in question exudes a charming airiness, but you can achieve this look without replacing it entirely. To get started, you’ll need a basic wood chair as a foundation, along with a few essential materials: matte Mod Podge, spray paint, an Exacto knife, and a foam brush. Once you have these supplies in hand, you can follow the fabric tutorial to infuse your piece with a fresh, floral flair.
Make Your Own Decoupage Table
Transforming a dated table into a charming centerpiece has never been easier! With the right materials, you can give your rustic old table a sweet makeover. To achieve this transformation, gather the following essential supplies: OFMP paint, extra bond, gift wrapping paper, glue, varnish, scissors, sandpaper, and a brush. By combining these simple yet effective tools, you’ll be able to elevate your table’s appearance from dull to delightful.
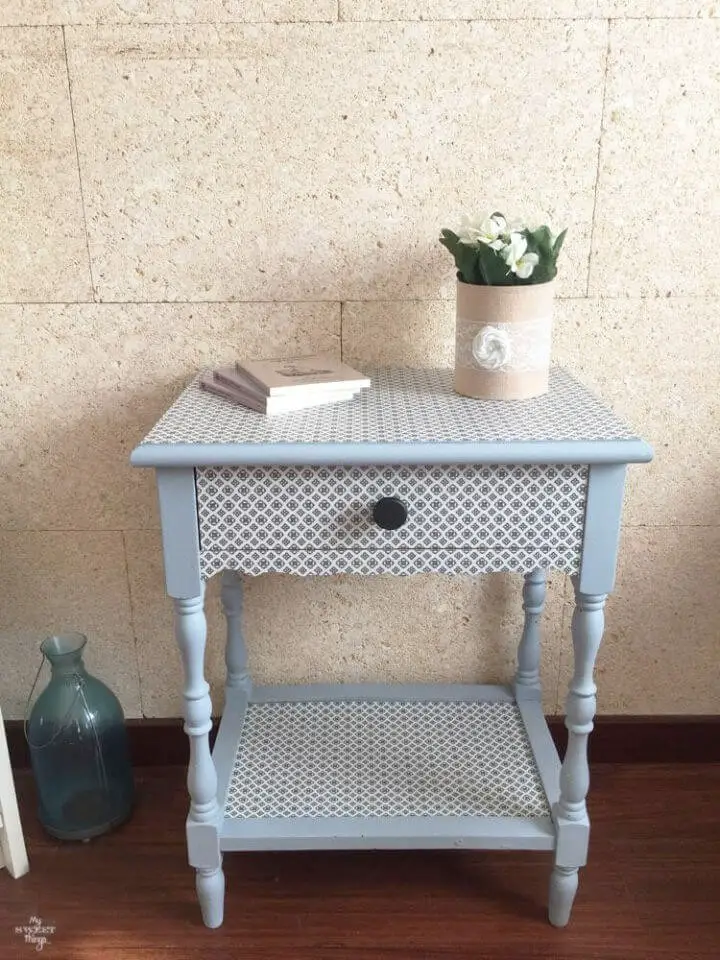
Simple DIY Decoupage Furniture with Wallpaper
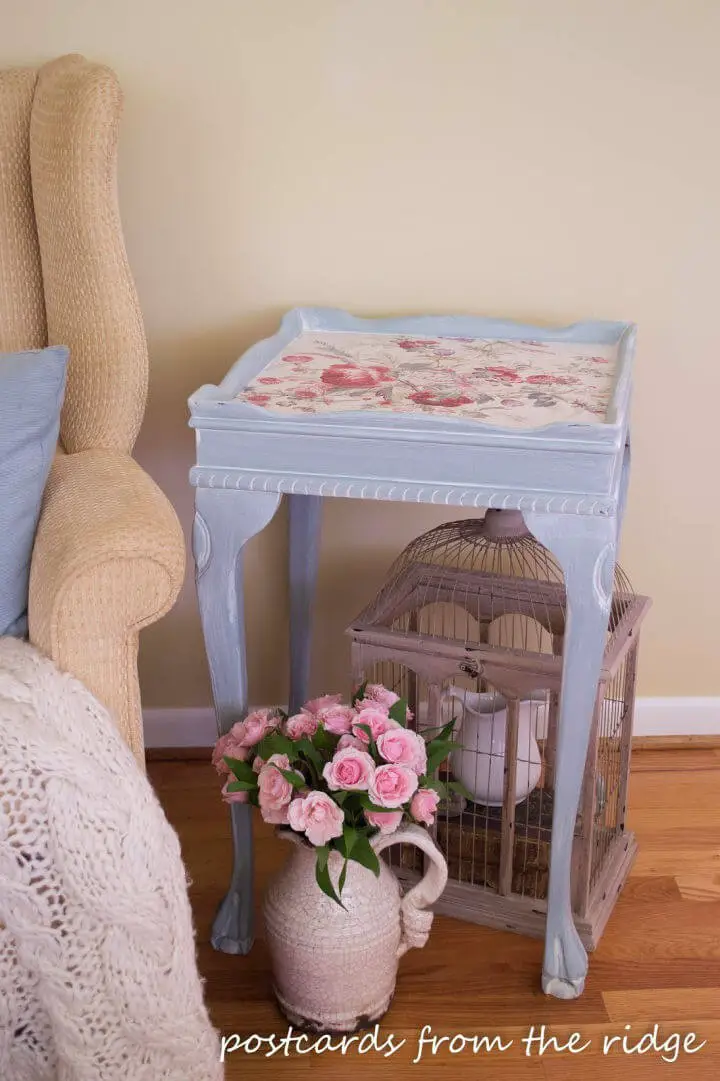
Elevate your side table or corner table’s aesthetic appeal by incorporating a charming decoupage design featuring wallpaper. For added ease, consider utilizing pre-pasted glue wallpaper and remember to dilute the Mod Podge with water for optimal results.
Decoupage Bookcase-Themed Furniture Makeover
The allure of transforming an old piece of furniture with the simplicity yet potency of themed makeover decoupage is undeniable. The harmonious blend of black and white patterns creates a captivating visual appeal that can elevate any room’s decor. For a comprehensive guide on how to achieve this stunning look, refer to our tutorial.
Conclusion:
Transforming ordinary furniture into extraordinary pieces is now a breeze with just 25 easy-to-follow decoupage ideas and basic craft supplies! With the freedom to choose from a variety of materials like wallpaper, fabric, or textured prints, you can give new life to old dressers, tables, or any other piece that’s lost its luster. By embracing your creative side and following these simple yet effective techniques, you’ll be well on your way to creating unique showpieces for your home. From adding a personal touch to store-bought items to breathing new life into hand-me-downs, the possibilities are endless with decoupage!
