Immerse yourself in the world of creative cookie decorating with our curated collection of 30 innovative ideas designed to ignite your imagination and take your baking skills to the next level. From mastering the perfect icing technique to unlocking the secrets of color theory, this comprehensive guide provides expert insights and practical tips to help you craft visually stunning masterpieces that will leave everyone in awe. Whether you’re looking to explore new flavors, discover the ideal tools and equipment, or overcome common decorating challenges, our authoritative advice ensures that your cookies will be the star of any gathering. As you delve deeper into the art of cookie decoration, you’ll gain confidence in tackling common obstacles, learn how to prioritize health and safety best practices, and get a glimpse into the creative processes of renowned cookie decorators. You’ll also discover the cultural significance and sustainable aspects of this beloved tradition, adding depth and meaning to your creations. Get ready to transform ordinary cookies into extraordinary edible art that delights the senses and captures the heart.
Ingredient Insights for Cookie Decorating
For cookie decorators, the quality of ingredients can significantly impact the final result. To achieve exceptional cookie art, it’s essential to select the right components. The key is finding a balance between flavor, texture, and appearance. In this guide, we’ll explore the ideal ingredients for elevating your cookie decorating game.
Choosing the Right Icing
When it comes to choosing the right type of icing for your baking project, there are several factors to consider. One popular option is royal icing, known for its ability to dry hard and smooth, making it ideal for detailed designs. However, this quick-drying nature can also make it tricky to work with. On the other hand, buttercream icing offers a creamy texture and rich flavor, providing a great finish for those who prefer a softer look. While it doesn’t dry as hard as royal icing, it’s still a popular choice for many bakers. For those looking for an easier-to-make option, glaze icing is a great alternative. With its shiny finish and simple recipe, it’s a great choice for anyone looking to add a touch of elegance to their baked goods. That being said, glaze icing may not be the best option for those who want precise detail work, as it doesn’t provide the same level of firmness as royal icing. Ultimately, the type of icing you choose will depend on your personal preference and the specific needs of your project.
The Best Sugars to Use
When it comes to baking, knowing the right type of sugar to use can make all the difference in achieving the perfect textures and flavors. Two fundamental types of sugar that every baker should know are powdered sugar and granulated sugar.
Powdered sugar, also known as confectioner’s sugar, is a must-have for making smooth and creamy icings, as well as dusting finished cookies with a delicate layer of sweetness. To ensure it remains lump-free, it’s essential to sift the powder before using it in your recipe.
On the other hand, granulated sugar is perfect for adding texture and structure to cookie dough itself or creating crunchy toppings. One creative way to use granulated sugar is by coloring it with food dye to create decorative sprinkles that add a pop of color to your baked goods.
Flavorings: Extracts vs. Emulsions
When it comes to extracts and emulsions in cooking, there are some key differences to consider. Extracts, which can come in a variety of flavors, have the advantage of being widely available. However, they do have one major drawback: their alcohol-based composition means that they can evaporate when mixed with hot ingredients, potentially affecting the overall flavor and consistency of your dish.Emulsions, on the other hand, are water-based and therefore retain their flavor better under heat. This makes them a great option for recipes that involve high temperatures or prolonged cooking times. However, emulsions may be less common than extracts and can be more difficult to find in some areas. Ultimately, the choice between an extract and an emulsion will depend on your specific needs and preferences as a chef.
Coloring Your Creations
When it comes to adding color to your baked goods, the type of food coloring you use can greatly impact the outcome. Gel, liquid, and natural options each have their own advantages and disadvantages that should be considered when choosing which one to use. Gel food colors, for instance, are highly concentrated and require only a small amount to achieve the desired shade, making them a great option for those who want precise control over their coloring. However, they can also be more expensive than other types. On the flip side, liquid food colors are readily available and easy to use, but must be used in moderation to avoid thinning out icing or other mixtures. Natural food colors offer a healthier alternative to synthetic dyes, but may not provide the same level of vibrancy as their artificial counterparts. Ultimately, selecting the right type of food coloring depends on your specific needs and preferences. With an understanding of each option’s pros and cons, you can make informed decisions that will result in beautifully colored and delicious treats.
Tools and Equipment for Cookie Decorating
When it comes to creating visually appealing and deliciously decorated cookies, having the right tools is crucial. In this section, we’ll dive into the fundamental equipment necessary for producing show-stopping confections. From precision-cutters to delicate piping bags, we’ll explore the must-haves that will take your cookie decorating game to the next level.
Piping Bags and Tips
When it comes to piping, having the right bags and tips can make all the difference. For a stress-free experience, consider using disposable bags that eliminate the need for thorough cleaning after use. Alternatively, opt for reusable silicone bags for an eco-friendly approach. One simple trick to get the most out of your bags is to trim the tip to fit snugly with your piping tips. This ensures a smooth and controlled flow of your chosen piping medium.In terms of piping tips themselves, round tips are incredibly versatile and can be used to create both outlines and fine details. Star tips, on the other hand, are perfect for creating textures and rosettes that add a touch of elegance to any project. For a more whimsical approach, leaf tips allow you to craft realistic leaves or ruffles that add a playful flair to your creations.
Spatulas and Spreaders
When it comes to decorating and crafting cookies, having the right tools makes all the difference. The offset spatula is a must-have for spreading icing smoothly on larger cookies, providing excellent control and precision thanks to its angled handle. This versatile tool allows you to achieve flawless finishes with ease.In addition to the offset spatula, a bench scraper is another essential tool in your cookie-making arsenal. Use it to smooth out the sides of a cookie cake or to cut dough evenly, ensuring uniformity throughout. A bench scraper with measurements can be particularly handy for precise work, allowing you to achieve perfect results with minimal waste. With these two tools at your disposal, you’ll be well-equipped to tackle even the most ambitious cookie projects.
Stencils and Projectors
For bakers looking to achieve uniform designs on their cookies, there are two excellent tools that can make all the difference: cookie stencils and projectors. Cookie stencils offer the versatility of being available in various patterns and even allowing for custom-made designs, making them perfect for creating consistent looks across multiple treats.
On the other hand, cookie projectors take intricate design work to a whole new level by projecting an image onto the cookie, allowing you to easily trace it with icing. This innovative tool is a must-have for any serious baker looking to elevate their decorating skills.
Miscellaneous Must-Haves
When it comes to decorating cookies, having the right tools can make all the difference in achieving professional-looking results. A scribe or toothpick is a simple yet crucial tool for popping air bubbles and adjusting icing placement, allowing you to fine-tune your designs with ease. Meanwhile, food coloring pens enable you to add intricate details and write on dried icing, perfect for adding that extra touch of personalization or finishing off a design. Reusable silicone baking mats provide a non-stick surface for rolling out dough to the right size, thanks to their built-in measurements. With these essential tools at your disposal, you’ll be well-equipped to start experimenting with your designs and refining your skills through practice.
How to Get Started with Cookie Decorating
Embarking on the sweet adventure of cookie decorating can be an exhilarating experience, yet it’s common to feel overwhelmed by the vast possibilities. As you strive to create visually stunning treats for friends and family or simply indulge in a fun kitchen escapade, cookie decorating presents a world of creativity and exploration. To help you take the first bite out of this delightful journey, here’s a step-by-step guide to get you started.
Mastering the Basics
To create beautifully decorated cookies, start by preparing your dough for rolling and cutting. Begin by lightly dusting a surface with flour to prevent sticking, then roll out the dough to an even thickness to ensure consistent baking. Use your chosen cookie cutters to shape the dough into desired forms, before transferring them to a baking sheet. Once baked according to recipe instructions, allow the cookies to cool completely before decorating to prevent icing from melting.Next, prepare your royal icing by mixing it to a smooth consistency. If it’s too thick, add a small amount of water; if too thin, adjust with powdered sugar. Divide the icing into portions and use food coloring to achieve desired hues. Begin outlining the edges of each cookie with a thicker icing consistency, creating a barrier to contain the thinner filling. Then, ‘flood’ the interior with the thinner icing, allowing it to spread smoothly. Once the base layer has dried, use a finer tip to add details, patterns or text to your cookies, unleashing your creativity and bringing your designs to life.
Practice and Patience
Mastering the art of cookie decorating requires dedication and persistence. While initial efforts may not yield flawless results, it’s through these early attempts that we develop our skills. To refine your technique, experiment with various methods such as marbling, stenciling, or utilizing edible markers. As you explore different approaches, you’ll discover the styles that work best for you.
Troubleshooting Tips for Cookie Decorating
As with any craft, even the most seasoned bakers can encounter obstacles when it comes to cookie decorating. However, with a few simple tips and tricks up your sleeve, you can overcome common challenges and create stunningly decorated treats that will leave everyone impressed.
One of the most significant hurdles many decorators face is achieving the right consistency in their icing. On one hand, if your icing is too thin, it won’t hold its shape, while on the other hand, if it’s too thick, it can be difficult to work with. To address this issue, simply adjust the powdered sugar content – add more for a thicker consistency and less for a thinner one.
Another common problem that cookie decorators face is color bleeding. This occurs when colors seep into each other, creating an unappealing effect. The key to preventing bleeding is to ensure the base layer of icing is completely dry before adding new colors on top. If bleeding has already occurred, you can fix it by gently scraping away the unwanted color with a toothpick.
Cracks and crumbs can also be a major issue when decorating cookies. To avoid cracked icing, make sure your cookies are completely cooled before applying the design. Additionally, try not to roll out your dough too thin, as this can lead to a brittle surface that’s prone to cracking. Crumbs in icing can be prevented by applying a thin layer of icing as a ‘crumb coat’ and letting it dry before adding more layers.
Piping issues are another common problem that decorators face. Uneven piping can be addressed by practicing on parchment paper before moving onto your cookies, while clogged tips can be fixed by removing any blockages with a toothpick. It’s also essential to strain your icing regularly to remove any lumps that could cause clogs.
Ultimately, patience is key when it comes to cookie decorating. Take the time to perfect your techniques and don’t be afraid to experiment. With practice, you’ll be able to overcome these common issues and create beautifully decorated cookies that are sure to impress.
Health and Safety in Cookie Decorating
To prioritize the well-being of all individuals participating in cookie decorating, it’s essential to strike a balance between creativity and caution. By following these guidelines, you can maintain a harmonious environment that fosters enjoyment while minimizing potential hazards. First and foremost, make sure to handle cookies with care, avoiding any sharp edges or broken pieces that could cause accidents. Furthermore, ensure that all surfaces are clean and free from distractions to prevent mishaps. Additionally, consider the environmental impact of your decorating endeavors and take steps to minimize waste and maximize sustainability.
Food Safety
To ensure a seamless baking experience, it’s crucial to begin with a sanitized workspace that prevents contamination. This means washing your hands thoroughly before handling any ingredients or cookies, eliminating the risk of unwanted germs getting in the way of your culinary creations.
Moreover, using fresh and high-quality ingredients is vital for producing delicious treats while minimizing the risk of foodborne illnesses. When it comes to perishable items like eggs and dairy products, make sure to check their expiration dates before incorporating them into your recipe, ensuring that you’re working with the best possible materials.
Allergen Awareness
When accommodating dietary restrictions or allergies in baking, it’s crucial to consider common allergens like nuts, gluten, and dairy. To cater to these needs, offer substitute ingredients that can replace these common culprits. Additionally, clearly label your baked goods with a note on potential allergens, ensuring transparency for those with specific requirements.
To minimize the risk of cross-contamination, maintain separate tools and surfaces for decorating your treats. Furthermore, make it a habit to thoroughly clean any equipment after each use, guaranteeing a safe environment for individuals with allergies.
Safe Practices for All Ages
When it comes to cookie decorating with kids, ensuring their safety is paramount. This involves supervising them at all times, particularly when they’re using sharp objects or tools that can cause harm. It’s also crucial to teach children about kitchen safety and proper handling of utensils to prevent accidents from occurring.
In addition to supervision and education, it’s essential to use only non-toxic materials and decorations in your cookie decorating activities. This means opting for food-grade materials and avoiding those that are not intended for consumption, such as craft glitter or other potentially hazardous substances.
By following these guidelines, you can create a safe environment that allows everyone to enjoy the process of cookie decorating without worrying about potential risks or hazards. And remember, safety is indeed the most important ingredient in any recipe – it’s what makes everything else possible!
Expert Interviews: Gleaning Wisdom from Cookie Decorating Masters
Elevating your cookie decorating skills requires more than just following a recipe or watching tutorials – it demands learning from those who have mastered the craft. The collective wisdom of professional cookie decorators can be a game-changer, providing valuable insights that transform your decorating experience. In this section, we’ll delve into the expert advice shared by seasoned bakers, revealing the secrets to taking your skills to new and exciting levels.
The Journey to Mastery
When you’re just starting out, it’s essential to begin with the fundamentals – mastering basic shapes and techniques is crucial for building a solid foundation. Consistency is key, so make sure to practice regularly to see noticeable improvements in your skills over time. As you progress, you’ll inevitably encounter setbacks and mistakes. However, every mistake is an opportunity to learn and grow, and it’s up to you to recognize the lesson hidden within. To maximize your learning experience, keep a journal or log of what works well for you and what doesn’t – this will help you refine your approach and avoid making the same errors in the future.
Advanced Techniques
To achieve consistent results in pressure piping, it’s essential to master the art of controlling pressure. Begin by honing your skills on a non-perishable surface like parchment paper before moving on to more delicate mediums like cookies. Once you’ve developed your technique, you can apply it to create stunning designs on your baked goods. Meanwhile, painting on cookies requires a unique set of skills and materials. Opt for food-grade paints or gel colors mixed with lemon extract to ensure the flavors and colors are safe for consumption. Start by mastering simple strokes before attempting complex scenes that will elevate your baking artistry.
Industry Secrets
When it comes to managing your time effectively while decorating cookies, planning ahead is key. To avoid rushing through the process, schedule out each step in advance. This will give you ample opportunity to allow for proper drying times between layers of icing, ensuring a smooth and even finish. Additionally, having a clear plan in place will help you stay focused and ensure that your decorations are executed flawlessly.In terms of resourcefulness, think creatively about the everyday items you can use to add texture and visual interest to your cookie creations. A comb, for instance, can be used to create unique patterns and designs. By thinking outside the box, you can come up with innovative ways to incorporate unexpected elements into your decorating process.Finally, don’t underestimate the value of seeking out expert advice. Interviewing experienced decorators or taking classes can provide valuable insights and tips that might not be widely known. By incorporating these new techniques into your own decorating process, you can take your cookie artistry to the next level.
Cultural Significance and Sustainability in Cookie Decorating
Beyond its reputation as a delightful pastime, cookie decorating holds deep roots in tradition and culture, while also offering a chance to adopt eco-friendly practices.
The Cultural Role of Decorated Cookies
Across cultures, decorated cookies hold a special significance, serving not only as sweet treats but also as meaningful gifts. The art of cookie decoration transcends borders, with each country and community adding its unique twist to this beloved tradition. From Germany’s intricate gingerbread houses to China’s delicate mooncakes, every cookie tells a story of heritage and shared culture. Beyond their tastiness, decorated cookies often carry symbolic meanings, such as good fortune, love, or prosperity. For example, during India’s festive celebration of Diwali, cookies are adorned with motifs that embody the triumph of light over darkness, highlighting the power of illumination in the face of adversity.
Embracing Eco-Friendly Practices
When crafting cookies, it’s essential to consider the environmental impact of your ingredients, designs, and waste management. To reduce this footprint, choose organic and locally-sourced ingredients that not only taste better but also promote a more sustainable agricultural system. Additionally, natural dyes made from fruits, vegetables, and spices can be used to add color to your cookies without compromising the planet’s health.
To minimize waste, carefully plan out your designs and quantities to avoid excess materials. Whenever possible, reuse or recycle packaging, decorations, and other materials to reduce the amount of trash generated by your cookie decorating endeavors.
By embracing sustainable practices in cookie decorating, we can honor our cultural traditions while also taking care of the planet for future generations. By doing so, we’ll be passing on valuable lessons about environmental responsibility and the importance of living in harmony with nature.
FAQs About Cookie Decorating
As you embark on the sweet adventure of cookie decorating, you may encounter a few common conundrums. To alleviate any uncertainty, we’ve compiled answers to frequently asked questions that will guide you through the process and ensure your treats turn out as beautifully decorated as they are delicious.
What is the best icing to use for cookie decorating?
When it comes to cookie decorating, royal icing is the go-to choice for many bakers. Its silky consistency and capacity to set make it an ideal medium for creating delicate, detailed designs that can withstand handling without smudging or crumbling.
How can I prevent my icing from running off the edges?
Achieving the perfect consistency is crucial when preventing icing from running. The ideal texture should strike a balance between being thick enough to maintain its shape and thin enough to effortlessly spread on your desired surface. This harmony of thickness and fluidity will ensure that your icing stays put, allowing you to create intricate designs without the risk of drips and messes.
Can I make vegan cookie icing?
A game-changer for vegans and those looking to reduce their environmental impact is the discovery that aquafaba – the liquid extracted from canned chickpeas – can be used as a substitute for egg whites in traditional royal icing recipes, effectively creating vegan-friendly icing options.
How long does it take for decorated cookies to dry?
When it comes to drying time, the duration can fluctuate, but a general guideline is to allocate at least 6-8 hours for royal icing to fully dry and set. This allows for a thorough evaporation of moisture, resulting in a strong and durable finish that’s less prone to smudging or fading.
What’s the best way to store decorated cookies?
When it comes to storing decorated cookies, it’s essential to keep them in an airtight container to maintain their freshness. Room temperature is also ideal for storage, as this helps prevent moisture from accumulating and causing the icing to become soggy. Additionally, be patient and avoid stacking the cookies until the icing has fully dried, as this will help prevent smudging and ensure they retain their decorative details.
Can I freeze decorated cookies?
To preserve the festive touch of decorated cookies for a longer period, simply arrange them in a single layer on a metal baking sheet or a wire rack set over a baking sheet. Allow the cookies to freeze completely, which usually takes around 30 minutes to an hour depending on their size and thickness. Once frozen, transfer the cookies to an airtight container, such as a glass jar or plastic storage bin, to maintain their fresh state.
How do I achieve vibrant colors in my icing?
To elevate your decorating game, consider using gel food coloring to produce a wider range of vibrant and intensely colored hues. To achieve the perfect shade, add the coloring in small increments, gradually building up the intensity until you’ve reached the desired level of saturation.
What should I do if my icing is too thick or too thin?
Achieving the perfect consistency for your icing can be a delicate balance. When faced with a too-thick icing, a small addition of water is often sufficient to bring it back into harmony. Conversely, if your icing is running a bit thin, a judicious application of powdered sugar will typically correct the issue and leave you with a smooth, even consistency that’s ideal for decorating or topping baked goods.
How can I add flavor to my cookie icing?
To take your icing game to the next level, consider infusing it with the rich flavors of extracts or emulsions. Among the most popular options are vanilla, almond, and lemon, which can add a depth and complexity that will elevate the overall taste experience.
Are there any alternatives to piping bags for cookie decorating?
While traditional piping bags are ideal for intricate designs, there are alternative tools that can help you achieve professional-looking results. For instance, a zip-top bag with a corner carefully snipped off or a squeeze bottle can be used to create simpler designs. By considering these alternatives and preparing in advance, you’ll be better equipped to tackle the challenges of cookie decorating and enjoy the process even more.
30 Fun Cookie Decorating Ideas That You’ll Love
Indulge in the sweet world of cookie decorating, where creativity meets culinary delight. With 30 innovative ideas to explore, you’ll be hooked on these scrumptious masterpieces.
How to Make Frost Sugar Cookies
Transform your holiday baking experience by adopting a game-changing DIY method for frosting sugar cookies. Ditch the knife and reach for a zip lock bag to produce beautifully frosted treats in no time. Fill the bag with your preferred frosting, carefully snip a corner, and start piping in a zigzag pattern, guaranteeing even coverage and an impressive finish. This efficient technique not only speeds up the process but also eliminates mess and ensures a delightful experience.
Begin by using a sandwich-sized ziplock bag and adjust the opening size according to your frosting needs. Remember to always prepare extra frosting to avoid running out midway, ensuring your creations are generously coated. For an unbeatable combination of sugary goodness, consider pairing this technique with our soft sugar cookies and cream cheese frosting recipe. Step into the world of effortless baking today and experience the magic of this clever frosting method.
Candy Filled Baseball Cap Piñata Cookie Decorating
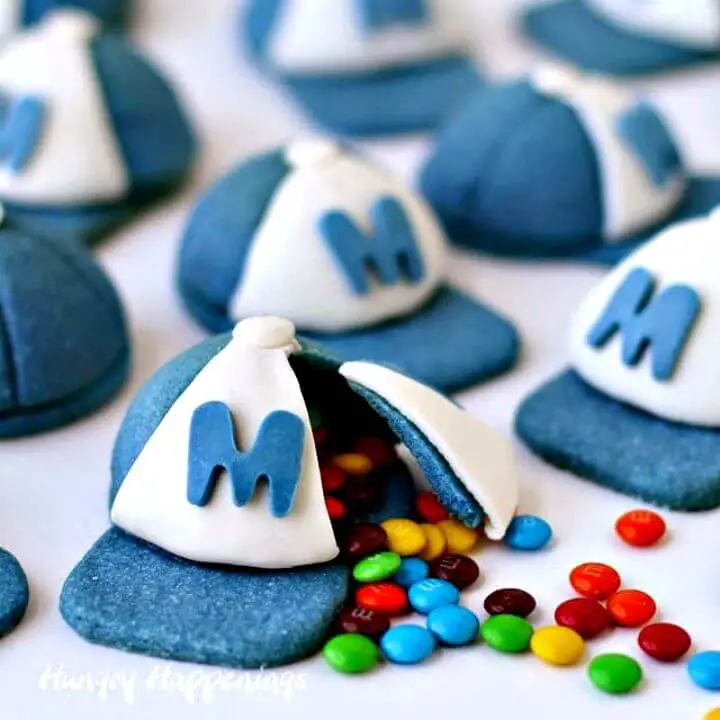
Take your cookie decorating game to the next level with these innovative ideas! One of our favorite concepts is creating DIY candy-filled baseball cap piñata cookies that are sure to score a home run with any sports enthusiast. The best part? These three-dimensional baked masterpieces are as much fun to make as they are to devour. By incorporating flavors like vanilla and almond, you can customize the cookies to match your favorite team’s colors, making them a unique addition to any baseball-themed event. To take it to the next level, fill the cookies with candies that match the team’s colors, adding an exciting surprise element. The process is surprisingly easy – simply bake cookie dough over a curved pan, such as a cake ball pan or mini muffin tin, and you’re ready to go. Whether your favorite team’s colors are blue and white, purple and yellow, or something entirely different, these playful cookies are the perfect way to celebrate the baseball season.
How to Decorate Hammerhead Shark Cookies

Impress your loved ones with creative cookie decorating ideas that will leave them in awe! Dive into the underwater world and create lifelike hammerhead shark cookies that not only look fantastic but also taste amazing. With readily available supplies like a hammerhead shark cookie cutter, royal icing in gray, white, and black, and candy eyes, you can easily recreate these unique treats at home. Follow this step-by-step guide to transform plain sugar cookie dough into realistic hammerheads, perfect for Shark Week celebrations or as a special treat for any wildlife enthusiast.
Adorable Bear Cookies
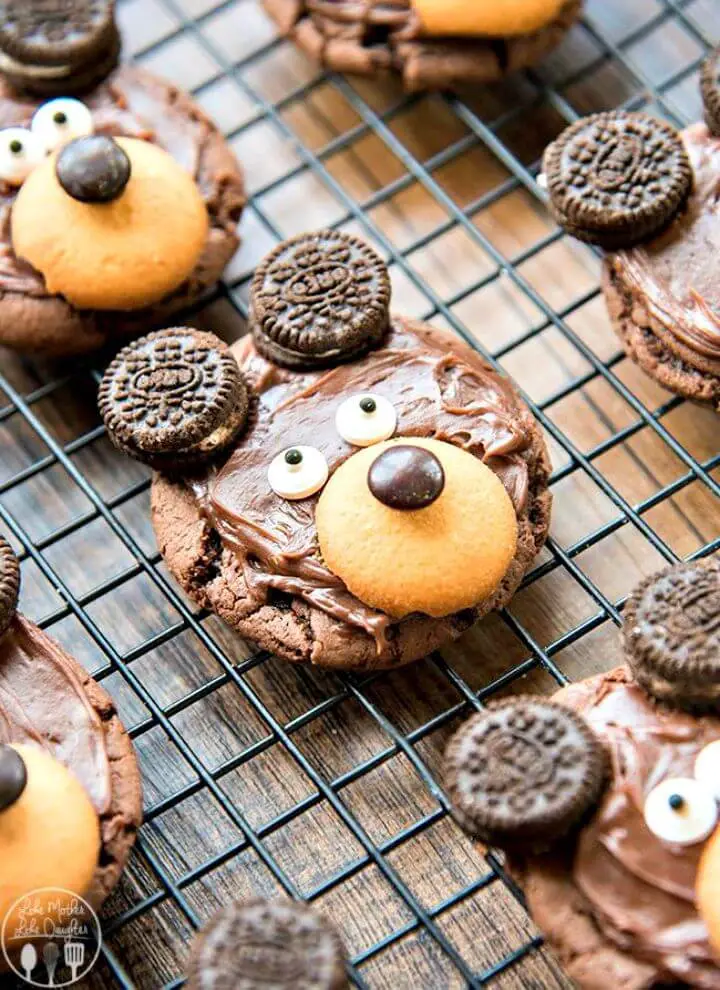
Indulge in the whimsical world of DIY bear cookies that are as much fun to make as they are to devour! These scrumptious treats are ideal for a teddy bear picnic or themed party, where their charm and playfulness will surely delight both kids and adults. To create these lovable characters, you’ll start with a rich chocolate cake mix, which is then elevated by the addition of decadent chocolate frosting, crunchy ‘Nilla wafers, tiny Oreo cookies, and M&Ms for the iconic eyes. The end result is an irresistible cookie that’s sure to bring joy to every bite. With its simplicity in assembly and uncomplicated ingredient list, this project is a perfect opportunity for families to bond over baking, with kids enthusiastically jumping at the chance to decorate and devour their very own masterpieces. So, get ready to roll up your sleeves, preheat the oven, and embark on a delightful baking adventure with these endearing bear cookies!
Delicious Donut Cookie Recipe

Discover the joy of cookie decorating with this easy DIY guide. Master the art of creating enticing donut-shaped cookies that not only tantalize your taste buds but also add a touch of visual flair to your holiday celebrations. To get started, you’ll need some key tools and ingredients, including royal icing, various sprinkles, food coloring, and a classic sugar cookie dough. With this step-by-step guide, you’ll learn the basics of working with royal icing and pick up tips on how to achieve the perfect donut shape. The result is a collection of beautiful, mouthwatering cookies that might just surpass the appeal of their donut counterparts. This creative project satisfies your sweet tooth and adds a charming touch to your holiday gatherings. Perfect your icing skills and surprise your guests with these adorable, delicious, festive donut cookies.
Margarita Cookie Decorating for Beginners
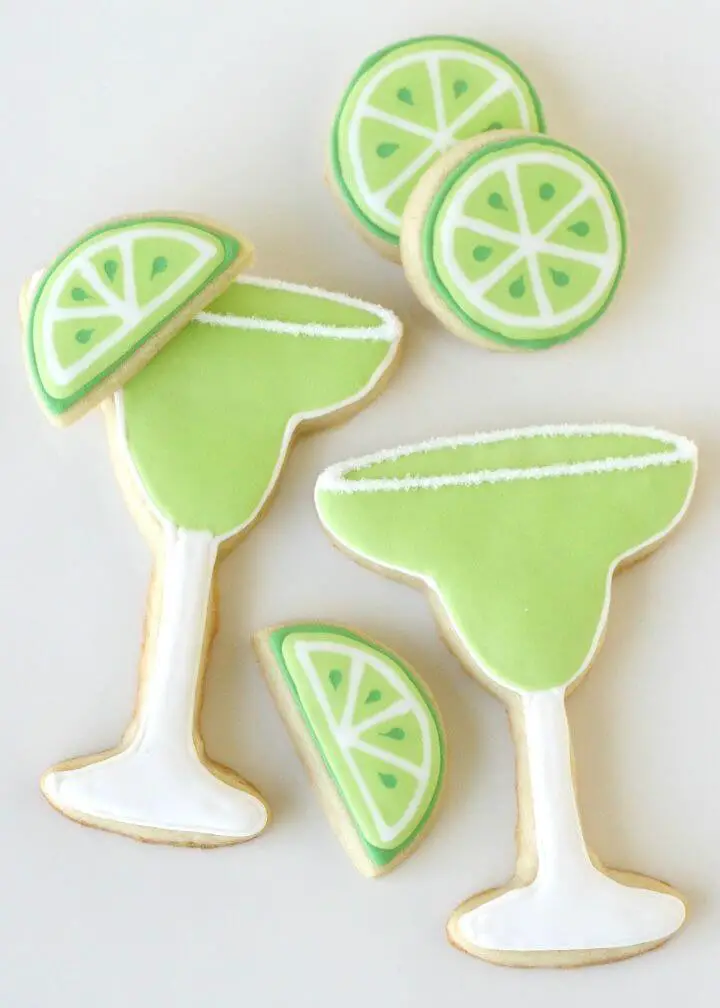
Indulge in the magic of homemade cookies with a refreshing spin! Combine the zest of margaritas with the whimsy of lime-shaped sugar cookies for an unforgettable experience. The tangy essence of lime brings a delightful fusion of flavors to these delectable treats, making them a perfect addition to any gathering.
Not only do these cookies tantalize the taste buds, but they also serve as thoughtful take-home favors, adding a personal touch to any event. Creatively package them and you’ll have a treasured keepsake!
This innovative twist on traditional sugar cookies elevates their appeal with the irresistible charm of lime. Add fun to your baking and bring joy to your table with these scrumptiously shaped cookies.
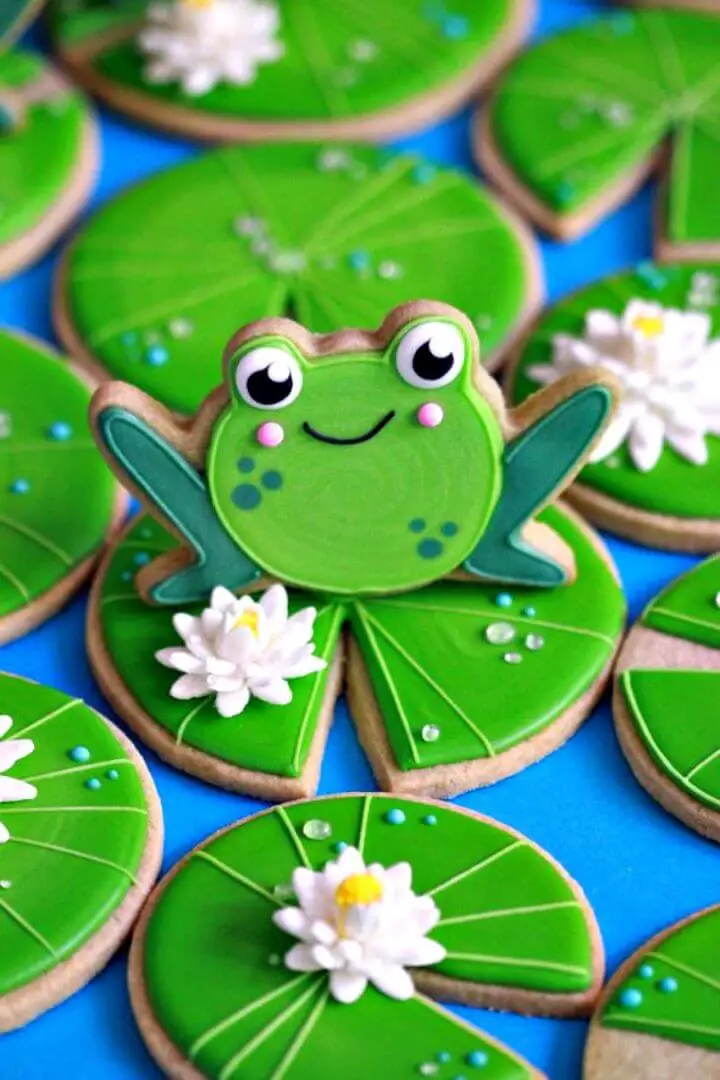
Cute Little Crab Cookies Decoration
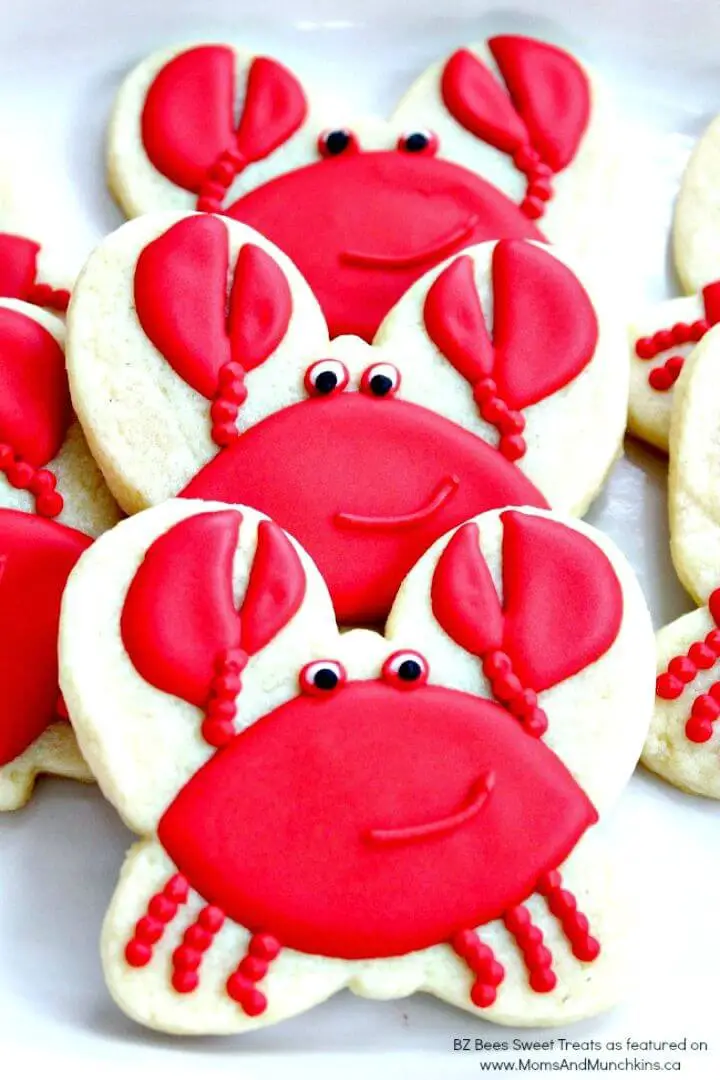
Kick off your summer celebrations with these delightful crab cookies that are as easy to make as they are charming. Designed to bring the beach party vibe to your Memorial Day spread or any other outdoor gathering, these treats will undoubtedly be a hit. What’s more, these creative cookies showcase how a little imagination can transform a butterfly cookie cutter into a playful sea creature design.
To craft each crab cookie, simply shape a football-like body, add dual claws and six legs, then bring it all to life with googly eyes and a friendly smile. Not only do they taste amazing, but these whimsical crabs will also add a touch of fun and playfulness to your summer dessert table. With their simplicity and creativity, it’s no wonder these little crustaceans might just become a new baking tradition for you!
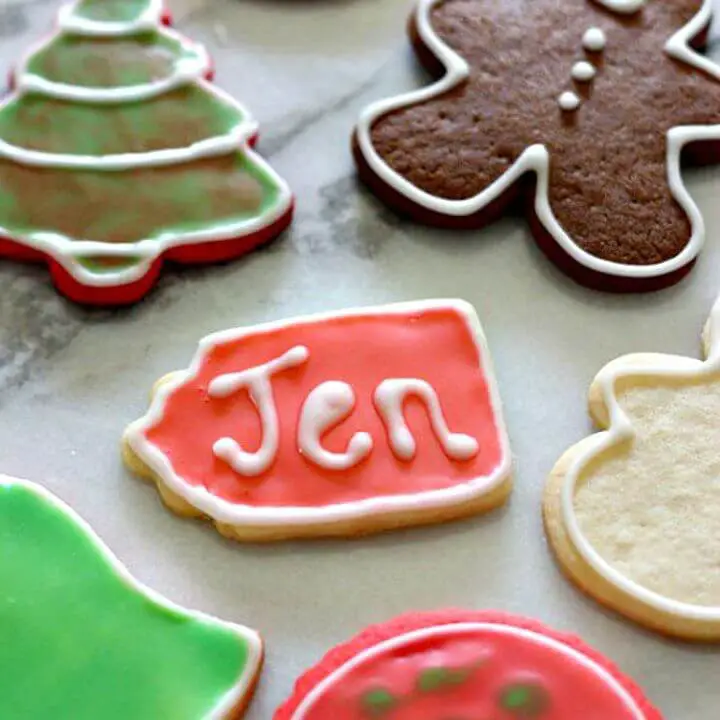
Make Stamp On A Cookies

Indulge in a one-of-a-kind cookie decorating experience with this innovative stamping method. Combine gel color and a carefully chosen stamp to create charming designs on sugar cookies made with dry icing. To achieve seamless results, consider pairing an Avery Reinkable Felt Stamp Pad Uninked with a Food Safe Marker. Each stamped cookie becomes a unique piece of edible art, perfect for decorating or using as creative name tags on gifts. Remember to prioritize cleanliness and opt for clear stamps and blocks, making it easy to maintain food safety. By incorporating this artistic approach into your baking journey, you’ll elevate your creations and add a delightful twist to the traditional cookie decorating process.
How to Decorate Hatching Chick Emoji Cookies
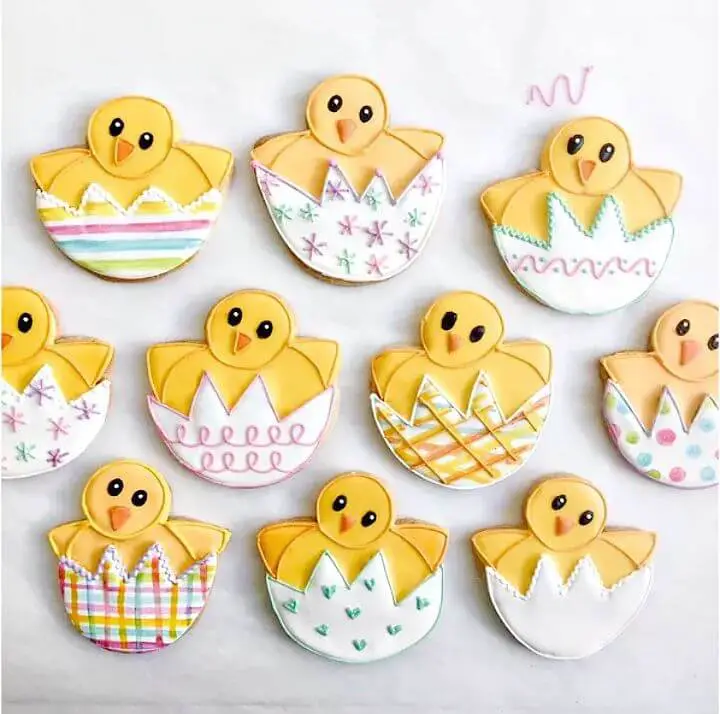
Indulge in the sweet joy of creating adorable hatching chick emoji cookies that are sure to spread cheer at any celebration. With just a few simple ingredients and tools, you can shape charming eggs using two circle cutters and a heart cutter. Add an authentic Easter touch by tinting the eggshell with pastel hues using royal icing. To make these treats, you’ll need sugar cookie dough, royal icing, food coloring, disposable pastry bags, pastry tube tips, and cookie cutters – or feel free to use store-bought shortcuts. Once baked and cooled, bring your creations to life by outlining and filling in the chick and egg details with your icing, then let your imagination run wild with shell decorations. Whether you opt for a pure white design or add pastel patterns, these delightful hatching chick cookies are sure to put a spring in everyone’s step this Easter season.
Cookies with Fondant and Art
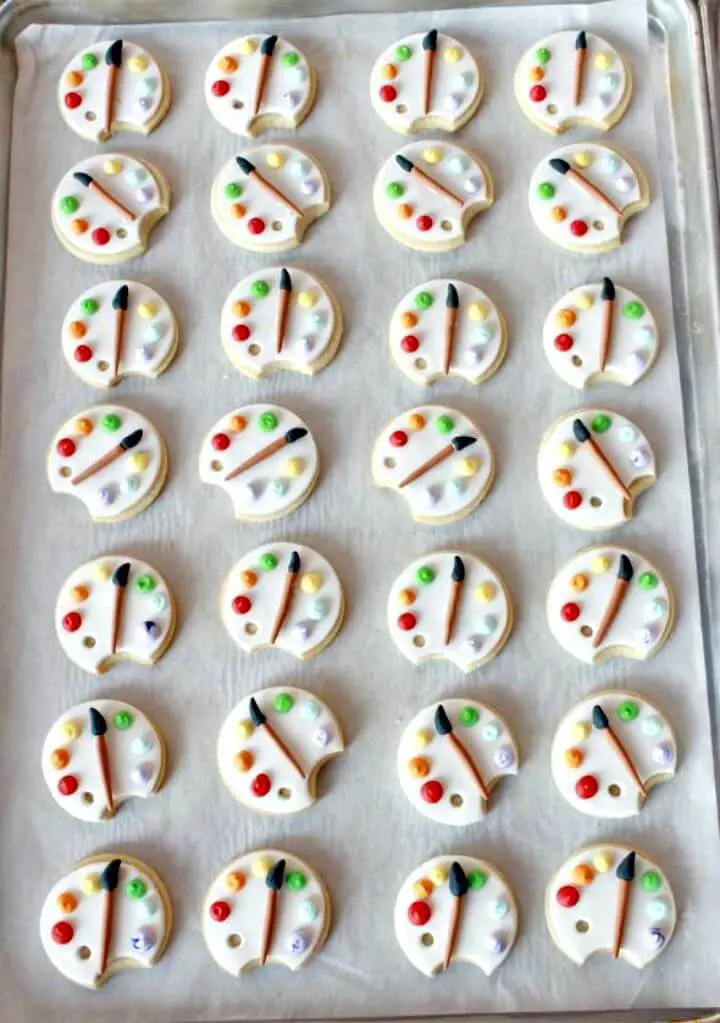
Indulge in the sweet fusion of art and baking with this DIY cookie fondant and art guide. Create a masterpiece that’s almost too beautiful to eat, but trust us, it’ll be devoured in no time! This step-by-step guide will take you on a journey of transforming sugar dough into a work of art using fondant covers and royal icing decorations. The crowning glory is the intricately designed fondant paint brush, crafted with black and brown fondant, which brings the art palette to life. What sets these cookies apart is their unique blend of artistry and indulgence, making them a sweet tribute to art lovers and a fun project for anyone looking to combine their creative passions.
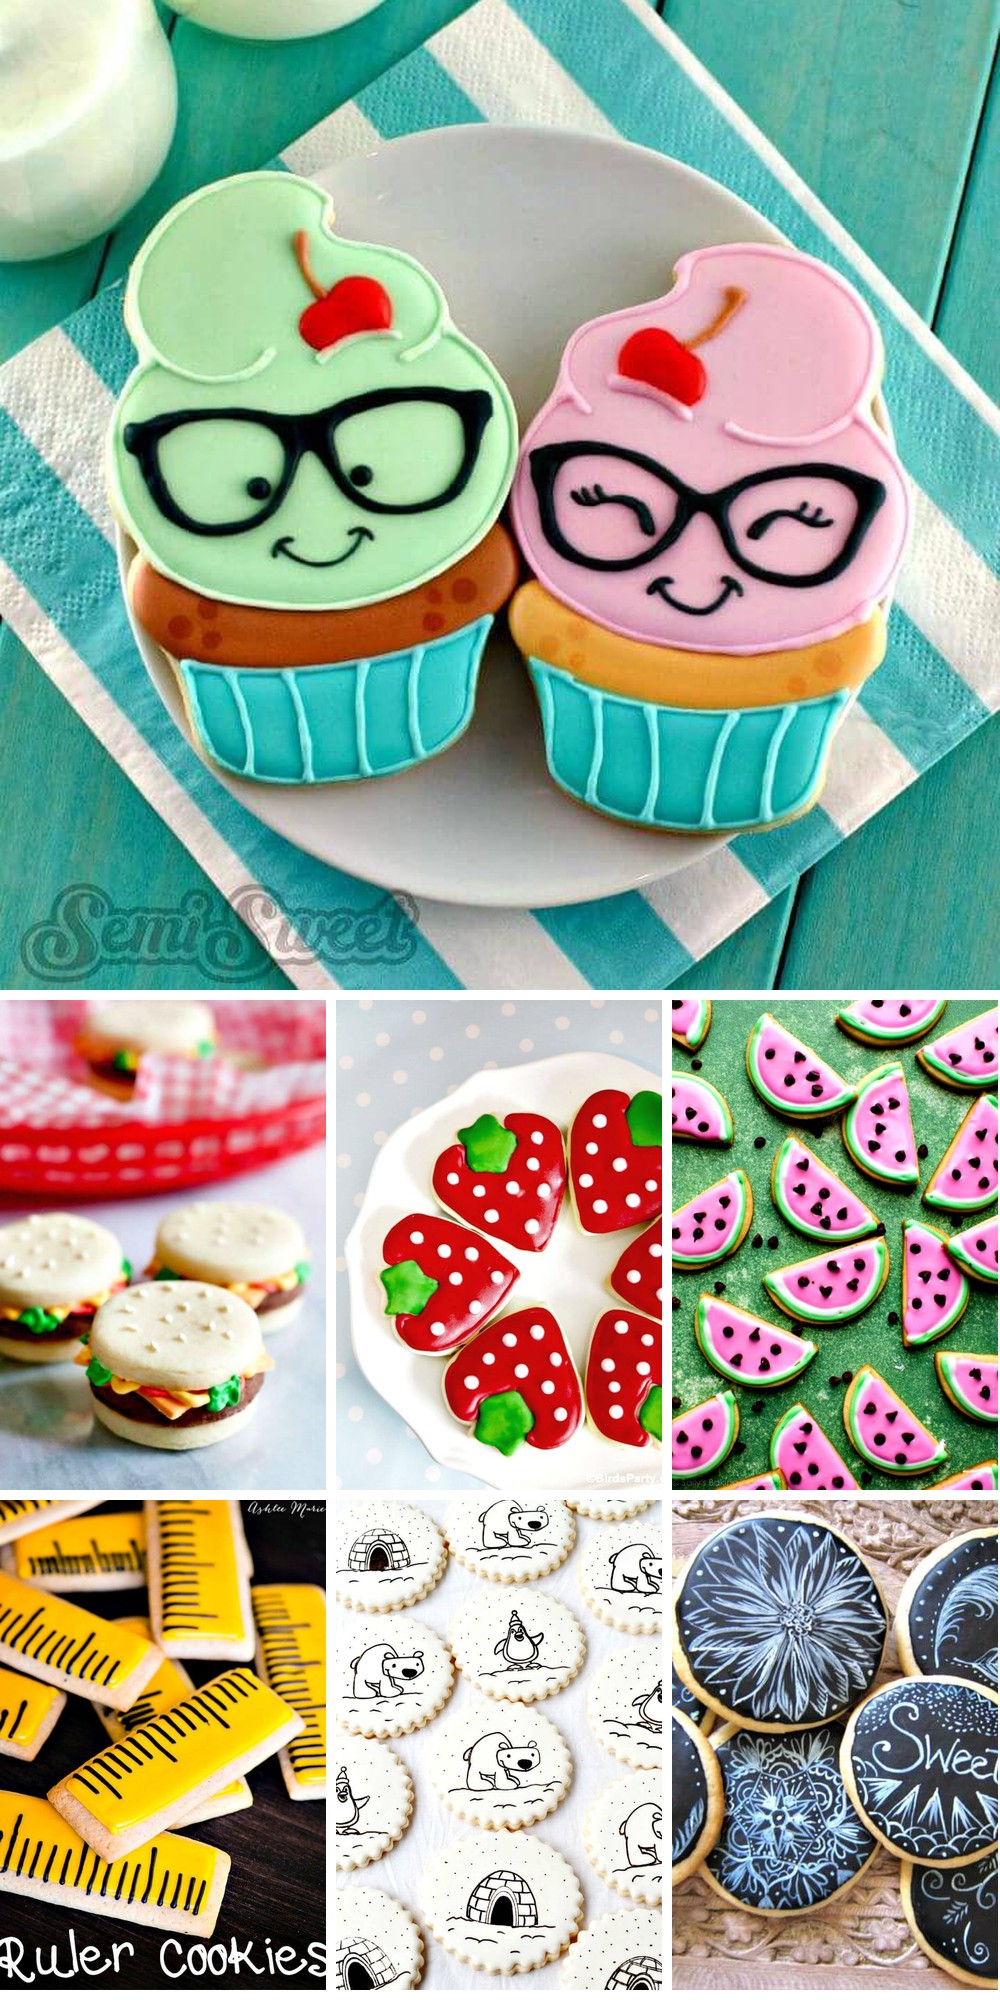
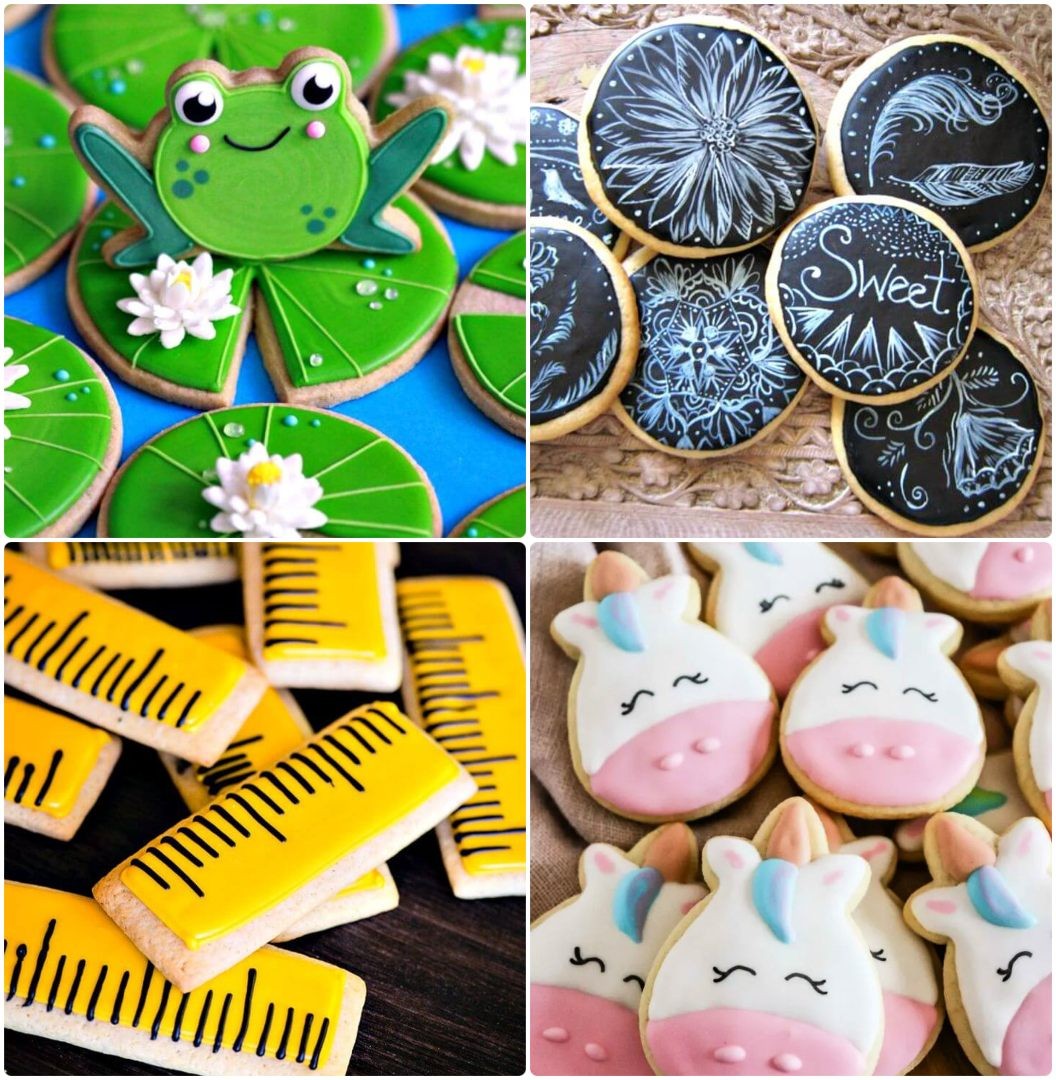
How to Make Decorative Ruler Sugar Cookies
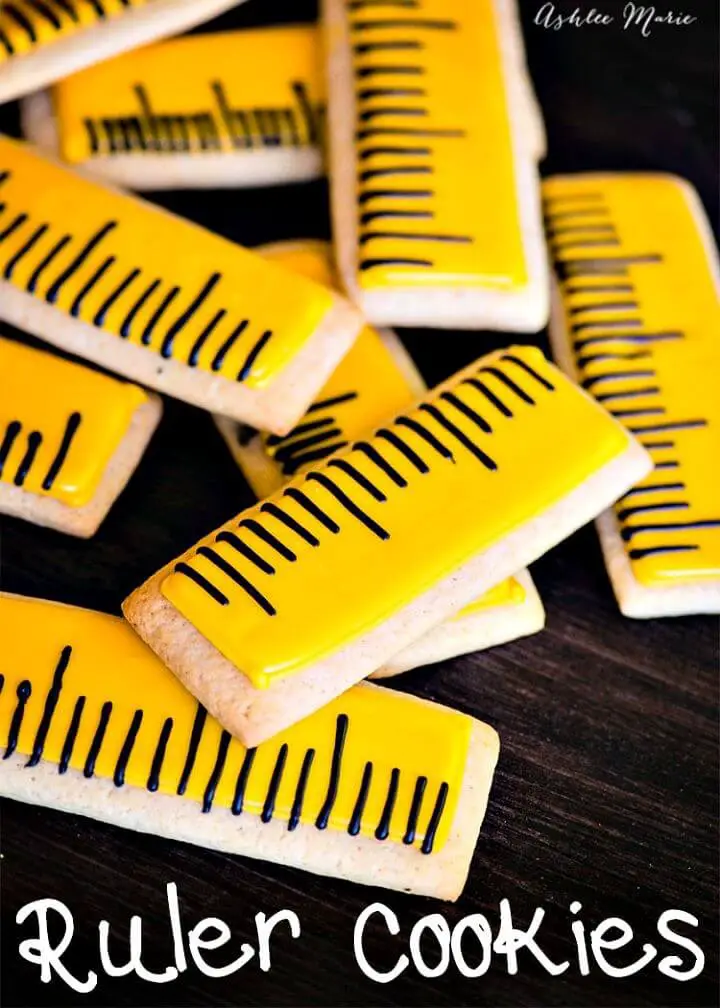
Kick off the new school year with a fun and tasty DIY treat that’s sure to delight both kids and adults alike – homemade sugar cookies shaped like rulers. Not only are they an easy and enjoyable activity for the whole family to get involved in, but they also make for a thoughtful gift for teachers. To achieve perfect icing lines, try using plastic wrap as a guide. Simply roll out your dough, cut rectangular shapes, bake until golden, then apply the icing. It’s that simple! The best part? These cookies are made with wholesome ingredients like all-purpose flour, baking soda, salt, and nutmeg, giving you peace of mind knowing what your loved ones are putting in their bodies. With a dash of love added to the mix, these delightful treats are sure to be a hit. So why not get creative in the kitchen and rule the school with these sweet surprises?
Best Bite-size Fruit and Veggie Cookies Recipe
Elevate your baking skills with creative cookie decorating ideas that bring a touch of springtime charm to your desserts. For those seeking healthier alternatives, this unique recipe imitates fruits and vegetables in a deliciously realistic way, catering to various dietary needs, including vegan options. With just a few simple ingredients, including cookie dough, royal icing, and food coloring, you’ll be ready to unleash your creativity and craft these adorable treats. The process is almost as enjoyable as devouring the finished products, making it an ideal activity for bakers of all levels. By incorporating fruits and vegetables into your baked goods, this recipe encourages a balanced approach to indulging in sweets. So, get ready to shake up your baking routine with these charming fruit and veggie-themed cookies that are sure to delight.
Easy Cookies On A Stick Recipe
Transform your baking experience with creative cookie decorating ideas suitable for any occasion. As you embark on this delightful DIY adventure, elevate your dessert game by crafting cookies that double as decorative pieces. Start by preparing cookie sticks and dough guides, then bake and insert the stick to ensure a firm hold. To take your creations to the next level, use royal icing to add intricate designs, making them perfect for any gathering or celebration. With these simple yet effective techniques, you’ll be well on your way to becoming a master of cookie decoration. So why not get creative, indulge your taste buds, and begin your cookie-on-a-stick journey today?
Ladies’ Hat Piñata Cookie Decorating Tutorial

Indulge in the art of cookie decorating and create show-stopping treats for special occasions. For events like Mother’s Day, Easter, or a Kentucky Derby Party, delight your guests with charming DIY Piñata cookies shaped like ladies’ hats. These sweet surprises are filled with candy and adorned with modeling chocolate daisies, evoking the nostalgia of bygone fashion trends.
To bring these confections to life, utilize everyday baking essentials like all-purpose flour, sugar, butter, eggs, and your choice of gel food coloring. Combine these staples with decorating ingredients like modeling chocolate, royal icing, and candy for a delightful treat. No specialized equipment is required; simply use a Bake Pop Pan or cake ball pan, cookie cutters, and a small daisy plunger cutter to shape the cookies.
With patience and creativity, you can bake a batch of these delectable treats perfect for sharing or gifting during festive gatherings.
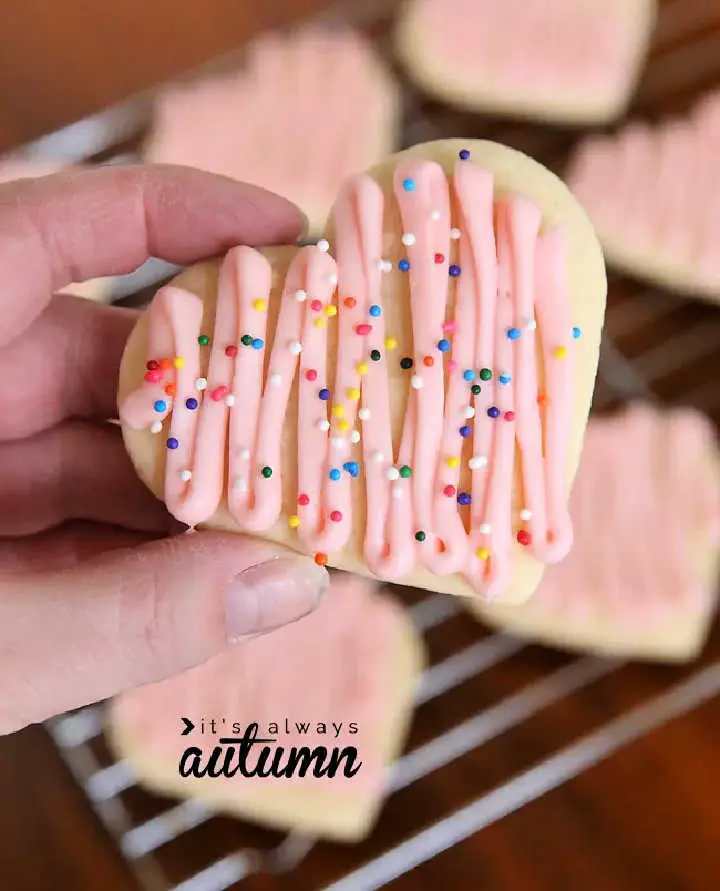
Sprinkle Sugar Cookies Recipe
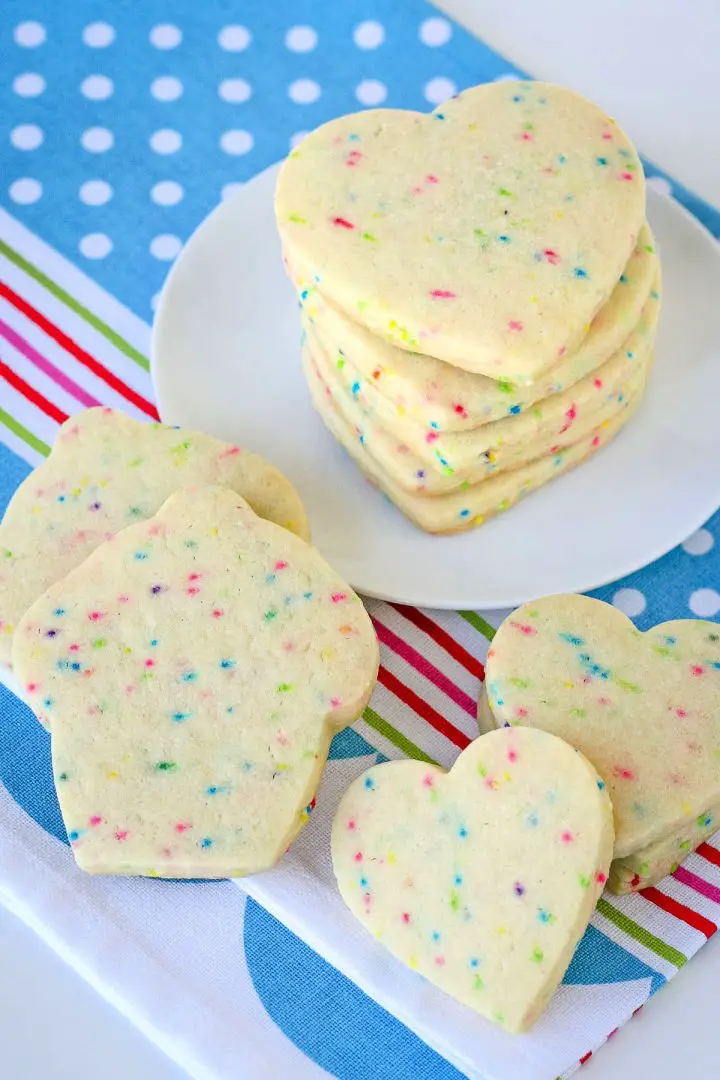
Get ready to create a sweet sensation in your kitchen! With just a few simple ingredients and some basic baking skills, you can make these scrumptious DIY sprinkle sugar cookies that are perfect for any occasion. Whether it’s a birthday, Valentine’s Day, or just because, these treats will fill your home with the mouthwatering aroma of freshly baked goods.
To make these delightful cookies, you’ll need unsalted butter, granulated sugar, a large room temperature egg, vanilla extract, baking powder, all-purpose flour, and nonpareil sprinkles. The result is a soft, flavorful cookie that maintains its shape perfectly and boasts a beautiful sprinkle topping.
The process is straightforward: simply mix your ingredients, chill the dough to allow it to set, roll it out to your desired thickness, and bake for 8-10 minutes. Once they’re done, enjoy them straight from the oven or with your favorite frosting for an added layer of flavor.
Strawberry Shaped Decorated Cookies
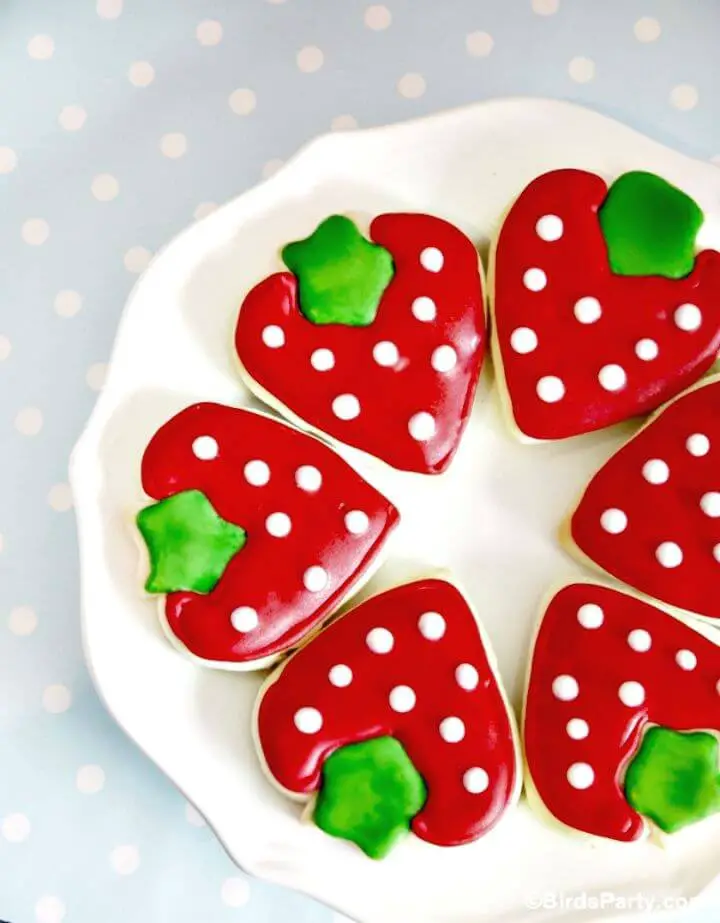
Embark on a delightful adventure of DIY cookie decorating by crafting scrumptious strawberry-shaped sugar cookies. Fear not the intricacies involved; this step-by-step guide simplifies the process, making it an enjoyable experience for all ages.
Start by gathering your essential tools: food coloring, piping bags, cookie cutters, and ingredients for the sugar dough and royal icing. Master the art of mixing the perfect hues of red and green, and grasp the ‘flooding’ technique for smooth, flawless icing.
In addition to these fundamental skills, uncover two unique methods for adding adorable polka dots to your creations. Create unforgettable memories at your next gathering with these charming, homemade strawberry cookies.
How to Decorate Surfboard and Wave Cookies

Unleash your creativity and bring the beach party to life by crafting your own surfboard and wave cookies with this easy-to-follow DIY guide. This sweet treat is perfect for a baby shower or summer soiree, as it not only tastes amazing but also serves as an attractive centerpiece. With its vintage-inspired surfboard designs and lively wave patterns, these cookies are sure to infuse joy into your celebration. To get started, you’ll need ingredients like our signature sugar cookie recipe, royal icing, and a range of food colors. Feel free to customize each cookie with your personal touch, making it a unique addition to the festivities. Bake these extraordinary Surfboard and Wave Cookies and let the fun, sun-kissed vibes wash over your gathering!
How to Make Chalkboard Cookies
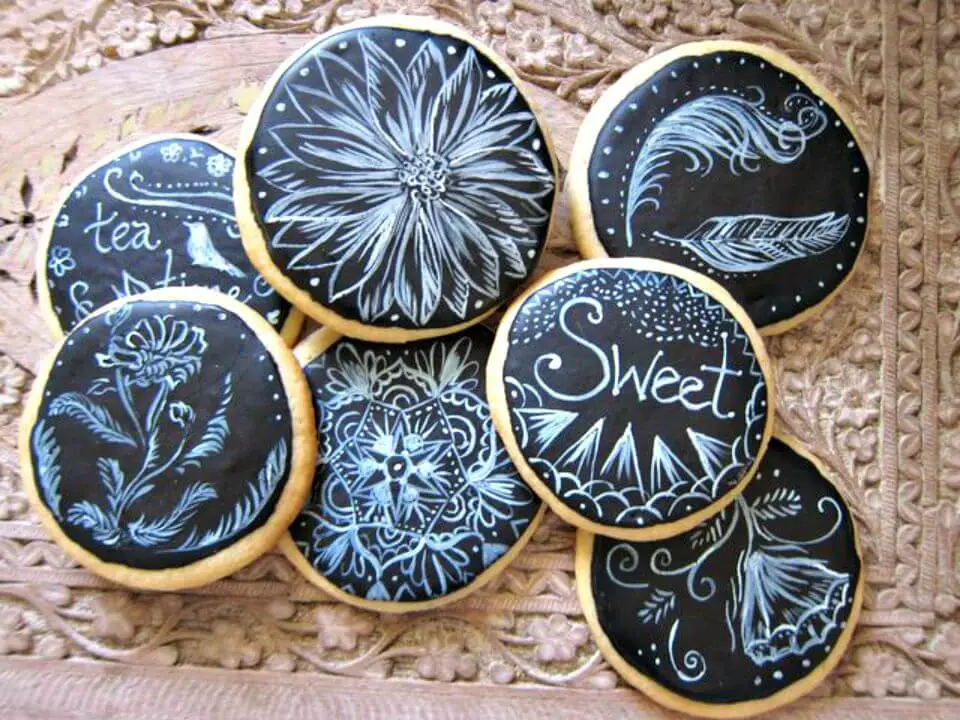
Transform your baking experience with intricate and personalized cookie decorating ideas for any celebration. Each sugar cookie is a delicious invitation to indulge in sweet artistry. The cookie-making process remains straightforward, involving the simple combination of dry and wet ingredients, followed by refrigeration before shaping and baking. However, it’s the detailed icing process that truly sets these cookies apart.
To create your canvas on each cookie, combine powdered sugar, egg white, and food coloring to form a versatile icing medium. Fine-tipped brushes and toothpicks serve as essential tools in bringing your edible masterpiece to life. For expedited drying of the icing, consider substituting water with vodka. As with any skill, practice is key – start perfecting your craft on less than perfect cookies before moving on to the showstoppers. With these beautifully decorated sugar cookies, even the most mundane occasions become extraordinary.
Delicious Cheeseburger Cookie Recipe
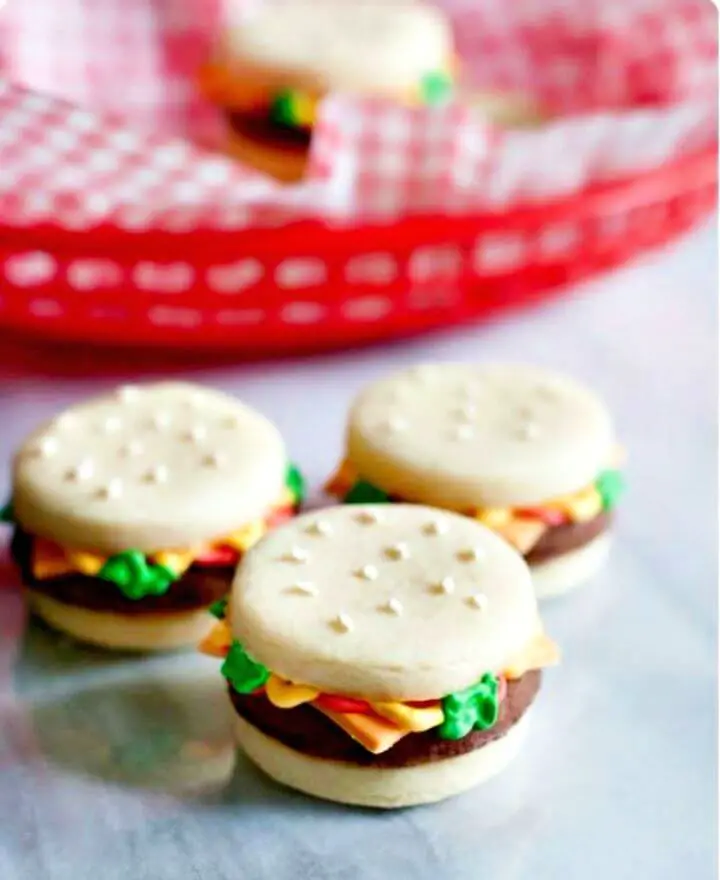
Unlock the whimsical world of edible artistry by crafting DIY cheeseburger cookies that tantalize the taste buds and delight the eyes. These innovative treats cleverly replicate the classic burger, comprising layered vanilla and chocolate cookies, precision-crafted royal icing, and masterfully molded fondant. The pièce de résistance is achieved through a harmonious blend of colors: a ‘cheese’ hue for the fondant, ketchup-like red, mustard-inspired yellow, and lettuce-green icing, all meticulously arranged to evoke a realistic burger. To add an authentic touch, employ a leaf tip for textured lettuce and finish with ‘sesame seeds’ crafted from ivory icing. With preparation time minimized by baking in advance, this delightful project is surprisingly easy to execute, ensuring a show-stopping presentation that will leave your family and friends in awe.
Make Brown Butter Heart Cookies
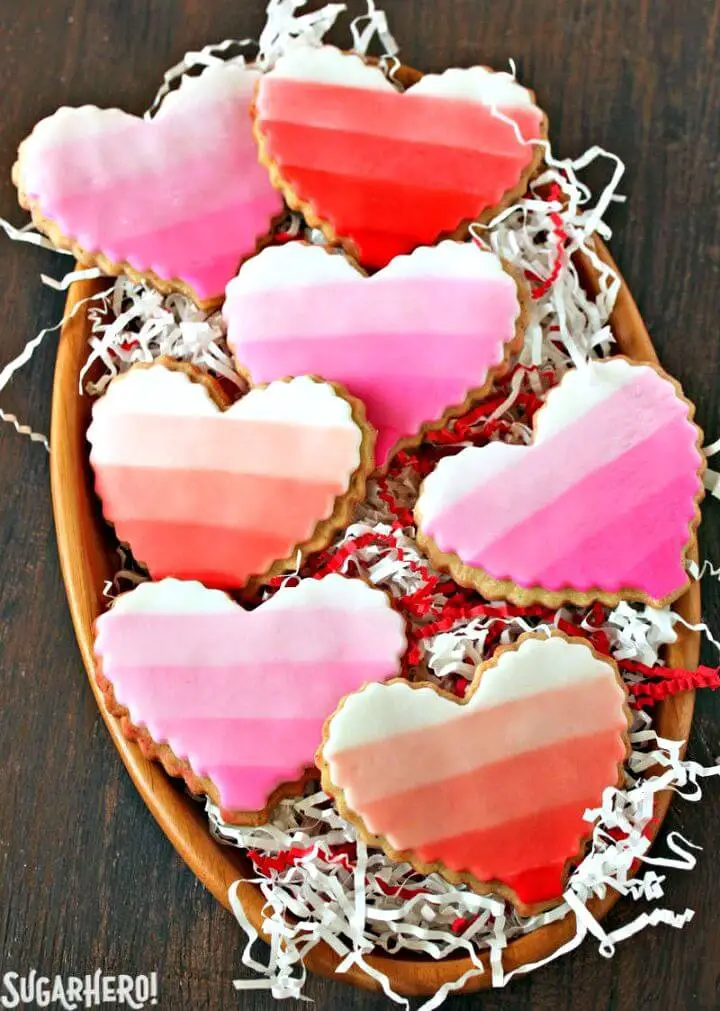
Indulge your loved ones in the warm, inviting aroma of freshly baked DIY brown butter heart cookies, a creative twist on traditional sugar cookies. The combination of rich brown butter and brown sugar yields a complex, caramel-like flavor profile that harmonizes beautifully with delicate fondant designs. A key aspect of these charming heart-shaped treats is the perfectly balanced sweetness, achieved through the thoughtful pairing of the nutty, caramelized base with the sweet, creamy fondant topping. The brown sugar’s subtle caramel note ensures the cookies remain delightfully soft for days to come. As they bake, your kitchen will be filled with a delectable scent, and the polished finish provided by the fondant adds an air of sophistication to these gourmet treats. For an effortless, airbrush-like effect, try incorporating color mist sprays into your decorating process. Savor the joy of creating these one-of-a-kind brown butter heart cookies!
Matcha Sugar Cookie Recipe
Indulge in the unique fusion of flavors and vibrant green hue of these DIY Matcha sugar cookies, where the rich, earthy essence of matcha powder is seamlessly integrated into a traditional sugar cookie recipe. With just a few common kitchen staples – including unsalted butter, granulated sugar, eggs, vanilla extract, all-purpose flour, baking powder, matcha powder, and salt – you’ll be able to create an exciting new treat that’s sure to delight both the eyes and taste buds. Perfect for adventurous bakers looking to add some excitement to their cookie game, these Matcha sugar cookies offer a delightful balance of sweetness and subtle umami undertones, making them a must-try for anyone seeking a culinary experience that’s as visually striking as it is delicious.
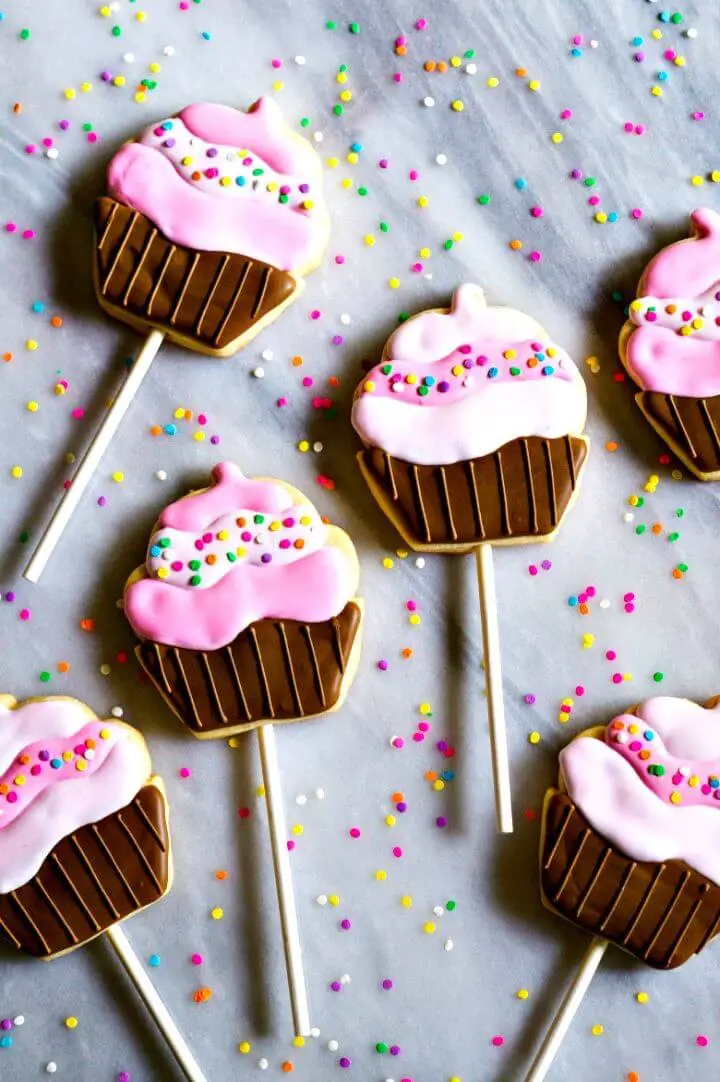
Nerdy Cupcake Cookies Recipe
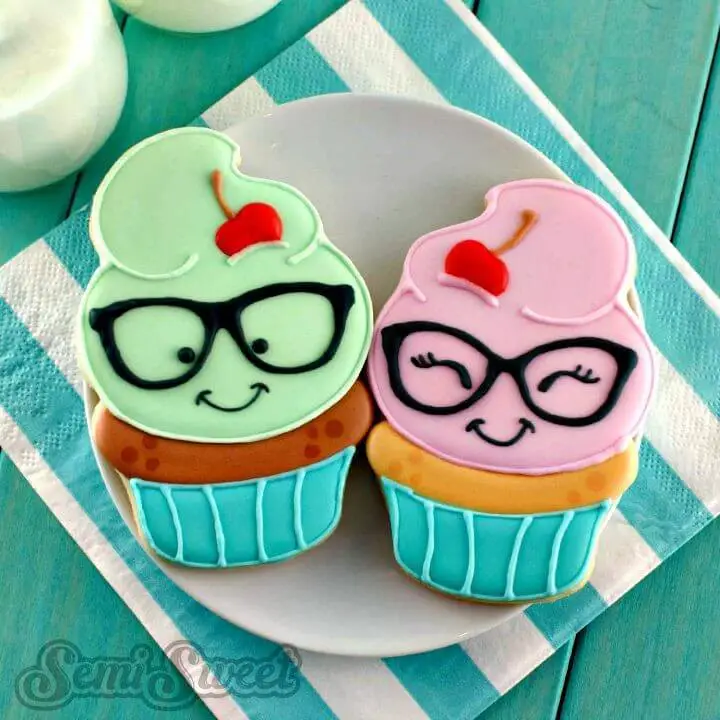
Indulge in the delightfully nerdy process of crafting whimsical DIY cupcake cookies, perfect for any occasion that calls for a touch of geeky charm. With their adorable special glasses and playful faces, these treats are sure to bring a smile to anyone’s face.This comprehensive guide takes you by the hand, providing an easy-to-follow method for creating these one-of-a-kind delicacies using new cupcakes and plaque cookie cutters. The included PDF templates offer a range of designs, including nerdy boy and girl cupcake versions, ensuring your creations are as unique as they are charming.With your choice of colored icing, bring these quirky cookies to life and master the art of creating complementary plaque cookies for an added flourish. As you bake and decorate, experience the joy of infusing your routine with creativity and humor, making each treat a reflection of your personality.
How to Decorate T-rex Dinosaur Cookies
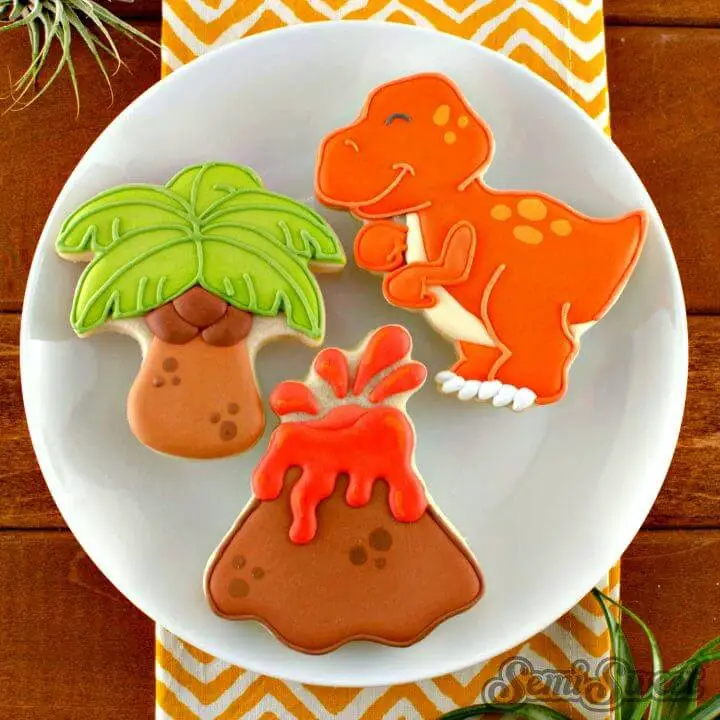
Indulge in the sweet adventure of cookie decorating by exploring new ideas. As the post-Easter slowdown provides an ideal opportunity to venture into exciting themes, why not try your hand at creating prehistoric-inspired treats? The shop has recently expanded its collection of dinosaur cookie cutters, now featuring six innovative designs – from stegosaurus and brontosaurus to triceratops, T-rex, palm tree, and volcano. Each cutter is designed for durability and cuteness, ensuring your cookies remain intact while exuding maximum appeal. To make the process even more enjoyable, an accompanying PDF template provides a step-by-step guide to decorating, making it easy to bring these fun and unique designs to life.
Prepare Watermelon Sugar Cookies
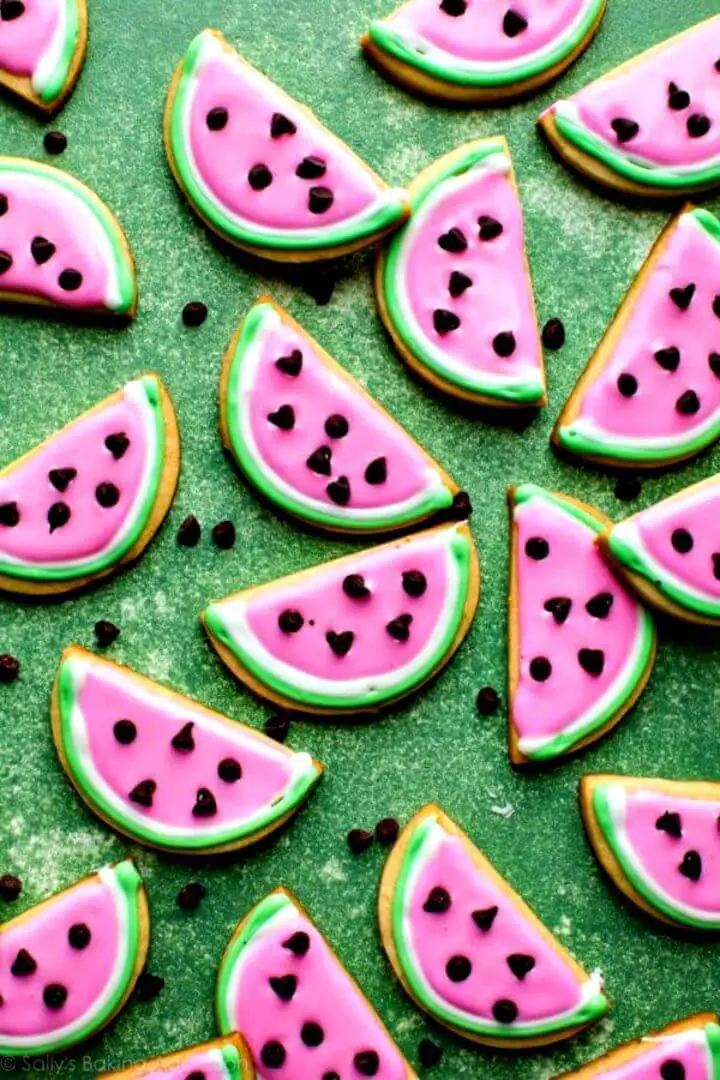
Indulge in the sweet simplicity of homemade watermelon sugar cookies, crafted using a reliable sugar cookie recipe and cut into slice-like shapes to mimic the refreshing fruit. A delicate balance of buttery goodness and sugary icing is achieved through the use of rich royal icing in pink, white, and green hues. The addition of mini chocolate chips as ‘seeds’ lends an air of indulgence, while optional watermelon extract allows for a deeper flavor connection. These charming cookies are perfect for picnics, barbecues, or any summer celebration, making them a delightful treat to share with friends and family. Experience the joy of cookie decorating and elevate your gatherings with these refreshing watermelon sugar cookies!
Quick and Easy Cookie Icing Recipe
Unleash your inner creativity with a simple DIY cookie icing recipe that’s both delicious and versatile. This tutorial offers a straightforward decorating method that will elevate the visual appeal of any cut-out cookie. With just a few basic ingredients like powdered sugar, vanilla extract, water or milk, and gel food coloring, you can create stunning and mouthwatering cookie designs. Don’t worry about achieving the perfect icing consistency – this guide provides practical tips to help you get it just right. Get ready to add an artistic touch to your baking journey with this easy, fun, and scrumptious cookie icing project! By following these simple steps, you’ll be able to create a range of unique and personalized cookie designs that are sure to impress.
Cute Pirate Cookies Recipe
Transform your next boys’ birthday party into a swashbuckling celebration with these scrumptious DIY pirate cookies! With just basic kitchen tools and a few simple ingredients like round sugar cookies and marshmallow fondant, this easy-to-follow guide ensures that baking is a breeze. Feel free to get creative by experimenting with different cookie flavors or customizing your fondant colors to match your party’s theme. To avoid any sticky situations, be sure to let the cookies cool completely before decorating. Plus, these tasty treats can be stored at room temperature for up to a week, making them perfect for parties of all sizes. So why not set sail on this culinary adventure and bring joy to your little pirate’s face?
Ice Cream Cone Cookies Recipe
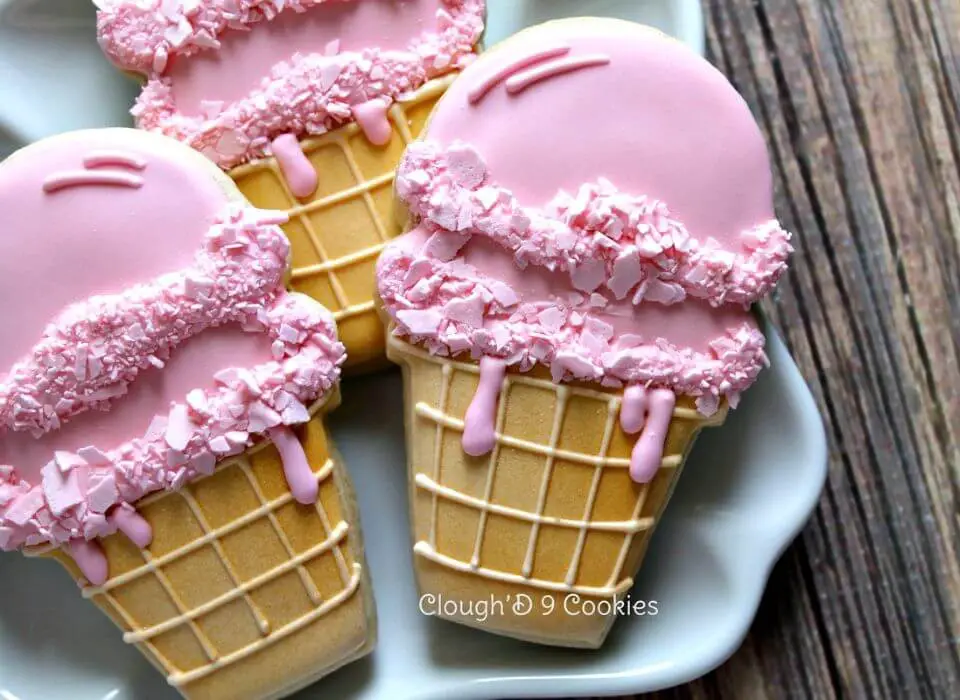
Indulge in the sweet art of baking with this imaginative approach to crafting DIY ice cream cone cookies. Begin by utilizing an ice cream cone-shaped cutter, transforming your favorite cookie dough into a refreshing summer treat. Add a touch of elegance with light ivory royal icing and authenticity with airbrushing using Amerimist Ivory. The leftover pink royal icing can be repurposed as a scrumptious strawberry ice cream topping, simply spreading it thinly on parchment paper and allowing it to dry before crumbling it onto the ice cream base. Elevate your cookies further by adding creative flourishes such as drips and lines on the dome. Pair these unique treats with real ice cream for a delightful summer indulgence that’s sure to bring smiles. This innovative technique guarantees a playful baking experience, yielding mouthwatering results that are sure to satisfy.
How to Make Popsicle Cookies
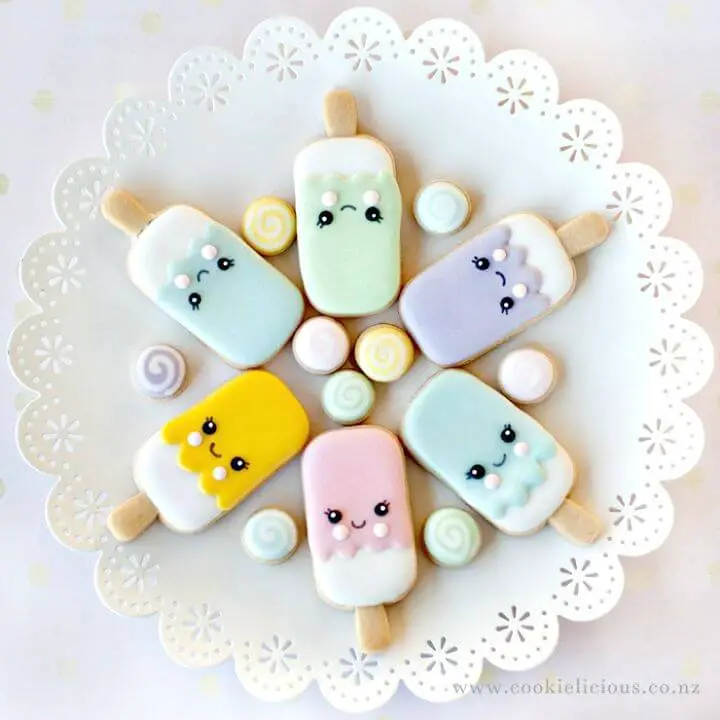
Winter’s chill doesn’t mean you can’t indulge in the sweetness of ice cream – as long as it comes in cookie form! This DIY guide will walk you through creating irresistible popsicle and ice cream cookies, perfect for a school fundraiser or a cozy weekend at home. The process is surprisingly simple: start by filling your cookie molds with icing, then let them dry. Once they’re set, add additional layers and details to give them that popsicle charm. And because cuteness knows no bounds, take it to the next level by adding kawaii faces using black icing and an edible marker – or get creative with different colors for a delightful assortment of sweet treats. Don’t worry if things don’t always go according to plan; minor mishaps like snapped handles only add to the charm. So go ahead, try your hand at these popsicle cookies, and share your creative baking journey!
Cookie Decorating with Glace Icing

Transform your sugar cookies into breathtaking works of art using this effortless DIY method for decorating with glaze icing. With just a few simple ingredients – powdered sugar, milk, corn syrup, and an extract of your choice – you’ll be well on your way to creating visually stunning and delicious treats that are perfect for gifting or showcasing at gatherings. The best part? This technique is incredibly forgiving, ensuring that even the most novice decorators can achieve professional-looking results without any fuss. Simply combine creativity with culinary skills and watch as your sugar cookies are elevated from ordinary to extraordinary.
Easy and Adorable Unicorn Sugar Cookies
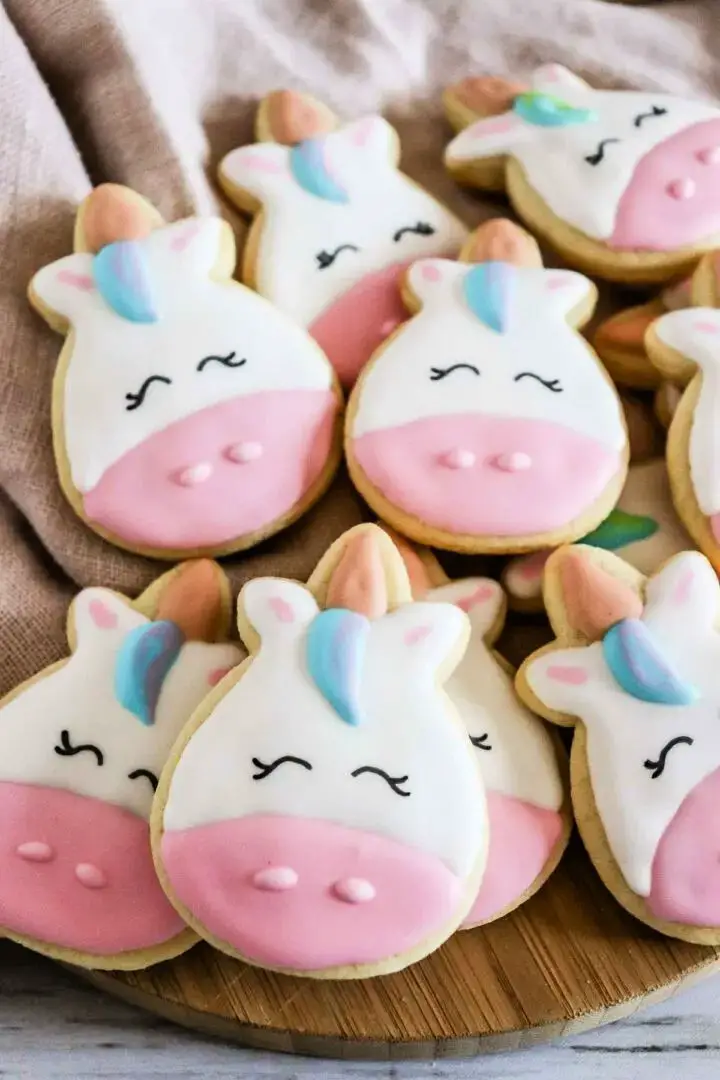
Indulge in the whimsy of the baking process with unicorn sugar cookies that mesmerize both young and old alike. This delightful treat combines a sweet, crunchy cookie base with vibrant royal icing decorations, making it an ideal addition to any party or special occasion. Simply gather easily accessible ingredients like Pillsbury sugar cookie dough, flour, powdered sugar, meringue powder, and water, then let your imagination run wild as you decorate the unicorn cookies to your heart’s desire.
Conclusion:
As you embark on the exciting journey of exploring 30 fun cookie decorating ideas that will captivate your senses, you’ll discover a world of limitless possibilities. From mastering the art of selecting the ideal icing and sugar combinations to perfecting the use of tools and equipment, each step builds upon the previous one, ultimately leading to the creation of stunning edible masterpieces. As you navigate the process, whether it’s understanding the fundamentals or troubleshooting common challenges, you’ll have ample opportunities to express your creativity and spread joy through delectable treats. With valuable insights on health and safety, as well as expert guidance to enhance your skills, you’ll be thoroughly prepared to bring these delightful cookie decorating ideas to life. Allow yourself to fully immerse in the creative process, and remember that the key to achieving exceptional results lies in the harmony of practice, patience, and a genuine passion for cookie decorating.
