Air dry clay presents a treasure trove of creative possibilities for both children and adults alike. This adaptable material’s versatility knows no bounds, making it an ideal medium for exploring cultural heritage, promoting sustainability in craft, or simply expressing one’s artistic side. From emulating the refined beauty of West Bengal’s terracotta pottery to crafting personalized gifts, air dry clay offers endless opportunities for self-expression. Its ease and adaptability enable the incorporation of diverse cultural designs, rendering each creation a unique piece of art with inherent meaning.
Embarking on a 40-project journey with air dry clay requires some preparation, but the payoff is immeasurable. Mastering fundamental techniques, gathering essential supplies, and selecting the right type of clay are crucial first steps towards crafting breathtaking pieces. This comprehensive guide is designed to facilitate a thorough understanding of working with air dry clay, featuring sections dedicated to sustainability tips, advanced projects, and answers to frequently asked questions.
Now, are you ready to unlock fresh ideas for air dry clay creations? Let’s delve into the world of air dry clay crafting, where inspiration and practical guidance await at every turn.
Cultural Exploration: Air Dry Clay Art Forms from Different Cultures
Embarking on a journey to explore the diverse world of air-dry clay art reveals a vibrant tapestry woven from the threads of various cultures. As we delve into this creative realm, we discover unique techniques, perspectives, and histories that not only reflect the cultural context but also transcend geographical boundaries and temporal constraints, making air-dry clay an art form that defies limitations and speaks to our shared human experience.
Terracotta Pottery in West Bengal, India
For centuries, the Kumbhakars, a community of potters in West Bengal, have been perfecting the ancient craft of terracotta pottery. Their output ranges from functional vessels to exquisite sculptures and ornate temple panels. Once a piece has been treated with a signature burnt red wash, it’s deemed complete. This traditional art form is not only a testament to the artisans’ mastery but also a reflection of West Bengal’s rich cultural heritage, deeply rooted in the region’s history and traditions.
Embracing Simplicity and Versatility
Air-dry clay is renowned for its user-friendly nature and versatility, making it a popular choice among artists. Unlike other types of clay, air dry clay doesn’t require the use of kilns or ovens, making it accessible to crafters of all skill levels. Whether you’re just starting out or have years of experience, this adaptable material offers endless possibilities. With air-dry clay, you can create a wide range of projects, including jewelry, home decor items, planters, and more.
Incorporating Cultural Designs
Air-dry clay art can be enriched by incorporating designs inspired by various cultures. To add a global touch, consider using stamps to create patterns reminiscent of Indian mandalas or African textiles. As you work with these cultural influences, it’s essential to approach the designs with respect and understanding. Take time to research the significance behind the patterns you choose to emulate, ensuring that your creative expression is not only visually appealing but also culturally sensitive.
Sustainability in Crafting
When delving into the world of cultural art forms inspired by air dry clay, it’s essential to practice eco-friendly craftsmanship. Opt for natural dyes whenever feasible and explore creative ways to repurpose or recycle leftover clay. By doing so, you not only pay homage to the artistic heritage of our predecessors but also demonstrate a commitment to preserving the environment that has fostered these traditions.
By integrating cultural exploration into your DIY air dry clay ideas, you enable readers to form meaningful connections with clay artists from around the globe, fostering a sense of community and shared appreciation for this versatile medium.
How to Get Started with Air Dry Clay Projects
Choosing Your Air Dry Clay
When embarking on an air dry clay project, it’s essential to select the right type for your needs. Different types of clay vary in terms of their pliability, making some better suited for intricate details while others are more robust and suitable for structural projects. Take the time to research and choose a clay that aligns with your project goals. Additionally, investing in high-quality air dry clay can make all the difference in achieving professional-looking results. Although it may cost a bit more, the ease of use and superior finish of the final product are well worth the investment.
Gathering Supplies
To begin crafting with air-dry clay, start by preparing a clean and flat workspace. You’ll need some fundamental tools to get started, including a rolling pin for flattening and shaping the clay, as well as knives or specialized cutting tools. A smooth surface such as a glass or ceramic tile is ideal for working on your projects. In addition to these basic necessities, consider having some creative extras at your disposal. These might include household items like lace, stamps, or leaves that can be used to add unique textures and patterns to your designs. It’s also helpful to have acrylic paints, brushes, and sealants on hand if you plan to decorate your finished pieces.
Planning Your Project
When embarking on an air dry clay project, it’s essential to begin with small, manageable tasks that allow you to become familiar with the material’s properties. Simple creations such as miniature bowls, decorative trinket trays, or dainty pendants are ideal for beginners. This initial experience will lay the foundation for future projects, giving you a sense of comfort and confidence in working with air dry clay. Additionally, before diving into the creative process, take a few moments to sketch out your ideas. This exercise helps visualize the final product and enables you to plan the steps required to bring your vision to life.
Working with Air Dry Clay
Before diving into molding, take some time to condition your clay by kneading it thoroughly. This step is crucial in making the clay more pliable and easier to work with. If the clay feels a bit too dry for your liking, you can always add a small amount of water to soften it up. It’s also essential to keep an eye on the thickness of your clay as you mold. If it’s too thin, there’s a risk that it might break easily once dried, while if it’s too thick, it may not dry properly or even crack when it does. Achieving the perfect balance is key in ensuring your final product turns out just right.
Drying and Finishing
When working with air-dry clay, it’s essential to follow the manufacturer’s guidelines for drying times, as this can impact the final product. Thinner pieces may be ready in a matter of hours, while thicker sections can take several days or even weeks to fully dry. After drying, use fine-grit sandpaper to smooth out any rough edges, which can significantly enhance the overall appearance and tactile experience of your project. Finally, to ensure your air-dry clay creations remain durable and resistant to moisture, apply a clear sealant. This can be achieved using either a spray or brush-on application method, depending on the specific needs of your project.
Decorating Your Project
When it comes to bringing your air dry clay creations to life, acrylic paints are an excellent choice. Not only do they come in a vast array of colors, but you can also experiment with different finishes such as matte, gloss, or metallic to achieve unique effects. This versatility allows for endless possibilities and encourages creative experimentation.To add the final touches to your project, consider sealing the painted surface with varnish to protect it from damage and give it a professional-looking finish. Additionally, incorporating embellishments like beads, fabric, or metal pieces can elevate your creation and make it truly stand out. With these finishing techniques, you’ll be able to showcase your artistic vision in its entirety.Embarking on an air dry clay project is a delightful journey of self-expression and creativity. As with any new skill, practice makes perfect, so don’t be discouraged if your first attempts may not turn out exactly as expected. Instead, focus on the process, be patient, and let your imagination run wild. With time and experience, you’ll discover your unique style and develop a deeper appreciation for the art of crafting.
Tools and Techniques for Working with Air Dry Clay
Crafting with air-dry clay offers a unique combination of artistic expression and hands-on skill-building. To unlock its full potential, it’s essential to grasp the fundamental tools and techniques that elevate this creative process.
Essential Tools for Air Dry Clay Crafting
A well-equipped workspace is essential for successful ceramics crafting. At the heart of this setup lies the rolling pin, which ensures your clay is evenly flattened and of consistent thickness. To achieve this, incorporate guide rings or wooden sticks on either side of your clay to maintain a steady pace.
In addition to the rolling pin, a variety of sculpting tools are necessary for shaping and refining your creations. These may include ribbon tools for cutting, loop tools for carefully removing excess clay, needle tools for precision details, and wire-end tools that add texture and depth.
To prevent your clay from sticking to the work surface, employ a non-stick material such as a silicone craft mat, wax paper, or plastic wrap. This simple step can save you frustration and time in the long run.
Finally, when working on projects that require structure and support, turn to armature materials like aluminum wire or foil to create a sturdy base for your design.
Techniques to Master
Mastering the Art of Clay Shaping: To create a smooth and even consistency, gently knead the clay using slightly dampened hands, removing any air bubbles that may have formed. This step is crucial in preparing your clay for further manipulation. Next, add some texture to your creation by utilizing everyday objects such as lace, leaves or stamps. These unique patterns will give your piece a one-of-a-kind character. When it comes time to join separate pieces of clay together, first score the surfaces you plan to connect, then apply a thin layer of slip – a mixture of clay and water – before pressing firmly to ensure a strong bond. Finally, allow your creation to dry slowly and evenly to prevent cracking. If necessary, cover it with a cloth to slow down the drying process, giving you more time to work on other aspects of your piece.
Finishing Touches
To refine your air dry clay project, start by sanding the surface once it’s completely dry. This step helps smooth out any rough edges or imperfections, ensuring a professional finish. Use fine-grit sandpaper for optimal results.
Next, apply a sealant to protect your finished work from moisture and give it a polished appearance. This not only enhances the overall aesthetic but also extends the longevity of your piece.
When it comes to adding color, acrylic paints are an excellent choice for air dry clay. Begin by applying a base coat and allowing it to dry before moving on to more detailed work. This foundation layer sets the stage for a vibrant and even finish.
As you master these techniques, you’ll find yourself growing increasingly confident in your ability to tackle air dry clay projects. The key to success lies not only in understanding the tools and methods but also in practice and experimentation. With time and patience, you’ll be able to refine your skills and produce stunning results.
Project Themes: Inspiring Ideas for Air Dry Clay Creations
As you embark on an air dry clay project, remember that the possibilities are truly boundless. The versatility of this medium is matched only by the limitless scope of your imagination. For those looking to elevate their creative endeavors, themed projects offer a unique opportunity to bring new ideas to life. Here’s a starting point for your next air dry clay adventure:
Seasonal Decorations
Transform your home into a seasonal sanctuary by embracing the ever-changing rhythms of nature. As winter’s chill sets in, craft delicate snowflakes and ornaments that add a touch of magic to your decor. As spring awakens, welcome vibrant flowers and adorable bunnies to brighten up your space. Summer’s warmth brings suns and seashells to evoke feelings of relaxation and tranquility. And when autumn leaves turn golden, incorporate colorful pumpkins and foliage into your decor to celebrate the season’s bounty.
Personalized Gifts
For a truly unique and meaningful gift-giving experience, consider working with air dry clay. This versatile medium allows you to create personalized treasures that reflect the individual’s personality, interests, or tastes. Imagine crafting custom nameplates with their name or initials, photo frames showcasing cherished memories, or trinket dishes filled with sentimental mementos. By incorporating favorite colors, symbols, or other meaningful details, your handmade creations will not only be treasured but also serve as a testament to the thought and effort you put into selecting a truly special gift.
Home Decor Items
Elevate the ambiance of your living space by crafting unique air-dried clay creations. From sophisticated vases to functional coasters and visually striking wall decor, the possibilities are endless. Push the boundaries of creativity by exploring different textures and finishes that harmonize with your home’s distinct style.
Cultural Celebrations
Embark on a journey of cultural discovery by creating air dry clay projects that honor traditional practices. From crafting vibrant lanterns for Diwali’s festivities to designing intricate skulls for Día de los Muertos, or even handcrafting dreidels for Hanukkah’s celebrations, the possibilities are endless. As you delve into the symbolism and significance of these cultural icons, you’ll not only deepen your understanding of different heritages but also cultivate a sense of appreciation and connection with the world around you.
Whimsical Creatures
Let your imagination soar by bringing whimsical characters to life. Design enchanting dragons, charming unicorns, or mystical mermaids that will captivate both children and adults. The process of crafting these fantastical creations can be a delightful experience for all.
Functional Art
Transform ordinary objects into extraordinary works of art by merging functionality with aesthetic appeal. Turn functional items like jewelry holders, desk organizers, or kitchenware into unique conversation starters. As you delve into these projects, not only will you refine your crafting skills, but you’ll also create meaningful pieces that reflect your personality and passions. With air dry clay as your medium, let these ideas ignite your creative spark!
Sustainability Tips for DIY Air Dry Clay Crafting
While crafting with air dry clay offers a unique combination of creativity and environmental friendliness, it’s essential to take additional steps to make your hobby truly sustainable. To achieve this, consider the following guidelines: Firstly, opt for high-quality air dry clay that is free from harsh chemicals or additives. This will not only ensure the well-being of yourself and others but also contribute minimally to waste and pollution. Next, think about repurposing materials you already have at home before seeking out new supplies. A simple example could be using old containers as molds for your air dry clay creations. Additionally, when it’s time to clean up, make sure to use a damp cloth or sponge and avoid harsh chemicals that can further contribute to waste and pollution. By implementing these eco-friendly practices into your crafting routine, you’ll not only be reducing your environmental impact but also fostering a sense of accomplishment and fulfillment.
Choose Natural Materials
When selecting air-dry clay, prioritize products comprised of natural materials whenever feasible. While some clays may contain synthetic components that don’t decompose easily, opting for those made from natural ingredients is a more eco-friendly choice as they will gradually disintegrate and minimize their environmental footprint.
Reuse and Recycle Clay Scraps
When working with clay, it’s tempting to discard any leftover pieces as waste. However, these scraps can be repurposed in future projects or molded back into a fresh batch of clay. If the remains have become too dry for reuse, a small amount of water can be added to rehydrate them and breathe new life into the material.
Make with Purpose
When designing your handmade creations, consider their potential longevity. Strive to create items that will be treasured and utilized for an extended period, rather than being discarded as single-use or disposable goods. By adopting this perspective, you’ll inadvertently reduce waste and foster a more eco-friendly approach to crafting.
Use Eco-Friendly Decorations
When it comes to enhancing the appearance of your clay creations, prioritize eco-friendly practices by selecting paints, glazes, and sealants that not only promote sustainability but also ensure a safe environment for both humans and the planet. Opt for non-toxic, environmentally responsible products that refrain from harmful chemicals, thereby minimizing the risk of contamination and pollution. This thoughtful approach will not only contribute to a healthier planet but also set a positive example for the creative community.
Air Dry Responsibly
By eschewing conventional drying methods that rely on ovens or other energy-intensive means, you can instead opt for a more sustainable approach: allowing your clay creations to air dry naturally. This eco-friendly approach not only conserves energy but also minimizes your carbon footprint. To ensure a seamless drying process and prevent warping, simply turn your pieces periodically to promote even evaporation.
Educate and Share
As you delve deeper into sustainable crafting, consider paying it forward by sharing your expertise with others. Create informative blog posts, develop engaging tutorials, or even host workshops to educate fellow crafters on eco-friendly practices. The ripple effect of these efforts will be a positive impact on the environment, as more people adopt and integrate these methods into their own creative processes. While crafting with air dry clay, you can simultaneously prioritize environmental stewardship by making conscious choices that reduce your ecological footprint. Every small action contributes to a larger movement towards sustainability, so let’s join forces to craft a brighter, greener future together.
Advanced Projects: Challenging Air Dry Clay Creations
If you’re already familiar with the fundamentals of working with air dry clay and seeking a new challenge, complex projects can be an excellent way to refine your skills and unleash your creative potential. To help inspire you, here are some innovative and intricate ideas for air dry clay creations that will not only test your abilities but also yield breathtakingly beautiful results.
Sculptural Art Pieces
Transform your space into a masterpiece by crafting a captivating sculpture that serves as the focal point of a room or the crowning jewel of an art exhibition. As you shape the figure, strive to convey a sense of dynamic energy or raw emotion, imbuing the piece with vitality and dimension. Allow yourself to become fully immersed in the creative process, allowing your imagination to flow freely and guide your hands as they bring forth a work of art that is truly one-of-a-kind.
Detailed Bas-Relief Panels
Crafting a stunning bas-relief panel demands dedication and attention to detail, as the design is carefully raised above its surroundings. To create a visually striking piece that tells a story or captures a natural scene, try your hand at this intricate sculpting technique. With patience and precision, you can transform a simple design into a textured masterpiece that showcases your artistic skills.
Miniature Models
When it comes to crafting intricate miniature models of structures, vehicles, or settings, a delicate touch and meticulous approach are essential. To ensure accuracy, consult reference images that provide precise measurements and proportions. Furthermore, strive to incorporate an abundance of nuanced details to infuse your miniatures with a sense of realism and vibrancy.
Intricate Jewelry
Craft exquisite jewelry pieces that showcase intricate designs, textures, and finishes. As you work with air dry clay, savor the patience and attention to detail required for creating delicate yet unique pendants, earrings, or bracelets.
Themed Chess Sets
Craft a one-of-a-kind chess set by bringing a unique theme to life through intricately designed pieces. This creative endeavor not only showcases your skill in shaping and crafting, but also demands attention to detail as you strive for uniformity across the entire collection of pieces, each carefully crafted to represent its specific character. Whether it’s historical figures, mythical creatures, or beloved literary characters, this project invites you to think outside the box and create a truly bespoke game that tells a story.
Realistic Animal Figurines
To craft realistic animal figurines, it’s essential to focus on anatomy and detail. A key step in achieving this level of realism is to thoroughly study the animals you wish to replicate. Observe their physical characteristics, such as fur texture, scale patterns, or feather arrangements, and practice recreating these features in your figurines. By doing so, you’ll be able to create pieces that convincingly capture the essence of the animal’s appearance.
Architectural Elements
Explore the art of crafting architectural elements like columns, arches, or decorative friezes using air dry clay. This type of project offers a unique opportunity to delve into historical styles and techniques while creating something that can be used as a standalone decorative piece or incorporated into a model. By taking on complex projects, you’ll not only refine your skills but also produce stunning works that showcase your artistic prowess. To achieve success, it’s essential to cultivate patience and practice. Get started with the necessary tools and let your creativity unfold.
FAQs About Air Dry Clay Crafting
Embark on a journey of creative expression by delving into the world of air dry clay crafting with this exhaustive FAQ resource. Gain unparalleled insight into the craft through expert-proffered guidance, cutting-edge techniques, and thorough explanations that cater to all your questions.
Do I need a kiln for air dry clay?
While traditional ceramics require a kiln or high-temperature firing process, air-dry clay eliminates this need. Its unique property allows it to harden and cure naturally at room temperature, making it an accessible and user-friendly medium for hobbyists and crafters alike.
What is the best brand of air dry clay?
When it comes to selecting the ideal air dry clay brand, individual requirements and personal preferences play a significant role. While several options are available, including DAS, Crayola, and Jovi, each has its unique characteristics that may make it more suitable for certain users. The most effective approach is to experiment with a few brands to determine which one best meets your specific needs.
Can I make my own air dry clay?
With a few basic components and some easy-to-find household items, it’s surprisingly simple to create your own air-dry clay. A popular DIY project, homemade clay recipes can be found in abundance online, typically combining baking soda, cornstarch, and water.
What tools do I need to work with air dry clay?
When it comes to shaping and molding your dough, having the right tools at hand is crucial. A trusty rolling pin is an essential starting point, allowing you to evenly distribute the dough and achieve the desired thickness. Additionally, a set of sculpting tools can help you create intricate designs or add texture to your final product. For a non-stick surface, consider using a silicone mat or a lightly floured work surface to prevent sticking and make cleanup a breeze. A sharp knife or cutting tool is also necessary for any trimming or shaping you may need to do once the dough has been rolled out. And if you’re feeling creative, don’t be afraid to get crafty with household items like combs, forks, or even everyday objects like credit cards or bottle caps – these can add unique textures and patterns to your finished baked goods.
How do I store air dry clay?
To maintain the moisture and pliability of air-dry clay, it is essential to store it in a sealed environment that prevents air from entering. This can be achieved by storing the clay in an airtight container or wrapping it tightly in plastic wrap to create a barrier against evaporation. By doing so, you will help prevent the clay from drying out and retain its workable consistency.
How do I soften air dry clay that has gone hard?
For individuals looking to revive hard air-dried clay, a simple yet effective approach is to introduce a measured quantity of water into the mixture. By gently kneading the clay until it regains its pliability, you can restore its workable consistency and continue with your creative project as intended.
What are the downsides of air dry clay?
While air-dry clay has its own unique benefits, it’s essential to recognize some of the potential drawbacks. One common issue is that it can be prone to cracking if not handled correctly. Additionally, compared to kiln-fired clay, air-dry clay may not offer the same level of durability. Furthermore, if not properly sealed, it can be susceptible to damage from water exposure.
How long does it take for air dry clay to dry?
The drying time of a project can be influenced by two primary factors: the thickness of the finished piece and the ambient humidity. As such, it’s not uncommon for the drying process to span anywhere from 24 to 72 hours, depending on these variables.
How hard does air dry clay get?
After the drying process is complete, the air-dried clay transforms into a robust and durable material that can be manipulated through various techniques. Not only can it withstand sanding and carving, but it also provides an ideal surface for applying paints, glazes, or other decorative mediums.
How to paint air dry clay?
When it comes to adding color and depth to air-dry clay, acrylic paints are an excellent choice. To achieve the best results, start by applying a base coat and allowing it to fully dry before building up layers of additional color and detail.
Can air dry clay be used outdoors?
While air-dry clay has its own unique benefits, it’s essential to note that it isn’t waterproof and can be vulnerable to damage when exposed to the elements. As such, it’s generally recommended for use on indoor projects where the risk of moisture exposure is minimal. If you do plan to use it outdoors, however, it’s crucial to seal it properly to protect your creation from the effects of rain or humidity.
Is air dry clay safe for children?
While it’s generally true that most air dry clay is non-toxic and safe for children to use, it’s essential to double-check the product label to confirm its safety. This precaution is crucial in ensuring a enjoyable and creative experience when working with air dry clay. By keeping these FAQs top of mind, you’ll be well-equipped to produce stunning and successful projects, ultimately elevating your skills as an air dry clay enthusiast.
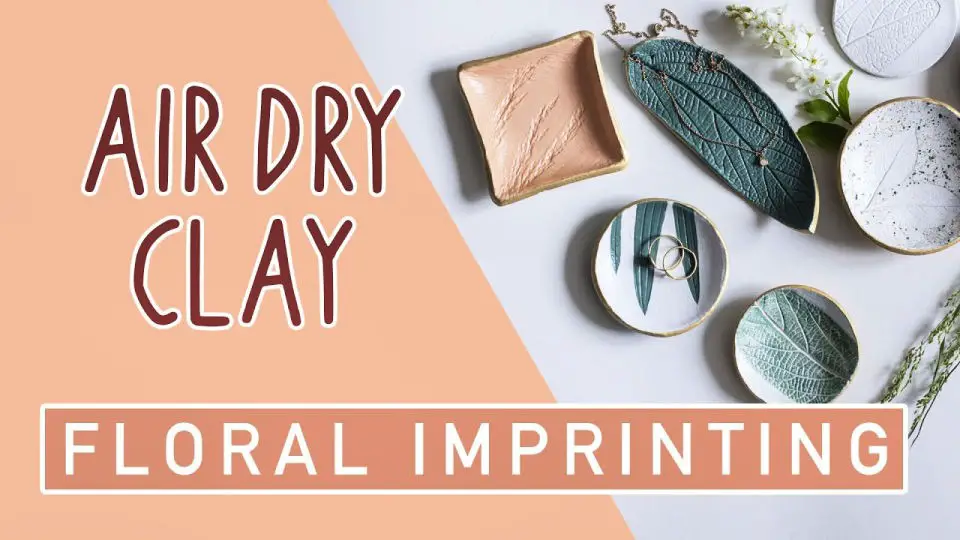
40 Air Dry Clay Ideas for Kids and Adults
Discover a world of creativity with 40 exciting air dry clay project ideas suitable for both kids and adults. Ranging from quick and easy endeavors to complex masterpieces, this treasure trove of inspiration awaits you, inviting you to unleash your artistic side and craft something truly unique!
Make an Air Dry Clay and Raffia Trivet

Elevate your crafting expertise by creating a unique air dry clay and raffia trivet that adds a touch of bohemian flair to your home decor. This DIY tutorial is perfect for making a functional plant pot holder or trivet, ideal for pots, pans, or serving dishes. By combining natural materials like air dry clay, raffia, and twine, you can craft this beautiful piece in no time. To get started, shape the centerpiece using clay, then weave the raffia around it according to a simple pattern. Finish off with a seamless joint for a polished look that will elevate your home decor or serve as a decorative accent for your plants.
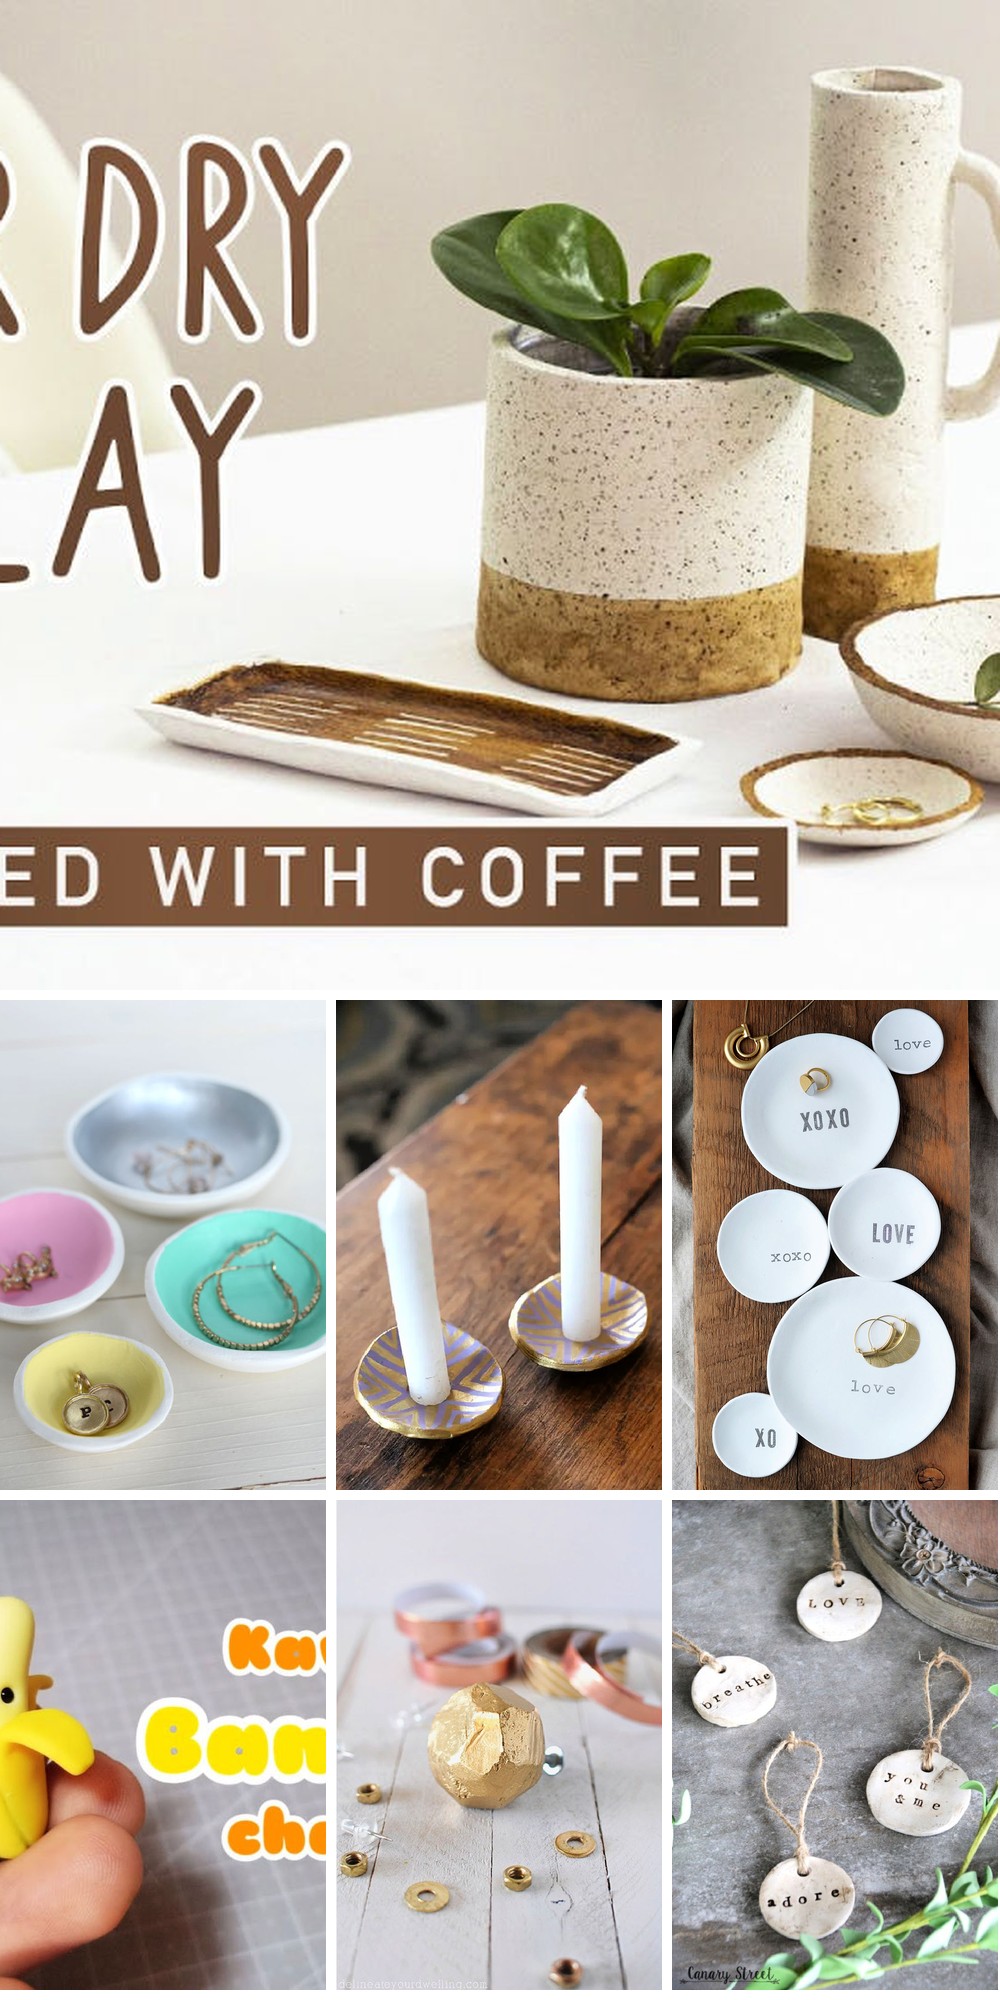
Best Air Dry Clay Jewelry Bowls
Transform your home’s ambiance with the enchanting DIY air dry clay jewelry bowl! For pottery aficionados or those seeking a creative outlet, air dry clay is an ideal material that doesn’t demand a kiln or oven. To begin, gather essential supplies: air dry clay, a rolling pin, glass bowls, acrylic craft paint, a paintbrush, and fine sandpaper. Roll out the clay to a 1/4-inch thickness and carefully cut around the edges of the bowls to create cozy nesting sets. Press the clay into the bowls, smooth the edges, and let them dry overnight. The next day, remove the dried clay from the bowls and use fine sandpaper to achieve a refined finish. Embellish your creations with vibrant acrylic paint, unleashing a world of artistic possibilities with air dry clay. This straightforward yet enjoyable craft project invites you to tap into your creativity and bring forth a unique piece that reflects your personal style.
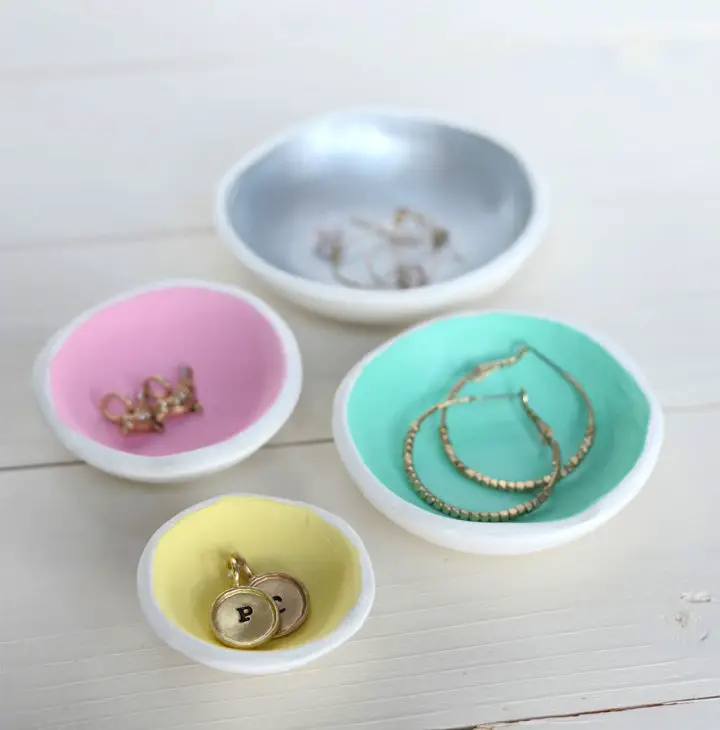
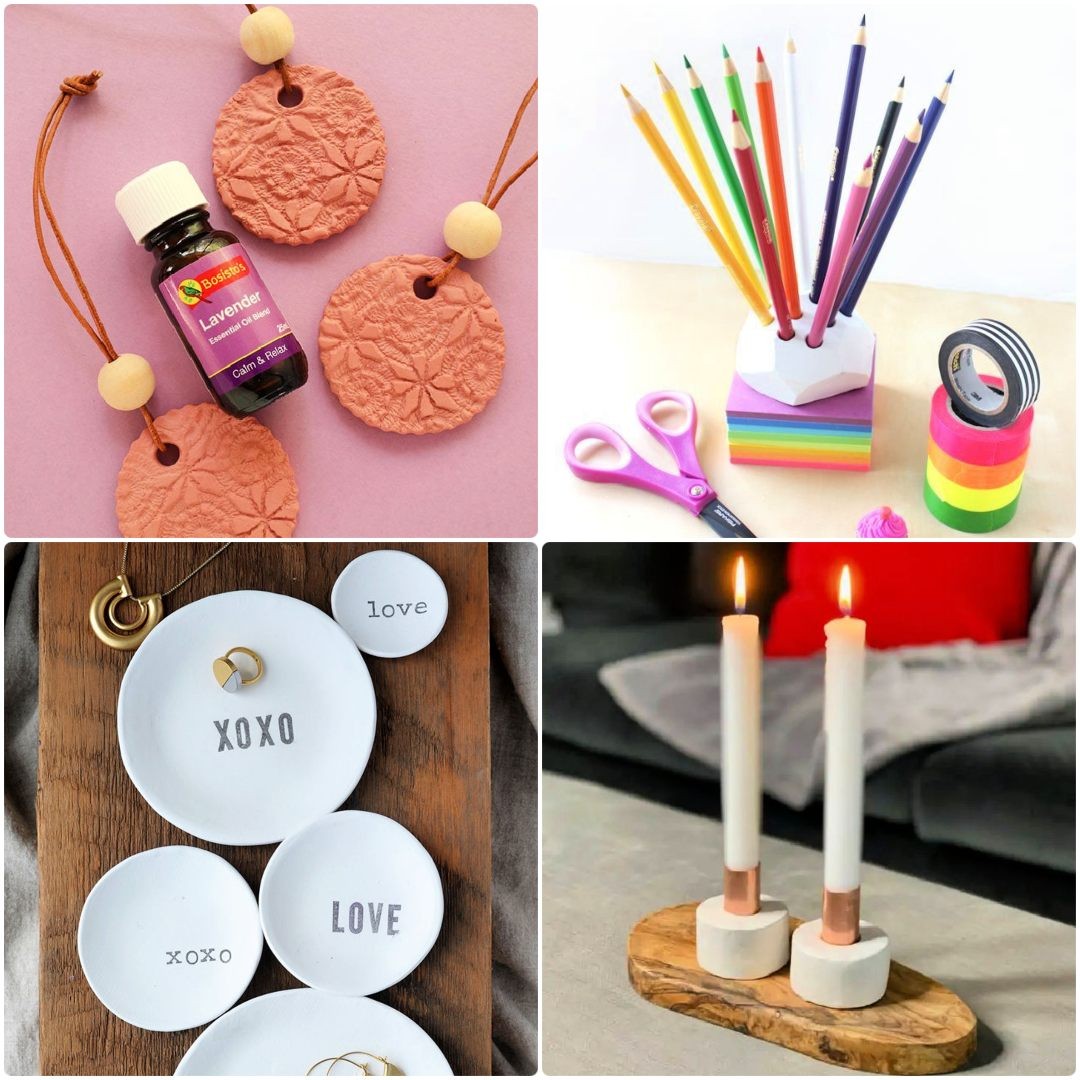
Making Candlestick Holders Out of Air Dry Clay
Transform your home decor with the warmth of handmade charm by crafting DIY air dry clay candlestick holders. This comprehensive tutorial takes you through a straightforward and enjoyable process, perfect for whipping up unique gifts or adding a personal touch to your holiday decor. To get started, gather essential materials like air-dried clay, copper tube cap fittings, a small bowl, wax paper, clay tools, a craft knife, sandpaper, and varnish. With step-by-step guidance and expert tips on smoothing seams and concealing imperfections, you’ll be surprised at how effortlessly you can create beautiful candlestick holders that radiate warmth and ambiance in any room.
Air Dry Clay Jewelry Dish for Beginners
Create your own stunning and functional clay jewelry dishes in this easy-to-follow DIY tutorial. These charming containers are ideal for storing small accessories like rings, earrings, and more while adding a touch of elegance to your vanity table. The best part? This project is perfect for crafters of all levels, offering a therapeutic and quick process that yields up to 10 beautiful dishes. Using air-hardening clay or polymer clay, along with basic materials like acrylic paint and household tools, you’ll be guided through the simple steps of shaping, flattening, and molding the clay, followed by a pop of color with acrylic paint. As you complete each dish, you’ll experience the joy of creating unique and personalized treasures for yourself or as thoughtful gifts.
DIY Air Dry Clay Chain Link for Decoration
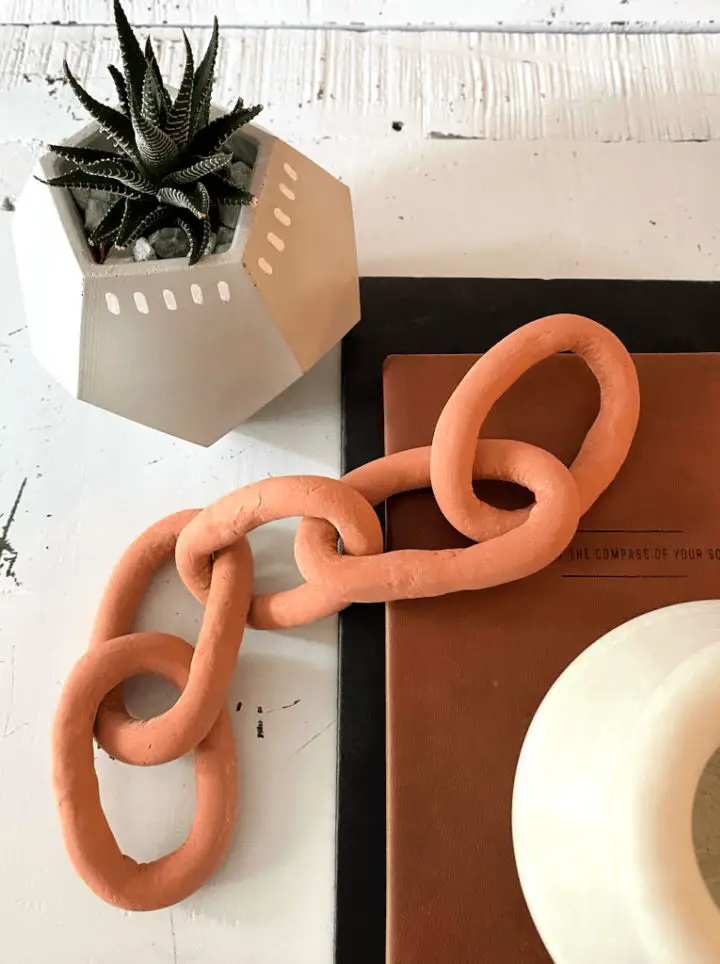
Give your coffee table a unique touch by crafting a decorative chain link piece using air-dry clay. This fun and easy DIY project requires no baking and allows you to customize the design to fit your personal style. Start by rolling out the clay into a long strand, then shape it into the first loop and connect subsequent strands to create a chain. Feel free to experiment with varying loop sizes, shapes, and lengths to add depth, texture, and interest to your coffee table decor. This quick and creative project is perfect for elevating your home’s aesthetic without breaking a sweat.
Cool Terracotta Clay Essential Oil Diffuser
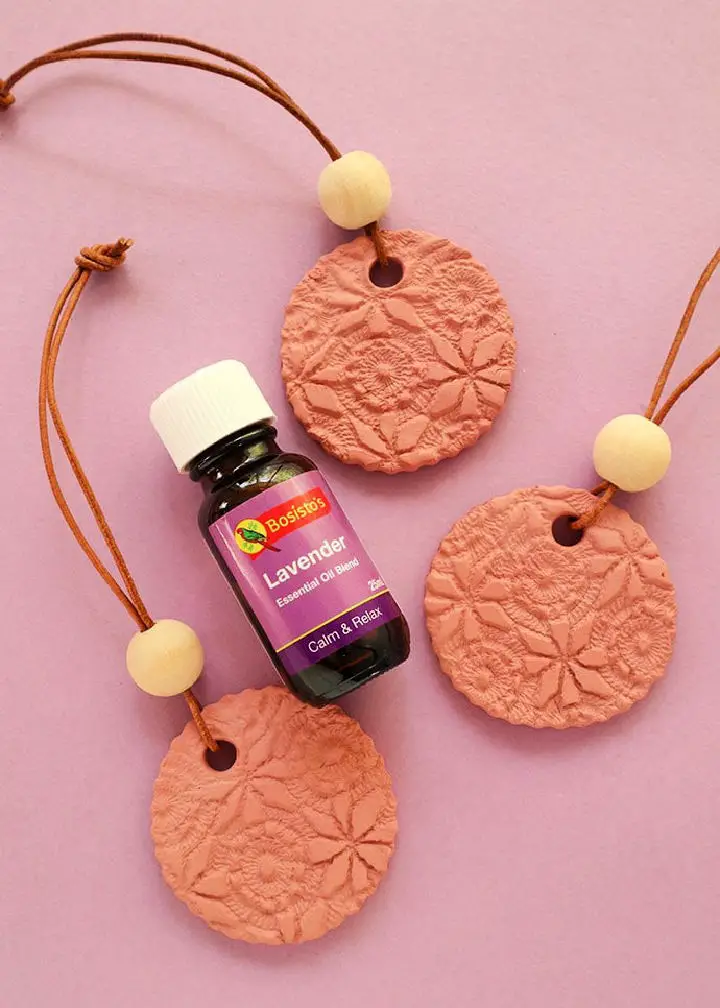
Discover the serene charm of natural scents with this DIY terracotta clay essential oil diffuser. Handcrafted from air-dried terracotta and adorned with vintage crochet lace, each diffuser boasts a unique texture and pattern. Not only do they provide a stylish touch to any room or vehicle, but they also make for thoughtful gifts.
These handmade creations can be personalized with initials or creative flair, adding an extra layer of thoughtfulness. By incorporating essential oils, you can release a delightful fragrance over time, perfect for home use or as a subtle air freshener in your car or school locker.
The porous terracotta clay absorbs the oils, allowing for a slow and steady release of the aroma. With easy-to-follow instructions, you can create these eco-friendly air fresheners for yourself or share them with loved ones.
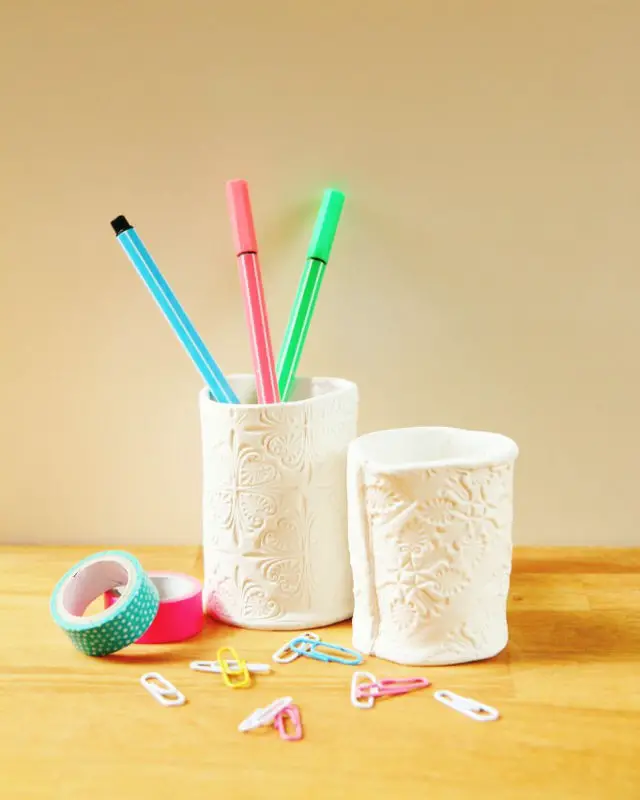
DIY Air Dry Clay Colored Pencil Holder
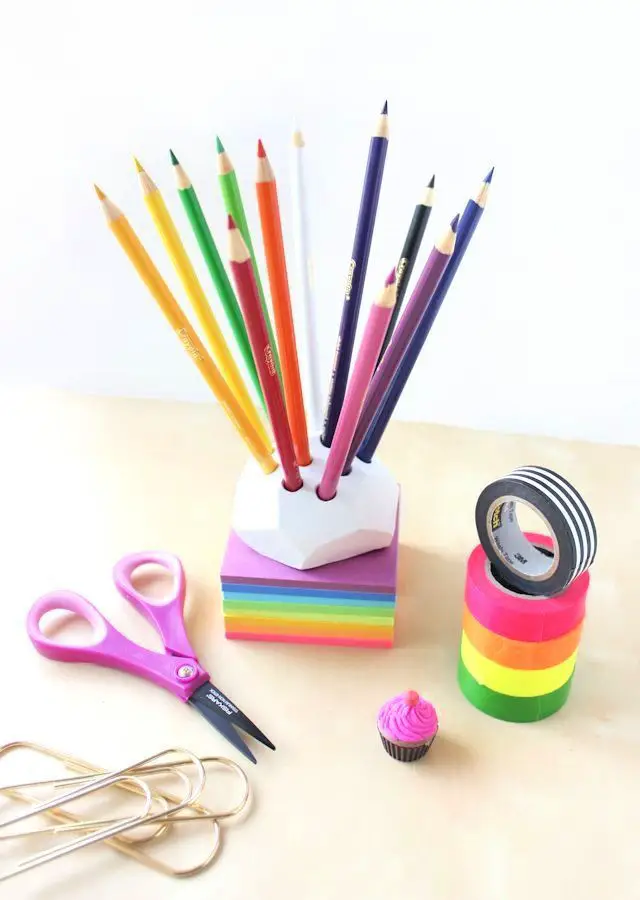
Bring out the artist within by creating a one-of-a-kind DIY air-dried clay pencil holder that showcases your creativity! Start by rolling and compressing a ball of clay into a dome shape, then insert your colored pencils for a unique display. Allow it to dry overnight before using a knife to carefully cut away random chunks of clay, revealing a geometric pattern. Once dry, give it a fresh coat with white paint or add touches of gold with a paint marker for an added pop of color.
This adaptable project can be tailored to hold various art supplies like Sharpies, crayons, or gel pens, making it a thoughtful addition to your workspace or a meaningful gift. The possibilities are endless!
Stamped Air Dry Clay Pottery Bowls
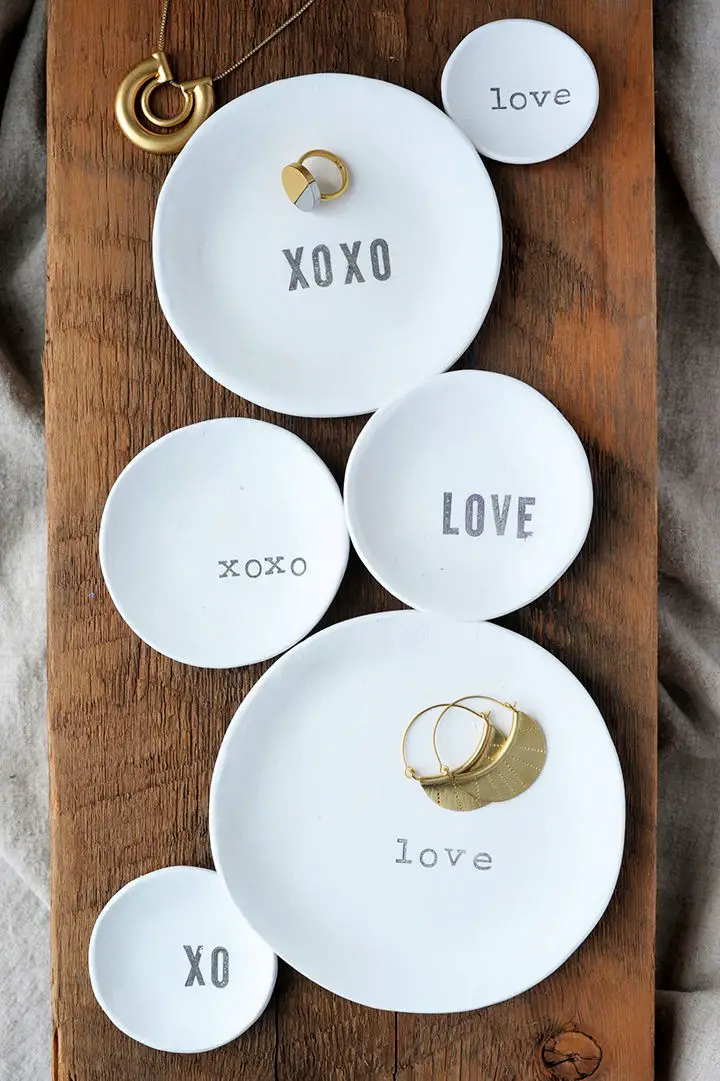
Unlock the art of creating unique air dry clay pieces by learning how to use molds and stamps. Take your pottery skills to the next level by crafting personalized, one-of-a-kind bowls that make perfect gifts for any occasion. With air dry clay as your canvas, you can create charming bowls featuring modern black lettering like ‘Love’ and ‘XOXO.’ The simplicity of white clay adds an elegant touch, making these pieces ideal for Valentine’s Day or any other special day. Start by gathering your supplies, rolling out the clay, cutting it into shapes, and smoothing out imperfections. Then, use your chosen stamps to add a personal touch. Let the clay dry overnight before carefully removing it from its mold. Remember, these bowls are not intended for food use. Instead, let your creativity shine by showcasing your delightful stamped air dry clay bowls.
How to Make Rustic Air Dry Clay Tags
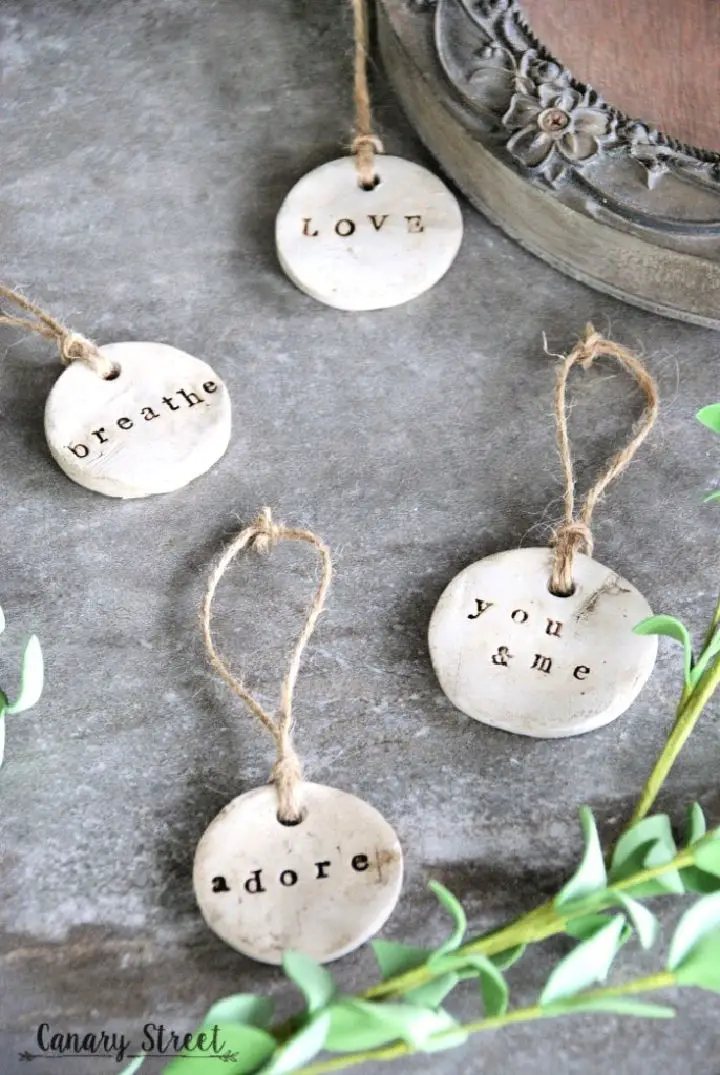
Transform your gifts with a charming rustic touch by crafting air dry clay tags that exude creativity! Whether used as gifts, keychains, or ornaments, these delicate pieces are surprisingly easy to create. Begin by rolling out the clay onto a non-stick surface like wax paper or a ziplock bag to prevent sticking, then use a cookie cutter or cup to shape the desired design.
Add personalized touches with alphabet stamps and create a hole for twine using a straw. Once dry, you can sand and seal the tags for a polished finish. While air dry clay may not be as durable as other options, it offers a unique natural color and texture that adds to its charm. If you’re looking for a more resilient alternative, consider exploring polymer clay for these creations.
Easy Faux Stone Jewelry With Air Dry Clay
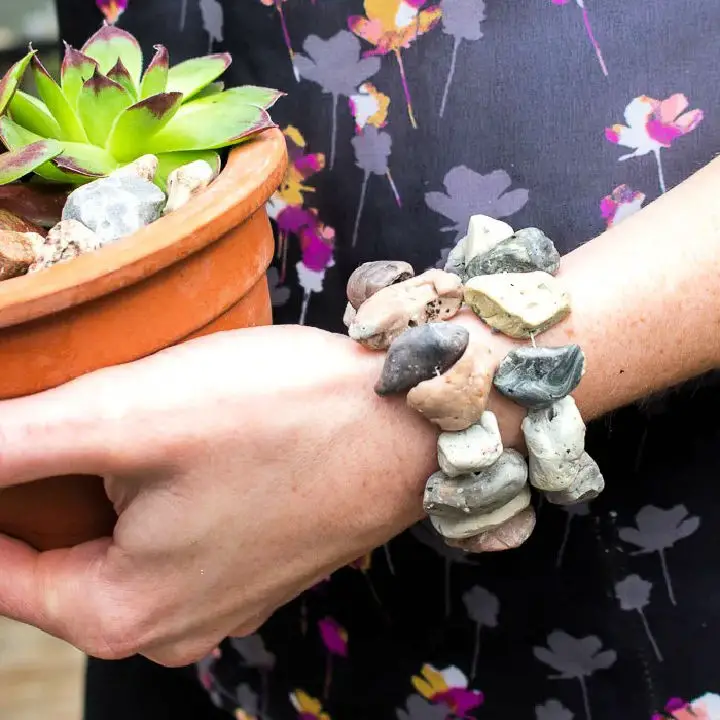
Elevate your accessory game with a modern twist by creating faux stone jewelry using air dry clay. Ditch the hassle of working with real rocks and opt for EasySculpt self-hardening epoxy modeling clay instead, which offers a realistic stone look with ease. To get started, gather the necessary materials: modeling clay, release agent, universal opaque pigments, gloves, wooden craft sticks, and a handheld drill equipped with a small drill bit. Then, follow these steps:Combine the clay to create a workable mixture.Introduce pigments to achieve the desired color effects.Shape the clay into stone-like forms.Allow them to cure before proceeding.Once cured, use your drill to create holes in the stones and string them onto elastic jewelry thread to craft stunning bracelets. Whether you’re making these for personal use or as gifts, your faux stone beads will undoubtedly impress with their natural, bohemian charm.
Homemade Air Dry Clay Half Moon Hangers
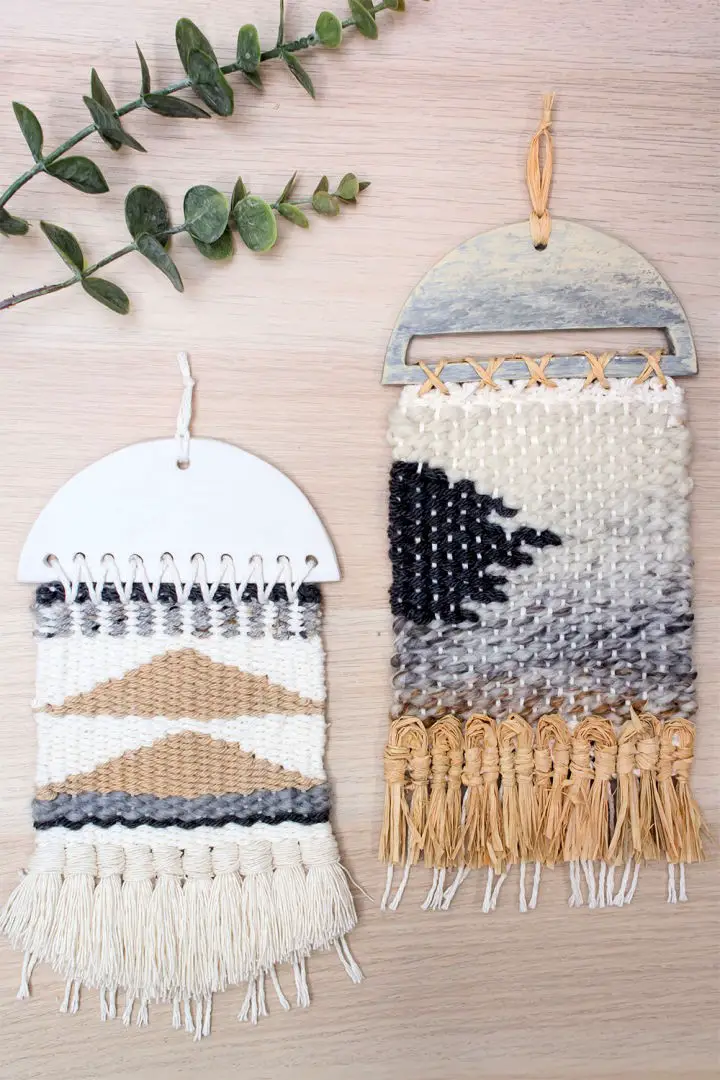
Get creative with this easy DIY project that yields stunning half-moon clay hangers perfect for displaying handmade art pieces, yarn wall hangings, or weavings. With just a few simple materials like air dry clay, dowels, rolling pin, and acrylic paint, you can create these charming hangers from scratch.
To get started, roll out the air dry clay to the desired thickness, then cut out half-moon shapes with openings for hanging your artwork. Allow the clay to air dry completely before sanding down any rough edges.
Once smooth, paint the hangers to match your personal style or to complement the colors of your displayed art. Finally, seal the paint with a matte varnish to protect it from fading. With these adorable clay hangers, you’ll be showcasing your artistic flair in no time.
Cute Air Dry Clay Napkin Rings
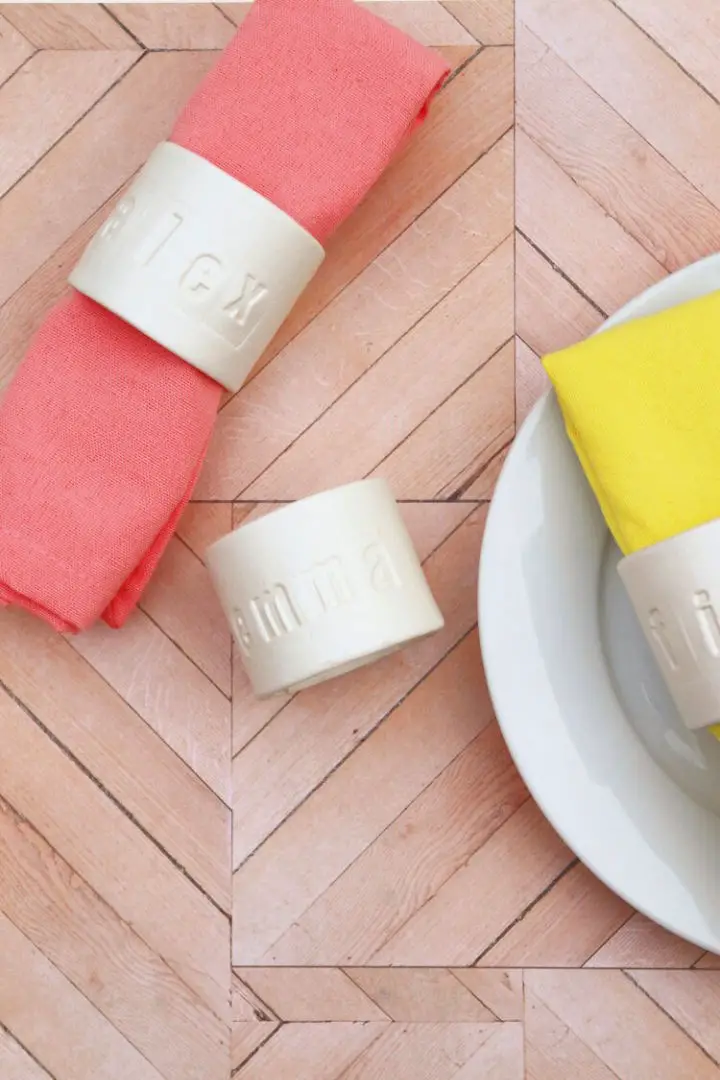
Elevate your holiday gatherings by creating personalized air dry clay napkin rings as DIY place cards. This budget-friendly craft project is a great way to add a touch of elegance to your Christmas table setting without breaking the bank. With just a few simple materials like air dry clay, alphabet stamps, and basic tools, you can create unique and stylish napkin rings that double as thoughtful place cards for your guests. Customize them with names or special messages using the alphabet stamps, then seal with varnish or paint to match your party’s color scheme. These charming napkin rings are perfect not only for Christmas but also for other special occasions. Get creative and impress your guests with this easy yet impactful DIY project.
Adorable Air Dry Clay Cocktail Garden Planters
Transform your cocktail experience by creating your own DIY clay planters for everyday herbs like basil, coriander, sage, rosemary, and chilies. These versatile planters, inspired by Mexican culture, allow you to grow a variety of fresh herbs right at home, elevating the flavors of your favorite drinks from start to finish. By following this easy-to-follow guide, which includes materials such as plant pots, a retractable knife, and sandpaper, you’ll be able to unleash your creativity and take your mixology skills to new levels with fragrant lavender and other fresh herbs straight from your own cocktail garden.
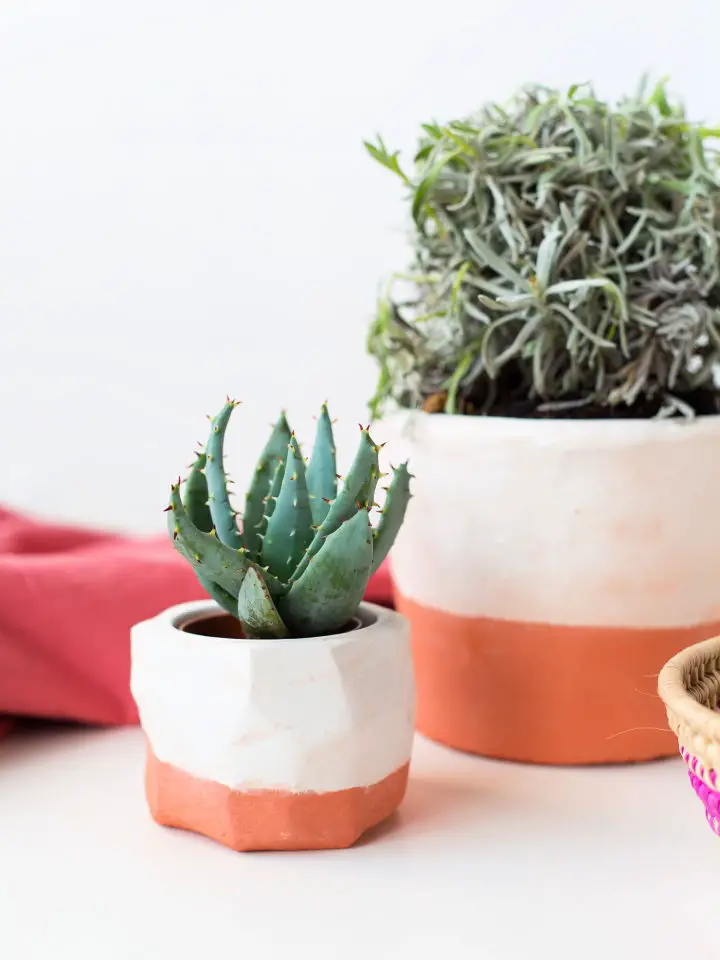
DIY Stamped Air Dry Clay Pots Idea
Give your space a unique flair by crafting personalized air dry clay pots with this simple DIY tutorial. This approachable guide will walk you through the process of creating custom-sized pots without the need for a kiln, allowing endless opportunities for creative expression. Whether adding a splash of color or keeping it natural, air dry clay offers a versatile canvas for your imagination.Use these charming pots as mini planters to add some greenery to your space or as stylish pen holders for your desk. The required materials are easily accessible, including air dry clay, stamps, an acrylic rolling pin, a craft knife, and fine sandpaper.Follow the step-by-step instructions to mold, shape, and decorate your pots, and finish them with a matte white look or add your personal touch. Let your creativity shine and create beautiful clay pots that harmonize with your home decor!
How to Make Air Dry Clay Fishes for Adults
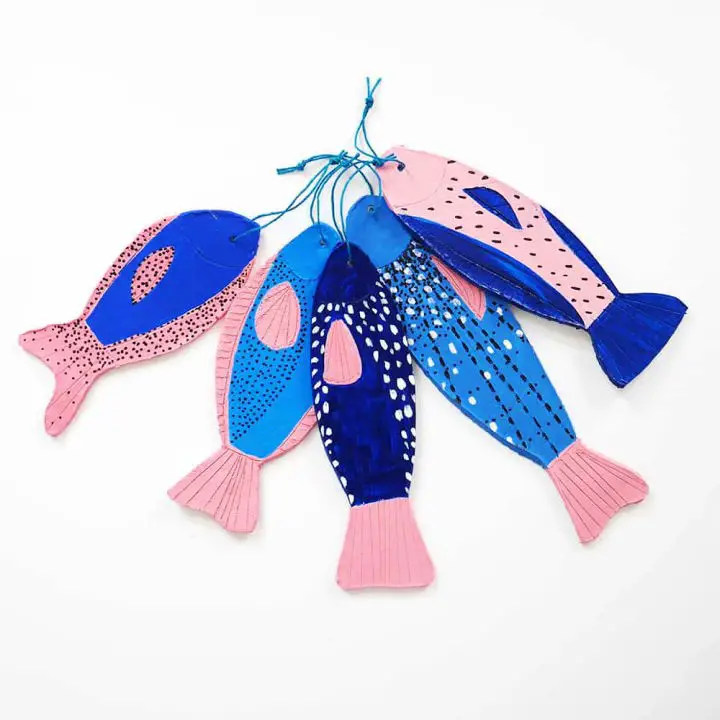
To create charming DIY air dry clay fishes for adults, all you need is a dash of creativity and a commitment to hard work. These handcrafted fish make perfect backpack tags, keychains for friends, or sea-inspired decorations for your home.
Start by gathering air clay, construction paper, scissors, a pencil, paint, paintbrushes, and string. Use the paper templates to create fish shapes from the clay, adding optional details with scissors or toothpicks if desired. Let the clay dry for at least 24 hours before moving on.
Once dry, bring your fish to life by painting them with vibrant colors. Then, attach a string through an eye hole to create a unique and functional piece. Hang them up, use as tags, or give as gifts – the possibilities are endless! With these step-by-step instructions, you’ll be crafting delightful fish in no time.
Handcrafted Air Dry Clay Pens

Unlock the perfect gift for the creative soul – handcrafted air dry clay pens that will ignite imagination! Crafted with simple supplies like Bic pens, air dry clay, and gold wire, these DIY pens are a treat for writers and pen enthusiasts alike. By following a step-by-step guide, you’ll learn to prepare the pens, wrap them in terracotta clay, add golden details, and finish with a coat of varnish. Get creative by mixing different clay colors to achieve a unique faux-aged ceramic effect. These personalized pens make exceptional gifts or special treats for yourself.
Creative Air Dry Clay Pendant Lamp
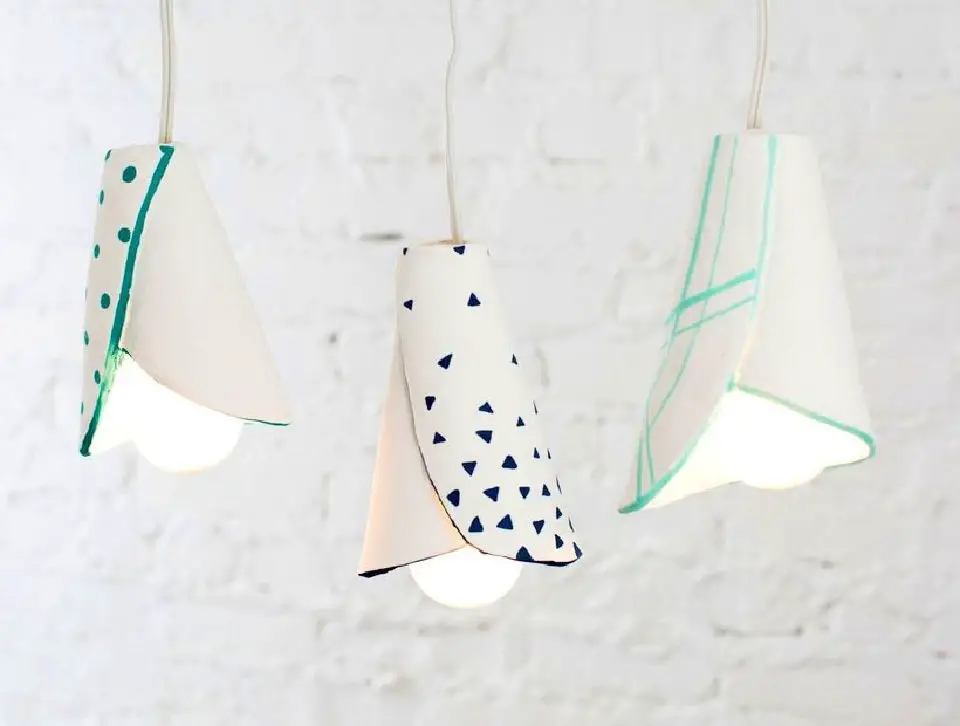
Discover the versatility of air dry clay by crafting enchanting sculptures, jewelry, and home decorations. One such creative endeavour is the DIY air dry clay pendant lamp, which brings a touch of uniqueness to any space with its captivating design. By combining air dry clay and mini orange cones, you can create a truly one-of-a-kind lampshade that adds an unexpected element to your decor. This project is perfect for those who want to explore pottery and ceramics without the need for a kiln.
With air dry clay, you can craft a show-stopping lampshade that hangs from the ceiling, bringing a dash of personality to any room. To create this masterpiece, simply shape the clay around the cone, flatten the top, and add decorative patterns using paint pens. Once the clay has dried, remove it from the cone and attach it to a hanging light cord. Whether you prefer understated designs or bold colours, these pendant lampshades will bring an undeniable charm to any room in your home. Join the DIY revolution and unleash your creativity with this innovative project.
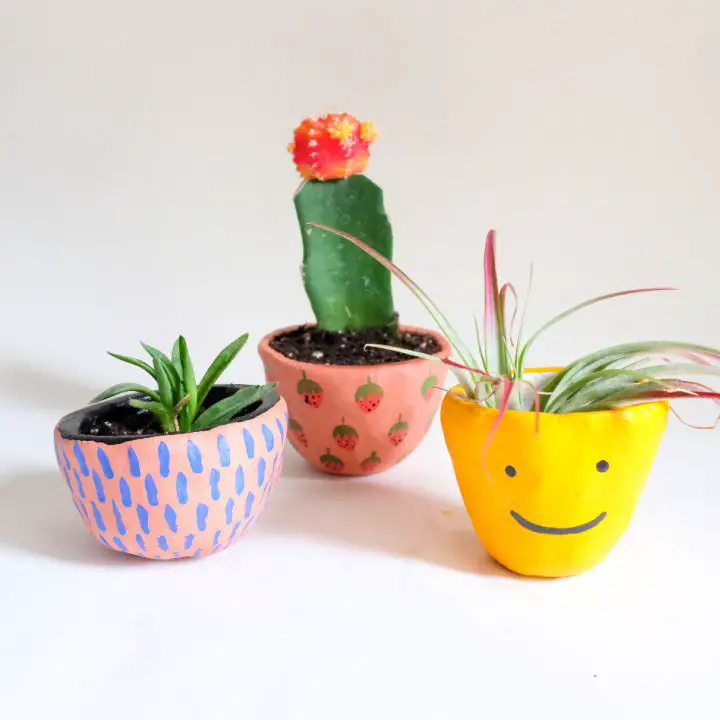
Beautiful Air Dry Clay Mini Succulent Planters
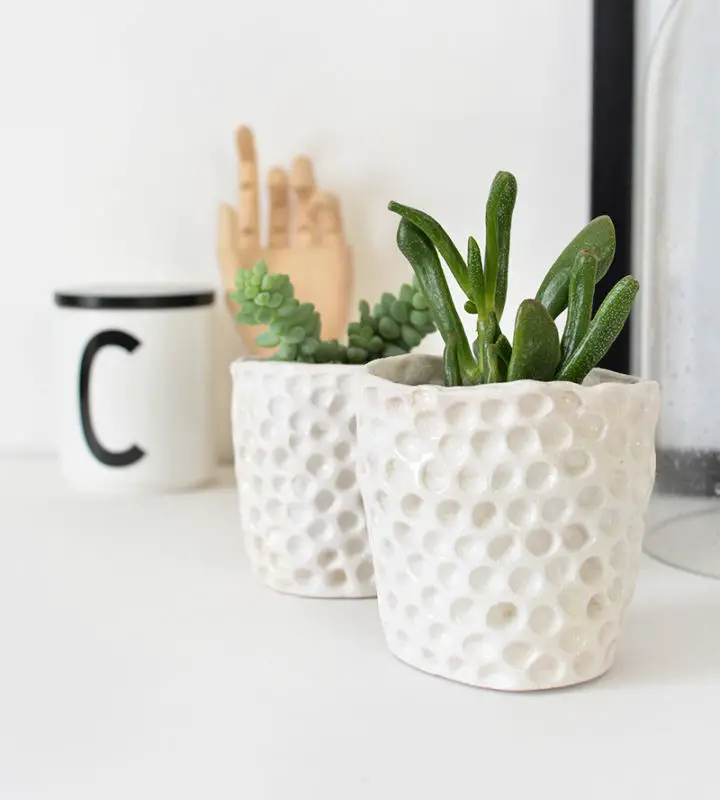
Transform any room into a serene oasis by creating enchanting DIY air dry clay succulent planters. These one-of-a-kind masterpieces can instantly brighten up even the most mundane spaces, spreading warmth and joy throughout your home. To bring this project to life, start by selecting a unique vessel such as a small cacti pot, plastic plant container, or glass candle jar. Then, roll out the air dry clay and carefully wrap it around your chosen base, smoothing out any seams and adding visual interest with different textures or shapes. Allow the clay to fully dry before giving it a radiant faux- finish by spraying on a coat of varnish. Once complete, simply place your succulents or cacti inside their new, cozy home and revel in the serenity they bring.
Gorgeous Air Dry Clay Leaf Dish Art
Create a stunning DIY air dry clay leaf dish art that celebrates the beauty of nature! This project is perfect for older kids and can be customized as a unique gift for birthdays or Christmas. Use leaves from a hydrangea plant or a maple leaf to shape the dish, or experiment with different leaf shapes for creative variations. To get started, you’ll need air dry clay, acrylic paint in your choice of colors (such as rose gold, gold, or bronze), and a sealer like Mod Podge Gloss. Follow our step-by-step guide to imprint the leaf, shape the clay, air dry it, paint it, and seal the dish. Once complete, these beautiful keepsakes can be used as ring dishes, key holders, or decorative pieces for years to come.
How to Make Air Dry Clay Sugar Skull Bead Necklaces
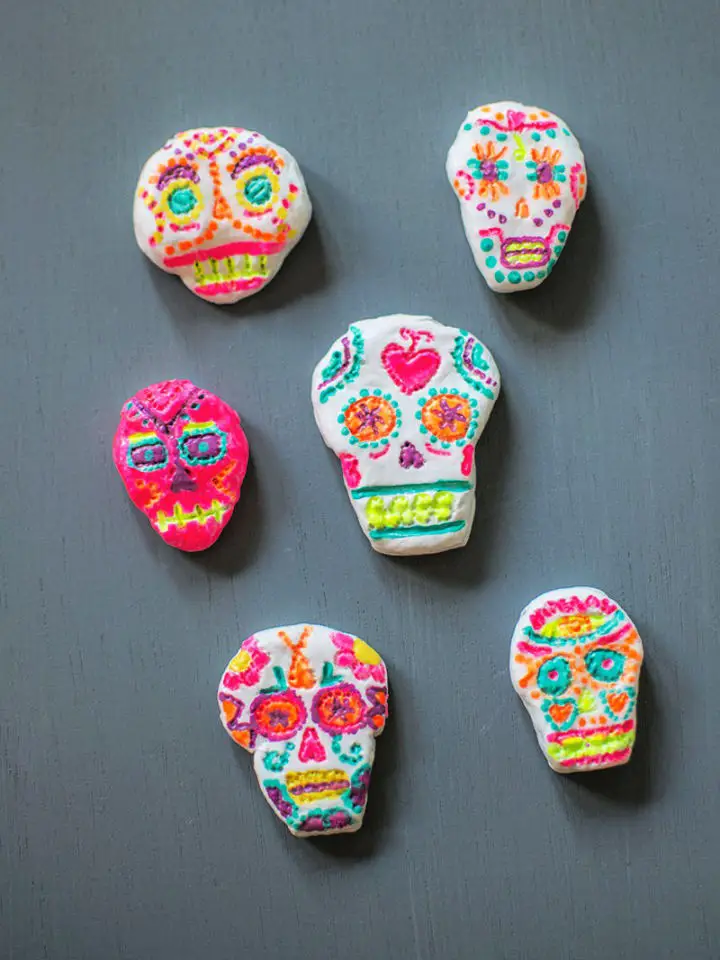
Transform your creative expression into stunning DIY air-dry clay sugar skull bead necklaces that radiate a unique charm! This versatile craft project is perfect for kids and adults, allowing you to shape the clay into intricate sugar skull designs using cocktail sticks. After crafting and adding a hole, let the clay dry for approximately 48 hours. Once dry, seal the beads with Mod Podge and bring them to life with vibrant acrylic colors. Apply multiple layers of Mod Podge for protection before threading yarn or thread through the hole. The end result is a wearable masterpiece that’s sure to delight, especially among skeleton enthusiasts like Cherry and Tiger. Unleash your creativity and experience the joy of working with air-dry clay as you bring this fun craft project to life.
Attractive Air Dry Clay and Rope Pot
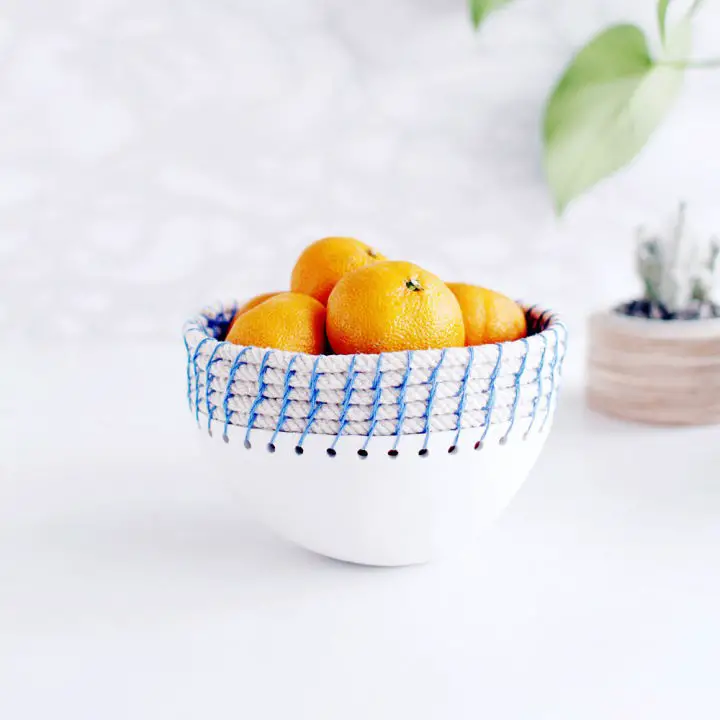
Transform your space with unique, handmade DIY clay bowls using air dry clay, simple tools, and a dash of creativity. The perfect vessels for holding small treasures or adding a touch of whimsy to any room. To get started, roll out the clay, shape it into a bowl form, and smooth out any imperfections. After drying, inspect the bowl for any cracks or creases and make any necessary repairs. Next, add some decorative flair by sewing embroidery thread through the holes around the edge of the bowl, then wrap rope around it to create a stunning finishing touch. With these easy steps, you can craft a set of delightful clay bowls that reflect your personal style.
Aesthetic DIY Air Dry Clay Keychains
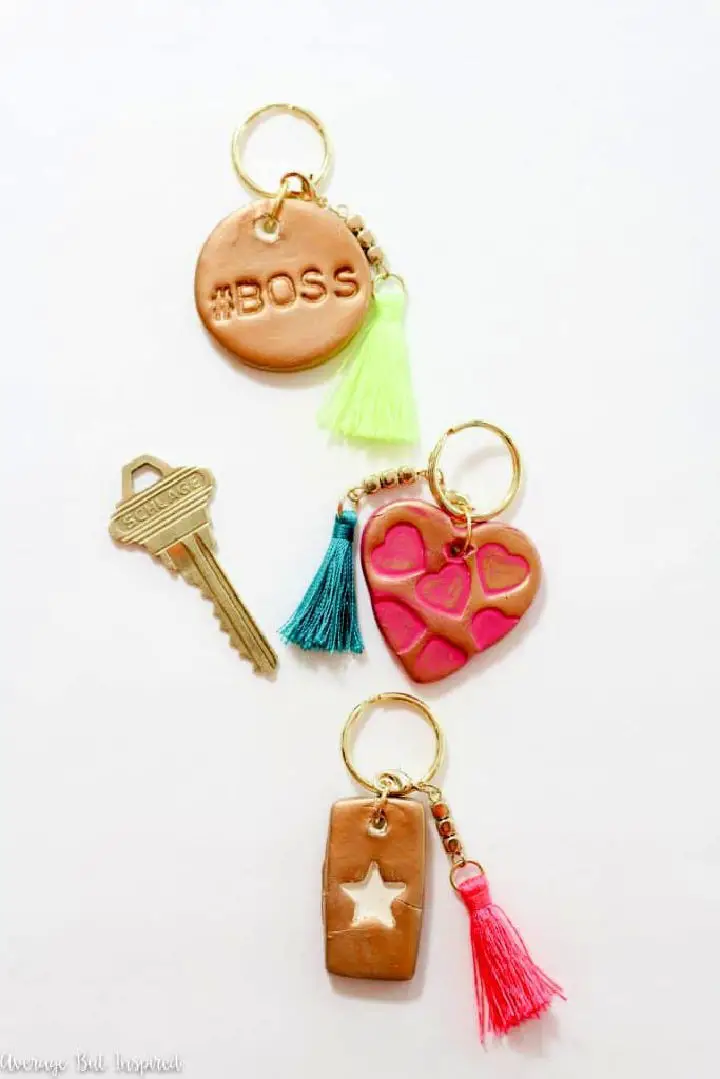
Unleash your creative potential by crafting distinctive DIY air-dry clay keychains, ideal for adding a touch of elegance to your daily routine! With air-dry clay being a versatile and budget-friendly material that doesn’t require any special equipment for drying, this project is perfect for crafty enthusiasts. The guide delves into the best air-dry clay brands, such as PLUS Clay, and outlines the essential supplies needed to get started, including clay cutters, texture sheets, and jump rings. Follow a step-by-step approach to roll out the clay, cut shapes, emboss letters and textures, create holes, patiently wait for the clay to dry, add some color with painting, and finally attach jump and key rings. For an added layer of sophistication, consider incorporating optional embellishments like tassels and charms. Experience the joy of working with air-dry clay and create unique keychains that make thoughtful gifts or personal accessories.
Unique Air Dry Clay Mantel Clock

Transform your space with a stunning DIY terracotta mantel clock, crafted in just three effortless steps. Ditching reliance on smartphones for time, this project offers a serene escape. Using natural air-dried terracotta clay and a clock mechanism, shape the clock body to your desired design, ensuring a seamless finish. Simply attach the clock mechanism, select the perfect pair of hands, and you’ll be ready to set up your one-of-a-kind mantel clock. For added stability, add a triangle-shaped backing, and voilà! Enjoy the warm charm of a handmade timepiece that will elevate any shelf or table in your home.
Air Dry Clay and Driftwood Spoons for Kids
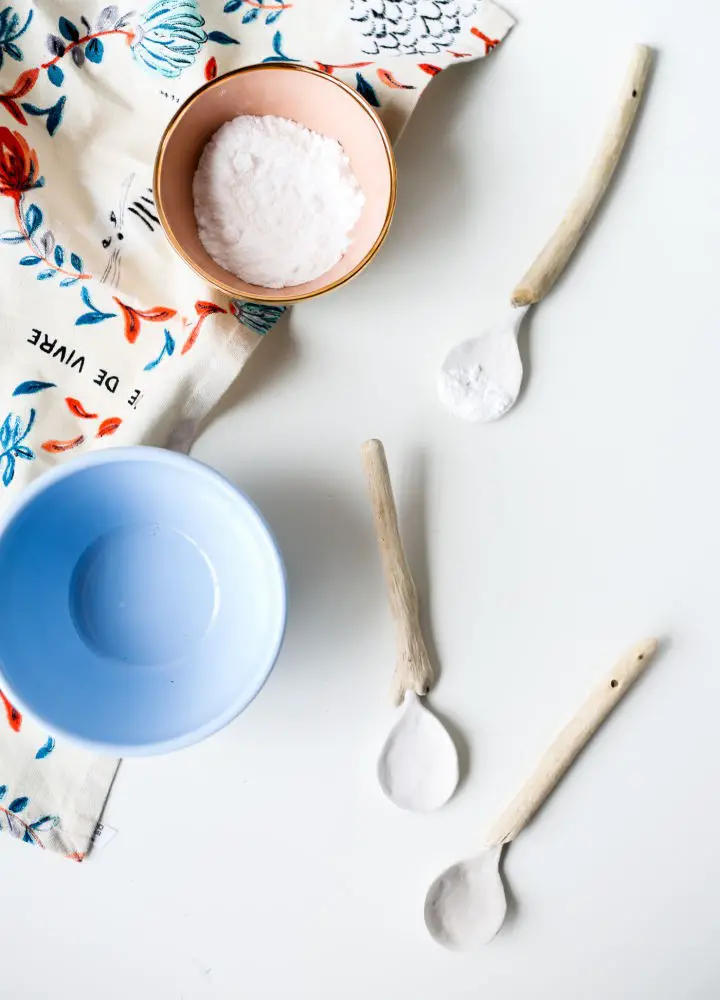
Unleash your child’s creative potential with this unique DIY project that combines air dry clay and driftwood to create one-of-a-kind spoons. Perfect for food styling or as decorative props, these handmade utensils are sure to add a personal touch to any kitchen or photo shoot setup. With just a few simple materials – including air dry clay, driftwood, wire, a drill, and food-safe varnish – you can follow this easy step-by-step guide to create stunning spoons that will leave your friends and family impressed. Just remember to keep them out of water, as they are prone to melting. Let your imagination run wild and add a touch of personality to each spoon by incorporating your child’s favorite colors or designs.
Making a 3D Graphic Planter With Air Dry Clay
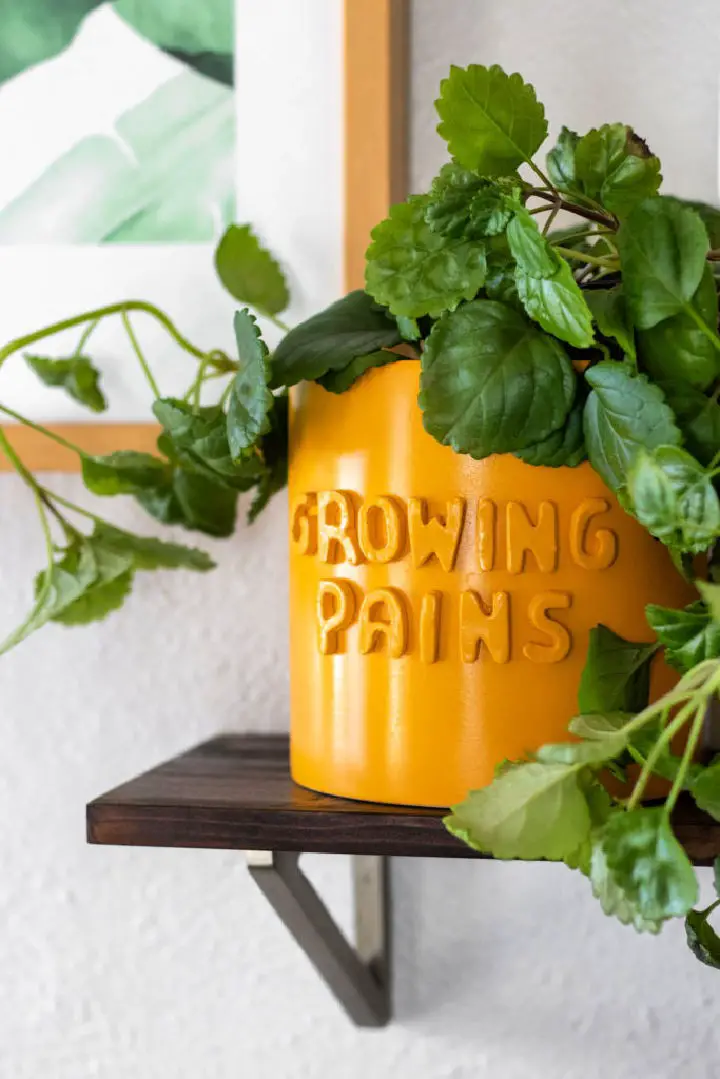
Take your plant game to the next level by creating a one-of-a-kind 3D graphic planter using air dry clay, mini alphabet cookie cutters, and some creative flair! Start by rolling out the clay and cutting out letters that reflect your personality or favorite quotes. To give them shape, use water to mold them to the curves of your pot. Allow the letters to dry completely before reattaching them with a strong adhesive. For an extra pop of color, spray paint the entire planter in your preferred hue. Once dry, you’ll be left with a truly unique and stylish vessel for showcasing your favorite plant. By embracing your inner plant enthusiast and adding a dash of creativity to your space, this DIY project is sure to bring a touch of personality to any room.
Colorful Air Dry Clay Animal Head
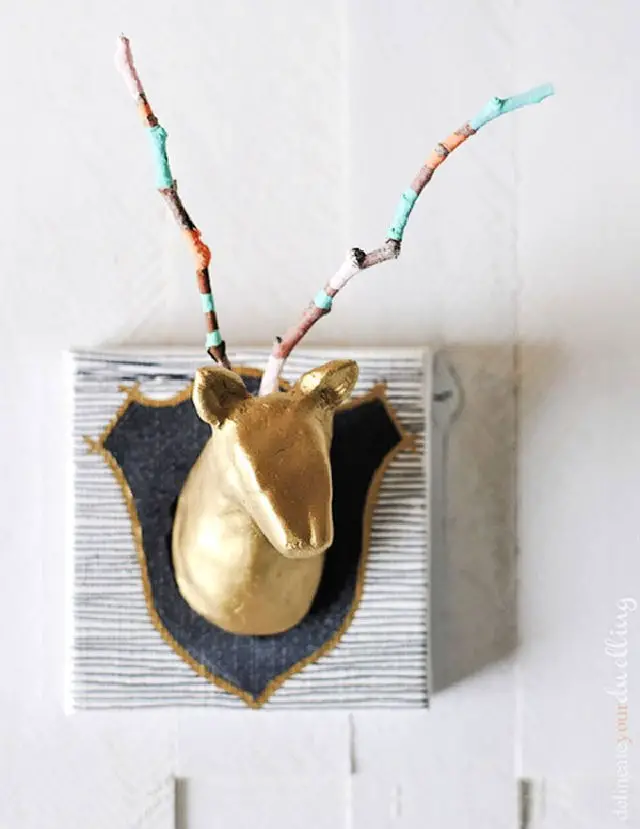
Transform your living space into a whimsical wonderland by crafting an eclectic menagerie of colorful air dry clay animal heads. Gather your supplies, including mini square canvases, small twigs, acrylic paint, paint pens, hot glue, and Velcro Command strips. Start by studying images of animal heads to create basic shapes, such as the deer’s neck (a log shape) and head (an oblong circle). Allow the clay to dry for two to three days before moving on to the mounting canvases. Paint them with black chalkboard paint and add texture using a gold paint pen. Once the canvas is prepped, spray paint the animal heads and add stripes to the twigs using acrylic paint. Attach the twigs to the back of the deer head, then use paint pens to add stripes to the zebra and polka dots to the elephant. Finally, secure your creations to the wall using Velcro Command strips, allowing you to easily rearrange your menagerie as desired. With a little creativity, you can turn any space into a charming and unique environment that reflects your personality.
Air-Dried Clay Bottle Vase Project
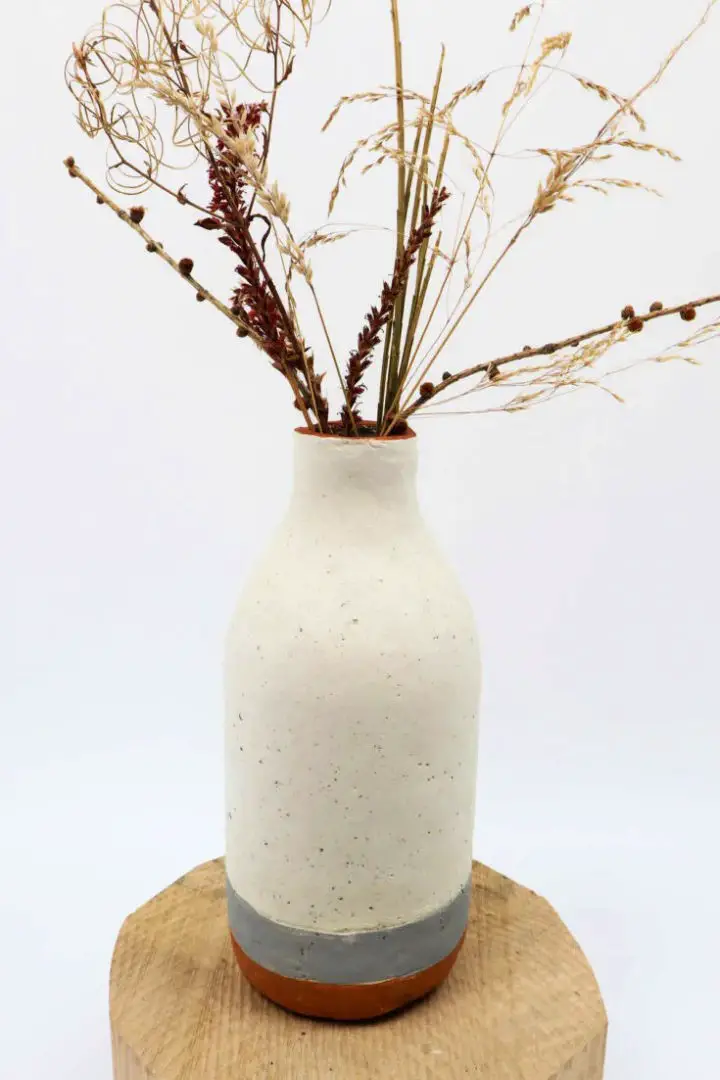
Transform your home decor with this charming DIY air-dried clay bottle vase project! Upcycle old glass bottles into stunning vases by working with air drying clay. This fun and creative activity is perfect for adults and teens who want to try their hand at clay crafting. Simply follow the steps below to create a beautiful, one-of-a-kind vase that can be used to display flowers, serve as a centerpiece, or add a touch of elegance to any room.
The process begins with kneading the air drying clay to achieve the desired consistency. For added texture and visual interest, mix in some ground coffee to create a speckled effect. Next, roll out the clay into a thin sheet, allowing it to relax and become pliable. Wrap the clay around your chosen glass bottle, smoothing out any imperfections as you go.
nThe finished vase can be painted and decorated according to your personal style. Display your masterpiece on a shelf, use it as a floor vase, or place it at the center of your dining table as a conversation piece. Let your creativity shine and craft a unique piece that reflects your personality.
Hand Painted Air Dry Clay Candle Holders

Transform plain candles into stunning works of art with these easy-to-make, painted DIY candle holders. Using air dry clay, you can create intricate geometric designs that not only add visual appeal but also catch wax drips, making them a functional and charming addition to any room.
To ensure stability and safety, make sure the base is flat and sturdy, and use shorter, wider candles to prevent accidents. With just a few simple steps – rolling out the clay, cutting a circle, shaping it around the candle, letting it dry, and then painting with acrylic craft paint – you can create unique holders that will elevate your home decor.
Remember to secure the candles with melted wax and always supervise them when in use. With these beautiful, handmade candle holders, you’ll enjoy the perfect blend of creativity and functionality.
How to Make Bowls With Air Dry Clay
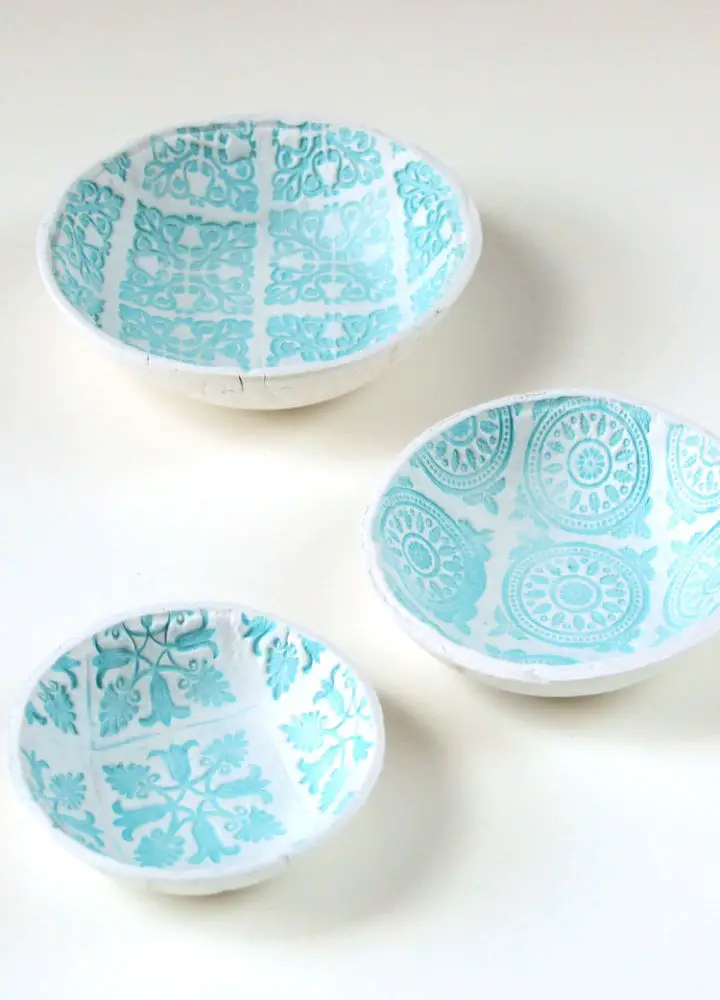
Craft a set of stunning stamped clay bowls using dry air clay without the need for firing or baking. This DIY project requires minimal tools and techniques, allowing you to create beautiful, durable, and unique decorative pieces. By combining rubber craft stamps, an ink pad, and basic cutting tools with dry air clay, you’ll be able to make charming catch-all clay dishes that can be used to decorate your home or given as thoughtful gifts. With the ability to personalize your bowls by selecting different stamps and ink colors, the possibilities for customization are endless. Experience the joy of working with air dry clay and enjoy the satisfaction of creating these lovely bowls.
Cool DIY Air Dry Clay Pinch Pot Planters
Transform your home’s ambiance by creating charming DIY air dry clay pinch pot planters that exude warmth and personality. This accessible ceramics project is perfect for those without access to a kiln or specialized studio, as it allows you to craft beautiful planters with minimal equipment. The process begins with rolling a ball of clay, pinching it into the desired shape, smoothing out imperfections, and allowing it to dry. You’ll also learn how to add a pop of color with painting and varnishing techniques. With this beginner-friendly guide, you can create unique and personalized clay pots for succulents or air plants, adding a touch of creativity to your space.
Inexpensive Handmade Air Dry Clay Knobs
Transform ordinary knobs into stunning, one-of-a-kind creations using air dry clay. This DIY project offers a budget-friendly alternative to expensive store-bought options. By covering your existing knobs with clay, shaping them to your desired design, and allowing them to dry, you’ll be left with beautifully customized pieces that exude elegance. Take it to the next level by adding a pop of color with a spray paint finish, such as Rust-Oleum’s Metallic Gold. With minimal supplies and endless possibilities, you can achieve a high-end look on a shoestring budget.
Egg Carton Craft With Air Dry Clay
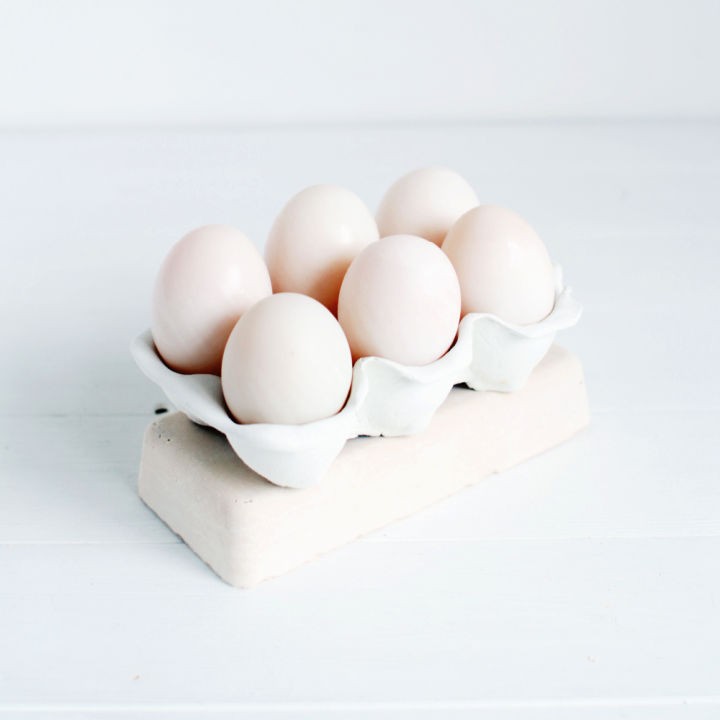
Transform an egg carton into a unique piece of DIY art by combining it with air dry clay and some creative flair. This spring-inspired project turns the humble egg carton into a charming jewelry holder that’s not only functional but also visually appealing. With just a few simple materials, including the egg carton, air dry clay, and sandpaper, you can create this beautiful piece of art that will keep your keepsakes or jewelry organized long after Easter. Begin by trimming the excess cardboard from the carton and rolling out the clay to the desired thickness. Press the clay onto the carton, smoothing it out and filling any gaps. Allow the clay to air dry overnight before carefully removing the cardboard and sanding down the edges and interior to smooth out any rough spots. Once the clay is fully dry, apply a few coats of varnish to protect your artwork and give it a glossy finish. The result is a lovely piece that’s perfect for displaying decorated eggs or storing precious jewelry. With this whimsical project, your creativity can truly blossom.
DIY Air Dry Clay Mushrooms Design
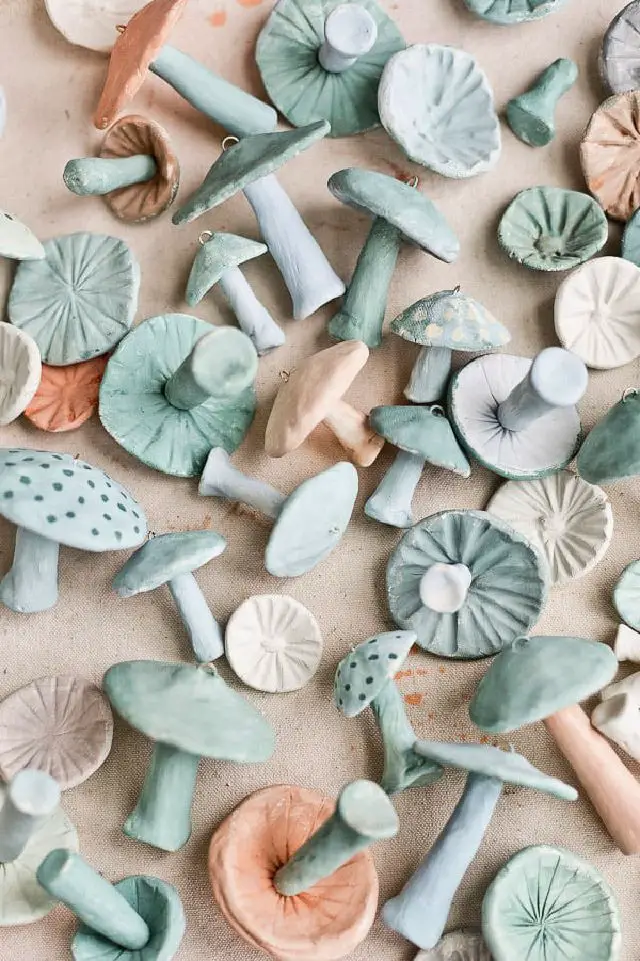
Add an enchanting touch to your Christmas tree by crafting whimsical DIY mushroom ornaments. These unique charms will undoubtedly be the showstopper of your holiday decor. To create these delightful ornaments, you’ll need air dry clay and a few basic tools. Follow our step-by-step guide to shape the clay into mushroom caps and stems, adding texture and details as you go. Once the clay is fully dry, you can paint and seal the ornaments to your desired level of sparkle before attaching a string for hanging. Not only do these DIY mushroom ornaments make thoughtful and creative gifts, but they also serve as a wonderful addition to your holiday decorations.
Make Your Own Air Dry Clay Llama Vase
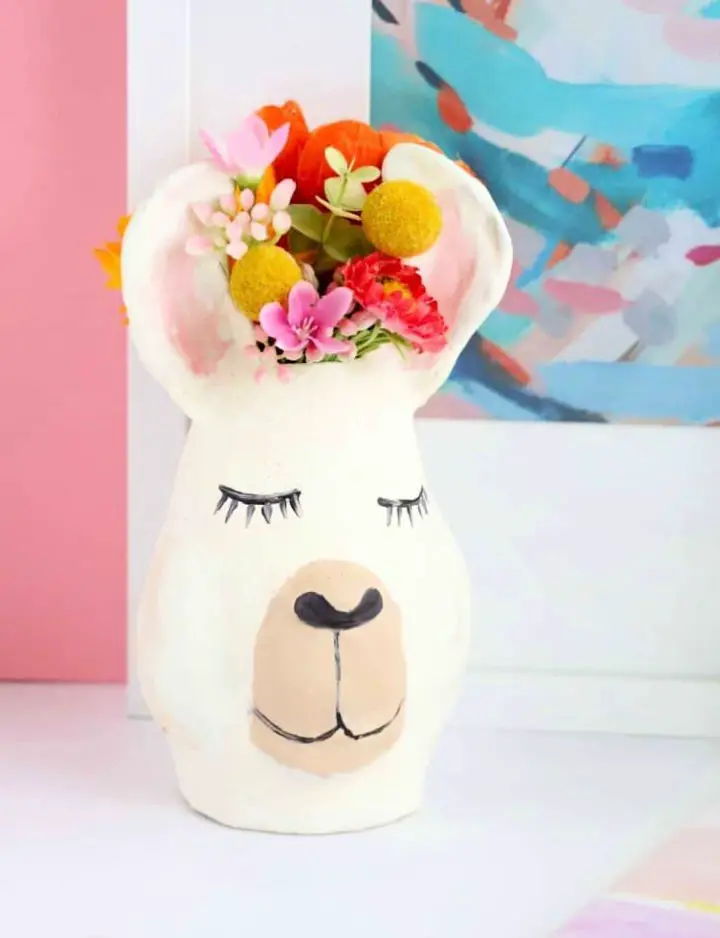
Transform ordinary vases into extraordinary, bespoke pieces with these versatile air dry clay ideas, ideal for artists of all skill levels. One such project is creating stunning DIY mushrooms that add a touch of nature-inspired elegance to any craft project. To bring your unique design to life, simply wrap the air dry clay around the vase, adding details like a muzzle, cheeks, and ears. Smooth out the clay with water, allowing it to dry completely before filling in any cracks with a clay paste. Once fully dry, paint the vase with acrylic craft paint to reveal the intricate details. This engaging project requires patience, but the end result is a charming, personalized vase that’s sure to impress.
Air Dry Clay Miniature Fairy Garden House
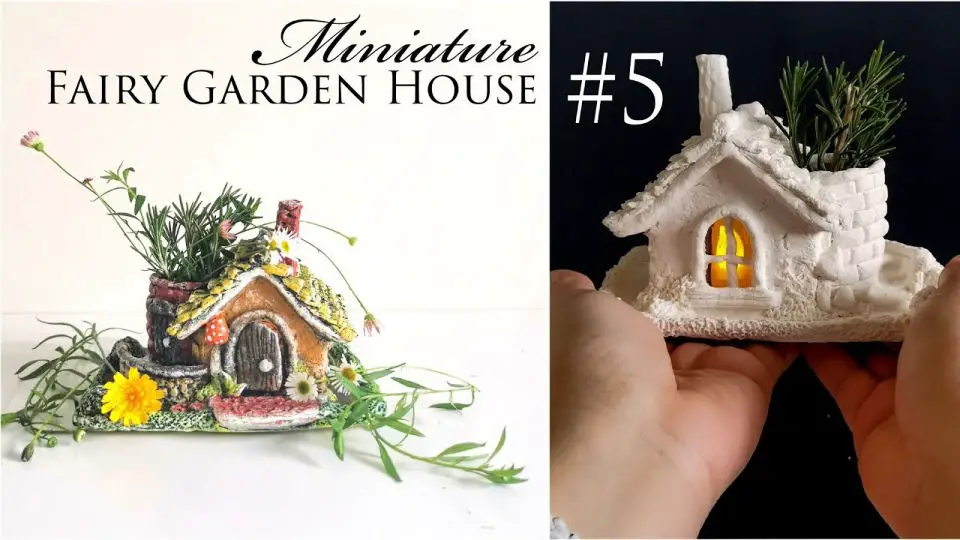
Imagine crafting a miniature masterpiece that brings the outdoors indoors. Using air-dried clay, you can create a whimsical fairy house with a rooftop garden, perfect for showcasing tiny succulents or indoor plants. This DIY project combines the tactile joy of working with homemade paper clay with the artistic flair of dry brush painting. The result is a unique and enchanting design that’s sure to delight anyone who loves the magical world of fairies. With its versatility and endless possibilities, this fairy garden house is the perfect way to bring a touch of whimsy into your home.
Make an Air Dry Clay Kawaii Banana Charm
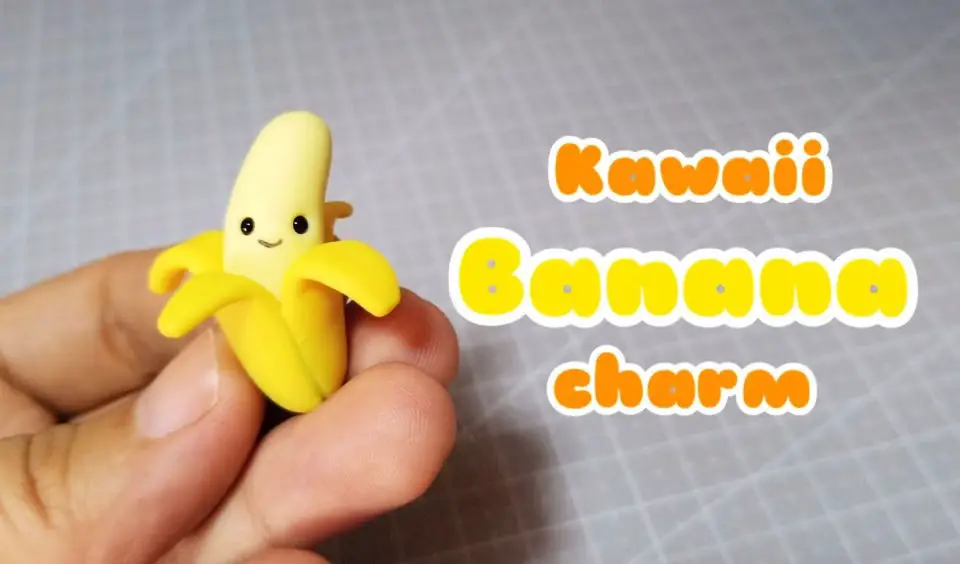
Transform your DIY air dry clay kawaii banana charm with a personal touch that reflects your unique style! This accessible tutorial is perfect for beginners, featuring a step-by-step video guide that walks you through the process of creating an adorable and customizable banana charm. From keychain to necklace pendant or decorative item, the possibilities are endless. So why wait? Dive into this creative project and let your personality shine!
Easy DIY Air Dry Clay Sculpture Tutorial
Unleash your inner creativity and transform ordinary air dry clay into a stunning piece of art with this DIY sculpture tutorial! This step-by-step guide will walk you through the process of crafting a beautiful bird sculpture that can be transformed into a one-of-a-kind table lamp. As you work through the project, discover the endless possibilities of air drying clay and let your imagination run wild. Whether you’re an experienced crafter or just starting out, this tutorial is designed to inspire and guide you every step of the way. So grab your supplies, get creative, and let your artistic spirit soar!
Simple and Effective Air Dry Clay Dishes
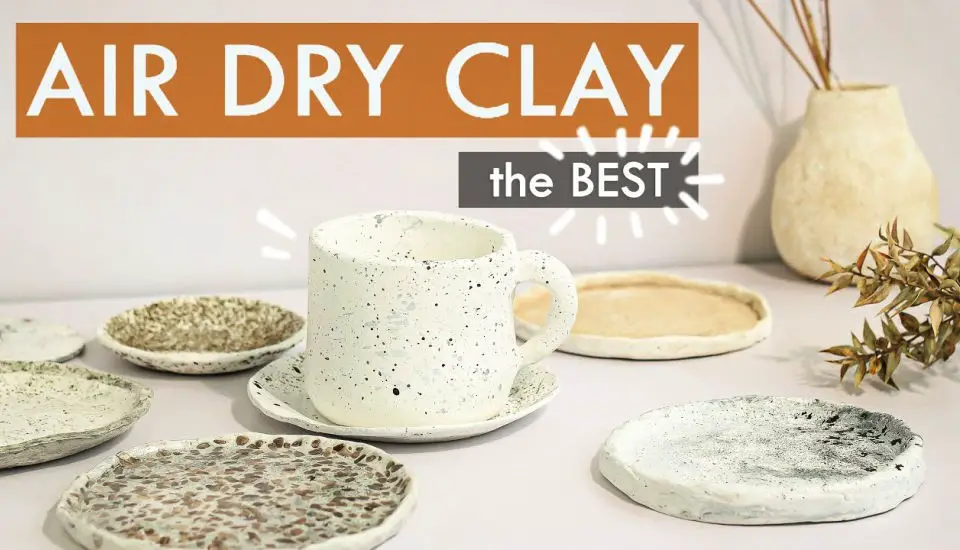
Unleash your creativity and give your home a unique touch by exploring these easy-to-follow air dry clay ideas for DIY home decor. With a focus on rustic textures rather than perfection, this project is perfect for beginners looking to express themselves artistically. You’ll discover simple yet effective ways to create trinket dishes, cups/mugs, and vases that can be tailored to fit your personal style. From adding unique decorative pieces to mastering a new crafting technique, these air dry clay projects will guide you in creating beautiful, personalized decor that reflects your personality. By following along with the accompanying video tutorial, you’ll gain confidence in your abilities and bring texture and charm to your living space.
Easy Air Dry Clay Project for Home Decor
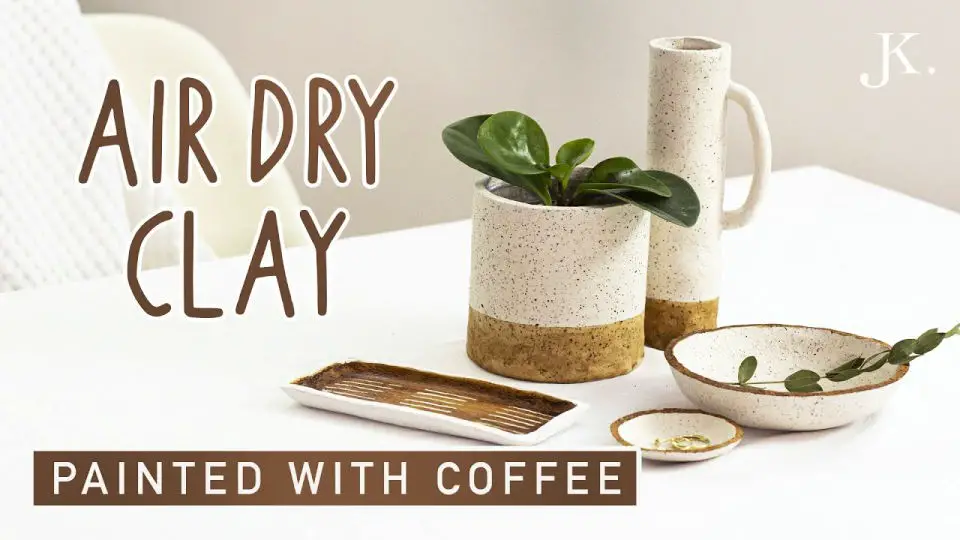
Elevate your home decor with the simplicity of stunning air dry clay creations. Unleash your creativity and transform any space into a masterpiece by embarking on this easy DIY adventure. This tutorial takes you through the process of crafting unique flower pots, vases, jewelry dishes, and bowls by incorporating instant coffee and ground coffee powder into the clay. The result is a one-of-a-kind, visually striking piece that makes for an exceptional gift. By exploring the world of air dry clay and the captivating coffee painting technique, this tutorial invites you to experience the joy of creating something beautiful and functional with your own hands. Let your imagination run wild and get inspired to try this creative coffee painting technique on air dry clay for yourself!
DIY Air Dry Clay Jewellery Trays
In this comprehensive tutorial, we’ll guide you through the process of creating unique and stylish DIY jewelry trays using air dry clay. By following our step-by-step instructions, you’ll be able to craft beautiful pieces featuring intricate patterns imprinted with leaves and grasses. The video showcases a fascinating transformation of ordinary materials into extraordinary works of art, perfect for those looking to unleash their creativity while crafting functional and decorative jewelry trays that reflect your personal style.
Conclusion:
The exploration of 40 air dry clay ideas for kids and adults presents a rich tapestry of creative possibilities, skill-building opportunities, and cultural celebrations through the medium of art. This versatile material enables the creation of unique pieces that bridge traditional practices with eco-friendly innovations, offering a platform for artistic expression that transcends age, skill level, or cultural background. With guidance on getting started, refining techniques, and adopting sustainable practices, this comprehensive guide equips crafters with the confidence to produce stunning, meaningful works that not only showcase their creativity but also prioritize environmental responsibility.
