Why Make DIY Earring Holders?
Transform your jewelry game by creating bespoke DIY earring holders that not only keep your accessories organized but also reflect your unique style. This easy, affordable, and fun craft project is the perfect way to express yourself creatively while saving money and time.One of the greatest advantages of making your own earring holder is the ability to customize it to your heart’s content. You can choose materials, colors, and sizes that harmonize with your décor and personal taste. This means you’ll end up with a storage solution that not only looks great but also fits seamlessly into your space.Of course, making your own earring holder is not just about aesthetics – it’s also an excellent way to save money. By repurposing materials you already have at home or upcycling items, you can create a beautiful and functional piece without breaking the bank. This approach not only saves you money but also reduces waste and promotes sustainability.But the benefits of DIY earring holders don’t stop there. A well-designed holder can also help keep your jewelry organized, preventing tangles, damage, and scratches. Each pair will have its own designated spot, making it easy to find what you’re looking for. This approach not only keeps your accessories in great condition but also reduces stress and makes getting ready a breeze.As an added bonus, crafting a DIY earring holder is a fun and fulfilling project that allows you to express your creativity and take pride in making something truly unique. You can even use it as a thoughtful gift for friends and family who love jewelry – a heartfelt present that shows you care.In addition to the personal benefits, DIY earring holders can also contribute to a cleaner and more organized space. By designating a specific area for your earrings, you’ll reduce clutter on dressers and in jewelry boxes. And if you’re feeling extra creative, your earring holder can even serve as a decorative piece that showcases your beautiful collection.In conclusion, DIY earring holders offer the perfect blend of practicality, personalization, and aesthetic appeal. They’re an ideal solution for jewelry lovers looking to elevate their storage game while adding a touch of personality to their space.
How to Make an Earring Holder
Crafting a bespoke jewelry display box that not only safeguards your treasured pieces but also elevates the aesthetic of your surroundings is an achievable feat. Drawing inspiration from the opulence of Tiffany & Co, this DIY endeavor is ideal for anyone seeking to beautifully protect their jewelry while infusing their home with a touch of sophistication. By following these straightforward steps, you can create your own unique display box that exudes refinement and charm.
What You’ll Need
To create a unique and personalized jewelry organizer, start by selecting a suitable shadow box or showcase. For this project, I used one found at Michael’s craft store. Next, choose your desired shade of blue paint – Tiffany blue was used here, but feel free to opt for any color that resonates with you. Apply the paint using a brush and let it dry completely before adding a gloss finish to protect and enhance the hue. To get started on the actual organizer, gather your materials: an assortment of paintbrushes for precision and coverage, a ruler for measuring and marking your design, sharp scissors for cutting fabric or foam, and a trusty Sharpie marker for outlining details. For added cushioning and support, incorporate cushion foam, available at most fabric stores, and cut it to fit the dimensions of your box. Finally, select any type of fabric you have on hand – old scarves, fleece, or other materials work well – and use it to create a custom backing for your organizer. If desired, add an extra touch by spraying hardware with silver paint for a modern, sophisticated look.
Preparing Your Box
To ensure a smooth painting process, consider removing any pre-installed hardware from your box. This will provide a clean surface for painting and reduce the risk of unwanted color bleed. When it comes to masking off areas, you can use masking tape or scrap paper to protect parts that don’t require a coat of Tiffany blue paint. Start by applying the paint and allow each layer to dry completely before adding additional coats as needed. If desired, you can also choose to give your hardware a refreshed look by spraying it with silver paint.
Making the Cushion Inserts
To create a custom-made box insert, it’s essential to first measure its interior dimensions. This will give you an accurate idea of how much foam and fabric you’ll need to acquire. Once you have these measurements, you can begin preparing your materials.
Start by cutting out foam strips that match the length of the box. For optimal results, each strip should be approximately 11.5 inches long and around one inch thick. This will ensure a snug fit when wrapped with fabric.
Next, cut your chosen fabric to the desired size, leaving some extra material (about 20-30 inches) for wrapping it securely around the foam strips.
Assembly
To begin the process of reupholstering a storage ottoman, start by positioning one end of your fabric inside the box. Place a foam strip on top of the fabric at this end, then fold the fabric over the foam to encase it. This initial step sets the stage for the rest of the process.
Continue this process of inserting and wrapping each foam strip with fabric, then placing the next until the box is filled. As you work, ensure that each strip is securely wrapped in fabric before moving on to the next one.
Once all the foam strips are inserted and wrapped, take a moment to trim away any excess fabric that may be sticking out beyond the edges of the box. This will give your reupholstered ottoman a clean, finished look.
Finally, once the interior is complete and your box is dry, you can reattach any hardware, such as handles or hinges, to restore its original functionality.
Your Jewelry Box is Ready!
While a new jewelry display box may seem like a mundane purchase, it can actually be a stunning addition to any room’s décor, much like a piece from Tiffany & Co. This thoughtful investment not only provides a practical solution for storing your valuables but also serves as a beautiful, handcrafted organizer that safeguards and showcases your most treasured pieces in a way that exudes elegance.
Video Tutorial
By supplementing the written guide with this YouTube video tutorial, you’ll gain a comprehensive understanding of how to create your own Tiffany & Co-inspired jewelry display box organizer. The video provides a visual companion that enhances the step-by-step process, allowing you to easily follow along and replicate the results. Moreover, crafting something unique for everyday use is not only about creating a personalized item, but also about adding a touch of personality to an otherwise mundane aspect of your daily routine.
How to Organize Earrings Efficiently
Staying on top of an earring collection can feel overwhelming, especially when it encompasses a wide range of styles from studs to statement pieces. Despite the challenge, maintaining a well-organized jewelry space is crucial for keeping your accessories tidy, easily accessible, and in good condition. To achieve this, let’s delve into some practical strategies and tools that will help you keep your earrings in order.
Determine Your Needs
Before diving into organizational strategies, take a moment to reflect on your jewelry collection as a whole. Consider the types of pieces you own – are studs and hooks the majority, or do other styles dominate? Think about which items get regular wear versus those saved for special occasions. This introspection will lay the groundwork for determining the most effective way to keep your treasures tidy and accessible.
Utilize Different Storage Solutions
When it comes to storing earrings, finding the right solution is crucial to keep them organized and prevent loss. Stud earrings, for instance, are prone to getting misplaced due to their small size. To combat this issue, consider utilizing ice cube trays to separate pairs and keep them contained in one place. Alternatively, you can pin them on a corkboard or display them on a magnetic board if they have metallic parts.
For hook and hoop earrings, which tend to tangle when not stored properly, jewelry trees are an ideal solution for keeping them untangled and on display. T-bar stands are also great for hanging hoops freely. If you’re dealing with a mixed collection of earring types, think about combining storage solutions – a drawer with dividers can house studs in compartments, while hooks or stands can accommodate hoops and dangling pieces.
Creative DIY Solutions
Transforming old picture frames by stretching wire mesh or lace across them not only serves as an organizer but also creates a unique piece of wall art. Moreover, the unconventional material adds texture and visual interest to the space. Similarly, repurposing everyday items like cheese graters or tea strainers can be done by painting them and using them to hang earrings. This quirky touch injects personality into your decor and turns ordinary objects into conversation-starting accessories.
Care and Maintenance
To preserve the allure and longevity of your earrings, adhere to these simple yet effective guidelines. Firstly, maintain a tidy storage solution by regularly dusting both the organizer and its contents. This habit will prevent grime from accumulating and ensure a sparkling appearance. Secondly, refrain from overcrowding your storage space, as this can lead to tangled or damaged pieces. By providing some breathing room, you’ll reduce the risk of mishaps and keep your collection in pristine condition. Finally, make it a point to store your most frequently worn earrings within easy reach. This thoughtful approach not only saves time but also stimulates rotation through your jewelry collection, keeping each piece fresh and exciting.
Regular Updates
As your earring collection expands or undergoes changes, it’s essential to reassess your storage needs. What initially worked well for a smaller collection might no longer be sufficient as new pieces are added. By regularly re-evaluating your organizational approach, you can ensure that your storage solution adapts to the evolving nature of your collection. This process will not only maintain a tidy and functional space but also guarantee that your earrings remain organized and easy to access.
How to Store Stud Earrings
Storing stud earrings can be a delicate task due to their minuscule size and propensity to get misplaced or entangled with other pieces of jewelry. Yet, with a dash of creativity and a touch of organization, you can ensure your studs remain secure, visible, and effortlessly retrievable. To achieve this, consider the following strategies and methods for effectively storing stud earrings.
Use a Jewelry Box with Small Compartments
When it comes to storing stud earrings, a jewelry box with multiple small compartments is an ideal solution. This design allows you to keep each earring separate and secure, preventing them from scratching one another or getting misplaced. If your current jewelry box lacks sufficient compartments, consider supplementing with smaller individual boxes or pouches that can be inserted within the larger box, effectively creating a customized storage system for each pair of earrings.
Try a Stud Earring Holder or Display
For jewelry enthusiasts who own a significant collection of stud earrings, specialized earring holders and displays provide a solution for organizing and showcasing these tiny treasures. These products come in diverse forms, including stands, boards, and frames that cater to individual preferences. Some innovative designs feature small holes or slots where you can insert the earrings directly, effectively keeping them untangled and within easy reach. This practical approach doubles as a stylish way to display your collection, making it both functional and visually appealing.
Repurpose Household Items
Turn everyday items into an efficient and budget-friendly solution for storing your earrings. Consider the following ideas: Large buttons, for instance, are ideal for holding pairs of stud earrings. Simply insert the earrings through the buttonholes and secure them with their backs. This keeps pairs together and can be stored in a small dish or on a shelf. Alternatively, you could attach a corkboard to your wall or inside your closet door, using pushpins to hang your earrings. This method offers an easy way to visualize all your options at once and adds a decorative touch to your space. If you’re looking for something more compact, consider repurposing an ice cube tray as a jewelry organizer. Each compartment can hold a pair or two of stud earrings, keeping them neatly separated.
Magnetic Boards
One effective way to keep track of stud earrings is by utilizing a magnetic board. To do this, attach a small magnet to the back of each earring or opt for earrings with built-in magnetic backs. This setup enables easy access and can even serve as a unique decorative element in your room, adding a touch of creativity to its overall aesthetic.
Care and Maintenance
To ensure your stud earrings remain in top condition, proper storage is just the beginning. In addition to securing the backs tightly to prevent loss, it’s essential to keep them dry and clean to avoid tarnish or damage. Regular inspections of the clasps and backs for wear and tear are also crucial. By following these simple care tips and utilizing effective storage solutions, you’ll be able to effortlessly locate your stud earrings, which will remain organized, well-maintained, and ready to elevate any outfit.
FAQs on DIY Earring Holder
Unlock the secrets to effortlessly managing and displaying your jewelry collection by understanding how to create and utilize DIY earring holders.
What materials are best for making a DIY earring holder?
When it comes to crafting a DIY earring holder, the choice of materials largely depends on your desired design and aesthetic. To create a unique and functional piece, consider combining the following options:
Frames or shadow boxes provide a sturdy base and can be easily customized with paint or spray paint.
Fabric or burlap backgrounds add a touch of texture and visual interest to the holder.
Chicken wire, corkboard, or mesh offer a rustic, earthy feel and provide ample space for hanging earrings.
Hooks or knobs can be added for extra hanging capacity, ensuring your earrings remain organized and within reach.
How can I make a simple earring holder without spending a lot?
Transform an old picture frame into a budget-friendly earring holder by giving it new life. Begin by removing the glass from the frame and setting it aside. Next, cut a piece of mesh or lace to fit snugly within the frame’s dimensions. Secure the mesh or lace to the back of the frame using your preferred method – glue, staples, or even sewing work well. For an added touch, consider painting the frame to seamlessly blend with your existing decor. This creative upcycle will not only keep your earrings organized but also add a unique touch to your home’s aesthetic.
Can I make an earring holder if I’m not very crafty?
Crafty solutions are often just around the corner, even if you’re not naturally inclined towards DIY projects. Take, for instance, creating an earring holder that’s both functional and visually appealing. It’s surprisingly easy to make one using everyday items, such as a cheese grater, which can be repurposed as a makeshift hook for hanging earrings. Alternatively, you could transform a cooling rack attached to a frame into a unique earring display. And if you’re feeling particularly resourceful, why not turn a corkboard into an earring holder with the help of pushpins? The possibilities are endless and require little more than creativity and a willingness to think outside the box.
How can I make my DIY earring holder stand out?
Transform your earring holder into a one-of-a-kind piece by infusing it with your personal style. Start by painting it in a vibrant hue that reflects your personality, or add some visual interest with a bold pattern. For an extra touch of whimsy, consider incorporating decorative elements like stenciling or decoupage. If you’re looking for something truly unique, try using unconventional materials such as driftwood or an embroidery hoop to give your earring holder a quirky charm. To tie everything together, draw inspiration from the colors and textures in your room’s decor and incorporate those elements into your design.
How can I ensure my DIY earring holder is durable?
When it comes to crafting a durable earring holder, the foundation is key. Start by selecting a sturdy frame or base material that can withstand regular use. Ensure all components are securely fastened using strong adhesives like glue or nails. If you’re incorporating fabric into your design, opt for a material with minimal stretch or tear potential. Finally, apply a sealant or finish to any painted surfaces to provide an extra layer of protection against wear and tear.
Can a DIY earring holder be used for other types of jewelry?
Many DIY earring holders offer versatility by accommodating a variety of jewelry pieces beyond just earrings. For instance, you can incorporate small hooks to store delicate necklaces and bracelets. Additionally, a bar or rod can be added to the design, allowing for the hanging of rings. Furthermore, sewing pockets or pouches into the fabric backing provides a convenient place to stash miscellaneous items such as charms, beads, or other small trinkets.
How do I clean my DIY earring holder?
To keep your earring holder in top condition, develop a routine for cleaning it regularly. For holders with soft fabrics, use a lint roller to gently remove dust and debris. For metal or wood-based designs, dampen a cloth slightly and wipe down the surface, allowing it to air dry completely. As you work on crafting your DIY earring holder, remember that the key to success lies in balancing creativity and functionality. Your creation should not only be aesthetically pleasing but also effectively organize and protect your earrings.
25 Homemade DIY Earring Holder Ideas To Make
Transform your jewelry storage with a plethora of innovative and easy-to-implement DIY earring holder ideas. Say goodbye to cluttered spaces and hello to a meticulously organized collection that showcases your personal style.
DIY Earring Holder for Studs
Transform everyday materials into a stylish jewelry display with this DIY earring holder tutorial. This project turns wine corks and a strip of wood into a chic organizational system for studs, keeping them easily accessible and clutter-free. With just basic tools like a knife, drill bit, and a piece of wood, the process is straightforward and requires minimal effort. By repurposing common materials in a creative way, you’ll not only create a functional solution but also add a touch of elegance to your jewelry storage needs.
Picture Frame Earring Holder
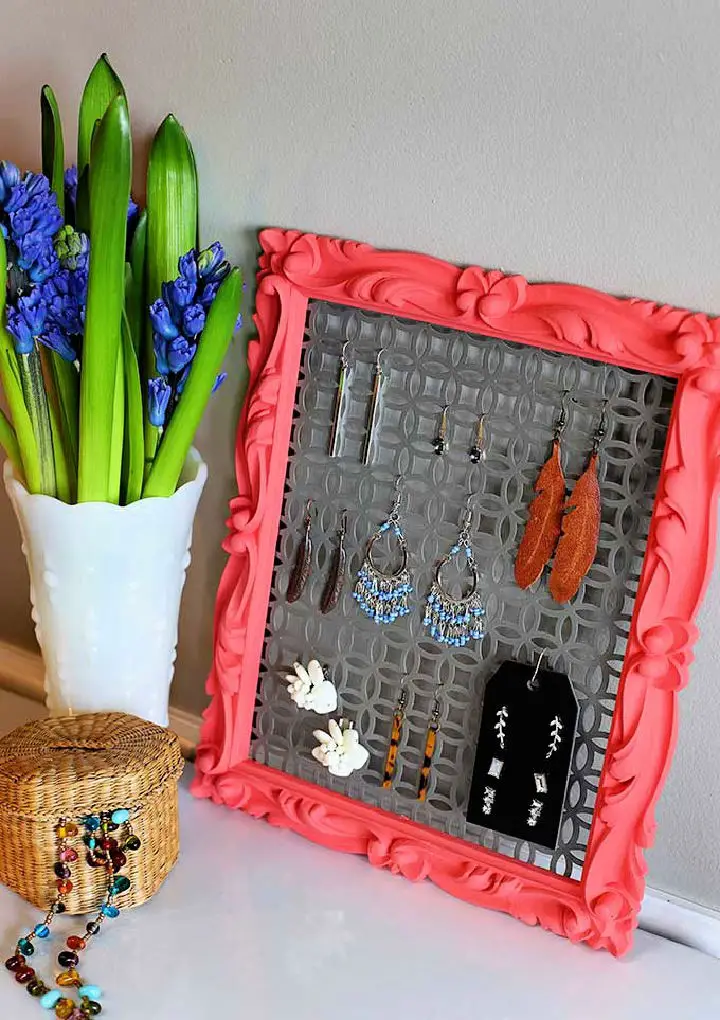
Transform a thrift store frame into a stylish earring organizer with a simple DIY project that’s perfect for adding a personal touch to your space while keeping your earrings neatly arranged. This ingenious solution is surprisingly easy to create, requiring just a few basic supplies and a dash of creativity. With step-by-step instructions and a comprehensive list of materials available at House of Hawthornes, you can have a functional and attractive earring holder in no time.
Make Your Own Earring Holder

Transforming scrap wood into a functional piece of art, consider gifting a charming DIY Earring Holder. This thoughtful craft not only organizes stud earrings but also adds a personal touch to any room. Perfect for placing on shelves or nightstands, it’s an ideal accompaniment to your favorite pieces of jewelry. If you’re looking for inspiration and guidance, visit Ugly Duckling House for a comprehensive step-by-step guide, including the materials and tools needed to bring this creative project to life.
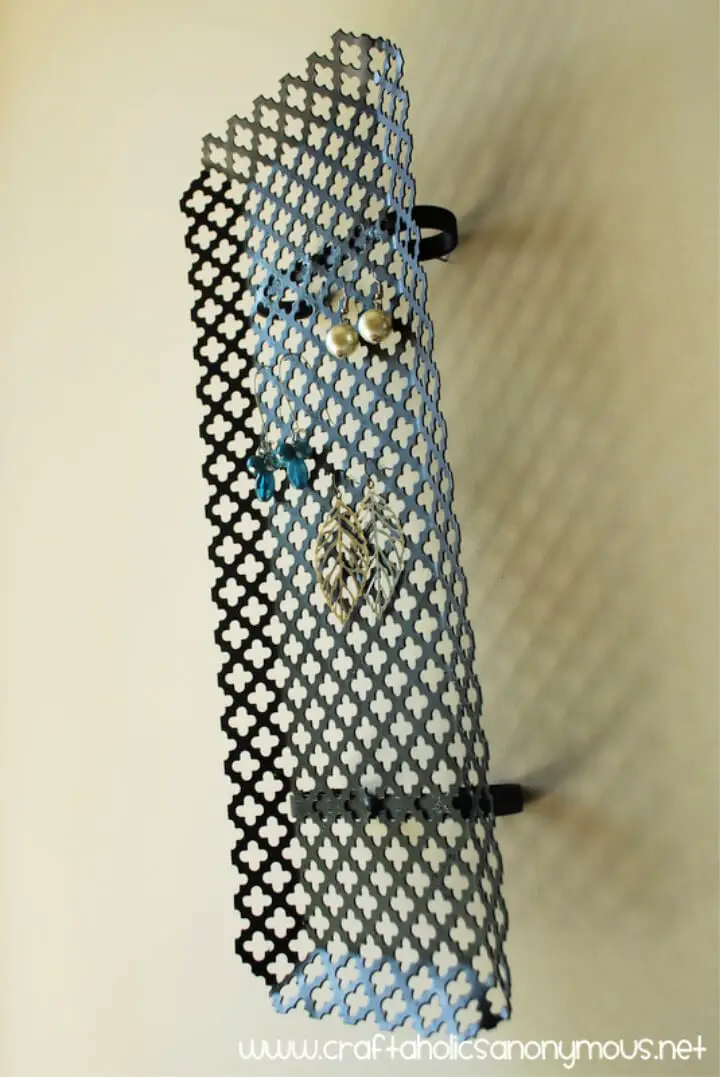
DIY Earring Organizer in Five Minutes
Elevate your earring storage game with a clever DIY organizer that requires minimal effort but yields maximum results. In mere minutes, you can transform a simple white picture frame into a stylish and practical space for showcasing your jewelry collection. The key to this project’s success lies in its accessibility – no prior crafting experience is necessary, making it an ideal solution for anyone seeking to tame the chaos of their earrings. By employing a cloverleaf aluminum sheet, heavy-duty scissors, and some basic DIY know-how, you’ll be able to bid farewell to tangled messes and hello to a beautifully organized collection that’s easy on the eyes. And if you’re eager to get started, head over to The Chronicles of Home for a step-by-step guide on how to bring this clever earring organizer to life.
Boho Chic Earring Holder for Less Than $10
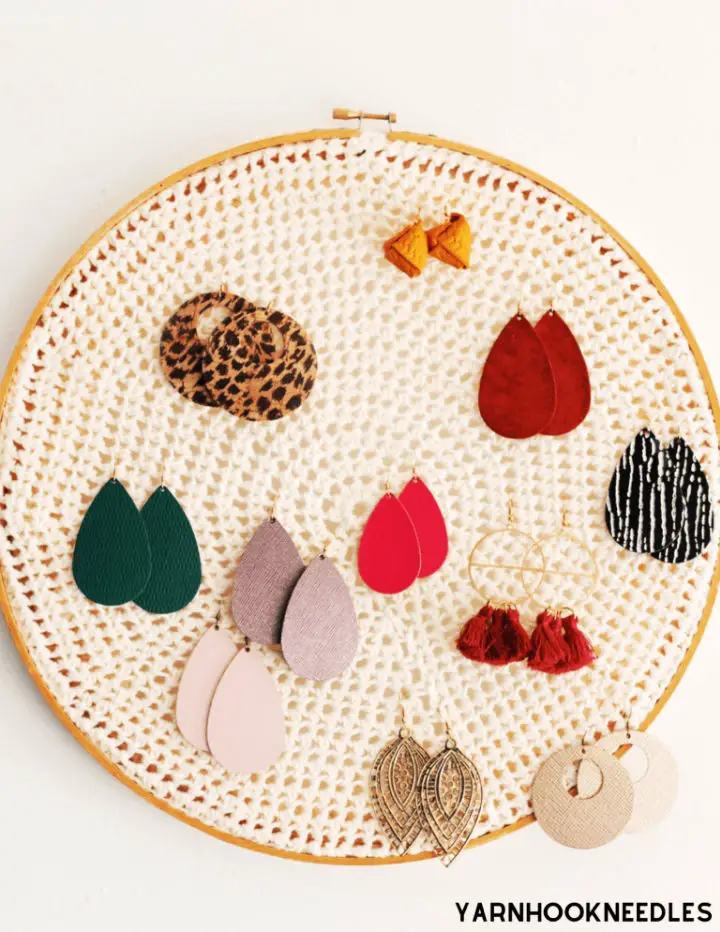
Transform any space into a haven of creativity with a charming DIY earring holder that’s perfect for crafting enthusiasts and a fun, kid-friendly project. This budget-friendly creation can be made for under $10, making it an accessible addition to your home or a thoughtful gift for friends. You have the freedom to choose between two unique methods: a hand-crocheted approach using simple stitches and an embroidery hoop, or a no- crochet version that captures the whimsical essence of a dreamcatcher. Both options promise a functional yet visually appealing earring display that adds a pop of color to your room. For a step-by-step guide on how to bring this creative outlet to life, visit YarnHookNeedles and turn your passion for earrings into a reality today!
Homemade Wood Earring Holder
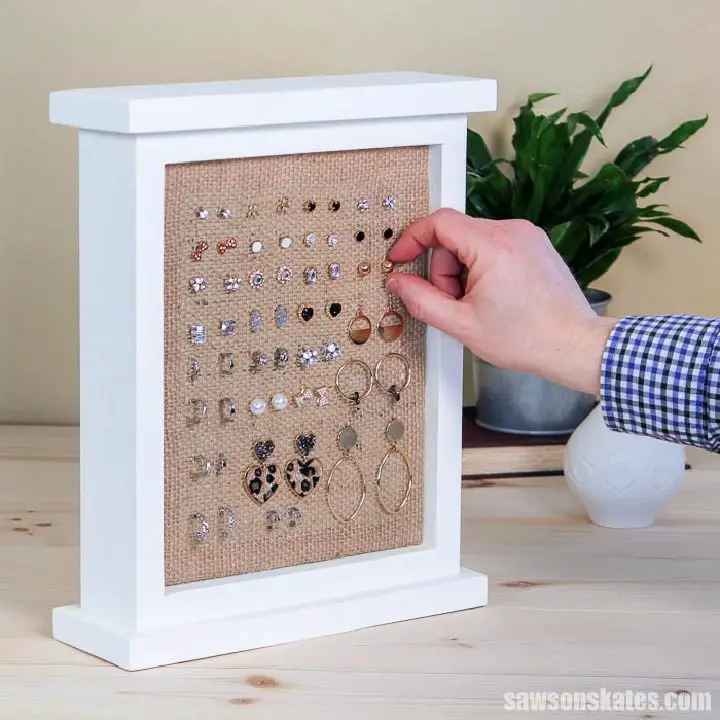
Elevate your jewelry game with a charming DIY earring holder from Saws on Skates. This rustic yet elegant project combines simplicity and creativity, making it perfect for crafty beginners. The wooden and burlap construction not only keeps your earrings organized but also adds a touch of natural charm to your decor. Say goodbye to the frustration of lost pairs and hello to a beautifully curated collection. Whether you’re treating yourself or gifting someone special, this functional piece is sure to bring joy and order to your daily routine.
Make a Cactus Earring Holder
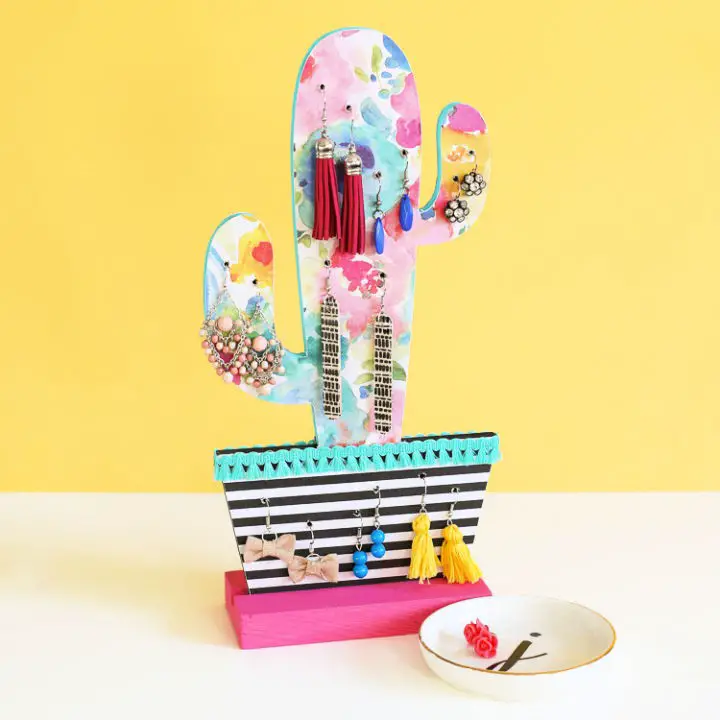
Transform your space with this delightful DIY cactus earring holder that effortlessly blends creativity, organization, and decor. This charming project not only showcases your favorite earrings but also adds a pop of color and whimsy to any room. Best of all, it’s surprisingly easy to create, making it an excellent introduction to DIY crafting. For step-by-step instructions and a comprehensive list of materials, visit The Craft Patch Blog for inspiration.
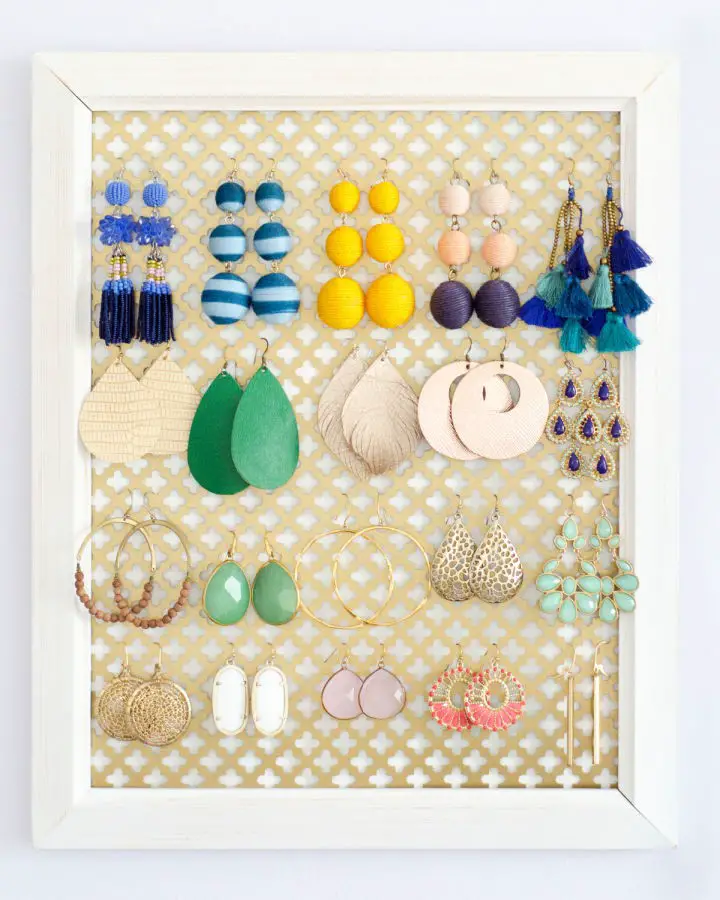
DIY Earring Holder Using Frame
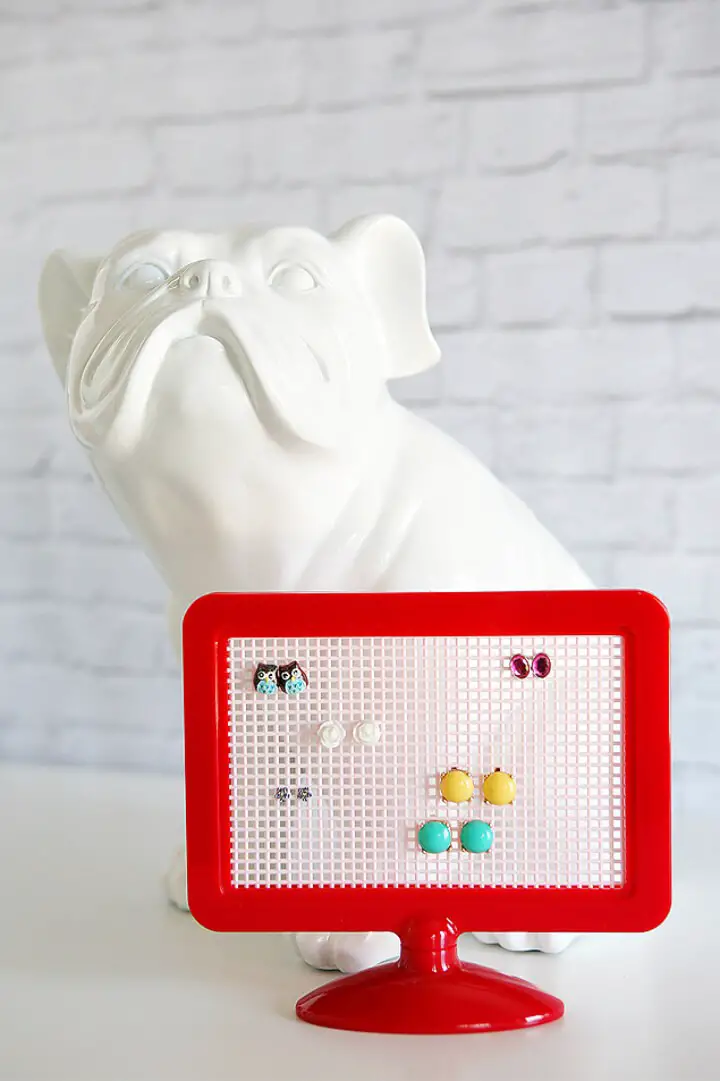
Transform your earring storage with a simple and budget-friendly DIY project. This versatile organizer is suitable for both adults and children, offering a practical solution to keep your earrings safe from damage. Gather basic materials such as plastic frames and canvas, easily accessible at an affordable price. Not only will this craft add a personal touch to your decor, but it also allows for customization in colors to match any room’s aesthetic. Perfect for crafters of all levels, follow the straightforward steps to assemble your unique earring holder. For further creative inspiration, explore more fun projects like DIY air freshener decorations and farmhouse-style print holders. Begin this useful craft by visiting Eighteen25.
Amazing DIY Acrylic Earring Holder

Ditch the frustration of searching through knotted earrings and create your own Acrylic Earring Holder, courtesy of A Beautiful Mess’s straightforward tutorial. This clever DIY project not only masterfully organizes post-back earrings but also adds a touch of sophistication to your dresser. With minimal materials like balsa wood, acrylic sheet, and your preferred finish, this budget-friendly solution is highly customizable as well. Say goodbye to jewelry chaos and hello to streamlined beauty with this visually appealing display. Ideal for showcasing your earrings in an orderly yet stylish manner.
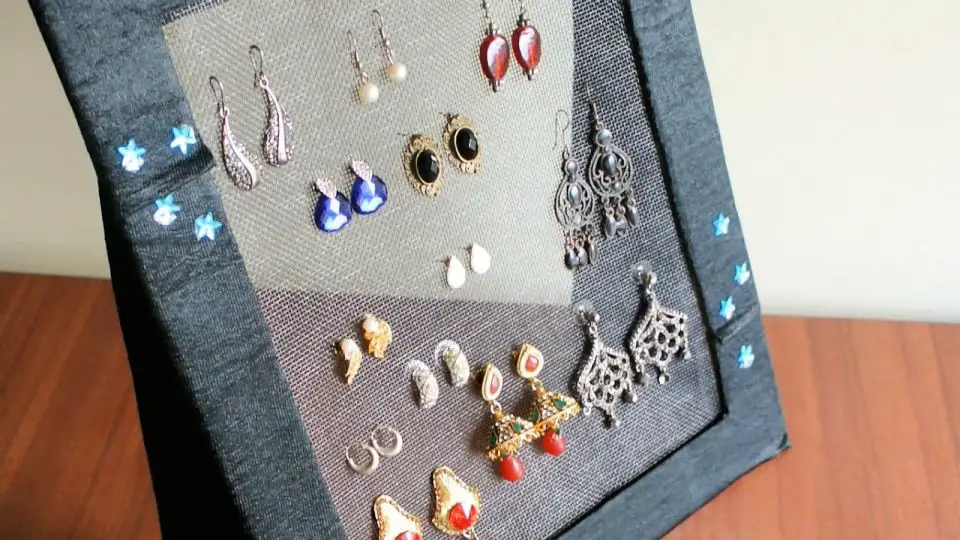
Frame Earring Holder Design
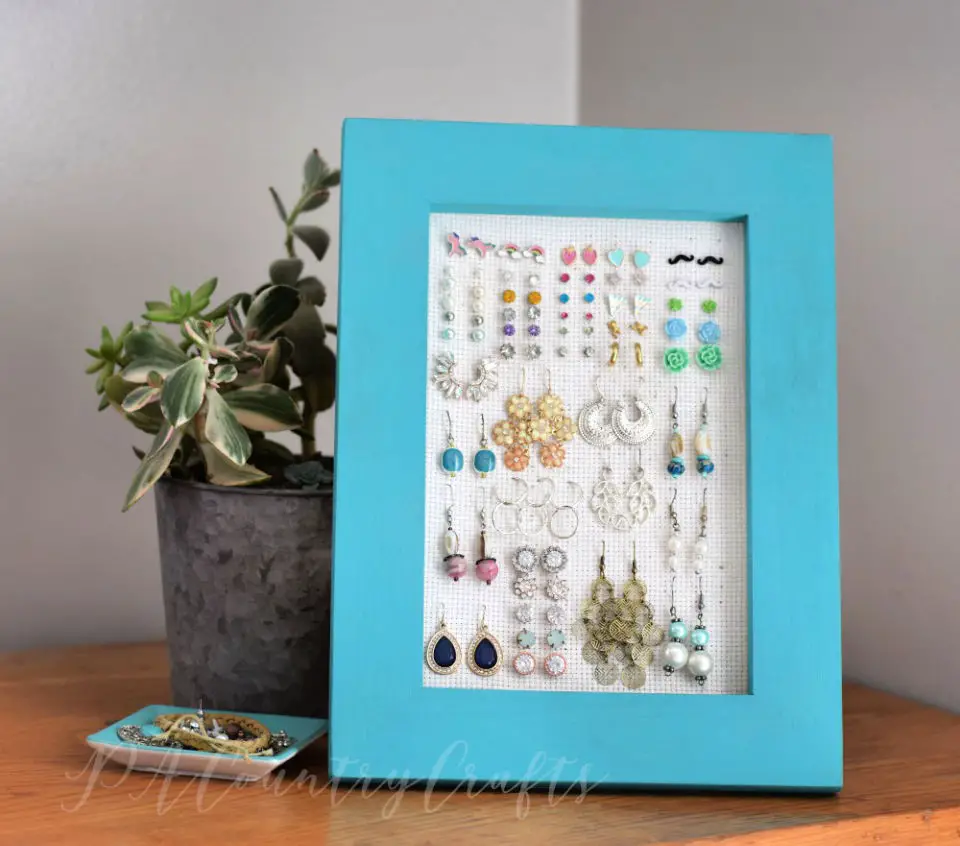
Elevate your jewelry storage with a creative DIY project that not only keeps your earrings organized but also adds a touch of charm to your decor. This unique holder is perfect for safeguarding delicate pieces from curious siblings or enthusiastic friends, and it’s surprisingly easy to make using cross stitch fabric. By upcycling an old frame, you’ll transform a humble piece of furniture into a functional work of art that’s sure to delight post earrings enthusiasts. With this practical yet stylish tutorial, you can turn your jewelry storage woes into a delightful DIY experience.
Dollar Tree Earring Holder Ideas

Say goodbye to tangled earrings and hello to organized bliss with this easy DIY Dollar Tree project. By repurposing a cooling rack and frame, you can create a chic storage solution that showcases your earring collection without breaking the bank – all for under $10. Add a splash of paint and make it your own personalized holder. Perfect for those who love combining creativity with organization, this DIY earring holder is the perfect solution for decluttering your jewelry and adding a touch of style to your daily routine.
How to Make Earrings Stand Under One Hour
Transforming the way you store your earrings is just a simple afternoon project away. Create a charming DIY Earring Stand to bring order to your dresser and say goodbye to clutter. This innovative stand accommodates both stud and dangling earrings, ensuring each piece has its own designated spot. With a straightforward guide, you can craft this functional home addition using basic tools, making it accessible to anyone. By embracing a tidier space and rediscovering your love for earrings, you’ll be treated to the perfect blend of style and practicality.
DIY Earring Storage Stand
Transform your unruly earring collection into a stunning and functional display with minimal effort. The Mom 4 Real DIY Earring Storage Stand project is an excellent starting point, requiring just a few basic materials like an old picture frame, foam board, and some paint. By following this straightforward guide, you can turn ordinary components into a unique accessory holder that not only keeps your earrings organized but also adds a touch of personality to any room. With the ability to customize designs to match your personal style or theme, this project is perfect for those looking to infuse their space with a little extra flair.
Embroidery Hoop Earring Holder
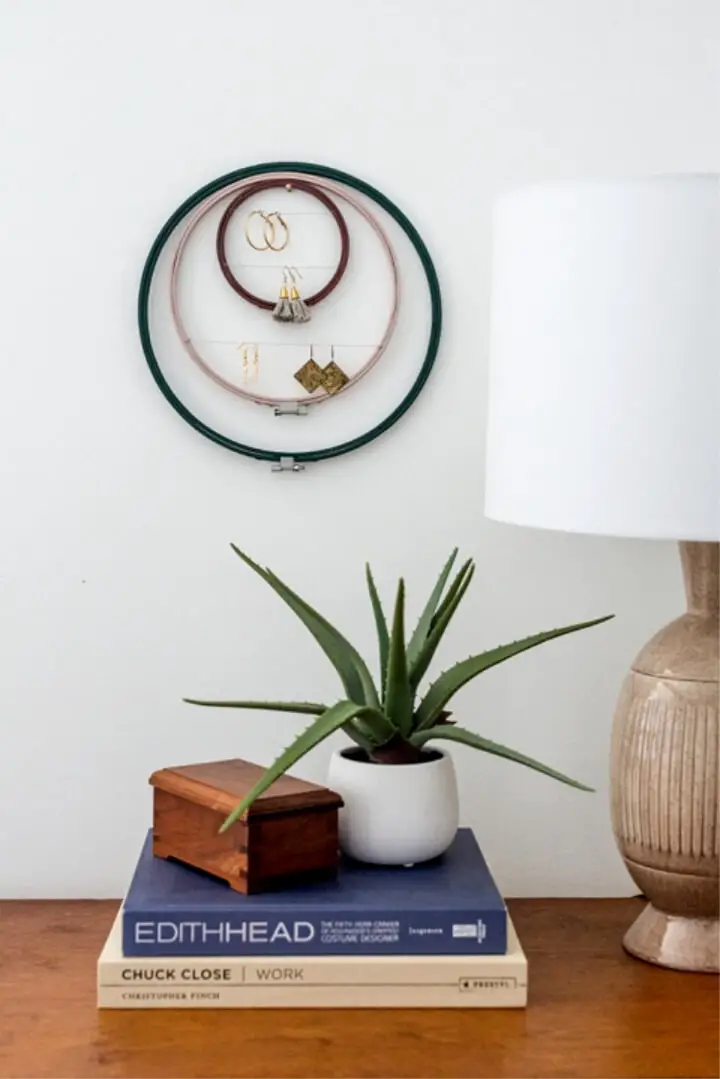
Transform ordinary objects into extraordinary works of art by unleashing your creativity through the Dream Green DIY project. Embark on a creative journey and bring a touch of modern elegance to your decor with an innovative DIY Embroidery Hoop Earring Holder. This accessible craft is designed for all skill levels, allowing you to experiment with different hoop sizes and create a one-of-a-kind piece that reflects your personal style. As you work through the step-by-step tutorial, feel inspired to repurpose everyday items in new and imaginative ways, and share your unique creations with others.
Build a Wooden Triangle Earring Holder
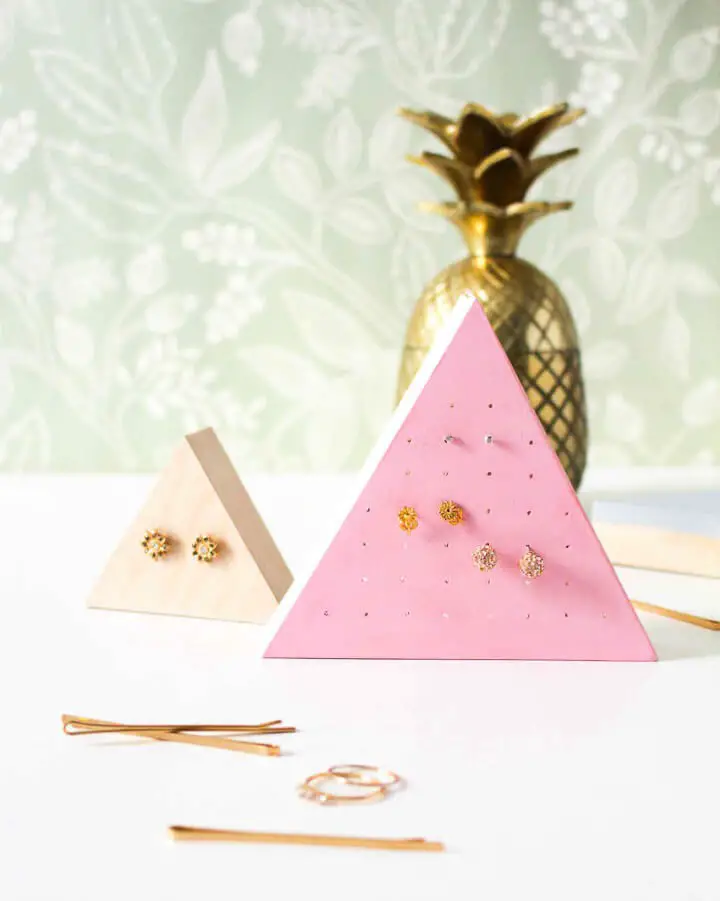
Get inspired to create a chic DIY earring holder that showcases your personal style while keeping your studs organized and within reach. This project, courtesy of Anusha Rajeswaran of Fish & Bull, combines straightforward woodworking with creative customization options – paint it up or leave the natural beauty intact for a minimalist touch. Perfect for anyone who treasures their jewelry collection, this earring holder seamlessly blends practical functionality with decorative flair, elevating your space’s overall aesthetic.
DIY Picture Frame Earring Organizer
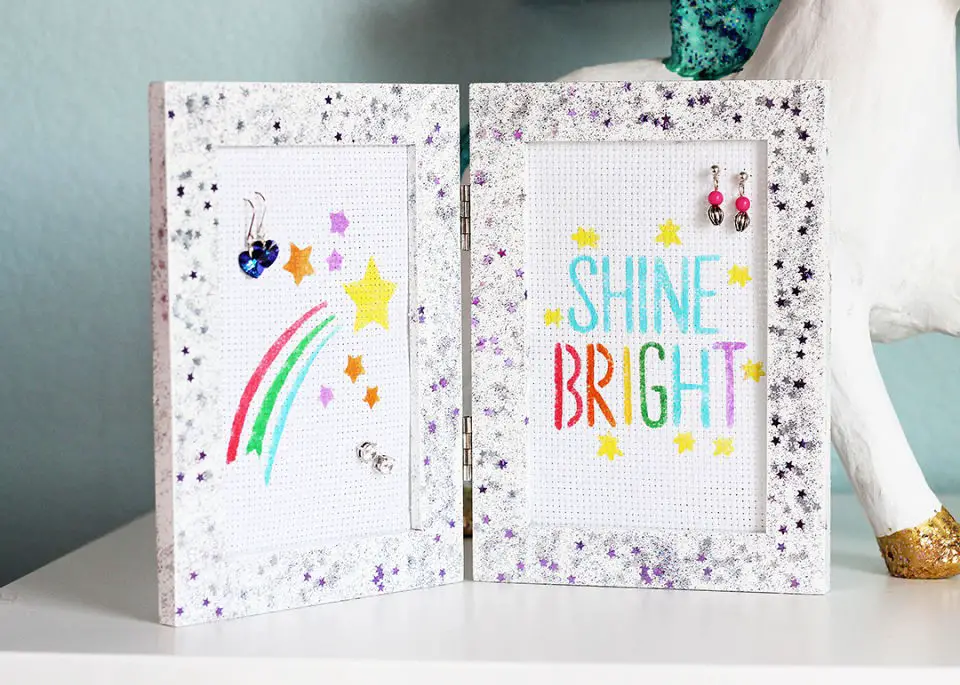
Transform an ordinary hinged picture frame into an extraordinary earring organizer with this straightforward tutorial. By incorporating Martha Stewart paints and stencils, you can infuse a unique touch of personality into your creation. This DIY endeavor is ideal for bringing harmony and flair to your jewelry collection. Whether you’re looking to revamp your space or engage in a creative activity with family members, this guide offers a delightful and innovative approach to showcasing your earrings.
Turn the Candle Holder Into an Earring Holder
Transform your space and jewelry collection with a creative and budget-friendly DIY solution. Upcycle a thrifted candle holder into a stunning earring organizer that’s both functional and visually appealing. This simple tutorial is perfect for those who enjoy crafting and value practicality, as it keeps your earrings easily accessible without cluttering the walls. With this project, you’ll experience an enjoyable and rewarding creative journey.
Easy DIY Earring Holder
Unleash your creativity in the world of DIY jewelry by exploring Lia Griffith’s extensive resources. This comprehensive guide will walk you through the process of crafting stunning shrink film leaf earrings and a custom earring holder, ideal for showcasing your unique creations. Despite being geared towards advanced crafters, this project is surprisingly accessible to beginners as well, thanks to its straightforward instructions.With just three simple steps – cutting, baking, and coloring – you can achieve professional-quality results that are sure to impress. To add an extra layer of sophistication, consider using a gold leafing pen or personalizing with your favorite colors. Join the creative journey and share your masterpieces on social media using #MadeWithLia, as your DIY skills continue to flourish.
Upcycled Cheese Grater Earring Holder
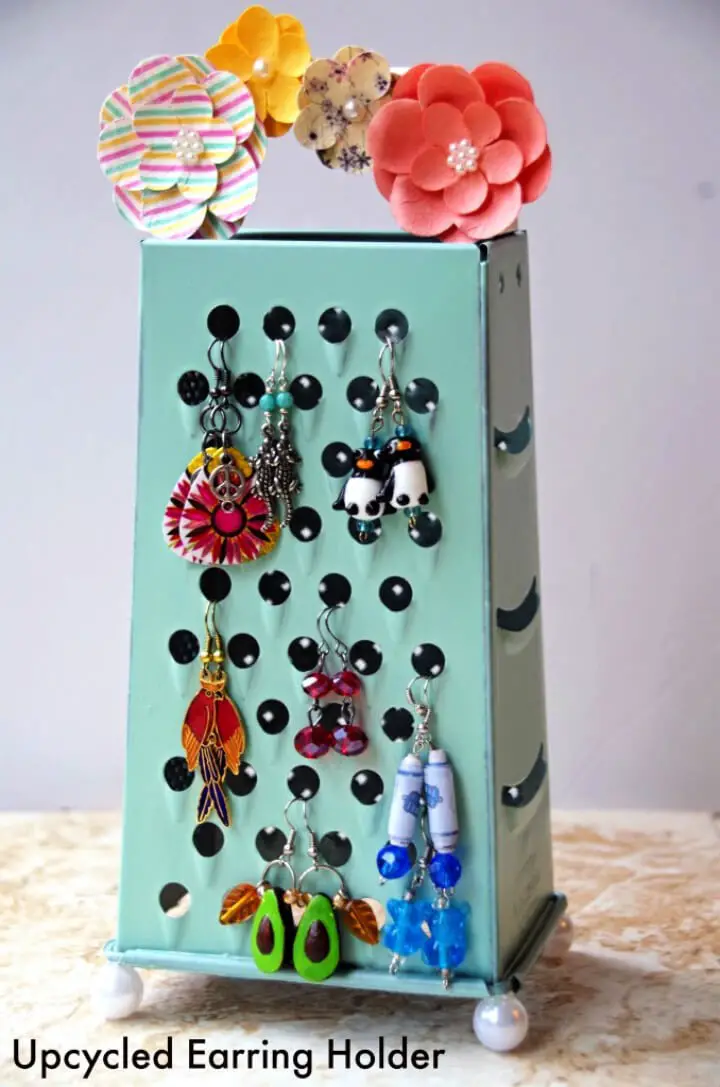
Take an old box cheese grater and give it a fresh makeover by transforming it into a stylish, personalized earring holder through this easy upcycling project. Not only will you be decluttering your jewelry collection, but also adding a touch of artistry to your space while promoting sustainability. To accomplish this eco-friendly feat, all you need are a few basic materials such as spray paint, acrylic paint, large beads for the ‘feet,’ and any embellishments that strike your fancy. For a comprehensive, step-by-step guide on how to bring this clever storage solution to life, visit Turning Clock Back. This project not only breathes new life into everyday items but also showcases creative problem-solving at its finest.
Shabby Chic Dangly Earring Display
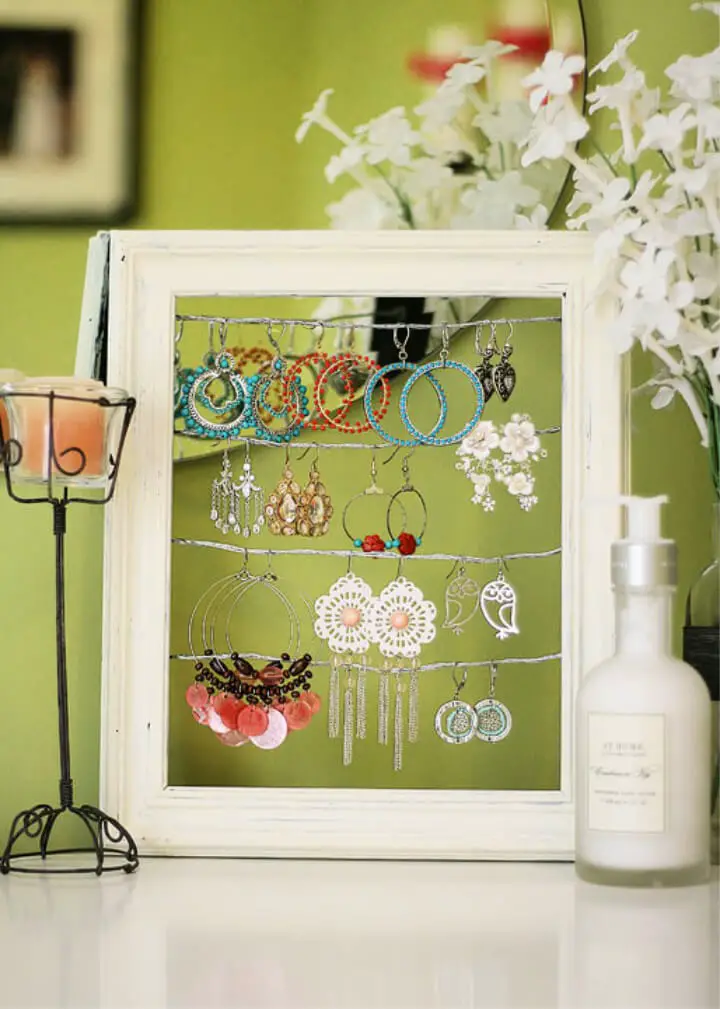
Elevate your earring storage with a charming DIY shabby chic dangly earring display, perfect for showcasing your collection in style. This creative project requires just a few simple materials: an old picture frame, some picture wire, paint, and a staple gun. In under 30 minutes, you can create an attractive display that will inspire you to wear your favorite earrings every day. With a budget-friendly price tag of under $10, this DIY project is a must-try for anyone looking to add a touch of vintage flair to their decor.
Cool Brass Pyramid Earring Holder
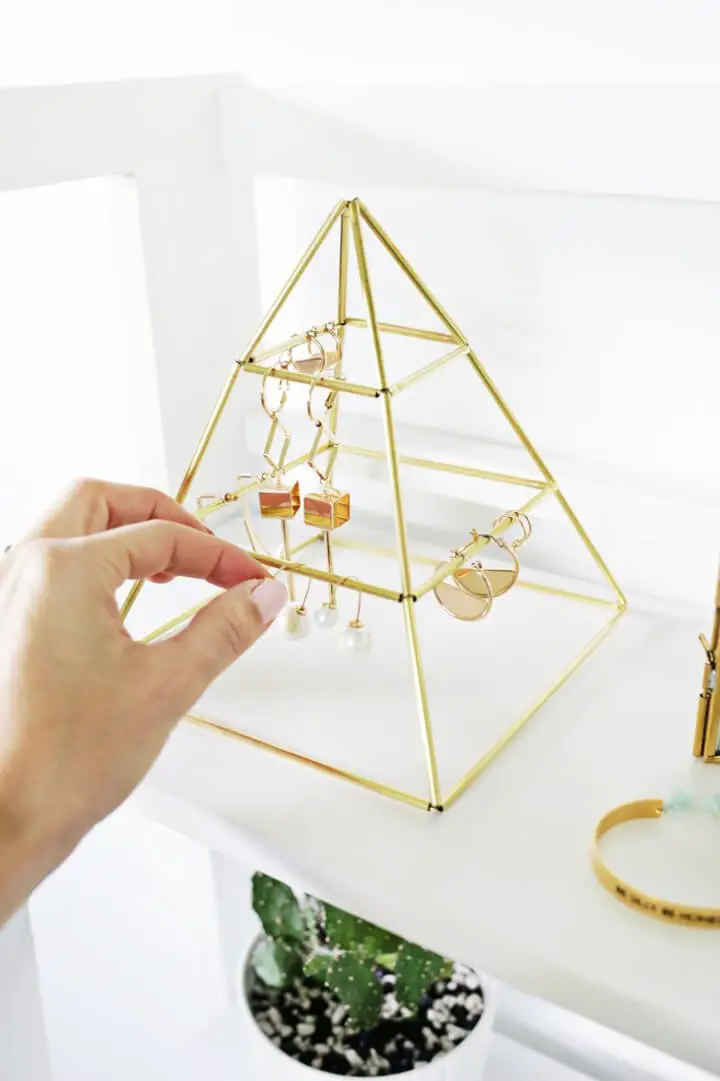
Transform the way you store your earrings with a striking Brass Earring Pyramid that’s as functional as it is beautiful. This DIY masterpiece combines brass tubes and wire to create a one-of-a-kind organizer that not only keeps your jewelry tidy but also adds a touch of sophistication to your dresser. No more scrambling to find lost earrings or sacrificing style for the sake of organization – this stunning pyramid does it all, effortlessly blending form and function to elevate your space.
Make Your Own Earring Display Tray
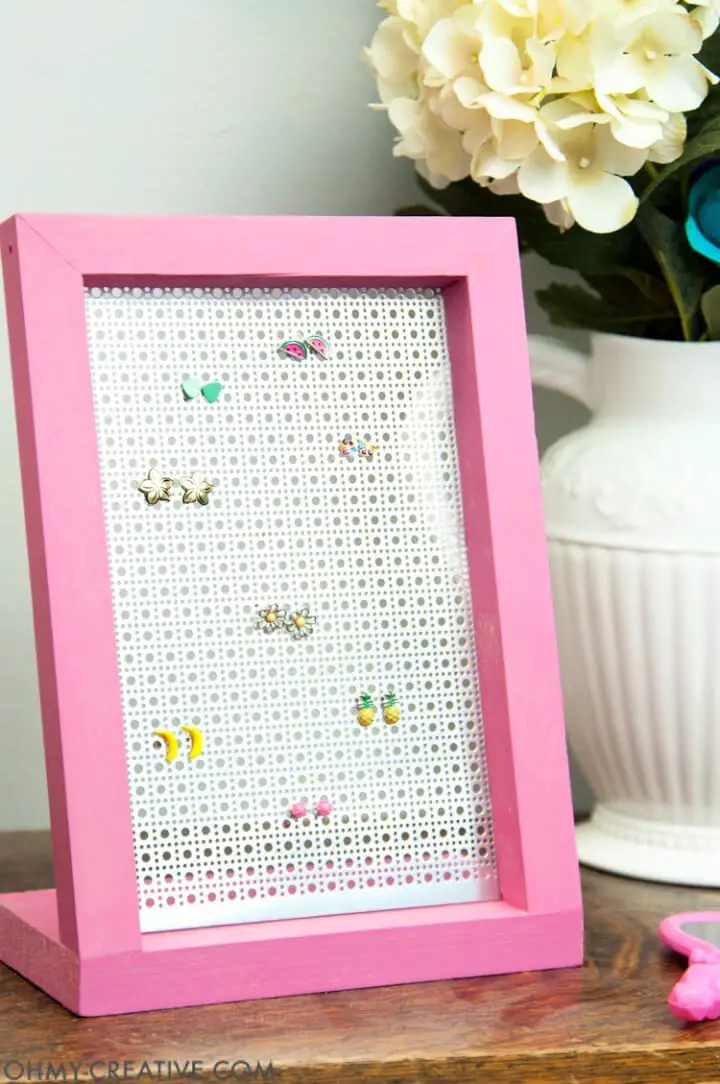
Bring a touch of elegance to your earring collection by crafting a one-of-a-kind display using basic materials. This DIY project requires minimal woodworking skills and only a few essential components: a 1×1 board, a 1×4 board, and decorative aluminum sheets for an added layer of sophistication. Whether you’re showcasing dainty studs or statement dangly earrings, this versatile display balances functionality with visual appeal. With a step-by-step guide to follow, you’ll be able to tame the chaos of your earrings and add a dash of style to your space. For more information on how to create this stunning piece, check out Oh My! Creative for inspiration.
How to Make an Earring Stand
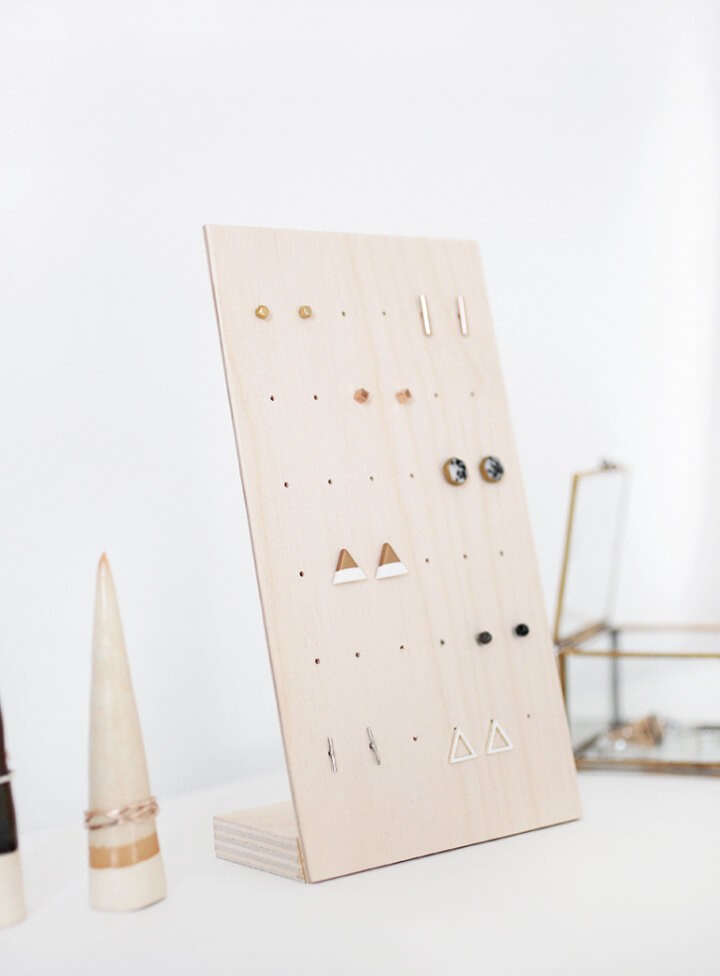
Transforming the way you store your earring collection doesn’t have to mean sacrificing style for functionality. By crafting a minimalist earring stand using plywood and basic tools, you can create a unique and personalized solution that not only streamlines your accessorizing routine but also adds a touch of elegance to your decor. The step-by-step guide available at The Merrythought makes it easy to follow along and customize the piece to fit your individual taste and needs.
DIY Color Splatter Earring Holder
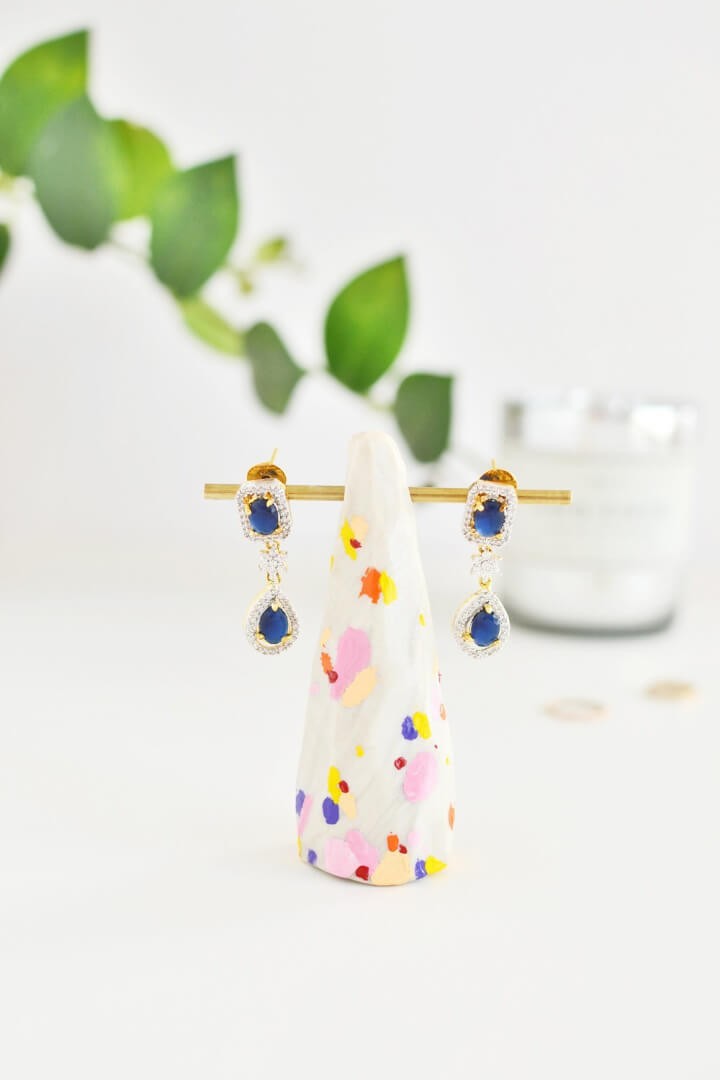
Elevate your earring organization game with a bold splash of color! The DIY Color Splatter Earring Holder project on Enthralling Gumption is a fun and creative solution that not only tidies up your vanity but also adds a vibrant pop to your decor. By combining simple materials like polymer clay, acrylic colors, and brass tubes, you can craft a one-of-a-kind storage solution for your jewelry. Perfect for personal use or as a thoughtful gift, this DIY earring holder is both functional and stylish. Get ready to bring a burst of color to your earrings and your space!
DIY Earring Organizer With Cardboard
Create a personalized jewelry storage system with this step-by-step DIY earring holder tutorial. By following the simple and helpful instructions, you’ll be able to design a bespoke organizer that keeps your favorite pieces tangle-free and easily accessible. Perfect for real-life use, this project is ideal for those looking to declutter and beautify their space. For a clear and easy-to-follow guide, click here Sefra Correa.
Conclusion:
In addition to providing creative and personalized ways to organize your jewelry, exploring 25 homemade DIY earring holder ideas also allows you to infuse your space with a touch of individuality. The projects themselves span a range of complexity, from simple designs that require minimal resources to more intricate creations that stand out. Regardless of skill level or aesthetic preference, there’s something for everyone in this collection of DIY earring holder ideas. By choosing the right materials and following our step-by-step guides, you can ensure not only a stunning but also a durable finished product. The beauty of crafting your own bespoke earring holder lies not just in its functionality; it’s about expressing your unique style and embracing the joy of creation. So, take the first step today and discover how a custom earring holder can elevate your accessory organization – and your personal flair.
