Why Create Your Own DIY Anklets?
Embarking on a DIY adventure with handmade anklets offers a multitude of benefits that extend far beyond the initial creative rush. By taking charge of crafting these charming accessories, you’ll unlock a world of personalization, cost-effectiveness, unique gifting opportunities, therapeutic activities, skill development, and eco-friendly choices.
Personal expression knows no bounds when creating your own anklets. Every aspect – beads, colors, charms – can be meticulously selected to reflect your individual style or carry sentimental value.
In addition to the creative freedom, making anklets at home is a cost-effective endeavor. By utilizing materials you already possess or sourcing supplies in bulk, you’ll save money and reduce waste.
Handmade anklets make for thoughtful, one-of-a-kind gifts that will be cherished by friends and family alike. By customizing them with personal significance, you’re gifting not just a piece of jewelry but a piece of yourself.
The therapeutic benefits of crafting are well-documented. As you focus on creating something beautiful, you’ll find yourself relaxing, unwinding, and cultivating mindfulness.
DIY crafting also presents an opportunity to develop new skills, refine fine motor abilities, and build confidence in your creative endeavors.
Lastly, by choosing sustainable materials for your anklets, you’re supporting eco-friendly practices and reducing your environmental impact.
Essential Materials and Tools for DIY Anklet Making
Creating DIY anklets offers a delightful way to express your individuality through craftsmanship. To embark on this creative journey, you’ll need a set of essential materials and tools that will guide you in crafting beautiful and durable anklets with ease. Here’s a comprehensive rundown of the fundamental components you’ll require:
Materials:
Beads – Select from an array of shapes, sizes, and colors to infuse your anklets with personality.
Thread or Cord – Opt for strong, resilient options like nylon, silk, or waxed linen suitable for jewelry-making.
Clasps – Choose a clasp that harmonizes with your design, such as lobster clasps, toggle clasps, or magnetic clasps.
Jump Rings – These small metal rings facilitate the attachment of clasps and charms to your anklet.
Charms – Add unique charms to personalize your anklet and imbue it with special significance.
Tools:
Pliers – Round-nose and flat-nose pliers are ideal for bending wire, securing clasps, and crafting intricate designs.
Scissors – A sharp pair is necessary for cutting thread and cord accurately, ensuring a seamless fit.
Measuring Tape – Take precise measurements of your ankle size beforehand to guarantee the perfect fit.
Crimping Tool – When using beading wire, this tool secures beads in place, maintaining their position throughout the anklet’s construction.
Steps to Crafting Your Anklet
To create a unique and personalized anklet, start by conceptualizing its design and style. Sketch out your idea to visualize the final product. Next, take precise measurements of your ankle, adding an extra inch for a comfortable fit. With this information, cut a length of thread or cord that exceeds the measured size, allowing for adjustments as needed. Proceed to string beads onto the thread according to your design plan, carefully crafting each step. As you work through the process, ensure secure attachments using pliers and jump rings, adding clasps and charms to complete the look. Double-check all connections are sturdy and trim any excess material for a polished finish. By following these straightforward steps, you’ll be well on your way to creating meaningful and stylish anklets that reflect your personal style.
How to Make Anklets
Embark on a creative journey by learning how to craft anklets with ease. To get started, collect all necessary materials, including beads, threads, clasps, and tools like pliers or scissors. Having everything at your fingertips will streamline the crafting process and reduce stress.Next, decide on the design of your anklet. Will it be a beaded masterpiece, a braided charm, a macramé work of art, or a simple chain design? Consider the occasion you’re crafting for – casual, formal, or something in between. This will help guide your creative decisions and ensure your finished product meets your expectations.Before diving in, take the time to measure your anklet size correctly. A well-fitted anklet is essential for comfort and confidence. Remember, measuring twice saves time and frustration in the long run.To make the process smoother, rely on step-by-step tutorials with clear photos or videos. This will help beginners grasp the basics quickly, while also allowing experienced crafters to refine their skills.As you work through each step, take your time and don’t rush. Patience is key when crafting, as it allows you to focus on details and avoid mistakes. If you do encounter issues, remember that they’re an opportunity to learn and improve.Once you’ve mastered the basics, feel free to experiment with different materials and designs. This will help you develop your unique style and create truly one-of-a-kind anklets.Finally, once your creation is complete, wear it proudly or present it as a gift. Sharing your work can also inspire others to try crafting and join the DIY community.
Frequently Asked Questions About DIY Anklets
What materials do I need to start making DIY anklets?
To craft your own unique anklets, gather a fundamental set of materials that can encompass beads in assorted colors and sizes, along with thread or cord designed for jewelry-making. Additionally, collect clasps for securing the piece, jump rings for attaching clasps and charms, and basic jewelry-making tools like pliers and scissors. Keep in mind that the specific materials may differ depending on the design you envision creating.
How do I measure my ankle for a DIY anklet?
To measure your ankle for a DIY anklet, you’ll want to use a flexible tape measure to wrap around the area where you envision the jewelry sitting comfortably. The key is to get the measurement just right – not too tight, but not too loose either. Wrap the tape measure snugly around your ankle and note down the measurement. To ensure a comfortable fit, consider adding an extra half-inch to an inch (1.27 cm to 2.54 cm) to your initial reading.
Can DIY anklets be good gifts?
When it comes to finding a thoughtful and meaningful gift, there’s nothing quite like a handmade anklet. Not only do they offer a personalized touch, but they also showcase the time and effort you’ve put into selecting something truly special for the recipient. And because every handmade anklet is unique, you can rest assured that the person receiving it will be the only one with an accessory that’s entirely their own.
Are there any eco-friendly options for making anklets?
When it comes to crafting an eco-friendly DIY anklet, there are several ways to make a positive impact on the environment. To start, consider using natural materials like hemp or cotton cord in place of synthetic fibers. This simple swap can help reduce your reliance on resource-intensive production methods. For beads and embellishments, look for recycled or upcycled options that give old materials new life. By avoiding plastics and opting for biodegradable alternatives, you’ll not only be reducing waste but also supporting a more sustainable approach to fashion.
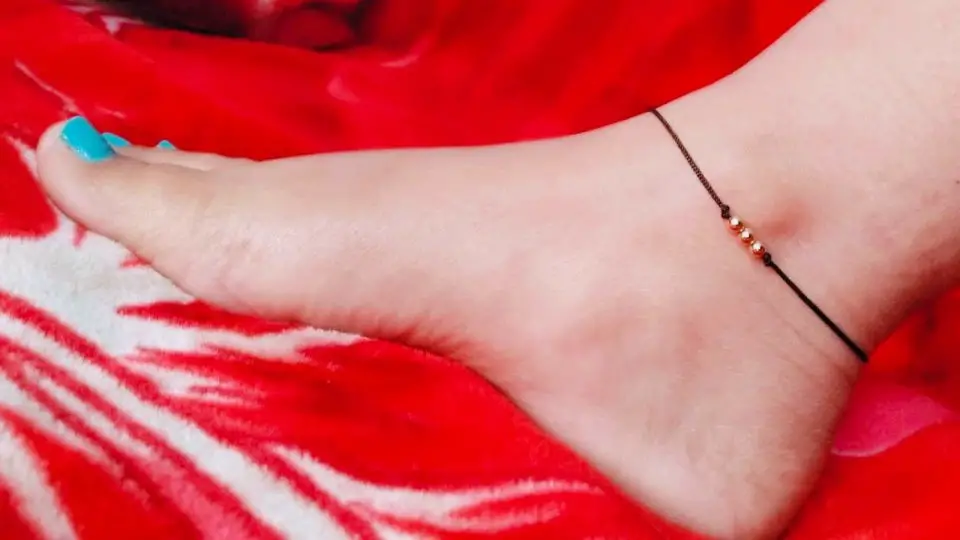
How do I make a simple beaded anklet?
To create a simple yet elegant beaded anklet, begin by cutting a piece of thread or wire to the desired length, leaving some extra for tying off or attaching clasps. Start by securing one end with a clasp or a knot, ensuring it’s firmly in place. Next, thread your chosen beads onto the thread, carefully adding each bead to create the design you envision. Once you’ve added all the beads, finish the anklet by securing them with another clasp or knot. Finally, trim any excess thread and adjust the anklet to ensure a comfortable fit.
What are some tips for beginners wanting to make DIY anklets?
When starting out, it’s essential to pace yourself and set achievable goals. Begin by tackling simple designs that can help boost your confidence. To accelerate the learning process, turn to tutorials that come equipped with step-by-step instructions, accompanied by visual aids such as images or videos. A key takeaway is to not rush through each technique – take the time you need to absorb and master it. Additionally, make sure to utilize high-quality materials that can withstand the test of time and contribute to a polished finish.
How can I incorporate charms into my anklet?
To infuse personality into your anklet, follow these steps: First, select a charm that features an integrated loop or hole, allowing for seamless attachment to your anklet. Next, utilize a jump ring as the intermediary connector between the charm and the desired spot on your anklet. Finally, ensure the jump ring remains securely closed using pliers, guaranteeing the charm stays firmly in place.
Can I make anklets without any jewelry-making tools?
To craft a simple anklet without specialized jewelry-making tools, focus on utilizing versatile materials and techniques. For instance, consider working with stretch cords that can be easily secured through knotting alone. If needed, a small amount of adhesive can also be used to attach ends. Additionally, look for design ideas that primarily involve braiding or knotting, as these methods often don’t require specialized tools. By embracing these creative workarounds, you can still create a beautiful and functional anklet without the need for expensive or complex equipment.
Explore 15 Easy DIY Anklet Ideas
Unleash your creativity and craft a unique DIY anklet to add a touch of personal style to your outfit. With just a few simple materials, you can create one of the 15 innovative and easy-to-follow projects outlined below.
Cute DIY Macrame Beaded Anklet

Crafting a boho-chic macramé anklet with beads is the perfect way to add a personalized touch to your summer style. With our step-by-step DIY guide, you’ll learn how to tie essential knots, incorporate stunning seed beads, and finish your piece with a sliding clasp for an adjustable fit. This tutorial is designed to help you master the art of macramé jewelry, whether it’s for yourself or as a thoughtful gift for a friend. By following our easy-to-follow instructions, you’ll be able to create a unique and elegant anklet that’s sure to elevate your accessory game.
How to Make Anklets at Home

Transform a pair of traditional Indian anklets, or payal, with a simple DIY project from Pink Chai Living that adds a personal touch to your accessories collection, makes for a thoughtful gift, or becomes a fun activity at gatherings. This step-by-step guide requires basic jewelry supplies like gold chain, jump rings, ghungroo, and a lobster clasp, which you can assemble with jewelry pliers in just about 15 minutes. With this easy-to-follow craft, you can indulge in the creative process of adornment and express your unique style.
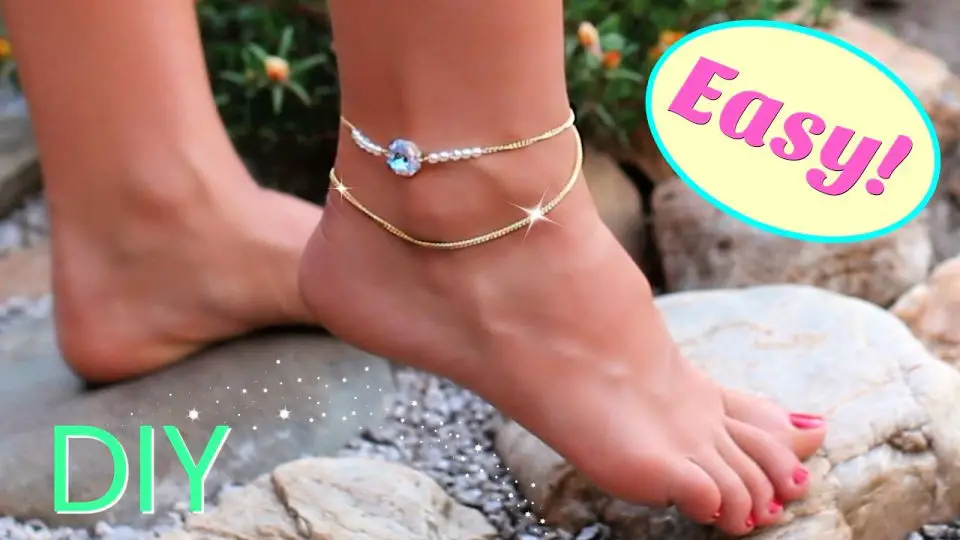
Easy DIY Bead Anklet
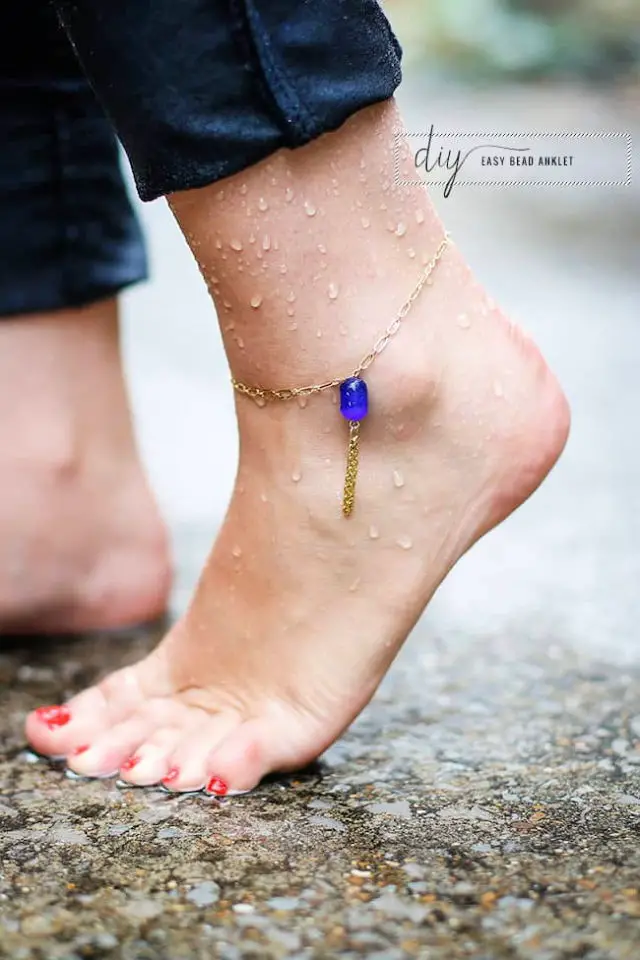
For those who appreciate understated elegance, crafting a DIY anklet is an excellent way to add a personal touch to their accessories. With minimal investment and some basic materials from a craft store, Hello Glow provides a straightforward guide on how to create a stylish and chic anklet that can be customized to fit any occasion. Simply choose your favorite beads, select the desired length, and with a few essential tools – pliers, jump rings, a lobster clasp, a head pin, and chain – you’ll have a one-of-a-kind accessory that complements any outfit. This engaging activity not only yields a fashionable result but also provides a sense of accomplishment as you admire your handcrafted creation. Whether worn on a sunny day or paired with ankle boots in the fall, your DIY anklet will be a unique expression of your personal style.
How to Make a Tassel Anklet
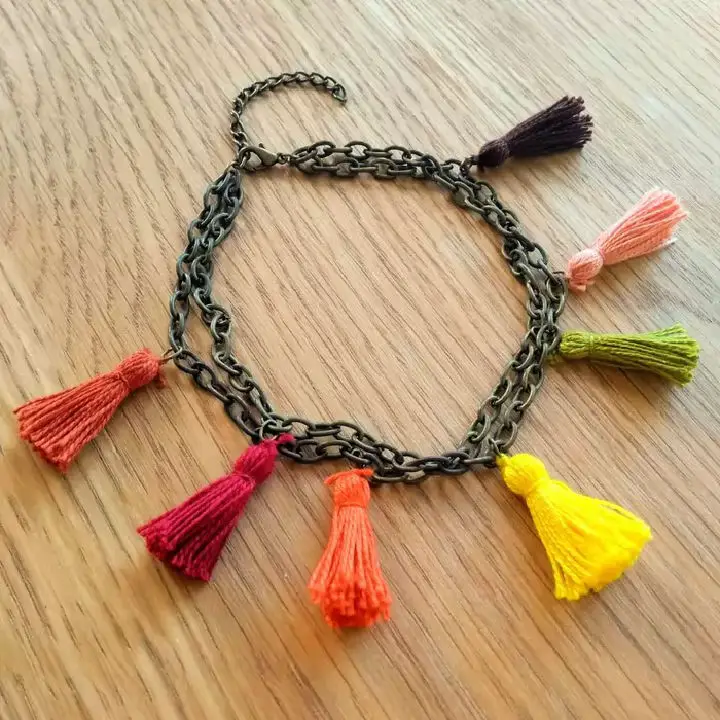
Looking for a stylish way to add some summer charm to your outfit? Why not try creating your own tassel anklet with Golden Age Beads Blog’s easy DIY guide? This fun project lets you customize your ankle adornment with colors and charms that reflect your personality. With our step-by-step instructions, you’ll be able to craft a unique accessory that’s perfect for sunny days at the beach or a casual evening out. From choosing the ideal chain length to attaching playful tassels, every detail is covered in this straightforward tutorial. So why not give it a try and show off your handmade anklet with confidence? The end result will be a beautiful piece of jewelry that you’ll love wearing.
DIY Gold Anklet With Beads for Girls
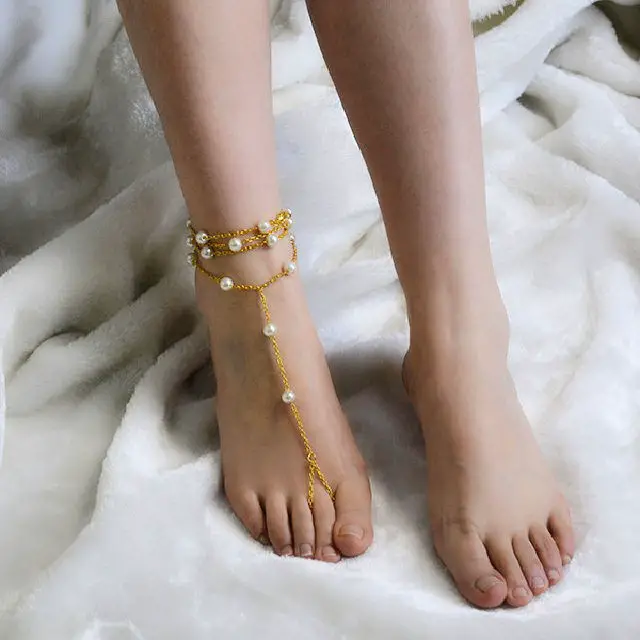
Crafting a gold anklet with beads can be a rewarding DIY project that allows you to express your creativity and showcase your personal style. To get started, gather the necessary materials such as 8mm pearl beads, golden cross chains, jump rings, and lobster claw clasps, which can be easily sourced from various craft stores or online retailers. Once you have all the required components, use basic tools like round nose pliers and side cutting pliers to assemble a beautiful piece of ankle jewelry. Our step-by-step tutorial is designed to guide you through each stage of the process, from forming a pearl- beaded chain to attaching the clasp, making it easy for anyone to create a stylish accessory for themselves or as a thoughtful gift for someone special.
Make Your Own Chain Ankle Straps
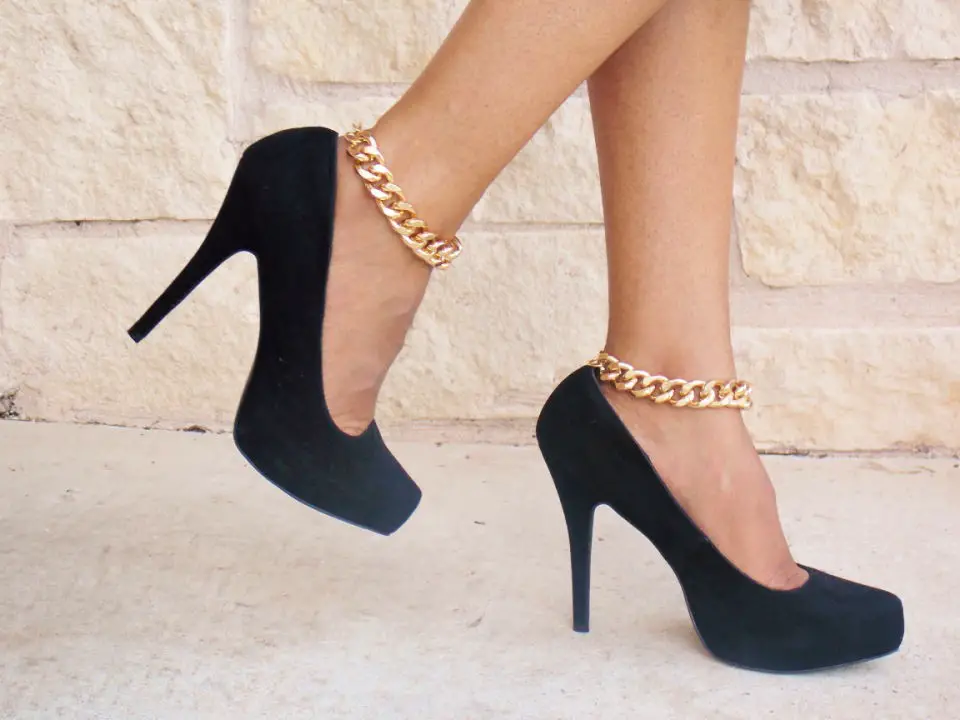
Give your footwear collection a unique touch by creating your own chain ankle straps. This effortless DIY project lets you add a sophisticated flair to your heels without breaking the bank. To get started, you’ll need 1/2 yard of large curb chain, a pair of pliers, four jump rings, and two lobster clasps.
Begin by measuring your ankles to ensure the chain fits comfortably around your ankle. Then, use the pliers to attach one end of the chain to a lobster clasp and the other end to a jump ring. Repeat this process for the second chain.
To wear, simply fasten the clasp to the jump ring on the opposite side. With these easy steps, you can quickly elevate any pair of pumps into a show-stopping accessory that’s sure to turn heads. At Why Buy it? DIY it, we’re all about empowering you to give your shoes an instant upgrade with this stylish and versatile adornment.
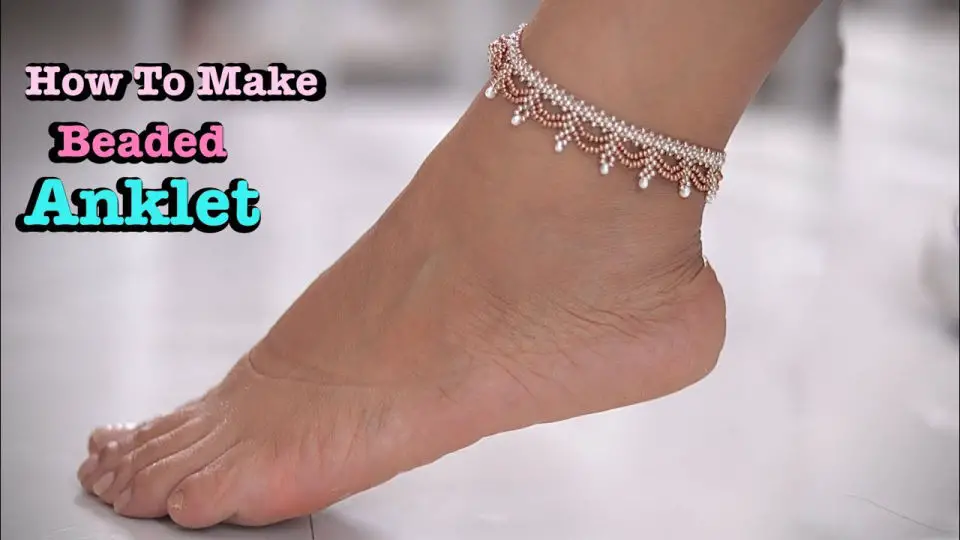
Making a Beach Anklet
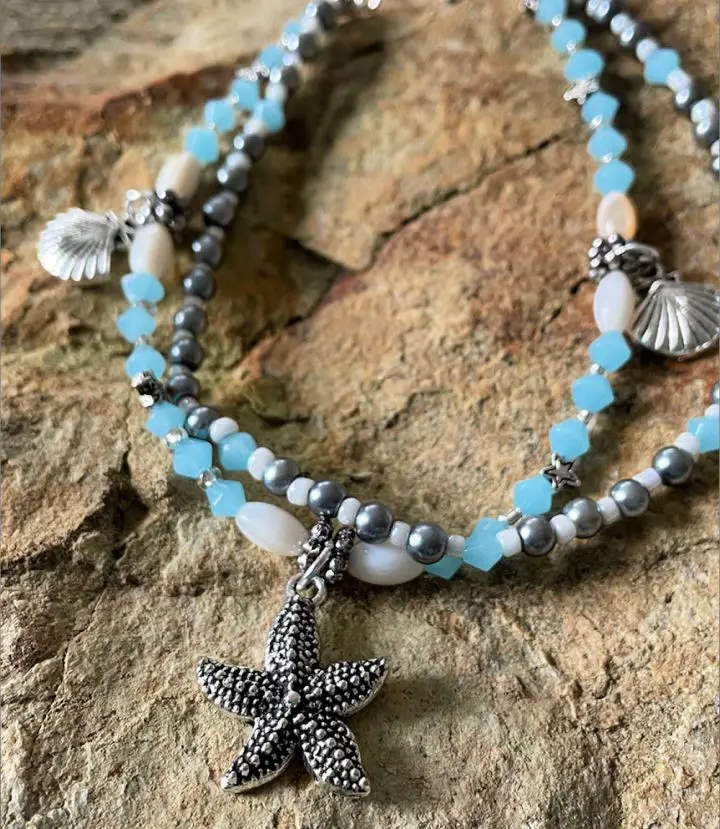
Indulge in the warmth of summer with a handmade beach anklet that perfectly complements your wardrobe. Our comprehensive guide provides a straightforward approach to crafting a unique ocean-inspired accessory using materials such as glass bicones, seed beads, and charming silver elements. As you follow our step-by-step instructions, you’ll discover how to create a beautiful piece that embodies the essence of the beach. Whether you’re looking to elevate your summer style or gift someone special, this DIY project offers a delightful crafting experience that’s sure to leave you feeling sun-kissed.
DIY Kumihimo Braided Anklet
Transform into a skilled Kumihimo braider with the help of Adventures of a DIY Mom’s insightful guide. By breaking down the intricate Japanese technique into straightforward steps, this comprehensive tutorial empowers you to create a stunning braided bracelet or anklet without feeling overwhelmed. All you need is some embroidery thread, a Kumihimo loom, and a small weight to get started. The guide provides clear instructions on calculating thread length, setting up your loom, and the braiding process, ensuring a smooth learning experience. Additionally, it offers valuable tips on finishing techniques to give your creation a professional touch. This engaging tutorial is perfect for crafting enthusiasts seeking to expand their skill set, making Kumihimo braiding an enjoyable and accessible hobby.
Simple DIY Anklet
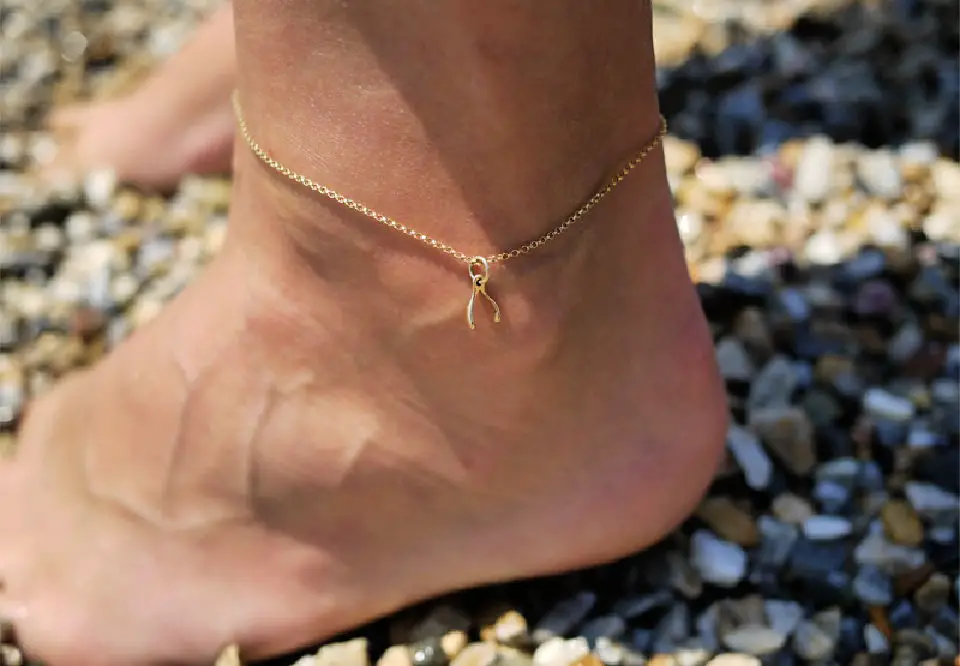
Elevate your summer style with a touch of personal flair by crafting your own elegant anklet using a simple DIY guide from Honestly WTF. This charming project requires just a few basic materials, including pliers, chain, a charm, and a clasp, making it perfect for those seeking to add a delicate finishing touch to their sandals or bare feet. The steps are refreshingly straightforward, and the adaptable method allows for the creation of stylish bracelets and necklaces as well. With these easy-to-follow instructions, you’ll be able to whip up a unique piece of handmade jewelry in no time, effortlessly elevating your warm-weather wardrobe.
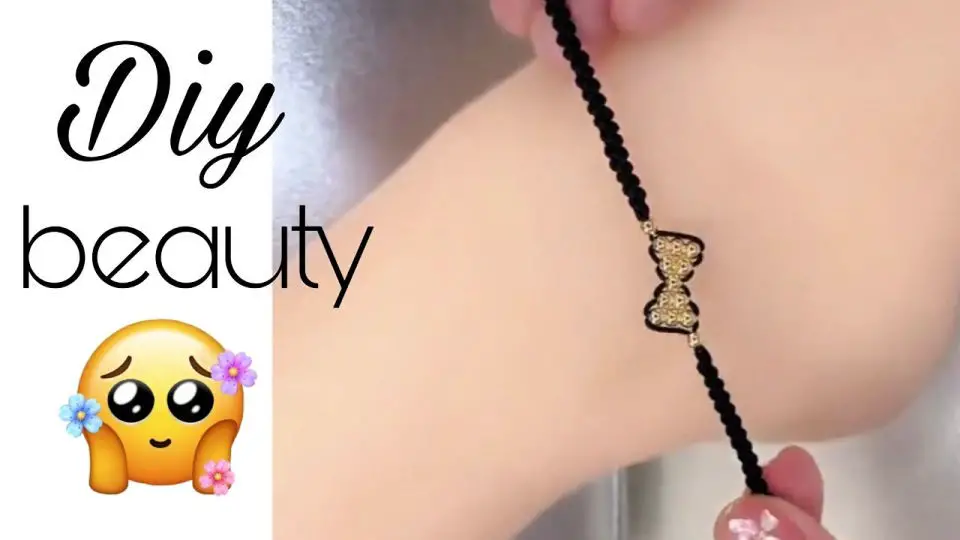
Making Black Thread Anklet
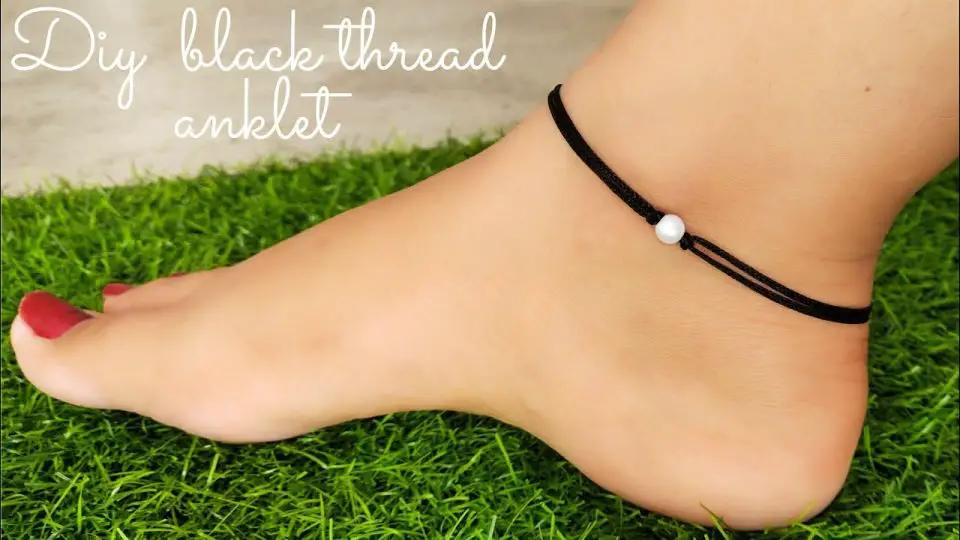
Crafting a DIY black thread anklet is an enjoyable and creative pursuit that lets you infuse your personal style with handmade charm. Building upon Jyoti’s World’s YouTube tutorial, this step-by-step guide empowers viewers to create their own unique piece using straightforward materials like nylon thread, scissors, and cello tape. With its engaging and easy-to-follow format, the tutorial is ideal for crafters eager to explore jewelry making. Throughout the process, each stage of anklet creation is meticulously detailed, from initial thread cutting to the final touches that impart a polished finish. The video’s crystal-clear visual and verbal instructions enable viewers to confidently follow along and produce a stunning result.
Easy to Make Anklet
YouTube offers a delightful tutorial on crafting a charming DIY anklet that adds a personal touch to your summer accessories. This easy-to-follow guide is perfect for anyone with an interest in handmade jewelry, as it walks you through the process of combining simple materials to create a dazzling piece that’s fit for royalty. With its engaging and instructive approach, the video ensures a pleasant crafting experience, whether you’re planning a beach day or a casual outing. This homemade anklet project is a creative way to elevate your look and add a unique touch to your warm-weather ensembles.
How to Make a Black Thread Anklet
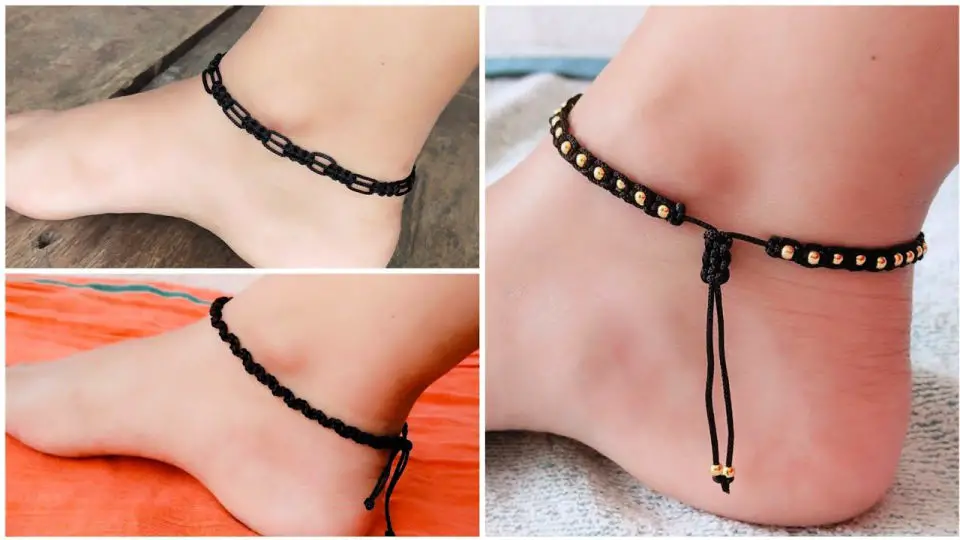
For those eager to craft a handmade black thread anklet, JyotisWorld’s YouTube tutorial stands out as a comprehensive guide that effortlessly conveys the intricacies of creating this accessory using minimal materials like nylon thread. The video’s step-by-step approach makes it an engaging and easy-to-follow resource for anyone looking to develop their crafting skills. By following JyotisWorld’s clear instructions, you’ll be able to create a stunning anklet that seamlessly integrates with any outfit, showcasing the versatility of this project. In addition to the tutorial, JyotisWorld’s website offers a wealth of creative ideas and resources to further enhance your crafting expertise.
Homemade Black Thread Anklet
Crafting handmade jewelry is a passion that brings joy to many. For those who relish in this hobby, creating an anklet at home can be a deeply fulfilling experience. One effective way to do so is by following YouTube tutorials, such as the detailed guide on crafting a black thread anklet. This process allows individuals to learn the intricacies of weaving and decorating their own unique piece using readily available materials. The benefits of this approach extend beyond the creative satisfaction it provides, as it also offers a cost-effective means of producing personalized jewelry that can be treasured by its maker or gifted to loved ones. Moreover, the step-by-step nature of these tutorials makes them accessible to newcomers to DIY jewelry, ensuring that anyone can achieve a stunning anklet with ease and take pride in their handiwork.
DIY Black Thread Anklet
If making unique jewelry is your passion, creating a black thread anklet can be an exciting project to tackle. The video tutorial by Jyoti’s World on YouTube is an excellent resource for anyone looking to craft their own beautiful black thread anklet from the comfort of their home. The tutorial provides a clear and detailed guide on what materials are required, including 1 mm nylon thread and golden pearls, making it easy to follow along. As you work through the video, you’ll learn how to thread beads, tie secure knots, and finish the anklet with a professional touch. What’s more, the techniques shared in the tutorial can be applied to other jewelry-making projects, allowing you to develop your crafting skills further. By the end of the tutorial, not only will you have a stylish new anklet to wear or give as a gift, but you’ll also have gained valuable experience and expertise that can be used on future creative endeavors.
Handmade Beaded Anklet
Crafting a personalized anklet is an excellent way to express your creativity while creating a meaningful addition to your jewelry collection. A DIY project of this nature allows you to infuse your unique style into the final product, making it a truly special piece that reflects your personality. YouTube’s Betchay’s Craft channel provides an invaluable resource for those looking to hone their jewelry-making skills by offering a step-by-step guide on how to create a beautiful beaded anklet from scratch. The tutorial is designed to be easy to follow, ensuring that even novice crafters can produce a stunning piece of jewelry with confidence. With the ability to customize your anklet’s color palette and bead selection, you’ll have the opportunity to put your personal touch on the final product. This engaging DIY project allows you to unleash your creativity while producing a one-of-a-kind accessory perfect for any occasion.
Conclusion
Ready to unleash your creative flair and craft one-of-a-kind DIY anklets? Our comprehensive guide presents 15 straightforward DIY projects, empowering you to create personalized accessories that reflect your unique style. From choosing the perfect beads to adding subtle yet striking details, crafting your own anklets has never been more approachable or delightful. Let inspiration strike, gather your materials, and begin designing anklets that add a distinctive touch to any ensemble. With our DIY expertise, get ready to turn heads with your handmade masterpieces!
