Crafting a DIY table is an exciting project that lets you tailor the size, shape, and design to fit your unique needs. To help you get started, I’ve gathered 20 free DIY craft table ideas and plans that are easy to execute at home. These simple projects will not only organize your crafting space but also provide inspiration for your next creative endeavor.As you begin this project, remember that careful planning and customization are crucial to achieving a successful outcome. Whether you’re looking to create a spacious workspace for multiple projects or innovative storage solutions to keep your supplies tidy, these plans are designed to be adaptable to your needs.Stay tuned for valuable insights on selecting eco-friendly materials, adding personal touches, and overcoming common challenges. With these tips and ideas, you’ll be well on your way to crafting a table that’s not only functional but also a reflection of your creativity.
How to Build a Craft Table – Step by Step
While building a DIY craft table with ample workspace and storage may seem like a daunting task, the right plan can make it achievable. With an 8-foot design in mind, you can create a spacious and organized crafting haven that meets your needs. Whether you’re looking to upgrade or establish a more efficient workspace, this guide will walk you through the process step-by-step. Let’s get started on turning your vision into reality!
Step 1: Planning Your Space and Materials
Before diving into the setup process, it’s essential to assess your storage needs and available space. This will help you determine the ideal dimensions of your craft table and guide your decisions regarding the type and quantity of cabinets and countertops required. In terms of cabinets, consider opting for pre-assembled base drawer units that can be easily installed, such as those offered at Home Depot or Lowe’s. For an 8 ft table, a combination of 18-inch and 30-inch (or 24-inch) cabinets provides a well-rounded storage solution. When it comes to the countertop, Ikea is a great resource for reversible designs that offer flexibility in your craft space. Make sure the chosen material complements or matches the color and style of your cabinets.
Step 2: Acquiring Your Materials
Before embarking on a home improvement shopping spree, take the initiative to research and plan ahead. Start by checking online inventories of local stores to confirm they carry the desired cabinets. Don’t be afraid to visit multiple locations to gather all necessary items under one roof. Additionally, consider your transportation options carefully. Ensure you have a reliable vehicle that can handle the weight and bulk of your purchases. To minimize the need for repeat trips, optimize your packing strategy by utilizing space-efficient techniques like removing moving blankets to accommodate larger or bulkier items.
Step 3: Preparing Your Space
To embark on a successful crafting journey, it’s essential to create an environment that fosters creativity and productivity. This begins with clearing the workspace of any obstacles or distractions. A clutter-free area allows you to visualize the setup and work safely, without worrying about tripping over cords or bumping into furniture. It may be necessary to relocate existing pieces or declutter the space to achieve this. Once the area is clear, it’s time to plan your layout. Think carefully about the positioning of your craft table and storage solutions. Consider how these elements will work together to facilitate a smooth workflow. By taking the time to layout your space thoughtfully, you’ll be able to create with ease and enjoy the process even more.
Step 4: Assembling Your Craft Table
When configuring your kitchen layout, the positioning of cabinets and countertops is crucial. To achieve a cohesive look, place your cabinets in close proximity to one another, ensuring they can support the countertop evenly and provide a seamless visual flow. As you install the cabinets, consider their arrangement according to your plan, taking into account factors like workflow, storage needs, and overall aesthetic appeal. Next, carefully place the countertop on top of the cabinets, factoring in any reversible design elements. For instance, if your countertop has a reversible finish or pattern, decide which side will complement your space best before finalizing the installation.
Step 5: Customization and Adjustment
To optimize your cabinet space, install custom shelves that cater to your unique storage requirements. This tailored approach enables you to make the most of your craft supply organization. Furthermore, take the time to fine-tune the setup by ensuring a seamless fit between the cabinets and wall, as well as a sturdy tabletop foundation.
Step 6: Organizing Your Workspace
To maximize storage efficiency, start by positioning essential items at a comfortable height, ensuring they’re easily accessible. Make the most of the space inside and atop your cabinetry to create a clutter-free zone. Meanwhile, consider incorporating thoughtful design elements or decorative accents that spark creativity and positivity in your workspace.
Video Tutorial
If you’re interested in creating a functional and spacious DIY craft table, I recommend checking out the step-by-step video tutorial on YouTube that demonstrates how to build an 8-foot long table with ample storage. The video, titled ‘Building my Craft Table with Tons of Storage | 8 ft DIY Table | Quick and Easy Build,’ provides a comprehensive guide for those looking to create their own custom craft table.
Customization Ideas for Your DIY Craft Table
Transforming a craft table into a reflection of your unique personality and a hub for your creative pursuits is an exciting endeavor. To get started, consider the following insights that will guide you in personalizing your DIY project.
Choose a Theme
To begin, choose a theme that sparks your creativity. This could be anything from vintage charm to bold modernity, rustic elegance to vibrant colorfulness. Allow your chosen theme to inform your decisions regarding paint colors, surface finishes, and decorative elements.
Paint and Finish
Transforming the appearance of your craft table can be achieved by applying a fresh coat of paint. For a distressed, vintage look, consider using chalk paint, while a high-gloss finish can give your table a sleek, modern aesthetic. To ensure your painted surface remains in pristine condition, be sure to top it off with a clear sealant to protect it from the rigors of frequent use and potential scratches.
Add Storage Solutions
When it comes to crafting, one of the biggest challenges is managing the multitude of small items that come into play. To stay organized and focused, consider incorporating storage solutions like drawers, shelves, or pegboards into your workspace. These tools will keep your supplies readily available yet discreetly tucked away, allowing you to work efficiently and minimize distractions.
Surface Options
When envisioning the ideal craft setting, consider the specific tasks that will be taking place at your workstation. For instance, if fabric manipulation is on the agenda, investing in a self-healing cutting mat can provide added protection and convenience. Conversely, when painting or applying adhesives, a glass-top surface could streamline cleanup processes, reducing the likelihood of messes and making for a more efficient workflow.
Lighting
To create an ideal environment for crafting, it’s essential to prioritize good lighting. A simple yet effective solution is to incorporate a lamp or LED strip lights under shelves into your workstation. These subtle additions can make a significant difference in enhancing the overall ambiance and helping you focus on your craft.
Personal Touches
As the finishing touches are applied to your workspace, it’s essential to infuse it with personality. This can manifest in various ways – for instance, incorporating decorative drawer knobs that reflect your unique style or opting for a plush, cushioned chair that provides unparalleled comfort and support while you work. By adding these personal flourishes, you’ll transform your space from a mere functional area into an extension of yourself, making it more enjoyable and productive to spend time in.
Eco-Friendly Options for Your DIY Craft Table
By integrating eco-friendly elements into your DIY craft table project, you’ll not only contribute to a healthier planet, but also infuse your handmade masterpiece with an added layer of distinctiveness. To achieve this harmonious blend of creativity and sustainability, consider the following strategies for incorporating environmentally conscious materials and techniques into your craft table design.
Choose Sustainable Materials
When choosing the primary material for your craft table, consider opting for recycled or reclaimed wood. This eco-friendly option not only benefits the environment but also imbues the table with a unique personality and history, making it a truly one-of-a-kind piece. Not to mention, the subtle imperfections and character marks on reclaimed wood can add an extra layer of visual interest and depth to your craft space.
Non-Toxic Finishes
Opt for eco-friendly finishes and paints that bear the labels ‘low-VOC’ or ‘non-toxic’. Not only do these products promote a healthier indoor environment for yourself and loved ones, but they also contribute to a more sustainable future by minimizing the release of hazardous emissions into your home and the atmosphere. This thoughtful choice not only benefits your well-being but also helps to reduce the environmental footprint.
Upcycle and Repurpose
Think twice before purchasing new materials for your craft project. Consider upcycling or repurposing items you already own to create a one-of-a-kind workspace. Old cabinets, doors, or shelves can be transformed into functional components of your craft table, minimizing waste and adding a touch of personality to your setup. By getting creative with what you already have, you’ll not only save resources but also cultivate a sense of pride and accomplishment in your DIY endeavors.
Energy-Efficient Lighting
When it comes to illuminating your crafting zone, consider opting for LED lights instead of their traditional counterparts. Not only do they consume significantly less energy, but they also boast a longer lifespan, ultimately transforming your creative haven into an eco-conscious sanctuary.
Decorate with Nature
Infuse your crafting sanctuary with the beauty of nature by incorporating organic decorations, such as potted plants or carefully arranged stones. Not only do these natural elements add a touch of elegance to your workspace, but they also have the ability to improve indoor air quality and promote a sense of calmness.
Troubleshooting Common Issues with DIY Craft Tables
If you’re embarking on a DIY craft table project, you may run into a few roadblocks. To get your creative journey back on track, consider this troubleshooting guide for addressing the most frequent challenges that arise when building your own bespoke workspace.
Wobbly Table
For a craft table to be effective, stability is crucial. Any instability can quickly turn a enjoyable creative session into a frustrating experience. To ensure your table remains sturdy, start by inspecting all joints and securing any loose screws or bolts. This simple step can make a significant difference in the overall stability of the table. Additionally, verify that the legs are evenly spaced and adjust their length as needed to maintain equilibrium. If one leg is shorter than the others, consider adding padding underneath it to prevent wobbling and ensure your creative space remains comfortable and productive.
Surface Damage
When working on craft projects, it’s not uncommon for your worktable to become scratched or discolored. To address these imperfections, start by lightly sanding the affected area to smooth out any rough spots. Once the surface is even, apply a stain or paint that matches the original color to restore its appearance. If the issue persists and the surface remains stained, try using a suitable cleaner to remove the discoloration. As a preventative measure, consider investing in a cover or wrap for your table that’s easy to wipe down and maintain.
Drawer Malfunctions
Minimizing frustration caused by sticky drawers involves tackling two key issues: ensuring proper closure and addressing any underlying causes. Firstly, consider applying a lubricant such as wax or soap to the drawer’s slides. This simple step can make a significant difference in its ability to open and close smoothly. Additionally, it’s essential to maintain a balanced load within the drawer, avoiding overloading that can put unnecessary strain on the slides. Furthermore, organizing the contents within the drawer can also contribute to improved functionality, making it easier for you to access what you need when you need it.
Lack of Space
When your craft space is feeling cramped, consider implementing a few simple solutions to maximize your usable area. One effective approach is to install hanging shelves directly above your worktable. These shelves not only provide additional storage but also help keep frequently used supplies within easy reach. For those occasions when you need more room, look into foldable extensions that can be easily pulled out and tucked away when not in use.
Maintenance and Care for Your DIY Craft Table
To ensure your DIY craft table continues to be a haven for creativity, it’s essential to maintain its condition. A well-maintained craft table is not only aesthetically pleasing but also efficient in supporting your projects. By following these simple steps, you’ll keep your workspace organized and inspire your next creative endeavors.
Regular Cleaning
To maintain the cleanliness of your work surface, make it a habit to wipe it down after each use. This will help prevent the accumulation of substances such as glue or paint. For everyday cleaning, opt for a damp cloth, while more stubborn stains can be tackled with a mild cleaner.
Protect the Surface
When handling scorching hot tools, such as glue guns, it’s crucial to take preventative measures to avoid damage. To achieve this, utilize coasters or protective mats that can withstand high temperatures. For added convenience and effortless cleaning, consider investing in a glass-top workstation or a removable mat that makes it easy to wipe away any debris.
Check for Wear and Tear
Maintaining a regular inspection routine is crucial in ensuring the longevity and performance of your equipment. This involves a meticulous examination of every component, searching for any signs of wear and tear. Check for loose screws, legs that are wobbly or unstable, and edges that are chipped or damaged. Make a note of any issues you find and address them promptly by tightening loose screws, applying glue to stabilize wobbly parts, or sanding down rough edges to achieve a smooth finish.
Avoid Excessive Weight
When setting up your DIY craft table, it’s crucial not to overburden its structure. To achieve this, store heavy items on lower shelves or in dedicated storage units, thereby distributing the weight evenly and minimizing the stress placed on the table. By taking these straightforward precautions, you can rest assured that your crafting space will remain sturdy and enjoyable for years to come.
FAQs About DIY Craft Tables
As crafters set out to create their own DIY craft tables, they often encounter uncertainty. To alleviate this ambiguity, we’ve compiled a comprehensive FAQ section, tackling the most pressing concerns and providing straightforward, trustworthy responses.
What is the best size for a DIY craft table?
When it comes to selecting the perfect size for a craft table, it’s essential to consider the available space in your home or workspace, as well as the types of projects you plan to work on. A good rule of thumb is to start with a table that measures around 60 inches in length and 30 inches in width. This provides an ample surface area for most crafting activities, allowing for comfortable working conditions and plenty of room to spread out your materials.
Can I use any type of wood for my craft table?
When it comes to selecting the perfect material for your project, you’ve got a range of options. If budget is a concern, plywood or Medium Density Fiberboard (MDF) are excellent choices, offering a cost-effective and sturdy solution. For added durability, consider investing in hardwoods like maple or oak, which can provide a robust and long-lasting surface.
How can I make my craft table more portable?
Elevate the mobility and versatility of your craft table by installing lockable casters on its legs. When selecting casters, ensure they are capable of supporting the weight of your table, guaranteeing a smooth and safe relocation process.
What’s the best way to protect the surface of my craft table?
When tackling projects that require precision cutting, consider investing in a self-healing cutting mat. This innovative tool allows for effortless retraction of cut lines, minimizing waste and saving you time and frustration. On the other hand, if your project involves painting or glueing, a silicone craft mat is an excellent choice. Its smooth surface provides a comfortable working environment, while its non-stick properties make cleanup a breeze, eliminating the risk of damaging your work surface.
How do I ensure my craft table is stable?
When it comes to building a sturdy structure, attention to detail is crucial. Ensure that every joint is thoroughly secured with glue and screws, and consider adding additional support with corner braces to enhance overall stability. Furthermore, conduct regular inspections to identify and promptly address any loose fittings, guaranteeing a solid foundation for your project.
Can I add storage to my craft table after it’s built?
Elevate the functionality of your space by incorporating clever storage solutions. Consider adding under-table drawers, side racks, or pegboards to cater to your unique requirements. Don’t be afraid to think outside the box and get creative with your design – after all, customization is key to maximizing your space’s potential.
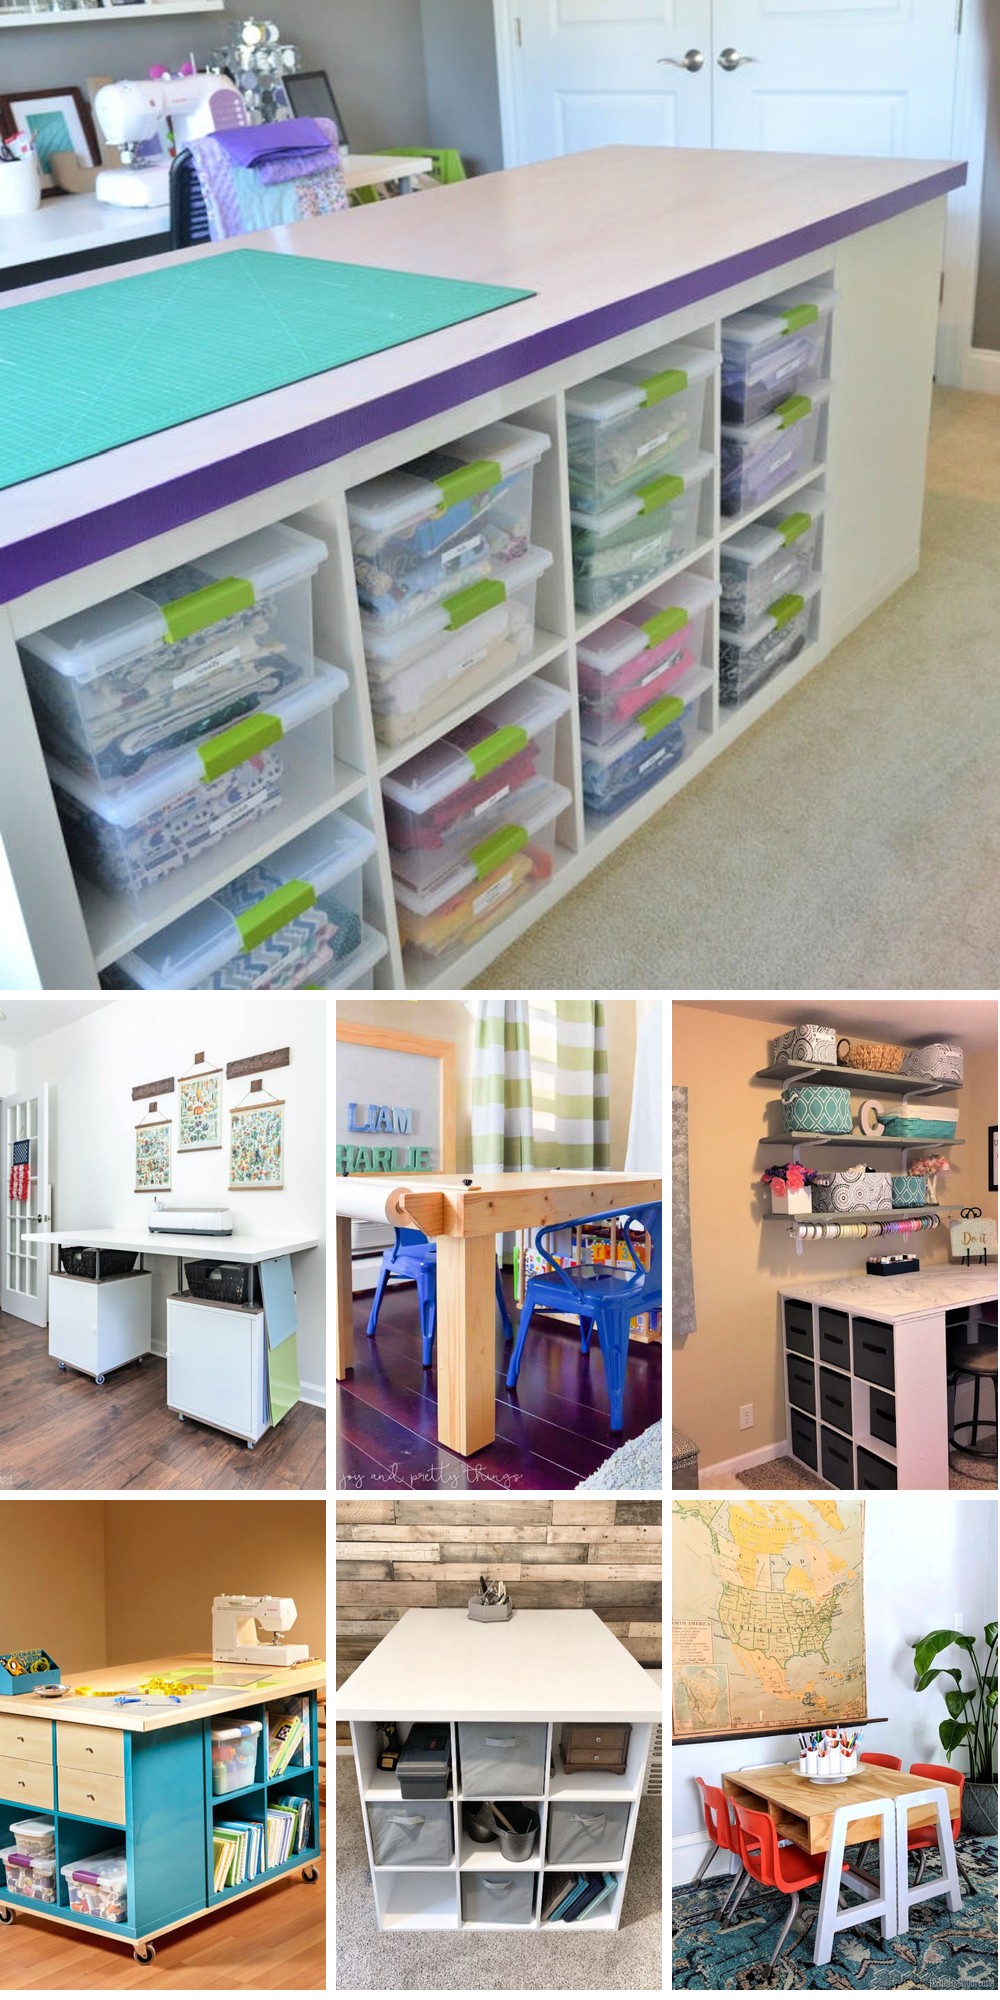
20 Easy To Make DIY Craft Table Plans
Transform your crafting experience with ease by creating a bespoke workspace using one of the many affordable and simple DIY craft table plans available. Choose from 20 unique designs to suit your style and needs, and get started on your next creative project today.
Building a Craft Room Storage Table
Transforming your craft room has never been more ingenious! Family Handyman presents an intermediate-level project that takes ready-to-assemble furniture to new heights, expertly merging affordability with customization. For a budget of $101-250, you can create a comprehensive worktable featuring a spacious surface, seamless storage for all your crafting essentials, and effortless mobility. The design masterfully stacks three storage units between a caster-equipped base and a sturdy plywood top, complete with attractive hardwood edging. Step-by-step instructions guide you through the cutting, assembling, and finishing process, ensuring a polished result that caters to your unique creative needs. With this versatile craft room solution, you can enjoy organized and stylish storage tailored specifically to your preferences.
DIY Plywood Projects
Unleash your creativity by exploring a vast array of DIY plywood project possibilities. From humble beginnings to stunning masterpieces, the world of DIY woodworking is full of limitless opportunities waiting to be discovered.
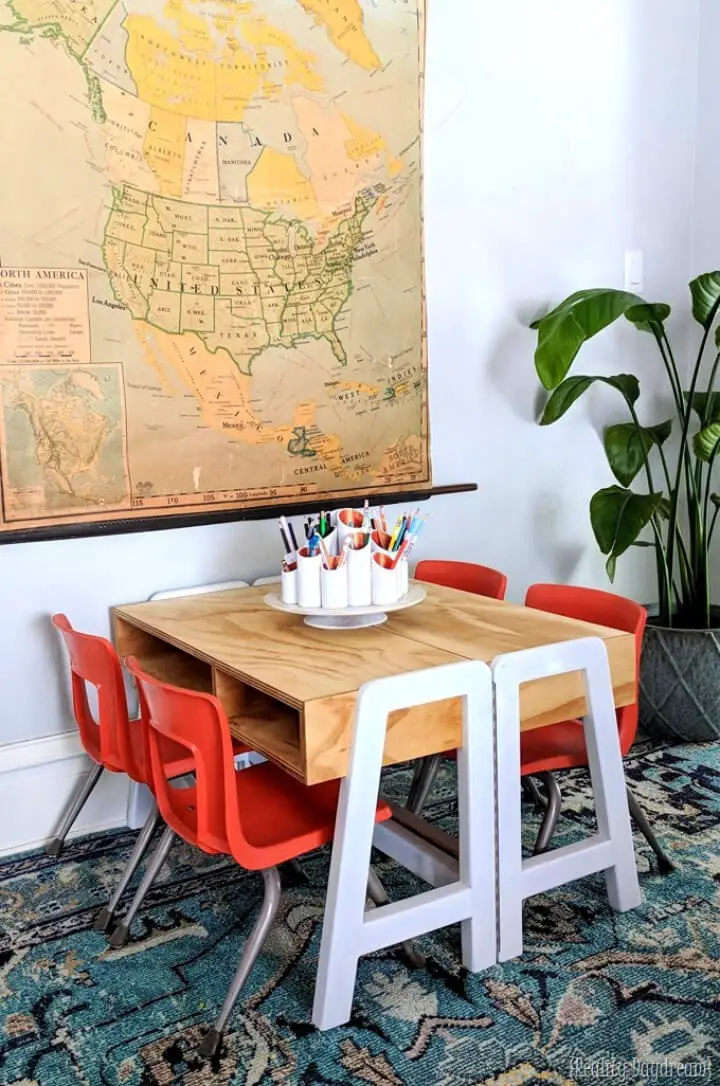
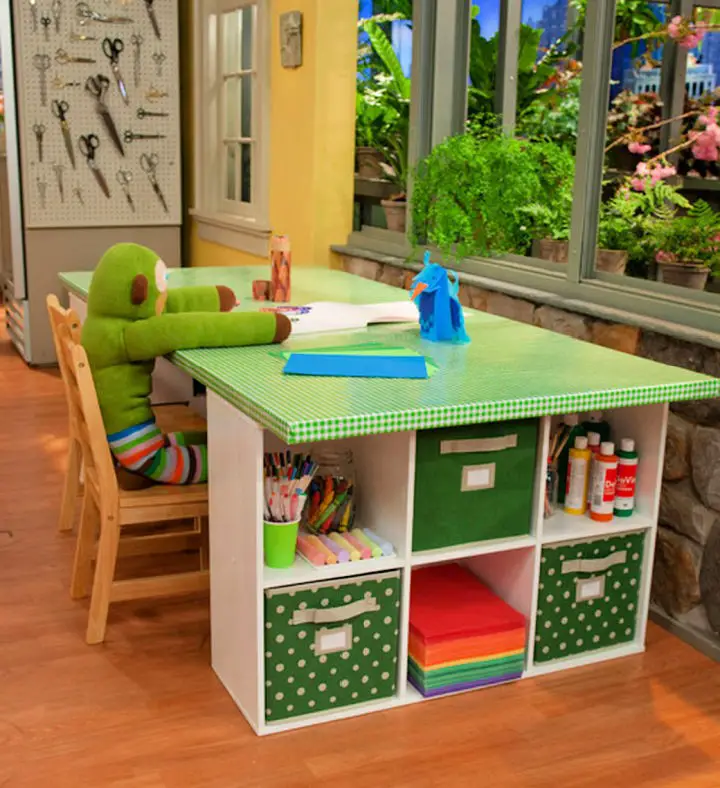
How to Make a Kids Craft Table
Creating a kid-friendly crafting table is an exciting DIY project that not only saves you money but also adds a personal touch to your home. By following a comprehensive guide, like the one offered by Making Joy and Pretty Things, you can construct a sturdy and multi-functional table perfect for little ones. This table features storage compartments for art supplies, such as coloring books and crayons, as well as a convenient paper roll holder for endless drawing and creativity. The guide is clear and detailed, making it suitable for those with intermediate DIY skills. By following the step-by-step instructions to assemble the tabletop, leg assembly, and other components, you can ensure a secure and polished finished product. Additionally, features like anti-slip feet keep the table in place even during the most enthusiastic art sessions. This crafting table is designed to be a space where your kids can explore their artistic abilities and keep their creative tools organized.
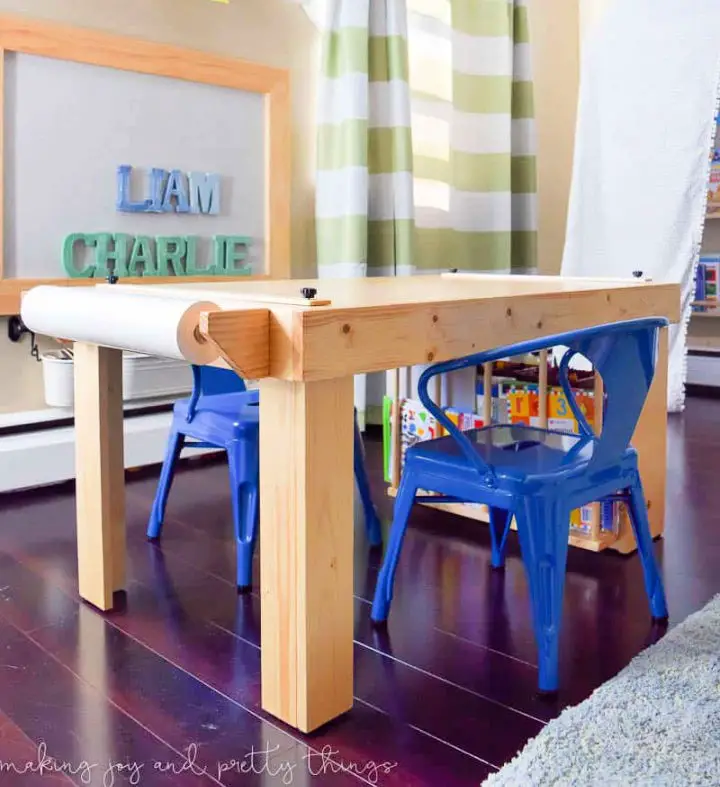
Convertible Kids Craft Table Building Plan
Imagination knows no bounds when kids have a versatile and fun craft table to express themselves. With Reality Daydream’s free building plans, you can create a convertible kids’ craft table that effortlessly transitions from a compact space-saver to a spacious art station. This comprehensive tutorial is designed to guide you through the DIY process with ease, providing a clear supply list and step-by-step instructions. As you bring this modern design to life, you’ll not only be creating a charming addition to any playroom but also building a sturdy piece of furniture that can withstand even the most energetic of kids. Get ready to unleash creativity and add a touch of style to your home with this innovative craft table.
Homemade Drop Leaf Craft Table
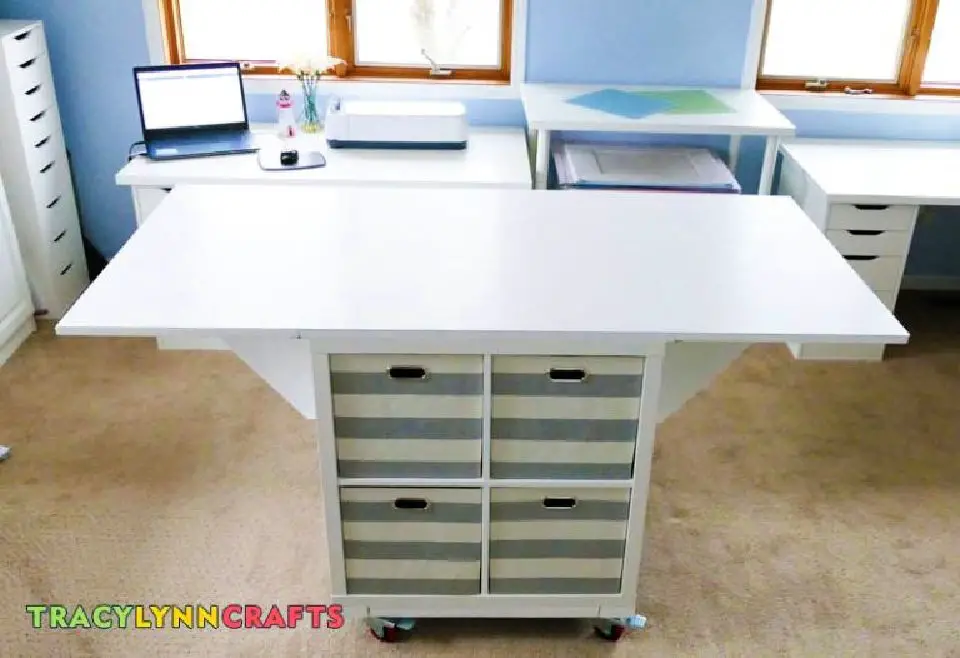
Transform your crafting space with ease by repurposing IKEA KALLAX units into a versatile DIY drop leaf craft table using Tracy Lynn Crafts’ step-by-step guide. This adaptable solution is perfect for dynamic creative environments that require flexibility. The tutorial takes you through the process of creating a functional table with foldable leaves and sturdy casters, allowing for easy reconfiguration to suit your needs. Whether you need to make space for guests or desire a central workstation, this mobile table ensures a seamless transition.The guide also provides practical advice on customization, ensuring that your craft table not only matches your height and workspace requirements but also seamlessly rolls through standard doorways. Ideal for crafters who require a large, flat surface, the thoughtful design includes an added PVC layer for durability, guaranteeing a long-lasting and visually appealing craft area.
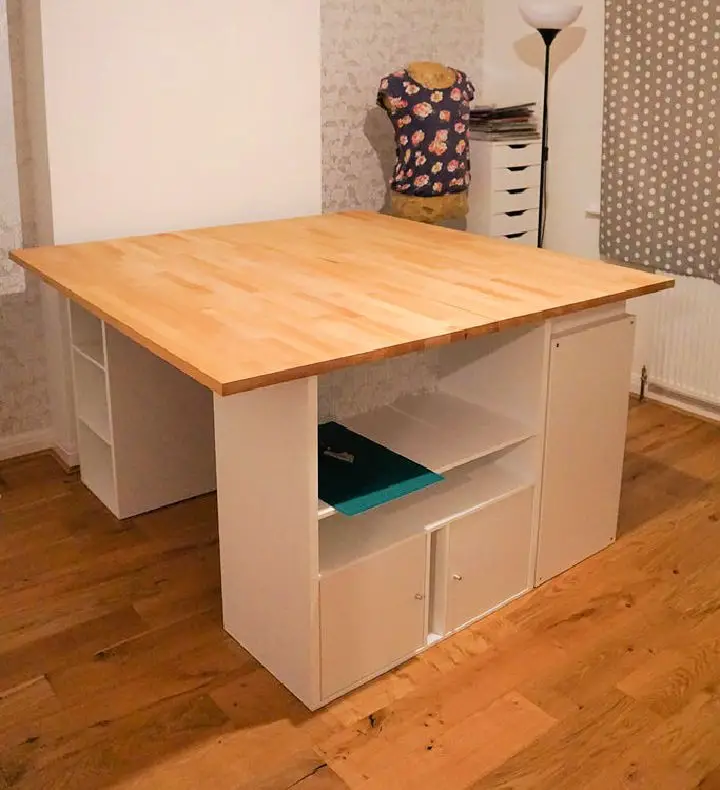
Large DIY Craft Table With Details Instructions
Transforming your space into a craft haven can be a thrilling DIY adventure. For those seeking an expansive and organized workspace, Infarrantly Creative provides a comprehensive guide to building a massive craft table measuring nearly 40 square feet. This ‘craft island’ combines functionality with simplicity, featuring a sturdy base and white laminate surface that can be customized to fit your room’s aesthetic. With a suggested height of 36 inches, the table accommodates various crafting activities, such as drafting or sewing. Moreover, it includes accessible storage solutions suitable for both adults and children, making it a versatile addition to any creative studio. Prepare to create a personalized haven where creativity can thrive.
Make a Craft Room Cutting Table
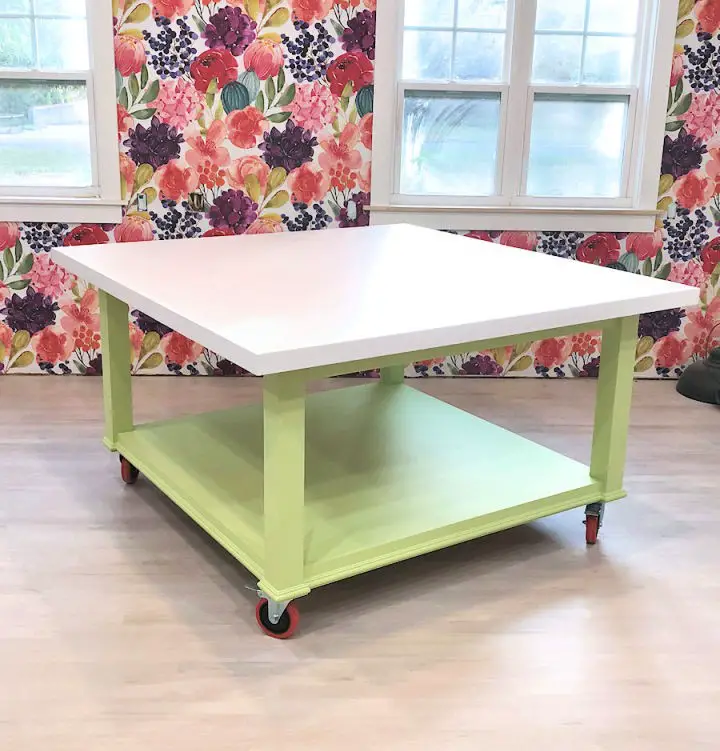
Building a DIY craft room cutting table is an exciting project for crafty individuals. Kristi Linauer’s comprehensive guide on Addicted 2 Decorating provides a step-by-step approach to constructing a large, sturdy worktable perfect for various projects. The post delves into material selection, construction process, and personal touches like vibrant green paint to harmonize with the studio space.Kristi shares practical tips throughout her instructive content, including adding a professional finish with cabinet trim and installing casters for effortless mobility. Her engaging narrative is accompanied by helpful videos, making it easy for readers to follow along and achieve a durable and cheerful work surface that elevates any creative workspace.
Easy DIY Craft Table on a Budget

Creating an efficient and organized craft space is crucial for anyone who enjoys DIY projects. The DIY Craft Table guide from Hometalk offers a practical solution to clutter by transforming a spare room into a functional creative area with ample storage. This budget-friendly approach uses easily sourced materials such as cube organizers, maple plywood, and peel-and-stick vinyl tiles. With step-by-step instructions and a helpful video for visual learners, this DIY project is an ideal weekend activity that yields a sturdy and stylish craft table perfect for any crafting enthusiast. The result is a workspace that can be enjoyed for years to come.
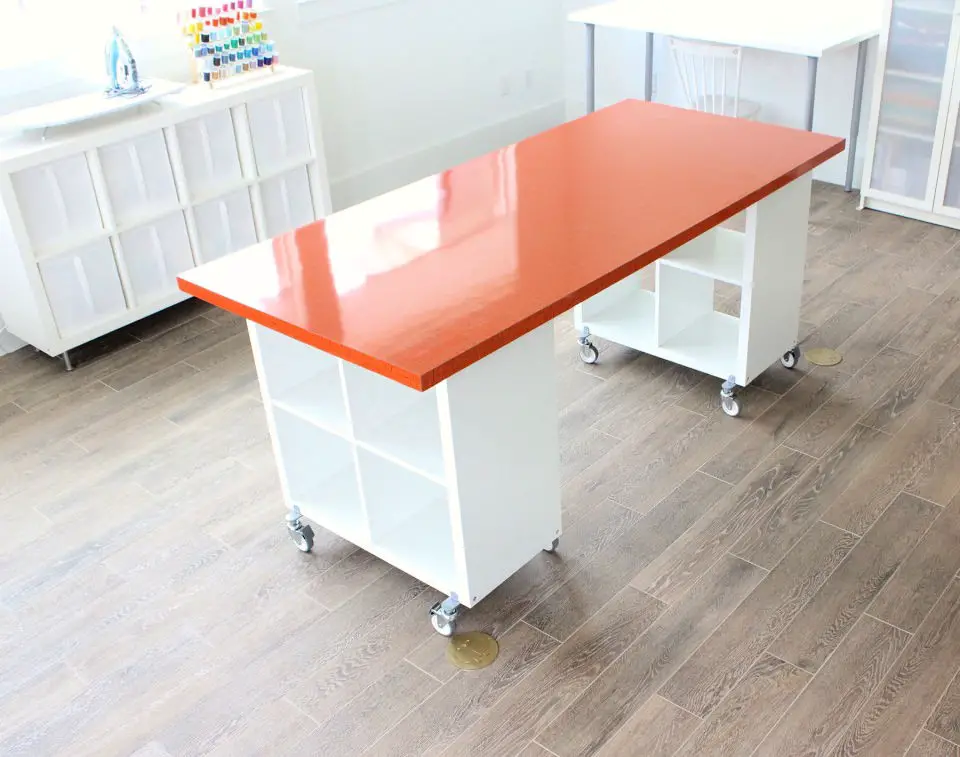
Ikea Craft Table Hack
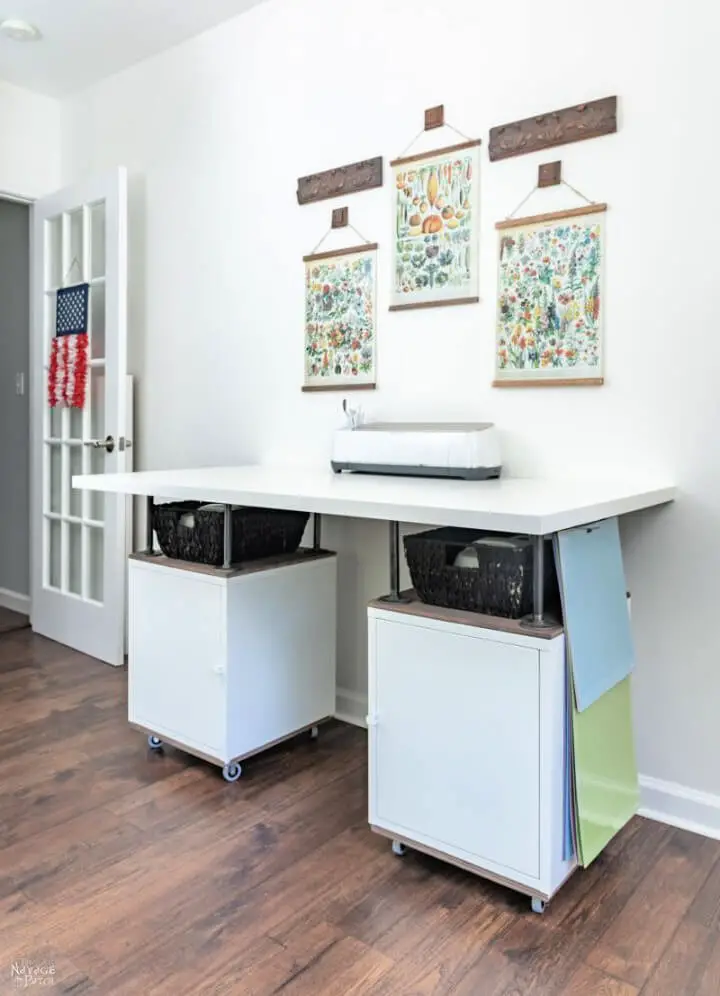
Creating a functional and spacious craft table is an exciting DIY project that can be achieved with affordable IKEA products and a bit of ingenuity. The Navage Patch has shared a brilliant hack that provides ample workspace for Cricut projects, as well as generous storage for materials and accessories, making it a must-have for dedicated crafters.
This guide shows you how to construct a stylish and practical craft station on wheels using simple tools like metal storage cubes, a composite tabletop, and some creative staining. The result is a sleek addition to your crafting area that’s not only functional but also easy to rearrange whenever needed.
By following this DIY solution, you can keep your space organized and your creativity flowing, making it the perfect setup for any crafter looking to elevate their workspace.
Barn Wood Industrial Work Table
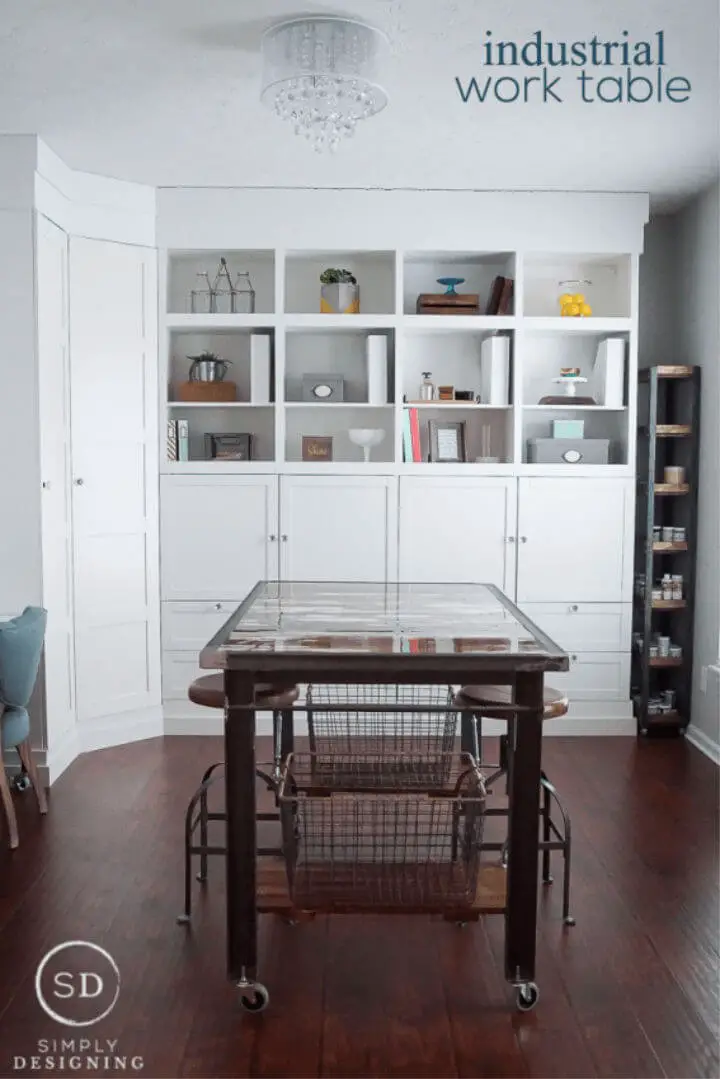
For those who crave the harmonious union of rustic charm and industrial edge, Ashley’s latest DIY endeavor offers a comprehensive guide to crafting an Industrial Work Table from reclaimed barn wood. This versatile creation seamlessly fuses the weathered beauty of distressed wood with the sturdiness of metal accents, making it perfect for a range of projects. By combining Ashley’s step-by-step instructions with valuable insights gleaned from her own creative space, this project becomes both accessible and fulfilling. Through her walkthrough, you’ll learn how to effectively clean and prepare the wood, construct a sturdy base, apply a durable finish, and even incorporate functional shelving, ensuring your new table serves not only as a stylish centerpiece but also a practical addition to your workspace.
Building Your Own Craft Table
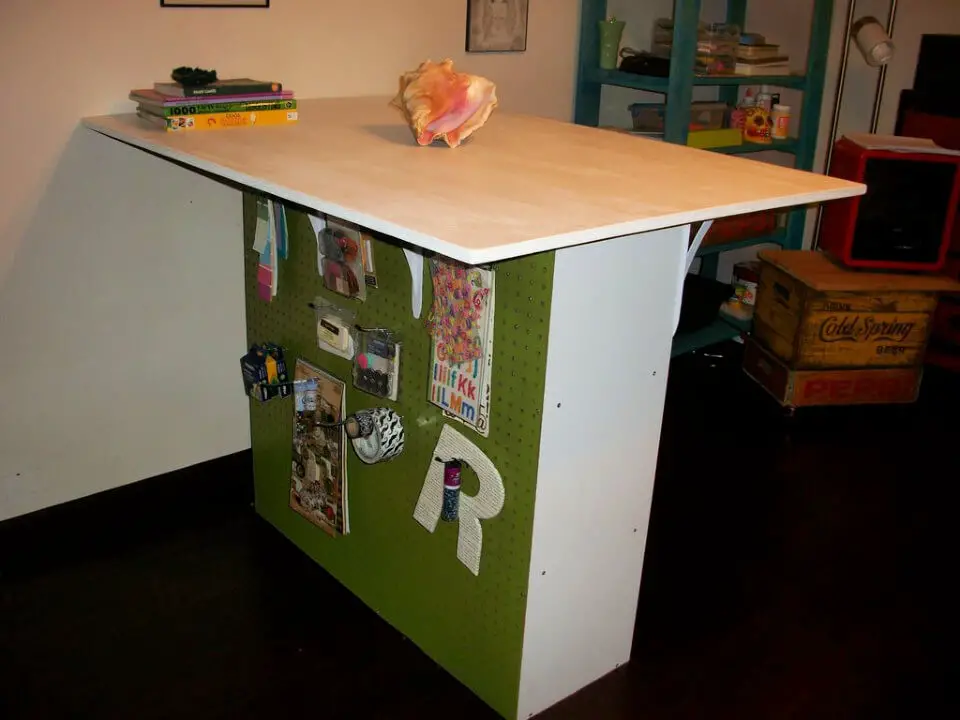
Transform your creative space by repurposing an ordinary storage cubby into an extraordinary craft table. This DIY project combines stability with style, thanks to a step-by-step guide from Instructables. To get started, gather materials such as MDF, pegboard, paint, screws, and optional casters for added mobility. Begin by sizing up your components and adding a personalized touch with paint. Next, secure the pegboard to the back of the cubby, reinforcing its stability. If desired, attach casters for effortless movement around your workspace. Then, install brackets and attach the tabletop, ensuring ample space for your creative endeavors. Finally, accessorize with pegs and custom storage boxes to keep your materials organized and clutter-free. With these clear instructions, you’ll be all set to dive into crafting on your new, one-of-a-kind table.
Vintage Industrial Cart Inspired Craft Table
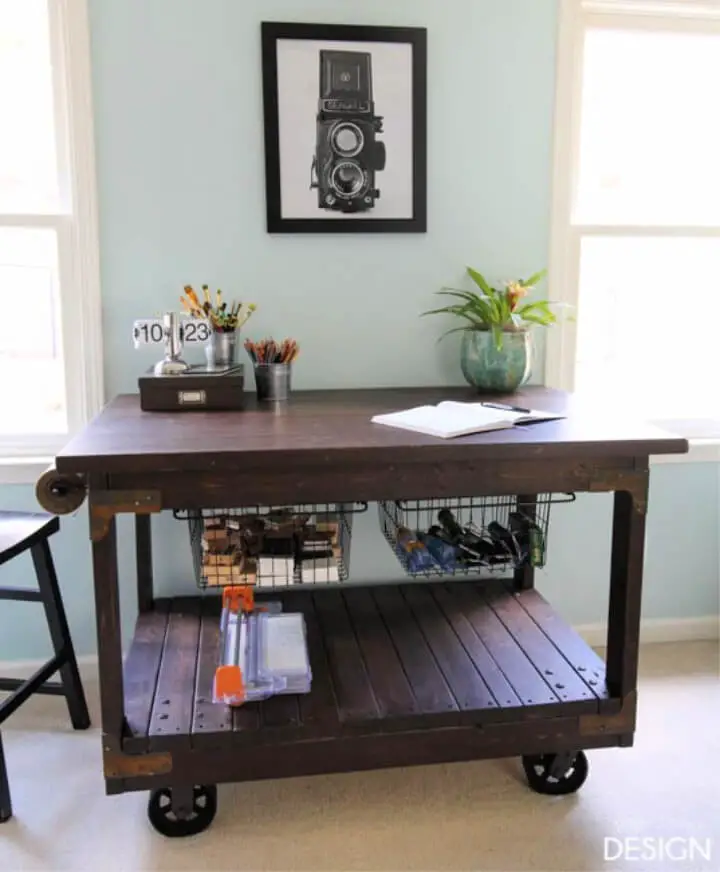
For those who are passionate about crafting, creating a versatile workspace that seamlessly blends functionality and style can be a dream come true. The Vintage Industrial Cart Inspired Craft Table project from Deeply Southern Home offers a unique opportunity to bring this vision to life. This DIY guide provides detailed instructions on how to construct a sturdy, movable craft table that exudes the charm of vintage industrial design using affordable materials and a reliable workbench kit from Simpson Strong Tie. Not only does this project provide ample space for various crafting activities, but it also incorporates smart storage solutions such as sliding baskets and a craft paper roll, making it an ideal choice for those who value convenience. By engaging in this fulfilling project, you can transform your crafting area into a functional and aesthetically pleasing space that reflects your personal style.
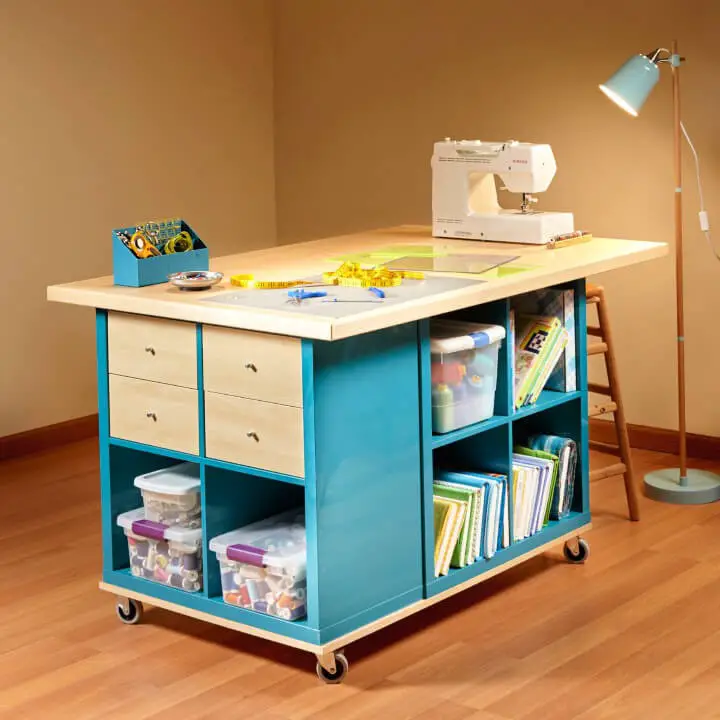
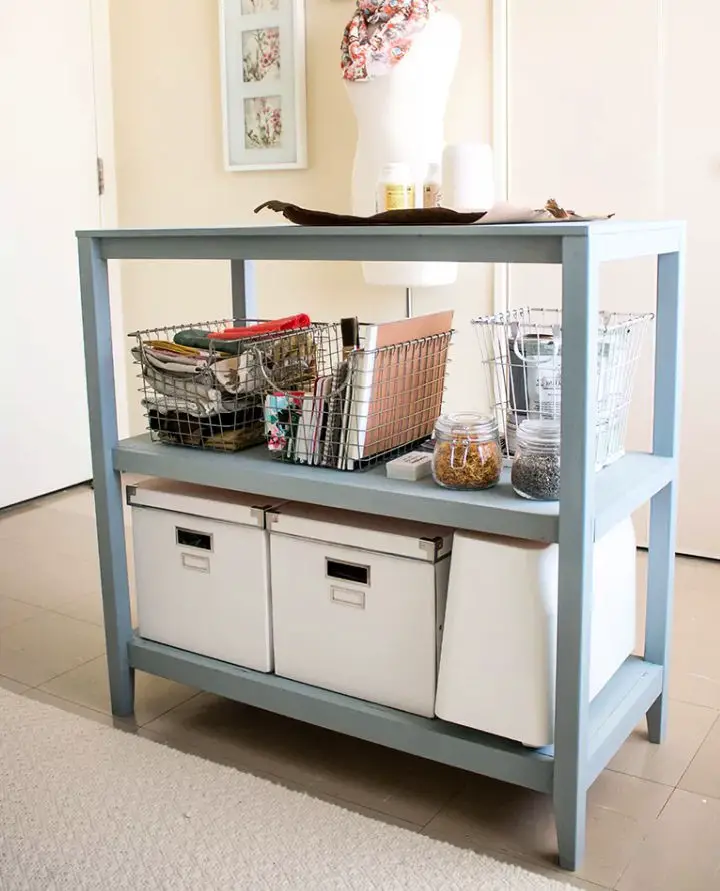
Make a Counter Height Craft Table
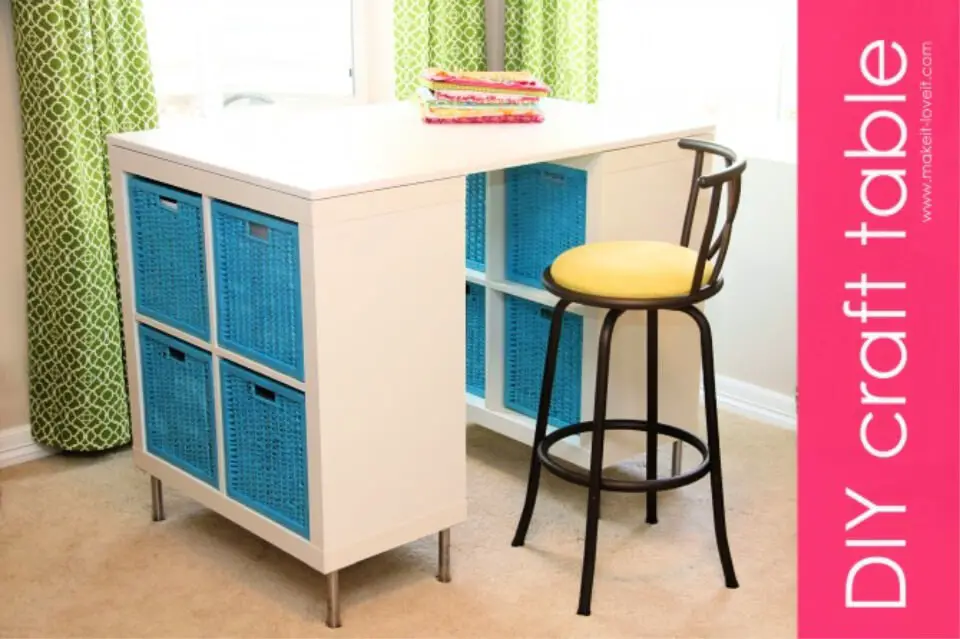
Elevate your crafting experience with a custom-built counter-height craft table that strikes the perfect balance between functionality and affordability. By combining two cube shelves, a tabletop, and optional legs for added height, Ashley Johnston from Make It & Love It shows you how to create a versatile piece that’s ideal for crafting enthusiasts seeking a spacious work area that eliminates the need for stooping. This DIY table also offers ample storage, making it perfect for a home craft room or dedicated spot for all your creative endeavors. The adaptability of this project allows it to seamlessly integrate into any crafter’s haven, providing a personalized and efficient space for all your crafting needs. For a step-by-step guide on building this craft table, including cost-effective purchasing tips, visit Make It & Love It and discover how you can create a budget-friendly addition to your crafting sanctuary.
How to Build a Crafting Table
Transform your creative space into a haven of organization and inspiration with this DIY crafting table project, inspired by Paige Hemmis’ Hallmark Channel tutorial. To create this functional and stylish workspace, start by building the foundation on a plywood base, then add adjustable legs that can be easily adjusted to suit your needs. Next, attach pre-assembled bookcases to provide ample storage for your materials and supplies. The pièce de résistance is the addition of a pre-cut butcher block top, which adds a touch of warmth and elegance to the overall design. To ensure everything stays in place, secure the butcher block from underneath with confidence. Finally, personalize the shelves to reflect your unique style and make the space truly yours. This crafting table is the perfect solution for keeping all your creative essentials organized and within reach, adding a welcoming atmosphere to your dedicated workspace.
Huge Sewing Table for Craft Room
A customized sewing table with ample storage can elevate any craft room to a new level of functionality and style. One excellent resource for building such a masterpiece is Instructables’ comprehensive guide on constructing a spacious sewing table that seamlessly integrates storage solutions for those pesky, irregularly shaped crafting supplies. By following the step-by-step instructions, DIY enthusiasts can utilize straightforward materials like MDF, an IKEA Kallax unit, and common hardware to craft a sturdy, roomy, and tailored piece of furniture that meets their specific needs. This engaging project not only yields a customized sewing table but also provides a sense of accomplishment and satisfaction as you transform your crafting space into a well-organized haven.
How to Make Your Own Craft Table
For those seeking the ultimate crafting haven, this comprehensive guide provides a straightforward path to constructing a versatile Craft Table. Say goodbye to cluttered workspaces and hello to a multifunctional station that can be adapted for various purposes – from a craft supply organizer to a kitchen island or display for entrepreneurial ventures. The instructions are presented in a clear, step-by-step format, ensuring that even those with basic DIY skills can create a robust and custom craft table. With a thorough list of required tools, materials, and precise cut lists, you’ll have everything needed to transform your space into a practical and stylish haven. As you dive into these plans, you’ll not only solve storage issues but also ignite creativity in your crafting area.
Making Your Own Craft Table

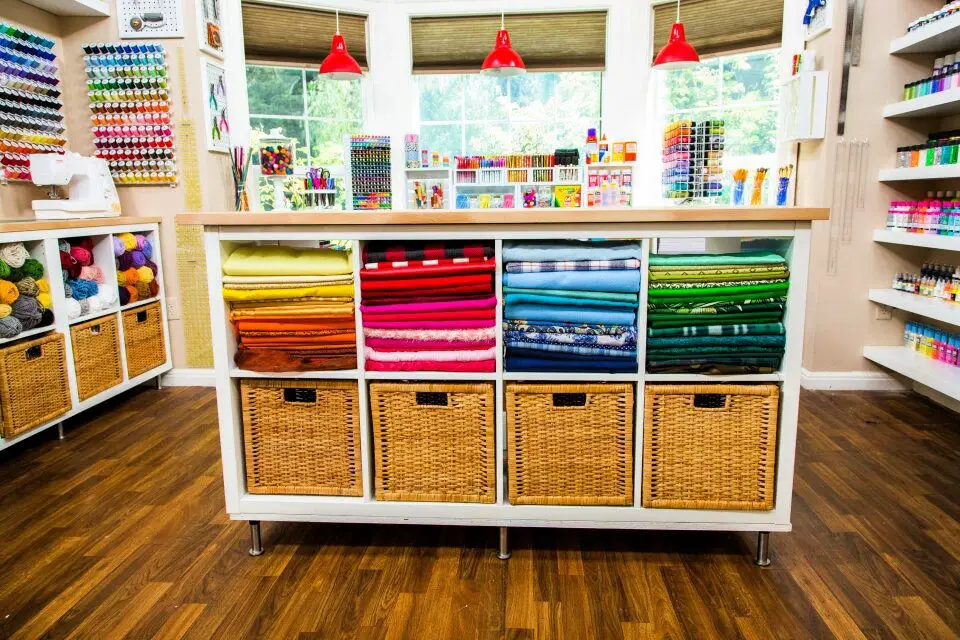
Transforming your crafting experience with a well-designed craft table can be nothing short of revolutionary. For those who are passionate about creating, having a dedicated space that sparks inspiration and creativity is essential. Fortunately, resources like De Jong Dream House’s DIY Craft Table guide provide comprehensive walkthroughs to help you achieve this goal. By choosing the right furniture pieces, such as Ikea’s Expedits for ample storage, and selecting a sturdy tabletop for your projects, you can create an inviting workspace that enhances productivity and enjoyment. Practical tips on organizing materials and tools ensure everything is within reach, allowing for an uncluttered and inviting space that makes crafting a true joy. With a tailored craft table, you’ll be able to focus on what matters most – bringing your creative vision to life.
Formica Craft Table With Wheels
Transform your creative space into a vibrant hub with the ultimate guide to crafting a home art table using Formica. Dive into the world of color selection, where personality meets practicality. Discover how incorporating IKEA shelves as sturdy legs can add stability and style to your studio. With its versatility and ease of cleaning, Formica becomes an ideal choice for creating a functional and visually stunning centerpiece that not only reflects your artistic flair but also withstands the demands of daily use. This engaging walkthrough is designed to inspire you to create a unique space that fuels your creativity and serves as the perfect platform for all your artistic pursuits.
DIY Crafting Table – Step by Step Instructions
Elevate your crafting experience with a truly unique workspace by merging cube organizers with an upcycled door. This innovative project, inspired by Martha Stewart’s creative genius, transforms ordinary items into a dynamic and functional hub for all your crafting endeavors. Begin by draping oilcloth over the hollow- core door to create a durable and easy-to-clean surface. Next, utilize storage units as the foundation for effortless organization, allowing you to effortlessly store and retrieve materials as needed. This eye-catching table is perfect for injecting a splash of color and structure into any crafting area. By following the straightforward instructions, you’ll be able to craft a both inspiring and efficient focal point that will serve as the heart of your creative space.
Handmade Craft Table and Pegboard
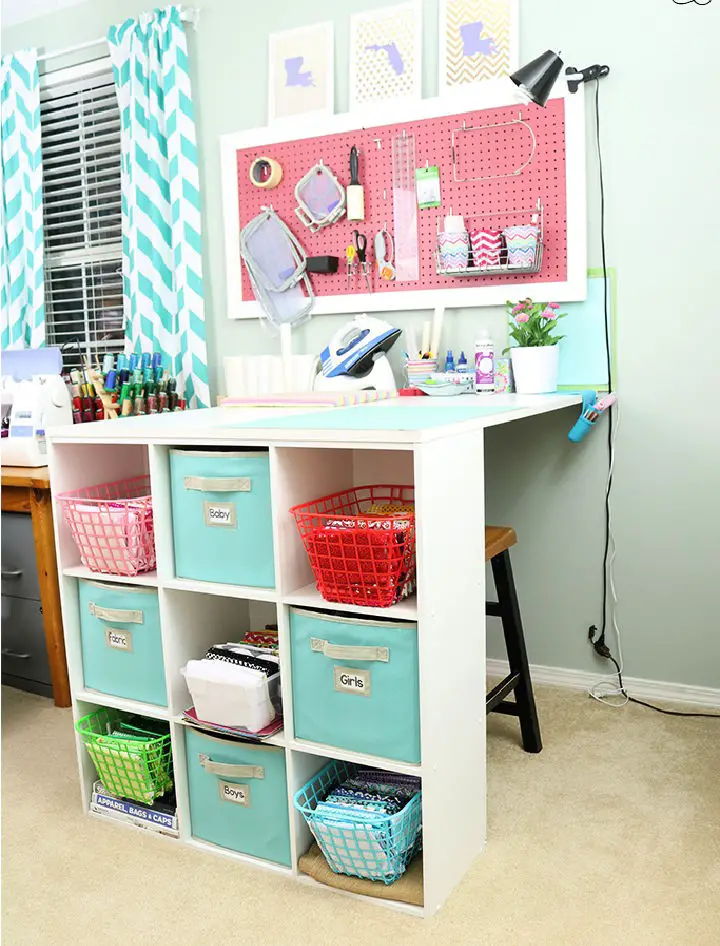
Transform any small space into a cozy and efficient crafting haven with Karlie Belle’s DIY craft table and pegboard guide. This comprehensive guide shares practical wisdom for building a customized craft table using a ClosetMaid Cubeical Organizer, melamine board, and L brackets, ensuring a seamless fit for your room’s unique dimensions. The guide also provides a step-by-step approach to setting up a functional pegboard that keeps your crafting essentials within arm’s reach. By utilizing simple materials like wood strips, screws, and trim, you’ll be able to create a space that inspires creativity and keeps your favorite tools at the ready. With clear instructions and expert tips for organizing tools and supplies, Karlie Belle’s walkthrough is an invaluable resource for anyone seeking to streamline their crafting area.
How to Make a Craft Table at Home
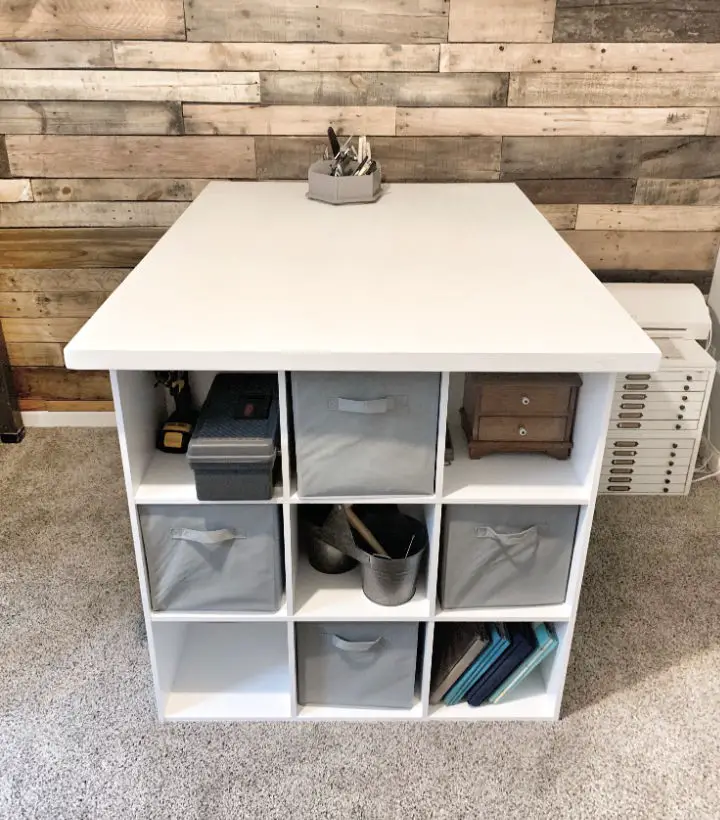
For crafty individuals seeking to create an organized sanctuary for their artistic pursuits, Ashley Diann Designs provides a comprehensive DIY guide to building a custom craft table. This innovative project not only furnishes a dedicated space for crafting but also incorporates clever storage solutions to keep supplies effortlessly within reach. By combining the sturdiness of 9-cube organizers with a spacious MDF work surface, the design caters to a variety of activities, from sewing and painting to standing desk applications. The adjustable table height ensures both sitting and standing preferences are accommodated, allowing for ultimate flexibility in your creative workflow. Ashley Diann’s engaging and instructive approach makes it easy to replicate this functional craft space, ultimately streamlining your creative process and boosting efficiency.
Conclusion:
Mastering the art of building a craft table from scratch is a highly rewarding experience that elevates your overall crafting process. Our comprehensive guide takes you through every step, from conceptualizing your ideal workspace and selecting materials to adding personal touches of customization. By incorporating eco-friendly elements, not only do you contribute to a more sustainable environment but also infuse your DIY project with a unique flair. With our expert guidance, you’ll be well-equipped to overcome common challenges and maintain your craft table’s functionality and aesthetic appeal over time. As you embark on this creative journey, remember these essential steps and tips to ensure the perfect blend of form and function.
