
If you’re looking for ways to make your graduation cap truly unique and reflective of your personality, our comprehensive guide is here to help. We’ve curated 15 creative DIY ideas and decoration options that will inspire you to create a one-of-a-kind cap that showcases your academic achievements, future aspirations, or cultural heritage. From simple yet thoughtful designs to more elaborate creations, our guide covers it all. But that’s not all – we also delve into practical considerations like budgeting and sustainability, ensuring that your DIY project is both cost-effective and environmentally friendly. Whether you’re looking for a way to make a statement or simply want to add a personal touch to your graduation celebration, our guide has got you covered.
How to Make a Paper Graduation Cap for Kids
Celebrating academic milestones with DIY flair! Graduation marks the culmination of a remarkable chapter in one’s life, and it’s even more special for kids as it commemorates their intellectual growth in a playful and lasting way. What better way to make this momentous occasion truly unforgettable than by crafting a one-of-a-kind graduation cap? This hands-on project not only encourages creativity but also instills pride in the young graduate’s accomplishments. With a simple, step-by-step approach, anyone can create a paper graduation hat that perfectly captures the joy and excitement of this milestone. This inspiring DIY endeavor is influenced by the creative expertise of Ms. Arjuna Art and Craft, committed to delivering an engaging craft experience for all ages.
Materials Needed:
Step-by-Step Guide:
To create your DIY graduation cap, start by preparing the base. Measure the child’s head and use black chart paper to create a band that fits comfortably around their head. Next, form the top of the cap by cutting a 12×12 inch square from the same chart paper – adjust this size based on the headband measurement. Attach the top to the base using glue or tape, ensuring it is centered for symmetry. Then, move on to crafting the tassel. Cut a 20-inch length of woolen thread and fold it in half several times until you have a small bundle. Tie one end together with a loop for attachment and trim the opposite end to create fringes. Adjust the tassel’s length to your liking. Once the tassel is complete, attach it to the center of the top square using glue or tape. Finally, adjust the tassel so that it hangs off one corner of the cap and double-check all glued parts for security.
Video Tutorial
To commemorate their academic achievements, consider crafting a DIY graduation cap with your child. Ms. Arjuna Art and Craft’s YouTube tutorial provides a comprehensive visual guide to making a paper graduation hat, which can be easily followed alongside this written guide. The result is an engaging and easy-to-follow crafting experience that yields a unique keepsake celebrating their educational journey. With minimal materials like black chart paper and woolen thread, you’ll create a memorable memento that honors your child’s hard-earned accomplishments.
Personalization Ideas for Your Graduation Cap
As graduates mark this significant milestone in their lives, making their caps a reflection of their individual journeys can elevate the celebration to new heights. To inspire creativity and self-expression, here are innovative ways to personalize a graduation cap, ensuring it stands out as a one-of-a-kind representation of each graduate’s unique story.
Reflect Your Major
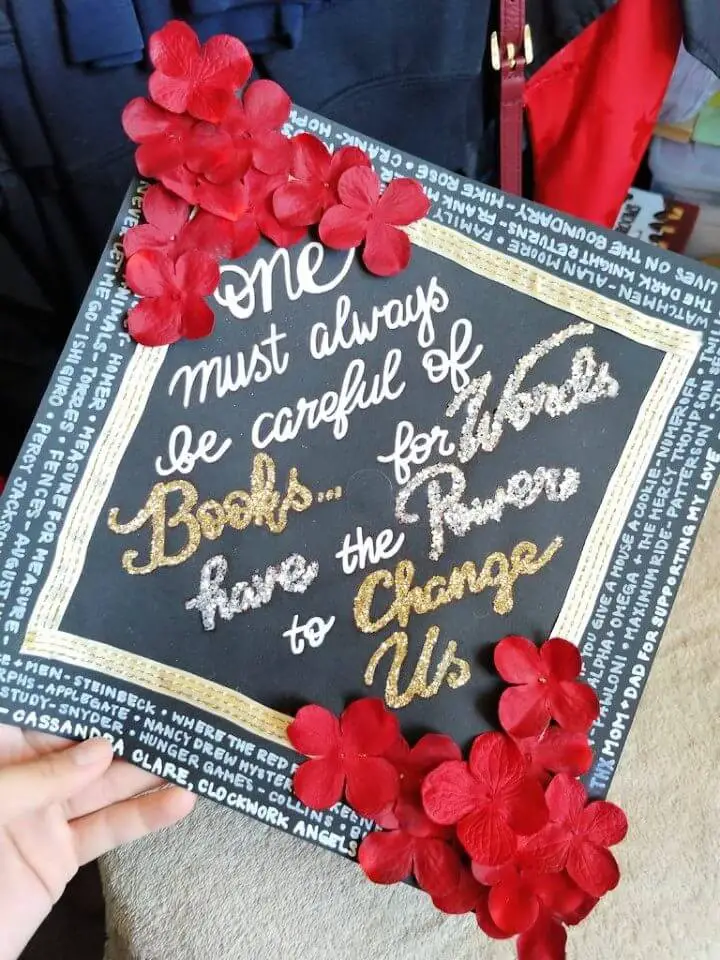
When representing their field of study, students often find creative ways to utilize symbols, tools, or elements that resonate with them. In the realm of literature, this may involve incorporating a profound quote from a beloved novel. For instance, a literature major might choose a famous phrase that has personal significance or speaks to the human experience. Similarly, science majors may draw upon iconic formulas or visual representations of complex scientific concepts, such as the double helix structure of DNA. By leveraging these symbols and elements, students can create a unique representation that reflects their academic pursuits and personal connection.
Inspirational Quotes
As you reflect on your academic journey, consider the quotes, phrases, or mantras that have motivated and guided you along the way. This might be a wise word from a renowned historical figure, a memorable line from a thought-provoking film, or even an insightful remark made by a professor who had a profound impact on your understanding of a particular subject. Whatever it may be, this quote has likely played a significant role in shaping your thoughts, driving your passions, and influencing your decisions as you navigated the complexities and challenges of higher education.
Thank Your Supporters
As a token of appreciation, extend heartfelt thanks to the individuals who’ve been instrumental in your journey’s success – whether that’s parents, close friends, mentors, or others who’ve lent their support. A sincere ‘Thank you’ or a heartfelt message expressing your gratitude can be incredibly touching and meaningful.
Showcase Your Future Plans
As you prepare to graduate, seize the opportunity to showcase your future aspirations. Consider sharing phrases that reveal your next steps, such as ‘Medical School Bound’ or ‘Teaching Adventures Ahead.’ These concise statements not only convey your enthusiasm but also provide a glimpse into the exciting opportunities on the horizon.
Add a Touch of Humor
Injecting humor into the commencement ceremony isn’t just about breaking the ice; it’s about creating a sense of relatability and shared experience among graduates, families, and faculty. A clever pun or humorous anecdote that subtly references your academic field or the milestone of graduation itself can be a powerful way to diffuse tension and bring people together in laughter.
Cultural Pride
Embrace your cultural identity by incorporating symbolic designs that resonate with your heritage. Draw inspiration from traditional patterns, national emblems, and flags that hold significant meaning for you and your community.
Use School Colors and Mascot
Integrating your school’s colors and mascot into the design is a thoughtful move that embodies school spirit and fosters a sense of community among graduating peers. By doing so, you’re not only paying homage to your alma mater but also creating a visual representation of shared identity and pride.
Include Hobbies or Passions
Regardless of whether you’re an artistic soul, a creative force, or a competitive spirit, your extracurricular pursuits have undoubtedly been woven into the fabric of your college experience. Consider showcasing these passions on your cap as a testament to the diverse facets that comprise your identity.
Go 3D
While traditional flat designs are always an option, consider taking your creativity to the next level by incorporating three-dimensional elements. Fabric, foam, or other materials can be used to add depth and visual interest to your design. However, it’s crucial to ensure that any 3D components are securely attached and won’t become dislodged during the ceremony, which could potentially cause a distraction or even create an awkward moment.
Keep It Classy
A design that’s understated yet effective can have just as much impact as one that’s bold and attention-grabging. Consider incorporating subtle yet sophisticated elements like calligraphy or a minimalist border to add depth and visual interest. Your graduation cap is a unique opportunity to showcase your personality and individuality, so don’t be afraid to get creative and let your personality shine through – have fun with it!
Cost Analysis of DIY Graduation Caps
When commemorating a milestone like graduation, crafting a DIY graduation cap is an innovative and budget-friendly approach. To provide clarity on the associated expenses, let’s dissect the financial implications and explore ways to minimize expenditures.
Materials
To get started with making your own graduation cap, begin by acquiring a plain graduation cap as the foundation. This base cap can be found for a reasonable price, typically ranging from $5 to $20, depending on the retailer you choose. Once you have your base cap, you’ll need to think about how you want to decorate it. You can use an assortment of materials, such as fabric paint, glitter, foam letters or rhinestones, each with its own unique characteristics and price point. For example, a small bottle of fabric paint might cost around $1 to $3, while a packet of rhinestones could set you back $2 to $5.
Tools
When it comes to crafting, you may be surprised to find that many of the basic tools you need are already within reach. In fact, items like scissors, glue, and markers can often be found in your home or at a low cost if not. A starter kit typically won’t break the bank, with prices generally falling under $10 for a set. This accessibility makes it easy to get started, even on a tight budget.
Time
When devoting time and effort to creating a personalized cap, remember that your time is precious. The hours spent designing and crafting this unique piece are an investment in yourself, much like the memories you’ll treasure from this special occasion. Consider the value of these moments as you labor with love over every detail, making your graduation attire truly one-of-a-kind.
Comparison to Pre-Made Caps
While pre-made decorated caps can cost anywhere from $30 to over $100, creating your own unique design offers a budget-friendly alternative with an added bonus: the satisfaction of owning a truly one-of-a-kind piece that reflects your personal style and creativity.
Budget Tips
When it comes to crafting on a budget, creativity is key. One of the most effective ways to stretch your dollars is by reusing and recycling materials you already have at home. Take stock of what you have lying around and think outside the box – that old cardboard tube could become a bird feeder, or those newspaper pages can be transformed into unique gift wrap. You can also ask friends and family if they have any crafting supplies they no longer need, which can lead to some great finds.Another way to save is by taking advantage of affordable options at dollar stores. These stores often carry a surprising array of craft supplies, from beads and buttons to paintbrushes and canvases. And don’t forget to keep an eye out for sales at craft stores – with a little planning, you can stock up on the materials you need while keeping your budget in check. To really maximize your savings, use coupons to snag discounts on everything from fabric to frames. With a little bit of creativity and some smart shopping, it’s possible to craft without breaking the bank.
Final Thoughts
As you celebrate this momentous occasion, why not take the opportunity to showcase your personal style while staying within budget? A DIY graduation cap offers the perfect chance to get creative and craft a unique accessory that reflects your personality. With some thoughtful planning and strategic shopping, you can create a cap that’s both affordable and meaningful, making it a truly special memento of this milestone achievement.
Sustainability Tips for Your Graduation Cap
As students don their graduation caps, it’s a moment to commemorate academic achievements while also acknowledging the importance of environmental stewardship. A simple yet significant step in this direction is incorporating eco-friendly elements into the cap-making process. Here are some practical suggestions for reducing the ecological footprint of graduation attire:
Choose Sustainable Materials
When it comes to decorating your cap, consider opting for eco-friendly options that not only reduce waste but also add a touch of uniqueness to your accessory. Think about incorporating recycled materials like old book pages, fabric remnants, or even natural elements such as dried botanicals. Not only will this approach minimize your environmental footprint, but it’ll also give your cap a one-of-a-kind charm.
Reuse and Upcycle
Before investing in new materials, take a moment to explore the creative potential of items already lurking within your possession. From vintage jewelry pieces to discarded buttons and beads, each one presents an opportunity to infuse your craft project with a dash of personality and sustainability. By repurposing these materials, you’ll not only breathe new life into old treasures but also reduce waste, making it a win-win for the environment and your creative pursuits.
Non-Toxic Adhesives and Paints
When choosing adhesives and paints, prioritize products bearing ‘non-toxic’ and ‘eco-friendly’ labels. Not only do these environmentally conscious options promote sustainability, but they also pose fewer risks to your health when used. By opting for such products, you’re investing in a safer, more responsible approach to creative pursuits.
Digital Decorations
Transform your greeting into a sustainable masterpiece by designing a digital template that can be effortlessly printed onto eco-friendly paper. By doing so, you’ll significantly reduce your reliance on plastic-based embellishments, making a positive impact on the environment.
Borrow Tools
When it comes to materials and supplies, consider exploring alternative solutions before making a purchase. One simple yet effective approach is to borrow what you need from trusted sources such as friends or family members. By doing so, you can significantly reduce the demand for new resources, thereby minimizing your environmental footprint.
Plan Your Design
By taking a thoughtful approach, you can minimize waste and optimize your results. Before diving into the actual project, take time to conceptualize your design on paper or digitally. This simple step can help prevent costly errors that would otherwise necessitate discarding unfinished work and starting anew.
Encourage Group Crafting
Host a collaborative celebration with your fellow students by organizing a cap-decorating party. By pooling resources and sharing supplies, you can reduce personal expenses and minimize environmental impact. This inclusive approach not only saves money but also fosters teamwork and camaraderie among classmates.
Donate After Use
After the ceremony, consider giving back by donating your cap to worthy causes. This could include passing it down to future graduates who will cherish the memory, or finding an organization that can repurpose the material for good.
Spread the Word
Share your innovative approach to creating a sustainable cap design by showcasing it on social media platforms. This simple act can help amplify the positive environmental impact, encouraging others to join in and adopt similar practices.
As you proudly display your commitment to sustainability on graduation day, your cap will not only be a stylish accessory but also serve as a powerful symbol of eco-friendly choices. By sharing your story and creative process with others, you can inspire a ripple effect of environmentally responsible behavior.
Maintenance and Storage of Your Graduation Cap
As the euphoria of graduation subsides, it’s crucial to safeguard the sentimental value of your cap by preserving it effectively. To guarantee its longevity, follow these steps to properly maintain and store your graduation cap, ensuring it remains a treasured keepsake for years to come.
Cleaning Your Cap
When dealing with a dirty cap, approach the task with care by gently wiping the surface with a soft, slightly damp cloth. To prevent potential damage to the material or any decorative elements, steer clear of harsh chemicals and avoid submerging it in water. Instead, opt for a gentle cleaning method that prioritizes preservation.
Storing Your Cap
When it comes to storing your cap, it’s essential to choose an environment that is free from excessive heat and moisture. These factors can lead to degradation of the material over time, causing the cap to lose its shape, fade, or even become brittle. To ensure your cap remains in good condition, consider designating a cool, dry space for storage. A closet shelf or a storage box under the bed are suitable options that will help protect your cap from the elements.
Using a Protective Box
For added peace of mind, consider investing in a specialized protective case or garment bag designed to safeguard your graduation regalia. These specially crafted enclosures will shield your cap from harm’s way, whether it’s accidental damage or environmental factors like dust and dirt.
Avoid Folding or Crushing
To ensure the longevity of your cap, it’s essential to handle it with care. When not in use, keep it flat or on a soft surface that provides adequate support. Avoid folding or crushing the cap as this can lead to permanent creases, damage to any embellishments, and potentially compromise its overall structure.
Handling Decorations
When handling a cap that’s lavishly embellished, exercise caution to prevent damage to the ornate details. Avoid excessive or rough handling, as this can lead to decorations dislodging or sustaining harm.
Long-Term Preservation
When it comes to preserving your canvas for the long haul, consider framing it or placing it within a shadow box. Not only will this safeguard against damage, but it’ll also transform your art into a stunning display piece that showcases your creativity.
Regular Check-Ups
Regularly inspect your graduation cap to verify its integrity remains intact. This practice is particularly crucial if you’re storing it for an extended period. By adhering to these straightforward guidelines, you can maintain the cap in pristine condition, allowing you to effortlessly recall and relive the memories of your academic accomplishments whenever desired.
FAQs About DIY Graduation Caps
Expressing your personal style on graduation day just got more exciting! Not only can you wear a customized cap that reflects your personality, but also create a unique keepsake to remember the milestone by making your own graduation cap. To get started, let’s address some common questions and concerns.
What materials do I need to decorate my graduation cap?
To give your graduation cap a personalized touch, gather a basic cap as well as an assortment of creative supplies such as fabric paint, glitter, foam letters, and any other decorative elements that resonate with your personality. Additionally, don’t overlook the importance of having essential crafting tools like scissors, glue, and markers on hand to ensure seamless execution.
How can I attach decorations securely to my cap?
When it comes to keeping your decorations firmly in place, it’s essential to use reliable adhesives like fabric glue or hot glue. Before applying these to your caps, though, be sure to conduct a small-scale test first. This will give you peace of mind knowing that the adhesive won’t compromise the material. By taking this precautionary step, you’ll ensure that your designs remain secure and intact throughout the wear-and-tear process.
Can I use my school’s logo on my cap?
Before utilizing official logos, it’s essential to verify your school’s policies regarding the usage of trademarked images and symbols. Some institutions may require permission before allowing you to incorporate these elements into your work.
How much time should I set aside for decorating my cap?
Before diving into the world of customizing your cap, take the time to meticulously craft your design. Whether it’s a simple or complex pattern, give yourself a few hours to ensure every detail is just right.
What’s the best way to plan my cap design?
Before diving into the nitty-gritty details of decoration, take a step back and get familiar with your design’s overall aesthetic by sketching it out on paper. This low-tech approach allows for a bird’s-eye view of the final look, enabling any necessary tweaks to be made before you start bringing your vision to life.
Is it okay to use humor in my cap design?
Adding a dash of humor to your caption is a great way to make it stand out from the crowd. Whether it’s a clever joke, a witty pun, or a playful quip, injecting some humor can help your post resonate with your audience. Just be mindful of the occasion and ensure that your humor is appropriate for the context.
How can I make my cap stand out from a distance?
Elevate your graduation cap design by incorporating attention-grabbing elements such as vibrant hues, metallic finishes, or tiny LED lights. However, don’t forget to ensure that your creative masterpiece adheres to the guidelines set forth by the graduation ceremony organizers.
What should I do if I make a mistake while decorating?
When faced with an error, take a step back and don’t stress – many problems can be resolved with a dash of ingenuity. Instead of getting hung up on the issue, try to reframe it as an opportunity to innovate. If you’re unable to correct the mistake, consider how you can cleverly incorporate it into your design to create something unique.
Can I decorate my cap with 3D elements?
When it comes to adding three-dimensional elements to your hat or cap, a key consideration is ensuring that they’re properly secured in place. Not only should you verify that any added embellishments aren’t obstructing the path of the wearer’s face during the ceremony, but also guarantee that they won’t unexpectedly detach and cause any disruptions.
How can I make my cap design meaningful?
Take a moment to revisit the highlights of your college experience. Think about how your academic pursuits, extracurricular interests, and cherished moments all blended together to shape who you are today. Consider the specific classes, projects, or assignments that stood out to you as particularly meaningful, as well as any notable achievements or milestones you reached during your time at school.
What if I’m not creative?
To add a touch of personality to your graduation cap, you don’t need to be an artistic mastermind. Instead, rely on simple yet effective design elements. Consider incorporating stencils or pre-made decorations to create a unique look. By doing so, you’ll be able to craft a cap that not only reflects your personal style but also makes a lasting impression. By keeping these key considerations in mind, you’ll be well-equipped to produce a graduation cap that is truly one-of-a-kind and memorable.
15 Unique DIY Graduation Cap Ideas and Decorations
As the culmination of years of hard work, a memorable graduation ceremony deserves a truly unique and personalized touch. To help you make a lasting impression, we’ve curated 15 innovative DIY ideas and decorations to elevate your graduation cap game.
How to Make a Graduation Cap
As you near graduation, why not make your cap a true reflection of your personality? Instructables provides a comprehensive DIY guide to help you bring your creative vision to life. With a step-by-step approach, you’ll learn how to choose affordable materials, plan your design, and expertly apply each element for a polished finish. The tutorial focuses on utilizing cardstock paper to add a decorative touch, ensuring your graduation cap is as unique as you are. This guide is perfect for those who crave a personalized touch on special occasions. By following these clear instructions and helpful tips, you’ll create a memorable keepsake that celebrates your academic achievements in style.
Homemade Decorated Graduation Cap
As graduates prepare to don their caps and gowns, they’re presented with an opportunity to leave a lasting impression. One way to make a statement is by personalizing one’s graduation cap, turning a traditional symbol of achievement into a unique reflection of one’s personality. To help navigate this creative process, the M&J Blog provides clear instructions on how to infuse caps with individuality through patches or rhinestones. This approachable guide empowers anyone looking to add some flair to their commencement attire, allowing them to craft a cap that not only celebrates their hard work but also showcases their personal style. For those set to take the stage, this is an opportunity to make a memorable impression and celebrate their achievements in a way that truly reflects who they are.
Easy DIY Paper Graduation Cap
Celebrate your child’s academic achievements with a personalized DIY paper graduation cap. This creative and easy-to-make project is perfect for commemorating end-of-year school milestones or adding a touch of festivity to graduation parties. With just black card stock, a downloadable template, and some basic crafting supplies, you can create a one-of-a-kind cap complete with a tassel that adds an authentic touch. Not only does this project provide a unique photo opportunity, but it also encourages children to get creative and engaged in hands-on activities. Get ready to mark the occasion in style with your very own handmade paper graduation cap.
Making a Graduation Cap Out of Money
If you’re searching for a graduation gift that will leave a lasting impression, why not consider creating a unique and thoughtful present that combines practicality with creativity? A handmade graduation cap made entirely out of money is an engaging and festive idea that’s sure to delight the graduate. With just a few simple materials like cardboard, bills, poster board, tissue paper, and ribbon – all likely already stashed away at home – you can craft a one-of-a-kind gift that will be treasured for years to come. Not only does this project serve as a personalized and enjoyable way to celebrate the graduate’s achievements, but it also doubles as a quirky accessory for the special day. By following our easy-to-follow step-by-step guide, you’ll be well on your way to creating a memorable graduation gift that will leave the graduate smiling long after the ceremony is over.
DIY Hello Kitty Grad Cap at Home
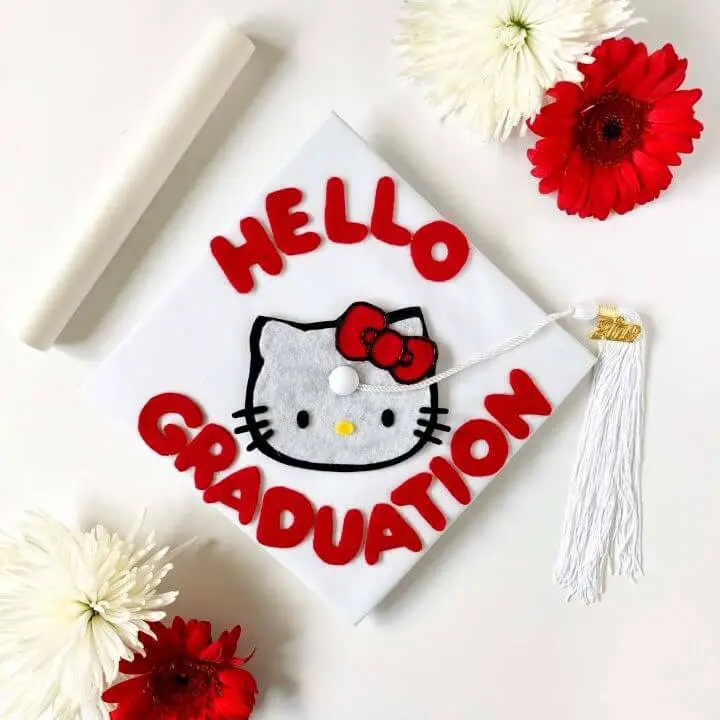
As a milestone, graduation deserves a celebration that’s uniquely yours. For fans of Hello Kitty, Sanrio offers a delightful DIY guide to create a personalized graduation cap that exudes charm. With basic materials like felt, scissors, and a glue gun, you can craft a one-of-a-kind design that showcases your affection for the iconic character. The step-by-step instructions ensure a fun and engaging experience, perfect for adding a playful touch to your graduation attire. By incorporating this creative project into your cap, you’ll not only make a statement but also receive admiring comments and stand out during the commencement ceremony.
Simple Graduation Cap for Preschools
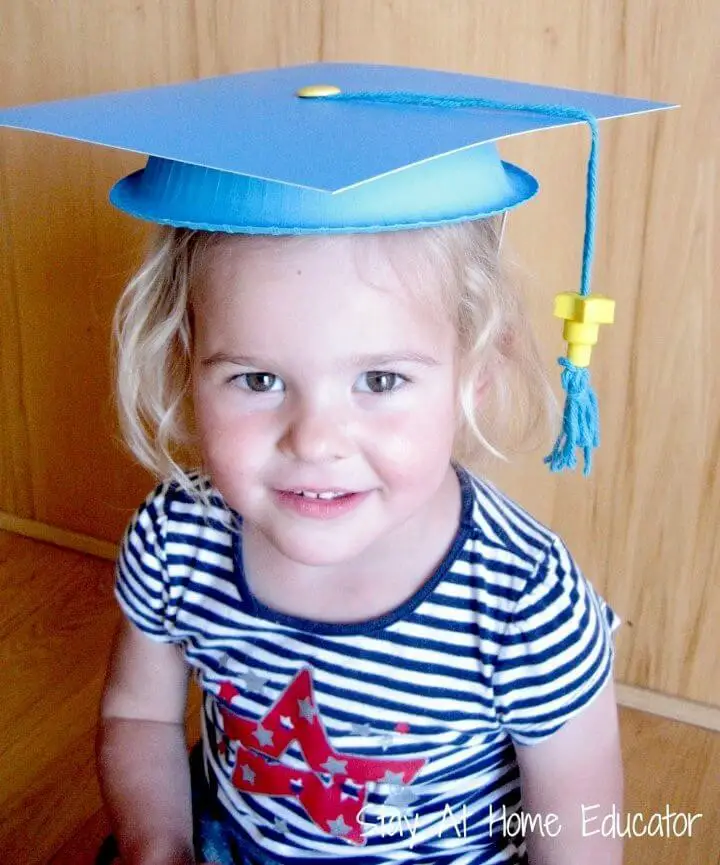
Create a personalized and meaningful graduation cap for your preschooler with this easy-to-follow DIY guide. By crafting your own caps, you’ll not only be celebrating this significant milestone but also creating a unique keepsake that will be cherished for years to come. Stay At Home Educator’s step-by-step instructions make it simple to gather the necessary materials and bring your creative vision to life. Perfect for both preschool and kindergarten graduations, these DIY caps offer a thoughtful touch to commemorate this special occasion. With minimal effort required, you’ll have fun crafting while preparing for an unforgettable graduation day.
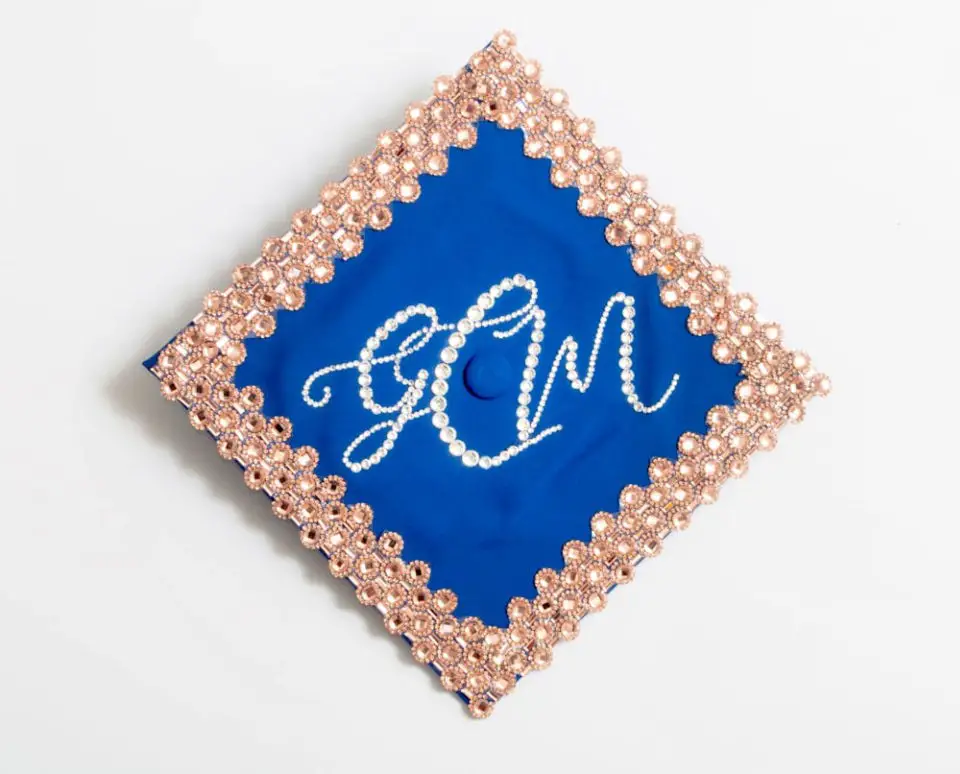
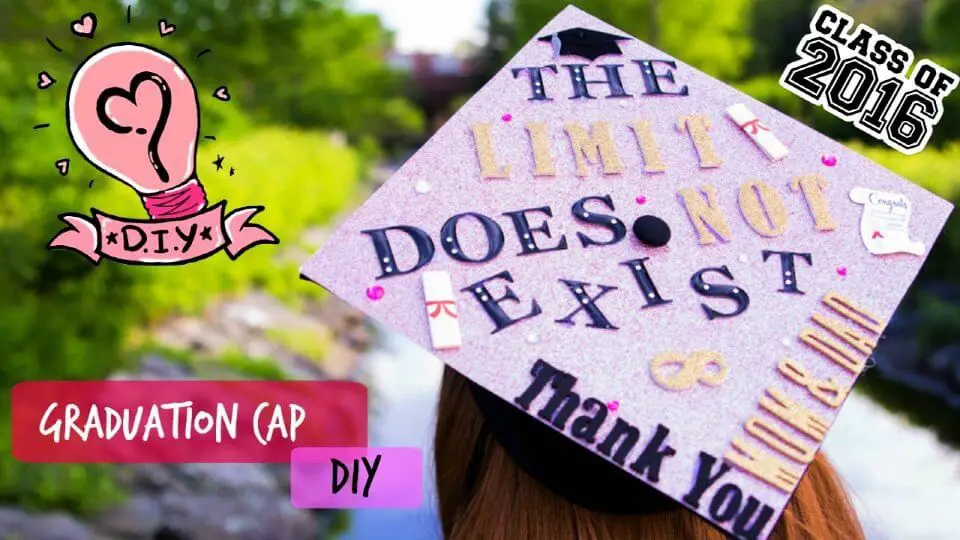
Handmade Bedazzled Graduation Cap

As you approach the milestone of graduation, it’s natural to crave a personal touch to make the day truly unforgettable. Decorating your graduation cap is an excellent way to infuse some personality and flair into this momentous occasion. By following a simple yet creative process, you can transform your cap into a stunning accessory that perfectly captures your individuality and academic achievements. With the guidance of our comprehensive tutorial, you’ll be able to add a touch of elegance and whimsy to your graduation attire, making it an experience to treasure for years to come.
Make a Graduation Cap Headband

Kick off the celebration of your graduate’s achievement with a thoughtful DIY touch! The FUN365 tutorial for making homemade Graduation Cap Headbands offers an inspiring way to craft a one-of-a-kind headpiece that combines creativity and festivity. Perfect for parties or everyday wear, this step-by-step guide takes you through crafting a charming headband using simple materials like black cardstock, a plain white base, ribbon, a tassel, and mini flowers for decoration. The process is easy to follow, making it an excellent choice for anyone seeking to infuse their graduation attire with personal flair. This handmade masterpiece not only adds a touch of uniqueness but also serves as a treasured keepsake to commemorate this significant milestone.
Graduation Cap Decorating Using Cricut Iron on

Transform your graduation celebration into an unforgettable experience by infusing it with personal touches. At The Polka Dot Chair, we’re excited to share a comprehensive DIY guide that empowers you to create unique and meaningful decorations for the graduate’s cap. This tutorial delves into the world of Cricut machines, teaching you how to precision-cut iron-on vinyl for a one-of-a-kind design. Furthermore, we’ll take you on a step-by-step journey to assemble a stunning graduation shadow box, complete with essential supplies and clear instructions. Whether you’re a craft enthusiast or simply looking for a special way to honor the graduate, these ideas promise to create not only a show-stopping decoration but also a treasured keepsake that captures the essence of this milestone moment.
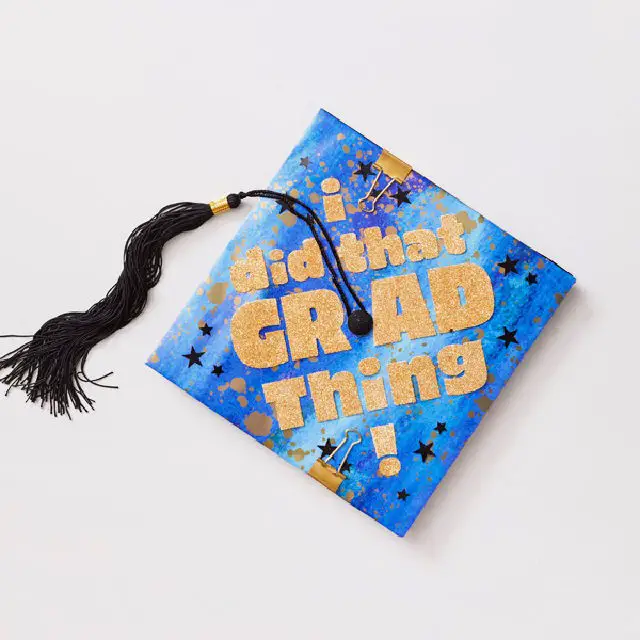
Make a Graduation Cap Message

Add a personal touch to your graduation cap with DIY messages that showcase your achievements and humor. By following Studio DIY’s guide on using Cricut’s Print Then Cut feature, you can create eye-catching decorations that make your cap stand out from the crowd. The process is straightforward: print your chosen phrases onto vinyl and then use a Cricut machine to cut them with precision. If you don’t have a Cricut, don’t worry – you can still print and hand-cut your designs for a customized look. These cap messages are perfect for capturing memorable graduation photos, allowing you to express your creativity on that special day.
DIY Graduation Cap – Step by Step Instructions
Add a personal flair to your graduation cap with creative DIY decorations from Hallmark Ideas & Inspiration. With customizable ideas and easy-to-follow steps, you’ll be able to express your style and educational journey through a unique and meaningful cap design. Gather your friends for a fun decoration party, stock up on crafting supplies, and let your personality shine as you prepare to receive your diploma. Make your graduation ceremony a memorable one with a cap that reflects your personality and accomplishments.
Make Your Own Graduation Cap

Crafting a DIY graduation cap for your preschooler’s big day is an endearing way to commemorate this milestone. Our guide at Casa de Fallon provides a step-by-step process to create a personalized cap using everyday materials, making it an enjoyable and rewarding experience. You’ll learn how to measure, cut, and assemble card stock or thin cardboard, secure it with duct tape or clear packing tape, and add a handmade tassel for that iconic graduation look. With clear instructions and a fun process, you’ll be left with a treasured keepsake for your little graduate to cherish. Whether celebrating virtually or in person, your child will be beaming with pride wearing their custom-made cap.
DIY Duck Tape Graduation Cap
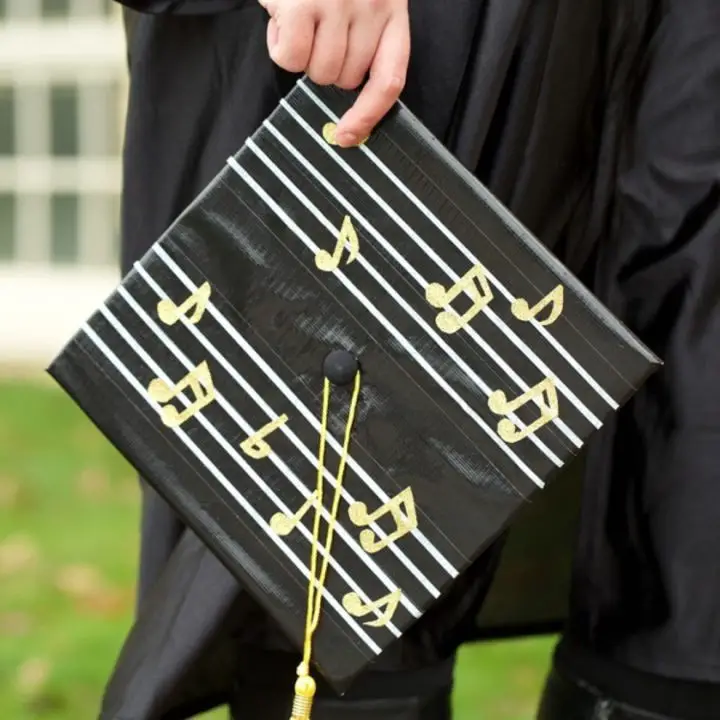
Crafting a personalized Graduation Cap with Duck Tape is an innovative way to commemorate a significant milestone. By following Duck Brand’s straightforward guide, you can easily create a unique and memorable design. The process begins with a simple pumpkin shape, which is then built upon with layers of tape, culminating in the addition of a stem for a finishing touch.
This DIY project requires only a few basic supplies, including Gold and Black Duck Tape, scissors, a graduation cap, a craft knife, and a crafting board. The lack of advanced skills needed makes it accessible to anyone looking to add a personal touch to their graduation attire. With minimal time investment, you can create a standout cap that embodies the essence of the occasion.
Handmade Graduation Cap Tutorial
Prepare for your graduation celebration with this step-by-step YouTube tutorial from TaysDays. This engaging video will walk you through the process of crafting a customized and decorated graduation cap, ensuring a one-of-a-kind piece to commemorate your achievement. From sourcing materials at your local craft store to adding the finishing touches, this tutorial streamlines the crafting experience. You’ll gain valuable insights on measuring and cutting the base cardstock, creating space for your tassel, and arranging decorations for a polished look. Perfect for those seeking to add a personal touch to their graduation attire, TaysDays’ tutorial empowers you to create a cap that reflects your unique academic journey. So grab your glue gun, choose your embellishments, and start crafting a graduation cap that you’ll be proud to wear on your special day!
Best DIY Graduation Cap for Toddlers
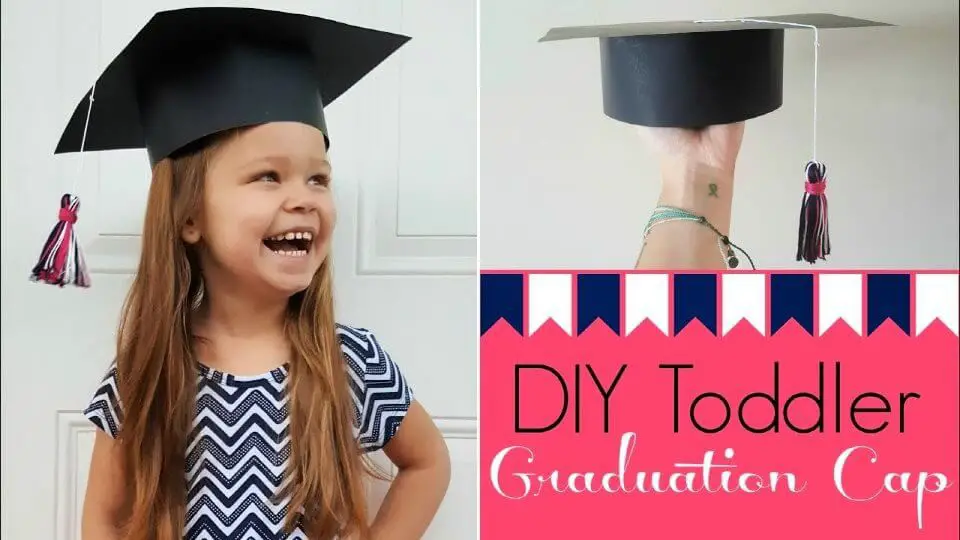
Celebrating a toddler’s preschool graduation is an exciting milestone, and creating a DIY cap is a wonderful way to add a personal touch to the ceremony. The process is surprisingly simple, requiring only basic materials like paper and craft tools. A recent YouTube video tutorial provides a step-by-step guide on how to make this charming graduation cap, perfect for parents or educators looking to create a unique keepsake. Not only does the tutorial cover the creation of the cap itself, but it also includes a comprehensive guide on making a matching tassel to complete the look. The engaging and easy-to-follow instructions ensure that even those new to crafting can follow along and produce a memorable memento for their child’s special day.
Frequently Asked Questions
How do you make a homemade graduation cap?
To create a personalized graduation cap at home, gather basic materials such as a cardboard box, scissors, markers or paint, and glue. Begin by cutting the box into a semi-circular shape to serve as the foundation of your design. Embellish it with vibrant colors, creative patterns, or inspiring quotes using your chosen medium. Consider adding decorative tassels or other embellishments to give your cap a unique touch. Secure the cap comfortably on your head using an elastic band or ribbon, and you’ll be ready to celebrate this momentous occasion. As you don your homemade graduation cap, take pride in your academic achievements and look forward to the exciting opportunities that lie ahead.
How to make a graduation cap design?
To create a personalized graduation cap design, begin by collecting essential materials like fabric, scissors, and adhesive. Next, visualize your concept on paper by sketching out the layout. Cut the fabric according to your plan and apply it to the graduation cap using glue. To add an extra touch of flair, incorporate decorative elements such as ribbons or glitter. With these steps complete, you’ve successfully crafted a custom design that reflects your unique style.
What materials to use to decorate the graduation cap?
As you prepare to adorn your graduation cap, the possibilities are endless. Think beyond traditional materials like glitter, fabric paint, and foam sheets. Why not add a touch of elegance with ribbons or elevate the design with strategically placed jewels? The key is to have fun and let your creativity shine! With this opportunity to express yourself, make the most of it and revel in the moment.
Can you use a Cricut on a graduation cap?
While it may not be the first thing that comes to mind, you can indeed use a Cricut to create custom designs on a graduation cap. To do so, you’ll need to choose materials and supplies that are compatible with your machine’s capabilities. Heat-resistant options like vinyl or heat transfer vinyl (HTV) are essential for safe and successful cutting. As always, be sure to follow all safety guidelines and manufacturer instructions when operating the Cricut.
What glue to use for decorating a graduation cap?
When it comes to decorating a graduation cap, you’ll want to opt for either light-bodied fabric glue or hot glue. Both options offer robust adhesion and are gentle on fabrics, ensuring a long-lasting and stain-free design. Unlike other adhesives, these glues won’t leave behind any residue or discoloration, allowing your creative vision to shine through without compromise.
How do you put flowers on a graduation cap?
To create a memorable graduation cap adorned with flowers, begin by choosing blooms that harmonize with your institution’s colors. This can add a touch of personal flair and school spirit to your ceremonial attire. For attachment, utilize fabric adhesive, applying the flowers in a single line or arrangement as desired. Allow the glue to dry completely before donning your cap, ensuring a secure and stylish finish.
Conclusion:
These DIY graduation cap ideas and decorations provide a creative outlet for celebrating your academic achievement. By incorporating personal touches such as your major, inspirational quotes, cultural heritage, or a dash of humor, you can craft a one-of-a-kind masterpiece that reflects your journey and aspirations. This guide not only sparks imagination but also promotes a thoughtful and environmentally conscious approach to your graduation cap project. With practical advice on sustainability, budgeting, and upkeep, you’re empowered to create a truly memorable piece that makes a statement on your special day.
