Transforming your home into a customized gym space is an innovative project that not only saves you money but also allows you to design a workout environment that perfectly suits your unique needs. By embracing 25 creative DIY gym equipment ideas, you can craft tools that amplify your fitness journey. This comprehensive guide will walk you through the process of selecting the most suitable projects for your goals and available space, ensuring you create safe, effective, and tailored workout gear that aligns with your aspirations. As we delve into this project, you’ll discover how to harness these 25 ideas in a way that’s informative, captivating, and harmoniously aligned with your fitness journey.
Why DIY Gym Equipment?
When it comes to fitness, having your own gym equipment at home can be a game-changer. Not only does it save you money compared to buying high-end products, but it also offers unparalleled customization options that cater to your unique needs and preferences. By building your own equipment, you’ll have the freedom to adjust the size, weight, or resistance to fit your specific workout style. This DIY approach not only saves you time and hassle by eliminating the need for gym commutes, but it also allows for a more flexible schedule that can be adapted to your daily routine. Furthermore, this creative process can be a rewarding learning experience, teaching you valuable skills and giving you a sense of accomplishment once you’ve completed a project. Additionally, opting for sustainable materials or repurposing existing resources can make your DIY gym equipment an eco-friendly endeavor. And let’s not forget the quality family time that building gym equipment can bring, encouraging teamwork and creating lasting memories with loved ones. Ultimately, considering these benefits will help you decide whether DIY gym equipment is the right fit for you, offering a practical and enjoyable path to achieving better fitness.
Safety First: Ensuring DIY Gym Equipment is Secure and Reliable
To create effective and safe DIY gym equipment, prioritize stability, durability, and maintenance from the outset. This ensures that the equipment can support your body weight and withstand repetitive stress. To achieve this, focus on the following key considerations:When selecting materials, opt for high-quality, durable options such as steel or aluminum for metal components, and solid wood free of cracks or splinters. Ensure stability by providing a solid base for items like squat racks or benches, and secure fittings for pull-up bars. Conduct thorough tests to confirm your equipment’s stability before use.Adhere to established safety standards, such as the General Product Safety Directive (GPSD) and harmonized standards for stationary training equipment. These guidelines provide a framework for ensuring your equipment is safe for use.Regular maintenance checks are crucial to identify any signs of wear and tear. Look out for loose bolts, fraying ropes, or cracks in materials. By performing regular maintenance, you can extend the longevity and safety of your equipment.When sharing your DIY gym equipment with others, provide clear instructions for safe use, including weight limits, proper form, and necessary precautions.In addition to these measures, equip your DIY gym with a first aid kit and understand basic first aid procedures. This prepares you in case of equipment failure or injury.Finally, don’t hesitate to consult with fitness professionals or engineers if you’re unsure about the design or construction of your equipment. Their expertise can guide you in creating safe and reliable gym equipment.By following these guidelines, you can create affordable, safe DIY gym gear that supports a successful fitness journey.
How to Get Started with DIY Gym Equipment
Customizing your workout space by creating your own gym equipment at home is a fantastic way to not only save money, but also tailor the gear to your specific needs and enjoy the rewarding experience of building something with your own hands. To help you get started on this DIY adventure, we’ll take it one step at a time, providing a comprehensive guide to ensure a successful and enjoyable journey.
Step 1: Assess Your Fitness Goals
As you prepare to start any fitness regimen, it’s essential to establish clear objectives. What do you hope to achieve? Are you seeking to boost muscle mass, enhance cardiovascular performance, increase flexibility, or maybe a combination of these? Your goals will significantly impact the type of equipment and exercises you’ll focus on. For instance, if strength training is your primary objective, you may want to concentrate on building a solid foundation with weight benches, dumbbells, or resistance bands.
Step 2: Determine Your Space
Assessing the physical space at your disposal is crucial when embarking on a DIY project. This encompasses not only indoor areas like garages or spare rooms but also outdoor spaces such as backyards. The available square footage will significantly impact the scale and complexity of the equipment you can realistically construct, maintain, and store within that area.
Step 3: Gather Materials
When it comes to DIY gym equipment projects, creativity knows no bounds. One approach is to utilize readily available materials like PVC pipes, old tires, or ropes that you might already have stashed away. This approach not only saves money but also reduces waste by reusing items that would otherwise be discarded. For more complex projects, local hardware stores can be a treasure trove of affordable and eco-friendly options. By thinking outside the box and getting resourceful, you can create a functional and cost-effective gym setup without breaking the bank or harming the environment.
Step 4: Pick Your Projects
Kickstart your DIY journey by embarking on simple yet rewarding projects that foster confidence and motivation. A great way to begin is by tackling practical tasks like crafting a sandbag for weight training or creating a jump rope for cardio exercises. By achieving quick and easy wins, you’ll build momentum and develop the enthusiasm needed to tackle more complex projects in the future.
Step 5: Follow Reliable Guides
When embarking on a DIY project, it’s essential to have access to comprehensive guides or tutorials that provide clear, step-by-step instructions. The tutorials you’ll find here cover a range of creative endeavors, from crafting a balance board to designing an adjustable weightlifting bench. To ensure success and minimize risk, look for guides that include a detailed materials list, outline tool requirements, and offer valuable safety tips.
Step 6: Safety First
Prioritizing safety is essential when embarking on any DIY venture. To mitigate potential risks, don’t forget to equip yourself with the necessary protective gear, such as gloves and goggles, which can help prevent injuries from sharp objects, chemicals, or other hazards. Furthermore, if you’re ever in doubt about a tool or technique, it’s crucial to invest time in researching the correct methods or seeking guidance from someone more experienced. Adopting a slow and steady approach is often the best way to ensure a successful project, rather than rushing and risking harm.
Step 7: Customize and Enjoy
One of the most appealing aspects of DIY projects is the capacity to tailor-make your equipment to align with your unique requirements and preferences. This flexibility allows you to adjust dimensions, weights, and resistance levels to suit your fitness level and goals. Moreover, once a project is complete, it’s essential to take pride in your accomplishment and enjoy the fruits of your labor. Each piece of equipment you create represents a step towards achieving a healthier, fitter lifestyle.Establishing a DIY home gym requires minimal effort and can be achieved by following straightforward steps. By commencing with smaller projects, prioritizing safety, and embracing the creative process, you’ll be well on your way to creating a customized fitness space that meets your needs and propels you towards reaching your goals.
Customization Ideas for DIY Gym Equipment
Transforming your own gym equipment into a personalized haven is a game-changer for your fitness journey. By designing each piece with customization in mind, you can create a space that not only reflects your unique needs but also motivates you to stay on track. Here’s how to make it happen: Measure your available space and design equipment that fits seamlessly within it, like a foldable squat rack or compact plyometric box that can be tucked away when not in use.To cater to various users, incorporate adjustable features such as telescopic designs or multiple holes for pins on benches or weight racks. This way, everyone can enjoy your DIY creations without compromising comfort or form.A personalized touch can go a long way in boosting morale and energy levels. Paint your equipment in vibrant colors that match your home’s aesthetic, or add decals and designs that motivate you to push through tough workouts.Ergonomics are also crucial when designing gym equipment. Ensure handles are comfortable to hold and don’t strain wrists during exercises. For example, if building a kettlebell, prioritize a secure grip and wrist alignment.Incorporate technology seamlessly into your creations by adding holders for smartphones or tablets on cardio equipment like stationary bikes or treadmills. This way, you can easily follow along with workout videos or track progress with fitness apps.Safety should always be top of mind when designing DIY gym equipment. Add rubber padding to sharp corners, non-slip surfaces to step-up platforms and balance boards, and other features that prevent injuries.Designing multipurpose equipment is a great way to maximize space and minimize clutter. A bench could serve as a step-up platform or plyometric box, while a pull-up bar could have attachments for resistance bands or TRX systems.Finally, don’t be afraid to gather feedback from users who’ve tried out your DIY creations. Use this information to refine and improve your equipment, making it more user-friendly and effective in the process.By embracing customization and putting thought into every detail, you can create a gym space that truly reflects your style and goals – and motivates you to train regularly.
Workout Plans Using DIY Gym Equipment
To get the most out of your DIY gym setup, it’s essential to develop a well-structured workout plan that aligns with your specific fitness goals. Before you start, take some time to reflect on what you want to achieve – whether it’s building muscle mass, shedding pounds, or boosting endurance. Your objectives will serve as the foundation for crafting effective routines.One of the most efficient ways to create a comprehensive workout plan is by incorporating full-body exercises that target multiple major muscle groups at once. For instance, combining squats, push-ups, and pull-ups in a single session can help you tackle different areas of your body. This approach not only saves time but also promotes overall fitness.Progressive overload is another crucial principle to incorporate into your workout plan. This involves gradually increasing the intensity of your exercises by adding more weight, upping the number of reps, or reducing rest time between sets. By doing so, you’ll be able to continually challenge yourself and promote steady improvement.In addition to physical exercise, don’t forget to prioritize rest and recovery. Your muscles need time to rebuild and grow after intense workouts, so be sure to schedule in some well-deserved rest days. This will help prevent plateaus and ensure you continue making progress towards your goals.If you’re looking for an added challenge, consider incorporating circuit training into your routine. By combining strength and cardio exercises, you’ll not only maximize calorie burn but also improve cardiovascular health.Flexibility and mobility are often overlooked aspects of a workout plan, but they’re essential for maintaining overall fitness and preventing injuries. Make sure to include exercises like stretching or yoga in your routine to keep these areas balanced.To track your progress and make data-driven decisions about your workout plan, keep a log of your workouts. This will help you monitor changes over time and make adjustments as needed to stay motivated and on track.Finally, always prioritize safety when working out at home. Ensure that your DIY equipment is secure and use proper form to prevent injuries. By following these guidelines and creating a workout plan tailored to your unique needs and goals, you’ll be well on your way to achieving fitness success.
Cost Analysis: Building vs. Buying Gym Equipment
When deciding whether to build or buy gym equipment, it’s crucial to weigh the costs and benefits carefully. The initial cost of DIY equipment is often significantly lower than commercial alternatives. For instance, a homemade squat rack can be built for under $60, while a commercial one might cost several hundred dollars.In addition to initial expenses, the type of materials used can also impact the overall cost. While high-quality steel and wood are durable, they may be expensive options. However, there are more affordable alternatives like PVC pipes for lightweight structures or reclaimed wood for non-weight-bearing items.Another important factor is the time investment required for DIY projects. When comparing the cost of building your own equipment to purchasing pre-made items, consider the value of your time and how it impacts the overall cost.DIY equipment also offers customization options that can save space and cater to personal needs, which may not be possible with store-bought items. This added value extends beyond the initial monetary cost.However, DIY equipment often requires more maintenance than commercial alternatives, which can add to long-term costs. On the other hand, understanding how your equipment is built can make repairs easier and cheaper.The lifespan of the equipment is also a critical consideration. Commercial gym equipment is typically designed for heavy use and longevity. While the lower initial cost of DIY equipment may seem attractive, it’s essential to consider whether the potential need for earlier replacement balances out against the savings.Another factor to consider is the resale value of the equipment. Commercial gear generally retains its value better than DIY equipment, which could be important if you plan to upgrade in the future.Finally, your skill level and ability to build sturdy and safe equipment are crucial considerations. If you lack the necessary skills, the cost of learning or hiring someone could offset the savings from DIY projects.In conclusion, while DIY gym equipment offers initial cost savings and customization options, it’s essential to consider long-term upkeep, safety, and replacement costs to make an informed decision for your home gym.
Expert Insights: Designing and Constructing DIY Gym Equipment
As a DIY enthusiast, I’m excited to share a comprehensive guide on designing and constructing high-quality gym equipment that meets your specific needs. To get started, it’s essential to understand your fitness goals and the space you have available. This will help you determine the type of equipment you need and its dimensions.When designing your equipment, remember that good design is about striking a balance between form and function. Prioritize ergonomic designs that enhance comfort and usability. Choose materials that are strong and durable, such as steel for weight-bearing equipment or PVC or wood for non-weight-bearing items.Ensure your equipment has a stable base and solid construction to prevent accidents. Test the stability under different conditions to guarantee safety. Don’t forget to prioritize comfort and grip, especially for equipment like bars and handles. Use materials like foam or rubber to enhance grip and reduce the risk of blisters.Incorporate adjustable features to cater to different body sizes and workout preferences. This can include adjustable heights, angles, or resistance levels. Include safety mechanisms like locks, clips, or weight pins to secure moving parts and weights. This is crucial to prevent injuries during use.Design your equipment for easy assembly and disassembly. This makes it convenient for maintenance and adjustments. Provide clear, step-by-step instructions for building and using the equipment. Use diagrams or videos to illustrate complex steps. Test your equipment thoroughly once it’s built, and be open to making improvements based on feedback from others who use it.Finally, offer advice on maintaining and caring for the equipment to ensure its longevity. This includes regular checks for wear and tear and proper storage practices. By following these expert tips, you can create gym gear that’s safe, professional, and effective. Success lies in planning, detail, quality, and safety. With the right approach, you’ll be enjoying your new DIY gym equipment in no time.
Maintenance and Upkeep for DIY Gym Equipment
To ensure your DIY gym equipment performs at its best and remains a safe haven for your workouts, it’s vital to establish a routine of regular maintenance. Here are the key steps to follow:
Cleaning: After each workout session, wipe down all surfaces with a disinfectant suitable for the material to remove sweat, oils, and dirt, preventing bacterial growth and maintaining hygiene.
Inspection Schedule: Set a schedule to inspect your equipment for signs of wear such as frayed cables, loose bolts, or cracks in the material. Addressing these issues early can prevent accidents and extend the life of your equipment.
Lubrication: Keep moving parts like pulleys, bearings, and joints well-lubricated to reduce friction and ensure smooth operation. Use the appropriate lubricant for the material and part type.
Tightening Fittings: Regularly check and tighten any bolts or screws that may have loosened over time due to vibration and movement during workouts, maintaining the structural integrity of your equipment.
Storage: Store your equipment in a clean, dry place to prevent rust and corrosion. If you have outdoor equipment, consider using covers to protect it from the elements.
Replacement Parts: Be prepared to replace parts that are worn out or damaged, keeping a list of the parts and materials used in your DIY projects for easy reference when replacements are needed.
Professional Advice: If unsure about how to maintain a piece of equipment, don’t hesitate to seek advice from a professional. They can provide specific guidance tailored to your equipment.
User Manual: Design a simple user manual for your equipment, outlining how to use and maintain it properly, which can be especially helpful if others will be using the equipment.
By following these care tips, you’ll be able to keep your DIY gym equipment safe and effective for longer, making regular maintenance essential for optimal use.
FAQs on DIY Gym Equipment
As individuals look to establish a personal training space within their own homes, numerous queries arise regarding the setup of a DIY home gym. To alleviate any uncertainty, this section aims to address the most common inquiries, providing valuable insights and practical guidance for those embarking on a DIY equipment installation project.
What materials are best for making DIY gym equipment?
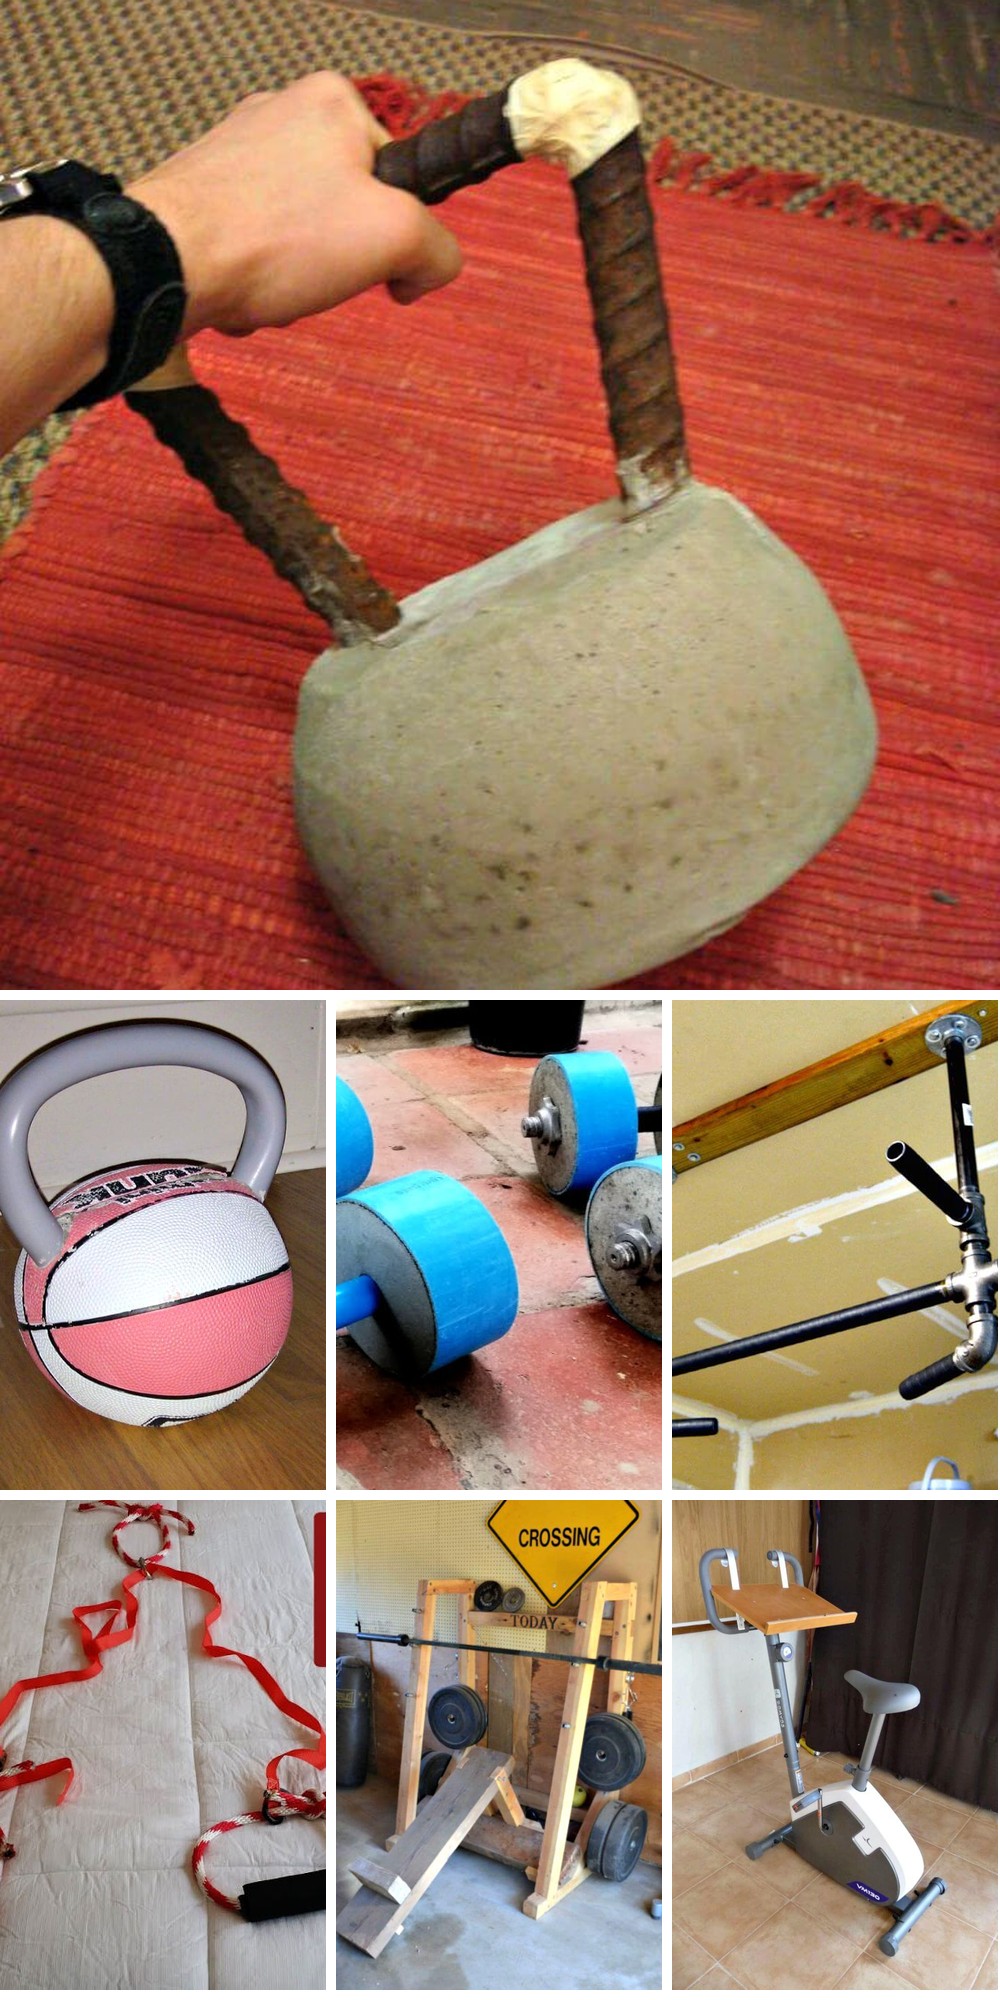
When it comes to creative problem-solving in the gym, repurposing everyday items can be a game-changer. From lightweight PVC pipes to sturdy wood, each material offers its unique benefits and uses. For example, PVC pipes are perfect for building bars and frames due to their versatility and affordability. On the other hand, concrete is ideal for crafting weights like kettlebells and dumbbells, thanks to its durability and resistance to wear. Old tires can be transformed into sleds or used for flip exercises, providing a great way to add some variety to your workouts. Rope, meanwhile, is perfect for creating climbing ropes or battle ropes that challenge your strength and agility. And finally, wood offers the stability needed to construct sturdy platforms like plyometric boxes or benches that provide a solid base for various exercises.
How can I ensure my DIY gym equipment is safe to use?
Before embarking on any DIY project, it’s crucial to ensure the stability and robustness of your equipment are up to par. This means selecting materials that can withstand the expected weight and stress associated with the task at hand. Regular inspections for signs of wear and tear are also essential to avoid any potential hazards or damages. If you’re ever in doubt about the safety of your DIY endeavour, it’s always a good idea to seek guidance from a professional before proceeding.
Can I make adjustable weights at home?
When it comes to creating adjustable weights, there are several creative solutions you can employ. One approach is to utilize sandbags of varying sizes by simply switching them out to alter the weight. Alternatively, you can fill water bottles with sand or water and use them as dumbbells or incorporate them into a homemade weight vest. For a more substantial and customizable option, consider building multiple concrete weights of different sizes, each featuring a central handle that allows for easy attachment and detachment from other weights.
How do I make a DIY punching bag?
To create an effective DIY laundry bag, start by selecting a suitable carrier. A duffel bag or canvas laundry bag is an excellent choice. Next, fill the bag with old clothes, rags, or sandbags to provide weight and cushioning. This will not only stabilize the load but also prevent any fragile items from getting damaged during transport. To secure the closure, you can stitch it up or use strong duct tape to ensure the bag stays shut and keeps its contents from spilling out. Finally, hang the bag from a sturdy support beam using a robust chain or rope. Make sure it’s securely attached to prevent any accidents or damage.
Is it cheaper to make your own gym equipment?
While it’s true that creating your own gym equipment can often be more budget-friendly than purchasing commercial-grade gear, the affordability ultimately hinges on several factors. The simplicity of the design and the availability of cost-effective materials both play a significant role in determining whether DIY equipment is indeed a cheaper option. By repurposing items you already have or sourcing affordable supplies from local hardware stores, you can create your own gym equipment at a lower cost than buying commercial-grade alternatives.
Can DIY gym equipment be as effective as commercial equipment?
Carefully crafting DIY gym equipment can deliver similar fitness gains as its commercial counterparts, provided it effectively engages the targeted muscle groups and provides adequate resistance or weight. Moreover, prioritizing safety and stability is crucial to ensure a successful and injury-free workout experience.
How can I make a simple home gym with limited space?
When setting up a DIY gym at home, it’s essential to prioritize versatility in equipment that doesn’t compromise on space efficiency. To achieve this, consider investing in equipment that serves multiple purposes without taking up too much room. Some great options include jump ropes for cardio exercises, resistance bands that offer a variety of workouts and easy storage, foldable workout benches that can be tucked away when not in use, wall-mounted pull-up bars that utilize vertical space without cluttering the floor, and adjustable dumbbells that replace an entire rack of weights with just one set. While these options are great for saving space, it’s also crucial to focus on safety, choose the right materials, and regularly maintain your gear to ensure a successful DIY gym experience.
25 Homemade DIY Gym Equipment Ideas
Elevate your fitness journey without breaking the bank by exploring innovative, homemade DIY gym equipment solutions. Revamp your home workout space with creative and effective exercises.
Homemade 3 In 1 Plyometric Box
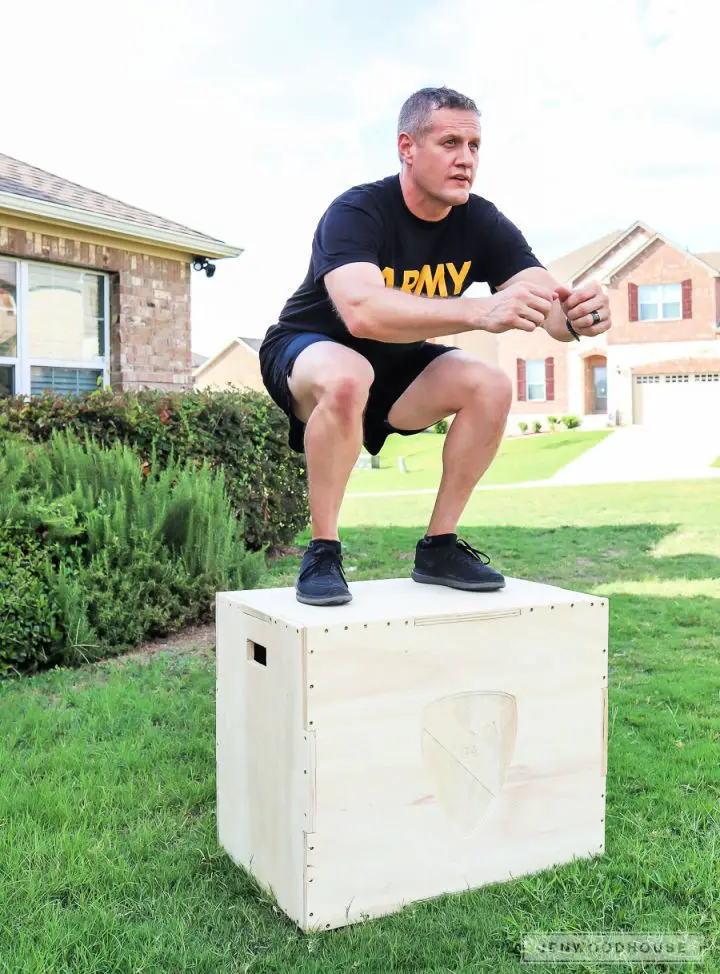
Elevate your home workouts with a clever DIY 3-in-1 Plyometric Box, an innovative solution for plyometric training. This space-saving contraption boasts three adjustable height settings, accommodating diverse fitness levels and exercises. A cost-effective and rewarding project for those combining their passion for fitness with hands-on crafting. Whether you’re seeking to enhance vertical jumps, step-ups, or dips, this versatile plyo box provides a sturdy foundation for your fitness regime. Follow our step-by-step instructions to craft your own multi-functional fitness tool and take the first step towards a fitter, healthier you.
Building a Treadmill Desk
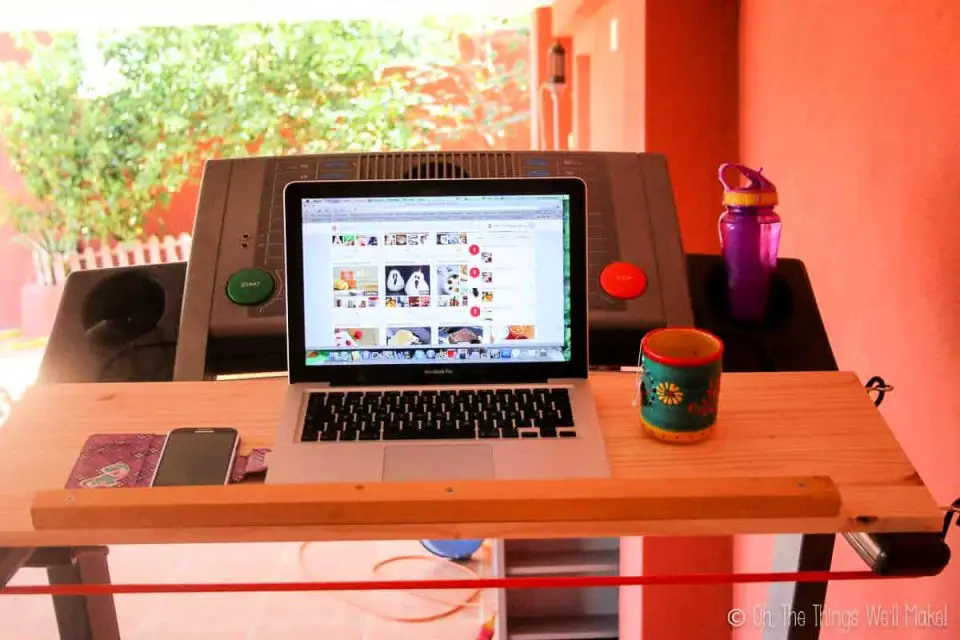
Elevate your daily walk into a productive experience by creating a DIY treadmill desk that combines physical activity with work-from-home efficiency. With a few basic materials, you can build a sturdy workspace on top of your treadmill, enabling seamless transitions between sitting and walking. Simply adjust the height to fit your laptop or tablet, ensuring secure placement for uninterrupted workflow. This innovative solution allows you to stay active, healthy, and productive without sacrificing tasks.
Making a Balance Board
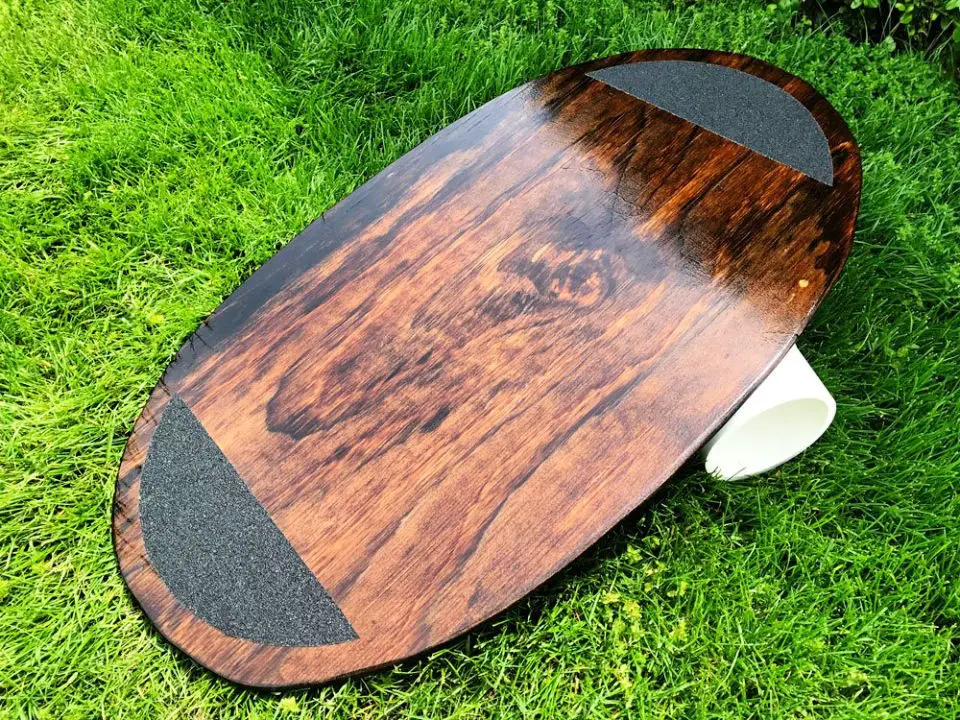
Are you prepared to create your own eco-friendly balance board using scraps of wood? Our DIY guide provides a budget-friendly and accessible solution for all skill levels, perfect for kids and adults alike. By following our step-by-step tutorial, you can craft a sturdy and stylish balance board that’s ideal for indoor or outdoor use. With just a few basic supplies like plywood, sandpaper, and wood glue, you’ll be well on your way to creating a unique and fun project that’s sure to provide hours of entertainment. Just remember to allow sufficient drying time after applying finishes to ensure the best results. This creative project is an excellent way to bring a taste of surf culture into your own backyard!
DIY Adjustable Wooden Weightlifting Bench
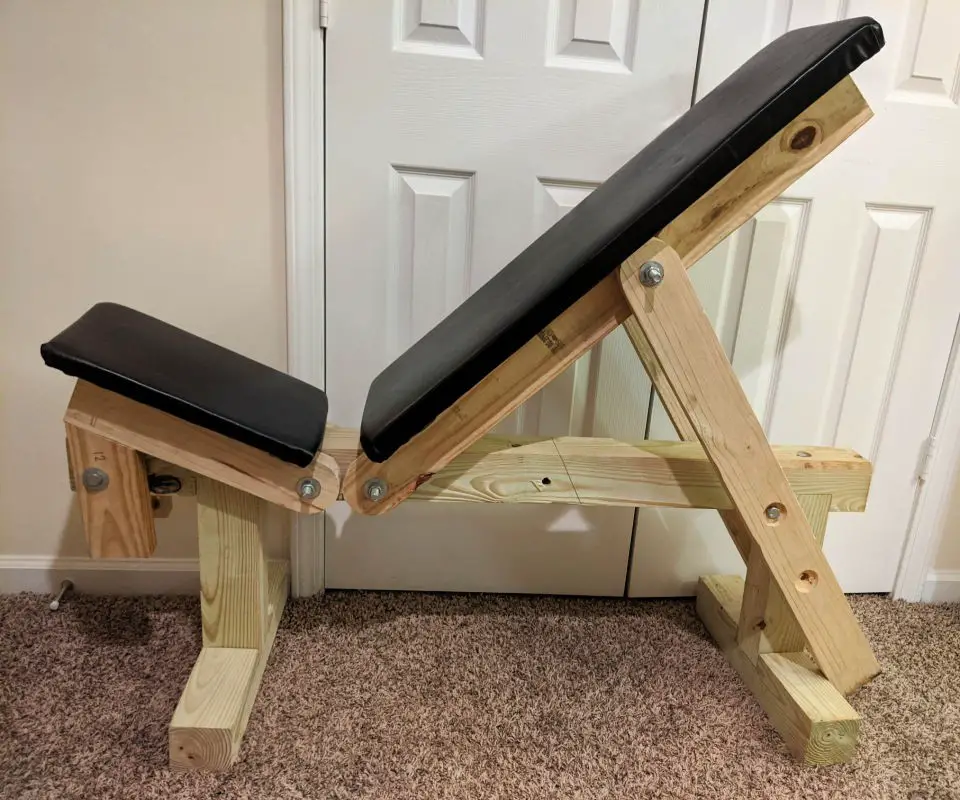
Transform your home gym into a versatile workout sanctuary by crafting your own adjustable wooden weightlifting bench. This DIY project is perfect for fitness enthusiasts seeking to mix up their strength training routine, as it can be easily adjusted to accommodate various exercises from flat bench presses to incline dumbbell curls. Built with sturdy quality wood, this bench ensures durability and safety, allowing you to focus on form and progression without worrying about the structure’s integrity. A comprehensive guide will walk you through the process, covering material selection, cutting, assembling, and adding padding for optimal comfort. Whether you’re a seasoned lifter or just starting out, this DIY project will empower your training, giving you the confidence to push yourself further and achieve greater results.
Homemade Dumbbells
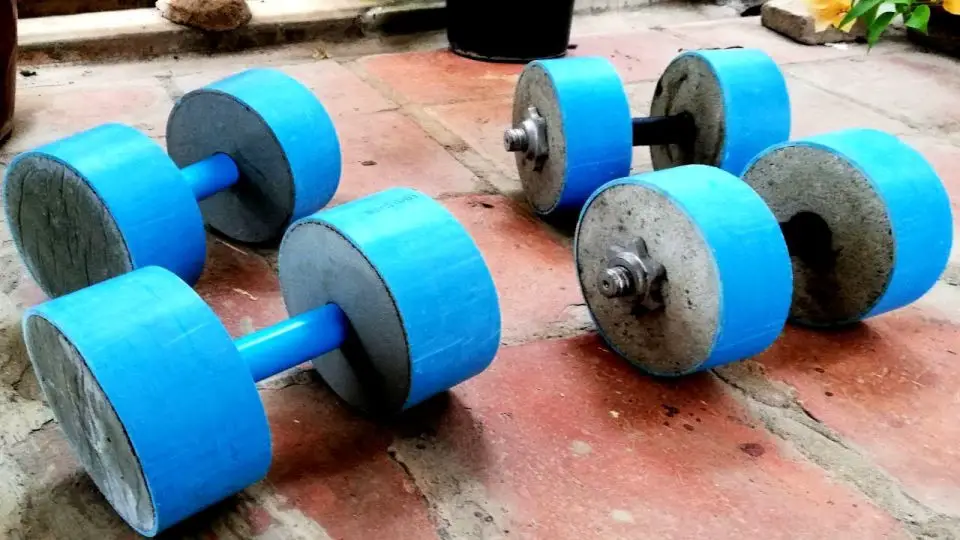
If you’re looking to elevate your home workout routine without breaking the bank, consider building your own gym equipment. A great resource for doing just that is DIY Dudes’ YouTube tutorial on creating homemade dumbbells. This engaging and informative video takes viewers through a step-by-step process of crafting durable and cost-effective dumbbells using readily available materials like concrete and PVC pipes. With clear instructions, anyone can follow along and create custom weights tailored to their fitness goals. The tutorial also provides valuable tips on ensuring the weights are secure and balanced for safe use. By the end of this comprehensive video, you’ll be empowered to add a personal touch to your home gym setup with custom-made dumbbells that meet your specific needs. Simply search for DIY Dudes on YouTube to get started and take your fitness routine to the next level.
Make a Resistance Band Station
Elevate your workouts with a DIY resistance band station that’s both versatile and space-efficient! Begin by identifying a sturdy anchor point, such as a heavy piece of furniture or a door anchor designed specifically for resistance bands. Verify that the anchor can withstand dynamic tension to ensure a safe and effective workout. Next, select a variety of resistance bands with distinct tension levels to accommodate multiple exercises and strength goals. Strategically position the bands at different heights to cater to full-body workouts. As a safety precaution, always inspect the bands for signs of wear before each use to guarantee a worry-free experience. With this customizable setup, you can perform exercises like rows, chest presses, leg curls, and many more, tailored to your unique fitness level.
DIY Medicine Ball for Under $10
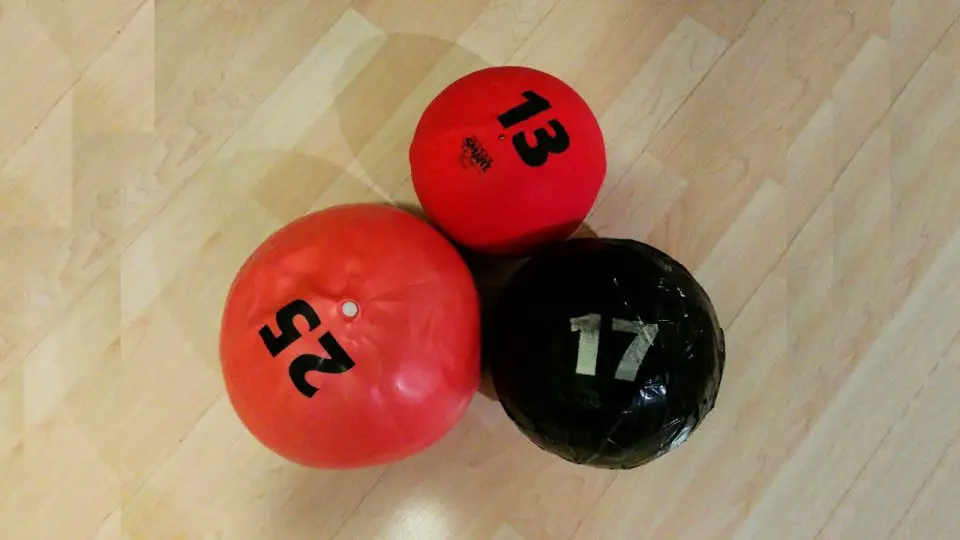
Create your own weighted medicine ball at home by transforming a yoga ball into a dynamic exercise tool. This DIY project requires minimal investment, using a yoga ball, heavy-duty trash bags, sand, duct tape, and cable ties to produce a 20-pound medicine ball. The process involves cutting a hole in the ball, lining it with a trash bag, and carefully adding sand before sealing it with duct tape and a touch of personal flair. Whether you’re looking to enhance your balance or core workouts, this homemade medicine ball offers a budget-friendly solution that’s both effective and rewarding.
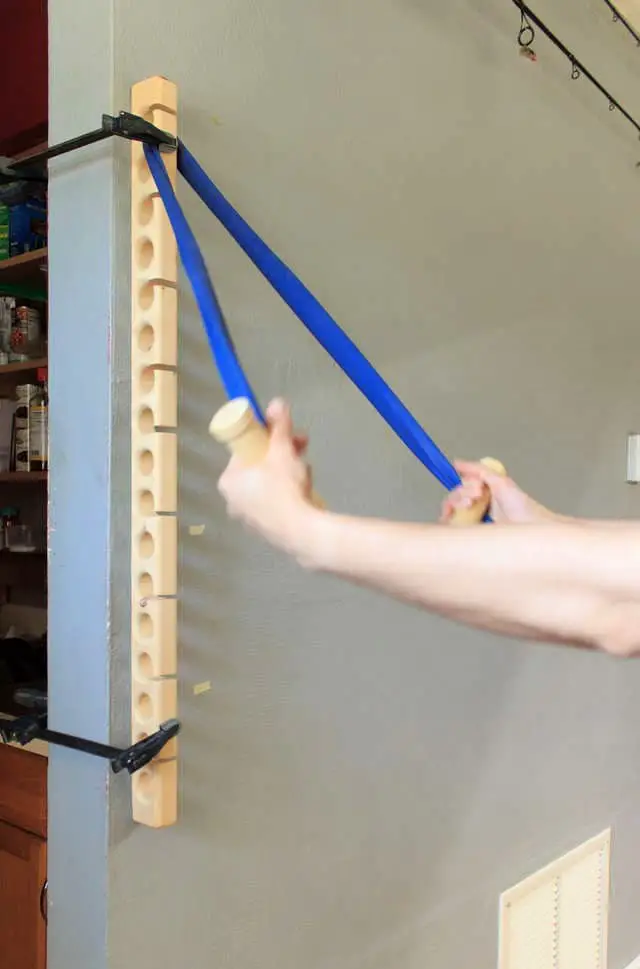
Handmade Suspension Trainer Straps

Transform your home fitness routine with a budget-friendly DIY TRX Suspension Trainer, achievable for just $20! According to Coach Kozak from HASfit, building your own durable and efficient suspension trainer requires only a trip to your local hardware store for materials like tie-down straps, ropes, PVC pipe, and an optional pipe insulator for added comfort. With a total investment of approximately $21, this DIY project offers substantial savings compared to commercial TRX systems. The comprehensive guide provides step-by-step instructions for assembling the trainer, ensuring each component is carefully selected for safety considerations. Perfect for a variety of suspension exercises, this homemade TRX trainer brings high-quality workouts directly to your doorstep without putting a strain on your wallet.
How to Make Sandbag Under $12 for Exercise
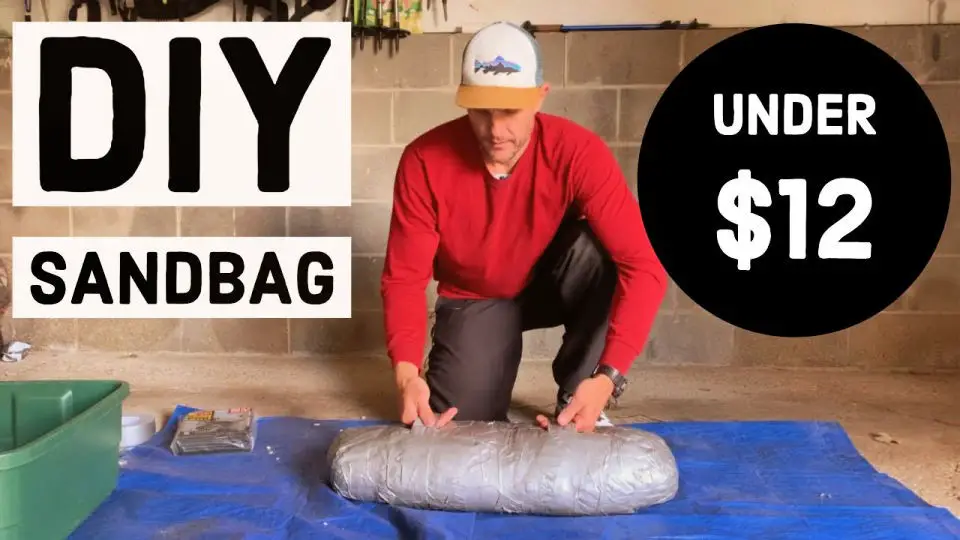
Transform your workout routine by crafting a homemade DIY sandbag for under $12. This innovative solution offers dynamic resistance without the hefty price tag, making it an ideal addition for anyone looking to mix up their exercises. To create this budget-friendly sandbag, you’ll need a few simple items: pea gravel, heavy-duty garbage bags, and duct tape – all easily sourced from local hardware stores.
The process is straightforward: measure out the desired amount of gravel, shape it into your preferred size, and secure it with duct tape. Add some handles for easy grip and you’re ready to go! Whether you’re looking to tackle sandbag get-ups or rucksack training, this sturdy DIY sandbag provides a practical and effective way to boost strength and endurance in your exercise routine.
Make Your Own Jump Rope
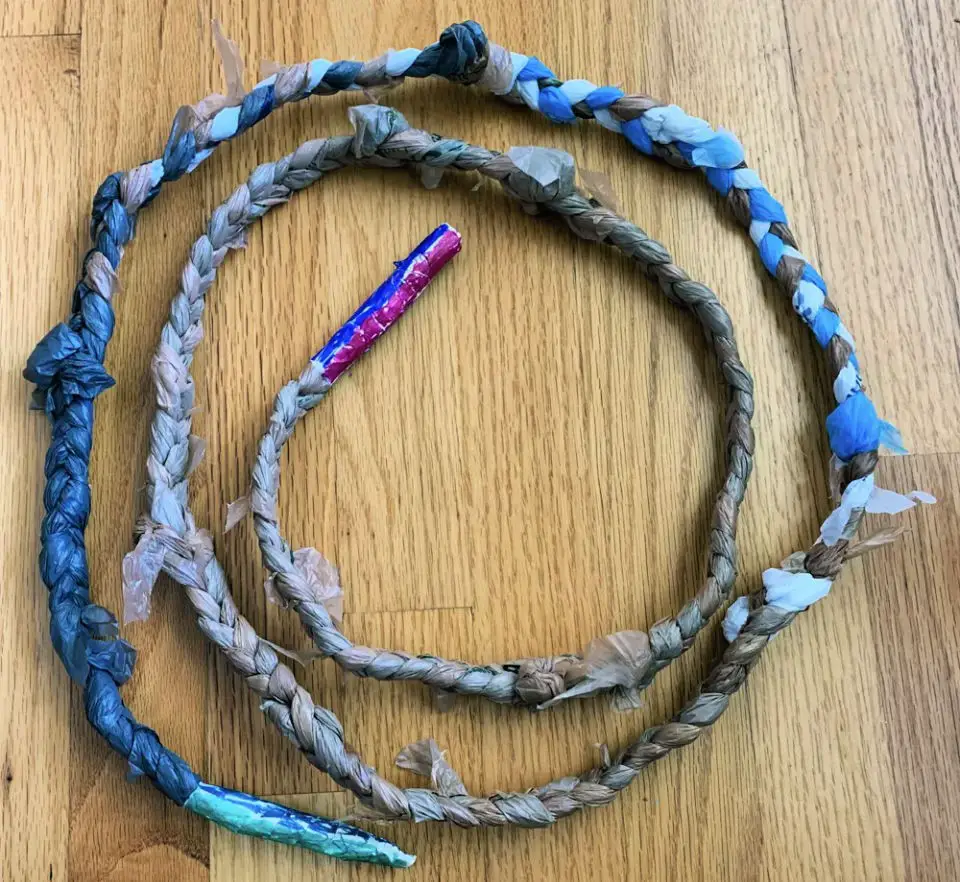
Are you ready to add a personal touch to your fitness routine in South Carolina’s sunny weather? Our guide takes the ordinary and turns it into an extraordinary DIY project, transforming plastic bags and tape into a durable and customized jump rope. This fun and sustainable crafting endeavor allows you to tailor the rope length to fit your height perfectly. By following our easy-to-follow instructions, you can create a unique piece of exercise equipment that reflects your personality. Grab your materials and let’s get started on crafting a one-of-a-kind jump rope that suits your needs!
DIY Parallettes for Bodyweight Exercises

Transform your home workout routine with DIY parallel bars, a budget-friendly exercise solution that’s surprisingly effective. By repurposing common materials like PVC pipe, T-sockets, elbow sockets, and end caps, you can create a versatile fitness tool without breaking the bank. The assembly process is straightforward and quick, much like building a mini version of professional gymnast equipment. This project is ideal for newcomers to home workouts, as it allows for a variety of exercises such as push-ups, dips, planks, and L-sit progressions, all designed to target specific muscle groups and enhance your range of motion. With these homemade parallel bars, you can embark on a new fitness journey from the comfort of your own home, bringing high-quality workouts right to your doorstep.
How to Make a Rowing Machine
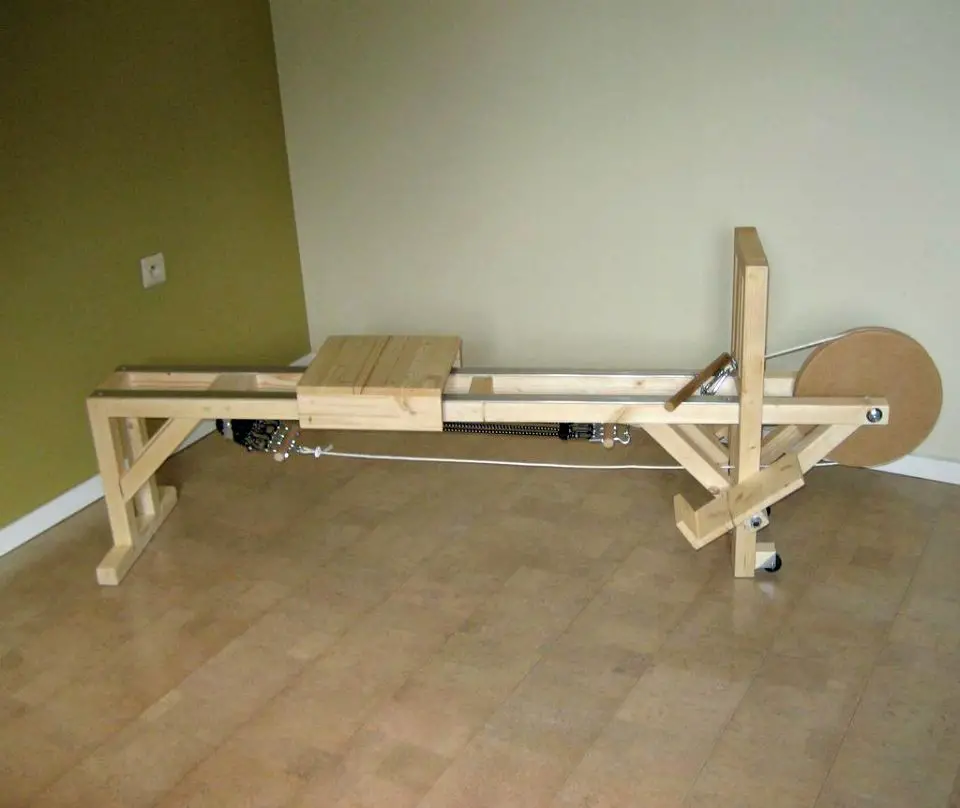
If you’re eager to create a rowing machine for your at-home workouts, Instructables has got you covered with a comprehensive DIY guide that’s both budget-friendly and effective. This step-by-step tutorial makes it easy to assemble a sturdy machine that targets multiple muscle groups while being gentle on your joints, even if you have minimal building experience. By following the optimized instructions, you’ll craft a rowing machine that seamlessly integrates into your workout routine and enhances your overall fitness journey. So, gather your tools and let’s get started, making fitness personal and accessible from the comfort of your own home.
DIY Climbing Wall and Cargo Net
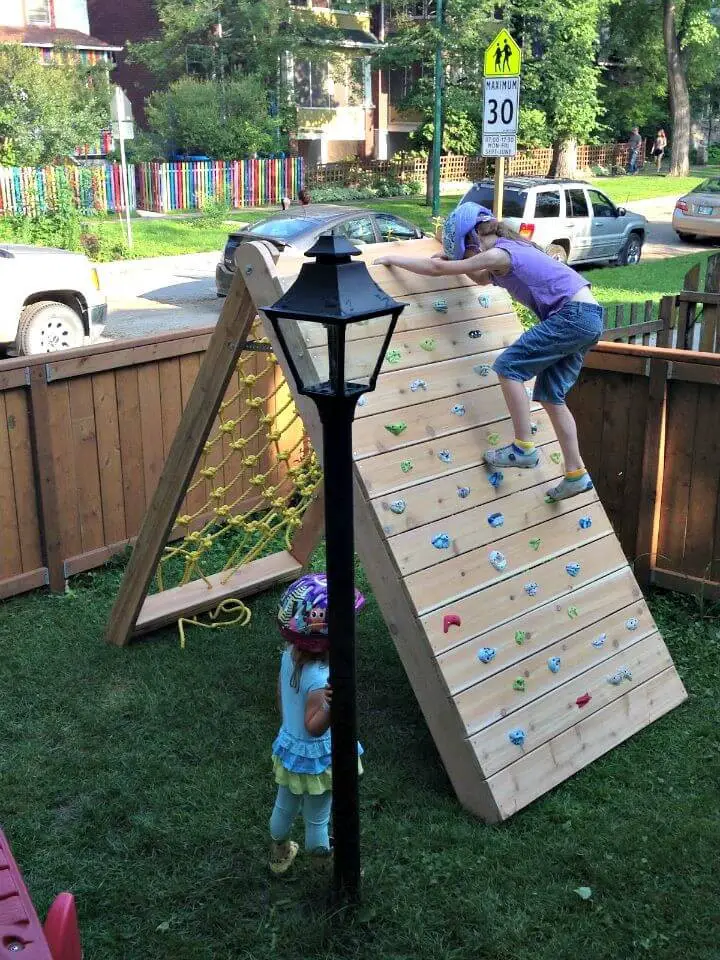
Transforming a backyard into an adventurous playground for kids can be a truly rewarding experience. One creative DIY project that’s perfect for smaller yards is building a climbing wall and cargo net. This engaging project not only provides a fun and challenging structure for kids to explore, but it’s also sturdy enough to accommodate multiple children at once. To make it even more practical, the design is portable and collapsible, making it easy to store during the winter months when not in use.
One of the biggest benefits of this project is that it’s designed to be budget-friendly and accessible, using common tools and materials that you may already have on hand. Our guide provides a comprehensive list of everything you’ll need, as well as clear, step-by-step instructions to ensure success. By incorporating this playful addition into your outdoor space, you can encourage your kids to get more physical activity while also fostering their imagination and creativity.
If you’re inspired to create your own climbing structure, we’d love to hear about your experience and see how it turns out!
How to Make an At-Home Gym
Transform your garage into a unique fitness sanctuary by harnessing Bower Power’s expertise in creating an at-home gym. By repurposing space effectively, you can create a fully functional workout area that caters to CrossFit enthusiasts like Jeremy. This involves selecting and installing space-saving equipment such as the fold-back wall mount rack from Titan Fitness, while optimizing storage with lockable cabinets for added safety. Take it a step further by setting up a weight tree and arranging your workout area for easy access and minimal footprint. As you bring your vision to life, remember that a well-designed home gym not only saves time but also fosters a healthy lifestyle, all without compromising the functionality of your home.
DIY Kettlebells For Under $10
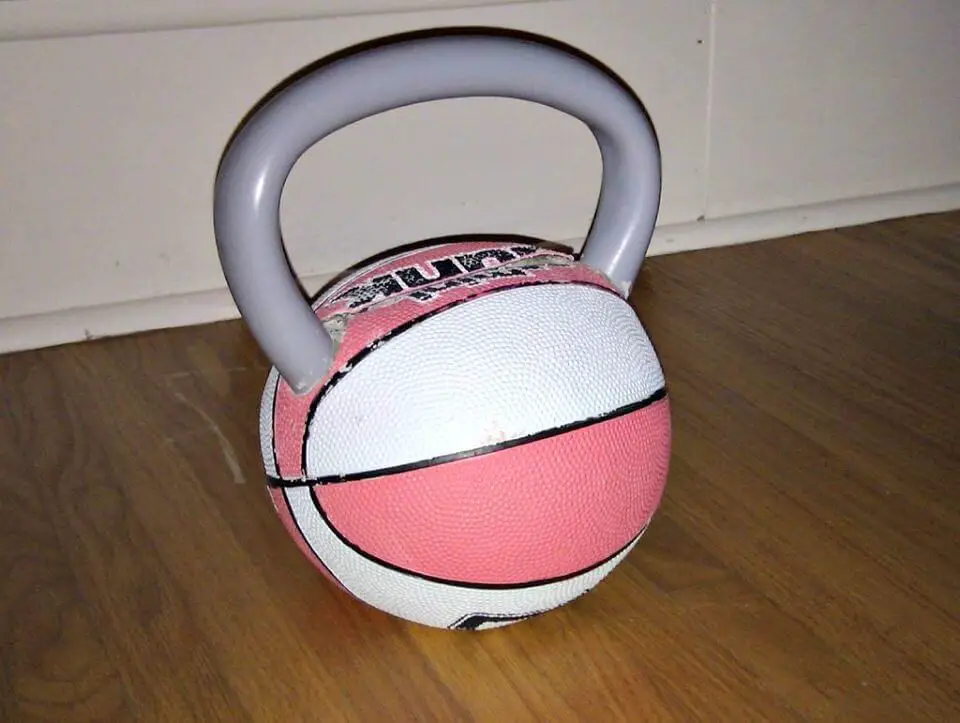
Elevate your fitness routine without sacrificing your budget by creating your own kettlebells using readily available materials. With Instructables’ comprehensive guide, you can craft durable and cost-effective kettlebells for under $10. This DIY project is perfect for those looking to improve their strength training at home, offering a comprehensive workout experience with the added bonus of personalization and significant savings. The step-by-step instructions and clear visuals make the process accessible and engaging, regardless of your DIY skills. Get ready to take your workouts to the next level with a unique touch that won’t break the bank.
DIY Exercise Bike With Laptop Holder

For individuals struggling to balance their busy schedules with fitness goals, the Worxercise Exercise Bike with Laptop Holder offers a game-changing solution. This innovative bike allows users to stay active while simultaneously tackling work or personal tasks, making it an ideal setup for those who prioritize both productivity and health. The exercise bike’s ergonomic design accommodates laptops, enabling users to participate in virtual meetings, watch webinars, or catch up on emails while staying physically active. With the included guide, setting up this versatile exercise solution is straightforward, whether at home or in a professional setting. As a result, individuals can boost their energy levels and multitask with greater efficiency, making it an attractive option for those seeking to optimize their busy lifestyles.
How to Build a Pull Up Bar
Eager to build a reliable and multi-functional pull-up bar at home? Our comprehensive guide will walk you through the process of creating a sturdy DIY bar that’s perfect for enhancing your workouts. With step-by-step instructions and a detailed materials list, building your own pull-up bar has never been easier. Not only does this project save you money, but it also adds variety to your fitness routine by allowing for different hand positions and angles. By taking on the challenge of constructing your own gym equipment, you’ll not only create a valuable addition to your home workout space but also experience a sense of accomplishment that comes with completing a rewarding DIY project.
Build a Kettle Bell for 10$
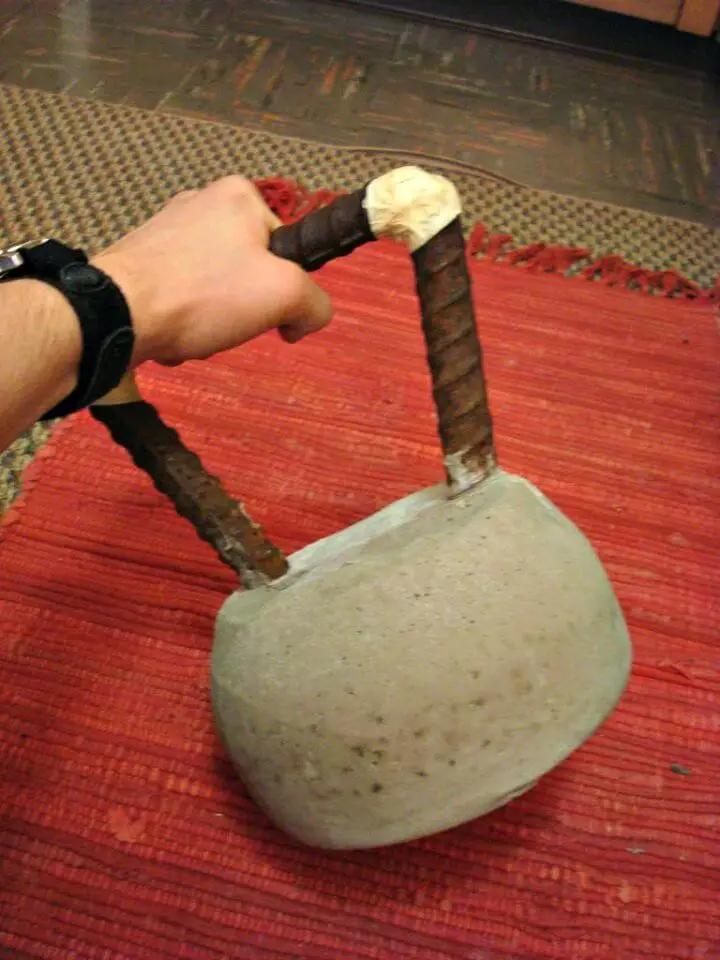
Looking to create a kettlebell on a budget for a home workout? A DIY approach can be a great option, especially with Instructables’ step-by-step guide to building a $10 kettlebell. This project offers a flexible and cost-effective way to get started with strength training without sacrificing quality or durability. With easy-to-follow instructions and readily available materials, anyone can assemble a reliable kettlebell and begin their fitness journey. For those who enjoy DIY projects and want to add a personal touch to their workout routine, this guide provides a fun and productive solution.
Homemade Power Rack
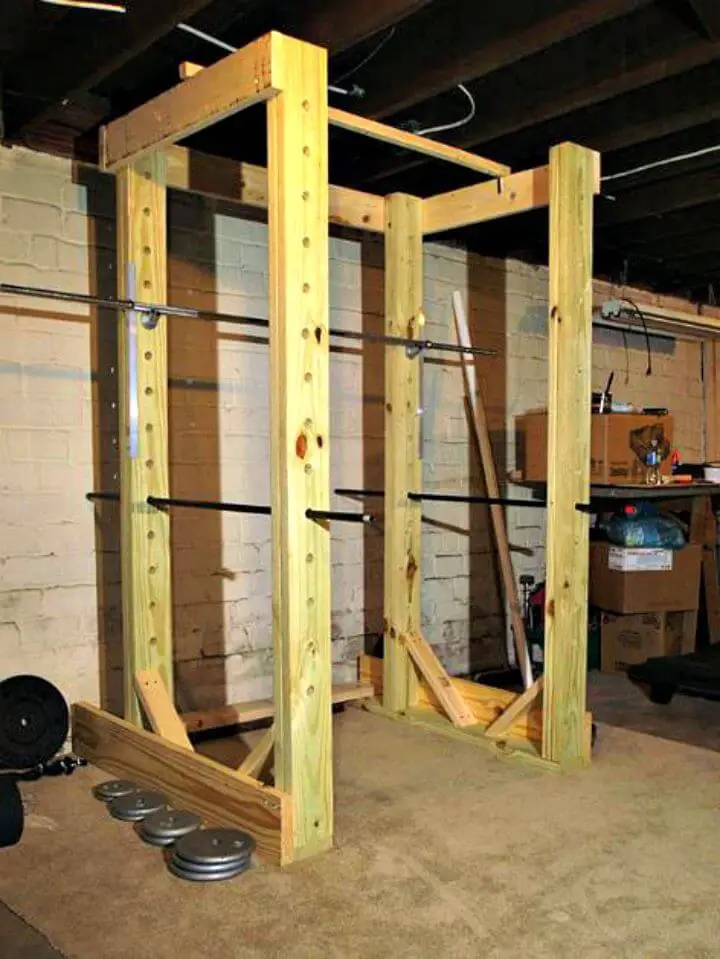
If you’re looking to create a sturdy and affordable power rack for your home gym without breaking the bank, our comprehensive guide is here to help. By following Aaron Gipperich’s step-by-step instructions and utilizing readily available materials from local hardware stores, you can construct a reliable wooden power rack that meets your unique space and weightlifting needs. Not only will this DIY project save you money, but it’ll also allow you to tailor the rack to your specific preferences and ensure a quiet workout experience late at night, free from disruptions for the household. With this homemade power rack solution, you’ll be able to enhance your strength training and take pride in knowing that you crafted the equipment yourself.
Easy DIY PVC Gymnastic Or Fitness Rings
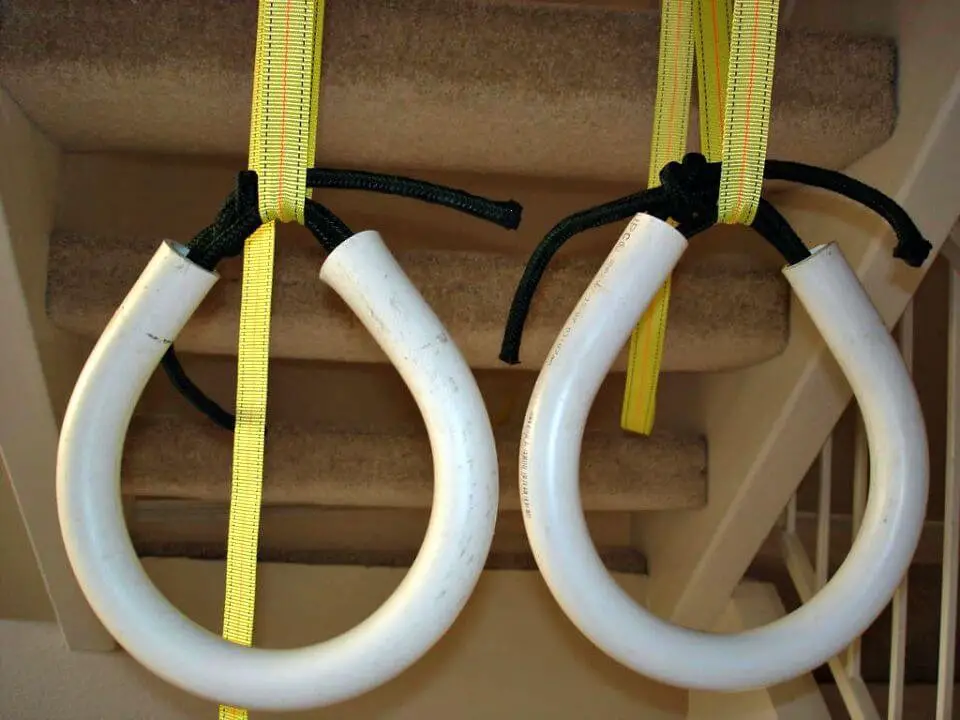
Savvy fitness enthusiasts seeking cost-effective solutions, Instructables provides an invaluable guide for creating PVC gymnastic rings. These versatile tools are ideal for incorporating bodyweight exercises into your workout routine, enhancing overall physical fitness and flexibility. By following the step-by-step instructions, you’ll be able to craft durable and safe homemade gym equipment that meets your specific training needs. With a focus on precision and attention to detail, you can simplify your fitness journey while enjoying the benefits of a customized fitness tool tailored to your unique goals.
Make Your Own Squat Rack
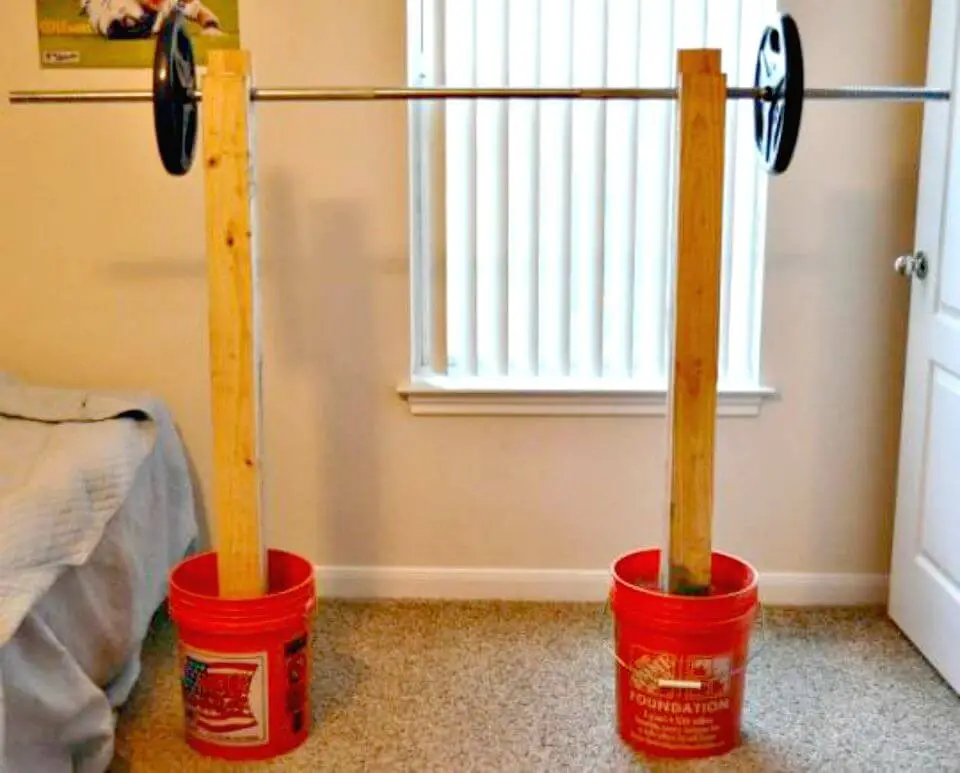
If you’re looking to upgrade your home gym with a sturdy squat rack without sacrificing your wallet, the Globetrotting Guppy offers a comprehensive DIY guide to building a heavy-duty rack from affordable materials. The tutorial takes you through a step-by-step process, starting with sourcing cost-effective materials like five-gallon buckets and Quikrete concrete mix, all the way to assembly and drying. With a total cost of under $40 and requiring only a few hours of your time, this project is perfect for fitness enthusiasts looking to enhance their workout space. The guide’s clear instructions ensure that you’ll end up with a functional and robust squat rack that will withstand even the most intense workouts.
Easy DIY Exercise Ball Cover
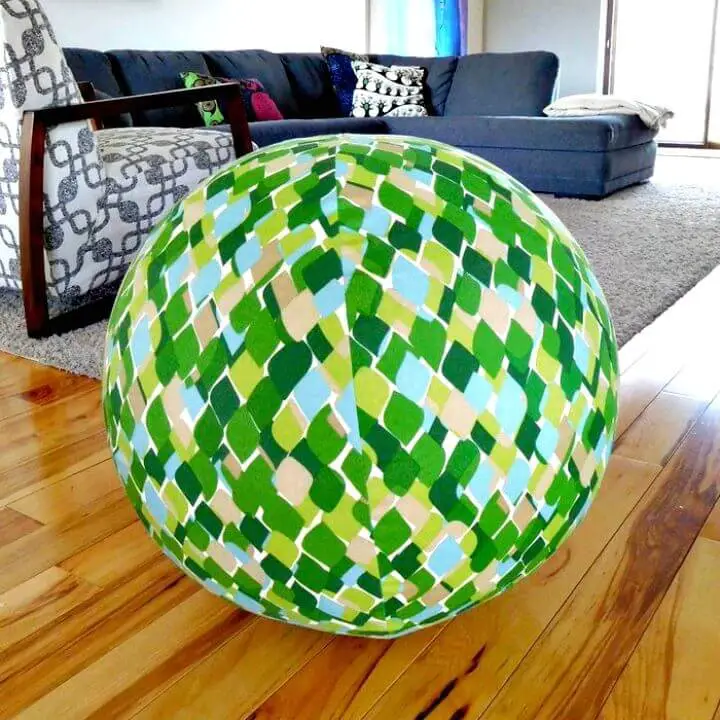
Elevate the humble exercise ball into a chic and ergonomic seating solution by crafting a DIY Exercise Ball Cover. This innovative project, courtesy of Instructables, empowers individuals to infuse their living or workspace with style while prioritizing good posture. By creating a custom cover, you not only imbue your workout gear with personal flair but also seamlessly integrate it into your decor. The accompanying guide is carefully crafted to be crystal clear and easy to follow, guiding you through each step of the process. As a result, you’ll be left with a functional and visually appealing exercise ball cover that adds a touch of comfort and sophistication to your daily routine.
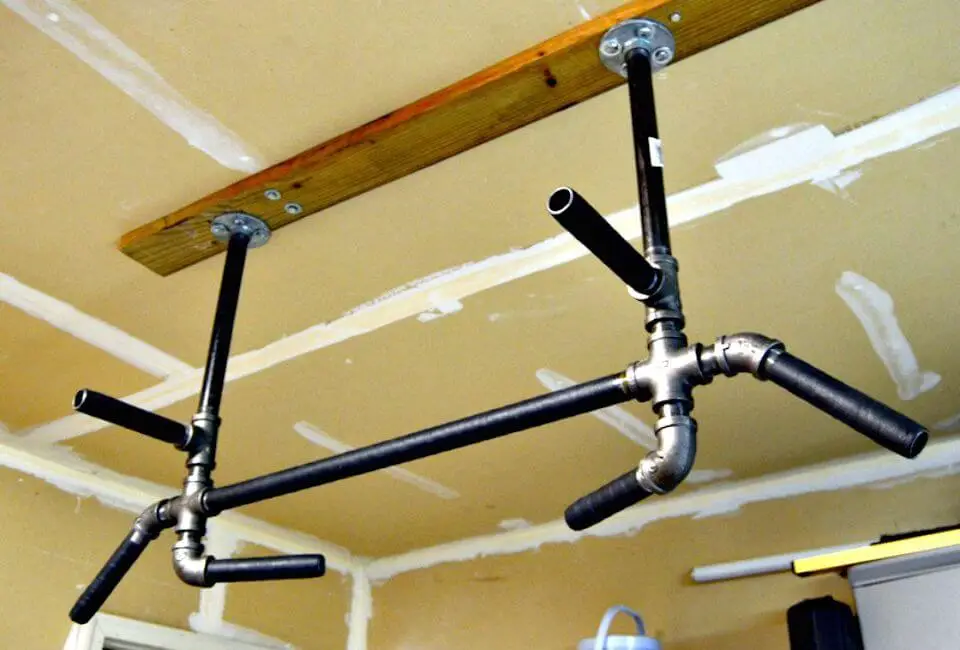
Simple DIY Free-Standing Pull-Up Bar
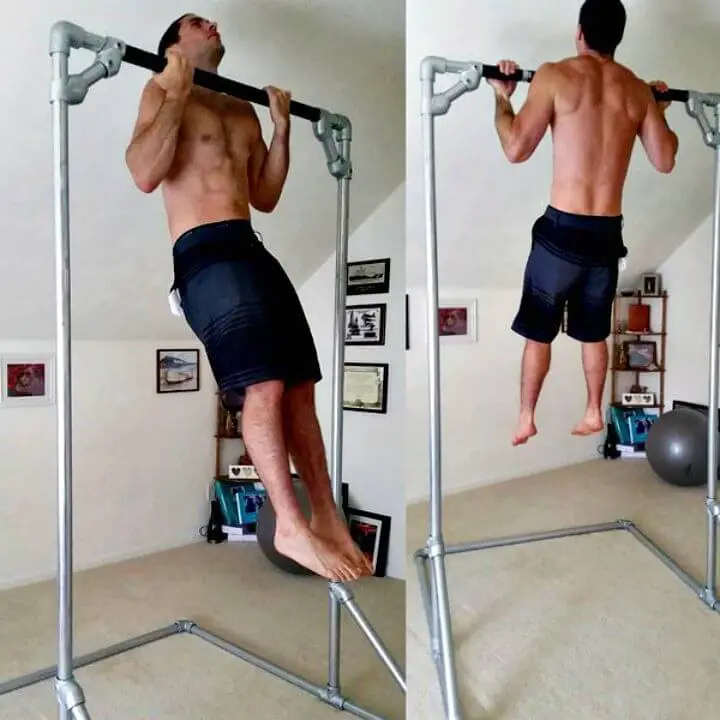
Simplify your fitness routine with a custom-made pull-up bar that meets your specific training needs. By building a DIY Free Standing Pull-Up Bar using robust Kee Klamp fittings, you can create a sturdy and reliable structure that’s perfect for athletes who require intense workouts. The design is not only stable but also portable, making it ideal for home or on-the-go exercises. With Simplified Building’s detailed instructions, you’ll have the support you need to construct your pull-up bar and start achieving your personal fitness goals.
Make Your Own Weight Rack and Bench
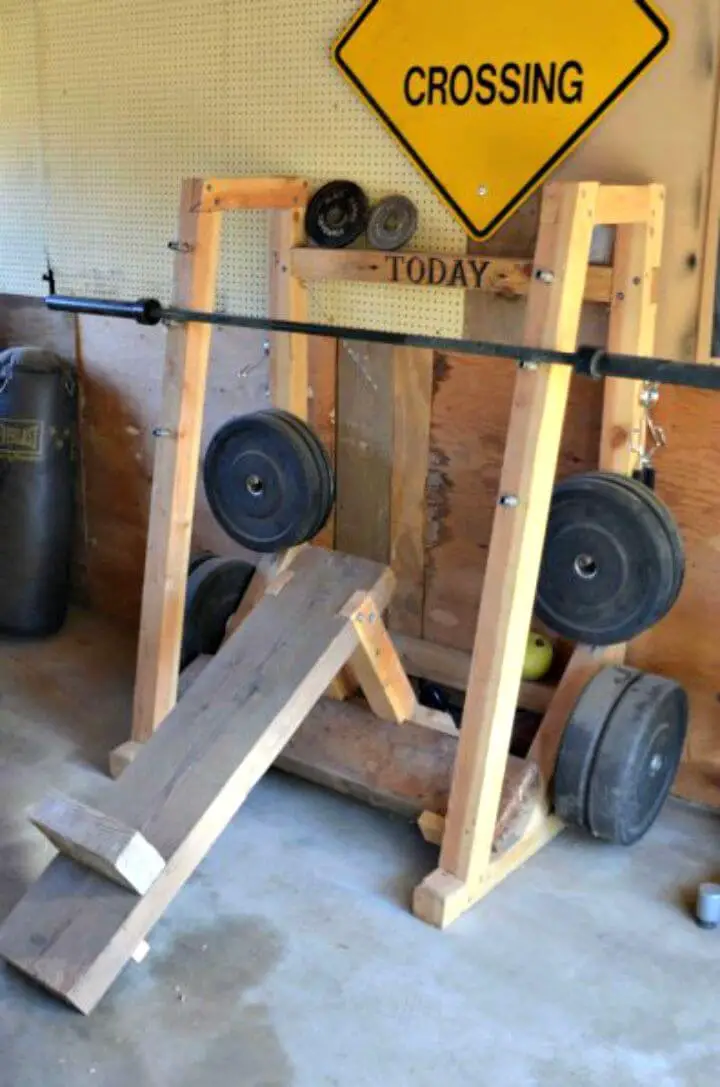
Transforming ordinary materials into extraordinary homemade gym equipment is the essence of CraftyJack’s creative journey on Master of None. As he embarks on crafting a DIY squat rack and bench, his process unfolds like a masterclass in upcycling salvaged wood into a sturdy and multi-functional weight rack. The resulting no-frills design embodies a minimalist philosophy that prioritizes function over flashiness, resonating with those who appreciate the unadulterated charm of weathered wood and self-made gym gear. With step-by-step guidance, instructional images, and a demonstration video at your disposal, you can learn to build your own workout setup and seamlessly integrate exercises like squats, bench presses, and incline presses into your fitness routine. By tapping into Jack’s expertise, you’ll be empowered to create a personalized space that motivates you to stay active and healthy.
How to Build See Saw for Exercise
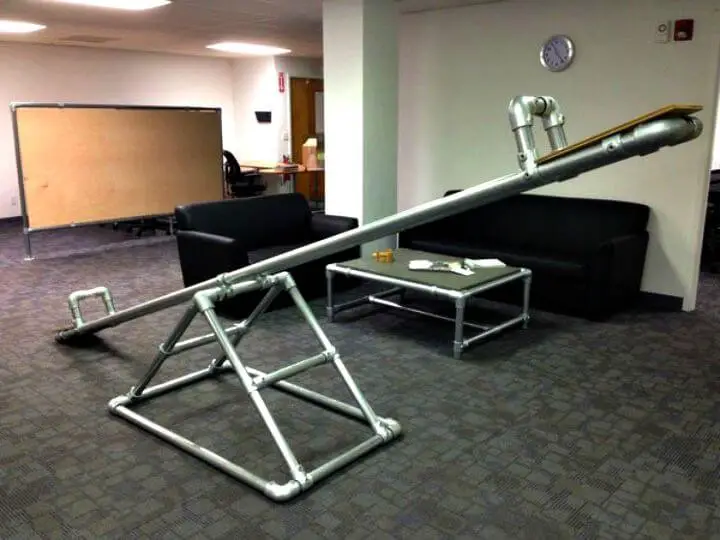
Bring back the carefree joy of childhood with a DIY portable seesaw that’s robust enough for adults and a surefire hit at any gathering. This comprehensive guide takes you through a step-by-step process to construct a durable seesaw using Kee Klamp fittings and Gator Tube pipe, ensuring a project that’s not only nostalgic but also built to last. Whether you’re looking to create a memorable experience at events, community spaces, or your own backyard, this see-saw is designed to provide endless entertainment and the thrill of balancing and moving with friends and family.
Conclusion:
As the culmination of crafting your own 25 homemade DIY gym equipment ideas, you’ve not only created a personalized fitness regimen but also nurtured a creative spark within your workout space. The journey, from assessing your fitness goals to ensuring the safety of each creation, is instrumental in building a home gym that harmoniously integrates with your aspirations and available space. This experience transforms making DIY gym equipment into a cost-effective solution as well as a rewarding hobby that enriches your overall fitness journey. With pride, you can customize your equipment and reap the benefits of a tailored workout environment at home.
