Transforming your living space with IKEA Kallax shelves is an art form. By embracing 30 creative hacks and DIY ideas, you can turn a plain shelf into a bespoke piece that reflects your personality and meets your functional needs. This guide caters to individuals who crave a personalized touch in their homes. From simple tweaks to more complex projects, our advice ranges from understanding your space and finding inspiration to executing the project with ease. Not only will these ideas enhance the visual appeal of your home, but they’ll also boost its organization and practicality. With this comprehensive guide, you’ll gain the confidence to take on DIY projects that turn ordinary furniture into extraordinary statements about your style.
Why Opt for IKEA Kallax Hacks?
Embracing an IKEA Kallax hack project is about more than just saving money – it’s a chance to infuse your living space with personality and style. These hacks offer several compelling reasons to consider them:
For starters, they enable personalization. The simplicity and versatility of the Kallax series mean that with some creativity, you can transform these pieces into something that perfectly reflects your taste and complements your surroundings. Whether it’s adding a unique color, swapping out hardware, or repurposing its use, the end result is uniquely yours.
Another significant advantage is cost-effectiveness. Buying bespoke furniture can be expensive, but IKEA Kallax hacks offer a budget-friendly alternative. With a little imagination and some DIY elbow grease, you can achieve a high-end look without breaking the bank.
These hacks are also eco-friendly. Upcycling or repurposing furniture reduces waste and the demand for new resources, making it a more sustainable choice.
Many of these hacks not only improve the appearance of the furniture but also enhance its functionality. Adding wheels, for instance, can turn a stationary shelf into a mobile cart. This adaptability means you get exactly what you need from your furniture.
Finally, there’s the sense of satisfaction that comes with completing a DIY project. You’ve not only created something useful but also honed your crafting skills in the process – a feeling that’s hard to match.
Material Lists and Alternatives
Embarking on an IKEA Kallax hack or DIY project requires meticulous planning, and having a comprehensive material list is essential. This not only facilitates budgeting and planning but also ensures you have all the necessary components within reach before commencing the project. To ensure a smooth execution, it’s vital to gather and prepare each required material. The following materials are necessary for a successful IKEA Kallax hack or DIY project:
– An IKEA Kallax shelving unit
– Customization-friendly wood or MDF panels
– Paint or wood stain for colour enhancement
– A range of sandpaper grits for surface preparation
– Wood glue for bonding
– Screws and fasteners for secure assembly
– A set of tools, including a saw, drill, screwdriver, and others
For those seeking creative alternatives, consider using fabric or wallpaper to infuse a unique aesthetic. Alternatively, adhesive vinyl can serve as a quick and easy solution for colour transformation.
For a more environmentally conscious approach, explore recycled or second-hand materials that can be repurposed, reducing waste and promoting sustainability.
Skill Level Indicators
To make customization accessible to everyone, we’ve grouped our Kallax unit projects by skill level. This way, you can choose a project that suits your expertise and enjoy the process of giving your storage unit a personalized touch. We’ve identified three categories: beginner-friendly projects that require minimal tools and skills; intermediate-level tasks that may need more advanced tools and some DIY experience; and advanced projects for those who are comfortable with power tools, complex constructions, and possibly even carpentry skills.
Estimated Time and Cost
To embark on a project successfully, it’s crucial to grasp the time and financial investments involved. A basic IKEA Kallax hack might require a weekend’s commitment, with costs ranging from $50 to $100. However, more intricate projects can span several weekends, potentially exceeding $200 in expenses, depending on the materials and tools required. These estimates serve as a starting point, but it’s essential to consider variables like material choices, project complexity, and your level of experience. A buffer in both time and budget is vital to account for any unforeseen challenges that may arise.
How to Get Started with IKEA Kallax Hacks
Transforming your IKEA Kallax into a one-of-a-kind piece that seamlessly integrates with your space and personal style can be intimidating, but fear not! With a dash of creativity and some DIY elbow grease, this project is both achievable and incredibly rewarding. To embark on this journey, follow these steps and make the process an enjoyable and stress-free experience.
Understanding Your Needs and Space
Before diving into IKEA Kallax hacks, take a step back and reflect on your objectives. Are you seeking to boost storage, create a functional space like a desk or bar cart, or simply enhance the room’s visual appeal? Clarifying your needs will dictate the direction of your project. Next, assess the surrounding environment by measuring the area where the Kallax will reside, factoring in how it interacts with other pieces and elements within the room. Furthermore, consider the primary purpose of the Kallax – will it serve as a storage solution, a mobile workstation, or something else entirely? This understanding will inform the type of hack you might employ, such as installing doors for concealed storage or incorporating wheels for effortless repositioning.
Inspiration and Planning
To ignite creativity for your DIY project, start by gathering inspiration from various sources like Pinterest, DIY blogs, and Instagram. These platforms are treasure troves of innovative ideas. Begin by crafting a visual representation of your aspirations. This can be achieved by collecting images that resonate with you, taking note of what specifically draws you to each one.
Next, establish a budgetary framework for your project. The amount you’re willing to allocate will significantly impact the materials and tools you’ll have at your disposal.
Finally, create a comprehensive list of required materials and tools. This list should be based on the DIY hack you’ve chosen, and common items include paint, adhesive, and hardware. Common tools might include a drill, saw, or screwdriver.
Execution: Step by Step
With a plan in hand, it’s time to embark on the DIY transformation. To make the journey less daunting, break down the process into logical steps, even if you’re new to DIY projects. Start by preparing your workspace and gathering necessary materials and tools. Ensure adequate ventilation if painting or staining is involved. Before cutting any materials, double-check measurements to avoid errors. The mantra ‘Measure twice, cut once’ serves as a useful reminder. Once prepared, follow your plan to assemble the components. This might involve building the IKEA Kallax according to instructions before adding custom elements. The customization phase is where creativity shines. Paint, add hardware, apply adhesive paper, or implement other hack ideas. Take your time and savor the process. Finally, complete any finishing touches. These may include additional decorations, organizing accessories, or simply styling your newly hacked Kallax.
Tips for Success
As you embark on your DIY journey, remember that patience is key. Some tasks may require waiting for processes to complete, much like paint drying. Avoid rushing through steps and instead focus on precision and attention to detail. Safety should also be your top priority. Always use tools according to the manufacturer’s instructions and don’t hesitate to wear protective gear when necessary. And don’t worry if things don’t go exactly as planned – DIY is all about learning from your mistakes. If a problem arises, take a step back, assess the situation, and find a solution or simply accept that it’s okay to make imperfections part of the process.
Enjoy Your Creation
As you gaze upon the finished product of your IKEA Kallax hack, take a moment to appreciate the fruits of your labor. Your creativity has been brought to life, your DIY skills have been sharpened, and your space now boasts a unique personal touch, all thanks to your innovative handiwork.
Sustainability Tips for IKEA Kallax Hacks
When creating a sustainable home, it’s essential to extend eco-friendly principles beyond energy efficiency. One way to do this is by thoughtfully approaching furniture and decor choices. When transforming an IKEA Kallax, consider the following strategies to minimize your environmental footprint:
Harness Sustainable Resources: Opt for recycled, reclaimed, or sustainably sourced materials for your DIY projects. For instance, utilize recycled wood or bamboo instead of new timber.
Repurpose with Purpose: Before acquiring new materials, explore opportunities to repurpose what you already possess. An old bookshelf or cabinet could provide valuable components like wood or hardware for your Kallax hack.
VOC-Conscious Finishing Touches: Select paints, stains, and adhesives that are low in volatile organic compounds (VOCs) to preserve indoor air quality.
Eco-Friendly Tooling: Utilize hand tools or electric tools featuring energy-saving designs to reduce your carbon footprint while working on your project.
Donate Unwanted Materials: If you have leftover materials, consider donating them to local schools, community centers, or online marketplaces. By embracing these strategies, you can create a functional and beautiful piece that aligns with your values and contributes to a healthier planet.
Maintenance and Care for Your IKEA Kallax
To maintain the appearance and longevity of your IKEA Kallax, follow these essential steps: Firstly, establish a regular cleaning routine using a soft, dry cloth to dust the unit. For stubborn stains or spills, employ a damp cloth with a mild cleaner, being cautious not to use harsh chemicals that could damage the surface. To safeguard against scratches and scuffs, utilize coasters, placemats, and felt pads on surfaces prone to wear. Moreover, position your Kallax in a way that avoids direct sunlight exposure, which can cause fading over time. This can be achieved by placing it away from windows or using curtains to minimize sun damage. When relocating the unit, handle it with care by lifting rather than dragging to prevent damage to both the furniture and floors. Finally, periodically inspect and tighten screws and fasteners to ensure stability and prevent wobbling. By following these simple yet effective tips, your Kallax will remain a stylish and functional element in your home, while also supporting sustainable choices for the long haul.
Troubleshooting Common Issues
When tackling an IKEA Kallax hack, it’s not uncommon to encounter some obstacles along the way. To ensure your DIY project turns out as desired, take heed of these common pitfalls and solutions. First off, if you’re struggling with pieces that don’t fit together seamlessly, double-check the assembly instructions to verify that all parts are properly oriented. If necessary, disassemble the affected sections and reassemble them, paying close attention to the correct order and orientation of components.On the other hand, if your assembled unit is wobbly or unstable, make sure all connections are secure and tightened. If the issue persists, inspect the floor for any unevenness; you may need to adjust the feet or add shims underneath for stability.When dealing with drawers or doors that don’t slide smoothly, first look out for any obstructions and verify that the drawer rails or door hinges are installed correctly. A silicone-based lubricant can also be applied to the rails to improve their movement.In some cases, surface damage may occur during assembly. If this happens, you can use a furniture marker or crayon that matches your Kallax’s color to fill in and camouflage the damage.Lastly, if you’re missing or damaged parts, don’t fret – IKEA provides replacement components for their products. Reach out to customer service or visit your local IKEA store to obtain the necessary components.Ultimately, patience is key when it comes to DIY tasks. Take your time, follow the instructions, and seek help if needed. By doing so, you’ll successfully build a stylish and functional Kallax that meets your expectations.
FAQS on IKEA Kallax Hacks and DIY Ideas
Many DIY enthusiasts turn to IKEA Kallax hacks as a creative way to revamp their living spaces. To support your project, here’s a comprehensive FAQ section addressing the most frequently asked questions about Kallax hacking.
What is an IKEA Kallax hack?
Transforming an IKEA Kallax shelf unit into a one-of-a-kind piece of furniture is what IKEA Kallax hacks are all about. By modifying or building upon the standard design, you can create a customized solution that not only serves its intended purpose but also reflects your personal style and preferences.
How do I start my IKEA Kallax hack project?
Before embarking on a DIY project, it’s essential to clarify its purpose. Are you aiming to create additional storage space? Enhance the aesthetic appeal of a room? Knowing the objective will help you stay focused throughout the process.
To ensure a successful outcome, measure your available space carefully to determine whether the hacked piece will fit comfortably within it. This step is crucial in avoiding any last-minute adjustments or costly mistakes.
्नNext, gather inspiration from various sources such as blogs, Pinterest, and Instagram. Browsing through these platforms can help you visualize the final product and identify potential design flaws or areas for improvement.
It’s also vital to plan your budget and create a comprehensive list of the materials and tools needed to complete the project. This will prevent any unexpected expenses or delays that might derail your progress.
Finally, follow a step-by-step guide to bring your DIY vision to life. By breaking down the process into manageable tasks, you’ll be able to tackle each stage with confidence and achieve the desired outcome.
Can I transform my Kallax unit into a bench or desk?
Transforming a Kallax unit into a functional piece of furniture is achievable with a little creativity and practicality. By adding a sturdy top, you can easily convert it into a bench or desk. To take your bench to the next level, incorporate comfortable cushions that will make it an inviting spot for relaxation. If you’re opting for a desk, consider reinforcing the unit’s structure to ensure it can withstand the weight of typical desktop items, such as laptops and office supplies.
Is it possible to add doors or drawers to a Kallax shelf?
Incorporating doors, drawers, or custom inserts is a popular workaround to enhance the versatility of an IKE Kallax shelf. For those seeking a seamless integration, purchasing official IKE Kallax inserts provides the perfect solution. Alternatively, utilizing custom-made pieces can help achieve the desired aesthetic and functionality.
What are some simple hacks for beginners?
For those just starting out, some straightforward tweaks can breathe new life into a piece of furniture. For instance, you can apply adhesive vinyl or contact paper to give it a fresh coat of ‘paint.’ Alternatively, swapping out knobs or handles on drawers or doors can instantly update the look. Another creative solution is to repurpose the unit by placing it on its side and adding a cushion to transform it into a bench. And if all else fails, a simple paint job can completely transform the color and aesthetic of the piece.
How do I ensure my hacked Kallax unit is safe to use?
To ensure the longevity and stability of your IKEA furniture, meticulously adhere to the provided assembly instructions. When integrating units into your space, consider the weight and structural integrity of any added components, and take necessary precautions to prevent damage or accidents. For instance, secure tall or stacked units to a wall to prevent tipping, and apply appropriate fixings when attaching shelves or other heavy elements to a wall. By prioritizing caution and attention to detail during the assembly process, you’ll be able to enjoy your new furniture for years to come.
Can I make my Kallax hack eco-friendly?
When it comes to making your IKEA hack more environmentally friendly, there are several strategies to keep in mind. For starters, opt for non-toxic paints and adhesives that won’t harm the planet or its inhabitants. Additionally, consider upcycling or reusing materials whenever possible. This not only reduces waste but also adds a unique touch to your design. When selecting sustainable add-ons, look for options like bamboo or reclaimed wood that offer a more eco-conscious alternative to traditional materials. And finally, if you find yourself no longer needing your Kallax hack, consider donating it instead of sending it to a landfill. This not only helps reduce waste but also supports those in need.
What should I do if my hack doesn’t go as planned?
It’s essential to adopt a flexible mindset when embarking on a DIY project, even if it doesn’t unfold exactly as planned. Instead of getting discouraged, consider whether a simple tweak or adjustment can salvage the situation. If not, don’t be afraid to embrace the imperfections and view them as an integral part of your project’s unique character. Alternatively, start anew with a different approach, recognizing that each attempt serves as a valuable learning experience. By embracing this growth-oriented mindset, you’ll be well-equipped to successfully complete your IKEA Kallax hack project. The key to success lies in cultivating creativity, planning, and that indispensable DIY spirit. As you navigate the process, remember to stay open-minded and willing to adapt – and don’t worry if things don’t go exactly as planned.
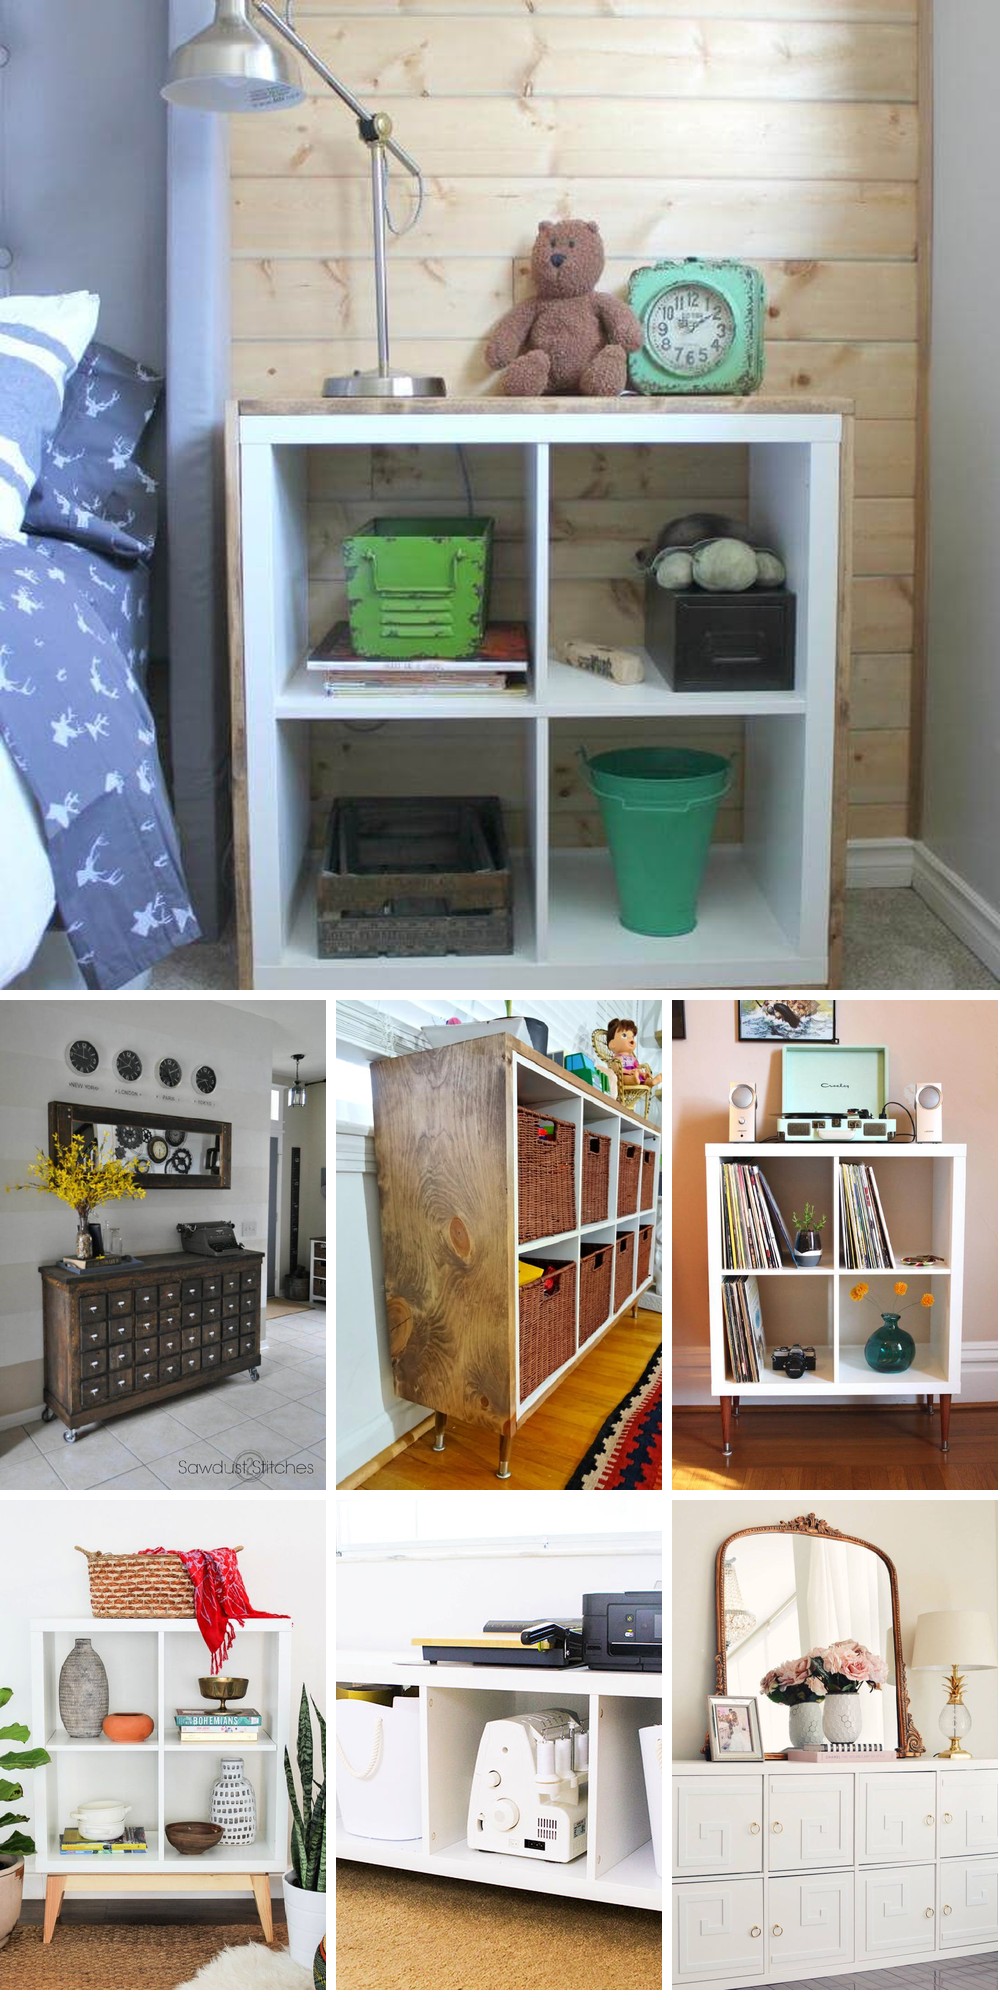
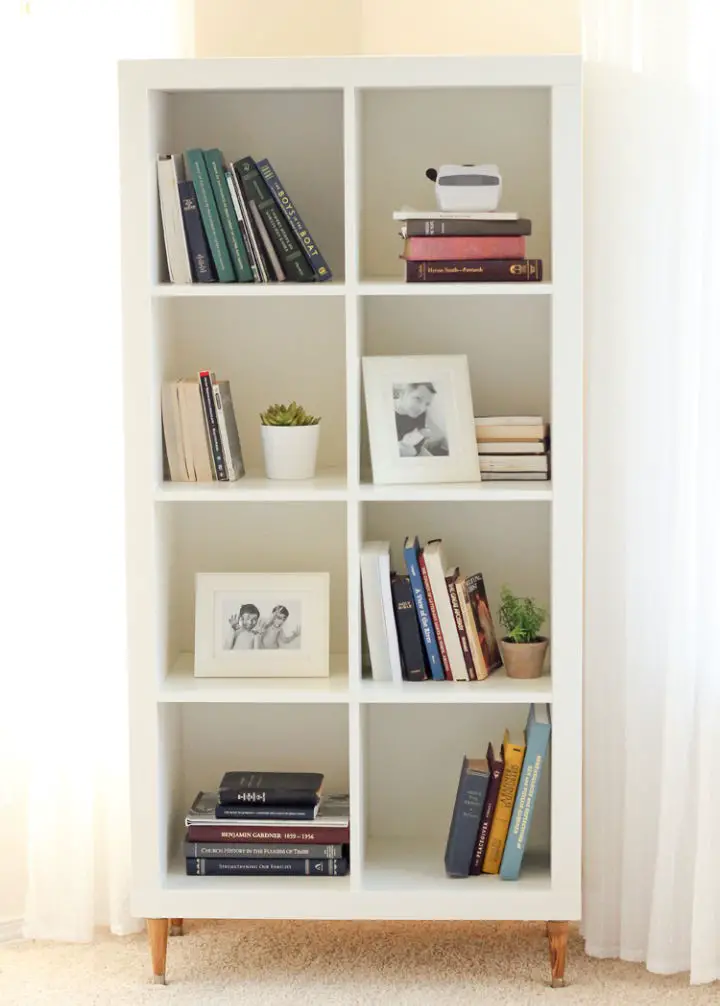
30 Creative IKEA Kallax Hacks and DIY Ideas
Transform your living space by unlocking the full potential of IKEA Kallax shelves. Explore a diverse range of 30 creative and ingenious ideas that blend functional storage with decorative flair, elevating your room’s ambiance and practicality.
IKEA Kallax Shelf Glow Up Hack
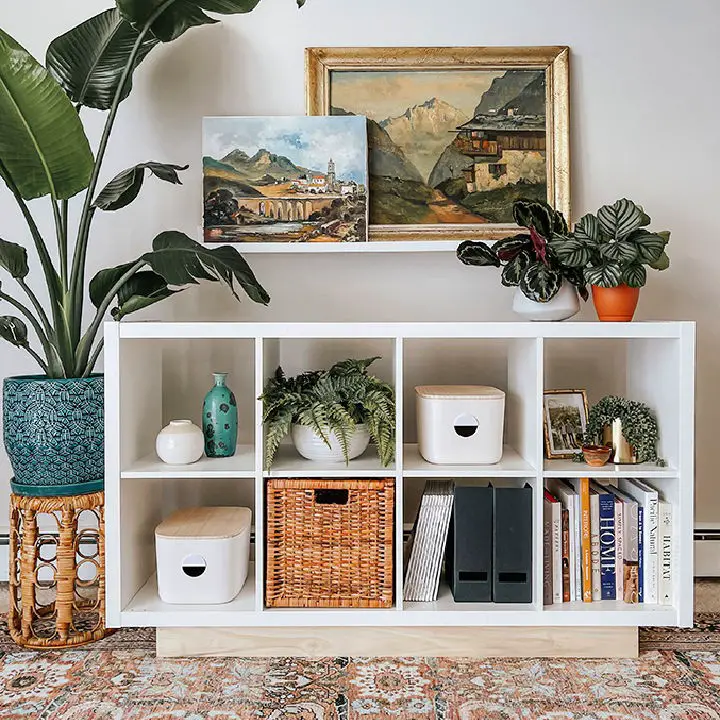
Transform the humble IKEA Kallax shelf into a stunning console with the expertise of Dream Green DIY’s meticulous guide. This innovative DIY project takes the versatile shelving unit to new heights by adding a custom wooden base and wrapping it in stylish peel-and-stick terrazzo wallpaper, giving it a sophisticated makeover that’s perfect for any space. Best of all, this creative adventure requires no heavy machinery or advanced skills, making it an ideal project for DIY enthusiasts looking to add a unique touch to their interior design without breaking a sweat.
How to Make a Rustic Cube Shelves
Transform your storage space with a unique DIY Rustic Cube Shelves project that injects personality into any room. This comprehensive guide takes you on a journey from basic woodworking techniques to crafting a one-of-a-kind piece by repurposing Ikea Kallax shelves. The step-by-step process is designed for beginners, making it an ideal starting point for unleashing your creativity and showcasing your skills. With this project, the possibilities are endless, limited only by your imagination.
IKEA Kallax Toy Storage
Transforming a chaotic playroom into a harmonious haven is achievable with a clever IKEA KALLAX storage solution. This adaptable hack allows you to categorize and corral a vast array of toys, effortlessly evolving with your child’s interests. Rather than replacing existing bins, repurpose them to create a budget-friendly approach that fosters a sense of accomplishment. As your little one’s passions shift over time, this ingenious system grows alongside them, ensuring a rewarding journey of discovery and organization.
IKEA Kallax Waterbed Frame
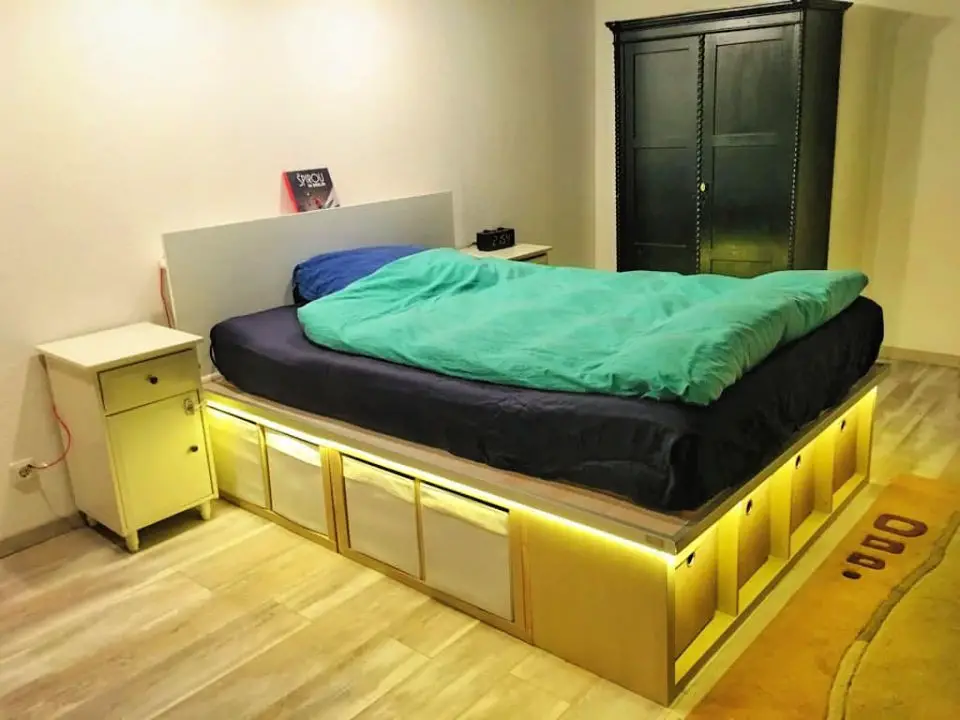
Transform your bedroom with an innovative DIY waterbed frame created by combining IKEA KALLAX shelves and other materials, courtesy of IKEA Hackers’ Christoph Bock. This remarkable makeover not only supports a full-sized waterbed but also incorporates clever design elements like a bespoke headboard, ambient LED lighting, and sound insulation. Follow the comprehensive guide for a step-by-step walkthrough on constructing your own waterbed frame, seamlessly blending functionality with style in your sleeping quarters.
Window Seat From Kallax Shelves
Elevate your living space with a creative IKEA hack that turns KALLAX shelves into a cozy window seat. This practical and stylish project combines storage and functionality, making it perfect for creating a warm reading nook or adding character to any room. Follow the simple step-by-step guide to bring this versatile piece to life, and enhance your home’s ambiance with a personalized spot all your own.
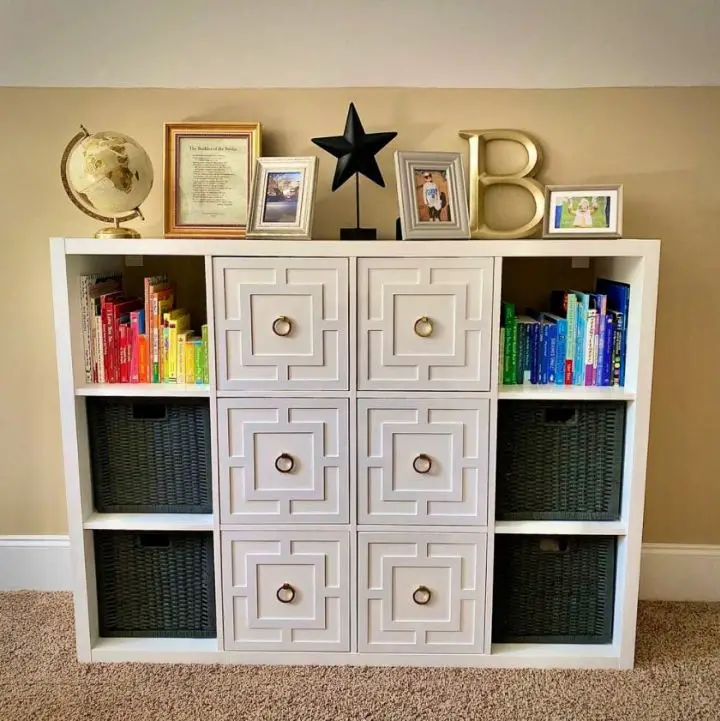
IKEA Kallax Overlays Hack
Elevate the humble IKEA Kallax into a sophisticated piece of furniture by applying a stunning DIY overlay hack. This budget-friendly project is perfect for parents seeking to stylishly conceal toys while maintaining an organized space. In just five easy steps, you can transform the door inserts with decorative overlays and paint, creating a high-end look that seamlessly blends functionality with elegance.
Make Your Own Library on Wheels
Elevate the functionality and aesthetic appeal of your living space with a versatile and adaptable library on wheels. This innovative DIY project seamlessly integrates IKEA’s Expedit shelves and Linnmon table tops, augmented by complementary materials from a local hardware store. The result is a mobile library that optimizes limited spaces while adding a distinctive touch to your home. By employing creative problem-solving skills, this solution effortlessly adapts to irregular room layouts, exploiting tight corners and making the most of inclines. For a step-by-step guide on bringing this clever concept to fruition, visit IKEA Hackers for inspiration.
IKEA Kallax Shelf Hack
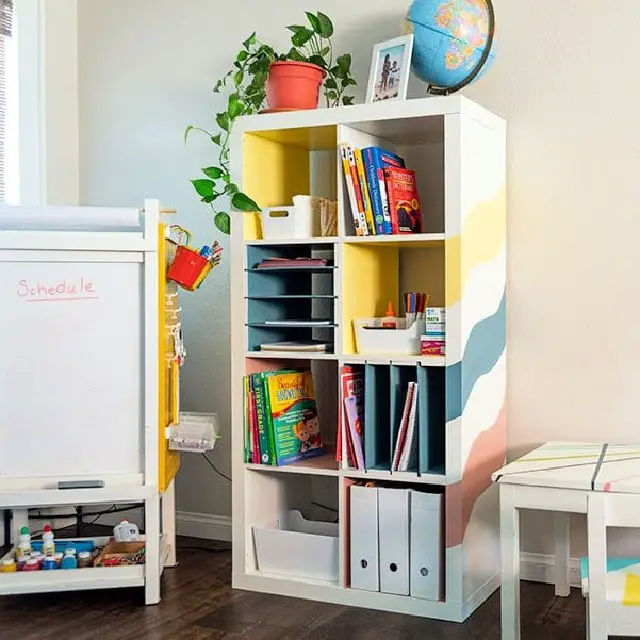
Transform your home office or homeschooling space with a creative and vibrant Ikea Kallax Shelf makeover. This DIY project, featured in Anika’s DIY Life, requires just a few basic materials: plywood, paint, and some simple tools. With these minimal inputs, you can turn an old, lackluster shelf into a colorful and organized focal point that not only breathes new life into the piece itself but also brightens up your entire workspace. This easy-to-follow tutorial guides you through each step of the process, ensuring that even the most novice DIY enthusiast can achieve a stunning result. Not only will this project give your space a fresh new look, but it will also help keep your supplies neatly organized and within reach, making it an ideal solution for anyone looking to streamline their workflow or homeschooling routine.
IKEA Kallax Expedit Sideboard
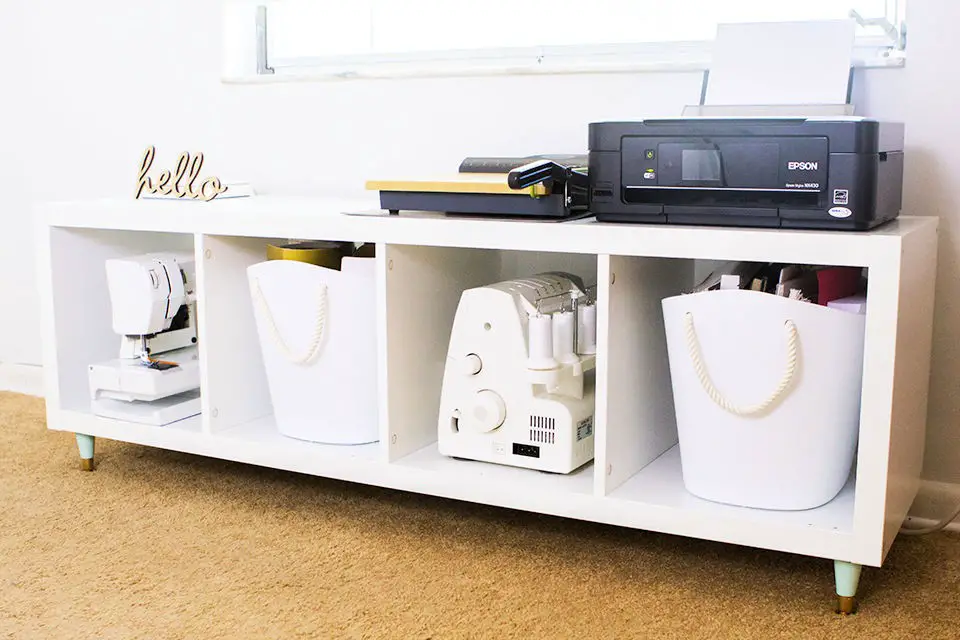
Transform an IKEA Kallax or Expedit bookcase into a stylish sideboard table with a seamless hack by Sarah Hearts. This creative project adds tapered table legs to give it a mid-century modern flair, perfect for under-the-window spaces or home studios. Not only does this hack provide ample storage for sewing machines and supplies, but it also elevates the overall aesthetic of any room. With its simple yet impactful design, this IKEA Kallax Expedit Sideboard Hack is ideal for adding a touch of sophistication to your home.
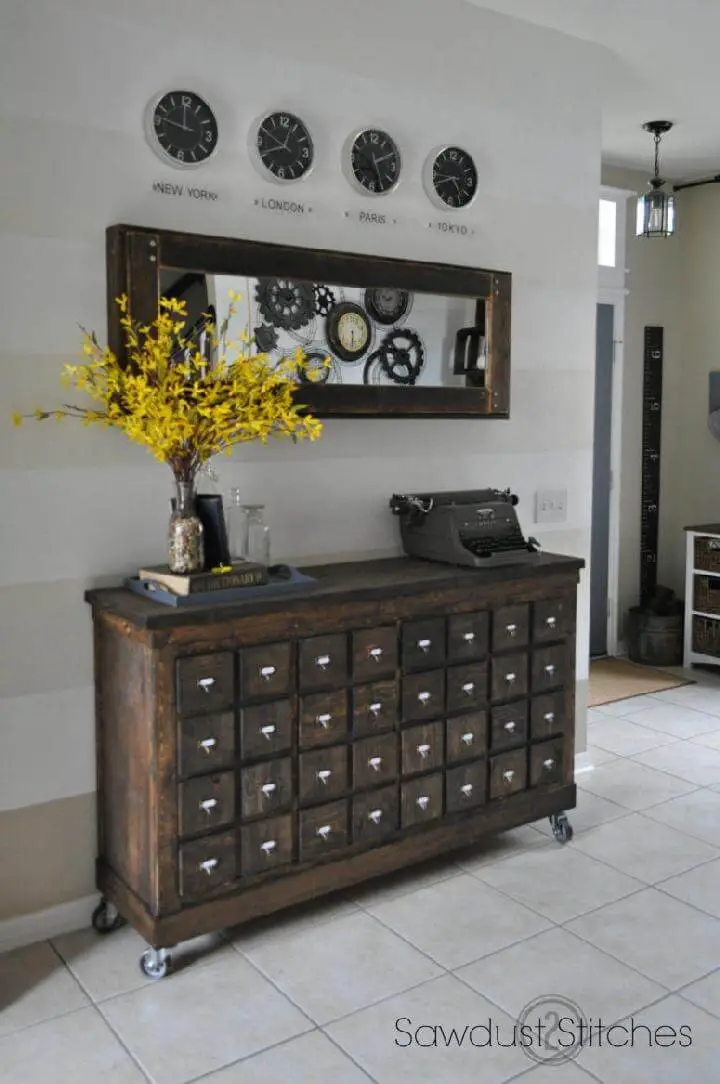
Modern Library Card Catalog Using Kallax Shelves
Transform any room with a clever DIY hack from IKEA! By repurposing Kallax shelves, you can create a sleek and modern library card catalog that brings organization and sophistication to your space. This straightforward project requires basic tools, Kallax shelves, drawer inserts, and stylish file pulls. The result is a functional piece that perfectly balances form and function, ideal for offices, kids’ rooms, or craft areas. To get started, simply follow the easy steps to assemble, customize, and fill your new creation. For a full guide and inspiration, head to The Savvy Heart and discover how this project brings elegance to your home with minimal effort.
How to Make Your Own Sliding Doors
Transform your bookshelf or IKEA Kallax into a sleek storage solution with sliding doors, thanks to this straightforward and captivating DIY guide from Deeply Southern Home. Ideal for concealing unsightly items or craft supplies, this project harmoniously combines charm and practicality, freeing up space without the need for constant access. By following the detailed steps, from sourcing materials like plywood and aluminum angle bars to adding finishing touches such as paint and knobs, anyone with a passion for DIY projects can successfully bring their vision to life, elevating their home’s organization and style.
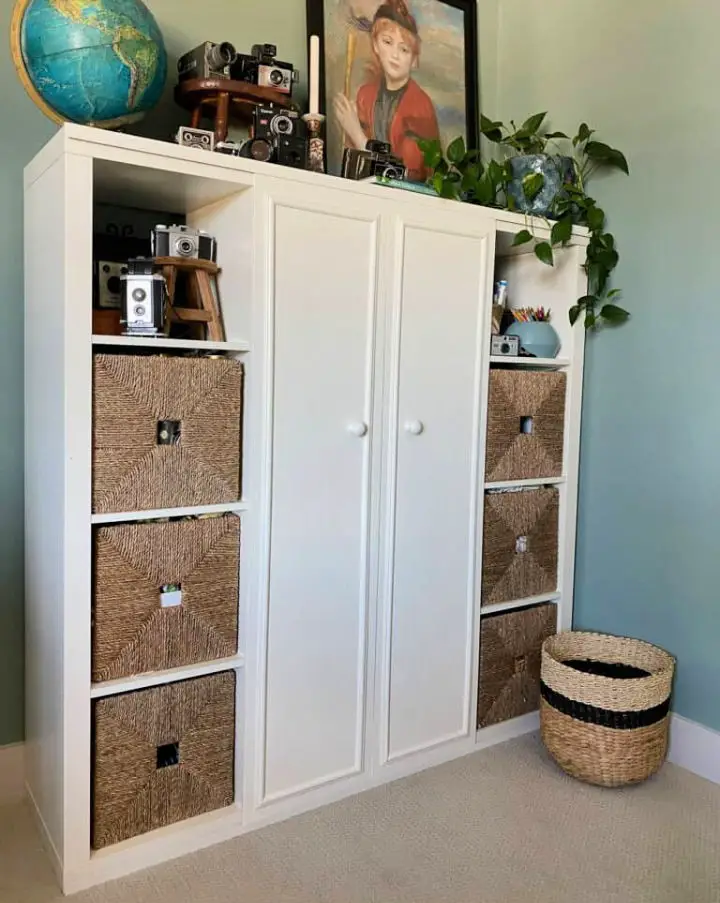
Homemade IKEA Kallax Cubby
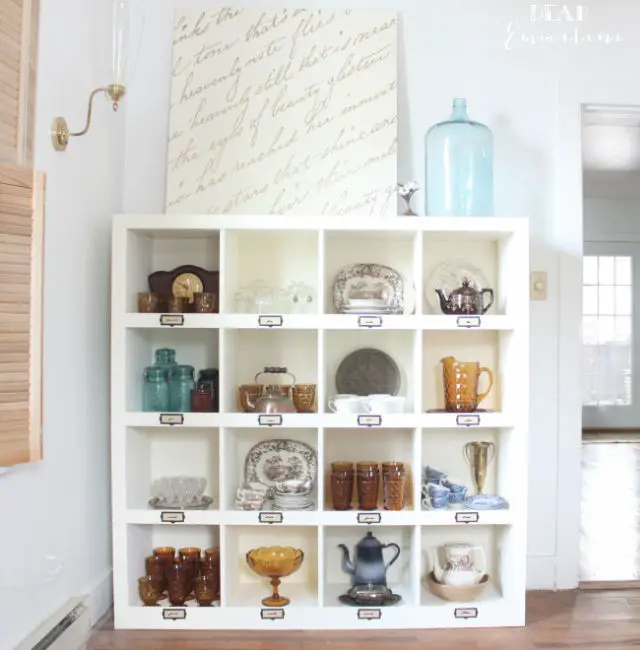
Elevate your Ikea Kallax storage units from ordinary to extraordinary by incorporating a simple yet effective hack. Inspired by the chic Pottery Barn Mitchell Cubby Storage style, this DIY project not only adds a polished look but also strengthens the structure, making it an ideal solution for any room. By visiting Petal and Ply for a comprehensive guide on building this stylish and functional piece, you’ll be able to create a handmade masterpiece that combines practicality with affordability, perfect for those seeking to enhance their home decor without breaking the bank.
IKEA Kallax Entryway Storage
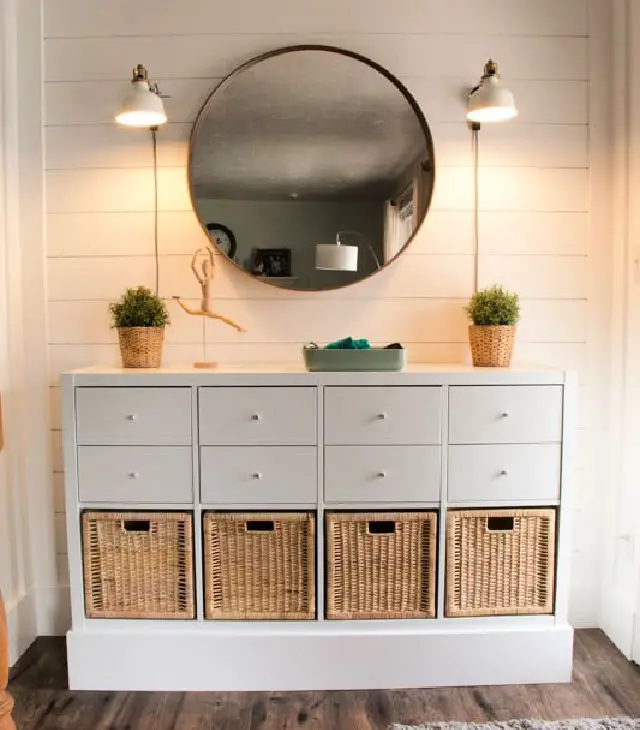
Give your entryway a stylish makeover on a budget by leveraging clever storage solutions from Remodelaholic. Learn how to breathe new life into your space with IKEA hacks that combine functionality and flair. By incorporating the versatile KALLAX shelf, maximizing hidden storage with drawer units, and adding natural textures with rattan baskets, you can create a functional and inviting area that’s also easy on the wallet. To complete the look, incorporate creative decor ideas like mirrors and LED spotlights to illuminate your entryway and make it feel more welcoming. With these budget-friendly tips, you’ll be able to rejuvenate your entryway and make a great first impression without breaking the bank.
IKEA Kallax With Doors and Overlays
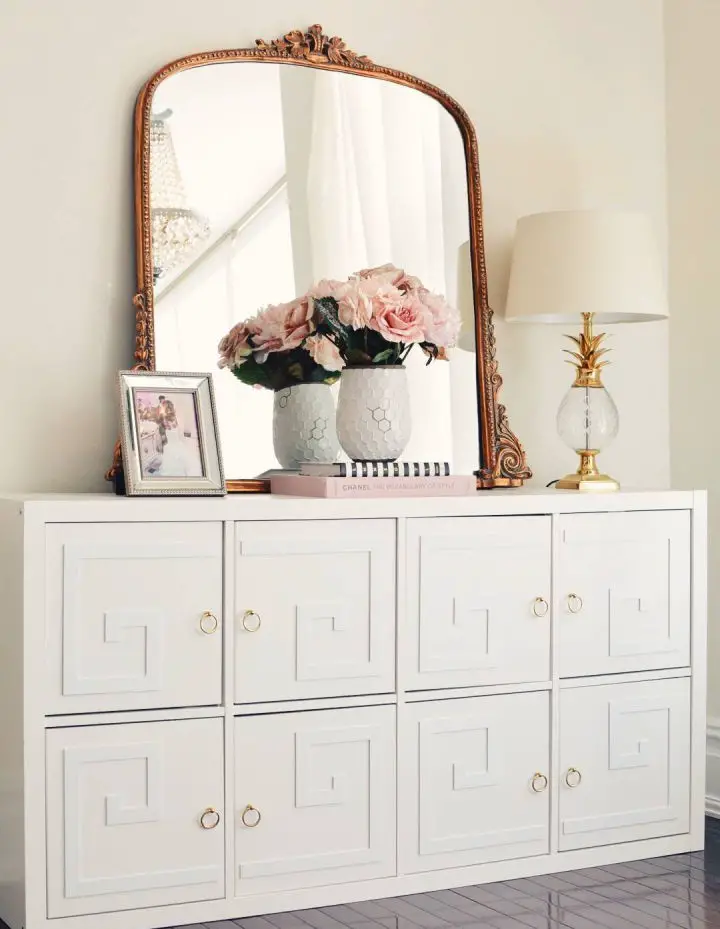
Give your IKEA Kallax unit a stylish makeover by adding doors and decorative overlays. This budget-friendly DIY project is perfect for hiding toys in the living room or organizing clutter. With this simple hack, you can create a customized look that fits your space perfectly. For a step-by-step guide and more inspiring IKEA hacks, visit The Pink Dream.
Mid Century Modern IKEA Kallax
Elevate your IKEA KALAX game by transforming it into a mid-century modern masterpiece. At Hawthorne and Main, learn the secrets to crafting stylish angled legs and a sleek frame that will leave you in awe. The key to success lies in precision and safety – follow our step-by-step guide to ensure seamless cuts and flawless assembly. Embrace flexibility and think outside the box to overcome any minor setbacks, and watch your DIY project come together with beautiful results. By adding a personal touch to your home decor, you’ll be amazed at how effortlessly stylish your space can become.
IKEA Expedit Bookcase With Wood

Transform an Ikea Expedit bookcase into a sophisticated and versatile piece by applying a simple wood-wrapping technique. This DIY project not only adds a personal touch to any room, including nurseries, but also provides ample open storage space without compromising on style. Perfect for storing changing pads, toys, or diapering essentials. For a comprehensive guide to this creative endeavor, visit Young House Love and learn how to elevate your furniture in just a few easy steps, resulting in a beautifully functional and stylish space.
IKEA Kallax Bathroom Vanity
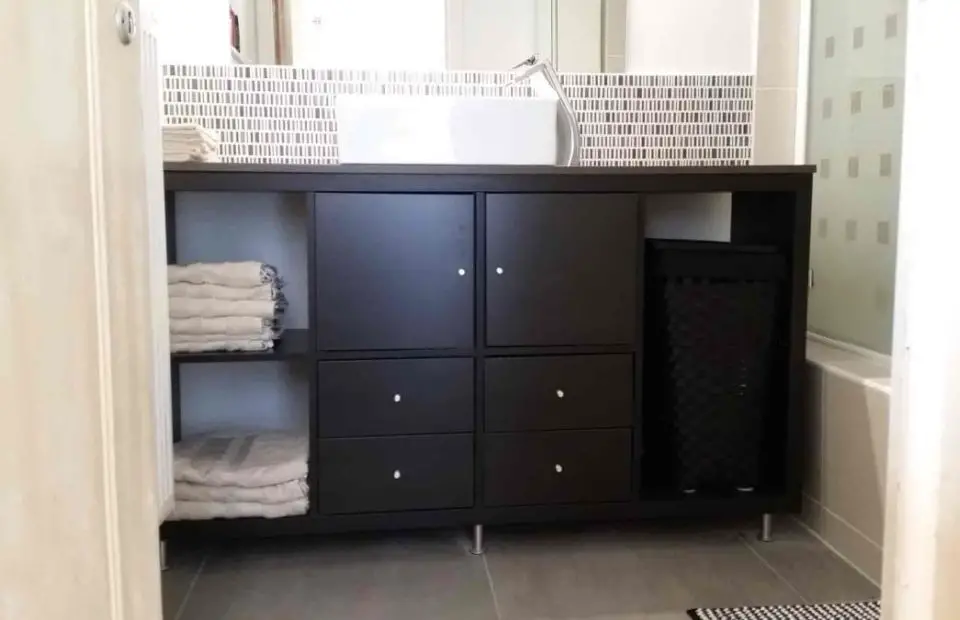
Step into a stylish and practical bathroom oasis by transforming your cramped space with an innovative IKEA hack! Stefanie’s ingenious design, featuring the KALLAX unit, turns a small bathroom into a chic retreat. By incorporating clever storage solutions and concealing essential plumbing, the vanity maximizes limited space without compromising on aesthetics. Sleek Capita legs ensure effortless cleaning underneath. Follow Stefanie’s detailed guide to unlock the full potential of your compact bathroom, where function and style beautifully coexist. Discover more at IKEA Hackers for a vanity that surpasses expectations.
IKEA Kallax Desk Hack

Transform your workspace with a clever combination of IKEA’s Kallax storage unit and Rast dresser. By adding a few boards, you can create a functional desk that offers ample storage while keeping essential items dust-free. This project is perfect for creative pursuits outside the workshop, maximizing space and keeping your belongings organized. To achieve this unique desk design, follow our easy-to-follow guide and discover how to blend style with practicality. With a customized desk area ideal for drafting plans or jotting down to-do lists, you’ll be able to work efficiently while enjoying the satisfaction of having created something yourself.
IKEA Shelves Craft Room Storage
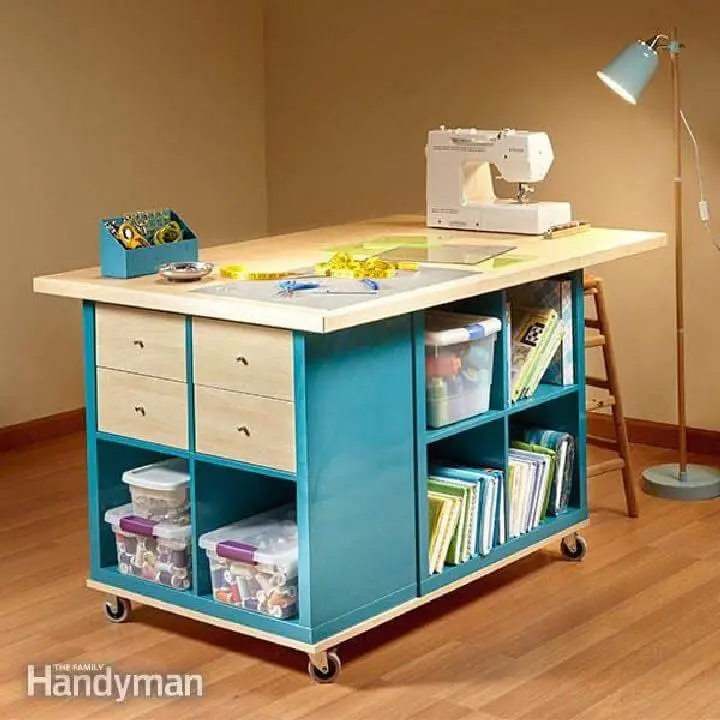
Transform your craft room with a creative Ikea Kallax Hack! By repurposing the versatile Ikea Kallax shelf, you can create a spacious worktable that combines ample surface space with clever craft storage and mobility solutions. This inventive project involves layering three small storage units between a robust base equipped with casters and a sturdy plywood top, finished with attractive hardwood edging. Perfect for those with an intermediate skill level, this hack requires a few days to complete and has a price tag of around $101–250. For a comprehensive guide on bringing your craft storage dream to life, head over to Family Handyman for the inside scoop.
IKEA Kallax Command Center With Storage and Chalkboard
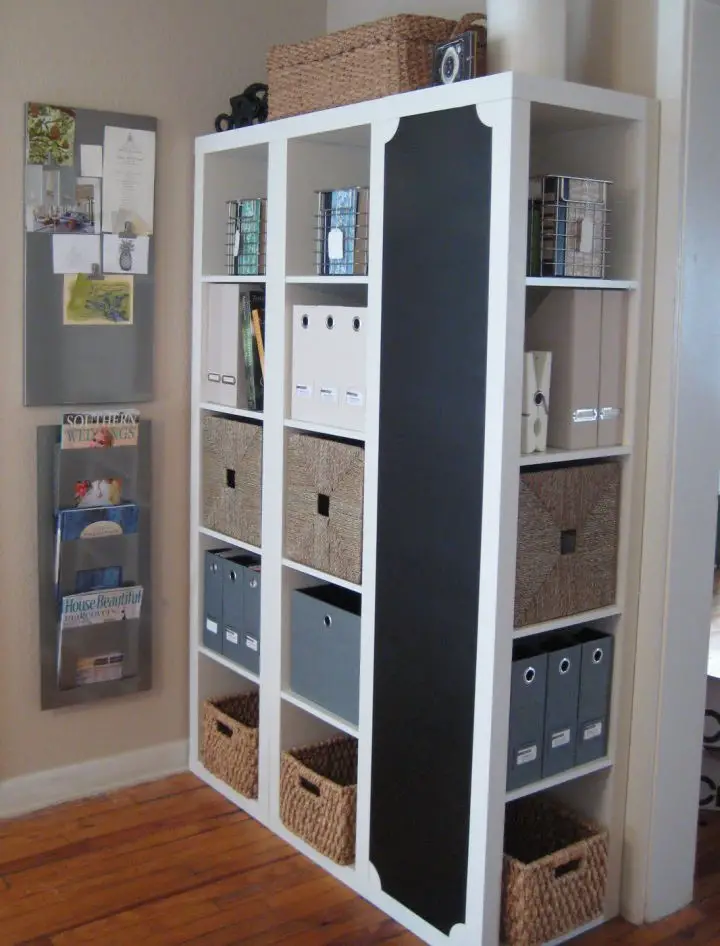
Transforming an Ikea Expedit into a functional hub of creativity and organization is a game-changer for any home. What was once perceived as a simple shelving unit has been reimagined into a command center that seamlessly integrates with daily life. The secret to this transformation lies in the clever combination of three shelving units, DIY ingenuity, and a touch of whimsy courtesy of a chalkboard. This multi-functional space has become a go-to destination for everything from keys and mail to crafting supplies. With its impressive track record of balancing form and function, it’s little wonder that this solution has stood the test of time. For those eager to replicate this success, Iron & Twine offers a step-by-step guide to help bring this creative vision to life.
Fabric Lined IKEA Kallax Bookshelf

Transforming your Expedit bookshelf into a unique piece of furniture can be achieved with a straightforward yet effective fabric lining technique. By following the steps outlined on Honey We’re Home, you’ll be able to give your bookshelf a fresh new look that seamlessly integrates with your existing decor. This approach is ideal for those looking to revamp their space without investing in major renovations. With this simple and budget-friendly solution, you can easily elevate your home’s ambiance.
IKEA Shelving Unit Into TV Stand
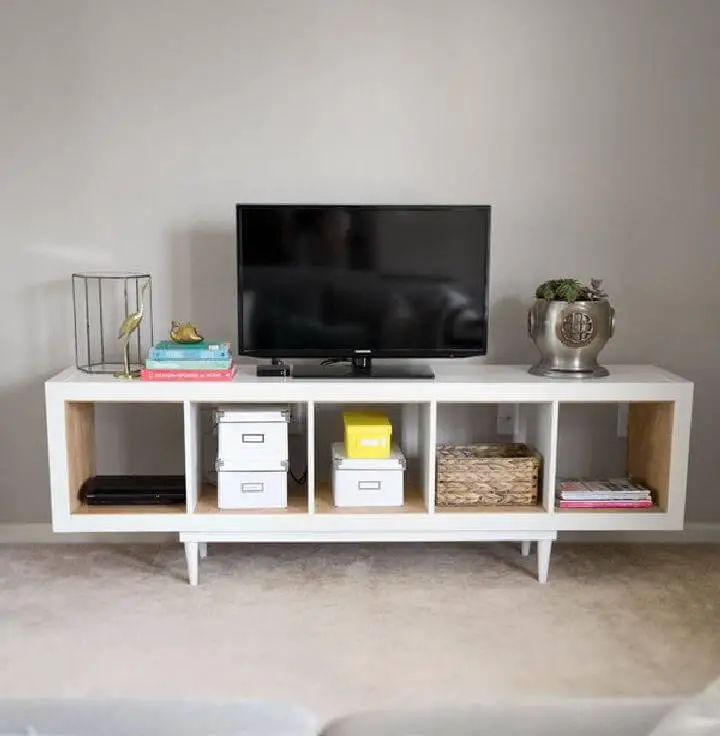
Elevate your living space with a modern TV stand created from an IKEA shelving unit, repurposing materials at their finest. Sarah M. Dorsey Designs’ latest DIY project masterfully transforms a humble shelving unit into a sleek and stylish TV stand, guided by step-by-step instructions that make the process effortlessly achievable over a weekend. By incorporating custom legs, this innovative project adds a personalized touch to any room, seamlessly blending form and function. For the complete guide on how to revamp your entertainment area, head over to Infarrantly Creative and start transforming today!
IKEA Kallax Bar Cart Hack
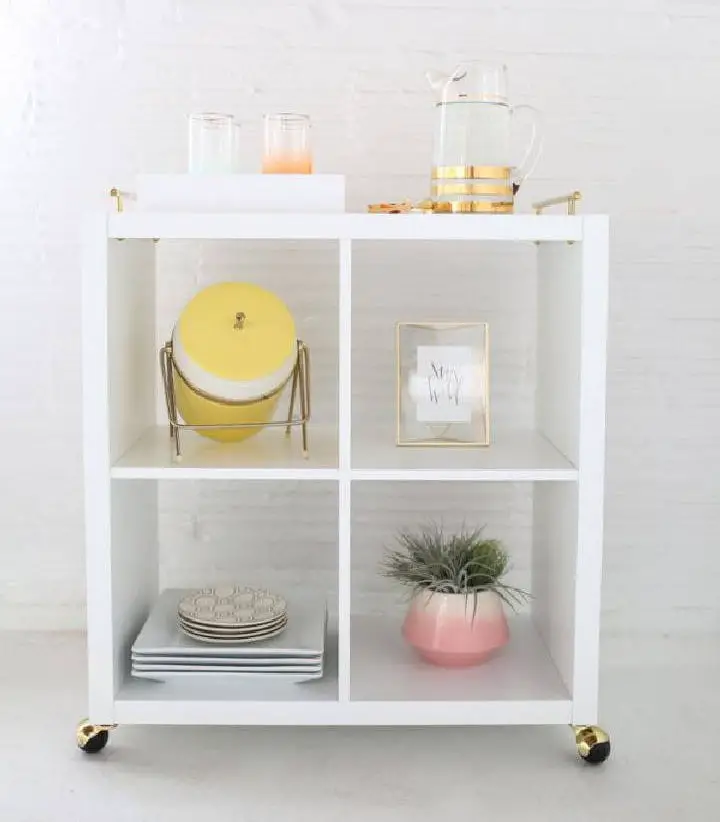
Transform your space with a stylish and budget-conscious DIY makeover that elevates Ikea’s classic bookshelf into a chic bar cart. This Sugar & Cloth guide demystifies the process of turning a humble shelf into a functional and fashionable hub perfect for entertaining or adding a mid-century flair to your decor. With just a few clever tweaks, such as swapping out hardware for brass pulls and adding casters, you can create a sophisticated piece that won’t put a dent in your wallet. Ideal for those who appreciate modern design with a pop of color, this DIY project proves that elegance doesn’t have to come at a hefty price tag. And the best part? You can bring it all together for under $70.
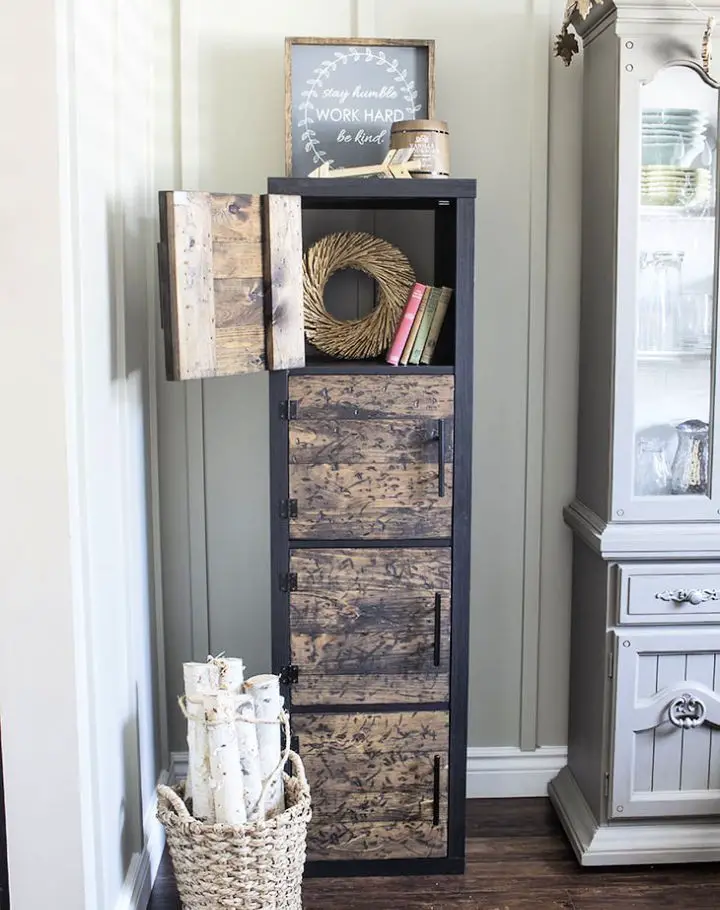
IKEA Cubbies Into Rustic Storage Apothecary
Give new life to plain Ikea cubbies by transforming them into rustic apothecaries with a charming blend of practical storage and vintage flair. By following these step-by-step instructions, you can build a sturdy base, add trim and details for character, and finish it off with a personalized stain that reflects your personal style. This DIY-friendly project is perfect for those who want to infuse their home with the warmth and coziness of an old-world apothecary. Not only will this project enhance your space, but it’ll also demonstrate the incredible potential for transformation that lies within everyday furniture.
IKEA Expedit Long Storage Unit
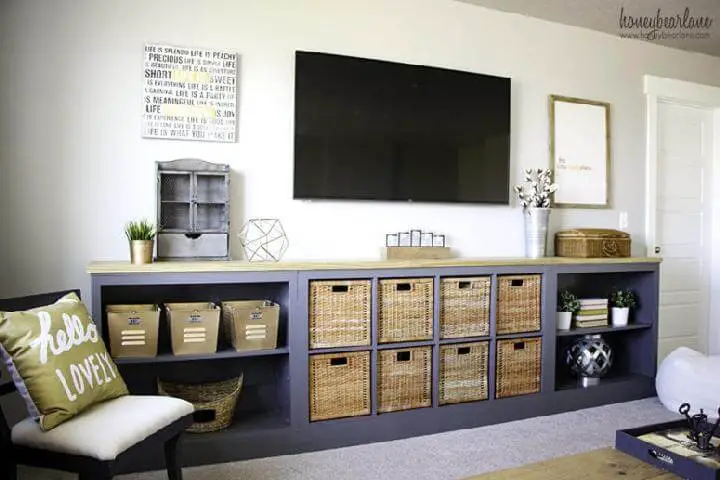
Transform your living space by repurposing an IKEA Expedit into a sleek, extended storage unit that combines functionality with style. This DIY endeavor is ideal for those seeking to personalize their home’s storage solution while adding a touch of flair. The process involves some sawing, painting, and assembling, ultimately yielding a polished, built-in appearance. For a comprehensive guide, material list, and step-by-step instructions, visit Honeybear Lane. Embark on this project and infuse your space with both practicality and visual appeal.
IKEA Kallax Vinyl Record Shelf
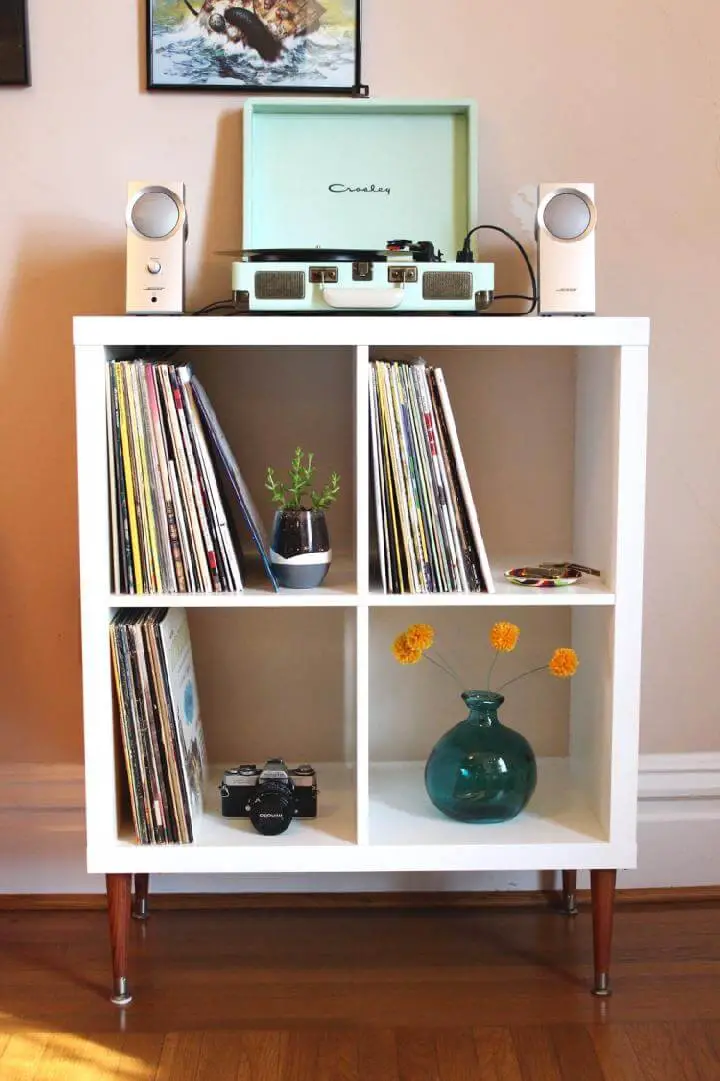
For music aficionados seeking to revitalize their space with a unique and stylish vinyl record display, look no further than this creative DIY project. Sarah and Nick’s transformation journey showcases how an outdated vinyl storage solution can be revitalized into a stunning, Scandinavian-inspired piece using an IKEA Kallax shelving unit as the foundation. The addition of mid-century modern legs lends a touch of retro flair to the overall design. A step-by-step guide available on SarahNick.com ensures that this DIY endeavor remains accessible and achievable for enthusiasts of all skill levels.
IKEA Kallax Shelving Hack
Transforming an IKEA Kallax or Expedit shelf into a stylish mid-century modern piece is easier than you think. With just a few simple DIY tweaks, you can elevate this humble shelving unit into a chic focal point for any room. The key to achieving this look lies in adding wooden legs and a painted plywood backing. By following the step-by-step tutorial provided by Deliamakes, you’ll learn how to measure, cut, paint, and assemble your new upgrade with ease. This DIY hack is perfect for anyone looking to give their shelf a creative and functional makeover that will leave onlookers impressed.
IKEA Kallax and Plywood Nightstand
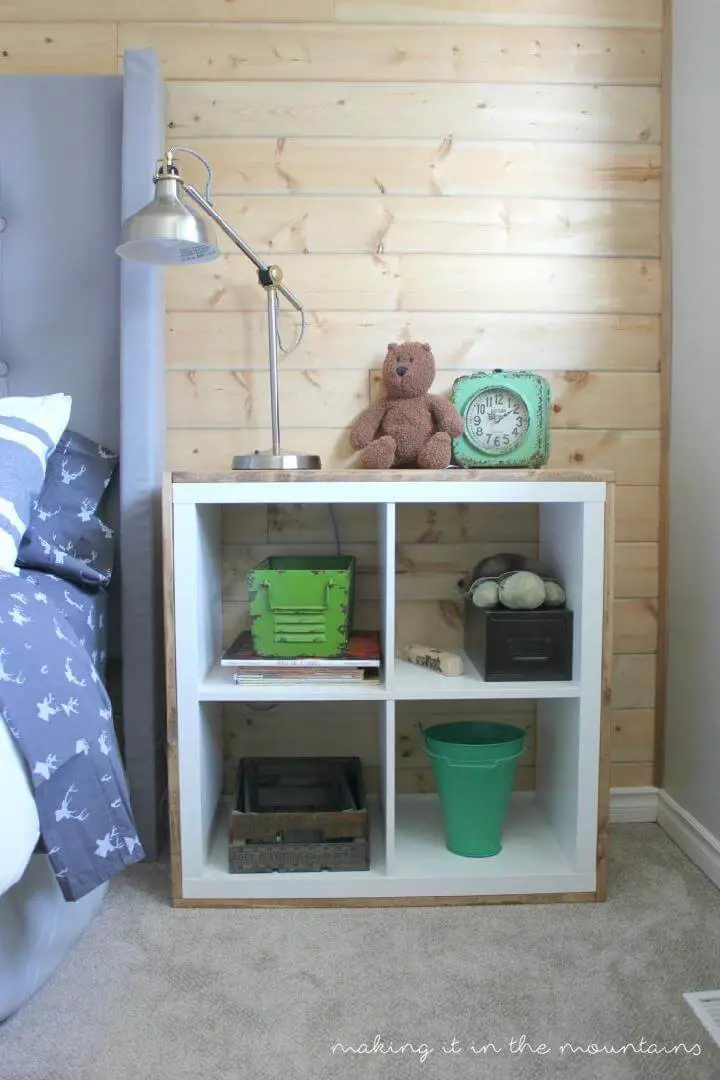
Turn an ordinary IKEA Kallax shelf into a cozy focal point by adding a rustic touch. This simple DIY project can be completed in just a few steps and requires minimal materials. We chose pine wood for its warm, countryside charm that complements any room’s decor. For a step-by-step guide on how to transform your IKEA shelf, head over to Making it in the Mountains.
Wood Wrapped Kallax Cube Shelf

Take your space to the next level with a clever IKEA hack that transforms a humble Kallax cube shelf into a stylish, retro-inspired storage solution. This DIY project is perfect for rooms in need of extra storage without compromising on style. With basic tools, some wood, and a dash of creativity, you can breathe new life into an ordinary organizer. Whether you’re looking to keep toys tidy or enhance any room’s decor, this practical yet chic upcycle has got you covered. Follow along for all the details and step-by-step instructions to elevate your space with ease.
IKEA Kallax Kitchen Island
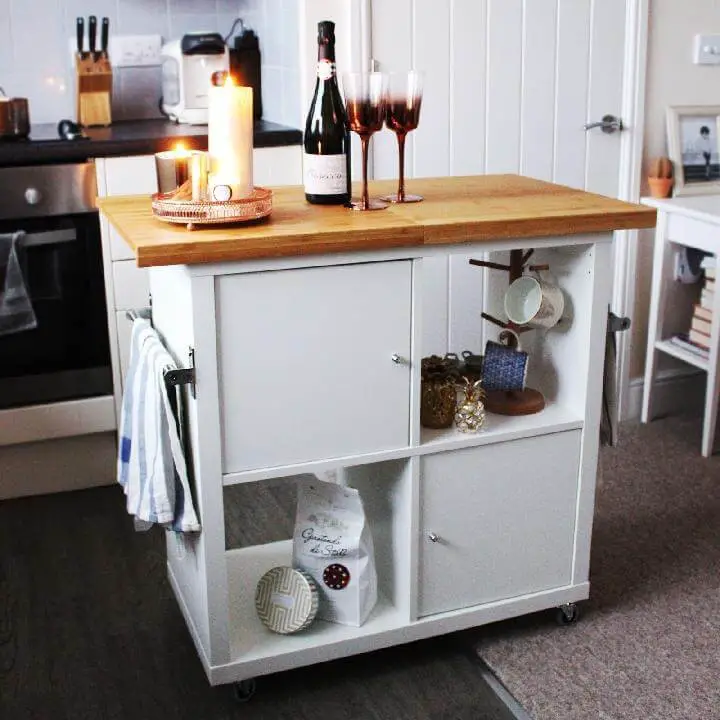
Transform your kitchen with a creative twist on the Ikea Kallax shelving unit. By repurposing this simple yet versatile piece into a movable kitchen island, you can effortlessly achieve additional storage and counter space in even the smallest of kitchens. And the best part? This DIY project is surprisingly affordable, with a total cost of just over £80. To bring your new kitchen island to life, simply follow these easy steps: assemble the Kallax unit, add castors for effortless mobility, and customize it with inserts and chopping boards to create dedicated storage spaces for your kitchen essentials and food preparation surfaces. For a comprehensive guide on how to bring this stylish and practical project to fruition, visit Jen Lou Meredith’s blog and get ready to elevate your kitchen’s functionality without breaking the bank.
Conclusion:
Discover a world of possibilities with 30 innovative IKEA Kallax hacks and DIY ideas that unlock the true potential of your living space. This comprehensive guide reveals clever ways to transform the versatile IKEA kallax shelf into a personalized masterpiece, catering to individuals seeking unique touches for their homes. From straightforward modifications to more complex DIY projects, our suggestions will not only elevate the visual appeal of your space but also enhance its functionality and organization. With our step-by-step guidance, you’ll effortlessly navigate the DIY process, from understanding your needs and space to planning and executing your project with ease. By the end of this journey, you’ll be inspired to take on your own creative endeavors, transforming ordinary furniture into extraordinary pieces that reflect your personality.
