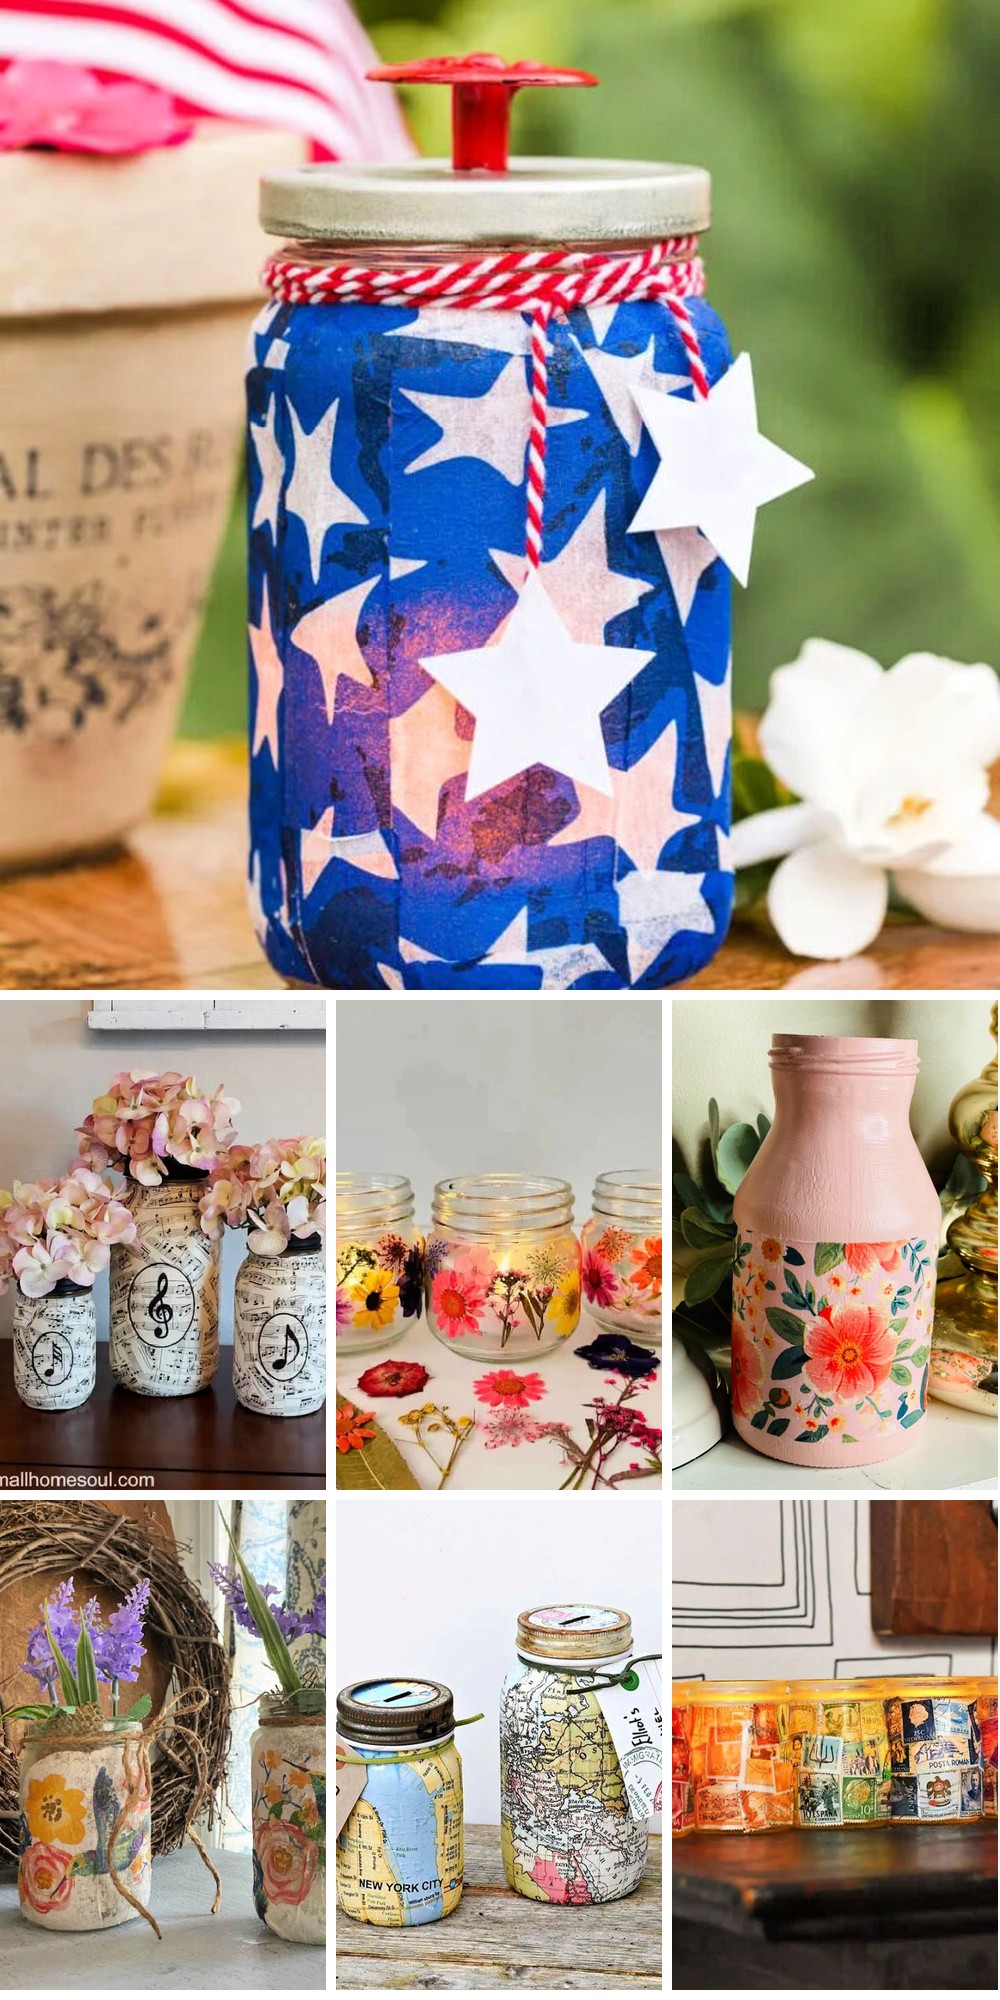
Transform ordinary mason jars into breathtaking masterpieces with the timeless art of decoupage. This versatile technique is perfect for infusing personal touches into your home decor or crafting one-of-a-kind gifts. With 15 straightforward and inspiring mason jar decoupage ideas at your disposal, you’ll learn how to effortlessly elevate your jars using everyday materials like napkins and Mod Podge. This comprehensive guide is designed to provide all the essential tips and tricks, empowering you to create stunning pieces with ease. Decoupage unlocks a world of creative possibilities, breathing new life into mason jars for storing treasures, holding flowers, or serving as decorative lights. By following step-by-step instructions, you’ll discover just how enjoyable and rewarding decoupaging can be. As we delve deeper into the art of decoupaging, get ready to unlock your creative potential and transform your mason jars into breathtaking works of art.
Why Decoupage Mason Jars?
Transforming mason jars through decoupage is not only an artistic expression but also an eco-conscious and budget-friendly way to breathe new life into your home decor. Here’s why this creative endeavor deserves a spot on your radar:
Innovative Reuse: By repurposing mason jars, you’re giving old containers a second chance at being useful and beautiful.
Practical yet Affordable: The materials needed for decoupage, such as Mod Podge, napkins, and paint, are easily accessible and won’t break the bank. You can even find mason jars in your own home or purchase them in bulk at a low cost.
Endless Customization Options: The possibilities are limitless when it comes to designing your decoupage creations. From bold tissue paper designs to vintage napkin collages, you can let your imagination run wild and create pieces that reflect your unique style or the occasion.
Versatility Unleashed: Decoupage mason jars have a multitude of uses, including serving as stunning vases, one-of-a-kind gift containers, stylish storage solutions, and cozy luminaries.
Simple yet Satisfying: With straightforward steps and room for error (mistakes can often add to the charm!), anyone from beginners to seasoned crafters can enjoy this project.
Therapeutic Benefits: The calming nature of crafting can be a powerful stress-reliever. As you focus on your decoupage creation, you’ll find yourself becoming fully immersed in the process, leading to a sense of accomplishment and satisfaction when completed.
In essence, decoupaging mason jars is a harmonious blend of creativity, sustainability, and practicality. Whether you’re crafting for personal enjoyment, as a gift, or with loved ones, this project has the power to bring joy and beauty to any space.
Understanding Decoupage
Derived from the French phrase ‘decoupert,’ meaning ‘to cut out,’ decoupage is an age-old craft technique that has gained immense popularity over the years. At its core, this art form involves cutting out intricate designs and patterns from decorative paper and then meticulously adhering them to various surfaces, often in conjunction with paint, gold leaf, or other embellishments, to produce a distinctive collage finish.
History of Decoupage
In the 17th century, decoupage emerged in France as a budget-friendly solution to painted furniture, offering an accessible art form that would eventually spread globally. As the centuries passed, this humble craft gained popularity for its ease of execution and stunning outcomes, captivating many with its versatility and creative possibilities.
The Process of Decoupage
Decoupage, an art form that’s accessible to all, involves three primary steps. It begins by harvesting visual elements from various sources such as vintage magazines, children’s book illustrations, or specially designed decoupage papers. These cut-out images are then carefully adhered to the object being embellished using a suitable adhesive. The final stage involves applying multiple layers of a protective medium, either glue or a dedicated decoupage sealant, to shield the artwork from environmental elements and ensure its longevity.
Why Decoupage?
Decoupage is an adaptable and user-friendly craft that empowers individuals to reimagine ordinary objects as unique works of art. This versatile technique enables the transformation of a wide range of items, from furniture pieces to containers like boxes or mason jars, into personalized masterpieces that reflect one’s personal style and creativity.
Warning: Decoupage Can Be Addictive!
As soon as you start exploring the world of decoupage, it’s not uncommon to get hooked. The process of transforming ordinary objects into unique works of art can be incredibly alluring. Before long, you’ll find yourself spotting potential projects everywhere you go – a vase, a box, a piece of furniture… the possibilities seem endless! As we dive deeper into the world of decoupage, you can expect to learn about the essential materials needed to get started, step-by-step instructions for creating your own masterpieces, and more. So, join me on this creative adventure as we uncover the secrets and joys of decoupage!
How to Decoupage Mason Jars
Transforming plain mason jars into stunning decorative pieces is an accessible and engaging way to add a personal touch to your home decor. With its versatility, you can use these revitalized containers as vases for fresh flowers, storage vessels for small items, or even as thoughtful gifts for friends and family. This straightforward guide will walk you through the simple process of decoupaging mason jars, allowing you to create unique pieces that reflect your personal style and flair.
What You’ll Need:
To give your mason jars a personalized touch, you’ll need the following materials: acrylic paint in a soft color of your choice – off-white is a popular option for a neutral look. You’ll also require decoupage glue, such as Mod Podge, decorative napkins with your desired design, and some paintbrushes to apply the designs. If you want to add an extra layer of texture, consider using plastic wrap or a plastic bag to create unique patterns. Water can be added to thin out the Mod Podge if needed for a smoother application. Finally, have some scissors on hand in case you need to trim any excess material, and sandpaper if you prefer a distressed look.
Step 1: Prepare Your Mason Jar
Before commencing the mason jar makeover, it’s crucial to prepare the surface by ensuring your vessel is spotlessly clean and free from any residual grease or dirt. This is because paint and glue require a smooth, non-porous surface to adhere effectively. To achieve this, simply wash the jars with dish soap and allow them to air dry completely. Once dry, apply a base coat of paint, taking care to let it fully dry before proceeding. For a vintage or rustic aesthetic, lightly sand specific areas to create a distressed look that adds depth and character to your design.
Step 2: Prepare Your Napkins
When it comes to choosing a decorative napkin for decoupage, select one that resonates with you. To prepare the napkin for use, carefully separate its layers until you’re left with just the top printed layer. This step may require some patience, as the layers can be tricky to differentiate. If your napkin is larger than expected, consider the design section you’d like to feature on your jar and use a gentle tearing technique, aided by water to create a soft, feathered edge. This approach will provide a more seamless finish once applied to the jar.
Step 3: Apply Mod Podge
To begin the decoupage process, carefully paint a thin layer of Mod Podge onto the mason jar using a brush, starting from the bottom and working your way up to achieve an even coating. It’s essential to maintain a light touch when applying the glue, as excessive amounts can cause the paper to become soggy and prone to tearing.
Step 4: Attach the Napkin
To achieve a smooth and tear-free application, delicately position the prepared napkin onto the adhesive surface of the mason jar. Utilizing either your fingertips or a piece of plastic wrap, gently coax out any wrinkles or creases, ensuring a precise fit without compromising the material’s integrity.
Step 5: Seal the Decoupage
Once the napkin is thoroughly dried on the jar, apply a second thin layer of Mod Podge to secure and shield the design. Allowing this coat to fully dry ensures a strong bond. For added durability, a third application can be made with caution.
Step 6: Final Touches
With your mason jar now thoroughly dry, it’s time to add a personal touch. Consider adorning your jar with ribbons, twine, or other decorative elements that reflect your unique style or the purpose of the finished piece. Whether you’re creating a thoughtful gift or adding a rustic flair to your home decor, this is an opportunity to make your mason jar truly one-of-a-kind.
Video Tutorial
The Rustic Cottage Co. offers a comprehensive video tutorial on decoupaging mason jars, perfectly complemented by this written guide. This visually engaging walkthrough provides an easy-to-follow roadmap for the crafting process, making it even more enjoyable and straightforward to bring your creative vision to life. By following these steps, you’ll transform ordinary mason jars into uniquely decorated pieces that showcase your personal style and creativity. Whether you’re using them for personal use, as gifts, or incorporating them into your home decor, these decoupaged mason jars will add a touch of charm and personality wherever they’re displayed.
Variations and Ideas
Decoupage is an innovative craft that offers immense creative freedom. By applying decoupage techniques to mason jars, you can produce unique and personalized designs. Here’s how you can experiment with variations: Consider the intended use of the jar as a starting point for your design. For instance, if it’s meant to store candy, seek out images featuring sweet treats or edible delights. Seasonal themes are also a great way to go, such as autumn leaves for fall or snowflakes for winter. Alternatively, you can opt for fabric decoupage, which adds a tactile dimension and distinct visual appeal. Faux stained glass effects can be achieved by using tissue paper, resulting in beautiful, translucent designs. If music is your passion, use old sheet music to create vintage-inspired mason jar vases. The possibilities are endless, allowing you to let your imagination run wild and create something truly unique.
Advanced Techniques
When it comes to taking your mason jar crafts to the next level, there are several advanced techniques you can employ to create unique and eye-catching designs. For instance, by combining craft paints with a speckled egg texture effect, you can add an extra layer of visual interest to your jars. Alternatively, you can try creating a galaxy-inspired design on your mason jars using decoupage glue, gel food coloring, and various types of glitter.In addition to these more intricate techniques, you can also experiment with layering different papers or fabrics to create complex designs that add depth and dimensionality to your jars. And finally, don’t be afraid to get creative by incorporating beads, ribbons, or other embellishments into your designs. Remember, the key to mastering any of these advanced techniques is practice, so don’t be discouraged if it takes a few tries to get the hang of things – just keep experimenting and trying new approaches until you achieve the look you want.
Care and Maintenance
To extend the life of your decoupage mason jars, it’s essential to adopt a consistent care routine. Start by ensuring each jar is meticulously cleaned with mild soap and warm water, using a soft cloth to wipe away any residue. If stubborn streaks remain, gently rub the area with a cotton swab soaked in rubbing alcohol. Once clean, dry the glass thoroughly to prevent moisture accumulation. Additionally, verify that all adhesive has been fully removed, accompanied by any lingering odors. When handling your decoupage mason jars, exercise caution to avoid accidental damage. Store them in a cool, dry environment to shield against heat and humidity, ultimately preserving their beauty for years to come.
FAQS About Decoupage Mason Jars
Whether you’re just starting out or have experience in crafting, understanding the basics of decoupaging mason jars is crucial to achieving professional-looking results. With that said, here’s a rundown of some frequently asked questions and answers about this popular DIY technique, designed to empower you with the knowledge you need to take on your next project with ease.
What is decoupage?
Transforming ordinary objects into extraordinary works of art is the essence of decoupage. This ancient craft involves adorning surfaces with cut-out paper designs or prints, which are then sealed with a durable finish, creating a unique and personalized piece. The process is surprisingly straightforward, making it an accessible creative outlet for anyone looking to add a touch of elegance to mundane items like mason jars.
What materials do I need for decoupaging mason jars?
To give your mason jar a unique and personalized touch, you’ll need a few simple materials. Start by gathering acrylic paint, decoupage glue (such as Mod Podge), decorative napkins or tissue paper, paintbrushes, scissors, and sandpaper if you want to achieve a distressed look. With these supplies, you can add color, texture, and visual interest to your mason jar without breaking the bank.
Can I use any kind of paper for decoupage?
When it comes to decoupage, not all papers are created equal. Thin, lightweight options such as napkins, tissue paper, or craft paper prove to be the most effective choices. These materials can be easily smoothed out onto a surface and adhere well without the risk of bubbling or wrinkling, ensuring a seamless finish.
How do I prevent air bubbles under the paper?
To achieve a bubble-free design on your jar, begin by applying a thin, uniform layer of Mod Podge to the surface. Next, carefully position your chosen paper onto the jar, ensuring a smooth application by gently smoothing out any wrinkles with either your fingers or a soft-bristled brush. Start at the center and work your way outward toward the edges, taking care not to introduce any air pockets. To further minimize friction and prevent tears, wrap plastic wrap around the paper, allowing it to help guide the design into place.
How long does it take for Mod Podge to dry?
When working with Mod Podge, it’s essential to plan ahead as it typically requires a waiting period of around 15-20 minutes to achieve a tacky consistency. However, for optimal results, it’s recommended to wait at least 24 hours for the adhesive to fully cure and dry. If you’re applying multiple coats, make sure to allow each layer sufficient time to dry completely before moving on to the next one.
Can decoupaged mason jars be washed?
When it comes to cleaning decoupaged mason jars, gentle is key. Avoid exposing them to harsh conditions like dishwasher cycles or excessive water exposure. Instead, simply wipe them down with a damp cloth to maintain their appearance and longevity.
Can I use decoupaged mason jars for food storage?
While it’s not ideal to utilize decoupaged mason jars for storing edibles due to the chemicals present in Mod Podge and paint, they can still serve a purpose for non-culinary items or even as decorative lids for containers holding food, provided that the decoupage and painting only occur on the exterior. This way, you can still appreciate their charm without compromising food safety.
How can I remove Mod Podge from a mason jar?
When dealing with stubborn Mod Podge residue, you’re often left with a conundrum: how to remove or correct mistakes without leaving behind an unsightly mess. Fortunately, there are a few simple techniques you can employ to rectify the situation. Once dry, the Mod Podge itself can be easily peeled off from the surface. However, if you encounter particularly stubborn patches, a more targeted approach may be necessary. One effective method involves submerging the affected jar in warm, soapy water for several hours, allowing the gentle abrasion of the suds to help loosen and soften the Mod Podge. This can make it much easier to scrape away, leaving your surface looking pristine once again.
Can I decoupage photos onto mason jars?
When it comes to giving mason jars a personal touch, one creative approach is to decoupage photos onto them. To achieve the best results, it’s recommended to use laser-printed photos instead of inkjet prints, as the latter may smudge when Mod Podge is applied. Before applying the photo to the jar, seal it with a layer of Mod Podge to protect the image and ensure a long-lasting finish.
How to Decoupage Mason Jars (15 Easy Ideas to Try)
Transform ordinary mason jars into extraordinary pieces of home decor by exploring 15 simple yet effective decoupage ideas. With a comprehensive, step-by-step guide, you’ll be empowered to unleash your creativity and bring personalized charm to your living space.
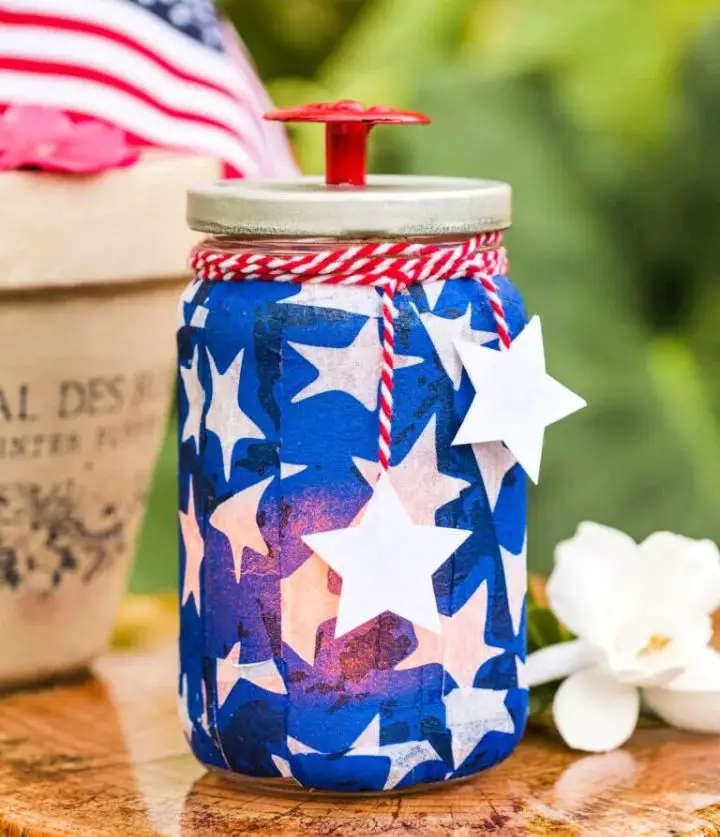
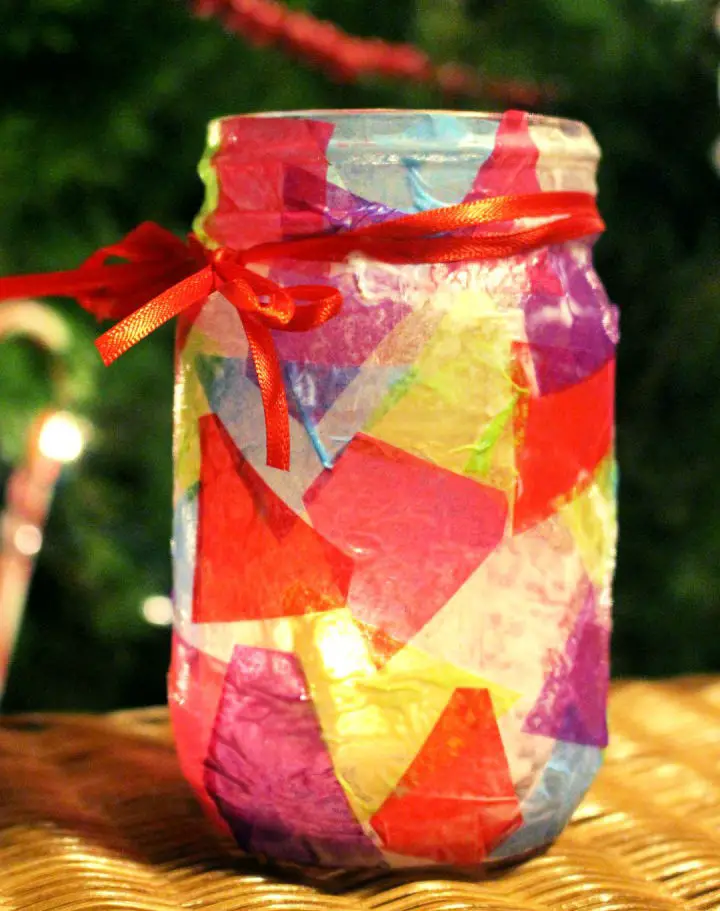
Tissue Paper Stained Glass Mason Jar
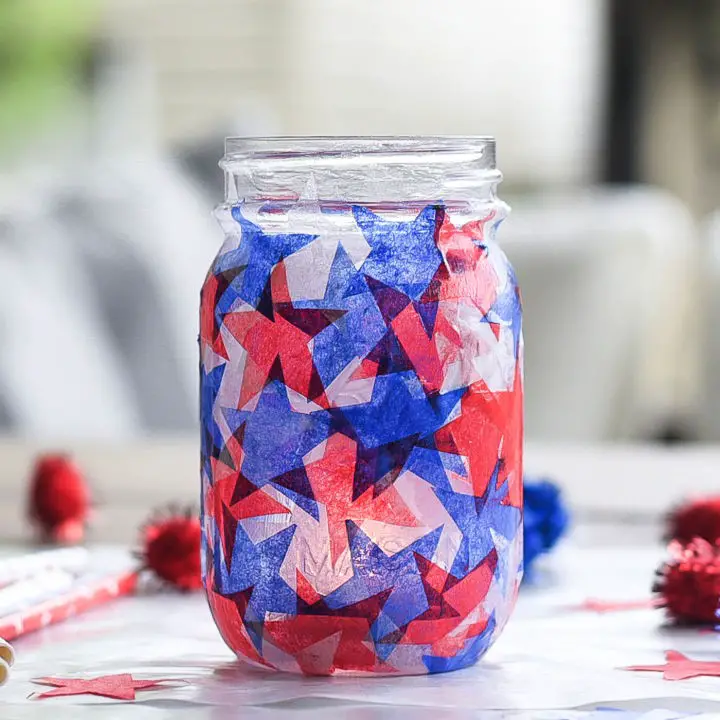
Transform your celebrations with a radiant stained glass effect using tissue paper and a mason jar. This DIY project combines vibrant red, white, and blue hues with soft lighting to create a unique decor piece perfect for Memorial Day through Labor Day festivities or Fourth of July picnics. By following an easy-to-follow tutorial, you can turn ordinary mason jars into stunning works of art that capture the spirit of America’s patriotic holidays while embracing the warmth of the season.
How to Make a Pressed Flower Jars
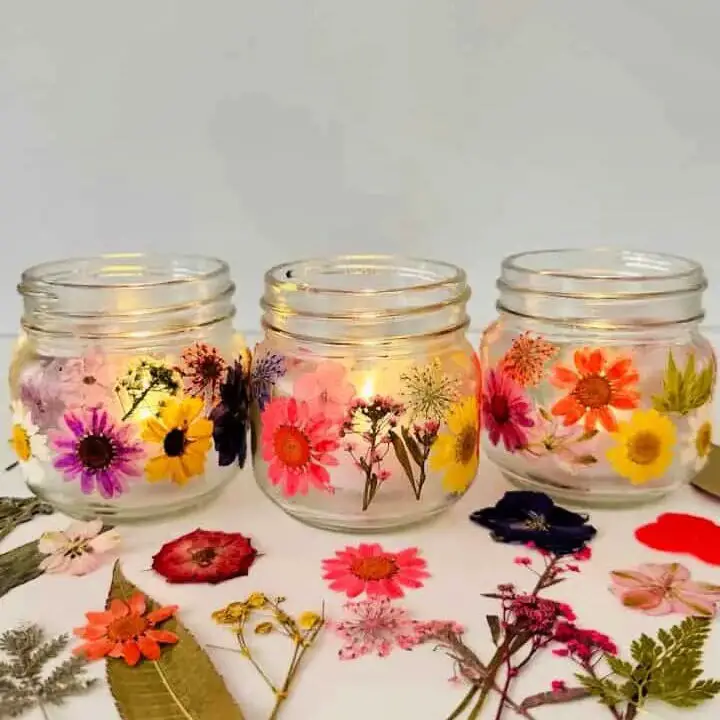
Transform your spring decor with the captivating charm of DIY pressed flower jars, a thoughtful and eco-friendly way to infuse any space with warmth. Perfectly suited for crafting with kids, these delicate creations allow you to capture the essence of spring through the intricate beauty of pressed flowers. Not only do they make for exquisite decorations, but they can also be repurposed into whimsical lanterns, casting a magical glow that’s sure to enchant. With just a few straightforward materials, including clear glass jars, pressed flowers, and Mod Podge, you can create these lovely vessels. Ideal for gift-giving or adding a touch of nature to your home, learn how to craft these stunning jars at Hello Wonderful.
DIY Sheet Music Mason Jar Vase
Transform ordinary mason jars into exquisite sheet music jar vases with this engaging and effortless DIY project. This creative endeavor is perfect for music enthusiasts and anyone seeking to infuse their home with vintage charm. With just a few simple materials – including mason jars, old sheet music, Mod Podge, and some additional supplies – you’ll be able to bring these stunning creations to life. Whether you’re looking to elevate your living space or craft a thoughtful handmade gift, these vases are sure to impress. So gather your supplies and get ready to add a harmonious touch to your decor! For a step-by-step guide, visit Girl Just DIY.
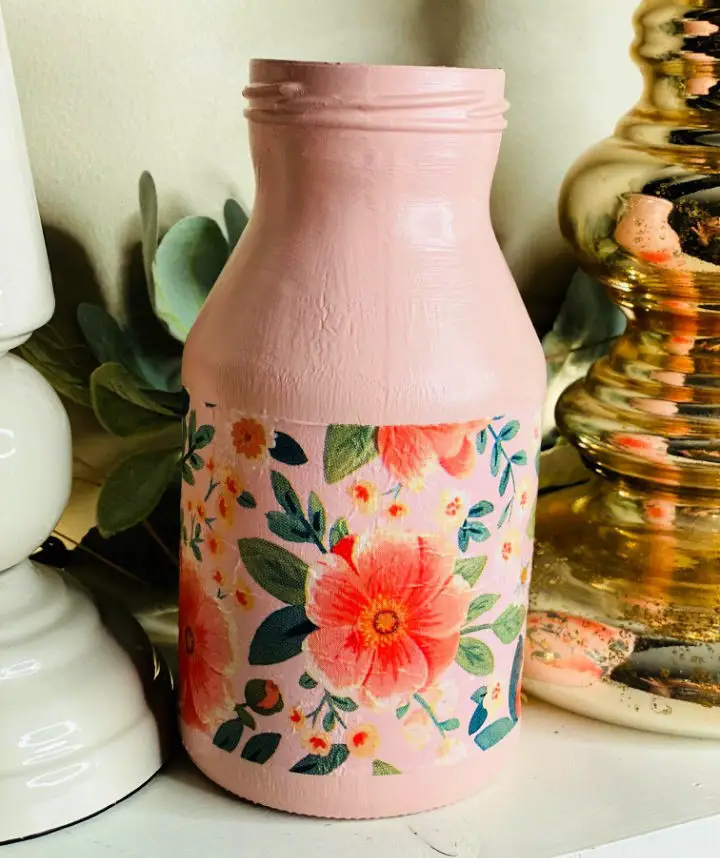
How to Decoupage Glass Jars With Mod Podge
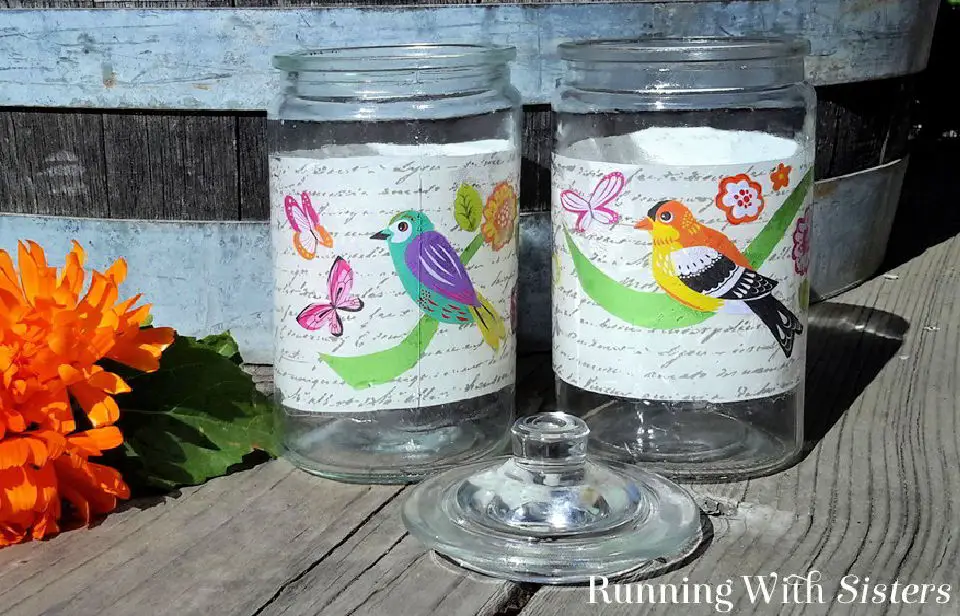
Transform ordinary glass jars into stunning works of art using the versatile Mod Podge! With the help of Running With Sisters’ step-by-step guide, you’ll learn how to elevate plain jars into unique decorative pieces. The process begins with selecting vibrant scrapbook papers that reflect your personal style, followed by a flawless application of Mod Podge. This comprehensive tutorial is designed for DIY enthusiasts seeking to infuse their space with creativity and personality. By following these simple steps, you can create your own decoupaged masterpieces in no time!
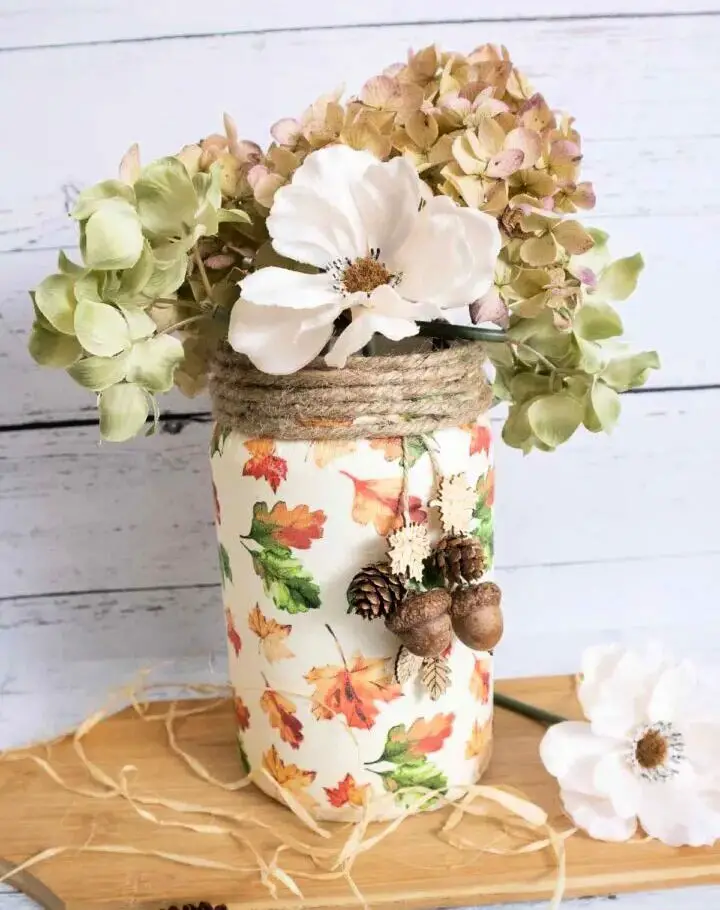
Decoupage on Glass Fall Leaf Luminaries
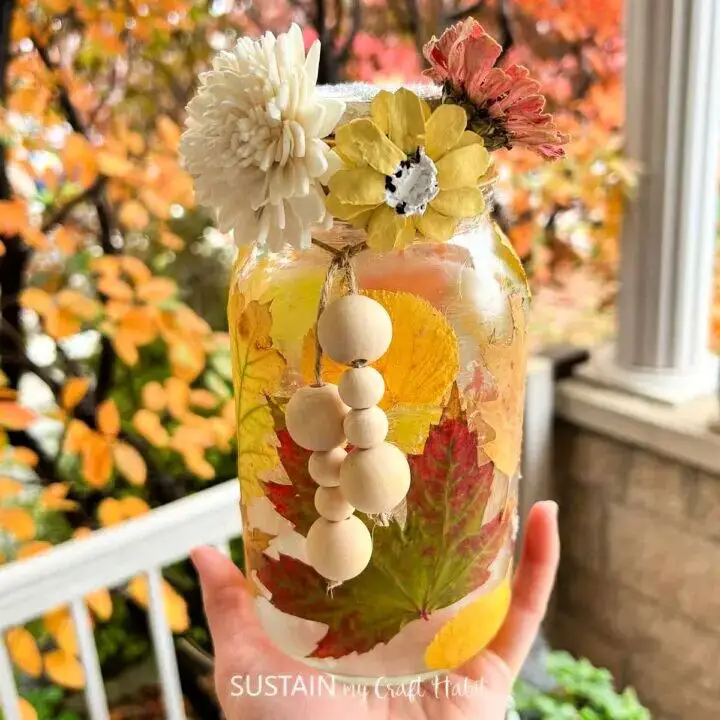
Imagine embracing the warmth and coziness of autumn within your own home by transforming ordinary glass jars into stunning luminaries using Mod Podge. This creative endeavor not only captures the essence of the season but also adds a touch of natural splendor to any room. With a few simple steps, you can turn mason jars into breathtaking pieces that evoke the fleeting beauty of fall. To guide you through this process, visit Sustain My Craft Habit for a step-by-step tutorial on crafting these enchanting autumn decorations.
Unique DIY Mason Jar Bank
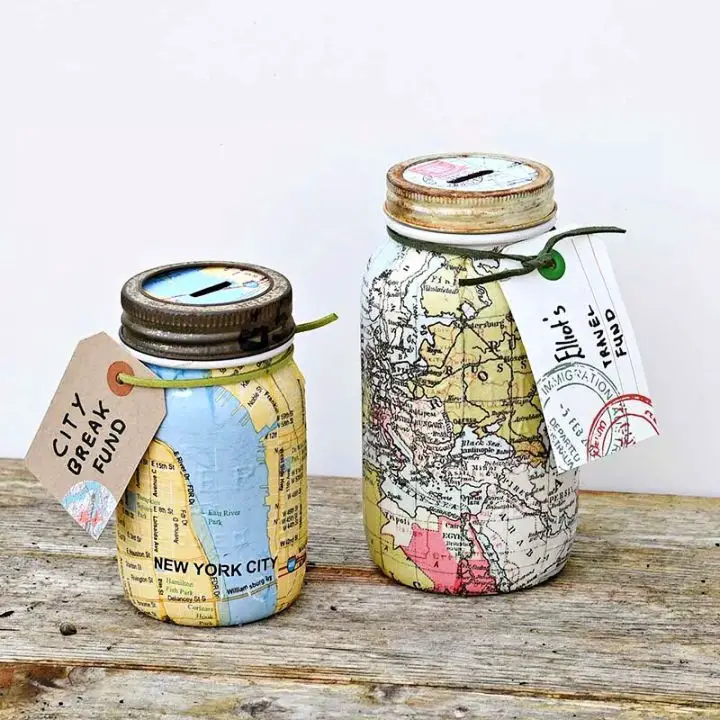
Transforming a Mason jar into a travel-themed Map Mason Jar Bank is a creative way to gift wanderlust appeal. This DIY project requires only a few basic materials: a Mason jar, map napkins, Mod Podge, and some crafting tools. The process of transforming an ordinary jar into a bespoke savings bank is surprisingly easy and takes about an hour to complete, excluding drying time. With this simple yet thoughtful craft, you can give a piece of the world to your loved ones, inspiring them to save for their next adventure.
Make Your Own Mason Jar Lights
Transform your space with whimsical charm by upcycling mason jars into enchanting lights. This DIY tutorial requires minimal materials and fosters creativity as you breathe new life into recycled containers. Perfect for special occasions like weddings or outdoor gatherings, these budget-friendly lighting solutions can be tailored to suit any theme, from patriotic celebrations to rustic soirees. Get inspired to illuminate your surroundings with a touch of magic.
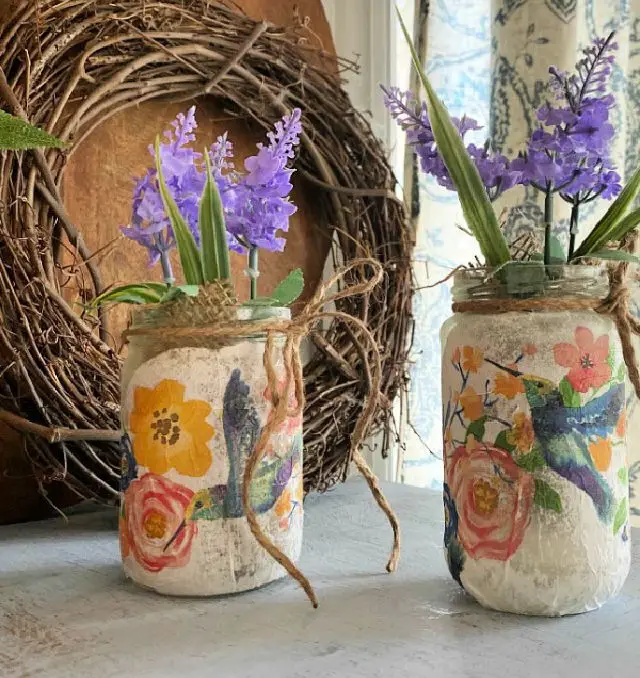
Upcycling Glass Food Jars for Storage
Breathe new life into old glass food jars with an innovative guide from my eclectic treasures. These empty vessels can be transformed into charming storage solutions or decorative pieces, perfect for storing pens, makeup brushes, or even repurposed as a unique vase.
This straightforward craft requires only basic materials like chalk paint, Mod Podge, napkins, and a simple heat gun. Not only is it an eco-friendly way to upcycle your old jars, but the result will also add a personal touch to your home’s decor. Start creating your own eclectic treasure today!
Homemade Mason Jar Night Light
Bring the whimsy of unicorns and rainbows into your daily routine by creating your own enchanting mason jar night light. This delightful DIY project combines the charm of mason jars with the magical allure of unicorns, resulting in a one-of-a-kind piece of home decor that’s sure to delight unicorn enthusiasts of all ages. Whether you’re looking to personalize your bedroom or gift something special to a fellow unicorn lover, this engaging craft is the perfect way to add a touch of magic to your space.
Faux Stained Glass Recycled Jars
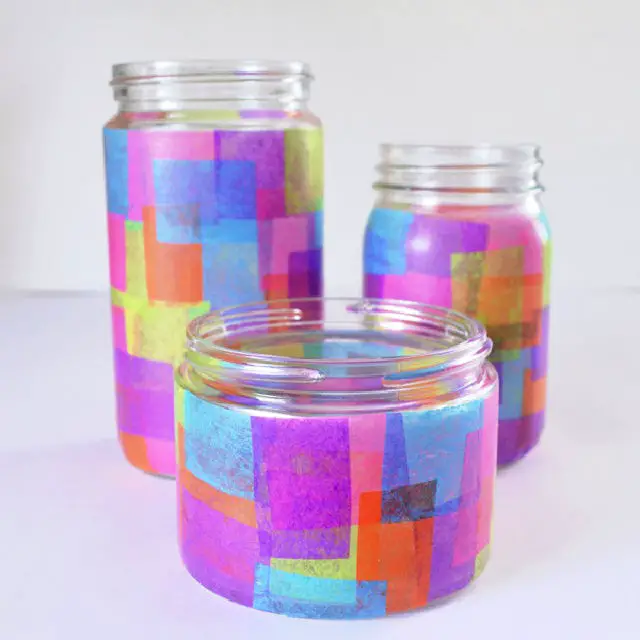
Turn ordinary jars into extraordinary DIY faux stained glass masterpieces using this straightforward guide. Embark on an inspiring project that brings a touch of magic to any room. With just tissue paper, Mod Podge, and some basic supplies, you can give recycled jars a stunning makeover. These colorful creations are perfect for storing pens, candles, or even toothbrushes, capturing the essence of stained glass without the complexity. For a comprehensive tutorial that takes you through each step, visit Mom Spark. Brighten up your space with these vibrant, handcrafted treasures.
Decoupaged Stained Glass Candle Holder
Step into the whimsical world of homemade crafts at Welcome To Nana’s, where a simple decoupaged stained glass candle holder project unfolds as an enchanting journey. This endeavor is tailored to captivate individuals of all ages, making it an ideal activity for families to bond over. With basic supplies like clear glass jars, vibrant tissue paper, and decoupage, you can bring to life a stunning piece that mimics the authenticity of stained glass. Perfect for adding a warm glow or personal touch to your décor, follow easy-to-follow instructions for a quick, mess-free craft experience. This engaging project is sure to ignite creativity and warmth in those cherished moments with loved ones.
How to Mod Podge on Plastic
Unleash the creative potential within by revamping everyday plastic items into stunning works of art. Our step-by-step guide on how to decoupage on plastic will walk you through the process of transforming a humble container into a captivating fall-themed luminary. With just a few basic materials like napkins, Mod Podge, and a dash of patience, you’ll be able to breathe new life into even the most mundane plastic items. As you craft your masterpiece, imagine the warmth and coziness it will bring to your living space when lit up.
Decoupaging Modge Podge Napkins on Glass
Unlock the art of transforming ordinary glassware into unique pieces with Mod Podge and napkins. This step-by-step guide, comprising nine effortless steps, is perfect for elevating jars, vases, and bottles into customized masterpieces. Whether you’re crafting gifts, home decor, or celebrating a special occasion, learn how to effortlessly apply napkins to glass and achieve a professional-looking finish. From selecting the right supplies to adding the final touches, discover the secrets to creating stunning pieces of art at Debbie-DebbieDoos.com.
Make a Sea Glass Mason Jar Lantern
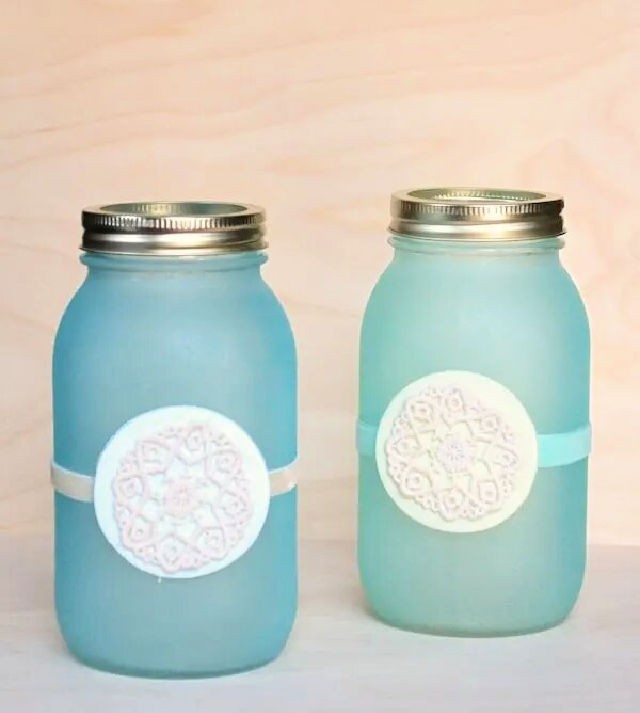
Transform ordinary mason jars into captivating coastal-inspired lanterns with a faux beach glass finish. Perfect for summer evenings, this project brings the serene beauty of the sea indoors, offering a unique textured and hued decor that’s sure to delight. With just a few simple supplies like glass paint, Mod Podge Dimensional Magic, and a dash of creativity, you can easily turn mason jars into enchanting decorative pieces that will illuminate your space with a warm, beachy glow.
Postage Stamp Decoupage Jar Tea Lights Ideas
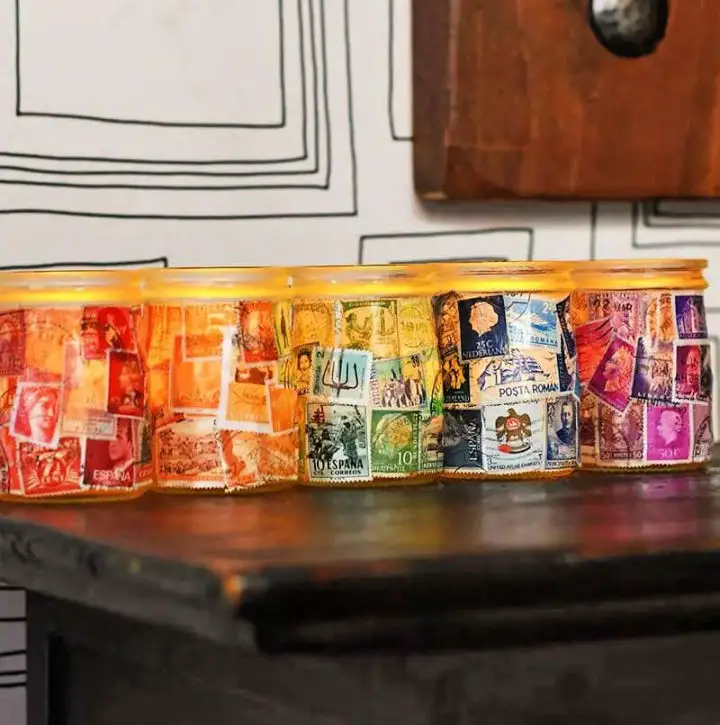
Transform your passion for travel and vintage postage stamps into a vibrant home accent with this imaginative DIY project. Create enchanting decoupage jar tea lights that exude a warm, inviting glow by combining basic materials like used postage stamps, small glass jars, and decoupage glue. Perfect for adding a personal touch to your decor or gifting to loved ones, these unique tea lights require minimal effort but yield maximum charm. By following our easy-to-follow guide available on Pillar Box Blue, you’ll be able to craft beautiful, stamp-filled lights that showcase a kaleidoscope of colors.
Conclusion:
As we wrap up this exploration into the world of decoupaged mason jars, it’s clear that this creative pursuit offers a harmonious blend of artistic expression and practical application. By following the straightforward steps outlined, from collecting supplies to applying Mod Podge and adding those finishing touches, this guide promises a rewarding and successful journey in transforming ordinary mason jars into stunning works of art. As you delve into these 15 easy-to-try decoupage ideas for mason jars, remember that each jar you transform is a unique reflection of your personal style and creativity. So gather your materials, and let the creative process unfold!
