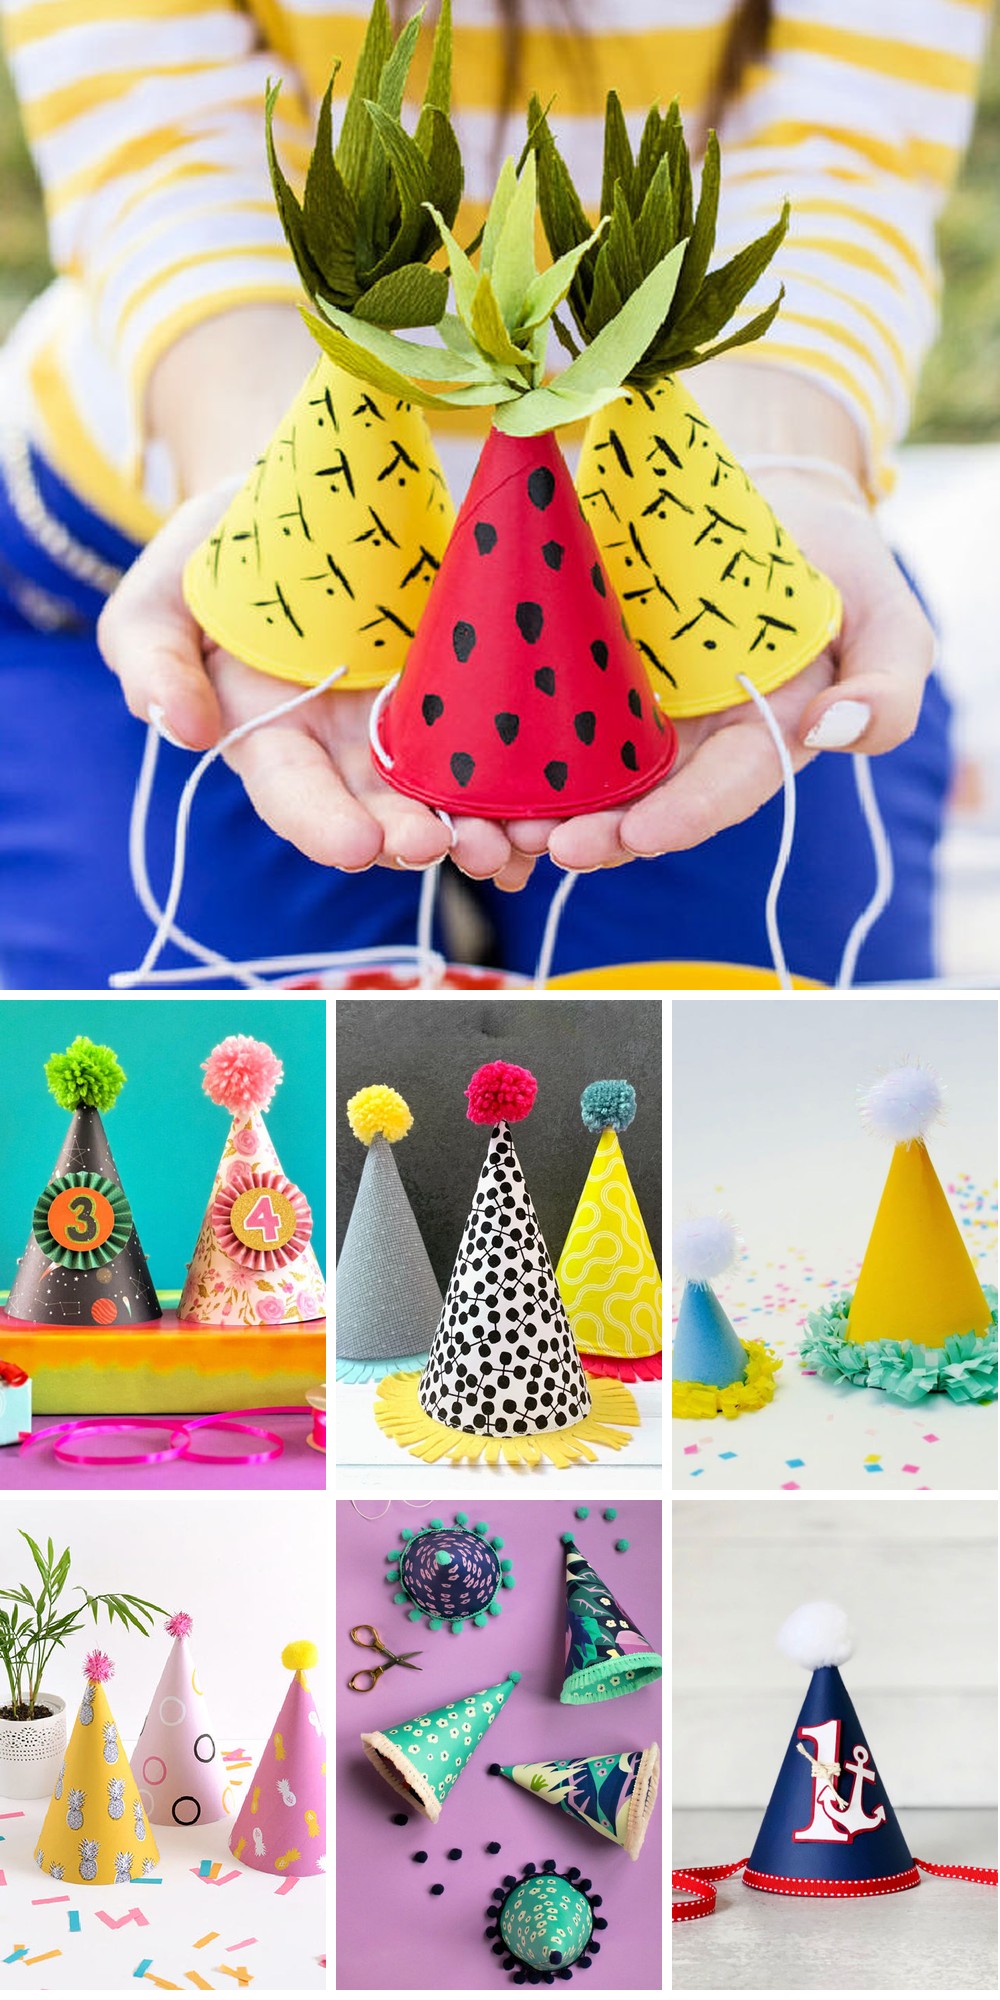
Transforming a birthday celebration into an unforgettable experience is just a DIY project away! To add a personalized touch, we’ll explore 15 creative and budget-friendly homemade birthday hat ideas perfect for kids and pets alike. Not only do these handmade masterpieces allow for endless customization options, but the process itself is an enjoyable and rewarding experience. By providing a comprehensive guide on selecting materials, decorating, and ensuring a comfortable fit, you’ll be well-prepared to tackle any project that comes your way. With additional sections covering customization, safety considerations, and troubleshooting tips, you’ll be equipped to overcome any obstacle and create a truly special celebration. Whether you’re planning a party for kids or pets, these DIY birthday hats are sure to bring joy and excitement to the occasion.
How to Make Birthday Hats – Step by Step
Adding a personal touch to any birthday celebration, making birthday caps at home is an enjoyable and straightforward craft project. With just a few basic supplies, you can create one-of-a-kind caps that will leave a lasting impression on the birthday celebrant. In this guide, we’ll walk you through the simple process of crafting your own unique birthday caps.
Materials Needed
When crafting a unique and eye-catching scrapbook page, the right materials can make all the difference. Start by gathering some essential supplies, including hard paper – preferably cardstock or another sturdy material for added durability. You’ll also need some glitter paper cuttings to add a touch of sparkle, as well as color paper cuttings in various hues to create visual interest. A rubber band or elastic string can help you secure any stray embellishments, while glue and scissors will enable you to bring your design together.
Step-by-Step Guide
To create the foundation of your DIY party hat, begin by cutting a large circle from hard paper. The size of this circle will ultimately determine the height and width of your finished cap, so feel free to adjust it according to your preference. Next, draw a straight line from the edge of the circle to its center, then carefully overlap the cut edges to form a cone shape. Continue to adjust the overlap until you’re satisfied with the size of your cone, which will serve as the basis for your party hat. To secure the overlapped edges, apply glue and hold the edges together for a minute or two to allow the glue to dry and the shape to set firmly in place.Once your cone is securely formed, it’s time to add some color and sparkle to your party hat! Take your glitter and colored paper cuttings and start decorating the cap. You can glue these decorative pieces all over the cone or create a specific design or pattern that reflects the birthday person’s preferences. Why not add their name, age, or favorite colors and shapes to make it an even more personalized gift?Finally, it’s time to attach the elastic strap that will keep your party hat securely in place on the wearer’s head. Begin by cutting a piece of rubber band or elastic string long enough to comfortably fit under the chin of the person who will be wearing the cap. Then, using a hole punch or the tip of your scissors, carefully make two small holes on opposite sides of the cone’s base. Tie each end of the elastic to these holes, double-knotting the ends to ensure that the cap stays securely in place.
Final Touches
Before donning your newly decorated birthday cap, take a moment to inspect its perimeter for any stray edges or loose embellishments. If you spot any, apply a touch more adhesive to keep everything in place. Once you’ve secured any loose elements, give the entire cap sufficient time to dry completely. This will guarantee that all decorations are thoroughly bonded and ready to withstand the wear and tear of your special day.
Video Tutorial
If you’re looking to add a personal touch to birthday celebrations, making your own paper birthday caps is a fantastic idea. To help you get started, we’ve got you covered with a step-by-step video tutorial available on Orthy Art & Crafts’ YouTube channel. This visual guide complements our written instructions, providing an alternative perspective on the crafting techniques and offering additional tips to enhance your experience. By following along with the video, you’ll not only learn how to create unique caps but also pick up some valuable tricks of the trade. With this combination of written guidance and visual instruction, you’ll be well-equipped to craft special birthday caps that will make any celebration even more memorable.
Customization Ideas for DIY Birthday Hats
Crafting a DIY birthday hat isn’t just about creating an accessory; it’s about infusing it with personality and making it a memorable part of the celebration. To take your hat-making skills to the next level, try incorporating these unique ideas that add a personal touch:Start by matching the hat to the party’s theme – whether it’s a superhero, princess, or jungle adventure. Let the theme guide your choice of colors, patterns, and embellishments.Next, get creative with textures! Mix and match different materials like felt, sequins, pom-poms, and tulle to make a hat that’s fun to touch and look at.Consider adding personal touches like writing the birthday person’s name or initials on the hat using fabric paint or markers. You can also include their age or a sweet birthday message.Take it up a notch by incorporating symbols of the birthday person’s hobbies or favorite things, such as musical notes for a music lover or paw prints for an animal enthusiast.To add some extra flair, incorporate metallic elements like glitter and tinsel to make your hat sparkle. Use glue to create patterns or shapes, then sprinkle with glitter for a dazzling effect.Why not try something different from the traditional pom-pom? Attach small stuffed toys, artificial flowers, or funny figurines as fun toppers instead.You can also add an interactive element by incorporating small bells, ribbons, or feathers that move when the wearer does. This adds an extra layer of fun and engagement to the hat.Finally, consider seasonal elements like mini pumpkins for fall or snowflakes for winter if the birthday is near a holiday. This adds an extra touch of whimsy and nostalgia to the celebration.The key to creating a truly special DIY birthday hat is creativity and personalization. Don’t be afraid to experiment and have fun with the process – your unique creation will surely be a hit at the party and a cherished keepsake for years to come.
Safety Tips for Crafting DIY Birthday Hats
To ensure a safe and enjoyable crafting experience when making DIY birthday hats, especially with children involved, it’s crucial to prioritize safety from start to finish. This can be achieved by following these essential guidelines:Firstly, opt for materials that are non-toxic and free from potential allergens or choking hazards. Next, always supervise children when they’re handling crafting materials to prevent accidental ingestion of small items or misuse of tools.When selecting tools, prioritize those with rounded tips, washable markers, and glue sticks over hot glue guns. This will significantly reduce the risk of accidents occurring. Additionally, maintain a tidy workspace to avoid tripping hazards by keeping loose materials off the floor.When handling sharp objects like pins or needles, be mindful of their location and handle them with care. Steer clear of flammable materials that could easily catch fire, especially if candles are involved in the celebration.As you craft the hat, regularly test its fit to ensure it’s comfortable and secure. A hat that’s too tight can cause discomfort, while one that’s too loose may fall off and become a trip hazard.Educate children on how to wear and remove the hat safely, emphasizing that it’s not a toy and should only be worn on the head. Finally, dispose of waste materials properly after crafting to prevent littering and potential hazards.It’s also a good idea to keep a first aid kit nearby in case any minor accidents occur. By following these guidelines, you can create a fun and secure environment for everyone involved in the DIY birthday hat project.
Troubleshooting Common Issues in DIY Birthday Hat Crafting
When crafting a DIY birthday hat, it’s not uncommon to encounter a few setbacks along the way. However, by being prepared and knowing how to troubleshoot common problems, you can ensure your project turns out successfully.To start with, if your hat is looking a bit too flimsy, you can reinforce it by adding an extra layer of cardstock or using a stapler to add some extra support at the seams. If decorations are starting to fall off, make sure you’re using the right adhesive for the materials involved. For heavier embellishments, consider using double-sided tape or a hot glue gun for a stronger bond.If your hat is looking a bit too big or small, don’t worry – it’s easy to make adjustments. Simply add an adjustable closure by sewing or gluing on some Velcro strips, or make slits in the base of the hat to allow for size changes.On the other hand, if you’re finding that your brim is looking a bit uneven, try using a compass or round template to trace out a perfect circle before cutting. This will help ensure a uniform edge all around. And when it comes to color bleeding – which can be a major issue with paints and markers – test them out on a scrap piece of material first. If they bleed, switch to a different brand or type that’s suitable for your paper or fabric.Other common problems you might encounter include difficulty attaching a topper, wrinkles or bubbles in the paper, glue drying too quickly, and hats that don’t stand straight. But with a little patience and some creative problem-solving, you can overcome these obstacles and create a truly unique and beautiful DIY birthday hat.
Sustainability and Upcycling in DIY Birthday Hats
To give your DIY birthday hats an eco-friendly twist, consider the following sustainable strategies: Start by repurposing materials like recycled cardstock or paper as the base of your hat. You can also breathe new life into old ribbons, buttons, fabric scraps, and magazine cutouts to create unique adornments. For added texture, incorporate natural elements like dried flowers, leaves, or twigs, which can be composted after use. If you prefer a more durable option, opt for fabric made from sustainable fibers like cotton or linen. To take it to the next level, decorate with edible items like small candies or cookies, ensuring nothing goes to waste. Avoid single-use plastics by choosing paper-based glitter and decorations instead of plastic alternatives. For a touch of light, use energy-efficient LED options. Consider hosting a crafting party where guests bring their own materials to upcycle and share ideas. You can also challenge your friends to create the most inventive hat using only recycled materials. Finally, think ahead about how you’ll repurpose the hats after the party – they could become part of a costume box, decorations for another event, or even a creative storage solution for small items. By incorporating these eco-conscious practices into your DIY project, you’ll not only create one-of-a-kind accessories but also contribute to a more sustainable future.
FAQs About DIY Birthday Hat
Unravel the mysteries surrounding DIY birthday hat crafting with this comprehensive guide. Discover expert advice and indispensable techniques to create a one-of-a-kind party essential.
What is the best material for making a sturdy birthday hat?
When it comes to crafting a long-lasting and stylish hat, cardstock is an excellent choice. Its thickness provides the necessary structure to maintain its shape, while its flexibility allows for effortless manipulation, making it ideal for creating a durable and visually appealing headpiece.
How can I make sure the hat fits both kids and adults?
When crafting a unique hat design, consider incorporating an adjustable closure that can be easily customized to fit different head sizes. Options such as a string tie or a Velcro strip enable you to quickly make adjustments without having to remove the hat entirely.
Can I make a birthday hat without using glue?
When it comes to crafting, having reliable adhesives at your disposal is crucial. While traditional glue works well, there are times when you might prefer a faster, mess-free, and more secure option. Fortunately, staples or tape can be used as effective alternatives to glue.
How long does it take to make a DIY birthday hat?
While the timeframe can fluctuate depending on the intricacy of the design, a straightforward hat typically takes around 15-30 minutes to create. However, more complex and elaborate designs may require significantly more time, often extending beyond this initial estimate.
Are there any eco-friendly options for birthday hats?
When it comes to adding a touch of eco-friendliness to your decor, why not start with some creative repurposing? Consider upcycling old paper or fabric into unique decorative pieces. Alternatively, bring the outdoors in by incorporating natural elements like dried leaves, flowers, or branches into your design. The possibilities are endless and can add a lovely organic feel to any space.
What if I’m not good at drawing or designing?
When seeking inspiration for your creative project, you can easily tap into existing design styles by utilizing online templates or analyzing visual elements from printed materials like books and magazines. This approach allows you to build upon established patterns and shapes, streamlining the process and ensuring a more cohesive outcome.
How can I involve my child in making their birthday hat?
Encourage your little ones to unleash their artistic side by assigning age-appropriate creative activities, such as colouring in, adding fun stickers, or sprinkling glitter with abandon. This not only fosters self-expression but also allows them to develop their fine motor skills and imagination.
My hat keeps falling off. What can I do?
When it comes to donning your headgear, it’s crucial that the foundation of the hat provides a comfortable and secure fit. To achieve this, ensure the base of the hat sits harmoniously on your cranium. For added peace of mind, consider fastening a chin strap for enhanced stability.
I want to add lights to my hat. Is that safe?
When it comes to choosing a lighting option for your nursery, consider using LED lights instead of traditional incandescent bulbs. One major advantage of LEDs is that they produce very little heat, making them a safer choice for a room where babies and toddlers will be present. Additionally, ensure the battery pack for any wireless or portable devices is safely secured and out of reach from young children to prevent any potential accidents or injuries.
How can I store the hat for future use?
When storing a flattened birthday hat, ensure it’s placed in a dry, sunlight-free environment to preserve its colors and materials. By providing clear guidance on these FAQs, you’ll empower your readers to confidently approach their DIY project, fostering a sense of accomplishment and creative expression.
15 Perfect Birthday Hat Ideas for Your Kids & Pets
Unleash creativity and make your kid’s and pet’s birthday party truly unforgettable with these 15 innovative and playful birthday hat ideas. Ranging from clever theme-based designs to simple yet effective DIY solutions, you’ll find the perfect headgear to match your celebratory mood.
DIY Birthday Party Hat Using Scrapbook Paper

Create a one-of-a-kind paper birthday party hat with this user-friendly tutorial from Crafting Cheerfully. Perfect for adding a personal touch to any celebration, this DIY guide walks you through the process of crafting a festive hat using scrapbook paper and yarn. A complimentary PDF pattern and SVG cut file are included to simplify the crafting experience. To make it even more special, customize the hats with numbers or theme-matching decorations, turning them into treasured keepsakes that your guests will adore. With basic tools and a dash of creativity, you can design a hat that perfectly complements your party’s unique theme.
Sewing Your Own Party Hat
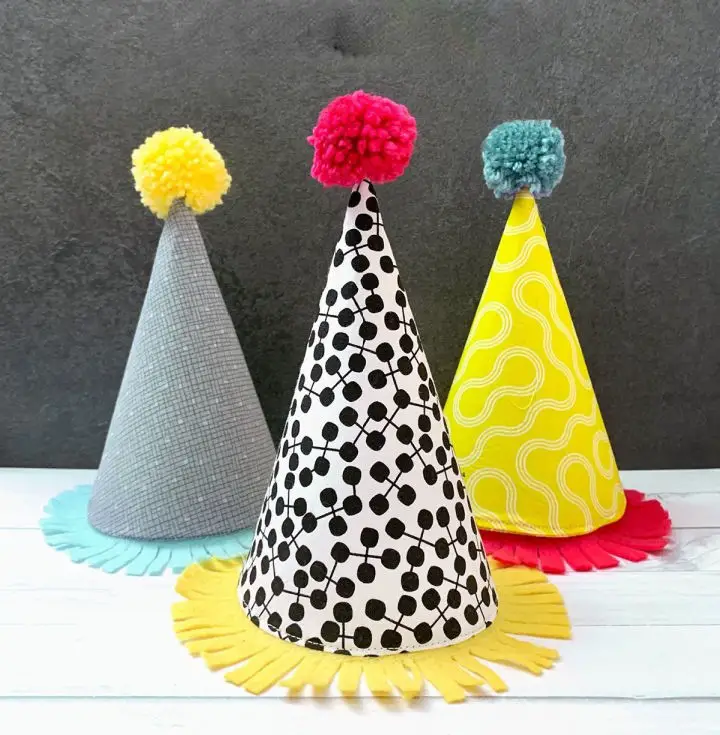
With the help of WeAllSew’s comprehensive tutorial, creating a festive atmosphere with handmade party hats has never been more accessible. The step-by-step guide promises a high-quality result, featuring fully lined interiors that eliminate raw edges and ensure a polished finish. This DIY project is perfect for a fun-filled crafting session with friends or family, requiring only basic materials such as fabric, card stock, and essential sewing tools. As you follow the clear instructions, you’ll be delighted by the charming party hats that add a personalized touch to any celebration, making it an ideal activity for birthdays, holidays, or special occasions.
Homemade Flower Power Party Hat
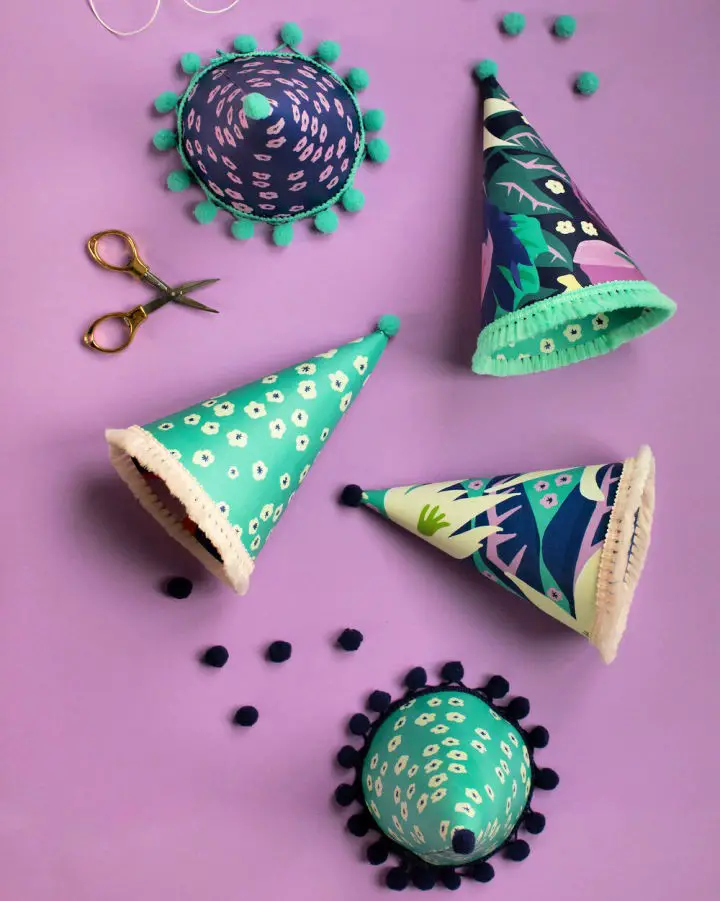
Transform your next gathering into an unforgettable celebration by crafting one-of-a-kind flower-power party hats. With March’s easy-to-follow guide, you’ll be able to create these charming headpieces using decorative gift wrap and a few simple materials. The result is a cohesive and unique addition to any themed event.
The process is surprisingly straightforward: start by downloading the provided template and tracing it onto your chosen paper. Then, assemble the hat into a cone shape and add some whimsical flair with pom-poms or tassels. Secure them in place using a hot glue gun or double-sided tape, before attaching a thin elastic to fit comfortably around the chin.
With these DIY party hats, you’ll be able to add a touch of personality to your celebration without breaking the bank. And with March Party Goods’ simple and engaging guide, you’ll be able to create an impressive array of unique hats that will leave your guests in awe.
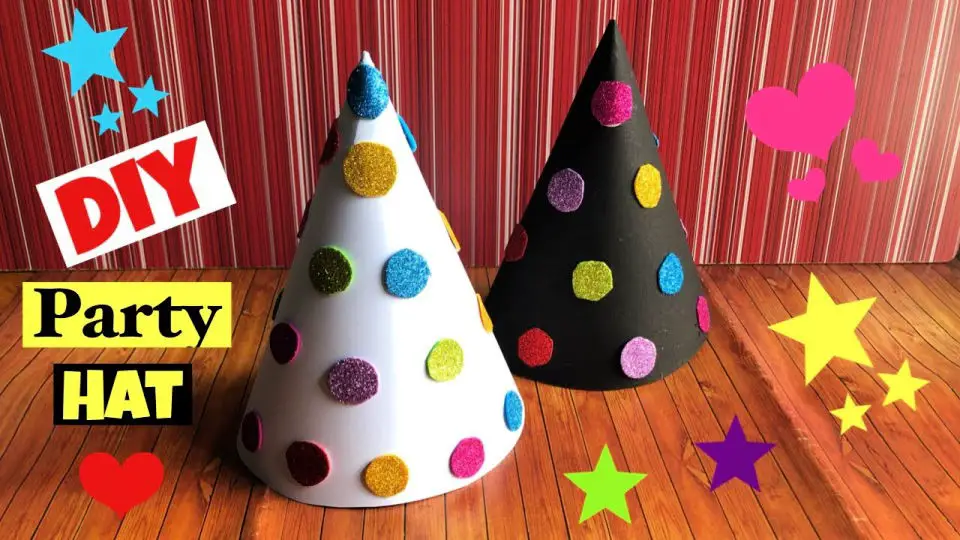
How to Make Birthday Party Hat
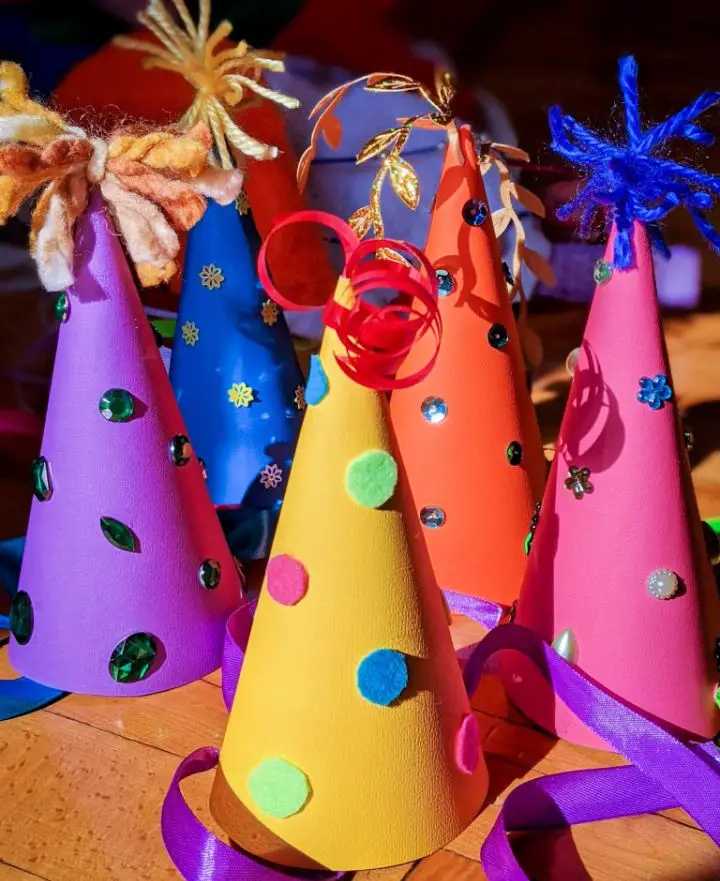
Get ready to infuse your next celebration with a personal touch by crafting unique party hats! Our DIY guide is designed to inspire creativity, offering a fun and engaging way to design and decorate one-of-a-kind headpieces perfect for any festive occasion. With minimal materials like card stock, sequins, and ribbons, you can create custom hats that reflect the personality of each guest. This step-by-step tutorial is ideal for crafting enthusiasts and those who enjoy adding a handmade twist to parties. By following our easy instructions to cut, glue, and adorn your hats, you’ll elevate your next birthday or gathering from ordinary to extraordinary. What’s more, this project provides an excellent opportunity to involve older children in the creative process, fostering imagination and giving them the joy of wearing their own creations. Embark on this crafting adventure and create memories that will last long after the party has ended.
Easy DIY Yarn Pom Pom Party Hat
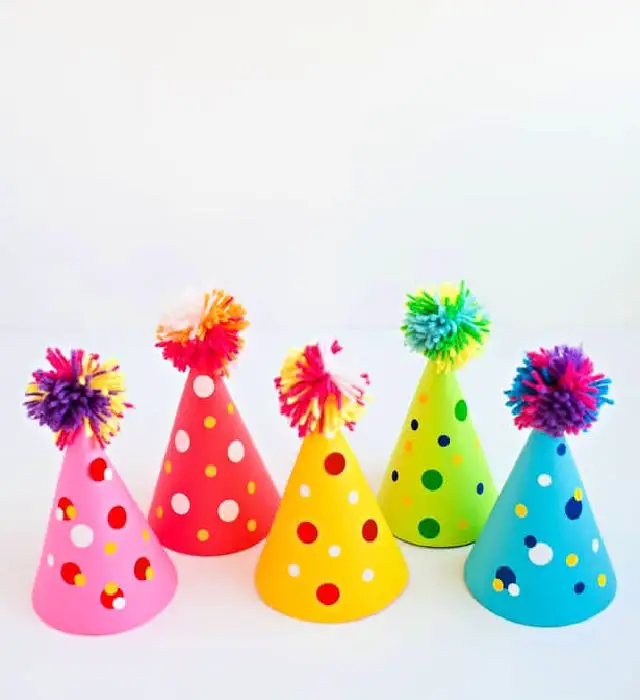
Add a pop of festive fun to your celebrations with DIY Yarn Pom Pom Party Hats, a colorful craft perfect for all ages. To get started, gather colored cardstock, yarn, scissors, a party hat template, hot glue, a hole puncher, and office round stickers. The process is straightforward: assemble the hats, create or attach pom poms, decorate with sticker dots, and secure the yarn to wear. These customizable hats are ideal for any party theme, and the crafting experience is enjoyable for both kids and adults. Simply follow these easy steps and you’ll be ready to ring in celebrations with a unique, handmade flair.
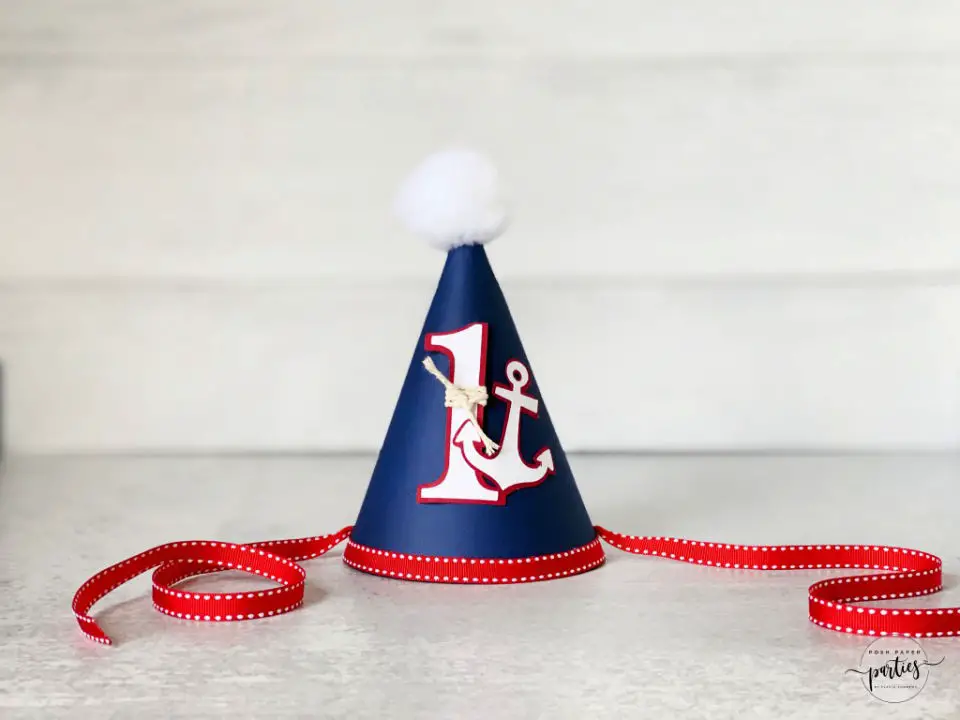
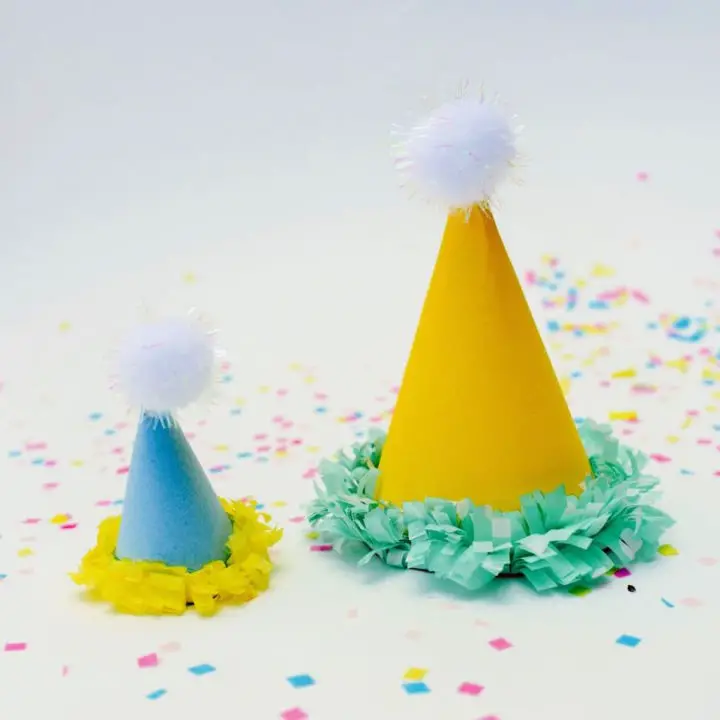
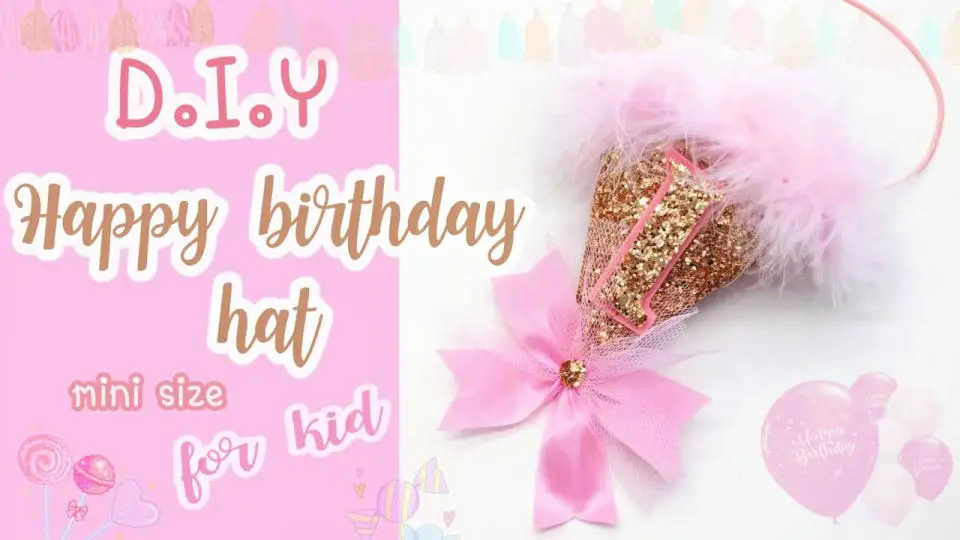
Make a Felt First Birthday Hat
Crafting a personalized felt hat for your child’s first birthday is not only a thoughtful gesture but also a keepsake to treasure for years to come. To create this charming headpiece, you’ll need basic supplies like felt, Pellon Peltex, sewing essentials or hot glue, an iron, elastic, and a hot glue gun. With the provided patterns, you can easily cut, iron, and assemble a delightful mini hat featuring a number ‘1’ and a cute tassel on top. The instructions are straightforward, making the crafting process enjoyable and accessible for all skill levels. As a result, your little one will have a unique and adorable hat to commemorate their special milestone.
Free Printable Party Hat for Baby
For parents seeking to create a one-of-a-kind party hat for their child’s special day, Neat House. Sweet Home offers a detailed, visually-driven tutorial that breaks down the process into manageable steps. From sourcing cardstock to adding the finishing touches, this comprehensive guide provides all the necessary information to craft a unique and endearing accessory. The clear instructions, accompanied by images, make it easy to follow along. Additionally, the provided free template simplifies the creative process, allowing you to focus on personalizing the party hat to match your child’s personality or the occasion. Whether planning for a first birthday or another milestone celebration, this guide empowers you to create a memorable and charming party hat that will delight both guests and the honored child.
Fruit-Inspired Party Hat Ideas
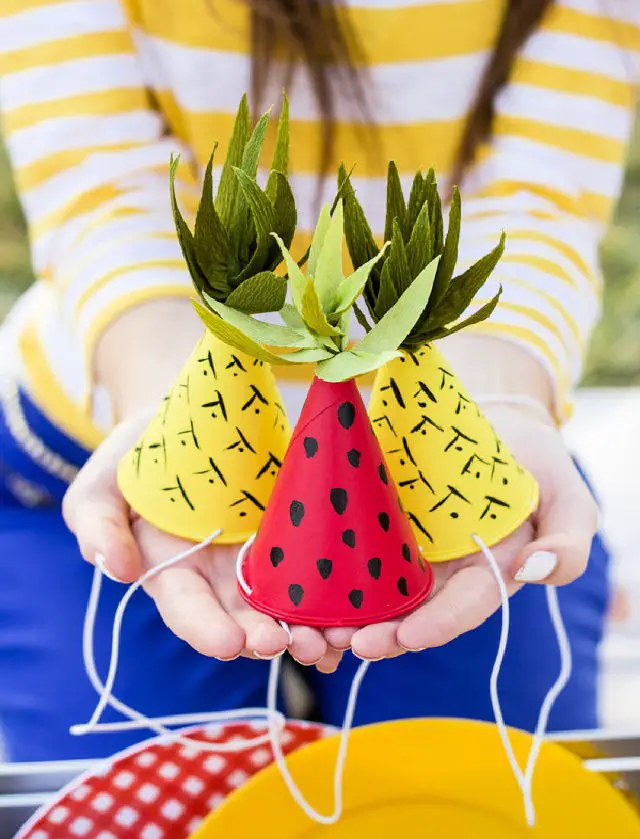
Transform your next picnic or fruit-themed birthday party into a whimsical wonderland with DIY Fruit-Inspired Mini Party Hats from Studio DIY. By upcycling simple paper cone cups, you’ll create charming party accessories that resemble juicy strawberries and prickly pineapples. The step-by-step guide is easy to follow, providing clear instructions on how to paint, cut, and assemble the hats, complete with lush green crepe paper leaves for added authenticity. With affordable materials and a streamlined process, this creative project is perfect for kids and adults alike. Simply grab your paints, scissors, and tape, and get ready to unleash your inner crafter as you bring these adorable hats to life.
Printable Pineapple Party Hat
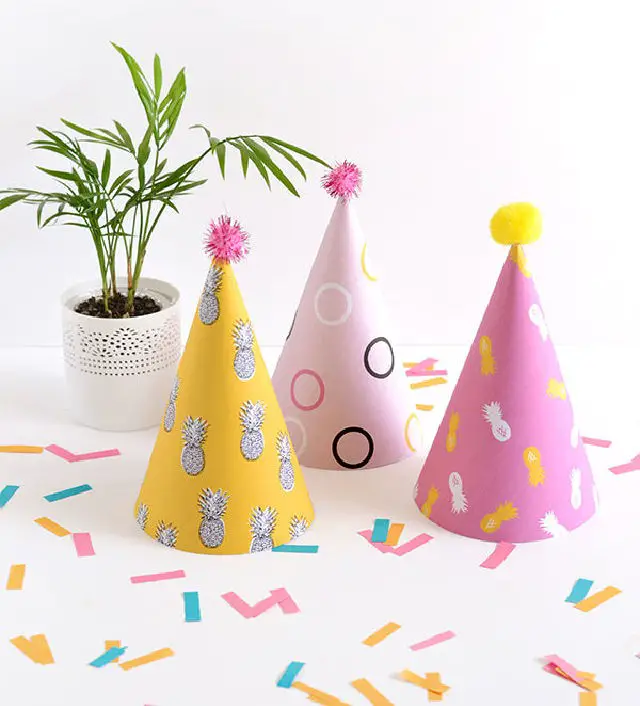
Join the celebration of DIY Crafts’ 2nd anniversary by creating festive pineapple party hats that will bring a pop of color to any gathering! With a simple and interactive guide, you’ll learn how to craft these adorable hats using basic materials like white card, scissors, a hot glue gun, elastic, and pom poms. This project is perfect for both personal enjoyment and setting the mood for your next party or celebration. As you follow the straightforward steps, you’ll be treated to a creative and joyful crafting experience that will leave you feeling inspired and eager to make more. And don’t forget to visit DIY Crafts for many more exciting crafting ideas!
DIY Confetti Birthday Party Hat for Kids
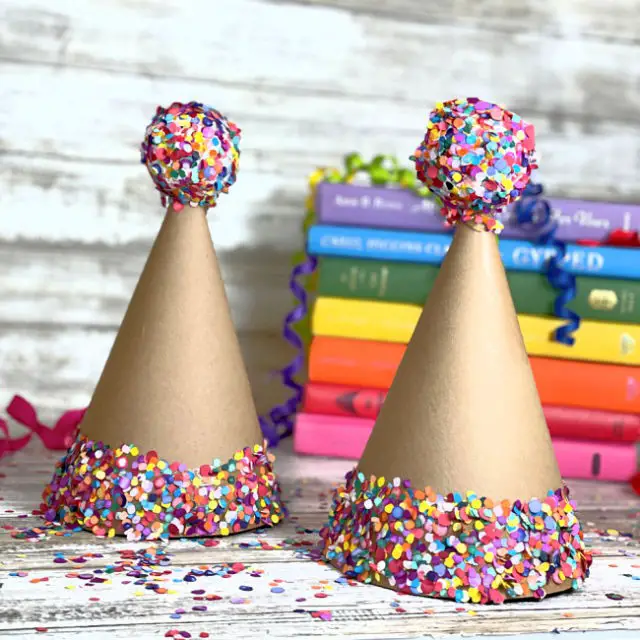
Want to add an extra layer of excitement to your birthday celebration? Look no further than DIY Confetti Birthday Party Hats, courtesy of Laura Kelly’s Inklings. This creative guide empowers you to create one-of-a-kind headpieces that will delight guests of all ages. By personalizing the cardstock and confetti, you can tailor the hats to fit your party’s unique theme and style. With clear instructions that are easy to follow, this craft activity is perfect for both kids and adults. As you work on these charming party hats, you’ll not only be creating a memorable experience but also engaging in a fun DIY project that’s sure to bring people together. Just be prepared for a mess (it’s all part of the confetti fun!) and have all your materials ready to roll. With these DIY hats, you’ll be adding a touch of homemade magic to your festive occasions.
Make Your Own Mini Party Hat
Transform celebrations into unforgettable experiences with the magic of mini party hats, achievable through a simple process outlined on Make Life Lovely. The art of crafting these whimsical toppers involves die-cutting, rolling, and embellishing with playful details like pom-poms or fringed tissue paper. These hats can be customized in various colors and sizes to harmonize with your event’s theme, making them perfect for decorating headbands or cupcakes. With easy-to-follow instructions and plenty of room for creativity, you’ll find delight in fashioning a set of these miniature marvels that can elevate your party ambiance or become a delightful activity for guests to enjoy. By engaging in this craft, you’ll add a personal touch to your next gathering, making it an occasion to cherish.
DIY Happy New Year’s Party Hat
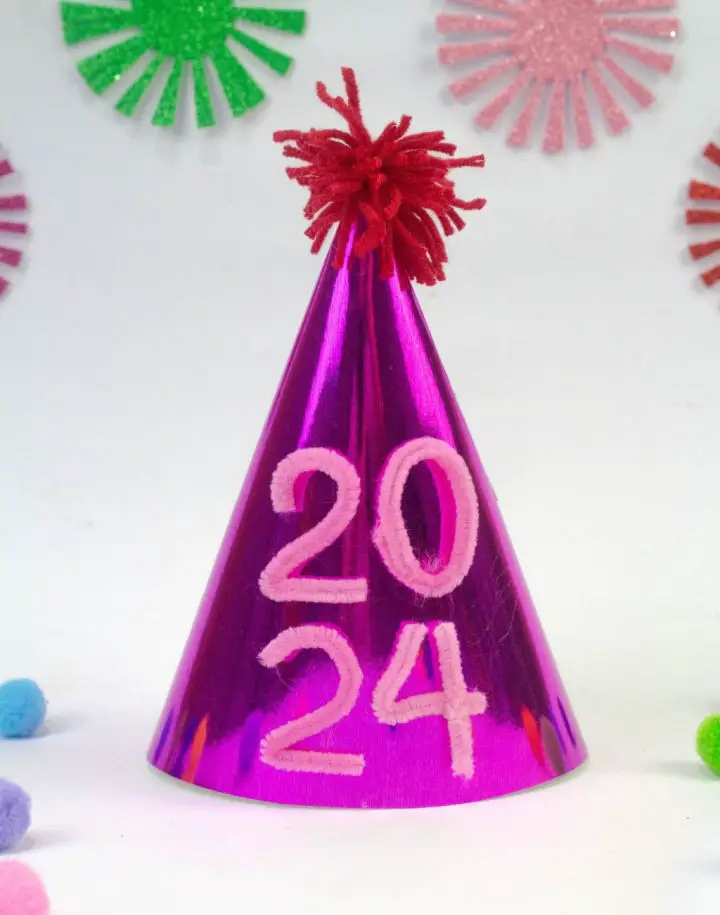
Get ready to add a personal touch to your New Year’s Eve celebration with an easy DIY party hat project from In The Playroom. This fun and creative activity is perfect for involving the whole family in the festivities, regardless of age. With just a few simple materials like metallic cardstock, pipe cleaners, yarn, and glue or tape, you can create a unique and festive accessory that’s sure to make your party stand out. The step-by-step instructions are designed to be enjoyable and stress-free, allowing everyone to participate in the crafting process and making it a memorable experience. As the clock strikes midnight, wear your handmade party hat with pride and get ready to count down to the new year!
Handmade Party Hat Tutorial
While traditional party hats may have their charm, creating a handmade birthday cap can elevate the celebratory atmosphere in a unique and personalized way. For those eager to get crafty, SalmArts offers an accessible tutorial on YouTube that demystifies the process with its clear instructions and creative flair. The step-by-step approach ensures that anyone, regardless of their crafting prowess, can follow along seamlessly. By utilizing materials such as paper, glitter sheets, or foam, you can craft a one-of-a-kind cap that’s sure to make a statement. This quick and fun DIY project can be enjoyed by kids and adults alike, making it an ideal activity for birthday parties or festive gatherings. As a bonus, the process is surprisingly fast, requiring only a few minutes of your time, making it an excellent way to spend quality time with loved ones while creating something truly special.
DIY Birthday Hats Using Household Items
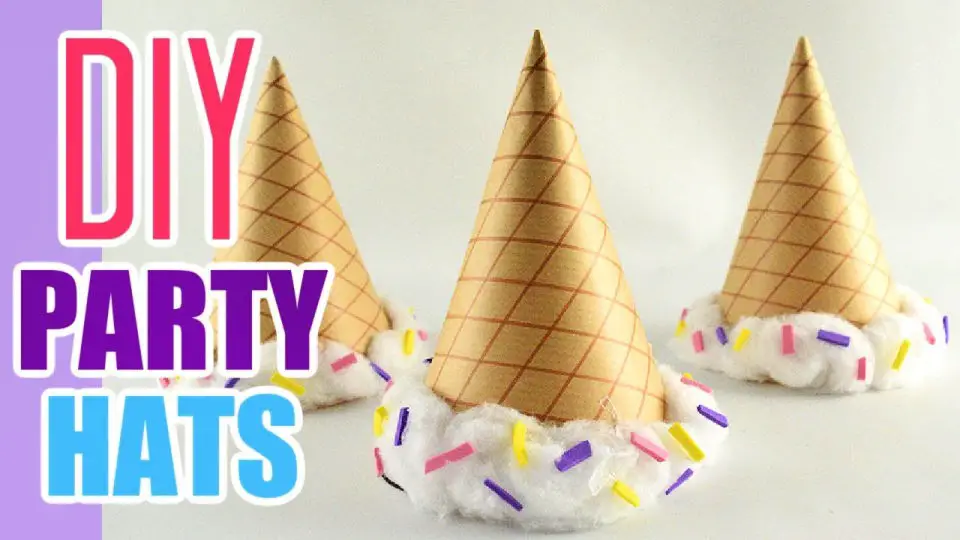
Want to add a personal touch to your next birthday party or festive event? One fun and simple way to do so is by creating your own DIY party hats. With the help of YouTube’s ‘Easy DIY Party Hats’ video tutorial, you can make charming birthday hats using basic household materials. The tutorial offers a step-by-step guide that’s easy to follow, even for those who are new to crafting. You’ll have the opportunity to download a free printable template to ensure your creation resembles a whimsical vanilla ice cream cone complete with colorful sprinkles. As you craft, you’ll find that the instructions are clear and engaging, making the experience enjoyable and rewarding. Whether you’re looking to add a creative flair to a birthday bash or simply enjoy a crafty afternoon, this tutorial is perfect for anyone who wants to make their special occasions even more memorable.
How to Make Your Own Birthday Party Hat
For a first birthday celebration with a personal touch, consider crafting a DIY party hat as a fun and rewarding project. One great resource is CHIRA Design’s YouTube tutorial (Episode 103), which offers a no-sew approach to creating a unique and charming party hat using materials like felt fabric, hot glue, pom-poms, and ribbon. This accessible activity is perfect for anyone looking to add a homemade touch to their party. By following the step-by-step guide, you’ll be able to create a cute and handcrafted birthday hat that’s sure to be a hit at the celebration and a wonderful keepsake for years to come. For more creative ideas and tutorials, explore CHIRA Design on YouTube.
Conclusion:
As you’ve navigated the process of creating a one-of-a-kind birthday hat for your children, pets, or both, remember that this art form transcends mere crafting. It’s an opportunity to infuse love and imagination into each design, making it a truly personal and meaningful gesture. From choosing the perfect materials to adding those final flourishes, every step is an invitation to let your creativity shine. Whether you’re seeking a vibrant, playful hat for a child’s party or a cozy, adorable option for your furry friend, the possibilities are endless. Above all, prioritize safety by following our guidelines and ensuring that each finished product meets the highest standards of both style and security. By embracing customization and upcycling, you’re not only crafting unique birthday accessories but also promoting sustainability and reducing waste. If any challenges arise during the creative process, refer back to our troubleshooting section for quick solutions. Moreover, DIY projects like these provide a special chance to bond with loved ones and create lasting memories. With your materials at the ready, embark on this journey of self-expression and celebration, and get inspired by our 15 perfect birthday hat ideas to make this birthday one to remember!
