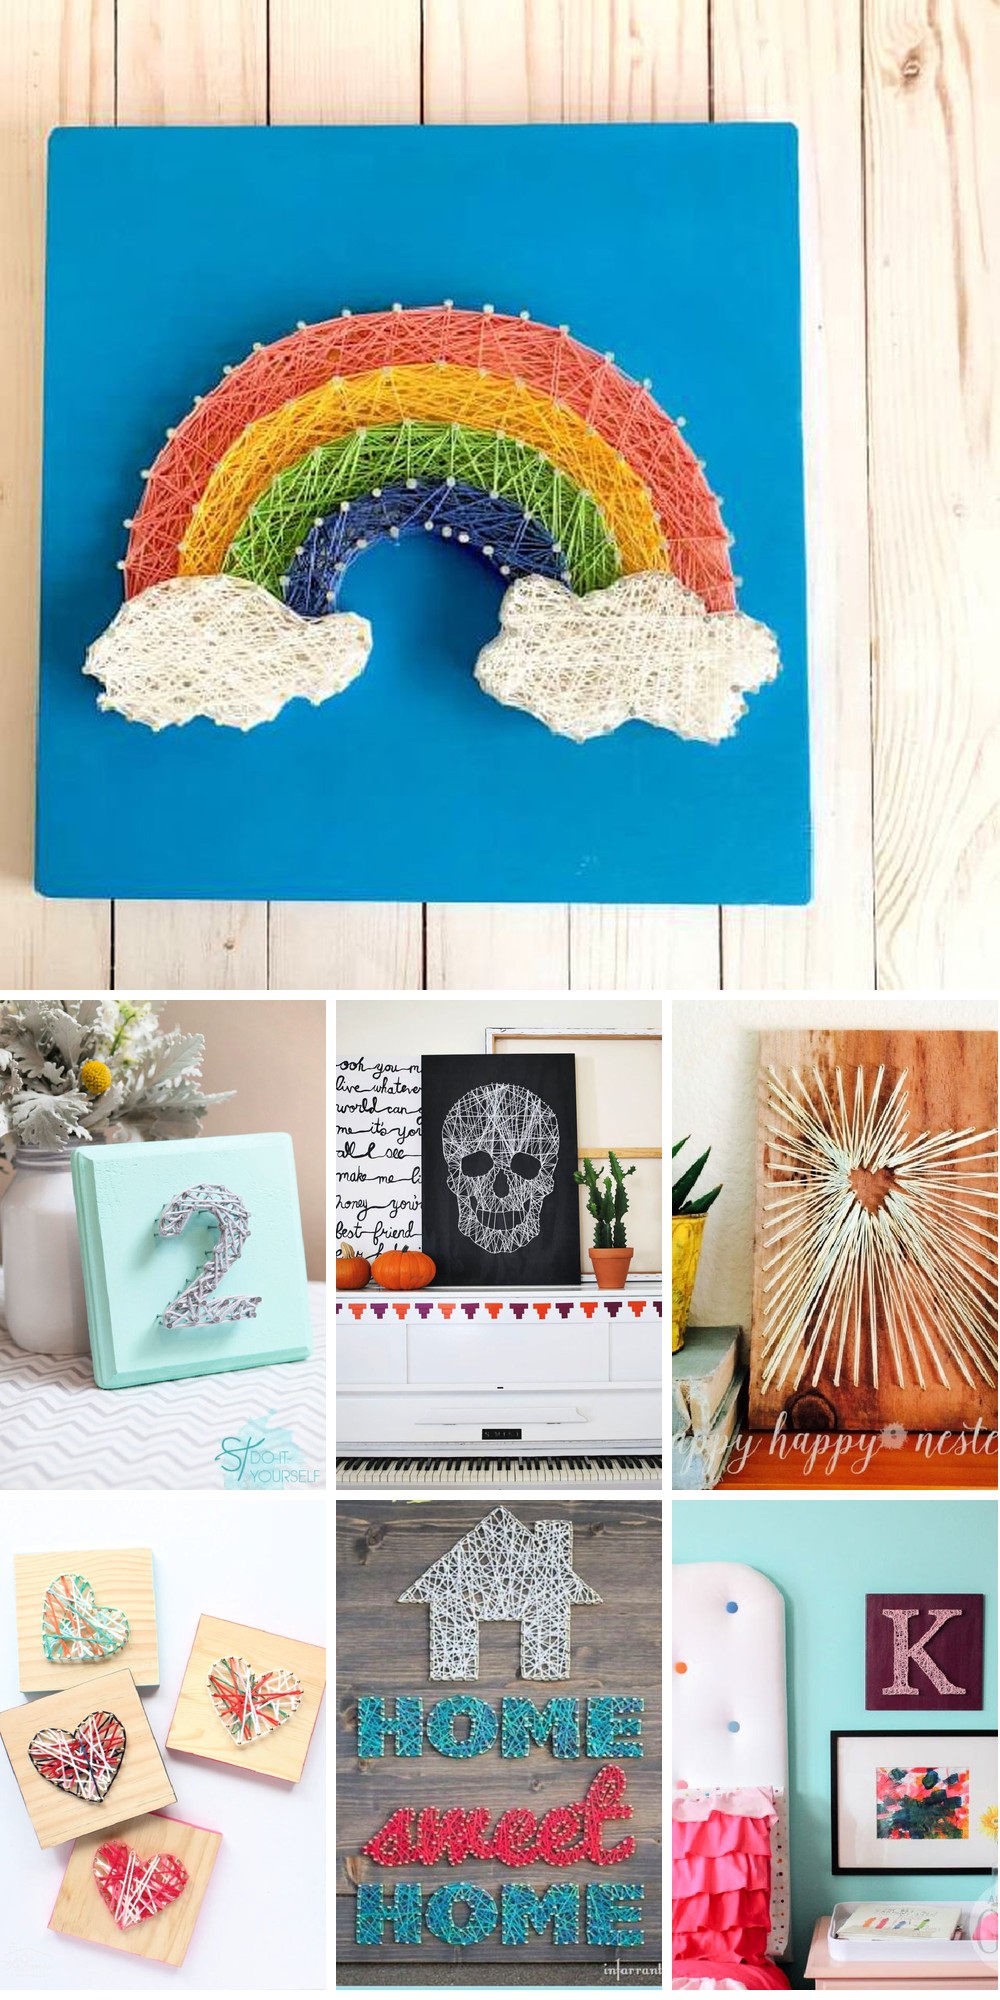
Transform ordinary objects into extraordinary works of art with these 25 creative DIY string art ideas. Follow step-by-step guides to unlock the secrets of creating stunning string art at home, using minimal materials like string and nails. This comprehensive guide is designed for crafters of all skill levels, providing a clear path from concept to completion. With a focus on simplicity, creativity, and practical advice, you’ll learn how to prepare wooden boards, select the perfect strings, and bring your artistic vision to life. A video tutorial accompanies each step, ensuring that every phase of the process is thoroughly understood. Embark on a journey of self-expression and creative discovery as you turn simple materials into masterpieces that reflect your unique style.
Why Make DIY String Art?
String art has become an increasingly popular DIY project among craft enthusiasts of all ages, offering numerous benefits that make it a worthwhile creative endeavor. This unique activity allows for self-expression through design, color, and pattern experimentation, bringing ideas to life. Additionally, the process of hammering nails and wrapping string improves fine motor skills and hand-eye coordination, providing a sense of accomplishment. Furthermore, crafting has been shown to have therapeutic effects, serving as a stress-relieving activity that can provide a calming influence. As a bonus, DIY string art projects make for personalized home decor or gifts, adding a touch of uniqueness that cannot be replicated by store-bought items. The cost-effectiveness of this project is another significant advantage, requiring only inexpensive and readily available materials to create beautiful pieces. Moreover, string art can be enjoyed as a family activity, making it an excellent way to spend quality time together. For beginners, this project provides a great introduction to DIY crafts, teaching fundamental skills that can be applied to more complex projects in the future. Ultimately, engaging in string art not only results in beautiful creations but also offers a rewarding crafting experience that benefits one’s mind, skills, and home.
Before You Start: Preparing for Your String Art Project
Before diving into a string art project, it’s essential to set yourself up for success. A little preparation can make all the difference between a piece that’s merely good and one that truly shines. To ensure your project gets off on the right foot, take some time to consider the following key factors.
Types of String
When it comes to creating a stunning piece of string art, selecting the ideal type and hue of string is essential. While there are several options to choose from, each has its unique characteristics that can impact the overall appearance of your project. Embroidery floss, for instance, boasts a fine texture and an extensive color palette, making it perfect for intricate designs. Crochet thread, on the other hand, offers a slightly sturdier construction, ideal for projects that require a bit more structure. Yarn, with its varied thicknesses and textures, can add a distinctive element to your art, ranging from bold statements made by thicker yarns to delicate, intricate designs achieved with thinner ones. Furthermore, the color of your string can drastically alter the look of your project, as bright hues can create a playful ambiance and monochromatic schemes can evoke a sophisticated atmosphere.
Best Wood for the Job
The foundation of a string art piece is the base material, typically wooden boards, which significantly impacts both its visual appeal and longevity. The properties of this wood have a direct influence on the final result.Density plays a crucial role in determining how well your design holds together. Softer woods like pine are more pliable and easier to work with, but they might not provide the same level of stability as harder woods. On the other hand, hardwoods like oak offer greater resistance and can securely hold even the most intricate designs.In addition to density, the wood grain also deserves consideration for its aesthetic value. A visible grain pattern can add a unique charm and character to your project, which may be desirable if you’re aiming for a rustic or natural look.
Nail Options
Nails not only serve as a functional component in holding together your string, but they can also significantly impact the overall aesthetic appeal of your finished piece. The choice between round head and finishing nails hinges on the desired visual outcome. Round head nails are intentionally designed to be more visible, allowing them to become an integral part of your design. In contrast, finishing nails are engineered to provide a sleeker, cleaner appearance. When selecting the appropriate size for your project, it’s essential to consider the scale of your undertaking. Smaller nails are ideal for intricate designs where precision is key, whereas larger nails work better for bold, simplistic patterns that require a more dramatic visual statement.
Essential Tools
To embark on a seamless string art experience, make sure to gather the following essential tools: A reliable hammer for driving nails into your base with precision, pliers that serve as a versatile assistant for adjusting or removing nails, a trusty pencil for sketching out your design before bringing it to life, and a thoughtful selection of protective gear like safety glasses to shield your eyes from any debris and gloves to prevent blisters. By taking these factors into account beforehand, you’ll be well-prepared to tackle your project with confidence and enjoy the process every step of the way.
String Art Ideas: A Skill Level Guide
Expressing creativity and adding a personal touch to home decor can be achieved through the wonderful world of string art. Whether you’re a seasoned crafter or just starting out, there’s always room for innovation and growth. To help guide your next creative venture, we’ve categorized our string art project ideas by skill level, ensuring that everyone from beginners to experienced artists can find their perfect match.
Beginner Projects
When venturing into the world of nail art, it’s essential to start with smaller, more manageable projects that allow you to develop your skills without feeling overwhelmed. Here are some beginner-friendly ideas to get you started:
Simple Shapes: Begin by creating basic shapes like hearts and stars. These designs require minimal precision and effort, making them perfect for newbies.
Personalized Initials: Create the first letter of your name or a loved one’s using a clear template. This project offers a unique touch while still being easy to accomplish.
Thicker is Better: For easier handling and manipulation, opt for thicker strings or yarns. This will allow you to cover more surface area with less effort, resulting in a bold and eye-catching design.
Intermediate Projects
As you master the fundamentals, it’s time to introduce a bit of intricacy into your designs. One way to do this is by exploring animal silhouettes, which can range from simple cat or dog shapes to more detailed depictions of elephants, birds, and other creatures. This adds a moderate level of complexity while still yielding delightful results.For an even greater challenge, try incorporating geometric patterns like triangles, hexagons, or chevrons. These designs offer ample opportunities for creativity in their arrangement and can be tailored to your desired level of intricacy. As you become more comfortable with these elements, you can also experiment with thinner threads or embroidery floss. This allows for the addition of finer details and enables you to play with color gradients, further enhancing the overall visual impact of your work.
Advanced Projects
For those looking to take their skills to the next level, there are several advanced techniques that can help them achieve stunning results. One approach is to focus on intricate designs, such as creating landscapes or portraits using high-level detail. This requires careful planning and a steady hand to bring the design to life.Another technique worth exploring is negative space, which involves deliberately leaving areas of the artwork empty to create a striking visual effect. By carefully planning where you place your string art, you can use this technique to add depth and dimensionality to your work.Experimenting with different colors and textures is also key to creating visually appealing string art. By blending various shades and types of strings, you can add depth and dimensionality to your artwork, making it truly come alive. Whether you’re a seasoned artist or just starting out, the key to successful string art is patience, creativity, and a willingness to try new things – so don’t be afraid to get creative and have fun with it!
How to Make a String Art – Step-by-Step Guide
Creating a stunning string art heart is an engaging and fulfilling project ideal for newcomers. This comprehensive guide will lead you through the process, from sourcing materials to finalizing your artwork. Whether you’re seeking to infuse a personal touch into your home decor or craft a thoughtful gift, follow these straightforward steps to bring your very own string art masterpiece to life.
Materials Needed
To create a unique wooden art piece, you’ll need the following materials: a wooden board measuring 20 x 20 cm is recommended for a good starting point. To prepare the surface, have some sandpaper on hand. For adding color and texture, you’ll require acrylic paint and a brush. If you’re feeling artistic, bring along a sheet of office paper and a pencil to sketch out your heart’s design. To add some stability and dimensionality to your piece, include small nails and a hammer in your arsenal. Finally, use cotton string with a smooth texture similar to Gamma Iris and have glue on standby if needed.
Preparing the Wooden Board
To create your wooden cutting board, start by selecting a suitable piece of wood at your local DIY store or online retailer. A 20 cm wide and 18 mm thick board is an ideal dimension, but you can adjust this based on personal preference. If possible, have the store cut the board into a square shape (20 x 20 cm) to provide a clean surface for cutting. Alternatively, you can use a saw or other woodworking tool to make this cut at home.
Next, smooth out the edges of the board using sandpaper to remove any splinters or rough areas that may be present. This step is crucial in ensuring your cutting board is safe and easy to clean.
Once the edges are sanded, it’s time to add some color to your board. Choose an acrylic paint that matches your personal style or complements your kitchen decor. Apply the paint evenly across the surface of the board, making sure to cover the edges as well. Allow the paint to dry completely before moving on to the next step.
After the paint is dry, lightly sand the surface of the board to enhance the natural pattern of the wood. This step helps bring out the unique characteristics of the wood grain and gives your cutting board a beautiful finish.
Making the Heart Design
To prepare for the design process, place a sheet of office paper on the painted board. You can either print out a heart design or draw one freehand. This will serve as a guide for your nail placement. Next, begin by hammering nails into position at the four corners of the heart design, ensuring they’re securely in place but still slightly protruding from the surface. Continue placing nails around the heart’s contour, spacing them approximately 1 cm apart or more. Once you’ve completed the nail placement, carefully remove and discard the paper guide to reveal your work.
Stringing Your Heart
To create a beautiful string art heart design, start by preparing your string. Knot one end of the string securely to a nail, using at least three knots for stability. For added reassurance, apply a small drop of glue to the knot. Next, outline the shape of the heart on a surface using the string, occasionally wrapping it around a nail to keep it in place as you go. To fill in the heart shape, gently pull the string and begin moving in various directions within the outlined perimeter. There’s no set method – simply ensure you cover the area thoroughly. Regularly press the strings down towards the base of the nails to maintain order. If the string slips or becomes loose, carefully tighten it again by wrapping around a nail before continuing. To add more color to your design, you can switch to a new colored string by cutting the current one, tying it off, and attaching the new string in the same manner. Once you’re satisfied with your design, finish by cutting the string and securing the end with a knot. Your string art heart is now complete!
Video Tutorial
While this written guide provides a detailed walkthrough of the string art heart project, it’s often helpful to supplement with visual aids to deepen comprehension. For those who prefer learning through video tutorials, I recommend watching the step-by-step demonstration on YouTube, which offers a hands-on exploration of the techniques discussed here. As you work on your own string art creation, remember that this project is not just about following instructions – it’s also an opportunity for personal expression and self-expression. With patience and creativity, you can craft a unique piece that combines visual appeal with emotional significance. The process itself can be incredibly fulfilling, so don’t be afraid to get creative and let your imagination run wild!
Troubleshooting and Problem-Solving
While creating string art can be an incredibly fulfilling experience, it’s not without its own set of obstacles. As we explore some of the most common pitfalls and unexpected snags that may arise during the process, you’ll gain valuable insights and practical advice to help overcome any hurdles and ensure your project reaches its full potential.
Common Mistakes
When working with nails, it’s common to encounter issues like bent nails, frayed string, or misaligned patterns. To minimize these problems, start by holding the nail with pliers for a better grip while hammering. If a nail does bend, carefully remove it with the back end of the hammer and replace it with a new one, applying gentle force to avoid further damage. Fraying can occur when string catches on splinters or rough edges; ensure your base is smooth and consider sealing it with a clear varnish to prevent this issue. If fraying does happen, trim the frayed end and apply a small amount of clear glue to prevent further damage. To avoid misaligned patterns, always plan your design layout using a template or sketching it on the base first. If your design starts to misalign, don’t hesitate to unstring certain sections and re-align your nails according to the corrected pattern.
“Oops!” Moments
When mistakes occur during the creation of string art, don’t worry – they can often be corrected or repurposed to add an element of surprise to the design. If you’ve accidentally removed a section of string, carefully retrace your steps using the same color thread to rectify the situation. Alternatively, consider incorporating the unintended gap as a unique feature that adds visual interest to the piece. Similarly, if holes are misplaced or too small to accommodate the desired nail placement, take a step back and reassess the design. In some cases, small holes can be concealed by strategically placing a nail and working it into the overall aesthetic. Larger gaps, however, may require filling with wood filler, allowing it to dry before sanding it smooth and re-drilling the correct hole.
Preventative Tips
When crafting string art, it’s crucial to prioritize high-quality materials for string, nails, and base components. This simple approach can drastically minimize issues like fraying and bending, ensuring a smoother creative process. Additionally, take the time to meticulously plan and sketch out your design before execution, as this will help you avoid common errors related to alignment and placement. If you’re venturing into uncharted territory with a new technique or material, be sure to test it on scrap wood first, allowing you to anticipate and address potential problems. Moreover, patience is essential throughout the process – don’t rush through individual steps like hammering nails or winding string, as this can lead to mistakes that are difficult to correct later on. By embracing these fundamental principles, you’ll be well-equipped to navigate common pitfalls and genuinely enjoy the creative journey of crafting beautiful string art. While every mistake serves as a valuable learning experience, it’s also possible for minor errors to add character to your final piece.
DIY String Art FAQs
Get the inside scoop on creating stunning DIY string art with our exhaustive FAQs section. Dive into a treasure trove of expert advice, tried-and-tested techniques, and easy-to-follow guides to transform your creative endeavors.
What materials do I need to start a string art project?
To embark on a captivating string art project, you’ll need to gather the following essential materials: A sturdy wooden board serves as the foundation. For a smooth surface, have some sandpaper at the ready. If you want to add a pop of color to your creation, bring along acrylic paint and a brush. Next, prepare for hammering by gathering small nails and the tool itself. The star of the show, however, is the string or yarn that will bring your design to life. Finally, have a pattern or template handy to guide your creative process.
Can string art be done on materials other than wood?
While wood remains the preferred medium for creating string art, it’s not the only option. Corkboard and dense foam boards can also serve as a canvas for this creative endeavour. Although these materials may not offer the same level of durability or visual appeal as wood, they do provide an alternative surface for artists to explore their creativity. The versatility of string art allows it to be adapted to various mediums, making it accessible to a broader range of creatives.
How do I choose the right string for my project?
When it comes to selecting a contrasting string for visibility, consider options like cotton, embroidery floss, or thin yarn. These materials offer a wide range of colors and a suitable thickness that allows for optimal contrast. Their versatility makes them popular choices for creating striking visual effects on your board.
Is string art suitable for beginners?
One of the beauty’s of string art lies in its accessibility – it’s a craft that can be enjoyed by individuals of varying skill levels. For those just starting out, simpler designs provide an excellent introduction, allowing them to build their skills and eventually tackle more intricate patterns with ease.
How can I prevent the string from slipping off the nails?
To ensure a secure foundation, take these precautions:
As you drive in each nail, make sure to hammer them securely into place, leaving enough clearance above the board to allow for the wrapping of your string.
When starting and ending your string, use a sturdy knot that will withstand the forces at play. To add an extra layer of security, apply a small amount of glue to the knots as you work.
As you progress, take time to periodically wrap the string around individual nails, anchoring it in place and preventing any potential slipping.
Can I do string art with kids?
While engaging in string art with kids, parents can foster both creative expression and fine motor skill development. By opting for straightforward designs and maintaining a watchful eye – particularly when utilizing hammers and nails – adults can ensure a safe and enjoyable experience for their young companions.
How can I make my string art last longer?
For a long-lasting string art, consider the following strategies: By using high-quality materials for its creation, you’ll be able to enjoy your masterpiece for years to come. In addition to selecting durable materials, apply a clear acrylic spray once it’s complete to shield against dust and fading. When deciding where to hang or display your artwork, choose a spot that is protected from direct sunlight and moisture. This will help prevent damage and preserve the piece’s vibrancy.
What if I make a mistake while doing string art?
Incorporating mistakes into the creative process is a natural part of growth. When an error arises, whether it’s a minor oversight or a more substantial misstep, approach the situation with a calm and level head. For smaller blunders, simply unwind and reattempt the task at hand. If the mistake is more significant, take a step back and carefully reassess the area that needs correction. Remember, imperfections can often add unique character to one’s work, making it all the more authentic.
Can string art be a good gift idea?
String art creations offer a thoughtful and personalized gift-giving solution for various occasions. By customizing the design to reflect the recipient’s interests, you can create a truly one-of-a-kind and meaningful present that shows you’ve put extra thought into your gift.
25 DIY String Art Ideas
Get creative and explore 25 simple yet impressive DIY string art ideas that can be easily replicated in the comfort of your own home. With clear, step-by-step guidance, you’ll be able to craft beautiful nail string art designs without needing extensive artistic experience.
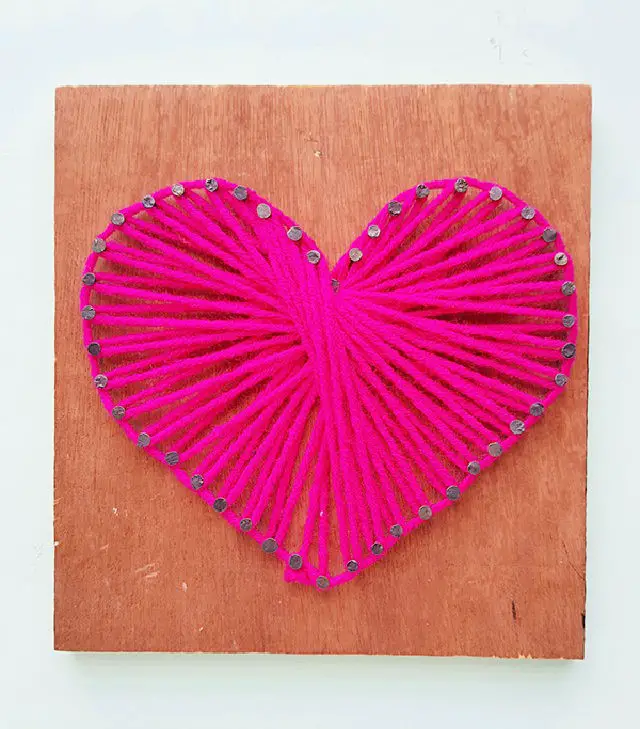
Colorful DIY Valentine’s Day Heart String Art
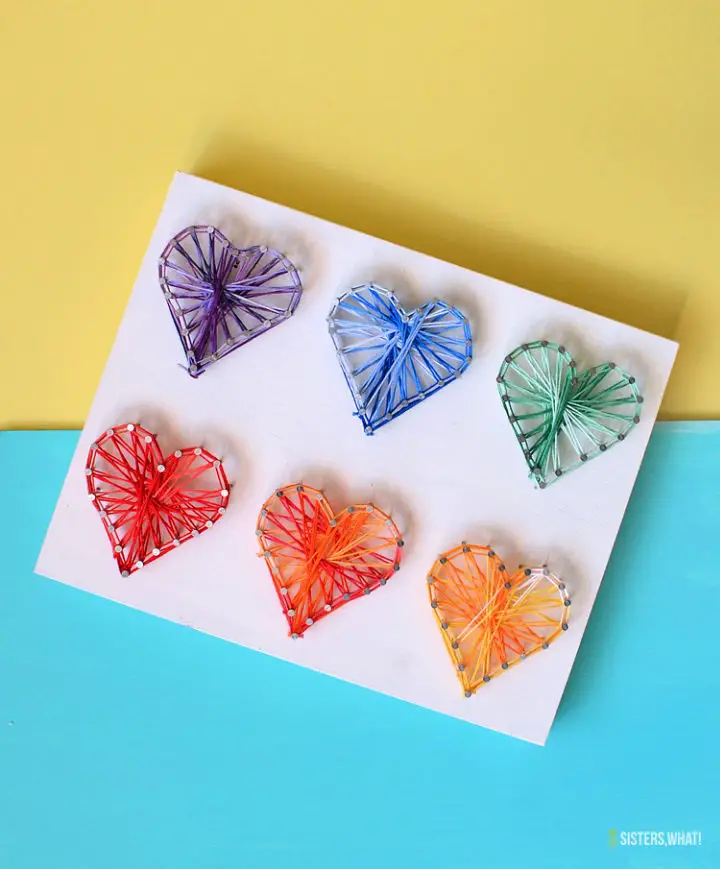
This Valentine’s Day, unleash your creative side with an enchanting heart string art project perfect for kids and craft enthusiasts alike! With just a few simple materials – a wood panel, embroidery string, paint, and a dash of imagination – you’ll create a heartfelt piece of art that’s sure to bring joy. Start by giving the wood a pop of color with some paint, then secure your heart pattern in place with a few strategically placed nails. Once the pattern is removed, get weaving! Use vibrant strings to add texture and visual interest around the nails, bringing your design to life. Not only is this project easy to follow, but it also results in a unique handmade gift or a charming addition to your home decor. With these steps, you’ll be treated to a fun and creative experience that celebrates love and self-expression.
Easy String Art Project
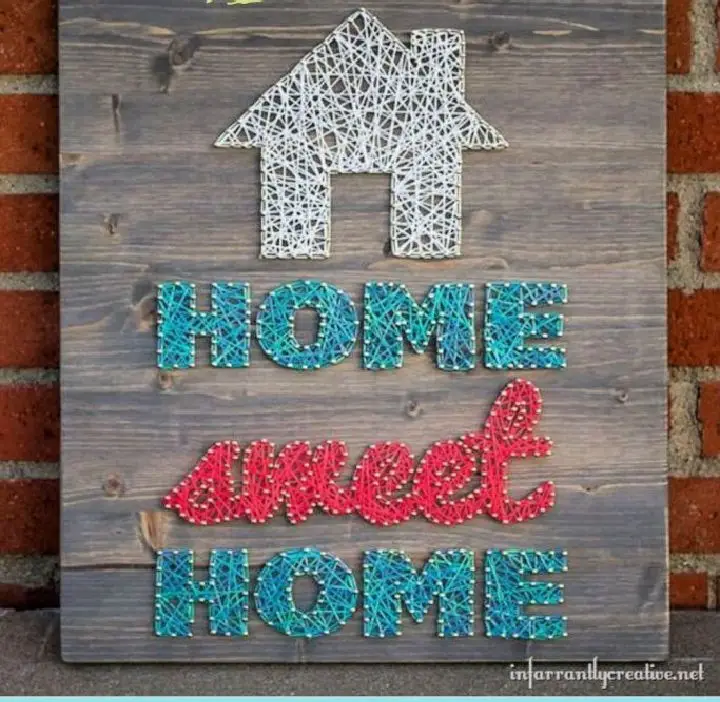
Step into the realm of creativity with the versatility of string crafts. Inspired by Infarrantly Creative’s comprehensive guide, learn how to craft stunning string art for your home with ease. This beginner-friendly tutorial demystifies the process, ensuring that even those new to crafting can join in on the fun. With a focus on essential supplies like wood, nails, and embroidery floss, you’ll gain hands-on experience with each stage of the project. From preparing your surface to mastering intricate stringing techniques, this step-by-step guide equips you with the skills and confidence to create a charming ‘Home Sweet Home’ piece that reflects your personal style. Get ready to unleash your creativity and revel in the satisfaction of crafting your own unique masterpiece.
How to Make a String Art for Kids
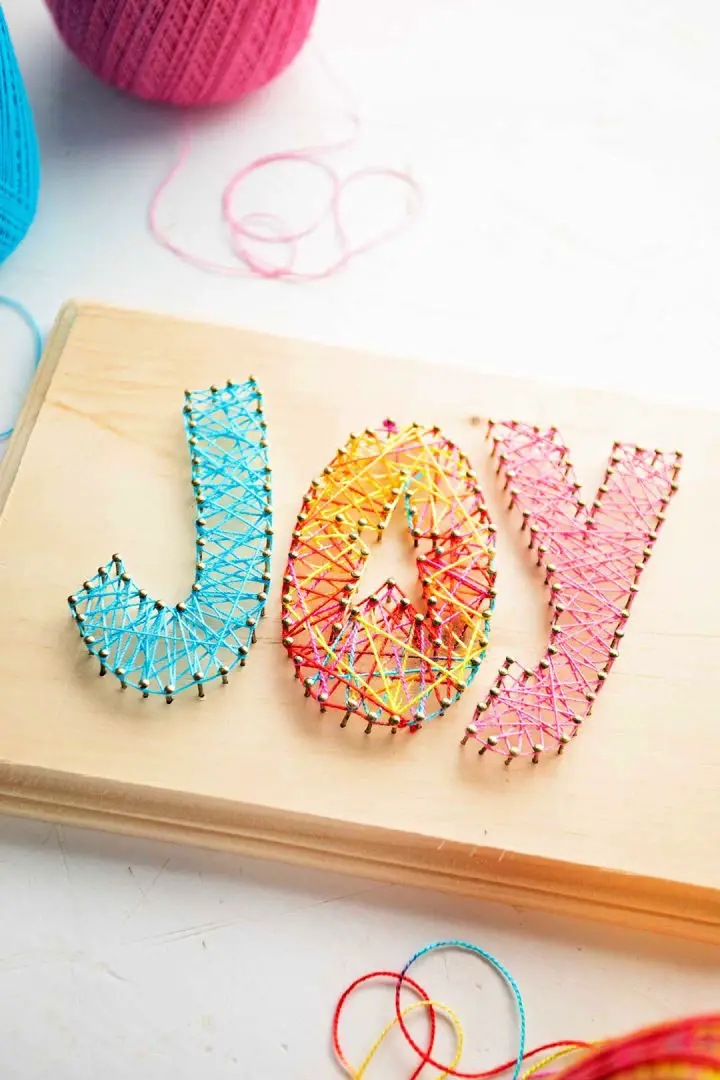
Indulge in the creative world of DIY crafts with The Homes I Have Made’s String Art Gift Idea, a delightful project perfect for kids and a thoughtful homemade present option. This engaging tutorial, led by Megan, takes you through each step with clarity and ease, making it accessible to crafters of all skill levels.
With minimal, budget-friendly supplies readily available at your local craft store, this string art project is a cinch to complete. Personalize these beautiful plaques for various occasions or recipients, and revel in the joy of creating a unique decoration or gift. The comprehensive tutorial includes step-by-step guidance and helpful tips, guaranteeing a successful and enjoyable crafting experience for all involved.
DIY Lightning Star String Art
Get ready to add a touch of American spirit to your Fourth of July celebrations with this easy and engaging DIY project! The Patriotic String Art Star Craft from Doodle Craft Blog transforms everyday materials into a charming piece of decor that’s perfect for both kids and adults. To create this festive masterpiece, you’ll need just a few simple supplies: a hammer, nails or carpet tacks, twine, and a small wooden board.
Begin by crafting a star template out of paper, embracing its natural imperfections to add a whimsical touch. Next, transfer the star shape to your board and carefully hammer in the nails around the outline. Then, wrap the twine around the nails in a pattern that suits your style, securing it with a knot to complete your creation.
This craft is not only simple but also a great way to get hands-on while preparing for your patriotic celebrations. With its rustic charm and personalized flair, this DIY project is sure to become a new family tradition.
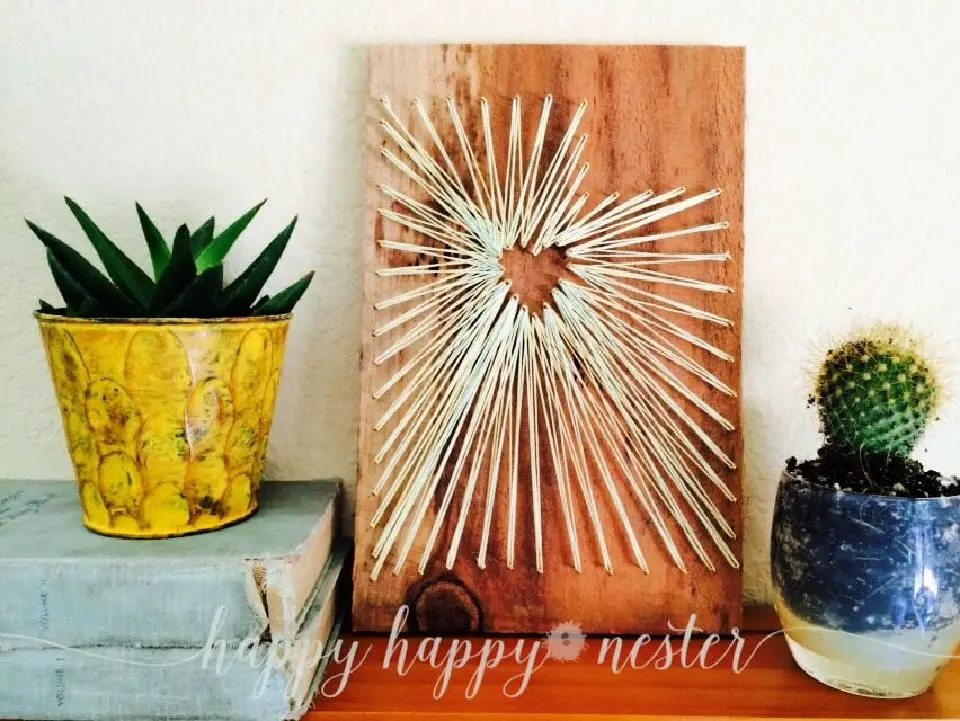
How to Make a String Art Flower Vase
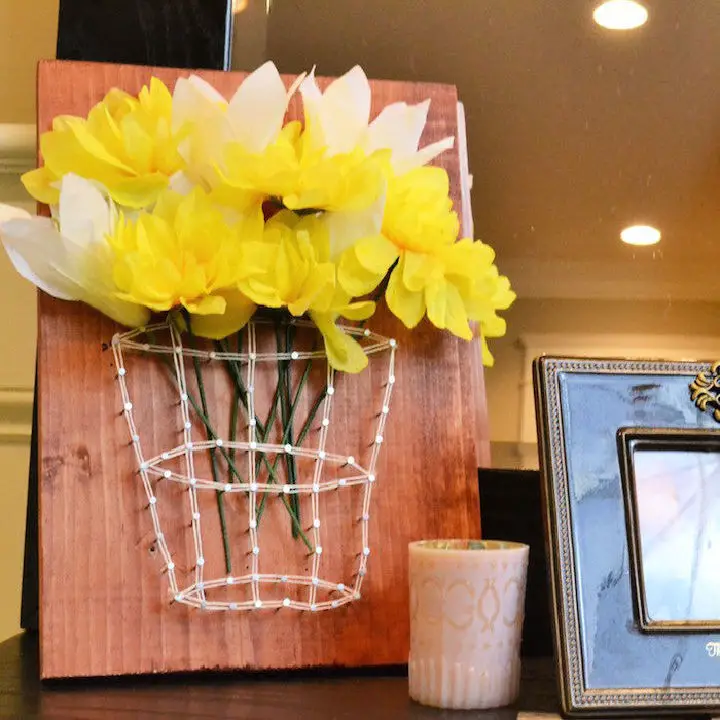
Transform your home decor with the elegance of handmade DIY projects. For a touch of spring in your home, create a beautiful string art flower vase that’s sure to delight. This engaging project is perfect for crafting enthusiasts looking to add a personal touch to their decor. With just a few simple materials – including wood planks, nails, and string – you can take ordinary items and turn them into a charming display for your favorite faux florals. The process involves staining the wood, outlining your design with chalk, and meticulously wrapping the string around the nails to create a stunning pattern. For those who want to achieve a lovely result, Craft Box Girls provides a step-by-step guide to help you get there. With this project, you’ll be hammering, stringing, and blooming your way to a unique vase that’s sure to start conversations.
Rustic DIY String Art Fall Decor
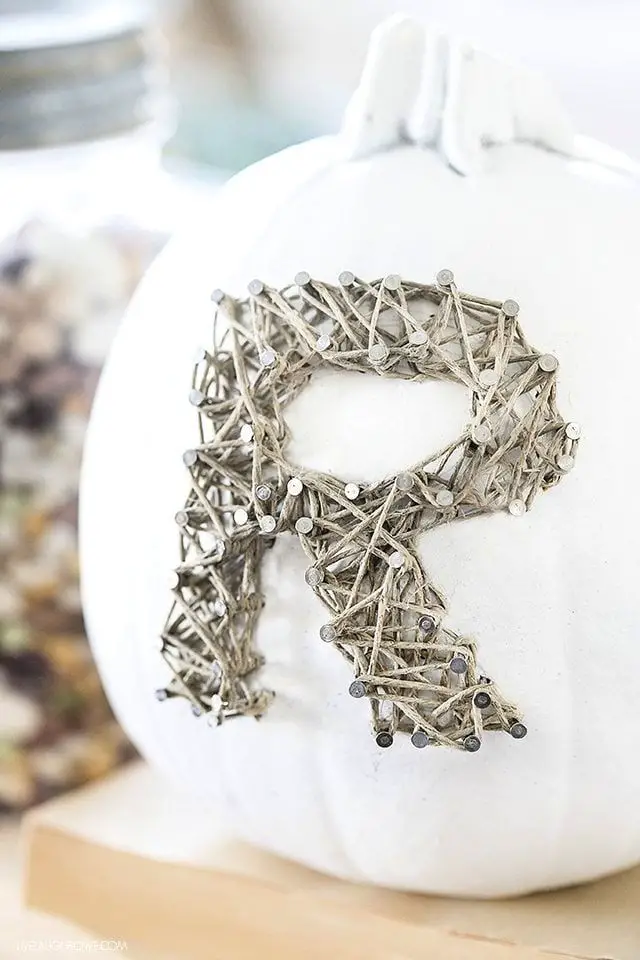
Elevate your fall decor with a charming rustic twist using DIY string art. By following Live Laugh Rowe’s straightforward step-by-step guide, you can turn a pumpkin into a unique piece of art utilizing just hemp twine and nails. This approachable project is designed to help beginners feel comfortable embracing imperfections, which adds character to the finished craft. Perfect for creating a cozy autumn ambiance, this string art pumpkin is an engaging way to add a personal touch to your home. With helpful tips and a focus on crafting a conversation starter, your DIY string art pumpkin is sure to impress this fall season.
Making a String Art Wall Hanging
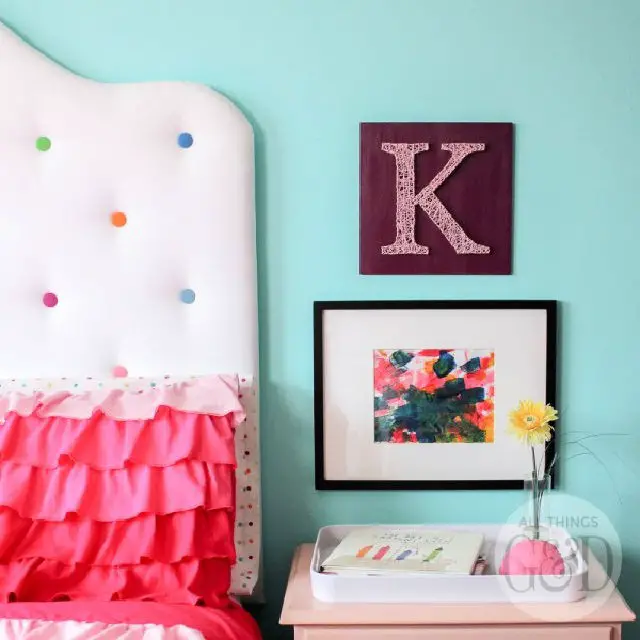
Discover the joy of DIY string art with All Things G&D’s comprehensive guide, designed to make creating a colorful masterpiece easy and fun! This engaging activity is perfect for children like Kate, allowing them to develop essential skills while exploring creativity under adult supervision. As you follow our step-by-step instructions, you’ll uncover the thrill of wrapping string in intricate patterns, crafting art that’s as delightful to create as it is to display. With endless possibilities for customization and a personalized touch, string art is an ideal project for kids’ bedrooms or a creative afternoon adventure. For a richly rewarding experience suitable for all ages, get ready to infuse your home decor with the vibrant spirit of handmade craftsmanship.
Mason Jar String Art Tutorial
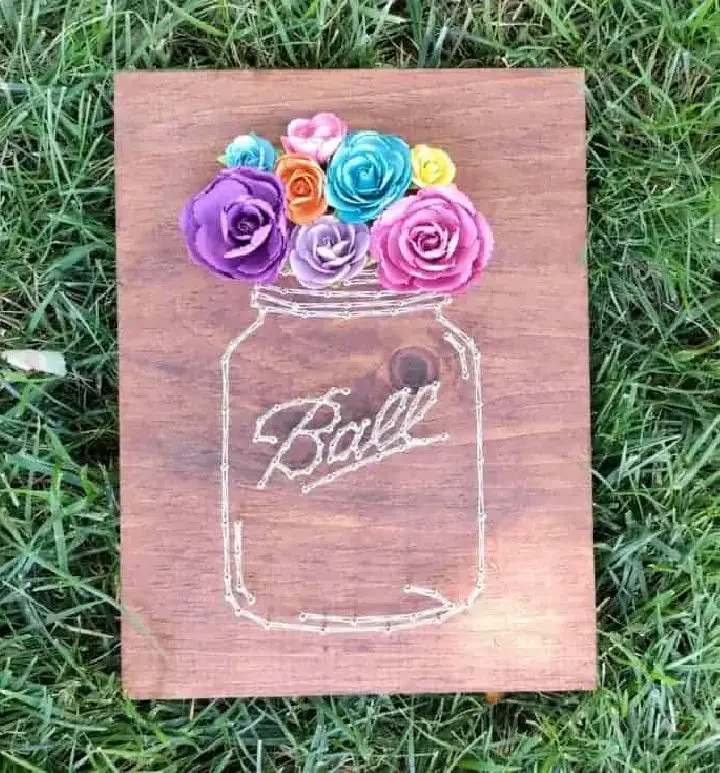
Unlock the world of creativity with these accessible string crafts suitable for all ages. Transform plain spaces into charming pieces of home decor using the DIY mason jar string art tutorial from chaotically yours. This comprehensive guide is perfect for craft newcomers and enthusiasts alike, offering a step-by-step process and a free pattern to help you get started. With a detailed supply list and clear instructions, this tutorial guarantees an enjoyable crafting experience that yields a lovely string art piece ideal for gifting or adorning your own space. Get ready to unleash your creativity by hammering, stringing, and embellishing simple materials into a stunning work of art.
Make Your Own String Art

Discover the joy of creating unique and personalized pieces with our in-depth DIY guide to string art at Let’s Craft Instead. For crafty individuals looking to add a personal touch to their space or create one-of-a-kind gifts, this comprehensive tutorial provides step-by-step instructions on crafting state-themed patterns. From selecting the ideal wooden backdrop to choosing the perfect thread for your project, we cover every essential detail. Learn how to expertly trace and nail your design, as well as master the art of weaving string into intricate patterns. This engaging and instructive resource makes it simple to develop the skills needed to create stunning works of art, ensuring an enjoyable crafting experience regardless of whether you’re designing a piece for yourself or as a thoughtful present.
Make a Skull String Art
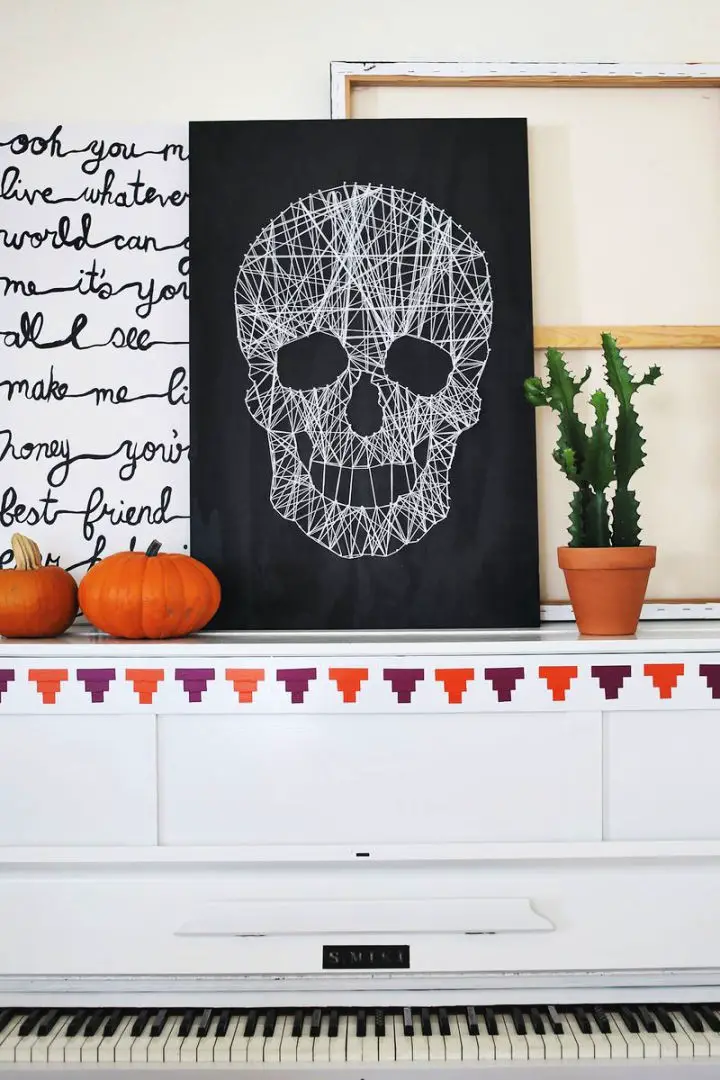
Transform any space with captivating string art designs that will leave onlookers mesmerized. For a unique and eerie addition to your Halloween decor, create a one-of-a-kind skull string art piece that exudes handmade charm. A comprehensive tutorial by Elsie Larson from A Beautiful Mess provides a seamless guide through the crafting process, making it accessible for both novice DIY enthusiasts and seasoned crafty experts alike. With just a few basic materials like wood, nails, paint, and string, you can create a show-stopping statement piece that perfectly captures the essence of the spooky season. As you follow the step-by-step instructions, you’ll embark on a fun and engaging experience, resulting in a decoration that will be proudly displayed year after year. Just remember to store it carefully once the holiday passes, ensuring your masterpiece remains intact for future years.
DIY Mother’s Day String Art Photo Gift

Transform Mother’s Day into a momentous celebration by crafting a one-of-a-kind string art gift that will become a treasured keepsake. With Lily Ardor’s guided DIY project, you’ll effortlessly turn ordinary materials like yarn, nails, wood, and printable letters into a heartfelt masterpiece. The personal touch doesn’t stop there – simply incorporate cherished photos to make the piece not only aesthetically pleasing but also a nostalgic repository of fond memories. The straightforward instructions ensure an enjoyable experience for anyone looking to create a thoughtful token of appreciation for their mother. Gather your supplies and let creativity flow as you intertwine love, yarn, and sentiment to craft the ultimate Mother’s Day surprise.
Adorable String Art Table Numbers for Wedding
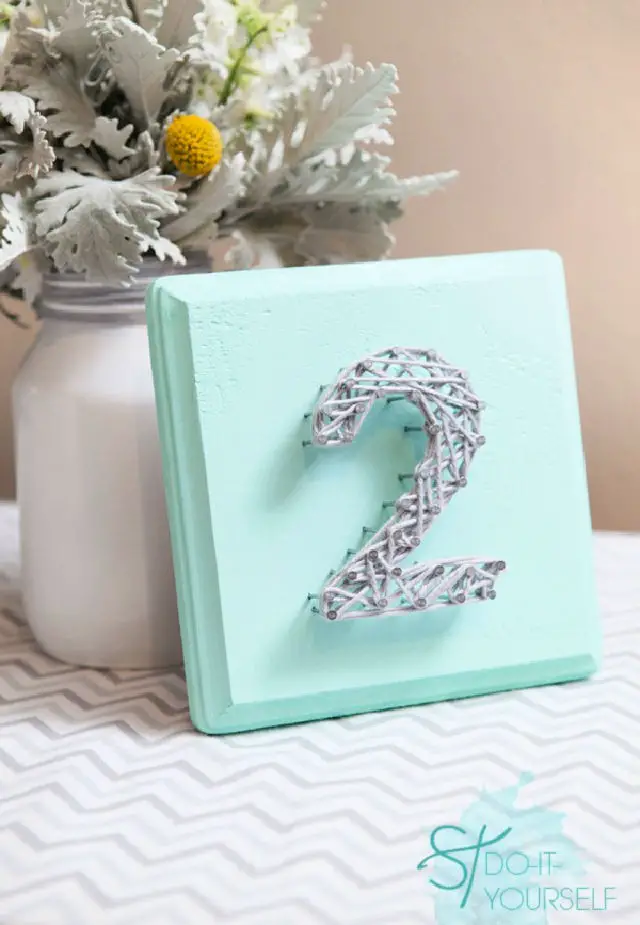
Embark on a creative adventure with these easy-to-follow string art ideas perfect for beginners. Take your wedding decor to the next level by crafting personalized table numbers with Something Turquoise’s comprehensive guide. This DIY project is an excellent way to infuse your special day with a unique, handmade touch. To get started, grab some essential supplies like wood plaques, a hammer, nails, yarn, and a dash of patience. Begin by painting your plaques in your preferred color scheme, then use a printed number template to mark the nail positions with a thumb tack. Hammer the nails into place, ensuring consistent spacing for a clean, polished look. Finally, wrap the yarn around the nails to bring the numbers to life. This versatile crafting technique isn’t limited to table numbers – you can also create meaningful designs that reflect your personal style. Let your creativity shine and delight your guests with these charming decorations.
Anchor String Art Tutorial
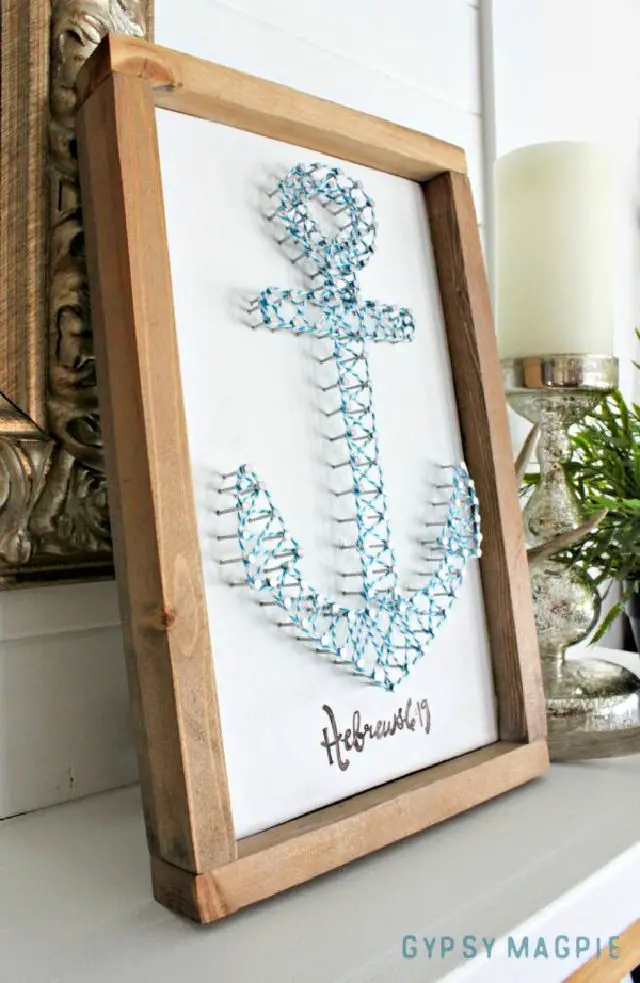
Embark on a creative journey by exploring various string art patterns and discovering your next exciting project. This Easter, get inspired by Gypsy Magpie’s DIY guide that combines creativity with hope and perseverance. Learn how to craft a stunning anchor string art piece that symbolizes resilience and determination. With clear instructions, a free printable pattern, and valuable tips, this tutorial ensures a rewarding experience as you bring your unique decoration or heartfelt gift to life. Perfect for those who adore handmade treasures, this guide promises a fulfilling experience while you create a meaningful work of art that embodies the essence of hope during Easter celebrations.
Simple DIY String Art
Want to create a one-of-a-kind piece of home decor that reflects your personal style? Lolly Jane’s DIY string art tutorial is here to walk you through the process of crafting a beautiful work of art using just a few simple materials, including wood, nails, and embroidery floss. This step-by-step guide is perfect for adding a touch of rustic charm to any room or making a thoughtful gift for someone special. With clear instructions, you’ll learn how to select a pattern, prepare your wood plank, and bring your design to life with stringing. The result will be a stunning piece of DIY art that you can be proud to display.
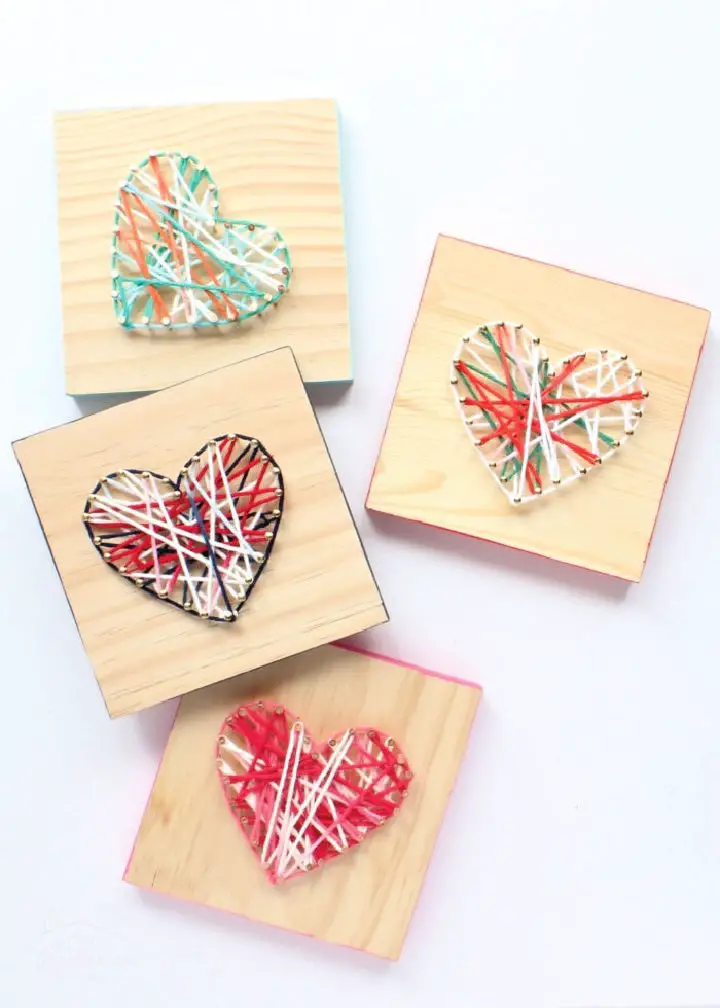
Sweet Heart String Art Project
Imagine embarking on a creative journey with a DIY Heart String Art project, perfect for tweens and teens to express themselves and unleash their artistic side. This delightful craft requires minimal materials like a wooden board, nails, hammer, and yarn, making it an accessible activity for anyone looking to create something unique.
Begin by sketching the shape of a heart on the board, then carefully hammer in nails along its outline, maintaining even spacing. Next, thread yarn through one nail and weave a beautiful pattern by stretching it across to opposite nails, allowing you to get lost in the meditative process. As you work on this project, you’ll not only be creating something visually appealing but also improving your fine motor skills and concentration.
Upon completion, you’ll have a handmade, heartfelt decoration or a thoughtful gift for someone special that will surely bring a smile to their face.
Inexpensive DIY Fall String Art

Transform your living space into a cozy autumn haven by creating an enchanting DIY Fall String Art project. This delightful craft not only adds a seasonal touch but also provides a wonderful opportunity to unwind and get creative. Following Sustain My Craft Habit’s straightforward tutorial, you’ll be guided through the process with a video guide and a free FALL pattern printable. To get started, gather simple materials like a wood board, nails, yarn or embroidery floss, and a few basic tools. Add a rustic touch by staining your wood, hammer in the nails, and then weave your string to bring your fall masterpiece to life. This project is perfect for crafters who love to personalize their home with unique handmade treasures, making it an ideal activity for a relaxing afternoon.
Make a String Art Neon Heart Sign
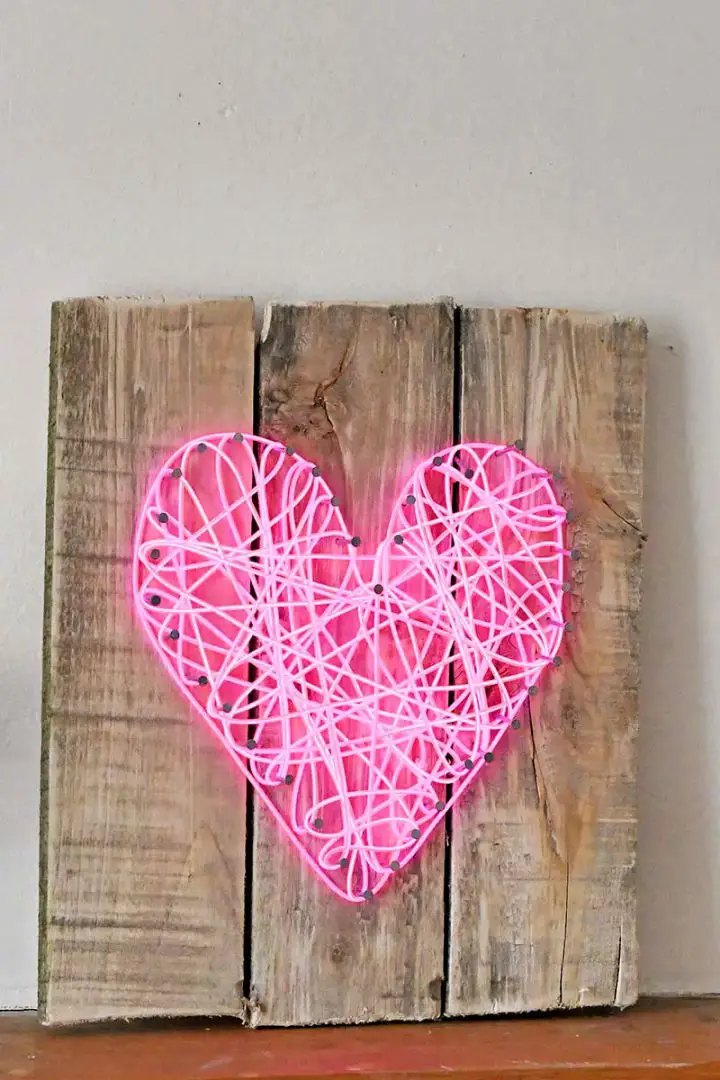
Bring some sparkle into your home with a unique DIY String Art Neon Heart Sign that’s not just limited to Valentine’s Day decor. By following the step-by-step guide from Pillar Box Blue, you can create a vibrant masterpiece that adds a personal touch to any room. With minimal materials – pallet wood or an old board, nails, neon El wire, and basic tools – you’ll be on your way to crafting a rustic backboard, designing a heart template, and weaving the neon wire into a stunning display. Whether you’re looking to illuminate your kitchen, living room, or want to give it as a gift, this easy yet striking project combines traditional string art with modern flair. Get ready to brighten up your space with a handmade sign that radiates love and creativity.
How to Make String Art for Beginners
Discover the world of string art through a comprehensive tutorial from Welcome To Nana’s, designed for crafting enthusiasts seeking unique decorative pieces. This step-by-step guide takes you on a journey from preparing a wooden base to finishing touches with string, providing clear instructions and valuable tips along the way. Start creating your own masterpiece with the site’s free patterns, then take it up a notch by personalizing designs to match your style. String art is an inclusive activity that can be enjoyed by both kids and adults, developing fine motor skills while allowing you to express your artistic creativity. As you bring your colorful geometric creations to life, get ready to fill your space with functional pieces that are not only visually appealing but also a testament to your imagination.
DIY String Art for a Girl’s Bedroom
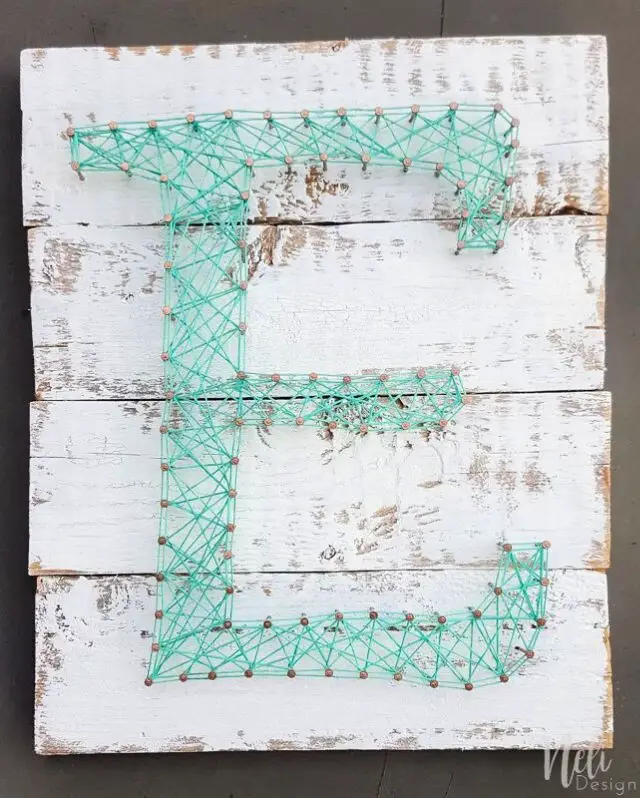
Unleash your creative potential by delving into the world of innovative string craft ideas. At NeliDesign, you’ll find a comprehensive guide to creating a stunning string art piece, complete with a step-by-step process, essential materials, and a valuable tip gleaned from hands-on experience. This engaging project allows for personalization with your child’s initials, making it a unique and meaningful way to spend quality time together.
Discover the joy of assembling a frame using a Kreg Jig, adding a vintage touch with paint, and masterfully hammering nails to outline your chosen letter. Then, let your creativity shine by skillfully weaving embroidery floss around the nails, bringing your string art to vibrant life. Perfect for elevating bedroom decor or creating a treasured keepsake, this DIY craft is an experience that will leave you feeling inspired and proud of your handiwork.
Make Your Own Colorful String Art Rainbow
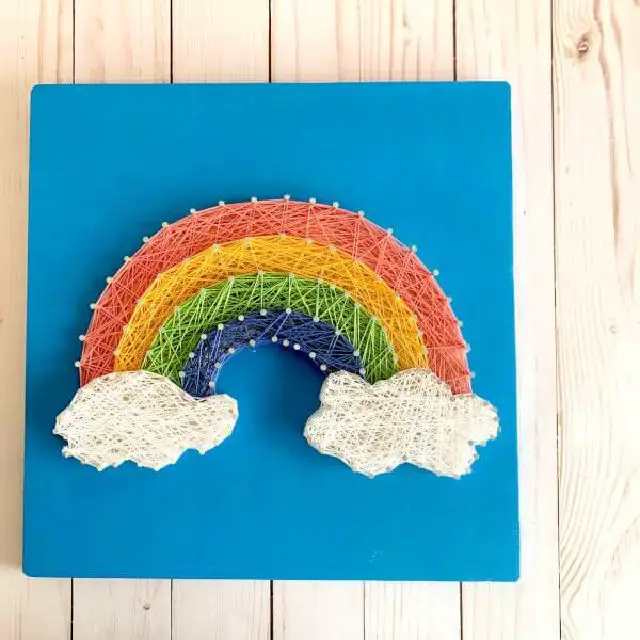
Discover the vibrant world of Rainbow String Art with ClassBento’s DIY craft kit. Perfect for crafters of all levels, this comprehensive set includes a pre-constructed wooden board, an array of colorful strings, paints, and essential tools – everything you need to create a breathtaking rainbow masterpiece. Follow the provided step-by-step guidelines and embark on a calming and fulfilling crafting adventure. Whether you’re looking to gift a unique piece or fuel your own creative passions, this string art kit is sure to add a pop of color and excitement to your artistic pursuits.
DIY Wisconsin State String Art
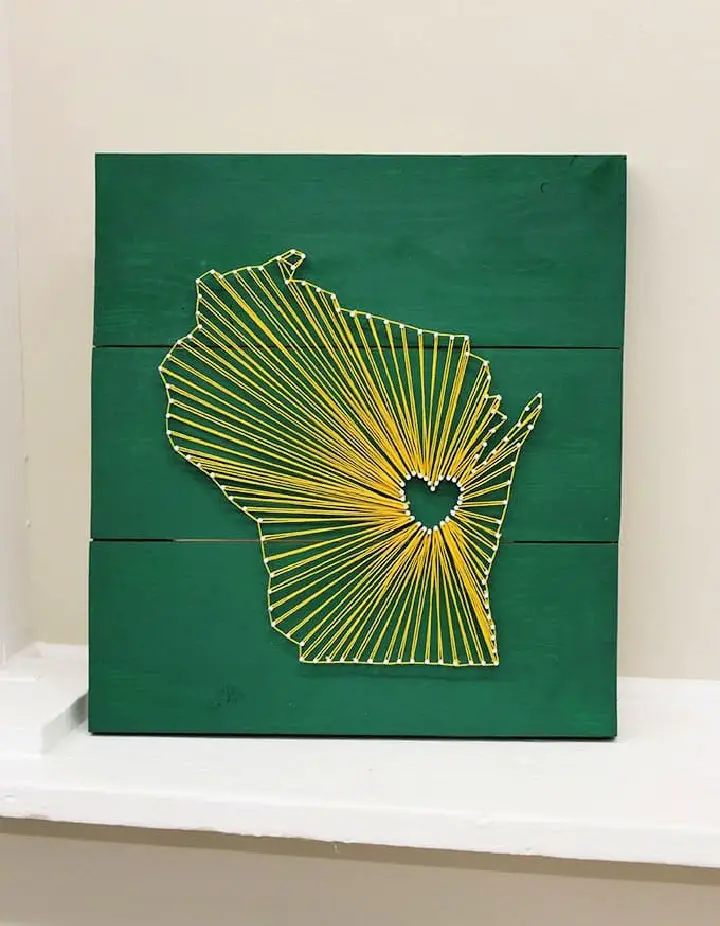
Transform your home decor with a one-of-a-kind Wisconsin state string art creation, perfect for die-hard Green Bay Packer fans or as a unique conversation starter. This comprehensive tutorial from Crafts by Amanda provides clear step-by-step guidance on combining embroidery floss, small nails, and craft glue to bring your wooden board masterpiece to life. Whether you’re looking for a thoughtful gift or a special addition to your wall decor, you’ll learn the secrets to showcasing your state pride with a touch of creative flair. With expert tips on achieving the best results, anyone can create a stunning piece of art that celebrates the iconic state of Wisconsin.
Make a Yin Yang String Art
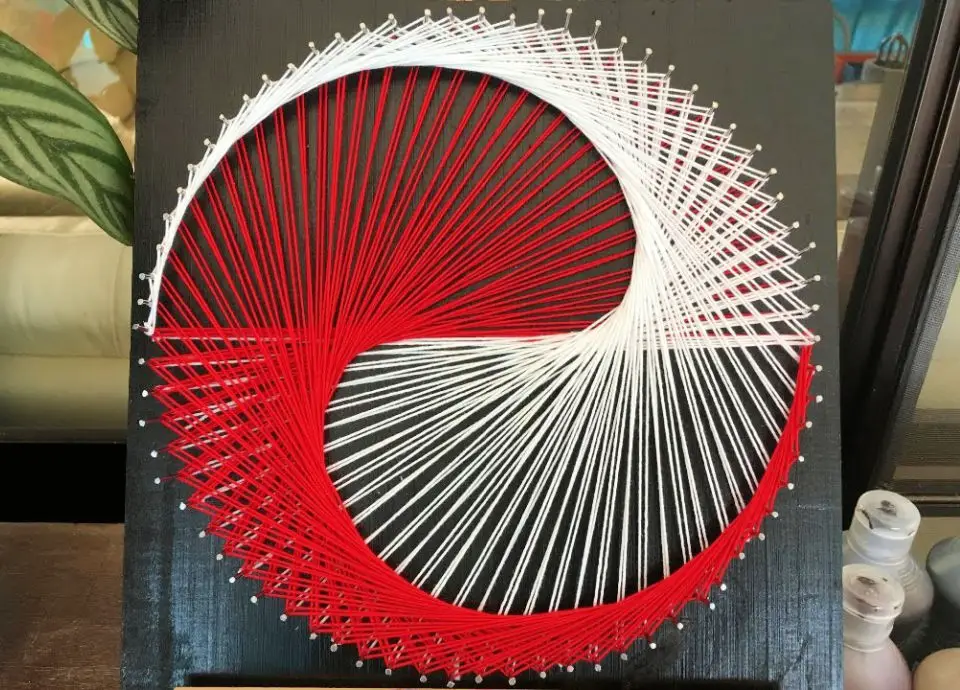
To bring your creative vision to life, look no further than these unique and innovative string art project ideas. One such example is the stunning yin yang design, which can be easily replicated by following a simple DIY tutorial on YouTube. The process begins with a plain piece of wood, which is then transformed into an intricate work of art using just string, nails, and optional spray paint. By following the clear pattern presented in the video, starting with a straight line at the center and strategically placing strings to create a beautiful finish, you’ll be able to create your own stunning yin yang design. To get started, you’ll need a wooden board measuring approximately 26 cm square, a circle diameter of 23 cm, nails spaced about 1 cm apart, and a total of 72 nails. This project is perfect for adding a personal touch to your home decor or as a thoughtful gift, making it an enjoyable and satisfying crafting experience.
How to Do String Art

Embark on a creative journey by exploring unique DIY projects that showcase the versatility of string. Our step-by-step video guide takes you through the process of crafting stunning string art letters, perfect for personalizing your space or gifting to loved ones. As you navigate the tools and materials required, you’ll develop the skills and precision needed to bring your design to life.
Join a community of DIY enthusiasts as they master the intricacies of string art. With clear commentary and visual aids, beginners will find the process accessible and rewarding. Let your artistic expression flourish as you engage with detailed instructions and watch your string art creations come to fruition.
How to Make a String Art
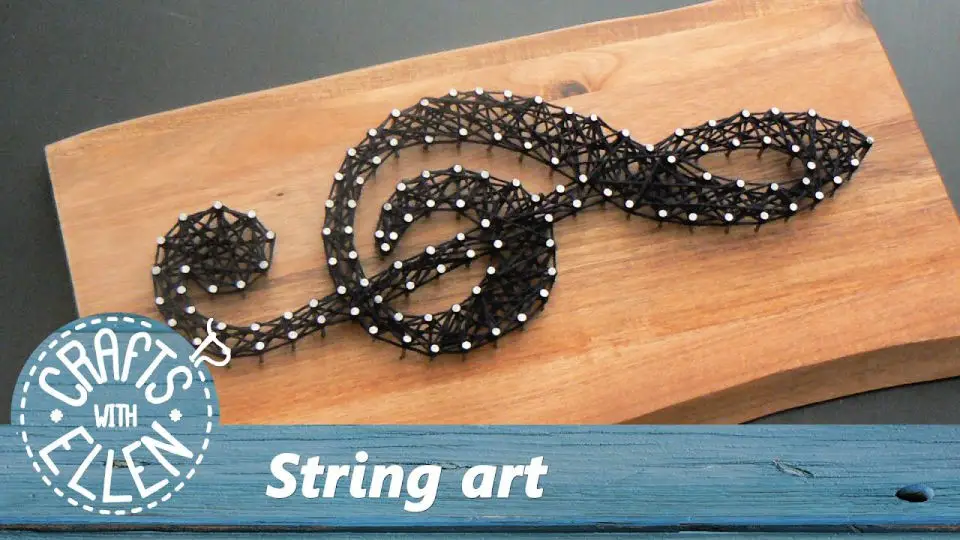
Transform your space with stunning string art, inspired by Ellen’s expert guidance on YouTube. Her step-by-step tutorial takes you from selecting the perfect pattern to adding the final touches of string, offering clear instructions and valuable tips along the way. This accessible yet impressive craft is perfect for personalizing your home or gifting a loved one. Experience the joy of transforming simple materials like wood, nails, and string into breathtaking works of art. Whether you’re an experienced crafter looking to explore a new medium or just starting out, Ellen’s engaging and easy-to-follow guide ensures a fun and rewarding crafting experience.
Easy to Make String Art
Transform plain nails and string into stunning works of art with our easy-to-follow string art ideas. Whether you’re a beginner or an experienced crafter, our YouTube tutorial provides a comprehensive guide to help you get started. This cost-effective hobby is perfect for adding a personal touch to your home decor or creating one-of-a-kind gifts. With our step-by-step video, learn the basics of starting your piece, securing the string with simple knots, and achieving a professional-looking finish. For those who want to unleash their creativity, additional tutorials are available to take your skills to the next level. Head to thediyday.com for free patterns and inspiration to kickstart your string art journey today. With minimal materials and a little patience, you’ll soon become a master of this captivating craft.
Color Theory for String Art
Unleash the beauty of string art by combining principles of color theory with creative techniques. By exploring complementary and analogous color schemes, you can add depth and visual interest to your designs. Don’t forget to experiment with negative space, allowing the absence of material to create a striking contrast. Take it to the next level by incorporating beads, sequins, or other materials to add texture and dimensionality.
Complementary Color Scheme
By leveraging complementary colors, which sit opposite each other on the color wheel, you can craft a visually striking string art piece that showcases each hue in its full glory. A perfect example of this would be a combination of deep blue and rich orange, where the bold contrast creates an eye-catching yet harmonious visual effect.
Analogous Color Scheme
This design scheme employs adjacent colors on the color wheel, producing a harmonious and soothing aesthetic. A sunset-inspired string art, incorporating shades of red, orange, and yellow, exemplifies this approach. By doing so, it yields a warm and unified visual experience that fosters a sense of calmness and serenity.
Monochromatic Color Scheme
When exploring the realm of design, one effective technique is to utilize varying shades of a single hue. This approach can lead to the creation of sophisticated and visually appealing pieces. A prime example of this concept is a monochromatic design, which might incorporate a range of greens, from lime to forest green. By doing so, the design achieves depth, interest, and a sense of cohesion.The visual impact of such a design can be seen when imagining it as a piece of string art. In this context, the color scheme takes on different forms. A complementary scheme would showcase stark contrasts, while an analogous scheme would exhibit a smooth transition between hues. Meanwhile, a monochromatic scheme would present a nuanced exploration of texture and saturation.
Negative Space Techniques
The subtle yet powerful concept of negative space can greatly impact the overall aesthetic of a string art piece. By intentionally leaving areas of the canvas blank, you create visual interest through the arrangement of shapes and designs. A striking example is the use of empty space to form tree-like structures, where the ‘leaves’ are defined by the surrounding voids rather than the strings themselves. This technique imbues the composition with depth and an element of surprise, encouraging the viewer’s eye to fill in the gaps and discover new visual pathways.
Incorporating Other Materials
Beads and Sequins
By incorporating beads or sequins into your design, you can introduce a sensory element that invites the viewer to touch and explore. For instance, a string art depiction of a night sky could be elevated by tiny, shimmering beads that evoke the twinkle of stars. This tactile quality not only adds depth but also amplifies the visual impact as the light reflects off their surfaces.
Paint and Background Coloring
By incorporating painted elements into your string art, you can effectively set the tone and draw attention to specific features. For instance, a gradual color transition in the background can evoke a sense of serenity, as if the scene is unfolding against a breathtaking natural backdrop. A delicate silhouette of a mountain or other landscape feature can then be juxtaposed against this calming atmosphere, allowing its contours to emerge as a focal point.
Fairy Lights
Transforming your string art into a mesmerizing display of light and color is as simple as incorporating fairy lights. Envision a stunning cityscape, its architectural details brought to life by tiny twinkling lights that evoke the glow of building windows. The result is an ambient piece that will captivate and elevate any room’s atmosphere.
Natural Materials
To inject a sense of rustic charm or organic elegance into your design, incorporate natural elements such as fallen leaves, weathered twigs, or polished stones. By incorporating these organic materials, you can create a visually striking and tactilely engaging visual narrative that invites the viewer to touch and explore. For instance, a tree-inspired motif could be elevated by the addition of real leaves, while a coastal scene might benefit from the inclusion of sand and shells, adding a layer of authenticity and textural interest.
Incorporating Mixed Media for Depth and Interest
When combining string art with various materials, you unlock a world of creative possibilities. Each element contributes its distinct qualities, allowing for a more intricate and personalized piece. The beauty of string art lies in its limitless potential, where imagination is the only constraint. By applying color theory principles, experimenting with negative space, and incorporating diverse materials, you can craft visually striking pieces that also boast texture and depth.
String Art Ideas: Creative and Unique Applications
String art, a creative outlet that combines simplicity with intricacy, can be applied in diverse settings to produce unique and personalized results. Beyond being a means of crafting personalized gifts or enhancing home decor, string art also lends itself well to interactive activities with children or as a way to breathe new life into interior spaces. With its versatility and ease of execution, the possibilities for using string art are truly endless.
Personalized Gifts
Personalized gifts crafted through string art not only demonstrate thoughtfulness but also showcase one’s creativity. This unique approach allows you to tailor your presents to the recipient’s preferences, making them truly special. To create these customized gifts, start by incorporating initials or names, using a loved one’s favorite colors for the strings and a contrasting background to make the letters stand out. Alternatively, commemorate significant dates like anniversaries or birthdays by stringing the numbers in a stylish font, and consider adding a heart or another meaningful symbol to further emphasize the personal connection.
Home Decor
Transforming your living space with the tactile appeal of string art is an excellent way to elevate its ambiance. The textured and vibrant nature of this art form lends itself to creating a unique focal point in any room. To achieve this, consider implementing large-scale pieces that can dominate a bare wall or create visual interest in a modern setting. When selecting colors and patterns for your string art, think about how they will interact with the overall aesthetic of your space. For instance, warm tones can bring a cozy feel to a room, while cool colors may promote a sense of serenity. Additionally, geometric patterns can harmonize well with modern décors, whereas floral designs might be more suitable for traditional settings.
Kids’ Projects
Developing fine motor skills and creativity in children through string art is an engaging activity that offers numerous benefits. To encourage kids’ artistic expression, start with simple yet meaningful projects that cater to their age and skill level. For instance, basic shapes like hearts, stars, or simple animals make excellent introductory projects, allowing young artists to experience a sense of accomplishment as they complete each design. For younger crafters, consider using pre-hammered nail templates to ensure safety and allow them to focus on the creative process, selecting colors and patterns for their unique string art masterpieces.
Tips for Success
When it comes to string art projects, safety should always be the top priority – especially when working with children and involving tools like nails and hammers. Take the time to thoroughly supervise young ones as they explore this creative outlet. In addition to prioritizing safety, don’t be afraid to experiment with different types of strings and their corresponding textures and effects. This is a crucial part of the process that can lead to truly unique and eye-catching results. As you work on your project, remember that patience is key – setting up the nails and winding the string requires attention to detail and a willingness to take things slowly. By embracing this mindset, you’ll not only produce stunning pieces of art but also cultivate a sense of calm and satisfaction. For many people, string art represents more than just a craft or activity – it’s a way to express their creativity, commemorate special moments, and bond with loved ones. Whether you’re creating a personalized gift for someone special, crafting a statement piece for your home, or simply looking for a fun project to do with family and friends, the possibilities offered by string art are truly endless.
Engaging the Community
Showcase your artistic talents by sharing your string art masterpieces with the world! Use the hashtag #MyStringArtJourney on social media platforms to not only share your work but also discover a treasure trove of inspiration from fellow crafty enthusiasts. Moreover, consider connecting with like-minded individuals through online forums or communities centered around string art, where you can exchange ideas, receive valuable feedback, and forge lasting connections with fellow creatives.
Finding Materials
To get started with string art, you’ll need minimal materials that can be easily sourced from local craft stores or online platforms. Here’s a concise overview of what you’ll require: The foundation of your artwork will be a wooden base, which can be found at hardware stores or craft shops. For securing the strings in place, you’ll need nails, readily available at general hardware stores. When it comes to the string itself, craft stores and online marketplaces like Etsy offer a diverse range of options. Consider using embroidery floss, thin yarn, or crochet thread for their versatility and aesthetic appeal.
Conclusion:
Mastering the art of nail string art unleashes a world of creative potential, as exemplified by our extensive collection of 25 DIY projects. By exploring the perfect materials and following our meticulous step-by-step guide to creating captivating designs, this comprehensive resource aims to spark inspiration and guide you through the engaging process. Beyond being a craft, nail string art serves as a means to bring your imaginative visions to life, create meaningful gifts, and imbue your surroundings with a personal touch. To facilitate a seamless journey, we’ve tackled common queries, emphasizing that with a dash of patience and creativity, anyone can transform humble strings and nails into breathtaking works of art.
