Discovering the world of DIY can be a thrilling adventure, especially when you unlock the secrets of chalk paint. This innovative medium has a remarkable ability to revive tired items, imbuing them with character and charm. Whether giving old furniture new life or crafting one-of-a-kind pieces, chalk paint’s user-friendly nature makes it a beloved choice among DIY enthusiasts. As you embark on your next project, grasping the fundamentals of chalk paint – from selecting the ideal type to preparing materials and adding those finishing touches – can be the difference between success and mediocrity. Our comprehensive guide is filled with practical advice and creative inspiration, ensuring your projects truly stand out. Get ready to transform items with ease and confidence, and let’s dive into the next section to uncover the countless possibilities chalk paint offers.
Why Choose Chalk Paint for Your DIY Projects?
Chalk paint is a game-changer for DIY enthusiasts, offering numerous benefits that make it an ideal choice for both beginners and seasoned professionals. The key advantages of chalk paint include its versatility, time-saving capabilities, aesthetic appeal, ease of distressing, eco-friendliness, and customizability.
One of the standout features of chalk paint is its ability to adhere to a wide range of surfaces without requiring primer or sanding. This means you can apply it to wood, metal, ceramic, fabric, and more, with minimal preparation needed. This versatility saves time and effort, allowing you to focus on the creative process.
Another significant advantage of chalk paint is its matte finish, which provides a unique, vintage look that adds character and charm to any item. Whether you’re aiming for a rustic, shabby chic, or modern appearance, chalk paint can help you achieve it.
For those who love the aged or antique look, chalk paint is easily distressed using just a bit of sanding. This allows you to create beautiful, time-worn pieces that have a unique story to tell.
Chalk paint is also an eco-friendly choice, as many water-based products contain low levels of volatile organic compounds (VOCs). This makes it a safer option for both the environment and your home.
Finally, chalk paint offers complete customization of your projects through its wide range of colors and ability to be mixed to achieve the exact shade you desire. With chalk paint, you can choose from available colors or create your own unique hues, allowing you to express your personal style and creativity.
How to Get Started with Chalk Paint Projects
Starting a DIY chalk paint project is an exhilarating way to unleash your creativity and infuse your space with personal touches. With its versatility and ease of use, chalk paint is the perfect medium for transforming furniture, crafting decorative pieces, or upcycling vintage items. To embark on this creative adventure, we’ll provide you with step-by-step guidance that’s straightforward, reliable, and empowering.
Choosing Your Chalk Paint
When it comes to selecting the ideal chalk paint for your project, it’s crucial to consider the specific material you’re working with. For instance, if you’re refinishing fabric, you’ll want to opt for a paint specifically designed for textile application. On the other hand, standard chalk paint is usually sufficient for wood or metal surfaces. The key takeaway here is that not all chalk paints are created equal, and choosing the right one can make all the difference in achieving your desired result.
Color selection is another crucial aspect of working with chalk paint. With an array of vibrant hues and subtle shades to choose from, you’re sure to find a color that suits your vision. And, if needed, you can always mix paints to create a custom shade that perfectly captures the essence of what you had in mind.
Preparing Your Workspace and Materials
To begin with, select a well-ventilated workspace where you can work comfortably without any distractions. Ensure that the area is covered with newspapers, drop cloths, or other protective materials to prevent damage from paint spills. This precautionary measure will save you time and effort in cleaning up any mishaps. In addition to your chalk paint, you’ll require various tools and supplies, such as brushes or rollers, sandpaper for smoothing out surfaces, painter’s tape for creating sharp edges, and a finishing wax or sealant to add an extra layer of protection and durability to your finished piece.
Starting Your Project
Before applying chalk paint, prepare the surface by giving it a quick clean to remove dust and grime, ensuring a smoother finish. For glossy surfaces, a light sanding is beneficial to improve adherence. After that, thoroughly stir the paint before use, and apply it in thin, even coats. You may need one coat for a distressed look or multiple coats for a more opaque finish. Allow each coat to dry completely, which usually takes around 30 minutes to an hour. If you’re aiming for a vintage or aged appearance, now is the time to distress your item by gently rubbing away some of the paint on edges or areas that would naturally show wear over time. Finally, seal your work with a coat of wax or sealant, which not only protects it but also enhances durability and adds a matte or glossy finish, depending on the product.
Finishing Touches
With DIY chalk paint projects, the possibilities for personalization are endless. You can express yourself through stenciling, adding decorative hardware or incorporating decoupage, allowing each piece to take on a unique character that reflects your style. The beauty of chalk painting lies not only in its creative potential but also in its practicality. For instance, you can easily wipe down the finished product with a damp cloth, and for high-traffic items like furniture, reapplying wax or sealant every few years will help maintain their appearance and durability. What’s more, anyone can partake in this process, regardless of artistic experience or DIY prowess. With a dash of creativity and some preparation, you can transform ordinary objects into personalized masterpieces that truly represent your taste.
Chalk Paint Ideas and Projects FAQs
What is chalk paint?
Chalk paint has gained popularity among DIY enthusiasts due to its unique characteristics, including a matte finish and exceptional adhesion capabilities. Unlike traditional paints, chalk paint doesn’t require priming or sanding before application, making it an ideal choice for those looking to give their surfaces a personal touch. Its versatility has made it a favorite among crafty individuals who appreciate the distinct aesthetic it brings.
Can chalk paint be used on any surface?
Chalk paint is incredibly versatile, allowing you to transform a wide range of surfaces with ease. From wood and metal to ceramic and even fabric, the possibilities are endless. And what’s more, its strong adhesive properties eliminate the need for tedious preparation or excessive sanding, making it a breeze to work with.
Do I need to prep my surface before using chalk paint?
One of the notable benefits of using chalk paint is its low-maintenance surface preparation requirements. Nevertheless, for optimal results, it’s crucial to begin by giving the surface a thorough cleaning to eliminate any dust or grime that may be present. On glossy surfaces, a gentle sanding can further enhance paint adhesion.
How long does chalk paint take to dry?
When working with chalk paint, you can usually expect it to dry to the touch within a timeframe of around 30 minutes to an hour. Nevertheless, it’s recommended to allow the paint some extra time – roughly a few hours – before adding subsequent coats or attempting any distressing techniques, such as sanding or scraping.
Can chalk paint be sealed?
When it comes to maintaining the integrity of your chalk-painted surfaces, applying a sealant is a crucial step. Not only does it safeguard against wear and tear, but it also enhances the overall aesthetic by introducing either a matte or glossy finish, depending on the type of sealant used.
How do I achieve a distressed look with chalk paint?
Achieving a distressed look is surprisingly straightforward. Begin by applying the chalk paint and allowing it to fully dry before introducing a subtle touch of weariness. To accomplish this, use sandpaper to gently buff away sections of the paint on edges or areas that would typically display signs of aging over time.
Is chalk paint eco-friendly?
Chalk paints, often water-based, boast remarkably low levels of volatile organic compounds (VOCs) – a significant departure from their traditional counterparts. This eco-friendly approach makes them an attractive choice for those seeking a more sustainable painting solution.
Can I mix chalk paint colors?
When it comes to creating unique and personalized pieces with chalk paint, one of the most exciting aspects is the ability to effortlessly blend different hues together to craft bespoke shades that perfectly align with your design vision. This flexibility enables you to tailor each project to reflect your distinct taste and style, ensuring a truly one-of-a-kind finish.
How do I clean chalk-painted items?
When it comes to maintaining the appearance of chalk-painted items, a simple damp cloth is often all that’s needed for cleaning. However, for furniture pieces or regularly used items, it’s recommended to reapply a layer of wax or sealant every few years to preserve the finish and ensure its durability over time.
Where can I find chalk paint?
Chalk paint can be easily sourced from multiple outlets, offering a diverse range of brands and colours to cater to various project requirements. This versatility is accessible through both physical stores, such as craft shops and home improvement retailers, as well as online platforms.
20 Chalk Paint Ideas and Projects
Elevate your DIY home decor skills by exploring a world of creative possibilities with chalk paint. Unleash your inner artist and give new life to forgotten furniture and decorative pieces using innovative techniques that will leave you wondering how you ever lived without them.
Colorful DIY Chalkboard Paint Calendar
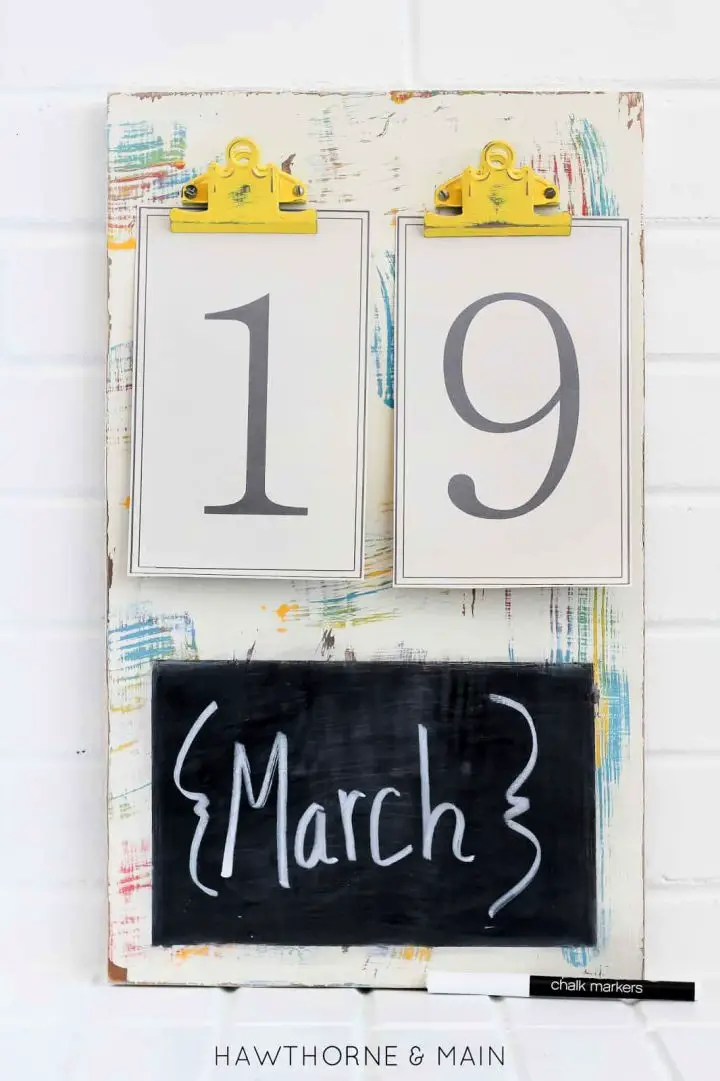
Transform your organizational routine with a unique, handmade chalkboard calendar that injects personality into your daily life. This creative project is perfect for those moments when life feels overwhelming and out of control. By combining functionality with style, this DIY calendar ensures you stay on top of important dates without sacrificing aesthetic appeal. To get started, gather basic supplies like paint, a wooden board, and some clips. For an added touch of whimsy, incorporate bright acrylic paints and distressed techniques to create a colorful backdrop that adds visual interest. For step-by-step guidance and free printable calendar numbers, visit PrincessPinkyGirl’s comprehensive guide. This DIY project transcends mere organization, becoming a statement piece that elevates any space.
Make a Chalkboard Paint Serving Tray
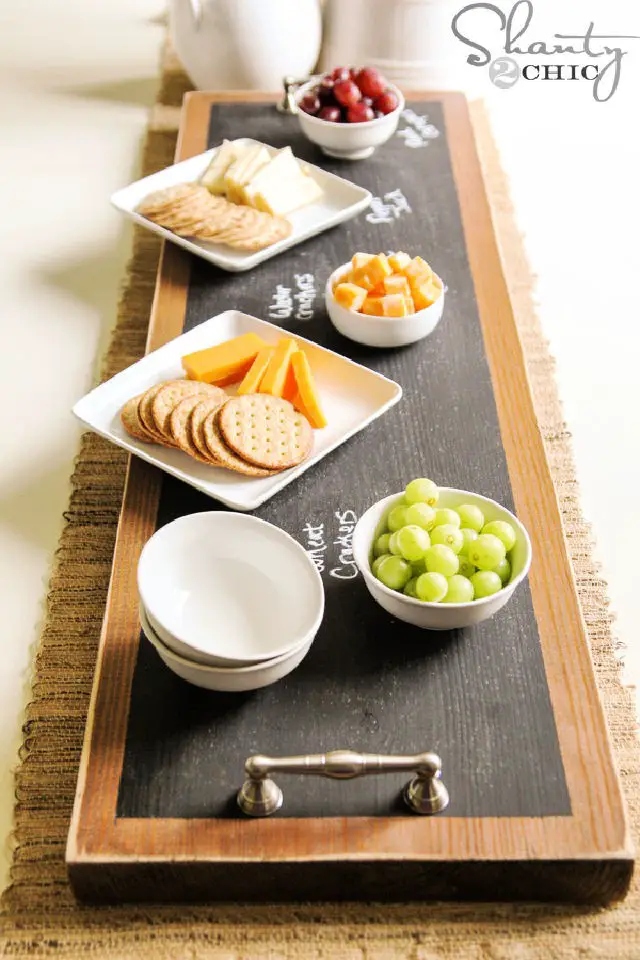
Elevate your gatherings with a charming DIY chalkboard serving tray that combines functionality and style. For under $15, you can create personalized trays perfect for hosting. This engaging guide takes you through the process of crafting unique trays from a single board. With straightforward steps on cutting, staining, and applying chalkboard paint, you’ll add a fun twist to serving your guests. A clever use of Gorilla Glue Gel ensures durable handles that will withstand repeated use. Get ready to impress at your next cookout or gathering with this easy-to-create and budget-friendly DIY project.
Homemade Chalkboard Paint Sign
Elevate your DIY skills with this straightforward guide to creating a charming chalkboard sign, perfect for adding a personal touch to any celebration. Our project was inspired by my sister’s wedding, where we crafted a unique and versatile sign that stole the show. Whether you’re planning a wedding, baby shower, or just looking for a fun creative outlet for kids, this DIY endeavour is surprisingly easy to execute and only requires some patience during the drying process. With a focus on selecting the right materials and providing step-by-step instructions, this guide has everything you need to bring your own chalkboard sign to life.
Chalkboard Paint Birthday and Anniversary Calendar
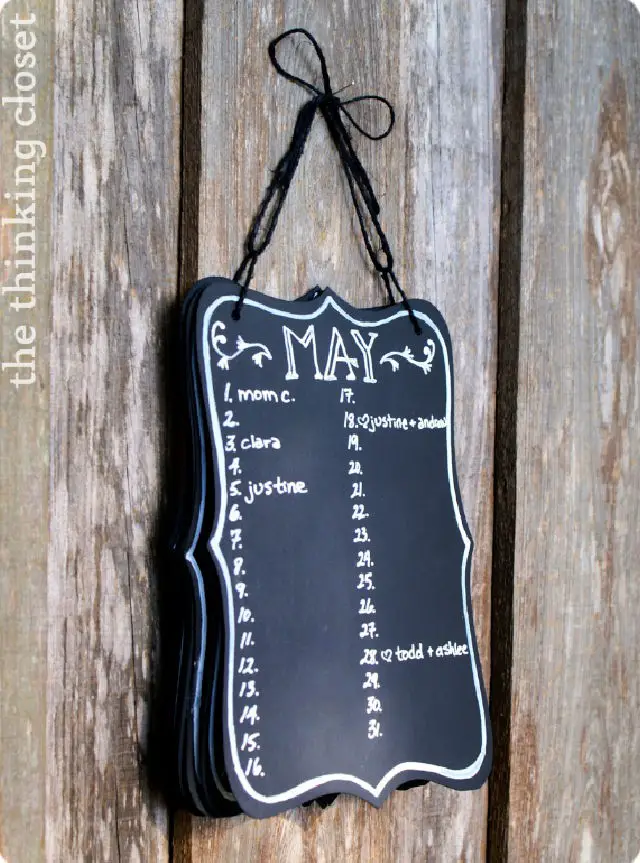
Transforming forgetfulness into a superpower has never been easier. With The Thinking Closet’s comprehensive guide to creating a personalized birthday and anniversary calendar, remembering special dates becomes second nature. This engaging tutorial takes you by the hand, providing clear instructions for crafting a charming and unique calendar that makes staying on top of important celebrations a breeze. Plus, Silhouette Studio users can optimize their experience with a free cut file. As you dive into this fun project, you’ll discover a fresh perspective on tracking special occasions in style.
Looking to add some greenery to your windows? Look no further! Our DIY window planter box guide offers simple and straightforward plans for creating beautiful planters that bring the outdoors in. Get inspired by these creative ideas and start beautifying your windows today.
Unleash your creativity with our top DIY pallet projects, featuring step-by-step diagrams to help you get started. Whether you’re a seasoned crafter or just looking for a fun weekend project, we’ve got you covered. Start making amazing pieces with pallets today and discover the endless possibilities!
DIY Chocolate Football Chalkboard
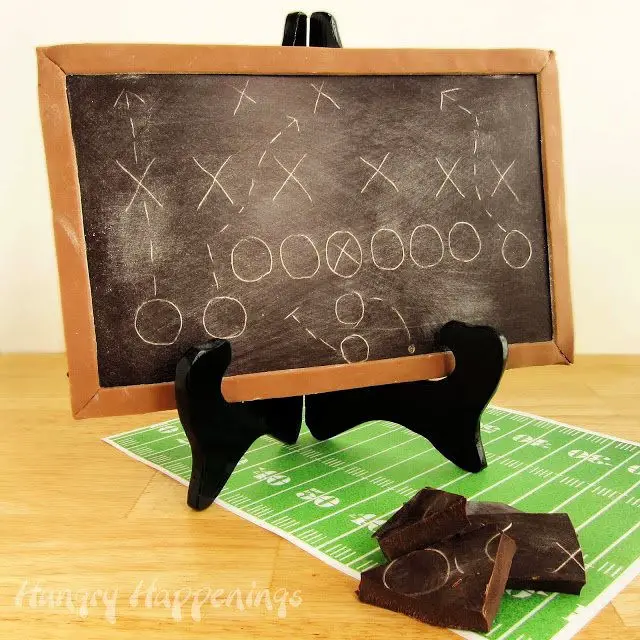
Elevate your game-day celebrations with a show-stopping Chocolate Football Chalkboard that will leave your guests in awe. This scrumptious centerpiece combines the excitement of football with the irresistible allure of chocolate, making it an ideal treat for Super Bowl parties or any sports-themed gathering. Not only does it serve as a stunning decoration, but it can also be devoured as a sweet indulgence or repurposed as a creative party favor. To recreate this masterpiece at home, follow the step-by-step guide on Hungry Happenings and discover how to craft your own white chocolate ‘chalk’ for drawing play diagrams, adding an extra layer of fun to the experience.
Chalkboard Paint and Mod Podge Fabric Frames
Immerse yourself in the realm of DIY crafting with Mod Podge Fabric Frames! By combining ordinary wood frames with Antique Matte Mod Podge and a dash of creativity, you can transform them into unique vintage masterpieces. Perfect for adding a personalized touch to your home or gifting loved ones, these frames seamlessly blend the charm of fabric with the rustic appeal of distressed edges. The process is surprisingly straightforward: simply follow the steps outlined on Number 2 Pencil to achieve this distinctive look, which cleverly incorporates chalkboard paint for an added functional twist. As you ready your scissors and unleash your creativity, get ready to be captivated by this engaging project’s potential.
Turn a Mirror Into a Chalkboard With Paint
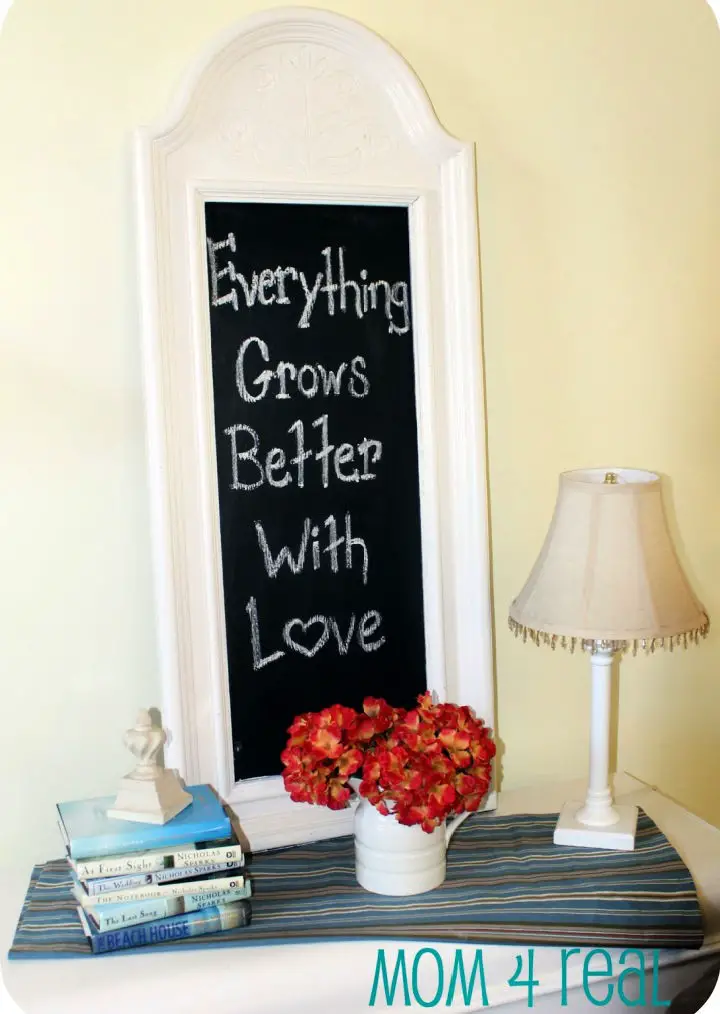
Give new life to an old mirror by transforming it into a functional and stylish chalkboard with minimal effort. At Mom 4 Real, we’re sharing a straightforward guide that helps you breathe new life into neglected mirrors. By following our simple steps on preparation, priming, and painting, you’ll be able to create a unique and bespoke chalkboard perfect for jotting down notes, doodling, or planning meals. This DIY project is not only practical but also an excellent way to express your creativity while adding a personal touch to any room. With this easy-to-follow guide, see how a simple mirror can become your go-to piece of home decor.
DIY Vintage Inspired Chalkboard Paint Tray
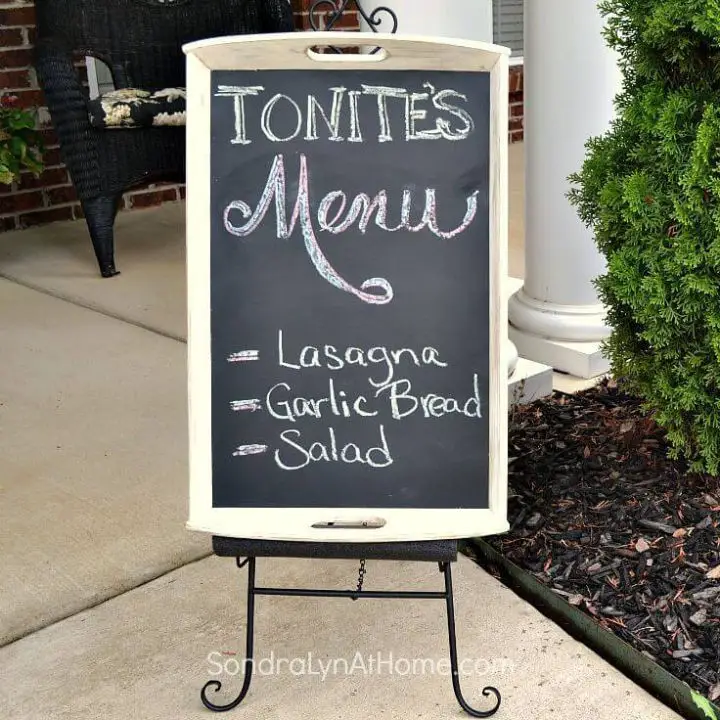
Transform an IKEA KLACK tray into a charming vintage-inspired chalkboard tray by following this simple tutorial. The process begins with selecting the right tray, which Sondra Lyn expertly walks you through. Next, she shares her secrets for giving the tray a distressed, weathered look using chalk and chalkboard paint. This unique project combines functional storage with a touch of old-world charm, making it perfect for eclectic signage or adding a personal flair to your serving needs. With this budget-friendly upcycling guide, you can give your space a one-of-a-kind addition that reflects your style and tells a story.
Make a Wood Slice Chalkboard Paint Wreath
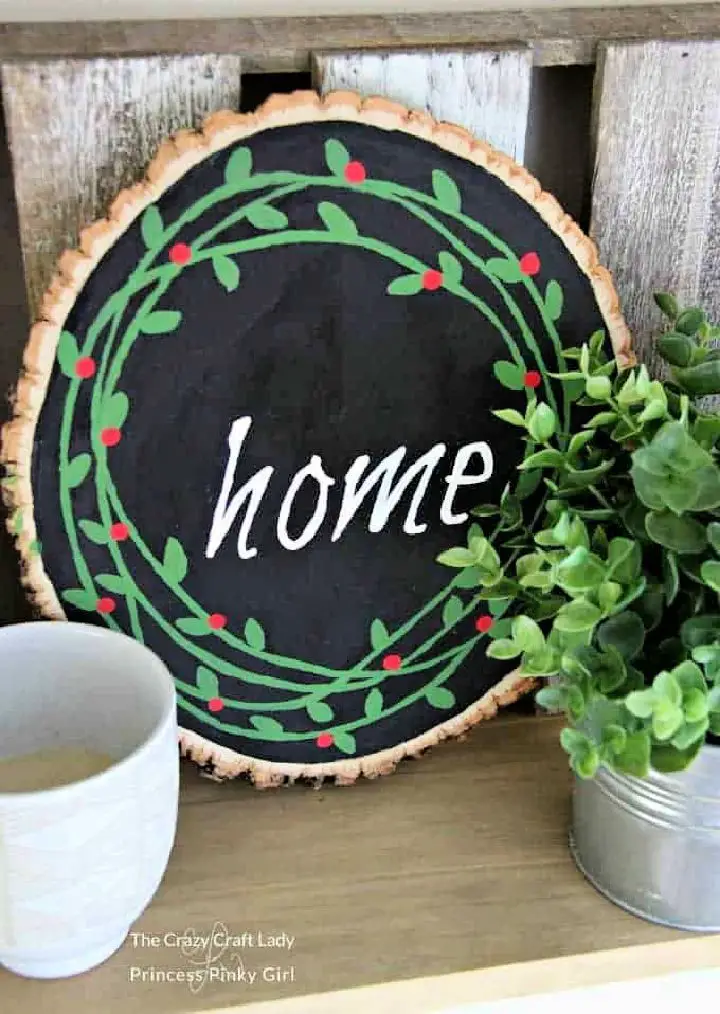
Embark on a creative journey with Princess Pinky Girl’s Wood Slice Painted Wreath tutorial, transforming a classic wreath into a charming winter wonderland piece for your home or a thoughtful gift. This easy Christmas craft requires basic supplies like chalk paint and a wood slice, making it accessible to anyone who wants to add a handmade touch to their décor. With straightforward instructions, you can create a unique decoration that exudes warmth and coziness. As the perfect blend of rustic charm and artistic expression, this DIY project embodies the spirit of winter’s magic.
DIY File Cabinet Makeover With Chalkboard Paint
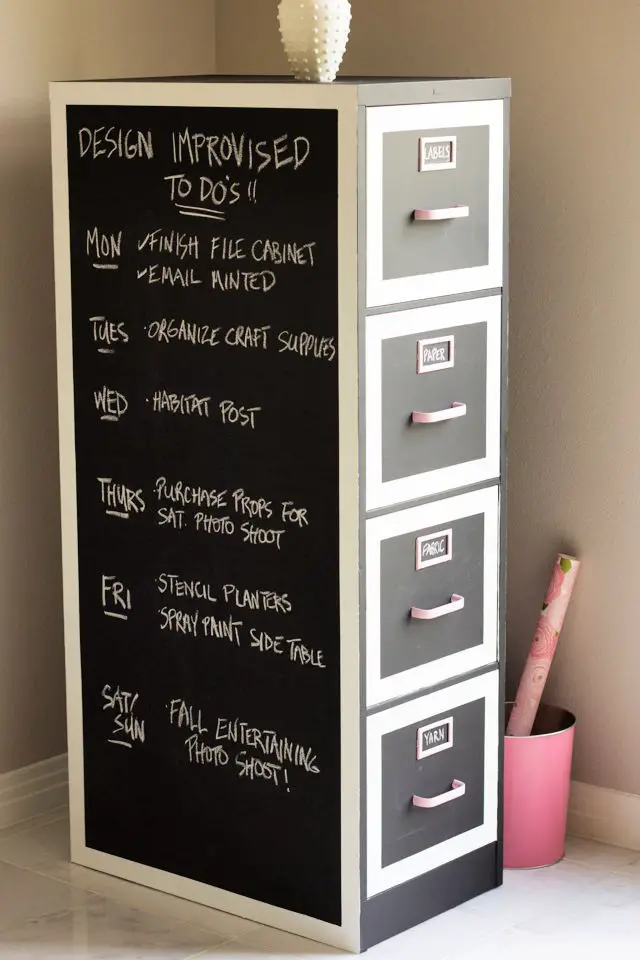
Elevate your craft space by transforming an ordinary file cabinet into a colorful storage solution using chalkboard paint. A DIY project available on Design Improvised shows how to repurpose an old file cabinet, turning it into a practical and visually appealing organizational tool for storing fabrics, yarns, and other crafting supplies. This hack not only adds functionality but also serves as a creative calendar, making it perfect for craft enthusiasts seeking unique storage solutions with a personal touch.
How to Make an Oversized Chalkboard With Paint
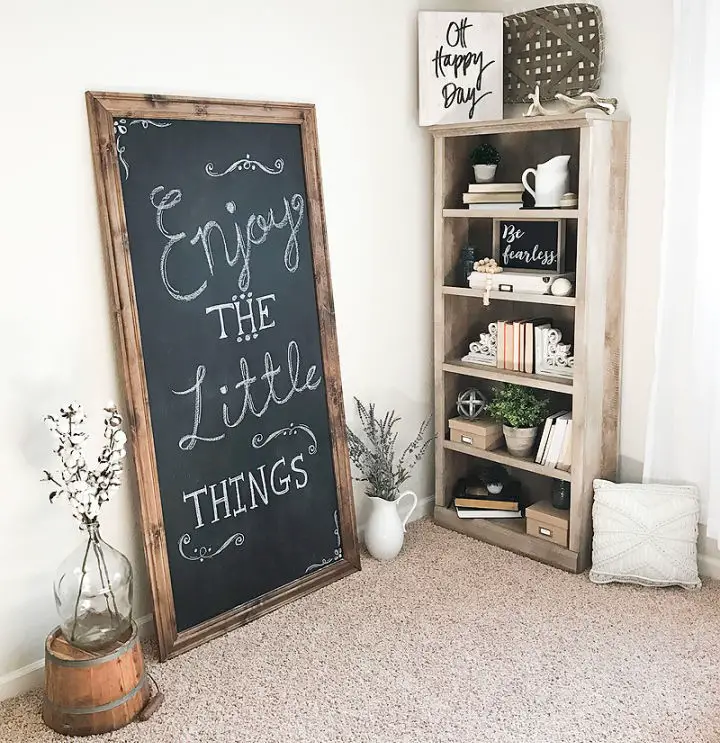
Elevate any room into a creative haven with a simple DIY Oversized Chalkboard project that’s perfect for adding a cozy farmhouse flair to your workspace or office. This effortless DIY endeavor requires minimal tools and affordable materials, including Devine Color by Valspar Chalkboard Paint available at Target, making it accessible even to those without extensive DIY experience. With the step-by-step tutorial from Blooming Homestead as your guide, you’ll be able to craft a charming and functional chalkboard ideal for jotting down ideas or adding a rustic decorative touch.
Handmade Menu Board Using Chalkboard Paint
Transforming an old frame and scraps of beadboard into a personalized menu board is a creative and functional addition to any kitchen. This DIY project combines the rustic charm of beadboard with the practicality of chalkboard paint, perfect for meal planning enthusiasts. With just a few simple steps, including cutting the beadboard to fit a frame, applying chalkboard paint, and adding vinyl letters for daily menus, you can create a unique display that showcases your culinary creations. For a detailed guide and more inspiring DIY projects, visit Adventures of a DIY Mom.
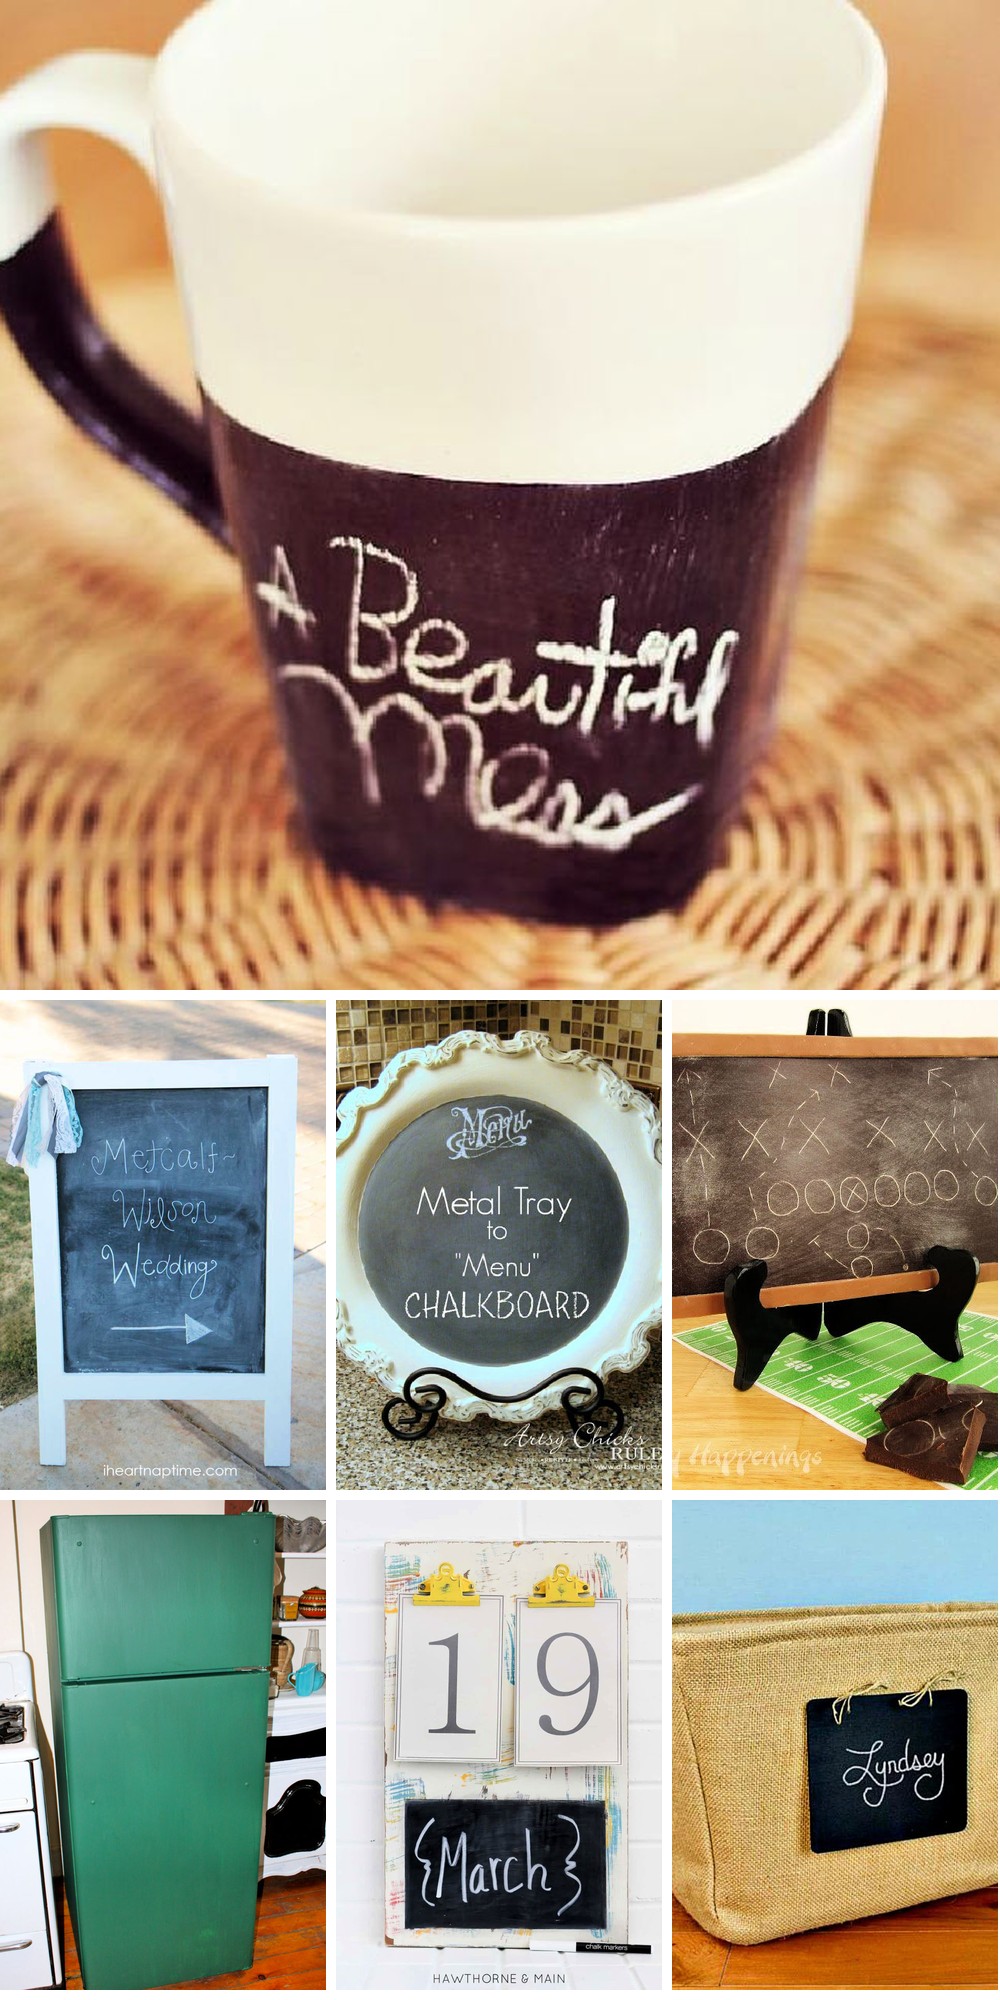
Making a Chalkboard Paint Mug
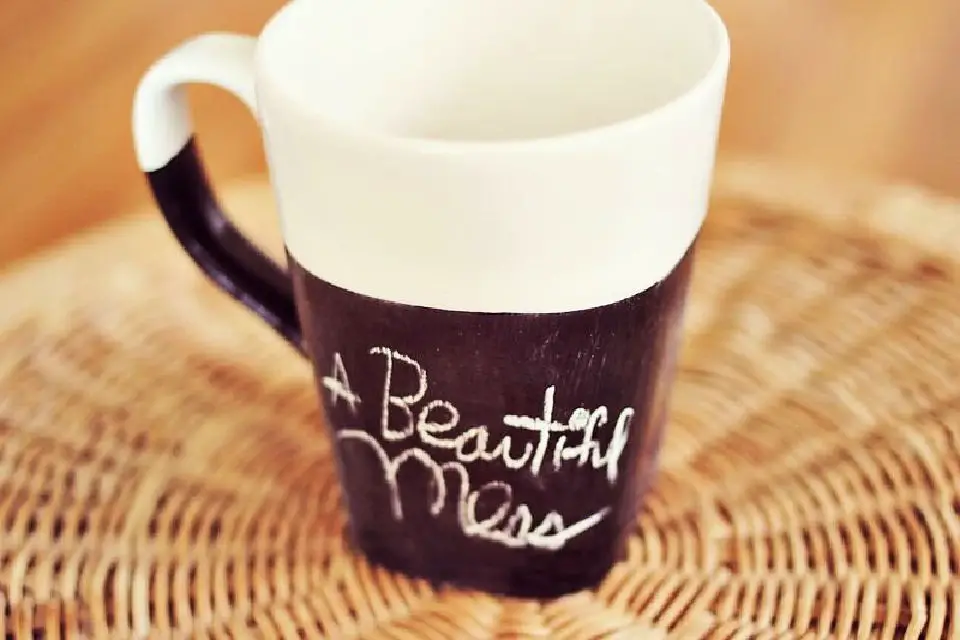
Transform a plain white mug into a unique piece of art with this easy DIY project! Perfect for crafting enthusiasts, it’s a great way to add some personality to your daily routine. To get started, you’ll need a few simple supplies: a white mug, masking tape, black Pebeo Chalkboard Paint, and a brush. First, apply the tape to create clean lines on the mug, then paint it with the chalkboard paint using a smooth, even motion. Once you’ve applied the paint, bake the mug in a preheated oven at 300°F for 30 minutes to set the design. And that’s it! You’ll be left with a dishwasher-safe, personalized mug that’s perfect for gifts or personal use. For more detailed instructions and tips on how to get started, head to A Beautiful Mess.
Easy DIY Chalkboard and Key Hooks
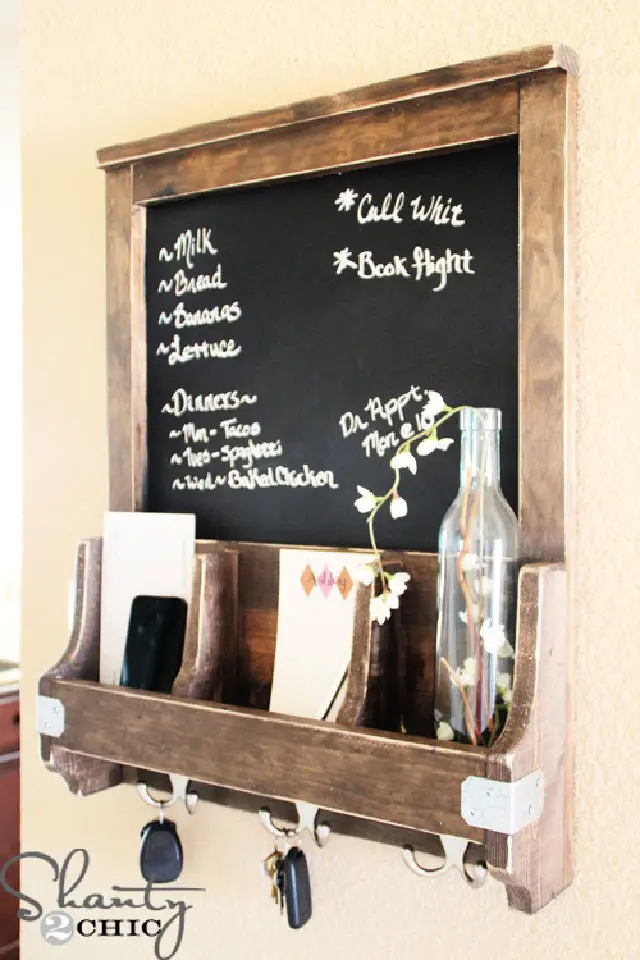
Discover the joy of functional artistry by bringing home a DIY Chalkboard and Key Hooks project that effortlessly elevates any entryway while keeping essentials in check. Don’t let intimidation get the better of you – this project is surprisingly easy to execute, making it perfect for DIY enthusiasts looking to infuse their space with personal flair without breaking the bank. With Shanty-2-Chic’s step-by-step guidance, you’ll be empowered to tackle each stage with confidence, from the initial cut to the final stroke of paint. As a bonus, this versatile piece seamlessly combines style and practicality, guaranteeing a sense of accomplishment that only comes from creating something truly unique.
Personalized Chalkboard Burlap Tote
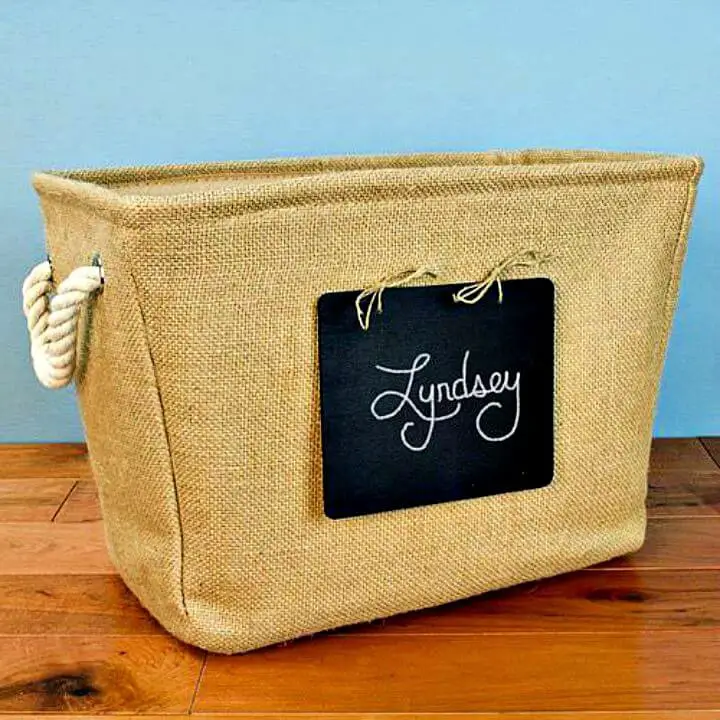
Transform a plain burlap tote into a unique, eco-friendly accessory by adding a customizable chalkboard label. This reusable bag is perfect for jotting down shopping lists, keeping track of daily tasks, or expressing your mood with a simple yet effective design. To achieve this stylish look, you’ll need just a few essential supplies: a burlap tote, Americana Chalkboard Paint, and some jute twine. Follow our step-by-step guide to bring your personalized tote bag to life.
Repurposed an Old Metal Tray With Chalk Paint
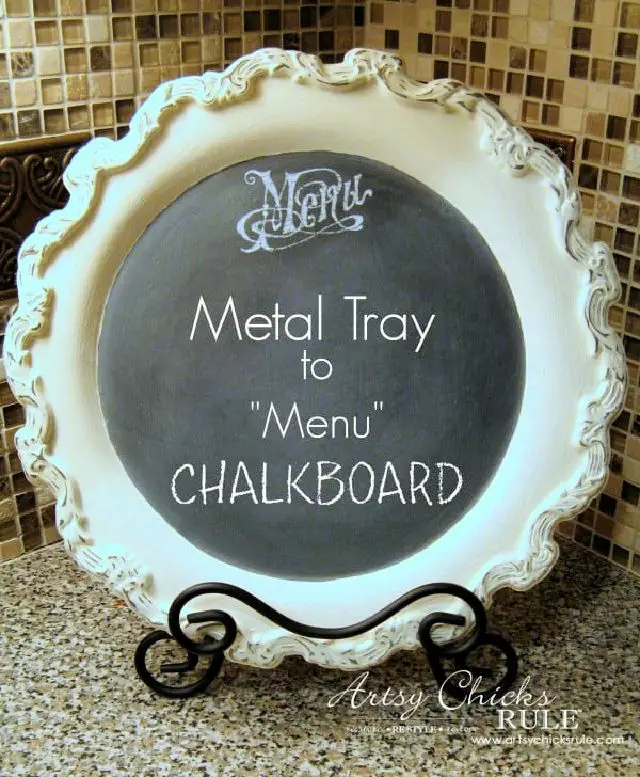
Breathe new life into an overlooked metal tray by transforming it into a stylish chalkboard menu. This straightforward yet impactful DIY project is the perfect way to revive thrift store finds, imbuing them with personality and charm. With just a few strokes of chalk paint and a dash of creativity, you can craft a one-of-a-kind note or menu board that adds a personal touch to your home or makes for a thoughtful gift. For a step-by-step guide on how to achieve this look, visit Artsy Chicks Rule. Remember, the next time you stumble upon an old metal tray, envision its potential and let your imagination run wild! And if you’re looking for more creative ways to elevate your celebrations, discover delightful DIY cupcake toppers that will add a touch of whimsy and charm to your party tables.
Inexpensive DIY 2-Ingredient Chalkboard
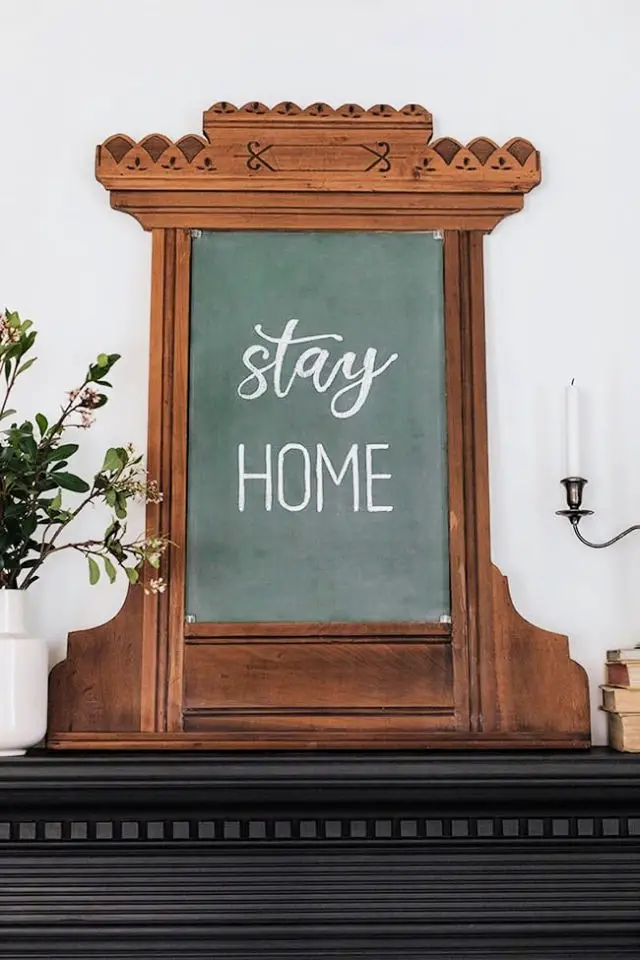
Transforming your space with a unique homemade chalkboard requires only two ingredients and a little creativity. One of the most impressive features of this DIY project is its simplicity, making it accessible to anyone looking to add a personal touch to their decor. To get started, scour your home for an old picture frame, mirror, or any other smooth surface that can serve as the base for your chalkboard. Once you’ve found the perfect candidate, mix latex paint with unsanded grout to create a durable and long-lasting writing surface. After applying the mixture and allowing it to dry, your new chalkboard is ready for use. For a step-by-step guide on how to bring this project to life, be sure to visit Jenna Sue Design.
Easy Steps to Make a Chalkboard Wall
Transform any space into an imaginative haven by installing a chalkboard wall! This creative feature is perfect for fostering creativity in kids’ spaces or adding a playful touch to kitchens and playrooms. Before starting your project, make sure the wall surface is smooth by sanding and filling in any imperfections. To achieve a professional-looking finish, use high-quality chalkboard paint and prime it with chalk beforehand. For a comprehensive guide on how to complete this DIY project, head over to Classy Clutter for valuable insights and materials lists.
How to Make Chalkboard Painted Pots
Transform your outdoor space with this charming DIY chalkboard painted pot guide from Sweet Pea. Begin by choosing terracotta pots and selecting the perfect shade of chalkboard paint, whether spray or brush-on. Thoroughly clean each pot to remove any dirt or debris, then secure the top edges with painter’s tape to create a crisp, defined border. Apply multiple coats of paint to achieve a rich, matte finish that’s ready for customization. Add a touch of rustic charm by wrapping twine around the pots and securing it with a small dab of glue. To ensure your chalkboard labels can be easily changed, season the paint by lightly rubbing it with chalk and then wiping away any excess. Fill your newly decorated pots with your favorite herbs like Sage, Rosemary, and Parsley, and enjoy the convenience and beauty they bring to your kitchen garden or window sill. This delightful project has stood the test of time, featuring prominently in magazines and remaining a beloved favorite among gardening enthusiasts.
Beautiful Chalkboard Painted Refrigerator
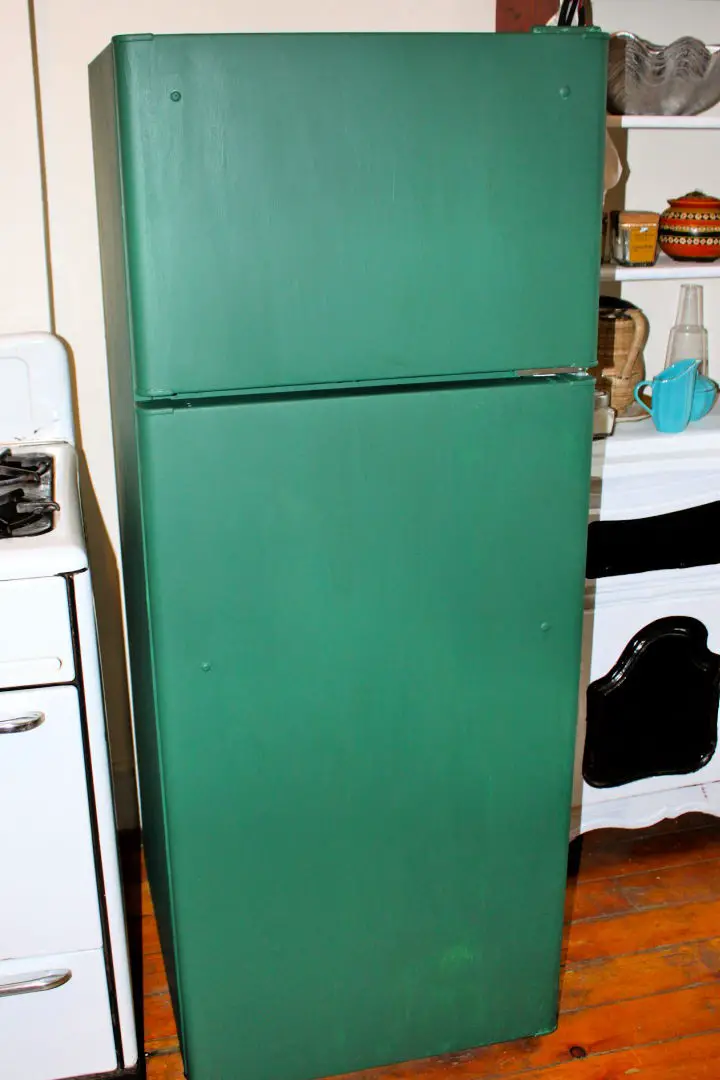
Transform your kitchen’s focal point into an artistic masterpiece by converting your refrigerator into a dynamic chalkboard! This budget-friendly DIY project from Ramshackle Glam brings together the functionality of a kitchen staple and the expressiveness of art, creating a unique space for menus, notes, and creative endeavors. By following a simple process that includes selecting chalkboard paint, preparing the surface, and applying multiple coats, you’ll turn your fridge into a conversation-starting canvas that seamlessly blends creativity with practicality.
Conclusion
As you conclude this odyssey of 20 chalk paint ideas and projects, remember that the true magic lies not in the end result, but in the creative journey itself. Chalk paint’s adaptability and simplicity make it an ideal companion for DIY enthusiasts seeking to infuse their surroundings with a personal touch. From preparing your workspace to selecting the perfect shade, every step presents an opportunity to unleash your imagination. The path from selecting your first project to basking in the glory of your completed masterpiece is replete with learning, self-expression, and joy. As you embark on your next DIY adventure with chalk paint, revel in the thrill of bringing something uniquely yours into being.
