If you’re looking to upgrade your home’s flooring without breaking the bank, consider DIY plywood flooring as a cost-effective and creative solution. By opting for plywood, homeowners can achieve the look of hardwood flooring at a fraction of the cost while adding a personal touch to their space. This guide will walk you through the process of making and maintaining plywood floors, covering selection, installation, staining, and sealing. From choosing the best plywood sheets to transforming them into planks, preparing the underlayer, and finishing with a beautiful finish, we’ll break down each step in detail. For those looking to add an extra layer of durability and aesthetic appeal, we’ll also provide tips on how to effectively stain and seal your floors. With these instructions and expert advice, you can transform your living space with plywood flooring while saving money and elevating your home.
Why Choose DIY Plywood Flooring?
While the idea of embarking on a DIY plywood flooring project may seem overwhelming at first, the benefits far outweigh any initial doubts. Here’s why: First and foremost, the cost-effectiveness of this approach is undeniable. Not only will you save money on materials by opting for plywood over traditional hardwood floors, but you’ll also avoid labor costs associated with hiring professionals. This budget-friendly option doesn’t sacrifice style, either – quite the opposite, in fact. Plywood flooring offers endless opportunities to customize your space through cutting, staining, and finishing techniques. Whether you’re aiming for a rustic, modern, or one-of-a-kind look, plywood is incredibly versatile. Additionally, choosing eco-friendly options like FSC-certified products ensures that your flooring selection aligns with your environmental values. Once installed and sealed properly, plywood floors are surprisingly durable – capable of withstanding daily wear and tear with minimal maintenance requirements. Finally, the installation process itself can be a rewarding experience for DIY enthusiasts, providing an opportunity to develop new skills and a sense of accomplishment. By considering these points, it’s clear that DIY plywood flooring is more than just a budget-conscious option; it’s a creative, sustainable way to upgrade your home.
How to Install Plywood Floors as an Alternative to Hardwood Flooring
Introduction
Seeking a cost-effective and visually appealing flooring solution? Consider transforming plywood sheets into stunning floors that mimic the look of hardwood, without breaking the bank. This comprehensive guide will take you through the process of creating beautiful, budget-friendly floors that combine functionality with style.
Step 1: Choosing the Right Plywood
When it comes to selecting the perfect plywood for your flooring, it’s essential to strike the right balance between quality and budget. Look for a grade that combines affordability with durability, ensuring it can withstand heavy foot traffic and maintain its appearance over time. A popular choice for flooring is radiata pine, often referred to as cabinet-grade plywood, which boasts a smooth, pre-sanded surface that’s ideal for finishing. It’s crucial to distinguish between different types of plywood, however – avoid sheathing subfloor varieties, as they’re not designed for the same level of wear and tear as flooring-grade materials.
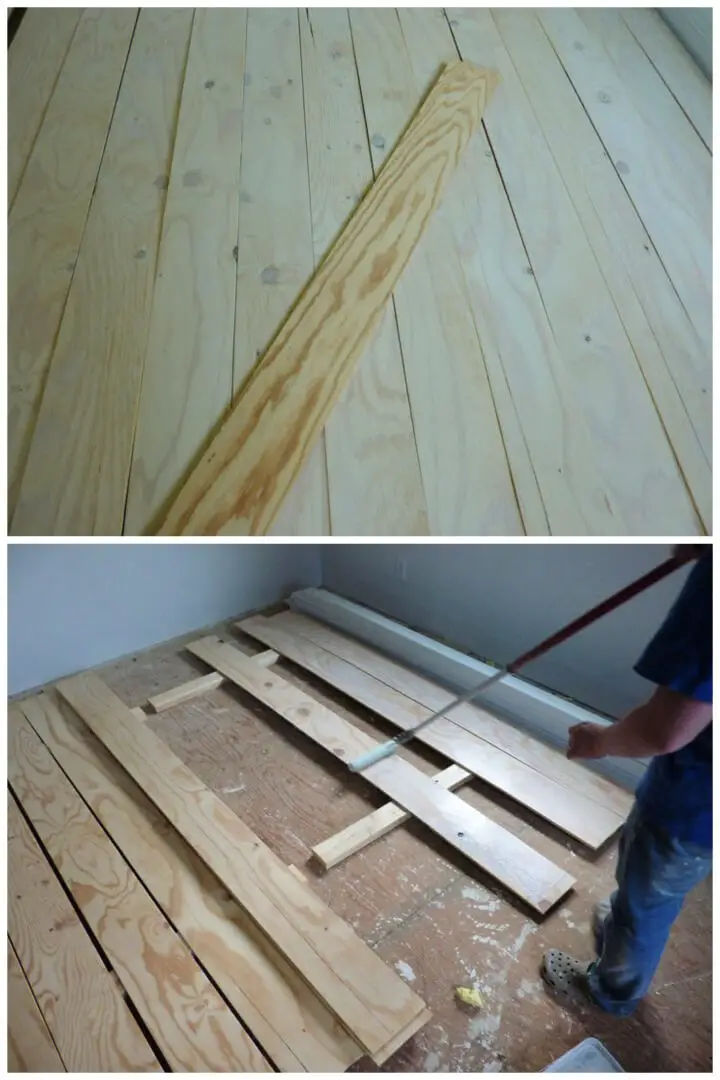
Step 2: Cutting Plywood into Planks
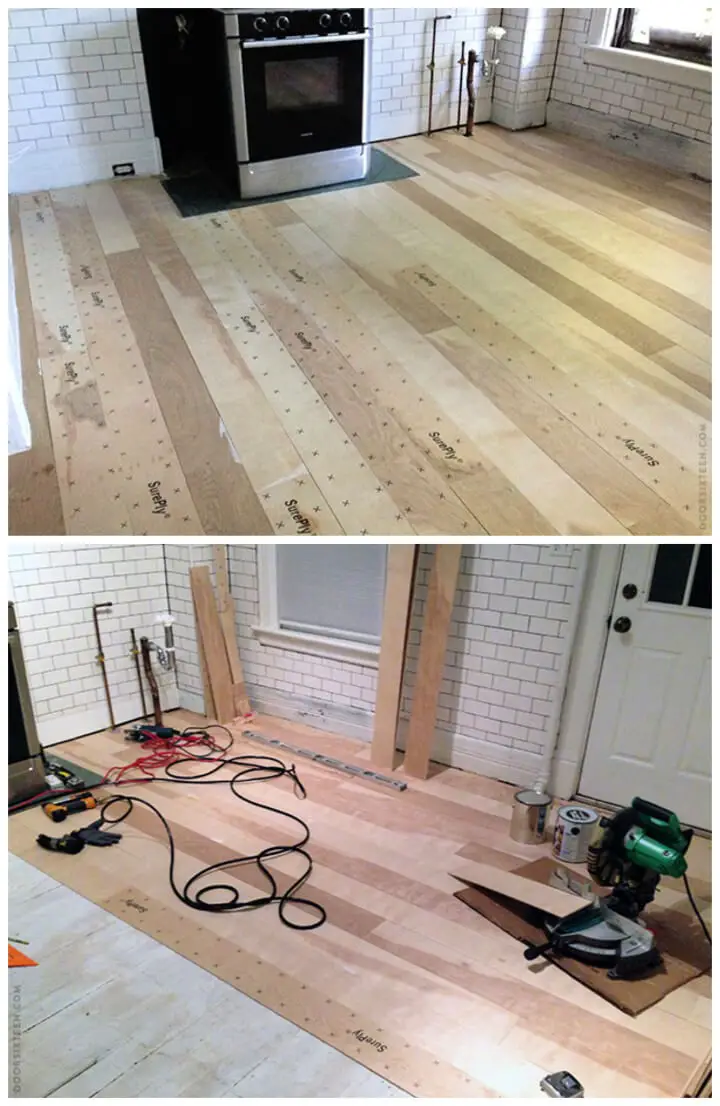
To achieve the look of hardwood flooring, you’ll need to transform your plywood into planks. For a wide plank effect, aim for strips that are 8 inches wide each, allowing you to obtain six boards from each sheet by making slight adjustments as needed. To ensure precise and consistent cuts, use a circular saw equipped with a straight edge guide attachment. For added protection during the cutting process, place the plywood on top of a thick piece of foam, shielding the surface below.
Step 3: Preparing the Subfloor
To set the stage for installing your plywood planks, it’s crucial to prepare the subfloor by making some necessary adjustments. If you have existing door casings, utilize an oscillating multi-tool to trim them and create a snug fit for the thicker plywood planks. Additionally, lay down a layer of roofing paper to provide an extra barrier against moisture and reduce creaking sounds. Secure this layer with a hand stapler, taking care to smooth out any ridges or bubbles that may form.
Step 4: Installing Plywood Planks
Once you’ve prepared your subfloor and cut your plywood planks, it’s time to start laying down the flooring. Begin at a fixed point, such as an entryway or against a wall, and work your way outward. While there’s no need to follow a precise pattern, staggering joints by full foot increments can create a more organic appearance. To secure the planks in place, use a pneumatic nail gun and aim for tight seams between boards. Before nailing, employ a lever or homemade tool to help tighten any gaps, ensuring a seamless finish.
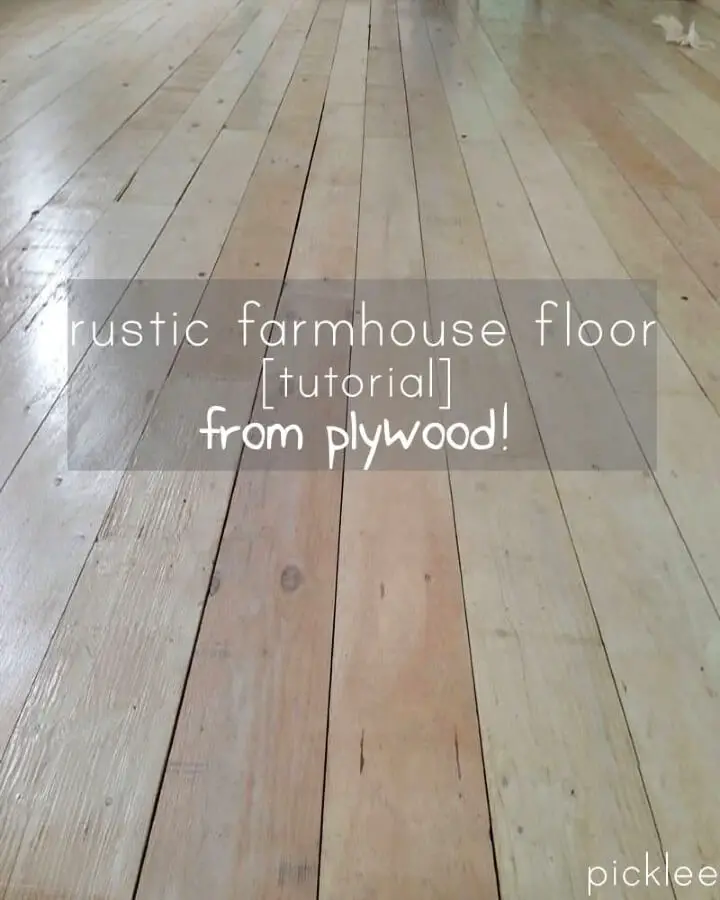
Step 5: Finishing Touches
As the installation of planks reaches its final stages, attention turns to fine-tuning the overall appearance. A crucial step involves addressing any noticeable gaps by applying wood filler and subsequently sanding the entire floor to produce a seamless surface. Next, select a stain or sealant that suits your aesthetic preferences, thereby not only enhancing the plywood’s visual appeal but also providing a protective barrier, imparting a rich hardwood-like finish.
Video Tutorial
While written guides can provide thorough instructions, sometimes having a visual aid can make all the difference in understanding a complex process like installing plywood floors. For a step-by-step video tutorial on this topic, I highly recommend checking out The Latina Next Door’s YouTube video, Plywood Flooring Video. This helpful resource pairs perfectly with this written guide, offering a clear and easy-to-follow visual representation of the techniques discussed here.
Conclusion
A budget-friendly alternative to traditional hardwood, plywood flooring offers a stylish and durable option without breaking the bank. By following these steps, you can successfully install your own DIY plywood floors, resulting in a high-quality and cost-effective solution for any room. As with any DIY project, patience and attention to detail are crucial to achieving a flawless outcome.
How to Stain and Seal Plywood Floors: A DIY Guide
To create a stunning plywood floor, it’s essential to approach the process with meticulous care and a willingness to put in the effort. If you’re eager to revamp your floors with a personalized stain and long-lasting seal, follow this detailed roadmap to achieve breathtaking results that will undoubtedly elevate the ambiance of your home.
Step 1: Prepare Your Floors for Staining
Prior to commencing the staining process, it’s essential to confirm that your plywood floors are securely installed and free from any debris or dirt. To achieve a seamless surface, utilize a sander in conjunction with 220-grit sandpaper, working methodically to cover the entire floor. This preliminary step is vital for guaranteeing an even application of stain. When utilizing larger sanders for broader areas and smaller orbitals for corners and edges, maintain a consistent smoothness across the entire floor, ensuring a flawless foundation for the subsequent staining process.
Step 2: Choose Your Stain
When selecting a stain color, it’s crucial to consider the overall aesthetic of your home. To make an informed decision, utilize a sample board to test the stain on plywood. This will allow you to visualize the final result and guarantee satisfaction with your chosen shade. A popular option is Mocha by Minwax, which boasts a rich, warm tone that complements many décors.
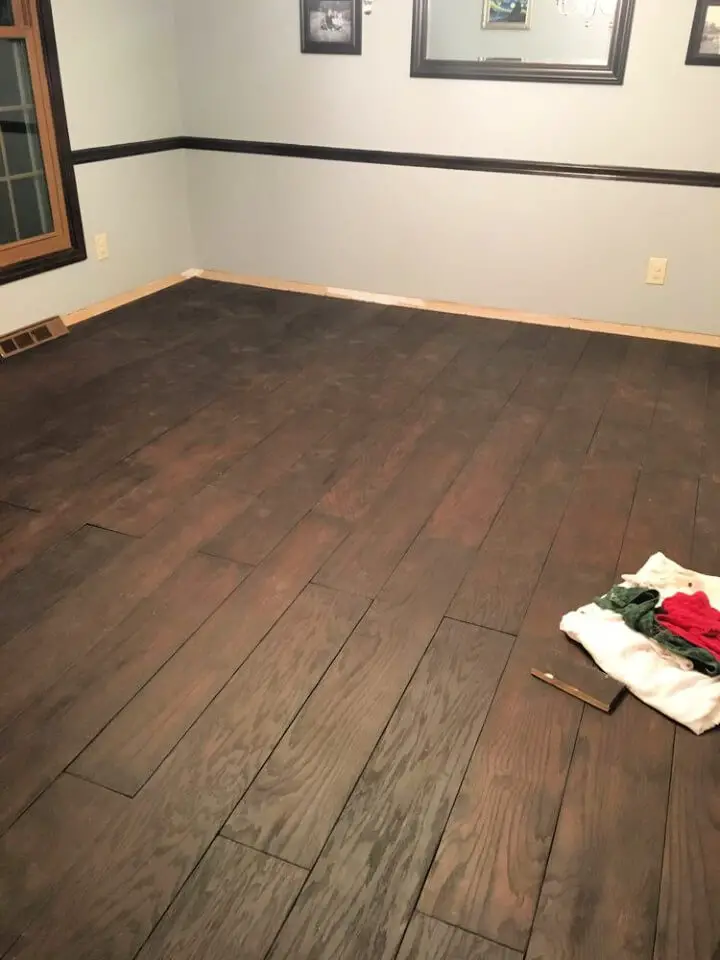
Step 3: Apply the Stain
When it comes to applying a stain for an even finish, opt for a sponge applicator or lint-free cloth. These tools allow for precise control over the amount of stain dispensed, thereby minimizing excess that can prolong drying times. The key to achieving uniform color is to apply the stain evenly – any excess can lead to darker-than-desired results. If using a sponge mop, be mindful not to leave too much stain on the floor, as this can result in an undesired deepening of the color.
Step 4: Seal with Polyurethane
Once the stain has fully dried, it’s time to add a protective layer with polyurethane. For optimal results, apply three coats of this topcoat, opting for a fast-drying formula to reduce downtime between applications. To avoid any issues with drying times, aim to complete each coat within an eight-hour window. When selecting the sheen level, consider your personal preference and choose from satin, semi-gloss, or high-gloss options. For the best finish, use a high-quality brush specifically designed for oil-based products.
Step 5: Sand for Satin Finish
To achieve a stunning satin finish, follow up the third polyurethane coat with a gentle sanding process using 220 grit sandpaper. As the polyurethane dries completely, meticulously work through the entire floor area, carefully removing any imperfections and subtly toning down the sheen to a sophisticated satin. This crucial step is essential in revealing the full beauty of your floors.
Step 6: Final Coat of Polyurethane
As the finishing touches are put on the floor, a final layer of polyurethane is applied to unlock the full potential of the stained wood grain. This ultimate protective barrier not only enhances the beauty of the floor but also provides long-lasting durability. A minimum of 72 hours must elapse before the floor can be used regularly again, allowing the newly-applied coating ample time to fully cure and bond with the underlying wood.
Cleaning and Maintenance
To keep your newly finished floors looking their best, establish a routine for regular cleaning. Opt for gentle methods like using a soft, dry cloth or a soft-mopped floor, as opposed to relying on harsh chemicals or coarse scrubbers. These abrasive tools can easily scratch the finish and compromise its integrity.
Video Tutorial
To complement the written instructions, a step-by-step video tutorial is available for watching: DIY Plywood Floors Part 2 | How to Stain and Seal Plywood Floors. This visual guide provides a practical demonstration of the techniques described, allowing you to achieve professional-looking results on your own project by following along with the hands-on process.
Conclusion
Transforming the look of your home is within reach with a DIY staining and sealing project for plywood floors. By devoting time to each step and allowing the necessary drying and curing processes to unfold, you can create a one-of-a-kind flooring solution that’s both stunning and long-lasting. This comprehensive guide, paired with its accompanying video tutorial, will walk you through every detail required to turn your plywood floors into a show-stopping feature that you’ll be proud to showcase.
FAQs on DIY Plywood Flooring
Immerse yourself in the world of DIY plywood flooring by exploring a wealth of informative FAQs. These expertly curated resources will equip you with the knowledge needed to create stunning, budget-friendly floors that showcase your personal style and craftsmanship.
What is DIY plywood flooring?
In the realm of home renovation, DIY plywood flooring offers a unique blend of affordability and personalization. By utilizing plywood sheets, homeowners can create a one-of-a-kind floor covering that not only saves on costs but also allows for a high degree of customization, making it an attractive alternative to traditional hardwood floors.
Why choose plywood for flooring?
Plywood is an attractive option for homeowners seeking to balance quality and affordability in their flooring choices. One of its greatest advantages lies in its cost-effectiveness, as it tends to be significantly cheaper than traditional hardwood options. This makes it an accessible choice for those on a budget. Furthermore, plywood’s versatility allows for customization through cutting, staining, and finishing. This enables homeowners to tailor the look and feel of their floors to suit their unique tastes. Additionally, environmentally conscious consumers will appreciate that plywood can be a sustainable choice when sourced from certified forests (FSC-certified options). Moreover, properly installed and sealed plywood floors are remarkably durable and long-lasting. And for those who may be intimidated by installation, it’s reassuring to know that with the right guidance, even beginners can successfully install plywood flooring.
What type of plywood is best for flooring?
When seeking the perfect material for your flooring project, prioritize a high-quality, cabinet grade, or Radiata pine plywood. This type of wood is characterized by its smooth surface, pre-sanded finish, and exceptional durability, making it an ideal choice for flooring applications. Be cautious when selecting materials, as sheathing or subfloor grades may not meet the necessary standards for this purpose. Instead, focus on finding a product that meets the requirements for flooring use.
How do you cut plywood into planks for flooring?
For a professional-looking finish, consider using a circular saw in conjunction with a straight edge guide attachment. By setting the guide to a consistent width, such as 8 inches to achieve a wide plank effect, you’ll be able to cut multiple pieces at once. To ensure a safe and controlled cutting experience, place your workpiece over a thick layer of foam to protect any surfaces below.
How can I prepare the subfloor for plywood flooring?
To achieve a seamless installation, begin by trimming any existing door casings to ensure a precise fit. Next, apply a layer of roofing paper along the door’s perimeter, taking care to protect against moisture ingress and minimize creaking noises. Secure the paper in place using a reliable stapler, deliberately smoothing out any wrinkles or bubbles as you go.
How do you install plywood planks?
To establish a solid foundation for your wooden floor installation, begin with a fixed point of reference such as an entryway or wall. From here, create a staggered joint pattern by spacing each plank a full foot apart from its adjacent counterpart. As you progress, utilize a pneumatic nail gun to firmly secure the planks together, ensuring a tight and even fit. Additionally, employ specialized tools designed specifically for tightening gaps before nailing, guaranteeing a seamless and professional-looking finish.
How do you finish plywood floors?
To achieve a polished finish, start by filling any gaps with wood filler and thoroughly sanding the entire floor to create a smooth surface. Next, select a stain or sealant that aligns with your desired aesthetic and protection needs. For a professional-grade finish, apply three coats of polyurethane, carefully sanding between each coat to achieve a satin sheen before applying the final layer.
How do I maintain my DIY plywood floors?
To keep your floors looking their best, establish a regular cleaning routine that involves gentle methods. Opt for a soft, dry cloth or a mild cleaning solution applied with a microfiber mop to effectively remove dirt and debris without compromising the finish. By avoiding harsh chemicals and abrasive materials, you’ll help preserve the integrity of your flooring surfaces.
Can plywood flooring be installed over existing floors?
When considering plywood flooring installation over an existing floor, a crucial step is ensuring the base floor is both stable and level. To achieve optimal results, it’s vital to thoroughly evaluate the current floor’s condition and take necessary preparations to guarantee a successful transition.
How long do DIY plywood floors last?
When installed and maintained correctly, DIY plywood floors have the potential to last just as long as traditional hardwood floors. Proper care and occasional refinishing can significantly extend their lifespan. By taking into account these crucial factors, you’ll be well-prepared to complete a successful DIY plywood flooring project that not only fits your budget but also boasts a stylish and durable finish.
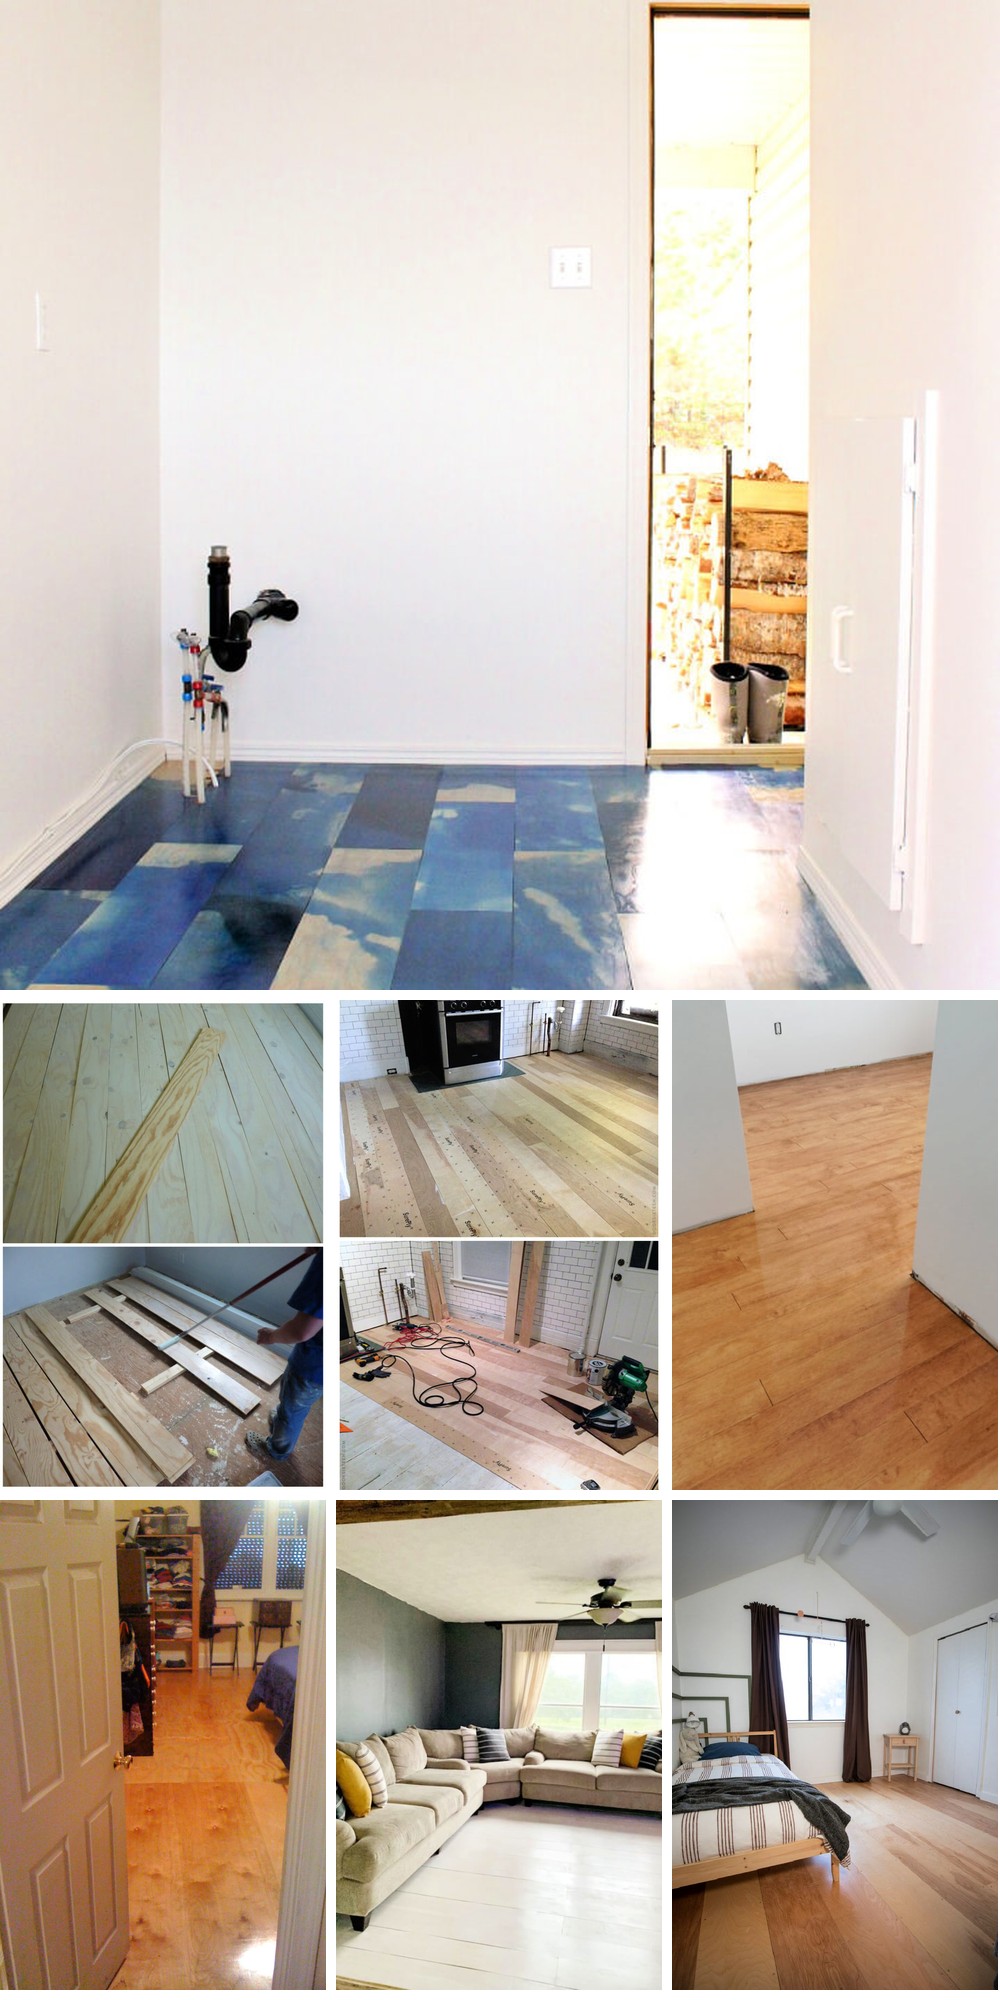
15 Cheap DIY Plywood Flooring Ideas
Transform your space into a stunning sanctuary without emptying your wallet by exploring 15 unique and budget-friendly DIY plywood flooring ideas. From cleverly concealed storage solutions to visually striking patterns, these creative designs will inspire you to get crafting and create a floor that’s as functional as it is fashionable.
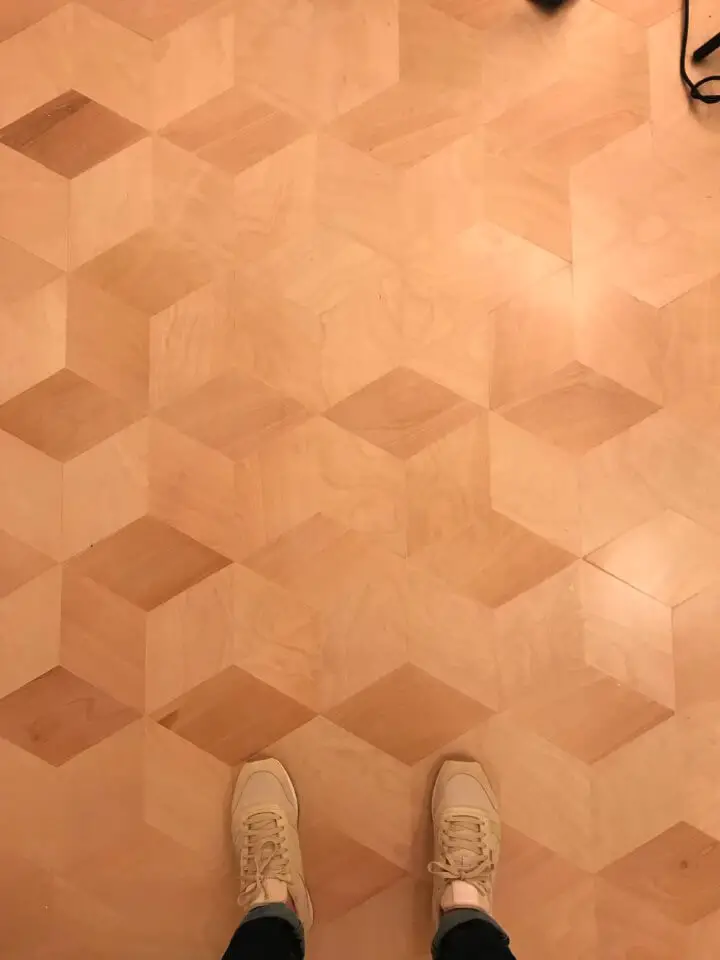
DIY Geometric Plywood Floor
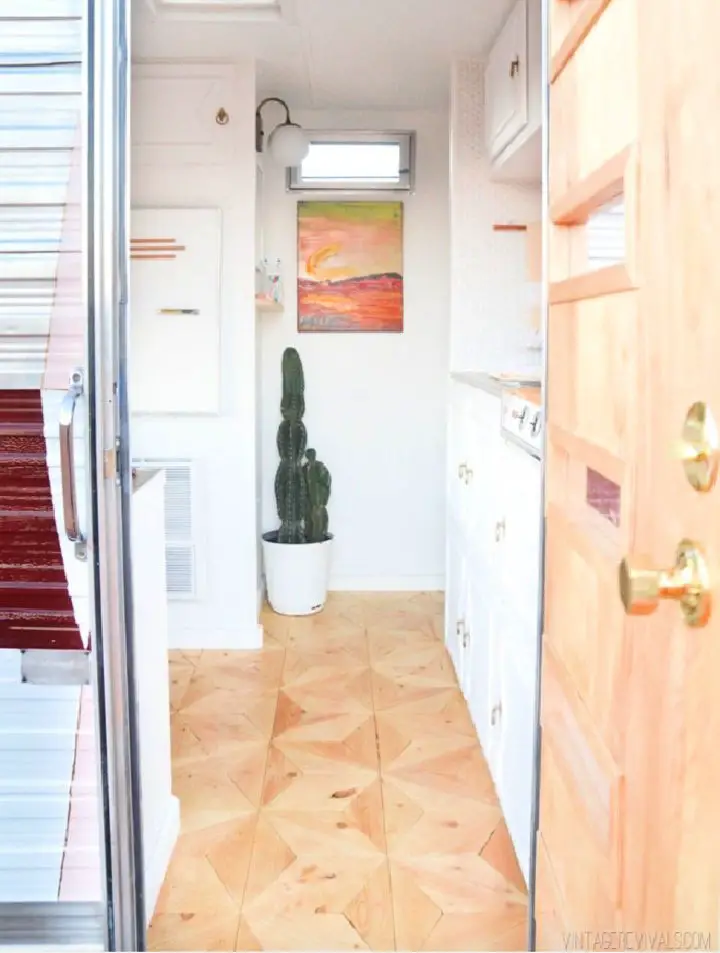
Transforming any room into a stylish sanctuary has never been easier with our comprehensive DIY Geometric Plywood Floor guide. Inspired by the expertise of Vintage Revivals, we’ll take you through every step of selecting high-quality birch plywood, precision-cutting geometric shapes, and installing them to create a truly unique flooring solution that’s both durable and cost-effective. This project is perfect for those seeking a robust yet budget-friendly way to elevate their home’s aesthetic. Not only will our step-by-step guide ensure your transformation is as efficient as it is beautiful, but we’ll also share valuable tips on minimizing waste, so you can achieve the desired look with minimal fuss. For more inspiration and guidance, visit Roost & Ramble today and start turning your space into a masterpiece!
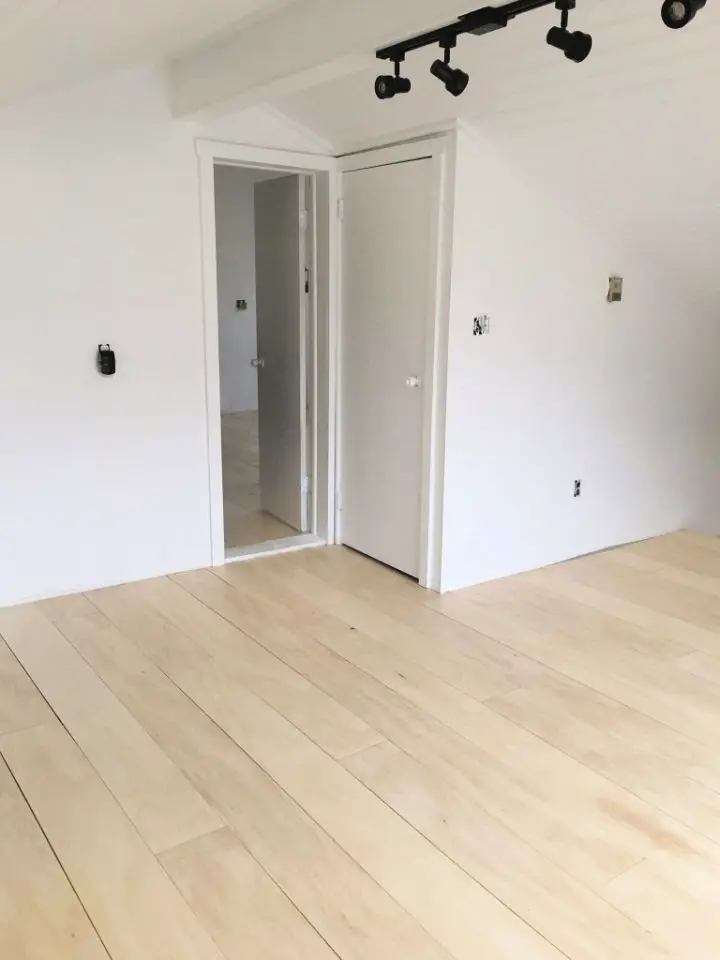
How to Make Plywood Floors
Elevate your living space by embracing the art of DIY plywood floors. This comprehensive guide provides a budget-friendly solution to traditional flooring methods, striking a perfect balance between style, durability, and customization. Ideal for those seeking a one-of-a-kind look, our step-by-step instructions demystify the installation process, making it accessible to anyone with basic DIY skills. Take your home to the next level by incorporating this practical and stylish flooring option.
Easy DIY Plywood Floors
Unleash the rustic charm of birch plywood to revitalize your home’s floors without breaking the bank! At DwellAware.me, we’re thrilled to guide you through a seamless DIY process that yields stunning results. Our step-by-step tutorial covers all the essentials: must-have tools, selecting the perfect plywood, and expert tips on securing and sealing for a long-lasting finish. You’ll be amazed by the remarkable durability and character of this budget-friendly flooring solution. Join the growing community of DIY enthusiasts who’ve discovered the magic of plywood floors. Take the first step towards transforming your space today!
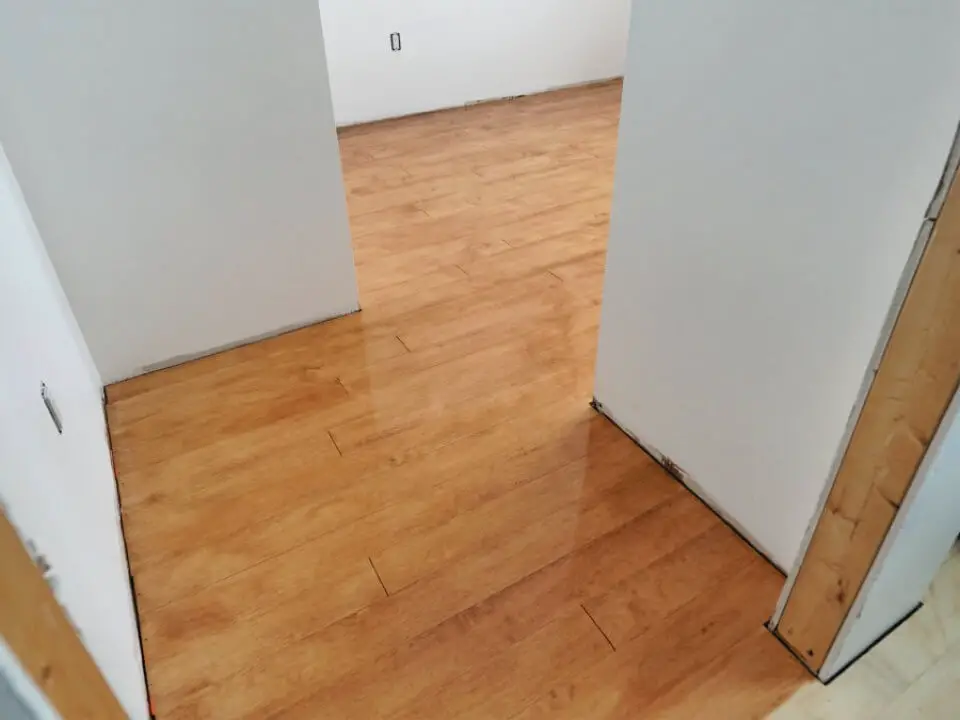
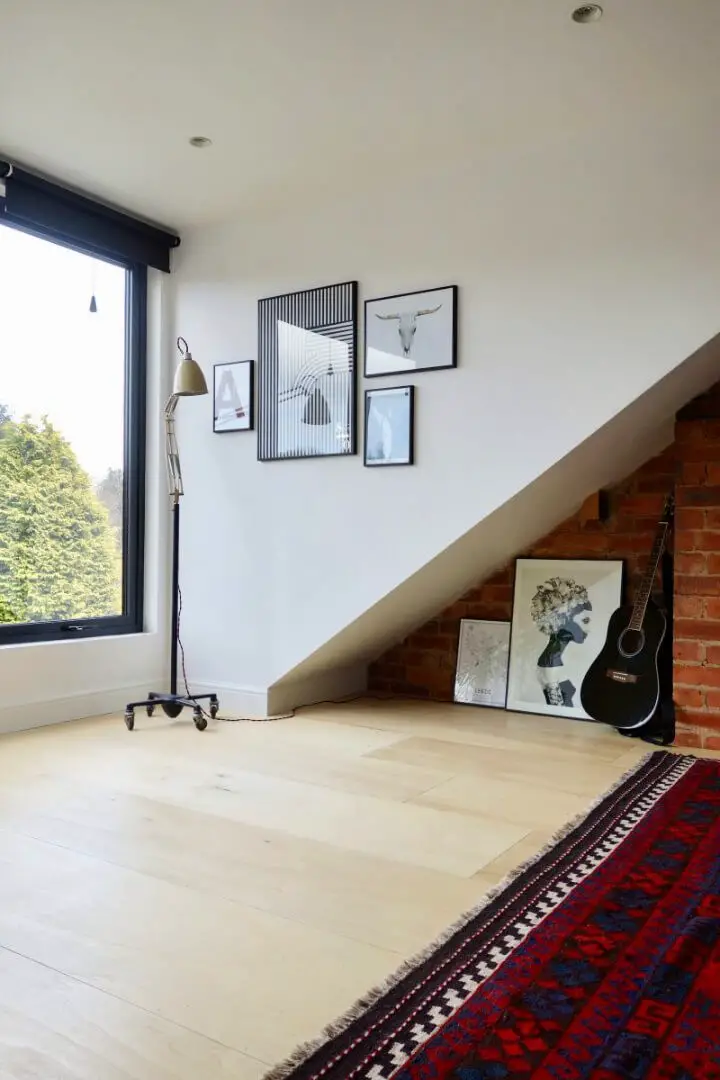
Wide Plank Wood Flooring from Plywood
Elevate your home’s ambiance with a cost-effective yet stylish flooring solution that lets you unleash your creativity! The Lake and the Land takes you on a step-by-step journey of transforming plywood into beautiful wide-plank wood floors, sharing valuable insights from selecting the right material to adding the finishing touches with polyurethane. This DIY guide is perfect for low-traffic areas, not only saving you money but also allowing you to personalize your floors to match your unique style. Join this comprehensive tutorial and discover how to infuse warmth and character into your space without sacrificing your budget.
How to Make Custom Plywood Floor
Transform any space with a modern touch by crafting unique and stylish DIY plywood floors featuring a patterned design, inspired by Modern Builds. This comprehensive guide takes you through every step, from cutting 1/2” birch plywood into strips to create charming parallelograms, to the final installation of your floors and application of a protective finish. With precision and creativity, bring new life to your floors and discover the joy of revamping your space.
DIY Plywood Flooring
Discover the simplicity and elegance of plywood flooring with iBuildit’s step-by-step guide. By walking you through the installation and finishing process, we demystify the process, ensuring a seamless transition to a durable and beautiful surface. Perfect for homes equipped with in-floor heating, our comprehensive guide shows you how to cut, install, and finish individual plywood strips to create a one-of-a-kind aesthetic that’s as budget-friendly as it is captivating. Experience the charm of plywood flooring and give your room a revitalized makeover that’s both practical and visually stunning.
DIY Marbled and Plywood Floor
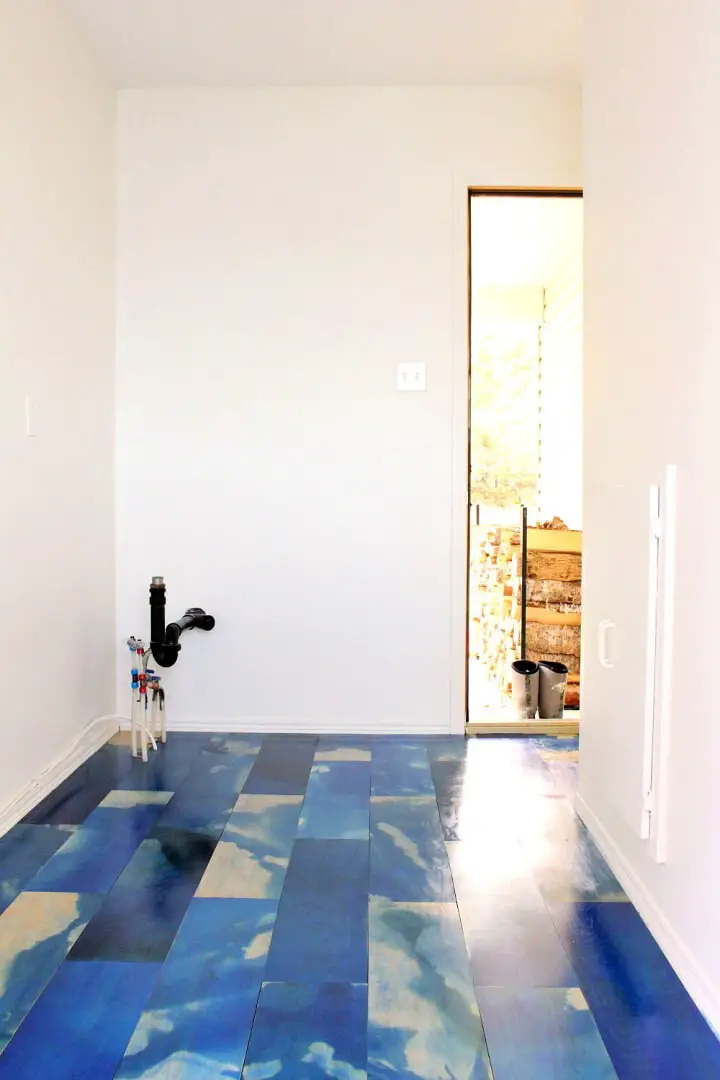
Considering a DIY plywood floor project? Dans le Lakehouse provides comprehensive guidance. For a striking marbled effect, we’ll walk you through the process of selecting suitable supplies, cutting planks, and applying wood stain. Additional tips cover crucial aspects like layout planning, installing the floor, sanding, and finishing with polyurethane. This detailed guide equips you to tackle minor errors and achieve a smooth finish, resulting in a durable and visually stunning plywood floor.
How to Install Plywood Flooring
Transform your living space with ease and affordability by installing DIY plywood plank floors. This game-changing flooring solution offers a unique blend of rustic charm and modern sophistication without the hefty price tag. By following our comprehensive guide, you’ll learn how to select the perfect plywood, overcome installation hurdles, and achieve a showroom-quality finish that will leave family and friends in awe. Whether you’re going for a cozy cabin vibe or a sleek, contemporary look, this DIY project is sure to bring warmth and elegance to any room. So why settle for ordinary flooring when you can create something extraordinary? Get the complete step-by-step guide at Hometalk and start revolutionizing your home today!
Low Budget Plywood Plank Floor
Transforming your home’s interior without breaking the bank is a challenge many of us face. One creative solution is to install DIY Plywood Plank Floors, offering a perfect blend of rustic charm and modern appeal. This budget-friendly project combines practicality with style, making it an ideal choice for those seeking a unique aesthetic at an affordable price. To get started, learn how to select the right plywood, navigate the installation process, and add the finishing touches to create durable, eye-catching floors that will elevate your home’s overall ambiance. By embracing the DIY spirit and taking on this project, you’ll not only save money but also give your space a personalized makeover that reflects your personal taste. For a comprehensive guide and inspiring tips to get you started, visit DIY Dork.
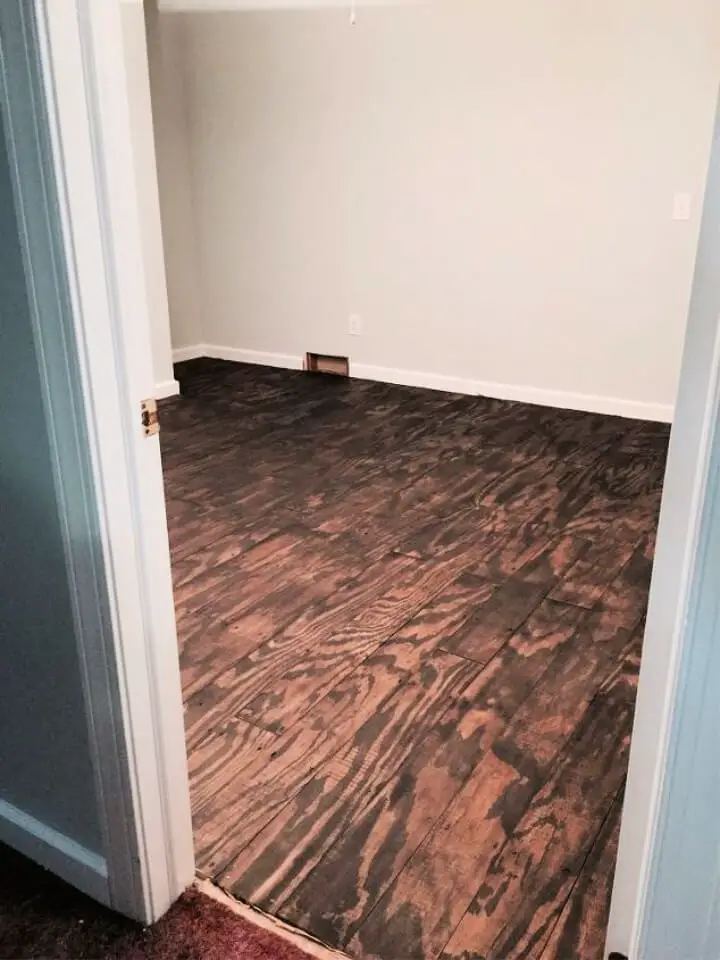
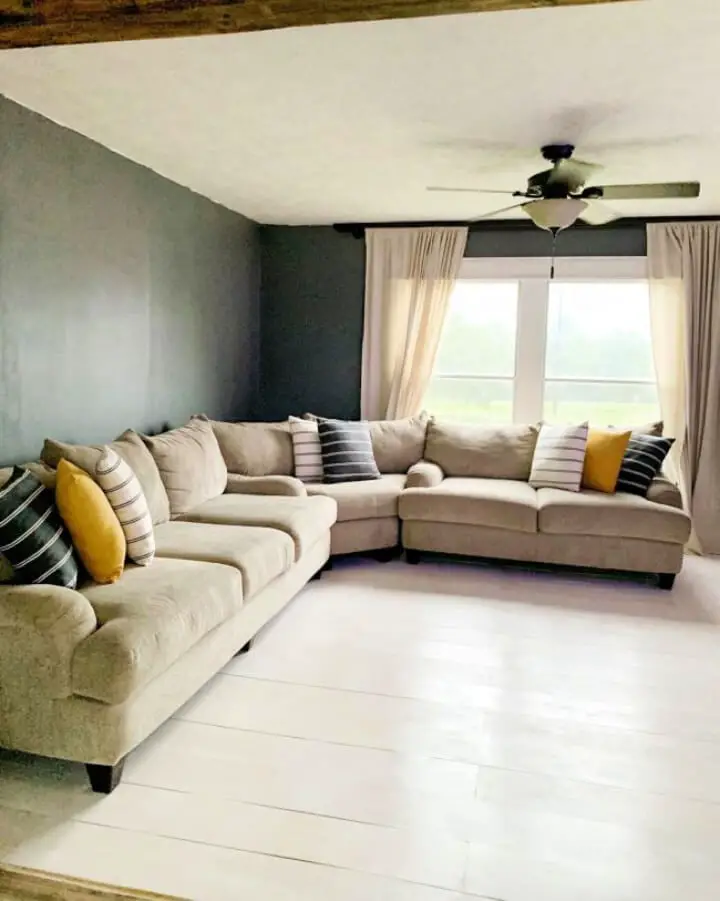
Wide Plank Floor Out of Plywood
Bring the rustic charm of traditional farmhouse floors to your home without the hefty price tag by upcycling plywood into wide planks. This cost-effective solution is perfect for DIY enthusiasts, offering a step-by-step guide on how to select, cut, and finish plywood to achieve a classic coastal look that exudes timeless beauty. By following our simple yet stunning project, you’ll be able to elevate your space with a unique feature that’s sure to become the focal point of any room.
Sitting Room’s Plywood Flooring
Transforming your mobile home’s flooring doesn’t have to break the bank or require professional expertise. With a DIY plywood flooring project, you can achieve a stylish and modern farmhouse look without sacrificing your budget. The key is finding the right balance of simplicity and creativity. By following a step-by-step guide that covers everything from selecting the perfect plywood to adding the finishing touches with paint, you’ll be well on your way to creating a cozy haven that reflects your unique style. For those looking for inspiration, Mobile Home Living offers a wealth of information on materials, process, and expert tips to help guide you through the project. By taking the plunge and getting creative with this cost-effective flooring solution, you can turn your mobile home into a warm and inviting space that truly feels like home.
Build Plywood Plank Kitchen Floor
Transforming your kitchen space into a chic haven without breaking the bank can be achieved by embarking on a DIY plywood plank installation journey. By adopting Anna’s inventive approach, you too can replicate her stunning wide-plank wood floor on a budget. This cost-effective solution involves cutting inexpensive 1/4″ plywood into planks and laying them over the existing subfloor. The result is not only visually appealing but also a testament to the power of creative problem-solving and elbow grease. With Anna’s step-by-step guide, you’ll gain valuable insights into overcoming common challenges and achieving a practical yet stylish kitchen floor upgrade.
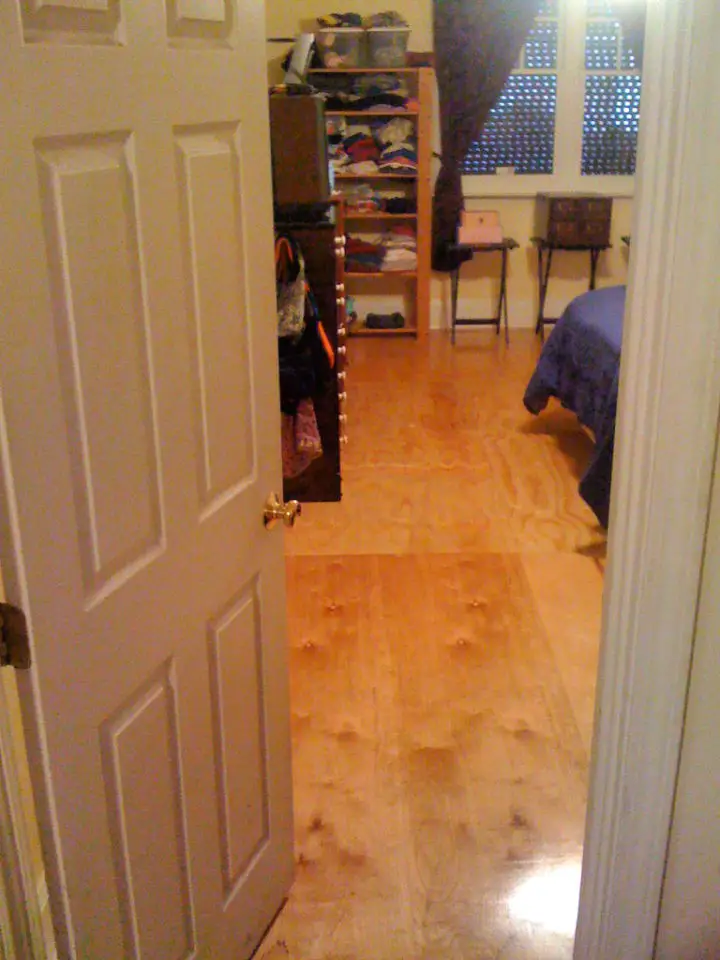
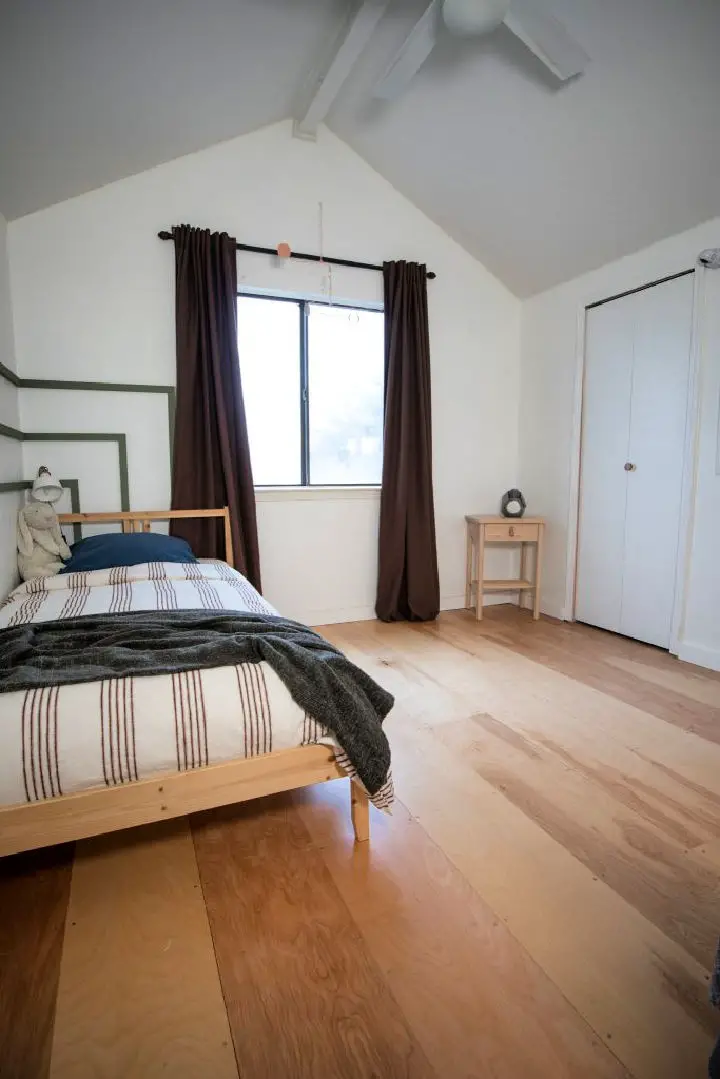
DIY Plywood Flooring in Bedroom
Transforming your space with a one-of-a-kind DIY plywood flooring solution is an exciting prospect. Drawing inspiration from Remodela La Casa’s insightful guide, you can revamp a second-story bedroom on a budget and achieve stunning results. The journey begins by removing the old carpet and preparing the sub-floor for a fresh start. A painted base in any dark shade adds a touch of sophistication, while minimizing cuts through strategic planning ensures a seamless installation. Secure the planks using liquid nails and brad nails, thoughtfully spacing them to create a tailored fit that not only boosts aesthetic appeal but also saves you approximately $1 per square foot. With this rewarding project, you’re just a few steps away from elevating your home’s design and making it truly unique.
Hardwood Plank Floor from Plywood
Transform your home’s aesthetic with a budget-friendly and modern twist by installing hardwood plank floors using plywood. In this journey, Ms. Kate shares her personal experience of upgrading the flooring in her 1980s home, showcasing the durability and resilience of plywood floors against the wear and tear from high heels to winter boots. As you explore this affordable alternative, learn about the significance of selecting the right materials, such as red oak plywood, and the detailed process from preparation to staining. With Ms. Kate’s expertise, you can create stunning, long-lasting floors that elevate your home’s style without breaking the bank. For more insights and inspiration on DIY plywood hardwood floors, visit Ms. Kate Decorates.
Make Your Own Plywood Floor
After 15 months of scrutiny, we’re excited to share our real-world insights on the durability, maintenance, and aesthetic evolution of a plywood floor. If you’re wondering where this versatile material excels or falls short in specific spaces, we’ve got valuable tips to guide your flooring choices. Moreover, for those with a DIY bent, turning plywood floor planks into a profitable venture can be a lucrative passion – making it one of the most rewarding woodworking projects to create and sell.
Conclusion
As you wrap up your DIY plywood flooring journey, remember that it’s not just about saving money – it’s also an opportunity to tap into your creative potential and bring your unique vision to life. Every step, from sourcing the right materials to adding the finishing touches of staining and sealing, presents a chance to personalize and elevate the beauty of your floors. By following this guide, you’ve gained the knowledge and confidence needed to transform your spaces. Now, it’s time to unleash your creativity and bring your flooring dreams to fruition. With careful planning, precision, and a pinch of imagination, you’ll be amazed at the stunning results that await you. So, take the leap and make your DIY plywood flooring project a resounding success!
