Unleashing your creativity at home can be as simple and enjoyable as crafting beautiful DIY nail art. This hobby not only allows you to express yourself through unique designs, but it’s also a wonderful way to unwind and tap into your artistic side. With 35 easy-to-follow DIY nail art ideas and designs, you’ll find the inspiration you need to get started, regardless of your skill level. Whether you’re looking for playful patterns or elegant designs, there’s something for everyone to help you adorn your nails with flair.While it may seem intimidating at first, mastering DIY nail art is a journey that can be navigated with ease once you have the right guidance and a bit of practice. This guide will walk you through the essential steps, from finding inspiration to selecting the perfect tools and supplies. You’ll also learn some fundamental techniques that will help you create stunning nail art with confidence. So, are you ready to turn your nails into miniature masterpieces? Let’s embark on this colorful adventure together.
Why Choose DIY Nail Art?
When it comes to nail art, many people assume that opting for a professional at a salon is the only way to achieve a stunning manicure. However, doing it yourself can have numerous benefits that go beyond just saving money or time. Here’s why you might consider taking up DIY nail art as your next creative pursuit.
Firstly, going the DIY route can be incredibly cost-effective. While salon visits may seem affordable at first, they can quickly add up – especially if you’re looking for intricate designs. By learning to do your nails at home, you’ll not only save money but also have complete control over the design.
Another benefit of DIY nail art is personalization. Whether you want a unique design or need to match your nails to a specific outfit, doing it yourself allows for total customization. You can choose from a vast array of colors, finishes, and techniques to create a look that’s truly one-of-a-kind.
Convenience is also a major plus when it comes to DIY nail art. No more booking appointments or adjusting your schedule – you can do your nails whenever it suits you, whether it’s a lazy Sunday afternoon or a late-night pampering session.
Furthermore, practicing nail art can be a great way to develop your fine motor skills and foster creativity. It’s also incredibly satisfying to master a new design and see your progress over time.
But DIY nail art isn’t just about the end result – it can also be a social activity. Invite friends over for a nail art night, share tips and designs with each other, and enjoy some quality bonding time.
Lastly, many people find that the process of painting their nails to be therapeutic. It’s a mindful activity that can calm the mind and offer a break from the hustle and bustle of daily life. So, even if your first few attempts aren’t salon-quality, remember that practice makes perfect – and most importantly, you’re having fun along the way.
How to Get Started with DIY Nail Art
Starting your DIY nail art venture is an exhilarating way to unleash your creative potential and infuse your personal style with unique flair. Whether you’re a novice eager to explore or seeking to refine your skills, this comprehensive guide will equip you with the fundamental building blocks to launch your nail art escapade.
Choose Your Inspiration
To kick-start your nail art journey, start by discovering the inspiration that drives you. Browse through an array of designs, from understated simplicity to elaborate masterpieces. You might find yourself drawn to the effortless charm of Sideways Ruffian nails or the celestial allure of Galaxy nails. Perhaps you’ll be captivated by the delicate beauty of Lace Stamping Nail art. Whatever your taste may be, let it guide your creative process. Online resources like SoNailicious, The Beauty Department, and love Maegan are treasure troves of ideas, just waiting to spark your imagination and set your artistic wheels in motion.
Gather Your Tools and Supplies
To begin creating, it’s crucial to gather a fundamental set of materials. Although specific designs might necessitate unique items, here’s a general list of must-haves: nail polish in various colors, including base coats and top coats, is essential for building a solid foundation. Additionally, detailing brushes are necessary for adding intricate details and patterns, while dotting tools allow for the creation of dots or small circles. Stencils or stickers can be used to achieve specific shapes or designs, and sponges are perfect for ombre or gradient effects. Finally, tape, such as scotch or painter’s tape, can aid in creating straight lines or geometric patterns. Don’t feel pressured to invest in high-end tools immediately – start with what you have and gradually build your collection as you discover what works best for your unique style.
Basic Techniques to Master
To get started with nail art, begin by mastering some fundamental skills. Initially, concentrate on the following key techniques:
Achieving uniform polish application: Develop a smooth technique for applying base coat, color, and top coat to prevent bubbles and streaks from forming.
Mastering the detailing brush: Practice controlling the brush to create thin lines and intricate designs.
Creating precise dots: Utilize dotting tools or toothpicks to produce perfect dots with precision.
Exploring stencils and tape: Experiment with using tape or pre-made stencils to achieve crisp, sharp lines and patterns in your nail art.
Practice and Patience
It’s a cliché, but true nonetheless – repetition is key when it comes to mastering any skill. Don’t be too hard on yourself if you don’t get it right away; instead, view mistakes as an opportunity to learn and improve. Start with simpler designs and gradually work your way up to more complex patterns as your confidence grows.
Health and Safety
Proper nail care necessitates attention to detail. As such, it’s vital to apply a base coat before painting to shield your nails from unsightly stains and top it off with a finisher for added luster. Moreover, it’s essential to maintain a well-ventilated workspace when working with nail polish and removers, which often contain potent chemicals that can be detrimental to your health.
Connect and Learn
For those looking to stay on top of the latest nail art trends and techniques, joining online communities or following nail art enthusiasts on social media is a great way to start. Not only will you find endless streams of inspiration, but also expertly curated tutorials designed for every skill level. Platforms like Instagram and YouTube are particularly valuable resources, offering an incredible wealth of information that’s easily accessible and free to consume.
Enjoy the Process
As you embark on the DIY nail art journey, remember that it’s not just about the final product – it’s also about embracing the creative process and allowing yourself to unwind. Invite friends over for a fun night of nail art experimentation, or simply spend some quality time alone honing your skills. The key is to approach each design with an open mind and a willingness to learn, knowing that every brush stroke brings you closer to mastering this unique form of self-expression.
DIY Nail Art FAQs
To facilitate a successful foray into the world of DIY nail art, we’ve compiled a list of frequently asked questions that address common concerns and provide valuable insights.
What basic tools do I need to start doing DIY nail art at home?
To embark on a DIY nail art journey, you’ll need to gather some fundamental tools. A starter kit should include a range of nail polishes, comprising a base and top coat, as well as a variety of colors to get creative with. In addition, having a collection of detailing brushes on hand will enable you to craft intricate designs with precision. Dotting tools are also a must-have for adding dots and small circles to your nail art. For those who want to create specific shapes or patterns, stencils and stickers can be a huge help. Meanwhile, sponges are perfect for achieving ombre or gradient effects, while tape – whether it’s scotch or painter’s tape – is ideal for creating straight lines or geometric patterns.
How can I practice nail art if I’m not good at drawing?
Mastering the art of nail design requires dedication and repetition. Begin by honing your skills with basic techniques like dotting, striping, or using tape to create geometric patterns. These methods eliminate the need for advanced drawing skills, allowing you to focus on building a strong foundation. Additionally, consider incorporating stickers or stamps into your designs to add intricate details without sacrificing precision.
Can I do nail art if I have short nails?
When it comes to nail art, many people assume that only longer nails can pull off elaborate designs. However, this couldn’t be further from the truth! Short nails can actually be a perfect canvas for simple yet stylish designs. The key is to choose patterns that don’t overwhelm the small space you have to work with. Opt for subtle elements like dots, stripes or tiny florals, which can add a touch of elegance and whimsy to your short nails.
How do I make my DIY nail art last longer?
To extend the lifespan of your DIY nail art, begin by preparing your nails for the application process. Start with clean, dry nails, and apply a base coat to provide protection and a smooth surface for the polish. When it comes to applying the polish itself, opt for thin layers rather than thick coats. This approach not only reduces drying time but also minimizes the risk of chipping. Following each layer, allow sufficient time for it to fully dry before moving on to the next. Once you’ve achieved your desired design, seal everything in place with a clear top coat and finish with a moisturizing routine that focuses on keeping your cuticles and hands hydrated. Finally, consider wearing gloves when performing tasks that could potentially cause chips or wear to your nail art.
What are some easy nail art designs for beginners?
For beginners looking to get creative, consider the following accessible designs:Polka dots can be achieved by utilizing a dotting tool or even the rounded end of a pin to create simple yet charming dots.Stripes can be accomplished using tape, allowing you to achieve crisp, straight lines. Try experimenting with horizontal, vertical, or diagonal patterns for unique results.For a glittering gradient effect, start at the tip of your nail and gradually fade down with glitter polish, creating a sparkling appearance that adds visual interest.Color blocking is another approach that involves sectioning off areas of your nail using tape to apply different hues. This can result in a striking, graphic look.Lastly, for a marbled effect, combine a few colors together using a toothpick and then apply it with a sponge, allowing the colors to blend seamlessly and create an intriguing pattern.
Can nail art damage my nails?
When it comes to nail art, the key is to strike a balance between creativity and nail health. To achieve this, start by applying a protective base coat that guards against staining and shields your nails from harsh chemicals. When it’s time to remove your polish, choose an acetone-free remover to prevent drying out and weakening of your nails. Additionally, be sure to give your nails regular breaks to allow them to breathe and recover from the constant exposure to polish and other nail treatments.
How can I fix mistakes in my nail art?
Learning from our mistakes is an essential part of personal growth. When minor errors occur, a gentle touch with nail polish remover can be used to correct them. For more significant mistakes, it may be more efficient to remove the polish altogether and start anew. As we continue to refine our skills, we’ll discover that these errors become less frequent.
DIY Sideways Ruffian Nails Tutorial

Elevate the classic manicure with the trendy Sideways Ruffian nail design. This straightforward technique doesn’t require advanced nail art skills, just a few simple tools: stencils, a detailing brush, and your favorite polish colors. To add a touch of sophistication to any outfit, follow this step-by-step guide to achieve professional-looking nails in the comfort of your own home. For a more comprehensive tutorial and further nail inspiration, visit SoNailicious for all your beauty needs.
Handmade Romance Nails for Valentine’s Day
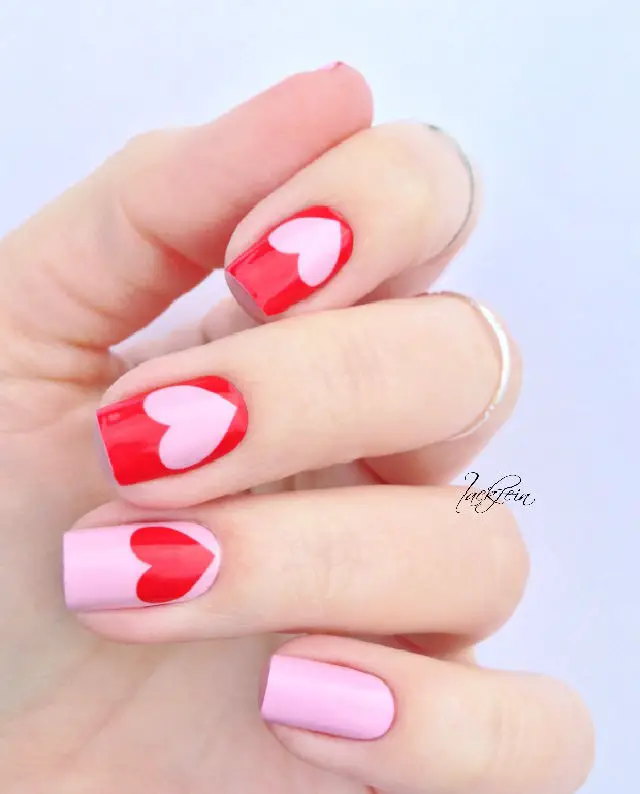
Indulge in the whimsical world of nail art with the Romance Collection, where love is in the details. This curated set of three overlay sticker designs promises to elevate your everyday look with its versatility and beauty. From heartwarming Valentine’s Day motifs to rich copper- metallic effects and subtle gradients, there’s a design to match your unique style for just €9-10. Even those who don’t typically gravitate towards playful nail art may be surprised by how these romantic designs can seamlessly integrate into their daily look, imbuing it with an unexpected air of sophistication.
Make a Delicate Lace Stamping Nail

Embracing the understated elegance of delicate lace stamping, ProcrastiNails’ latest creation is a masterclass in subtle sophistication. Their Day 15 challenge entry showcases a calming design that exudes refinement through its use of soft, neutral tones. By mastering this technique with Konad’s innovative stamping tools, you can add a touch of serenity to your nail art and create a truly unique look.
Homemade Rainbow Drops Drag Marble Nail Art
Transform your nail art skills with the SoNailicious Rainbow Drops Drag Marble Nail Art Tutorial, a captivating design that embodies hope for peace amidst turmoil. This easy-to-follow guide requires only a few essential tools and vibrant polishes to create stunning rainbow effects on your nails. Whether you’re looking to perfect your drag marbling technique or simply desire a colorful nail art masterpiece, this tutorial is the perfect starting point. With practice, you can achieve flawless results that will elevate your nail art game.
DIY Fresh Mani Monday Nail Art
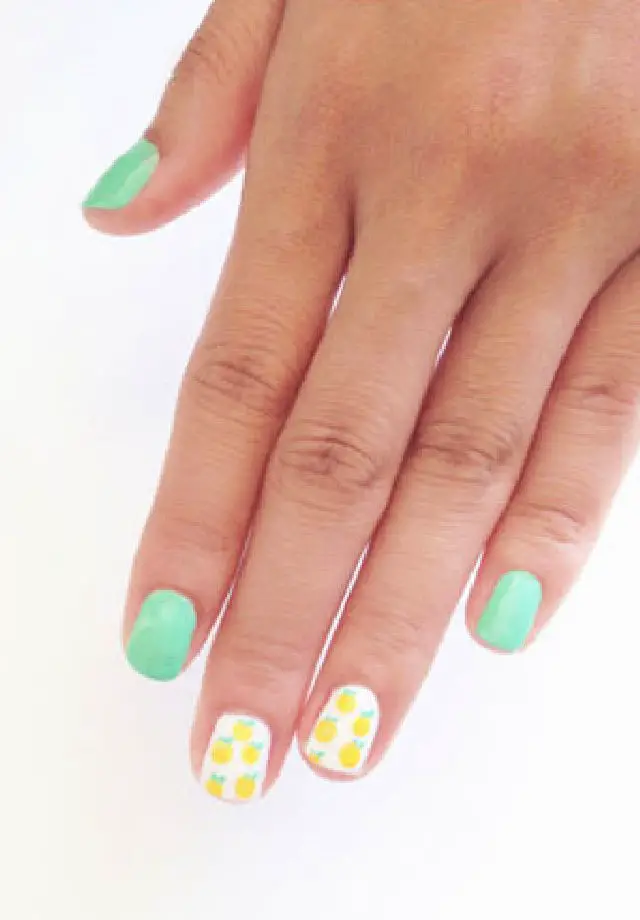
Elevate your manicure skills with our ‘Mani Monday’ tutorial, infused with the essence of summer! In just four effortless steps, you can create a radiant lemon-themed look that’s perfect for the season. Begin by adding a burst of turquoise to your thumbs, pinkies, and index fingers using Zoya’s stunning polish. Next, bring a touch of summer sunshine to your middle and ring fingers with OPI’s crisp white base. Then, add adorable yellow dots – transforming them into tiny lemons with the help of a mechanical pencil for the leaves. Finally, seal your design with a clear coat to ensure lasting vibrancy. Whether you opt for accent nails or go all out with a lemon explosion, your mani is sure to turn heads. For a comprehensive guide, visit The Beauty Department and take your manicure game to the next level.
Making Galaxy Nails With Step by Step Instructions

Transform the ordinary into extraordinary by unleashing your creative side with a cosmic spin! Our step-by-step DIY Galaxy Nails tutorial makes it easy to achieve breathtaking galaxy-inspired nail art. With just a few essential supplies, including black, purple, and glitter polish, a makeup sponge, and a toothpick for precision work, you can create mesmerizing galactic designs on your nails. This accessible project is perfect for teens or anyone looking to spice up their nail art game, regardless of skill level. Not only will you be rocking a show-stopping look, but this fun activity also provides an opportunity to bond with friends and unleash your inner artist.
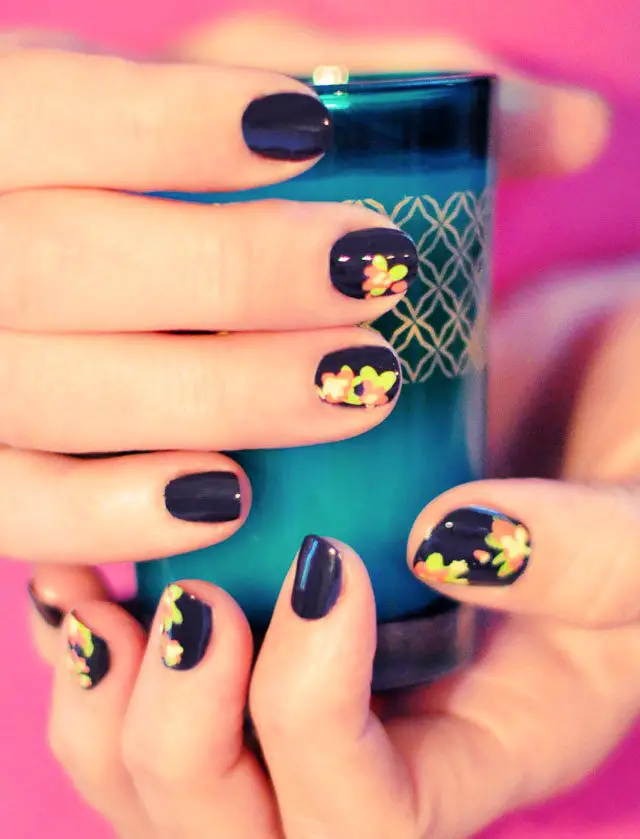
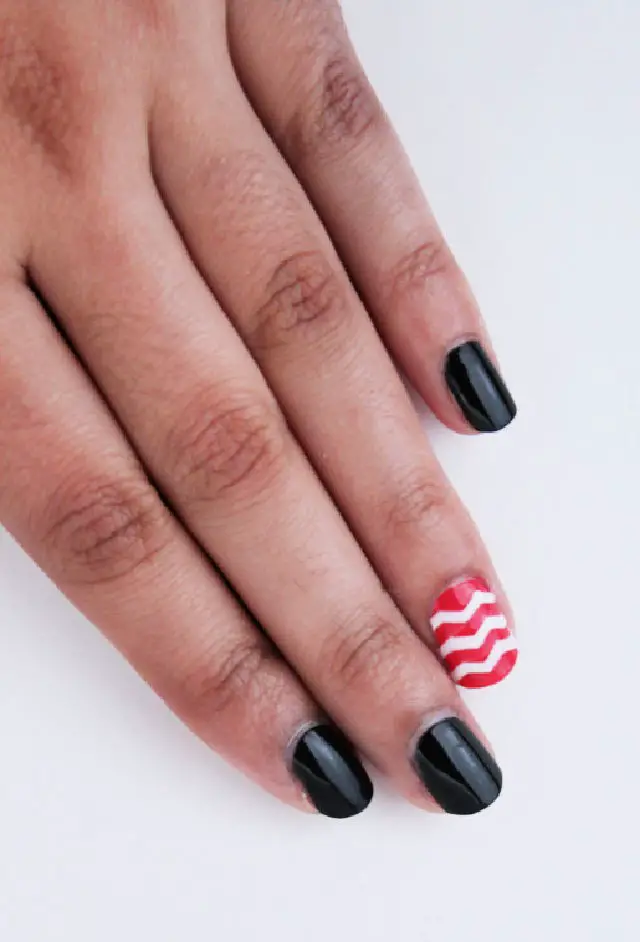
Awesome Daisy Nail on a Classic Black Manicure
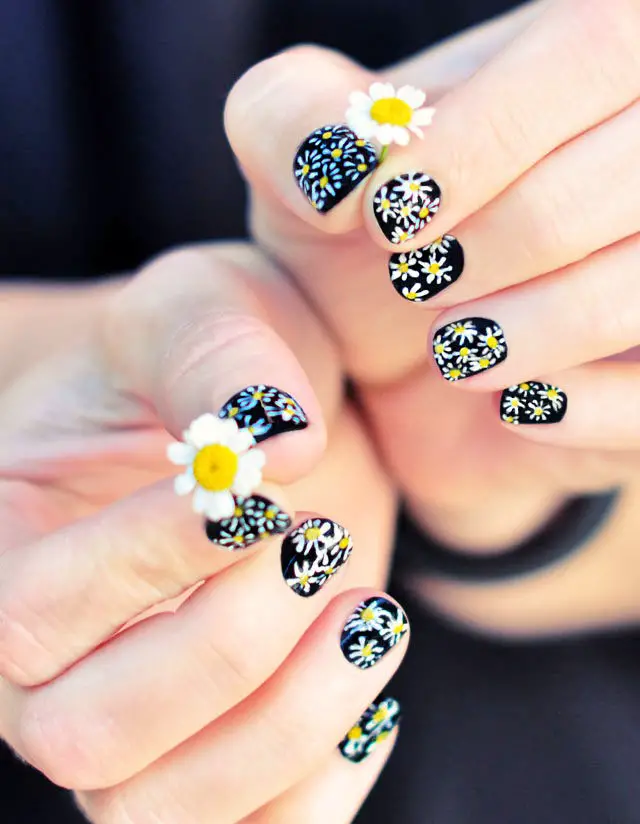
Give your classic black manicure a playful twist with this easy DIY Daisy Nail Art tutorial inspired by 1990s floral prints and the iconic style of Drew Barrymore. This charming design is perfect for those who love nostalgia or simply adore daisy patterns. To create this look, you’ll need basic nail supplies like a black base coat, yellow and white polish pens, and a top coat. In under 30 minutes, follow these simple steps: start with a glossy black background, add a pop of yellow to the center of each flower, then sweep on white petals to complete the design. This is a fun and affordable way to personalize your nail art and make it truly special.
Easy DIY Flame Manicure Nail Tutorial
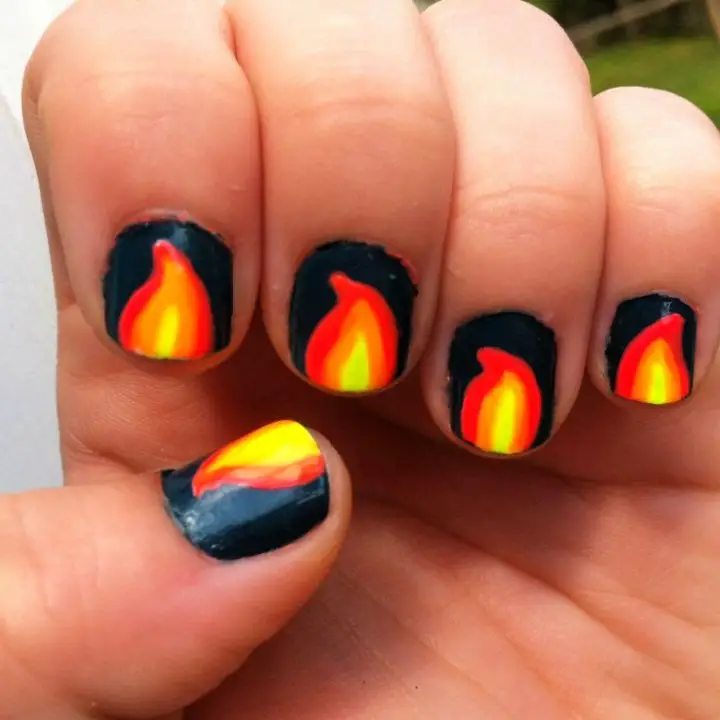
Transform your manicure routine with a bold, neon-inspired flame design, reminiscent of the electrifying world of The Hunger Games. For those seeking to infuse their nails with a dash of color and creativity, our step-by-step guide introduces the ‘baggie technique’, a game-changing method that simplifies nail art and makes intricate designs achievable. Gather your favorite neon polishes and get ready to ignite your passion for nail art as you master this fun, DIY challenge. Perfect for enthusiasts looking to elevate their skills and create eye-catching flames that turn heads.
Make a Ladybug Nail at Home
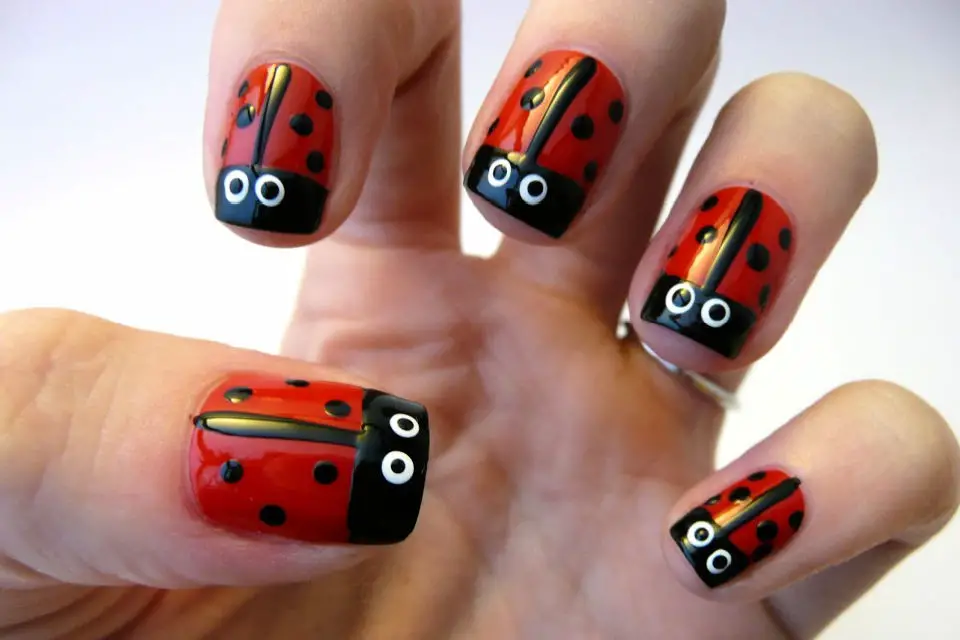
Transform your nails into a haven of cuteness by embracing the whimsical charm of ladybug-inspired nail art. A simple yet effective design, it’s perfect for novice artists seeking to explore freehanded techniques. To get started, apply a base coat followed by a vibrant red polish. Next, use black lines and dots to bring your ladybugs’ bodies and faces to life. Add a touch of personality with white and black dots, carefully crafted to resemble their twinkling eyes. With this step-by-step guide, you’ll be creating adorable nail art masterpieces in no time. For a comprehensive tutorial, head over to Casa de Polish for a detailed walkthrough on how to adorn your nails with these endearing creatures.
DIY Horrible Snake Skin Nail Art
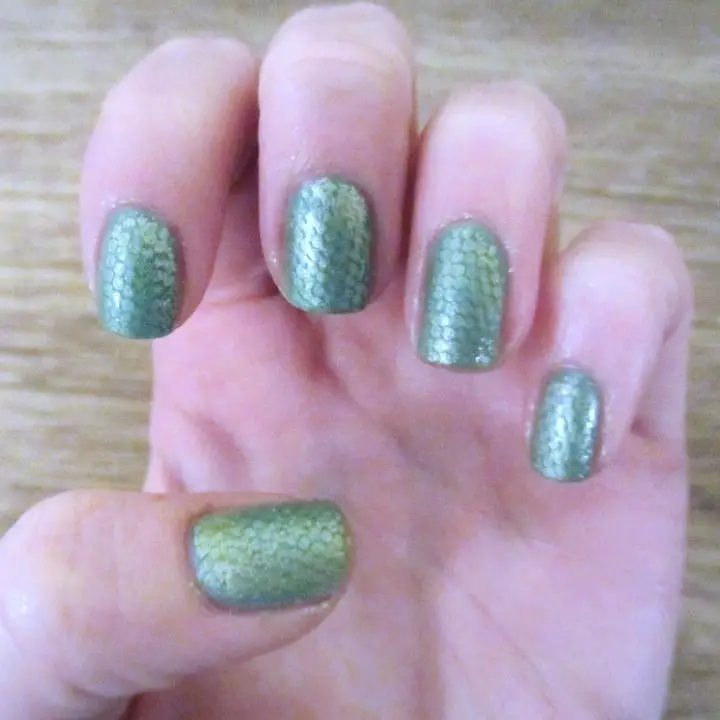
Discover the art of snake skin nail art, where creativity meets innovation. This unique tutorial is perfect for those looking to break free from traditional designs and try something new. By combining simple materials like netting with a couple of bold nail varnishes, you’ll be able to achieve a textured, scale-like effect that’s sure to turn heads. Whether you’re seeking a bold statement or just want to add some excitement to your everyday look, this method promises a fun and challenging experience with results that are truly show-stopping. So why not unleash your inner artist and give your nails a touch of the wild?
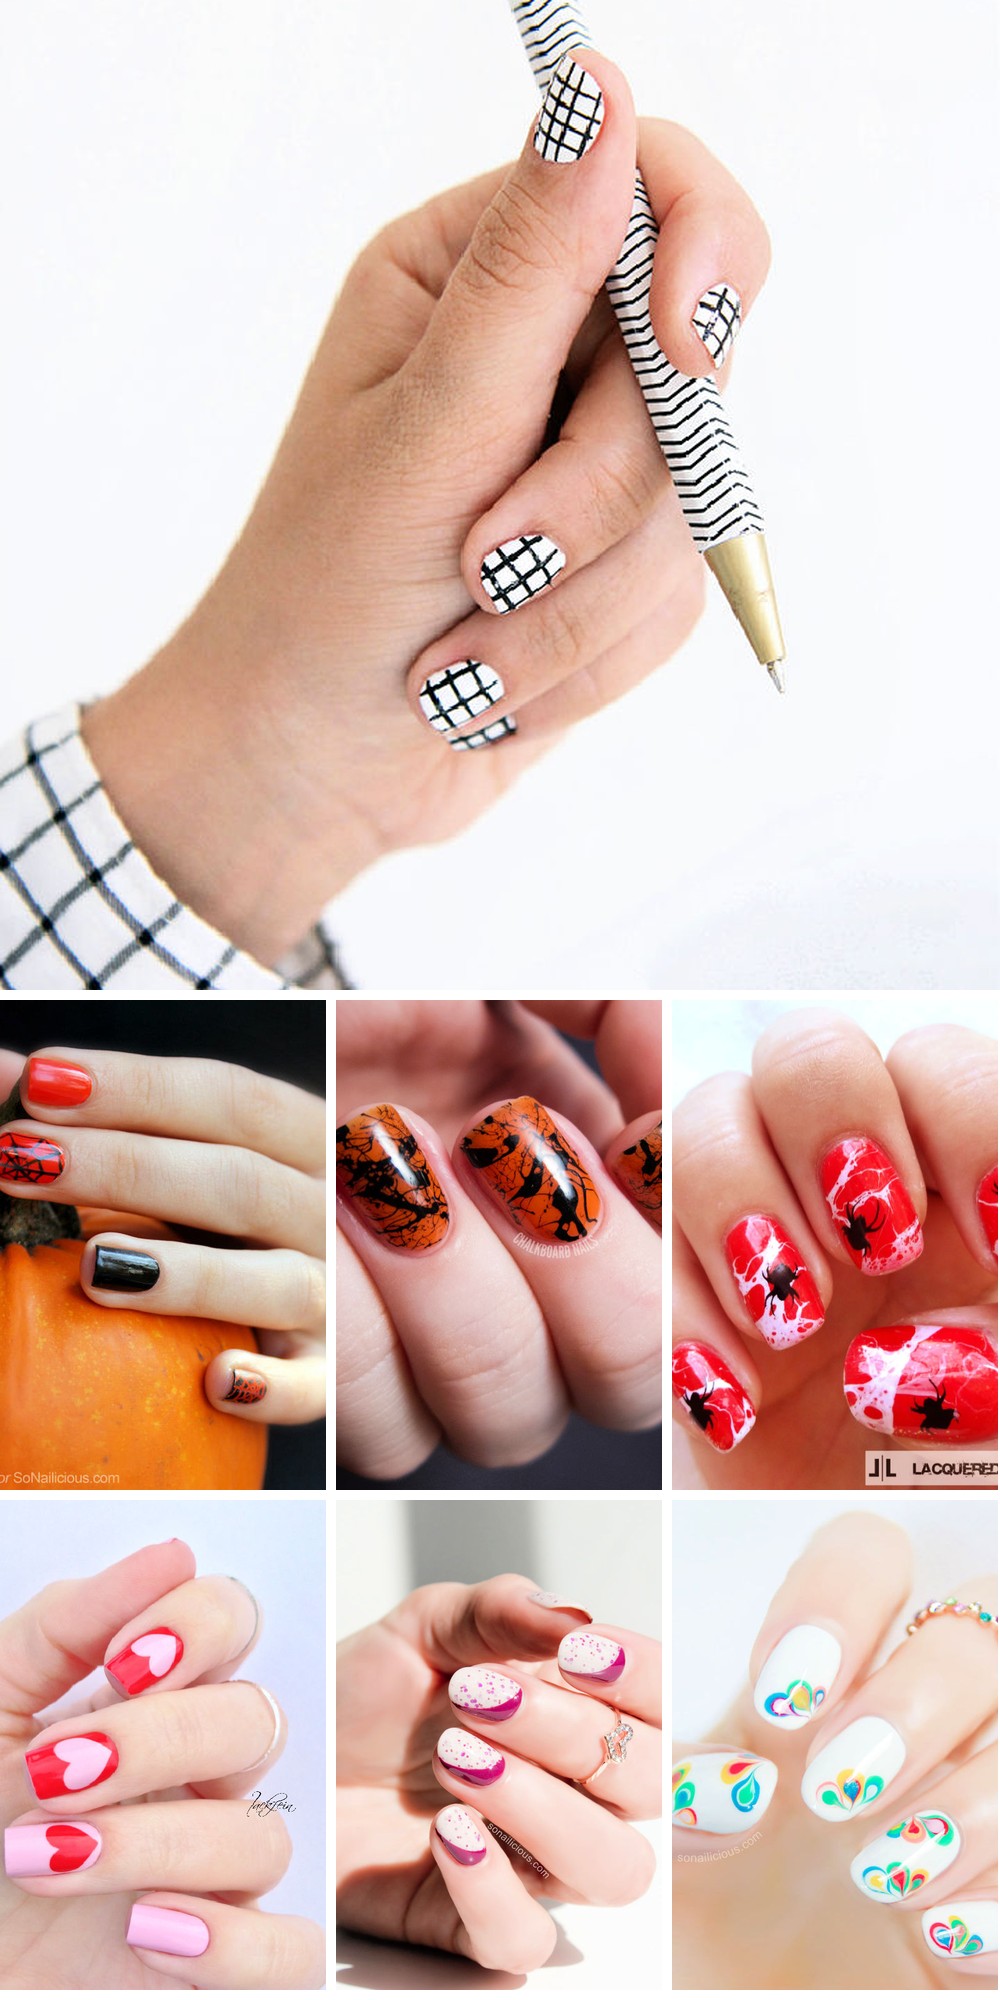
Handmade Patterned Line Nails
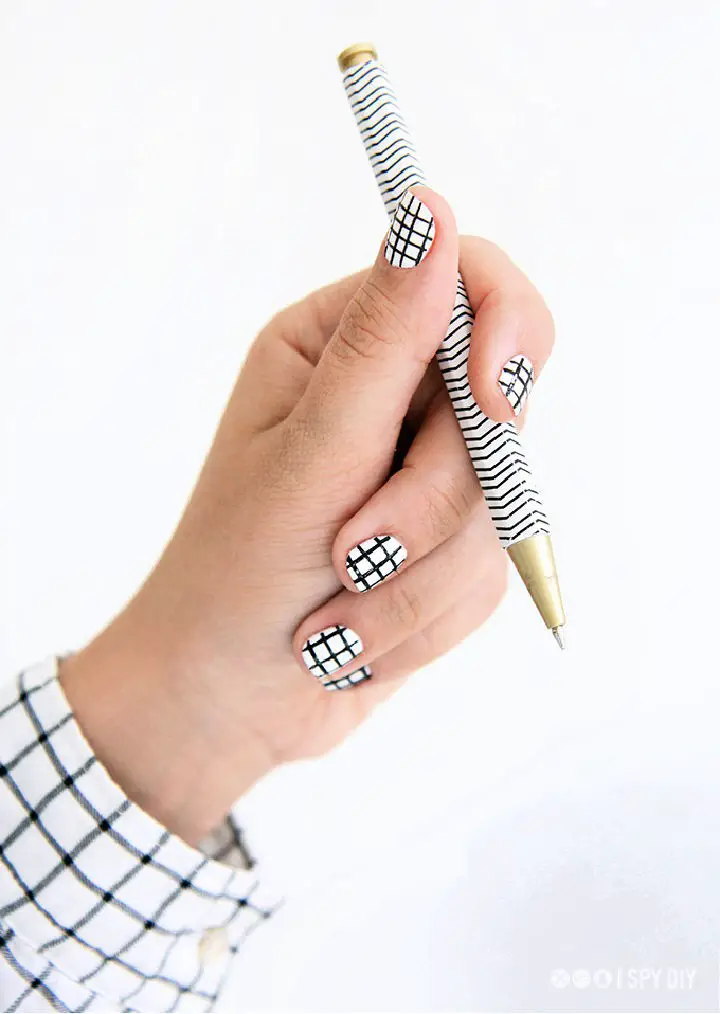
Elevate your nail art game with a chic and sophisticated crosshatch design that exudes elegance. This DIY guide uses Scotch Magic Tape to create precise, straight lines that are perfect for minimalists who crave simplicity and sophistication. With just white and black nail polish, scissors, and a nail art brush, you can achieve a captivating look that’s sure to turn heads. The easy-to-follow steps promise patience-rewarding results, making this tutorial a must-try for anyone looking to refresh their nail art routine. For the complete guide, head to I SPY DIY.
How to Make Galaxy Nails With Video
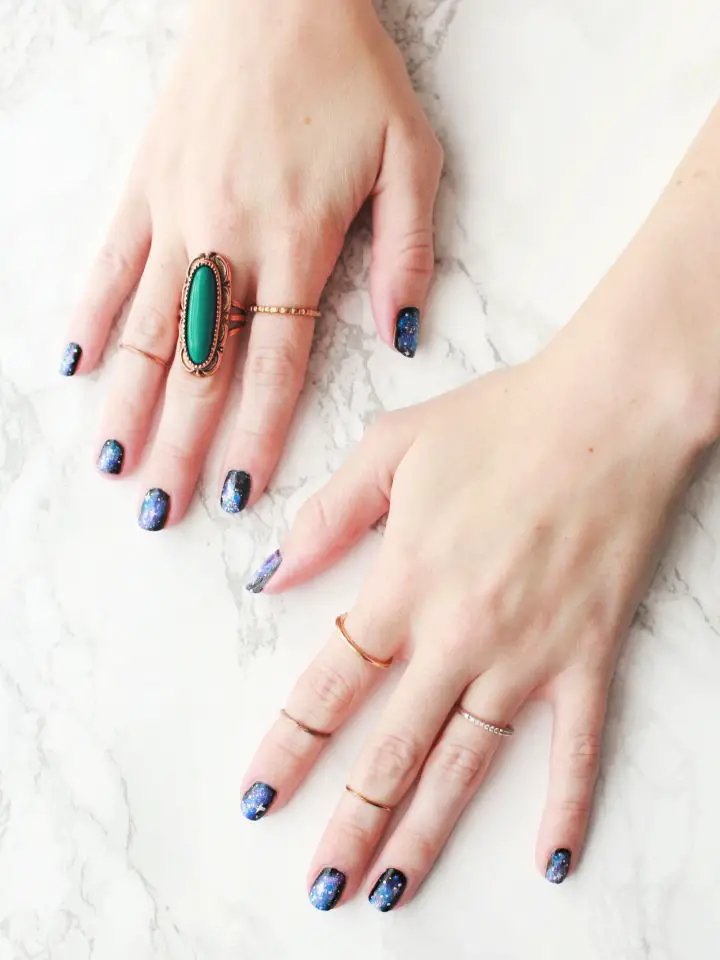
Transform your nails into a breathtaking work of art with this easy-to-follow galaxy nail tutorial. In just a few simple steps, you can create a stunning cosmic design using basic supplies like black polish, vibrant paints or polishes, a makeup sponge, and a toothpick for added detailing. To seal in the magic, top off your celestial masterpiece with a coat of clear topcoat to add shine and durability. Whether you’re looking to make a statement at a themed party, Halloween, or just want to add some whimsy to your everyday look, these galaxy nails are sure to leave onlookers starstruck. Get ready to embark on a DIY adventure that’s out of this world!
Making Your Own Marble Manicure Nails
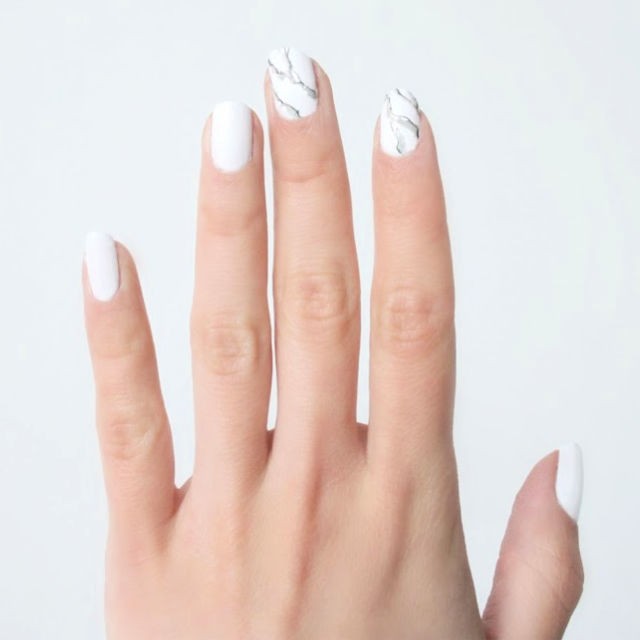
Transform your nail art with an opulent marble manicure tutorial! Emulate the understated sophistication of marble by creating a subtle, yet stunning design on just one or two nails. To achieve this refined look, you’ll need a few simple supplies: white, light grey, and dark grey nail polish, along with a topcoat and a thin brush. With our step-by-step guide, you can replicate the natural elegance of marble at home. The result is a sophisticated manicure that’s perfect for any occasion, adding a touch of understated glamour to your look.
Adorable DIY Strawberry Milk Nails
Discover the whimsical charm of DIY strawberry milk nails, a delightful trend that’s not only adorable but surprisingly easy to recreate from the comfort of your own home. Perfect for those who adore the creamy, dreamy aesthetic, these nails bring a playful pink twist to the popular milky nail trend. For a straightforward guide on how to master this low-maintenance style, head over to Beyond Polish. Whether you’re aiming for a subtle sheen or decorating with chic designs, your nails are bound to make a statement. Get started on this sweet and simple look today! The best part? This DIY project requires minimal effort and can be completed in no time.
Easy Steps to Make a Bow Mani Nail

Indulge in a creative escapade by mastering an effortless yet captivating nail art tutorial that transforms your nails into a stunning work of art. Inspired by Fairly Charming, this delightful design combines the soft, sun-kissed tones of coral with whimsical bows for a truly unique and eye-catching look. To get started, blend the rich colors of Color Club’s ‘In Theory’ and Daisy Nail Lacquer’s ‘White Diamond’ to achieve the perfect hue. Then, take your artistry to the next level by mastering the techniques of applying chevrons and free-handing bows with ease. This tutorial is perfect for adding a touch of playfulness and personality to your everyday look.
Making Flower Accent Nails for Spring
Transform your spring manicure with a DIY floral nail art masterpiece that embodies the season’s carefree spirit. For those who crave unique personal touches, this hand-painted flower accent nails tutorial from love Maegan offers a comprehensive guide to creating your own botanical beauty at home. To achieve this lively look, you’ll need only a few essential nail polish colors, a top coat, and a fine nail art brush or even a toothpick will suffice. This design is accessible enough for beginners yet inspiring for seasoned pros, guaranteed to put a spring in your step with its vibrant charm.
DIY Sugared Stars and Stripes Nail Art
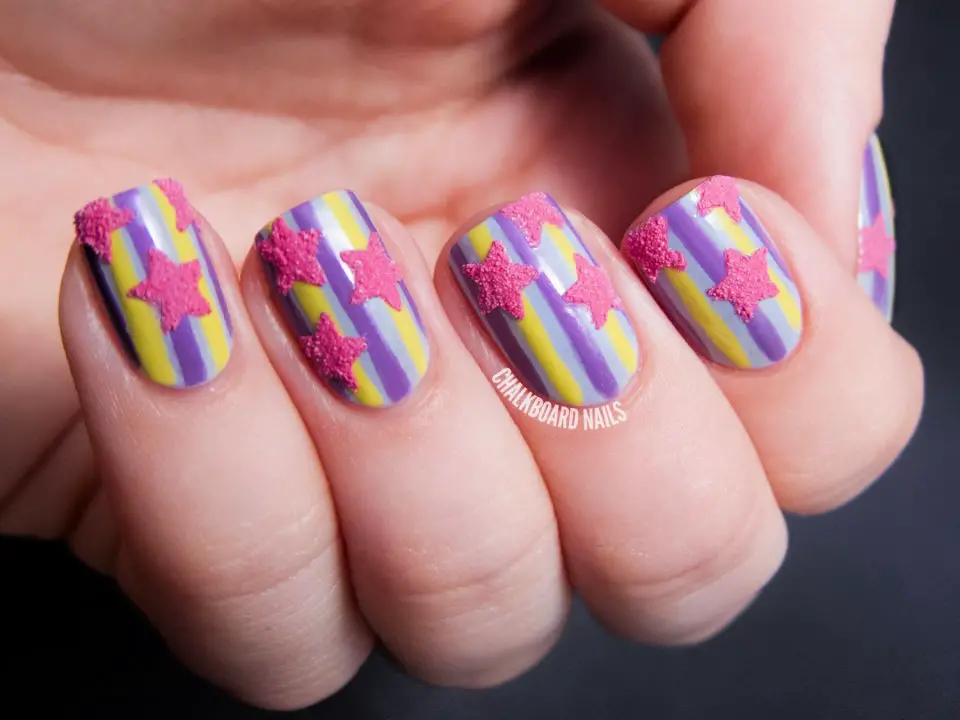
Take your nail art skills to new heights with a vibrant Sugared Stars and Stripes manicure that’s perfect for making a statement. This comprehensive tutorial will walk you through the process of creating textured star effects and choosing the right polishes to bring this festive design to life. Whether you’re participating in the Sally Hansen I Heart Nail Art competition or simply looking to add some visual interest to your nails, this guide has got you covered. With its simple, step-by-step approach, you’ll be able to recreate this eye-catching look and show off your unique style.
How to Refined Gradient Nails
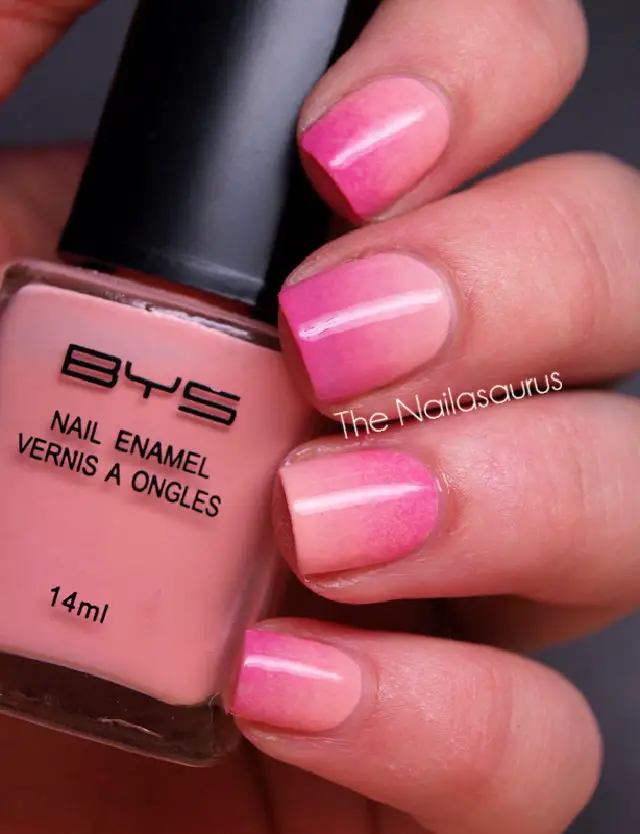
To elevate your nail art game without the hassle of complex techniques, try a chic gradient design that’s easy to master. To get started, you’ll need two polish colors, a top coat, a sponge, toothpicks, and a plastic sheet. Begin by applying a base layer of the lighter polish color and let it dry completely. Next, blend your chosen colors on the plastic sheet using a toothpick to softly merge them. Then, dab a flat sponge into the mixed polish and apply it to your nails in thin layers, allowing each layer to dry before adding more intensity. Finish off the look with a top coat for a smooth, high-gloss finish. For a step-by-step guide and even more inspiration, head over to AllDayChic to discover just how simple and enjoyable making gradient nails can be.
Unique DIY Rainbow Acrylic Nails
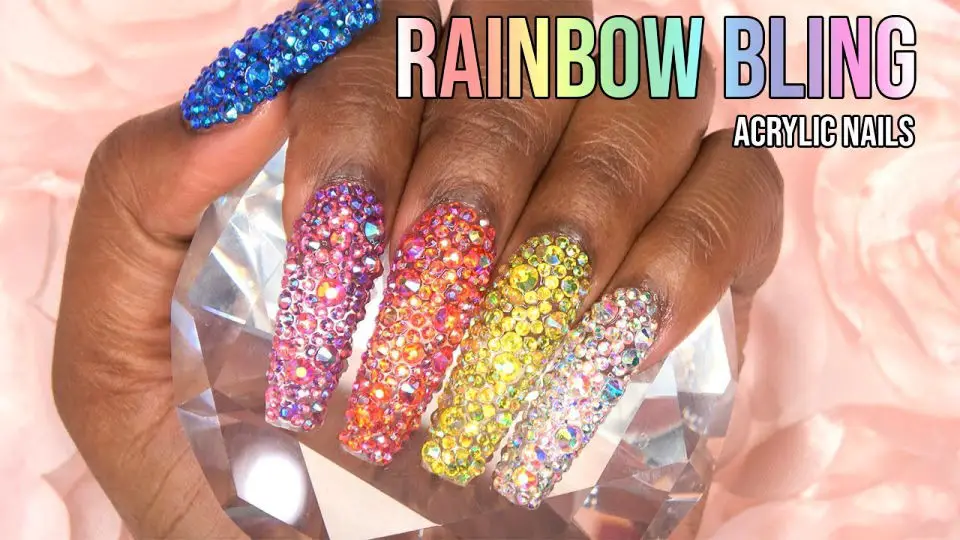
Get ready to unleash the glamour in your nail art with this step-by-step guide on creating breathtaking bling nails. By mastering the technique of crafting acrylic nails using nail forms, you’ll learn how to elevate your manicure game and achieve a mesmerizing rainbow effect. This comprehensive tutorial will walk you through the process of sculpting flawless acrylic nails and adorning them with an array of iridescent crystals, providing valuable insights for those who prefer working with tips or free-form designs. With this guide, you’ll be well on your way to adding a touch of sparkle to your look.
How to Make Blue Velvet Nails
Unleash the allure of magnetic polish with a comprehensive guide from Phyrra. This step-by-step tutorial transforms ordinary nails into extraordinary showstoppers by harnessing the power of U magnets and gel polish. Master the art of prepping your nails, applying gel polish like a pro, and achieving that coveted velvet finish. Whether you’re seeking to add a touch of luxury to your winter look or create a dazzling design for everyday glamour, this guide empowers you to craft eye-catching nails that turn heads. With expert troubleshooting tips and recommended products at your fingertips, you’ll be well on your way to flaunting stunning velvet nails that leave a lasting impression.
Make a Halloween Spider Web Nail
Indulge your Halloween enthusiasm with an uncomplicated yet captivating spider web nail art tutorial from SoNailicious. This adaptable guide effortlessly transforms your nails into a masterpiece, suitable for both costume parties and everyday wear. With only a few essential supplies like black, white, and orange polish, along with a thin nail art brush, you’ll be well-equipped to create an eye-catching design that’s as versatile as it is eerie. Simply follow the straightforward steps to achieve a look that’s sure to mesmerize this season.
Easy Way to Make Chevron Nails
Transform your manicure game without breaking out the fancy tools. With just Scotch tape, pinking shears, a top coat, acetone, and your favorite nail colors, you can create stunning Chevron nails that rival those of a professional. Start by applying a base color to each nail as your foundation. Then, use the simplicity of Scotch tape to craft crisp, chevron-patterned strips that will elevate your look. Simply paint over the design, carefully shape and clean up any stray polish, and seal it all with a top coat for a flawless finish. Whether you’re looking to add an accent touch or go all out with a full set, this foolproof technique makes it easy to achieve professional-quality results.
Simple DIY Glassy Nude Nails
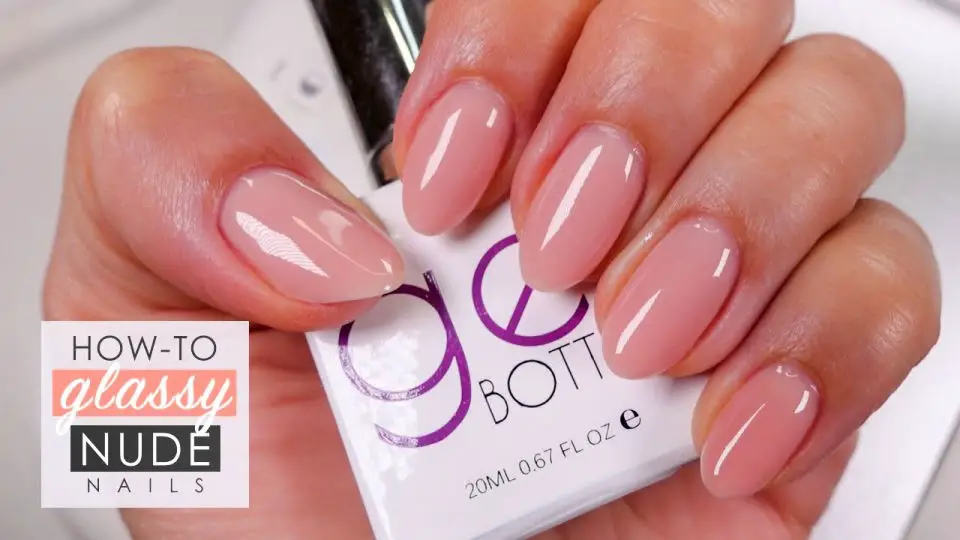
Master the art of achieving perfect glassy nude nails at home with Shonagh Scott’s comprehensive BIAB (build it around the nail) tutorial. The step-by-step guide covers preparation, application, and finishing techniques to create long-lasting, strong overlays that beautifully complement natural nails. Whether you’re a seasoned beauty enthusiast or new to DIY manicures, this insightful tutorial is designed to help you achieve salon-quality results from the comfort of your own home. For a detailed look at Shonagh’s top tips and recommended products, click here.
How to Abstract Holo Nail Design
Elevate your nail art skills with an easy-to-master yet mesmerizing Abstract Holo Nail Art Design. Drawing inspiration from the captivating F.U.N Lacquer Princess collection, this look seamlessly blends holographic hues in Aurora, Cinderella, Rapunzel, Ariel, and Belle. By incorporating striking black lines achieved using acrylic paint, you can add a touch of abstract flair to your design. Whether you’re a seasoned pro or just starting out, this innovative concept is sure to impress. And the best part? Its stunning appearance really comes alive when viewed under sunlight. For a detailed guide on how to achieve this look, visit Lucy’s Stash and get ready to unleash your creativity!
Cute One Stroke Flowers Nail Art
Ready to blossom into a nail art expert? Let’s embark on an enchanting adventure together! With Nicole By OPI What’s The Mitch-uation as our canvas, we’ll master the technique of painting stunning one-stroke flowers step-by-step. Don’t worry if you’re new to nail art – with practice and patience, you’ll be creating masterpieces in no time. I’m here to guide you through every stroke, ensuring your skills are on fleek. So, what are you waiting for? Dive into the tutorial and take your nail game to the next level today!
DIY Dry Marble Chocolate Nails Using a Needle
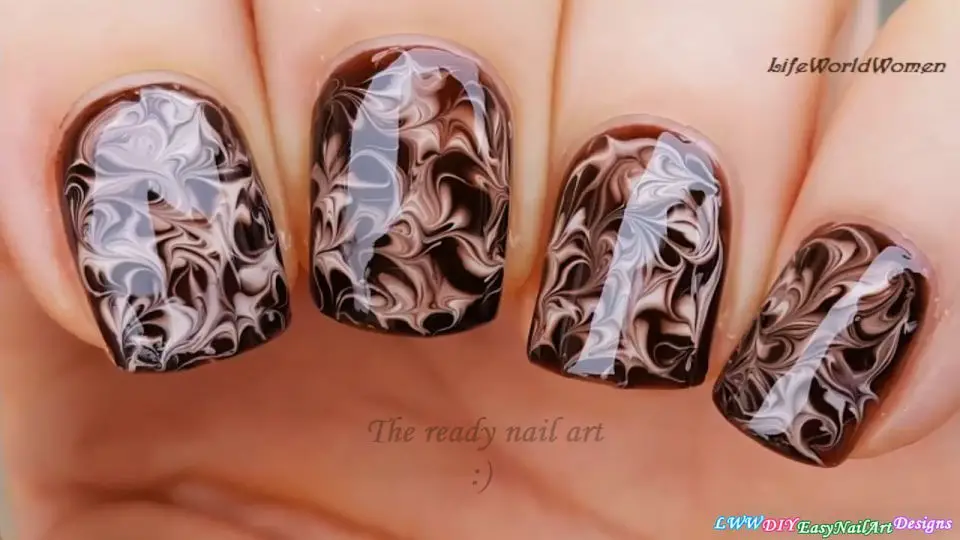
To create stunning marble chocolate nails using a simple needle technique, begin by applying a base coat to protect your natural nails. Start with a rich chocolate brown polish as the foundation, then add light brown dots while the polish is still wet. The magic happens when you use a needle to transform these blobs into intricate marble designs. To seal and add lasting shine, finish with a top coat. For further guidance and product recommendations, visit LifeWorldWomen for a wealth of DIY nail art tutorials.
How Do You Make Summer Polygel Nails
Unlock the world of polygel nails and elevate your beauty game with our comprehensive summer nail tutorial, designed specifically for beginners. This step-by-step guide takes you on a journey from applying polygel to creating stunning nail art designs that are perfect for the sunny season. With a focus on clarity and simplicity, you’ll be able to master the techniques and craft a unique look that showcases your personal style. As you explore the world of polygel nails, you’ll discover how easy it is to add a pop of color and a touch of creativity to your summer beauty routine.
Beginner-Friendly DIY Pumpkins Nail Art
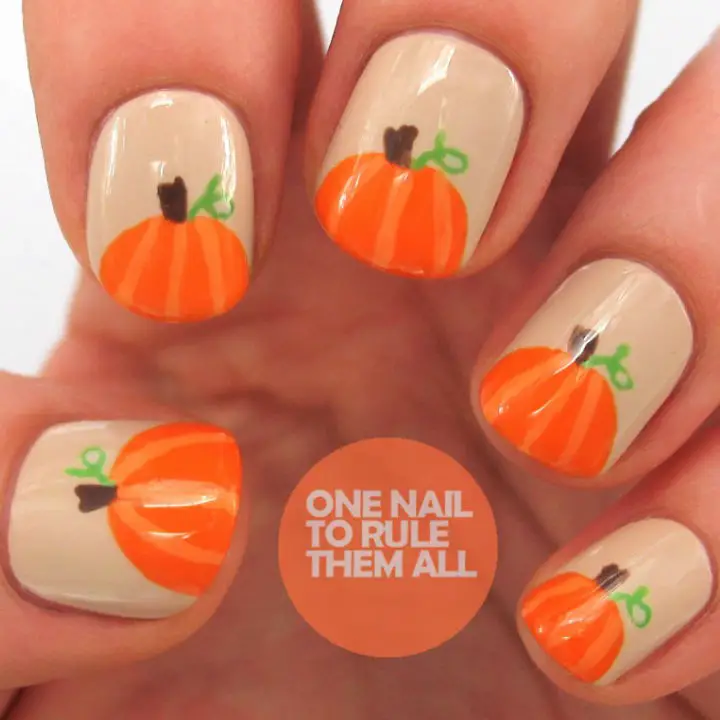
As the leaves begin to turn and the air grows crisp, autumn’s warm charm can be brought to life on your nails with ease. This pumpkin nail art tutorial is perfect for Halloween enthusiasts and those who simply appreciate the season’s cozy aesthetic. Don’t worry if pumpkin isn’t your favorite flavor – its visual appeal can be just as captivating. Building upon timeless designs and introducing new twists, this guide seamlessly blends simplicity and creativity. From a distinctive base coat to delicate details, every step is outlined to help you bring autumnal vibes to your fingertips. Ready to give it a go? Look no further than One Nail to Rule Them All for the full tutorial. Your nails will be grateful!
Free Spooky Splatter Nails Pattern
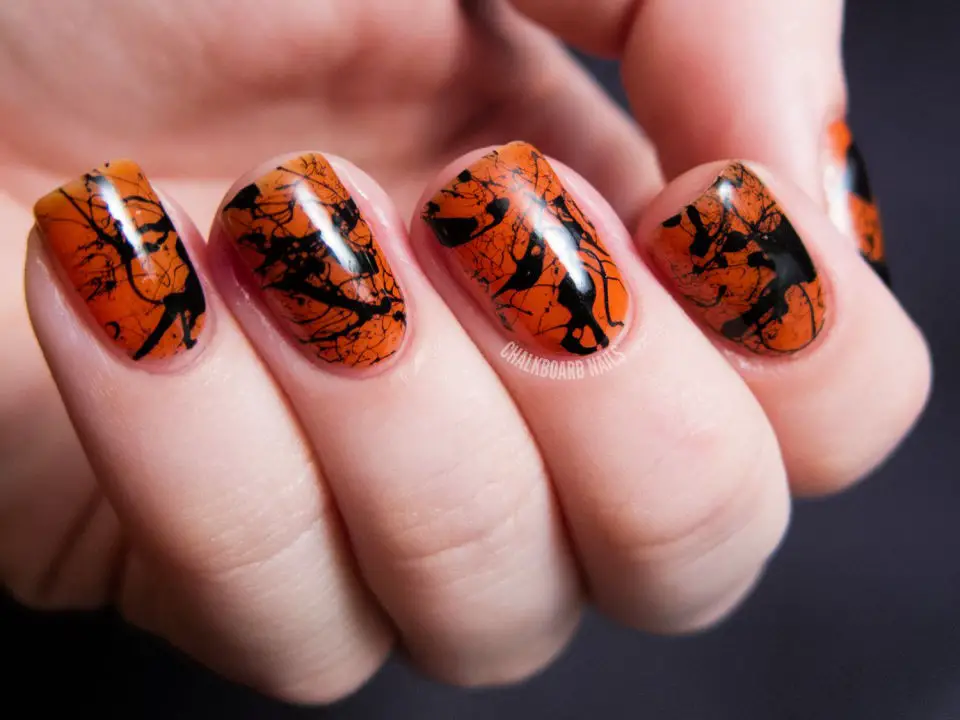
Get ready to unleash your inner witch and add a touch of darkness to your nail game this Halloween. Our Spooky Splatter Nails tutorial is the perfect way to get creative and make a statement. With just a few simple steps, you can create eye-catching designs that are sure to cast a spell on everyone who sees them. Using a straw, your favorite polish colors, and a dash of creativity, you’ll be able to conjure up mesmerizing splatter effects that will leave your friends green with envy. Yes, the process might get messy, but the end result is well worth the extra effort. So why not give your nails a spooky makeover and join the ranks of the nail art elite?
How to Make a Halloween Nail Art
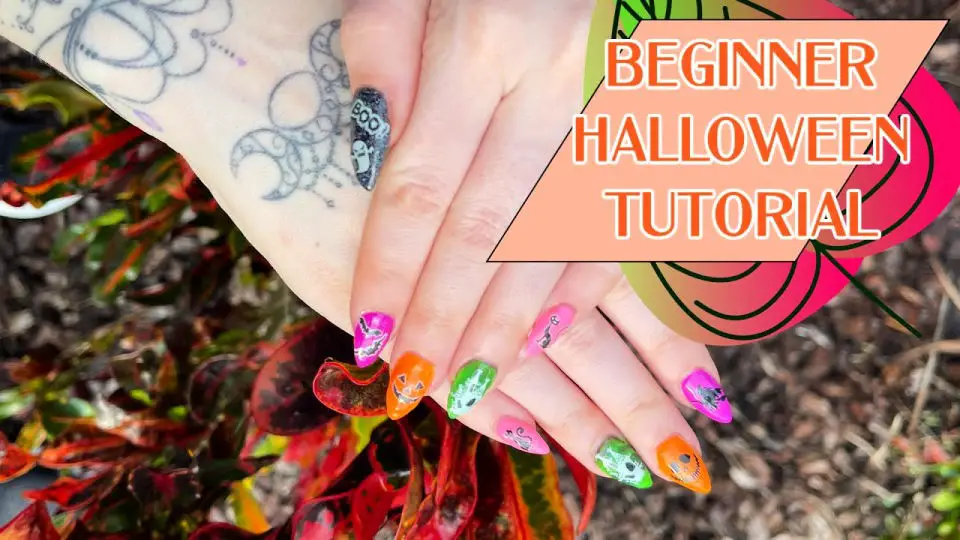
Immerse yourself in the thrill of Halloween with this straightforward and fun nail art tutorial, ideal for those looking to inject some creativity into their look. This step-by-step guide, hosted by Phyrra on their YouTube channel, takes you through the process of applying gel tips and crafting beginner-friendly, spooky designs that are sure to impress. Whether you’re opting for eerie ghosts or bats, these techniques guarantee your nails will stand out from the crowd. Additionally, discover the key to a long-lasting manicure with expert gel adhesion methods. Ready to transform your nails into a Halloween masterpiece? The full tutorial is just a click away.
DIY Velvet Ghosts Nail Design
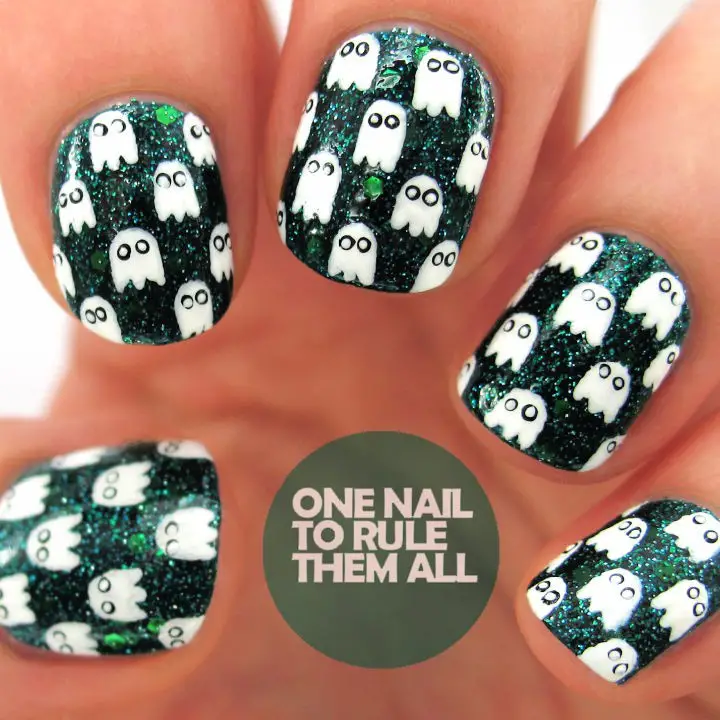
Transform your Halloween nail art into a bewitching masterpiece by following this step-by-step tutorial on creating mesmerizing Velvet Ghosts. Drawing inspiration from the captivating Models Own – Absinthe shade, this design effortlessly blends matte and glossy finishes. The comprehensive guide simplifies crafting ethereal white ghosts on your nails, guaranteeing show-stopping results. Start with a bewitching base colour, build up ghostly silhouettes, and finish with expressive details that leave a lasting impression. As the perfect finishing touch for your festive manicure, these steps yield a one-of-a-kind look that’s as smooth to the touch as it is striking. For the complete how-to, head over to One Nail To Rule Them All.
Make Your Own Eyeball Nails
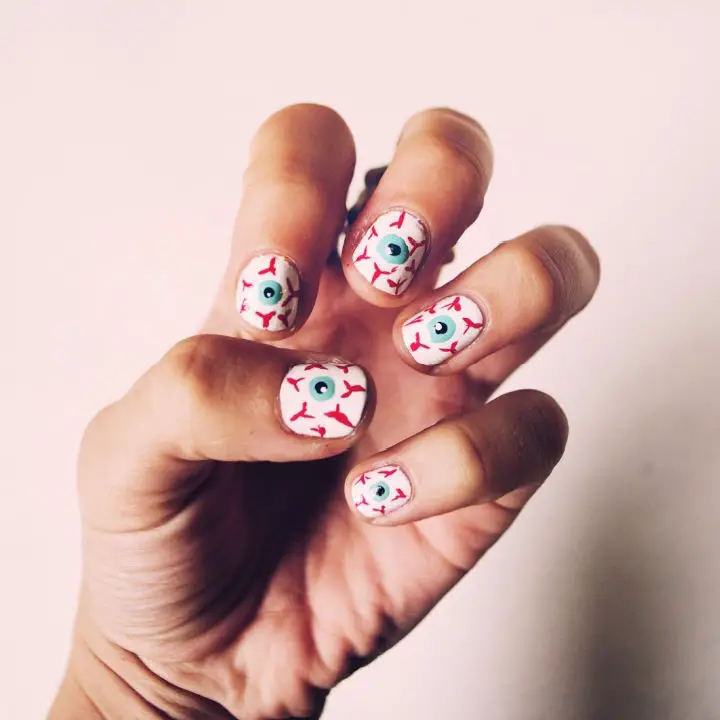
Get creative this Halloween season by transforming your nails into a spooky masterpiece with this DIY eyeball nail art tutorial. To get started, gather your essential supplies: black, red, blue, and white polish, along with a top coat and dotting tool. Begin by applying a base coat of white polish to set the tone for your eerie eyes. Next, use the dotting tool to create a blue iris, adding depth and dimension to your design. Add some subtle red veins to give your eyeballs some life, before finishing off the look with a small black pupil. To complete the illusion, add a tiny white dot to represent the glare of the eye. Seal everything in place with a top coat, and you’ll be rocking some seriously spooky nails that are sure to impress. For a step-by-step guide on how to bring this creepy crawly design to life, click here.
Making Halloween Mummy Water Marble Nails
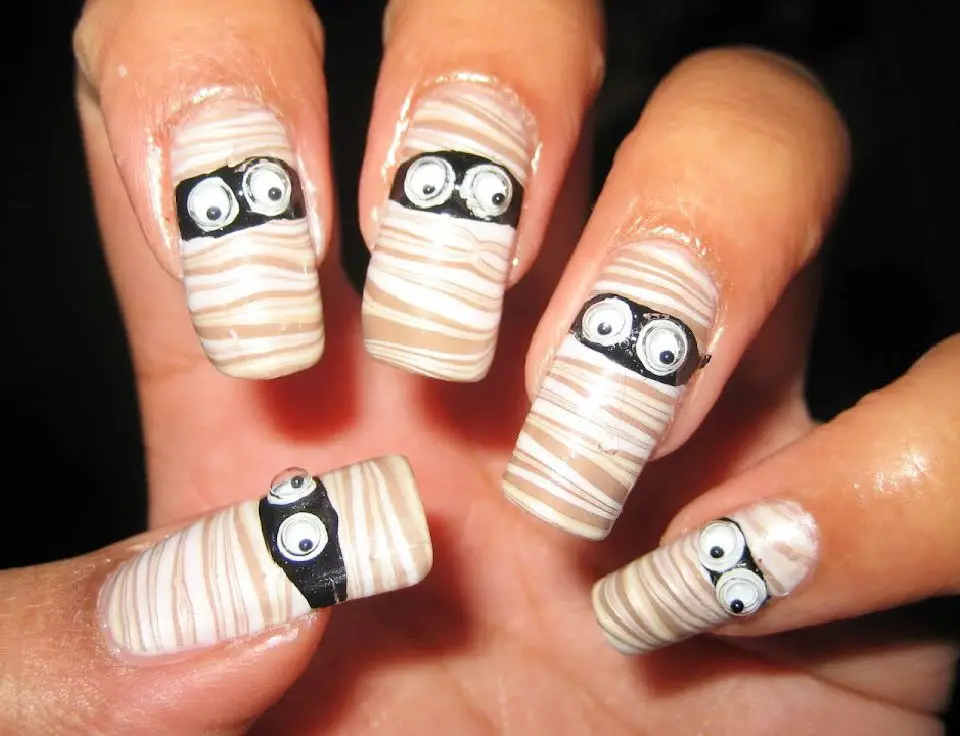
Embrace the spooky season with a creative twist on your manicure! Our DIY Nail Art Tutorial: Mummy Water Marble Delight takes you through the process of crafting mesmerizing mummy-inspired designs using water marble techniques. This comprehensive guide not only demonstrates how to achieve an eye-catching striped pattern but also shares secrets for adding playful peeping eyes, giving your Halloween look a touch of whimsy. Perfect for adventurous nail art enthusiasts seeking to elevate their skills and add an extraordinary flair to their Halloween attire.
Easy DIY Spider Web Splatter Nails
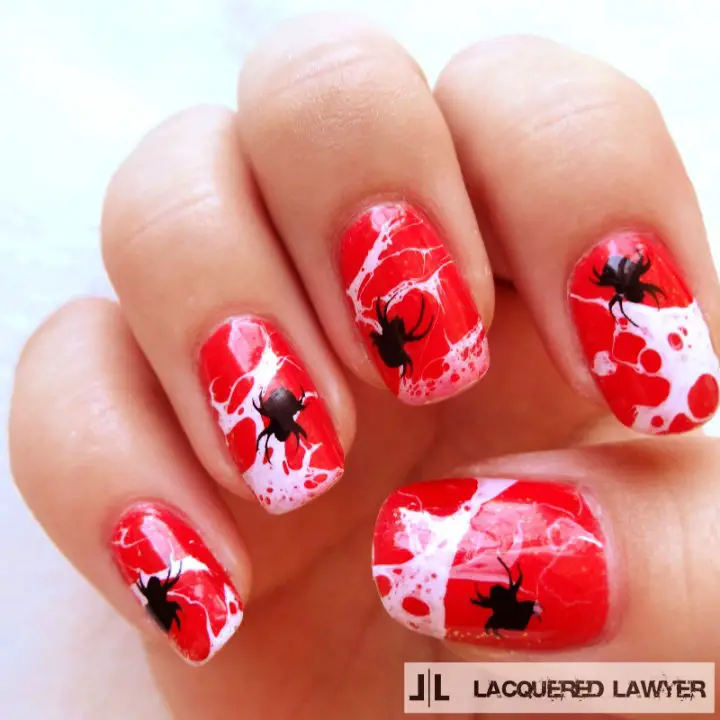
Get ready to cast a spell of elegance and terror with our Spider Web Splatter tutorial, perfect for those who dare to make their Halloween nails unforgettable. This innovative guide combines the boldness of vibrant orange polish, Sydney, with the mesmerizing sparkle of Chunky Holo Poppy. The real showstopper is the water spotting technique that brings forth intricate white spider webs, adding an air of mystery to your manicure. To complete the look, use stamping techniques to add eerie spider designs, elevating your Halloween style to new heights. Follow our step-by-step guide at Lacquered Lawyer and discover how to create a truly hauntingly beautiful nail art.
Gorgeous Gold Leaf Nail Art
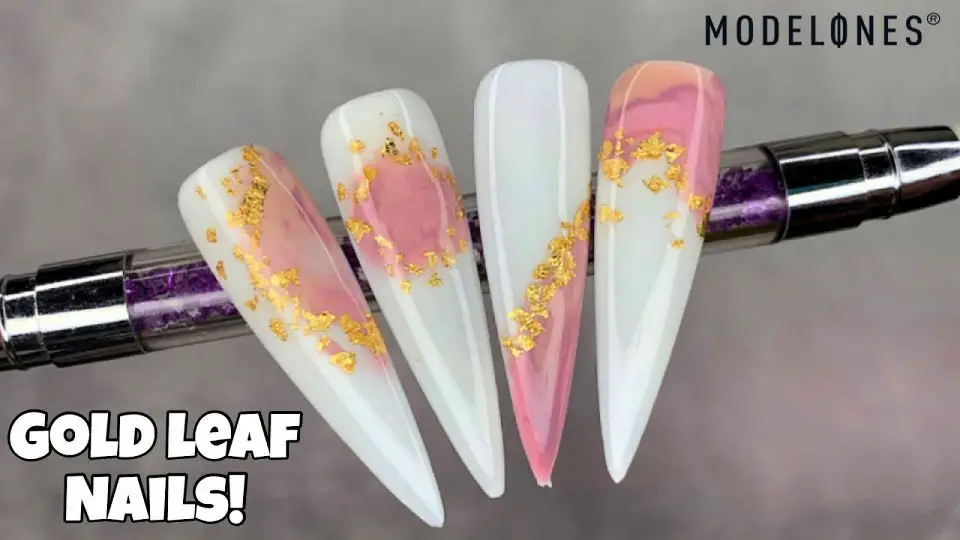
Discover the art of elevating your nail game with Modelones Nail Sugar’s 16-piece set, designed specifically for home users seeking personalized nail art. In this comprehensive tutorial, Natalie Mugridge Nail Artist walks you through creating stunning designs that combine vibrant colors and intricate gold leaf details. Whether you’re a seasoned pro or just starting out, this engaging and straightforward guide is perfect for unleashing your inner creativity and transforming your aesthetic with sophistication.
Conclusion
As we wrap up this comprehensive collection of 35 easy DIY nail art ideas and designs to do at home, it’s clear that embracing this creative outlet can be a wonderful way to express yourself and add a personal touch to your everyday look. By mastering the fundamental tips and techniques presented here, you’ll discover that crafting breathtaking nail designs is well within your grasp. Like any artistic endeavor, building skills takes time and effort – but with persistence and patience, your nails can become a canvas for unique and captivating works of art. So, what’s holding you back? Grab your polish and brushes, and let your imagination run wild today!
