Crafting friendship bracelets is a unique way to showcase your creativity and affection for loved ones. With 25 straightforward patterns, anyone can start creating personalized gifts that symbolize the bond between friends. The process allows for endless customization options, from selecting colors to choosing patterns, giving you the freedom to make each creation truly special. This comprehensive guide provides step-by-step instructions, ensuring you have all the necessary information to craft stunning and meaningful bracelets.
Why Make Your Own Friendship Bracelets?
Making handmade friendship bracelets is an experience that offers far-reaching benefits beyond just creating a beautiful piece of jewelry. This creative endeavor has the power to enrich your personal life in numerous ways.One of the greatest advantages of making your own friendship bracelets is the opportunity for personalization. With complete control over the colors, patterns, and materials used, you can create something truly unique that reflects your personality or the special bond you share with a friend.Beyond the creative benefits, making handmade friendship bracelets can be a cost-effective way to express yourself. By purchasing materials in bulk or using supplies you already have at home, you can save money compared to buying pre-made bracelets. This not only helps your wallet but also reduces waste and promotes sustainability.The process of making a bracelet is also a therapeutic activity that can help reduce stress and promote relaxation. The repetitive motion of knotting and braiding can be meditative, allowing you to focus on the simple act of creating something beautiful.Moreover, making friendship bracelets for others can strengthen your bond with them. It’s a thoughtful way to show someone you care and are willing to invest time in making something special just for them. This act of kindness can bring people together and foster deeper connections.As you continue to make handmade friendship bracelets, you’ll also develop new skills such as fine motor control and patience. With each bracelet, you’ll become more adept at following patterns and handling small materials, which can translate to other areas of your life.Finally, making handmade friendship bracelets can be a fun group activity that encourages creativity and teamwork. Whether it’s at a party or a sleepover, this activity can bring people together and create lasting memories.
How to Make a Friendship Bracelet
To create a stunning heart-shaped friendship bracelet, ideal for expressing your affection on Valentine’s Day, we’ll take you through a step-by-step process that’s accessible to both newbies and those with some familiarity with crafting these sentimental accessories.
Materials Needed:
To get started with creating your own embroidery design, you’ll need a few basic supplies. First, gather approximately 5 feet of pink and red embroidery thread – the exact amount may vary depending on the size of your wrist. Additionally, have scissors at the ready for trimming excess thread as needed. To keep your threads organized and tidy during the creative process, consider using tape or attaching them to a clipboard for secure storage.
Step 1: Prepare Your Threads
To initiate the thread organization process, gather all pink and red embroidery threads and align their ends in a single row. Form a loop by folding the threads in half at the top and create a secure knot to hold them together. This will allow you to manage your threads efficiently during the stitching process. To maintain stability, attach the formed loop to your workspace using tape or a clipboard, ensuring your threads remain organized throughout the task.
Step 2: Organize Your Threads
To achieve the desired mirrored design, arrange your threads in a symmetrical pattern on each side of the loom’s warp. A straightforward approach is to position the background color threads (in this case, pink) on the outer edges of the warp, while reserving the center area for the thread used for heart outlines, such as red. This strategic placement enables the creation of a visually appealing mirrored design that showcases your skills in yarn crafting.
Step 3: Start Knotting
To create the bracelet pattern, you’ll need to follow four main steps or rows of knotting, which you’ll repeat until the desired length is achieved. The process begins with a foundation row that sets the stage for the rest of the design.The first step involves creating forward knots on one side and backward knots on the other, working your way towards the center. This is repeated to form the initial shape of the heart. To complete the foundation row, you’ll then connect the two sides with a forward knot.The subsequent rows follow a similar pattern, but with some key differences. You’ll start by making backward knots on one side, followed by forward knots on the other. As you work your way along each side, you’ll alternate between these two techniques until reaching the midpoint, where you’ll create a final forward knot to secure the connection.The fourth and final row is essentially a repeat of the first, forming the bottom portion of the heart shape. By following these steps, you’ll be able to create a beautiful and intricate bracelet that showcases your knotting skills.
Step 4: Repeat and Finish
To create your desired length of heart-shaped beads, simply repeat these four steps: Create each heart shape by [briefly describe how to create a heart shape], then thread it onto the bracelet string. Continue this process until you achieve the preferred length. Once you’ve reached the desired length, secure the ends by weaving them together and tying a knot at the bottom of the bracelet. For added visual interest, consider braiding or twisting the ends instead.
Tying Your Bracelet
To put on your new accessory, start by threading all the strings through the loop you created initially. Once everything is in place, secure the design with a knot that’s both tight and comfortable. Having a friend assist can make this process easier, allowing you to achieve a snug fit without sacrificing comfort.
Video Tutorial
To take your jewelry-making skills to the next level, I recommend checking out Audrey’s Jar’s YouTube tutorial on creating a heart friendship bracelet. This engaging video provides a step-by-step visual guide that perfectly complements the written instructions. By pairing the two, you’ll gain a deeper understanding of each process and be able to create a one-of-a-kind piece of jewelry that captures the essence of Valentine’s Day. Whether you’re looking for a meaningful gift or a special treat for yourself, this unique heart-shaped friendship bracelet is sure to impress.
FAQs on Making Friendship Bracelets
While making friendship bracelets can be a delightful hobby, it’s natural to have queries before diving in. To assist both beginners and seasoned enthusiasts alike, here are some frequently asked questions that cover the essentials of getting started with this creative pursuit.
What materials do I need to start making friendship bracelets?
To begin creating your unique embroidery piece, you’ll need a few essential supplies. First and foremost, you’ll require a selection of embroidery threads or yarns in various colors to bring your design to life. Additionally, sharp scissors will be necessary for cutting the thread as needed. A tape or clipboard can also come in handy to securely hold your bracelet in place while you work on it. If you’re looking to add an extra touch of personality, consider incorporating beads, charms, or clasps into your design.
How do I choose colors for my friendship bracelet?
When it comes to selecting colors for your bracelet, consider the significance they hold for you personally. You might choose hues that reflect your mood, personality, or style. Alternatively, opt for colors that complement an outfit or match a specific occasion. If the bracelet is intended as a gift, think about incorporating your friend’s favorite colors into the design. Additionally, combining contrasting colors can create a visually striking effect, making patterns and details truly pop.
Can beginners make friendship bracelets?
For those new to quilting, it’s essential to begin with straightforward and accessible patterns. Simple designs like stripes or chevrons are an excellent starting point, allowing you to build your skills and confidence before tackling more intricate and challenging patterns.
How long does it take to make a friendship bracelet?
The time it takes to craft a bracelet hinges on two primary factors: the intricacy of the design and one’s proficiency level. For straightforward patterns, the process can be completed within an hour or two, whereas more elaborate designs may necessitate several hours’ dedication.
How do I finish and secure my friendship bracelet?
For a polished finish, secure the ends of your braided or knotted design by tying a knot. This allows you to add extra thread to accommodate different wrist sizes or opt for a more permanent solution with a clasp or button, making it effortless to slip on and off.
How can I make my friendship bracelets look professional?
To create a visually appealing and long-lasting piece, it’s crucial to maintain consistent knot sizes and tensions throughout the bracelet. For this reason, use high-grade thread that not only showcases vibrant colors but also offers superior durability. Before diving into the final product, take some time to perfect your pattern by practicing on a smaller scale. This will help you identify any potential issues or areas for improvement, ensuring a smooth transition into the actual creation process. Finally, consider adding a clasp or charm to give your bracelet a sophisticated and polished finish.
Can friendship bracelets be washed?
For optimal results, it’s recommended to hand wash these delicate items in cold water to prevent damage to the thread and preserve the vibrant colors. Simply rinse with a gentle touch, then allow them to air dry naturally.
How do I add beads to my friendship bracelet?
When it’s time to incorporate beads into your creation, start by threading one onto your cord or string. From there, you can begin weaving in your pattern, adding more beads as needed. As you work, double-check that the bead holes are spacious enough to accommodate the thread smoothly, ensuring a seamless and secure connection.
What do different friendship bracelet patterns mean?
Some individuals assign symbolic meanings to various patterns, using colors or designs to convey the significance of a particular aspect of their friendship. For instance, the concept of trust might be represented by a specific color combination or design motif, while loyalty could be symbolized by another distinct pattern. In this way, friends can create personalized and meaningful representations of their relationships, such as the heart pattern which is commonly associated with love and care.
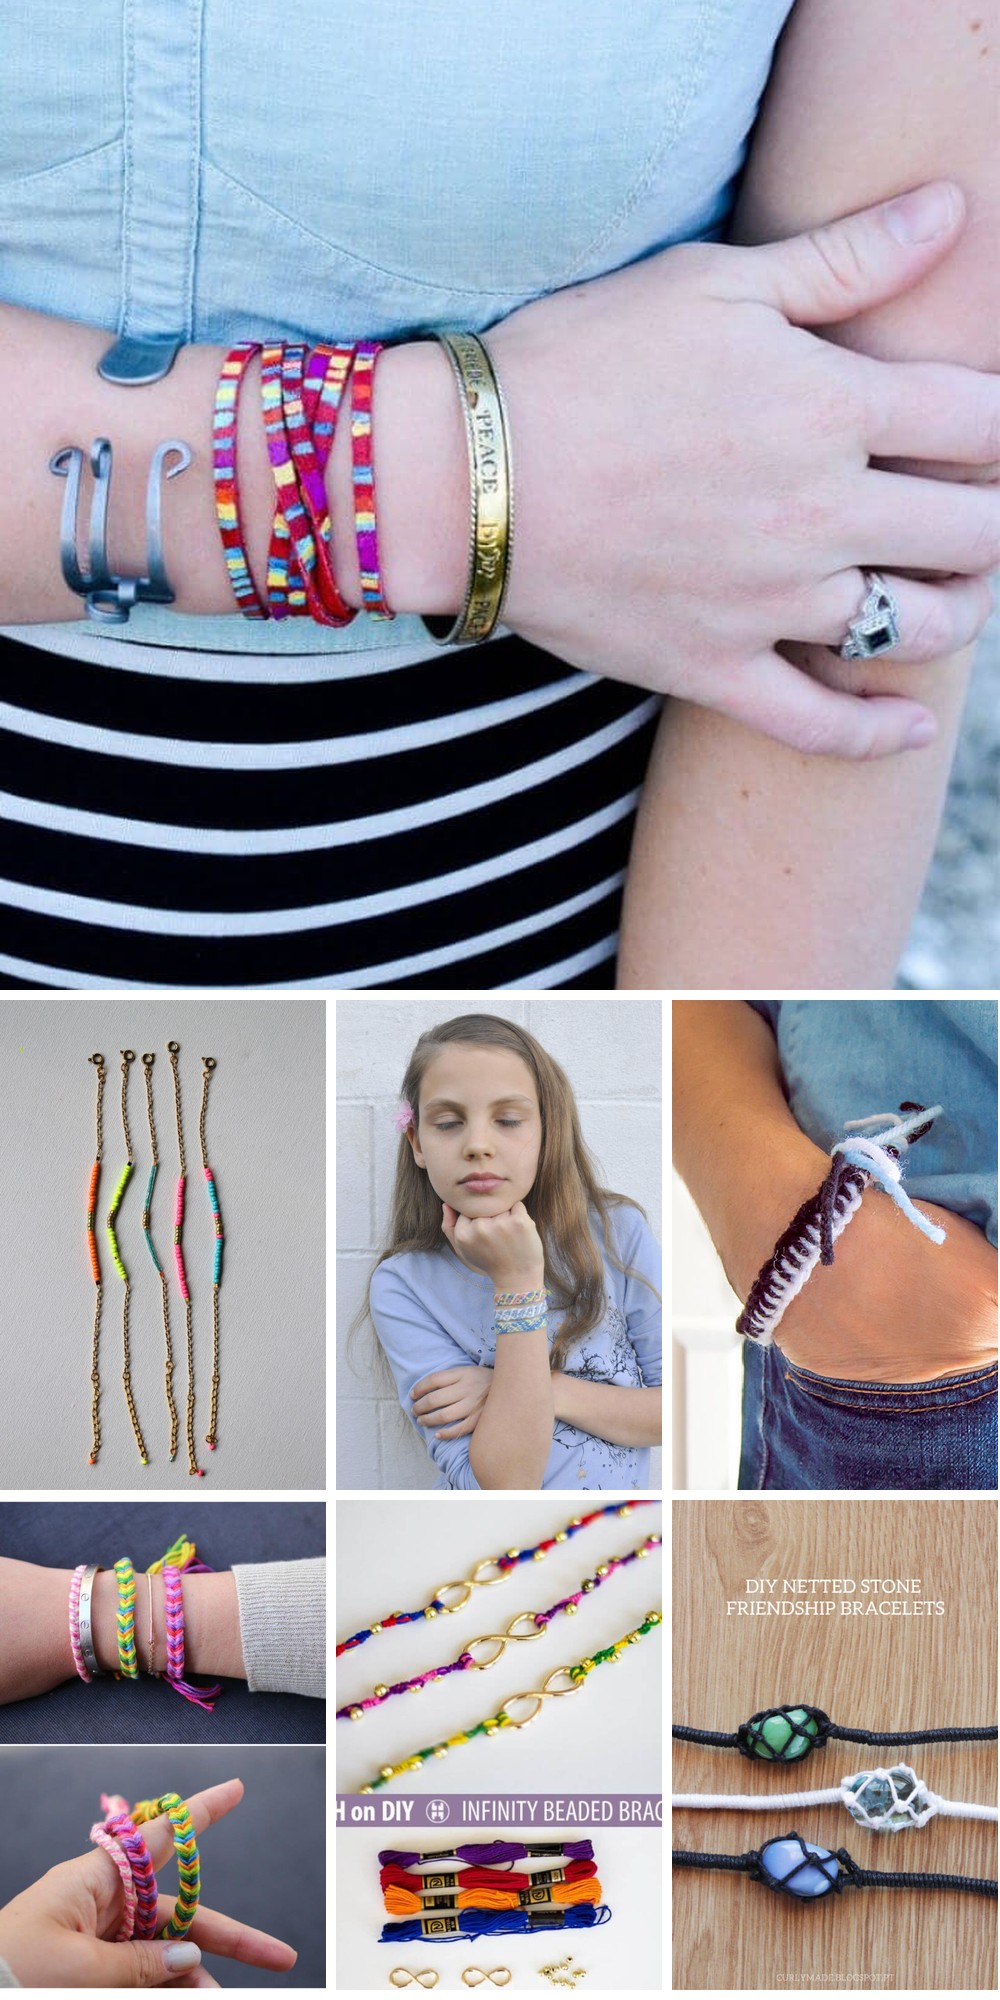
25 Simple Friendship Bracelet Patterns for Beginners
Unleash your creativity and get ready to craft stunning friendships with our comprehensive guide to 25 effortless bracelet patterns perfect for novices. Let the step-by-step instructions be your trusted companion as you embark on a journey of artistic expression.
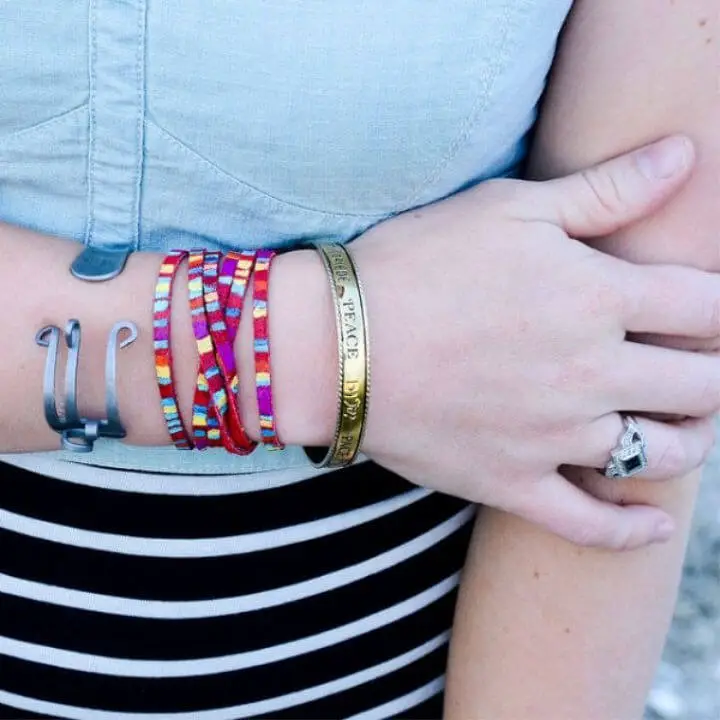
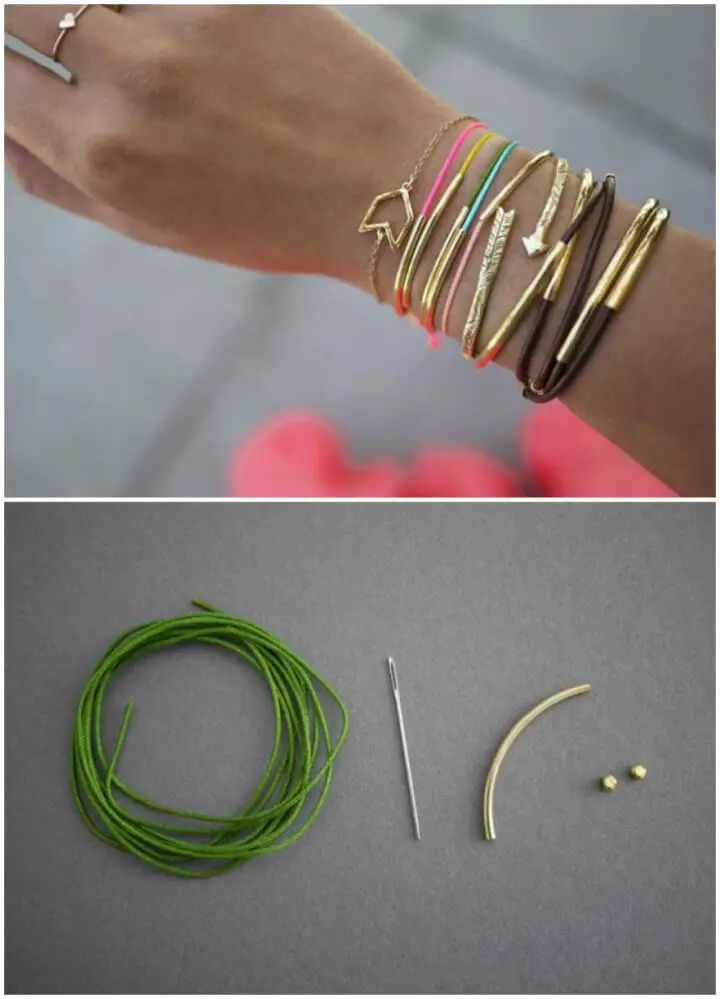
DIY Grown-up Friendship Bracelets
Transform your accessory game with a creative DIY spin! By incorporating the techniques from Hey Wanderer’s comprehensive guide on crafting a sophisticated friendship bracelet, you can breathe new life into a classic keepsake and create a stylish, adult-oriented piece that exudes refinement and poise. With an arsenal of materials at your disposal, including thread, jewelry pliers, and lobster claws, the possibilities are endless for designing a customized bracelet that perfectly captures your personal style or serves as a thoughtful gift for a special friend. This step-by-step tutorial is designed to ensure that even the most novice crafter can produce a finished piece that appears polished and professional, effortlessly infusing a touch of elegance into a timeless tradition.
Easy String Friendship Bracelet Patterns
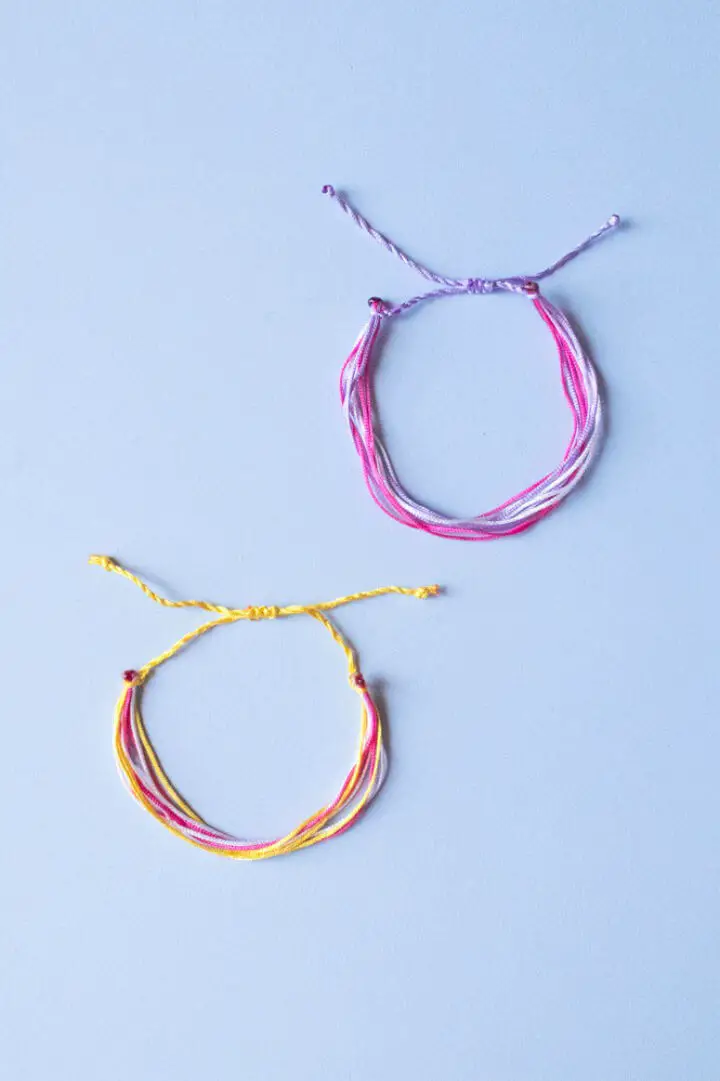
Get ready to weave together the essence of Pura Vida-inspired friendship bracelets with Curly Made’s easy-to-follow tutorial. Say goodbye to stiff and scratchy traditional waxed polyester, and hello to soft and supple nylon satin cord. This no-fuss DIY project requires no glue or hardware, making it an accessible and budget-friendly way to add a personal touch to your accessories collection. Perfect for gifting to friends, these carefree summer-inspired bracelets exude a laid-back charm that’s sure to bring people together.
How to Make Friendship Bracelets

Bring the nostalgic charm of friendship bands into your life with a fun and easy activity inspired by Be A Fun Mum. If you have colorful mini wool balls, you can quickly create these captivating wrist accessories that make for thoughtful gifts or party favors. With just wool and optional fasteners required, this project is perfect for a relaxed afternoon at home, a sleepover, or birthday celebration.
To start, simply cut the wool strands to size, knot them together, and begin weaving for a personalized touch. These bands can also be used as bookmarks or keyring decorations, adding a creative twist to everyday items.
This engaging and easy-to-follow guide is ideal for a fun craft project that’s perfect for all occasions.
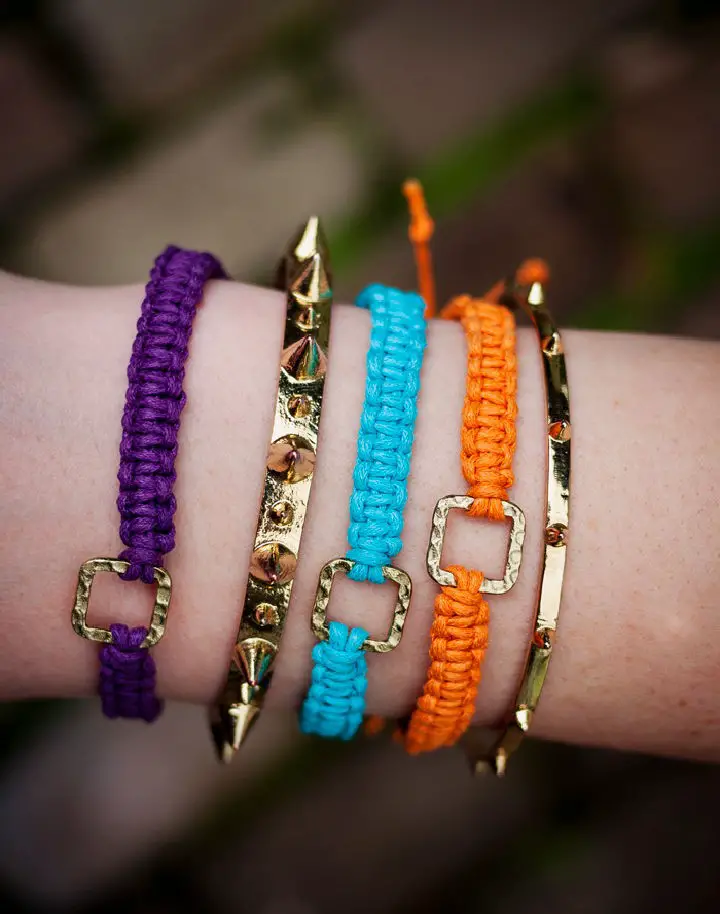
DIY Bling-ed Out Friendship Bracelet Patterns
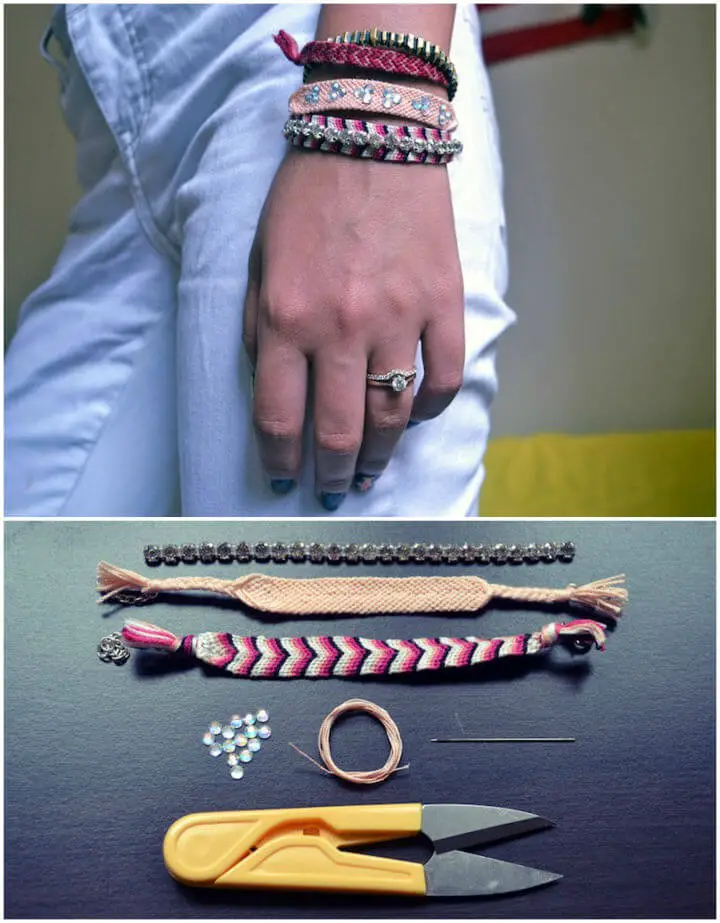
Add some extra flair to your handmade friendship bracelets by incorporating rhinestones using two straightforward techniques. To get started, you’ll need a few simple supplies: friendship bracelets, rhinestone banding, hotfix rhinestones, scissors, a needle and thread, and a heat source such as an iron or hotfix wand.
Begin by cutting the rhinestone banding to the desired length and securely attaching it to your bracelet using a needle and thread. Alternatively, arrange the hotfix rhinestones in your preferred pattern and apply heat to fix them in place. With just about 20 minutes of effort, you can transform your bracelet into a dazzling accessory that’s sure to turn heads and reflect your personal style.
Round Braid Leather Friendship Bracelets
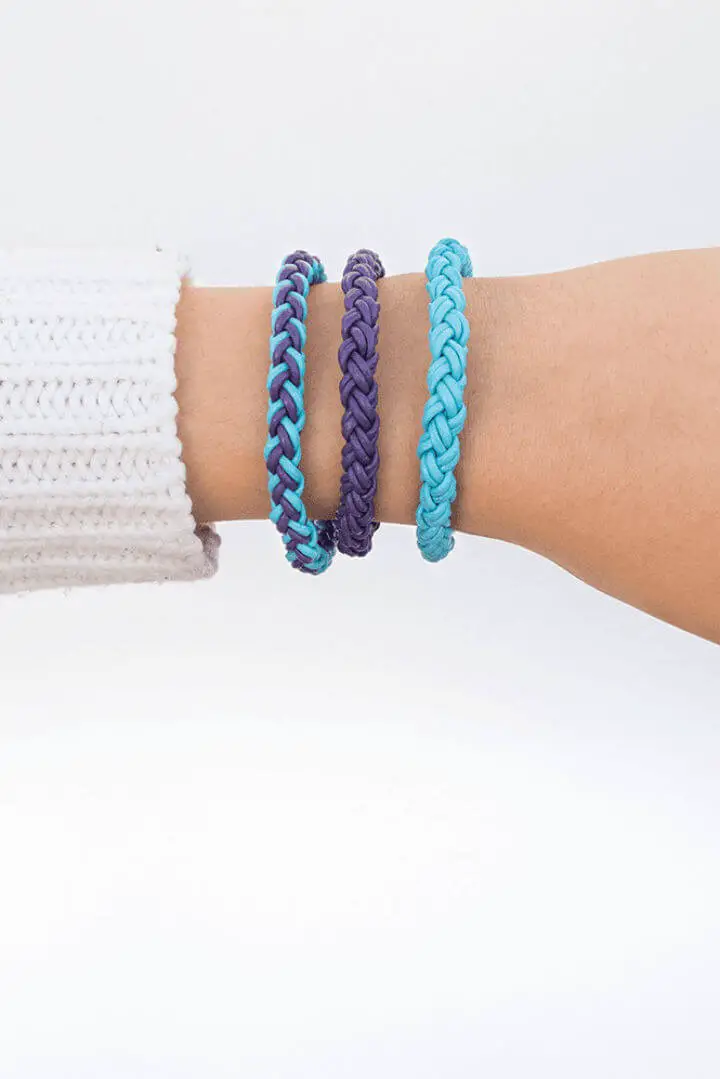
Crafting your own friendship bracelets is a delightful way to add a personal touch to your gifts, making it an ideal hobby for those seeking creative expression. At its core, this craft requires minimal materials – simply some leather cord, magnetic clasps, and epoxy glue – yet yields stunning results. With the guidance of Curly Made’s clear video tutorial, you’ll be able to effortlessly master a four-strand round braid technique that produces breathtaking leather bracelets. To ensure a polished finish, select clasps that complement the braided cords’ thickness. The end result is a beautiful, handcrafted piece of jewelry perfect for sharing with loved ones as a thoughtful gesture. By diving into this DIY project, you’ll not only create unique accessories but also experience the joy of crafting something special.
Make Your Own Wavy Friendship Bracelet Patterns

Elevate your accessory game by unleashing your creativity with WomanShopsWorld’s Friendship Bracelet Kit! This unique bundle is designed for crafting personalized beaded bracelets that can be worn or traded at events, allowing you to create an average of 16 vibrant pieces. The kit is packed with handmade and one-of-a-kind beads, providing endless opportunities for self-expression.To get started, simply follow our step-by-step guide on the blog, which features easy-to-follow instructions and expert tips to help you design your own stunning arm candy. With this comprehensive resource, you’ll be tying up your new beaded creations in no time, ready to make a statement wherever you go. Join the crafting craze and forge meaningful connections with these charming tokens of friendship.
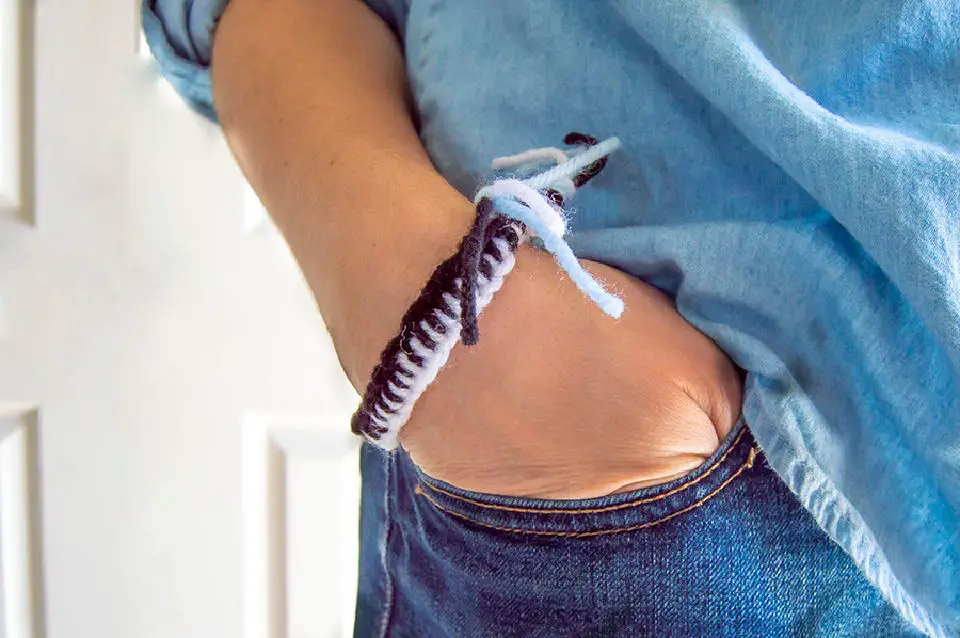
DIY Backward Knot and Striped Friendship Bracelet
Rediscover the joy of crafting with this straightforward guide to creating friendship bracelets. By following a simple backward knot technique, you can recreate the vibrant, striped styles that were all the rage in the ’90s using colorful embroidery thread and scissors. This fun project is perfect for adding a personal touch to any outfit or gifting to friends. With easy-to-follow step-by-step instructions, you’ll quickly master the pattern, paving the way for even more complex designs down the line. As you immerse yourself in this creative process, you may find yourself enjoying a relaxing and rejuvenating crafting session.
Easy to Make Friendship Bracelet Patterns
Indulge in the therapeutic joy of crafting by creating a timeless chevron friendship bracelet, courtesy of Honestly WTF. This step-by-step guide simplifies the process of transforming basic materials like embroidery thread, scissors, and a safety pin or tape into a stunning, handmade piece. As you learn to cut and knot with ease, you’ll be empowered to create personalized gifts or enjoy a fun summer activity. With clear instructions, this tutorial is perfect for anyone seeking DIY inspiration. Let the colorful creations adorn your wrist, sparking conversations and cherished memories that will last a lifetime.
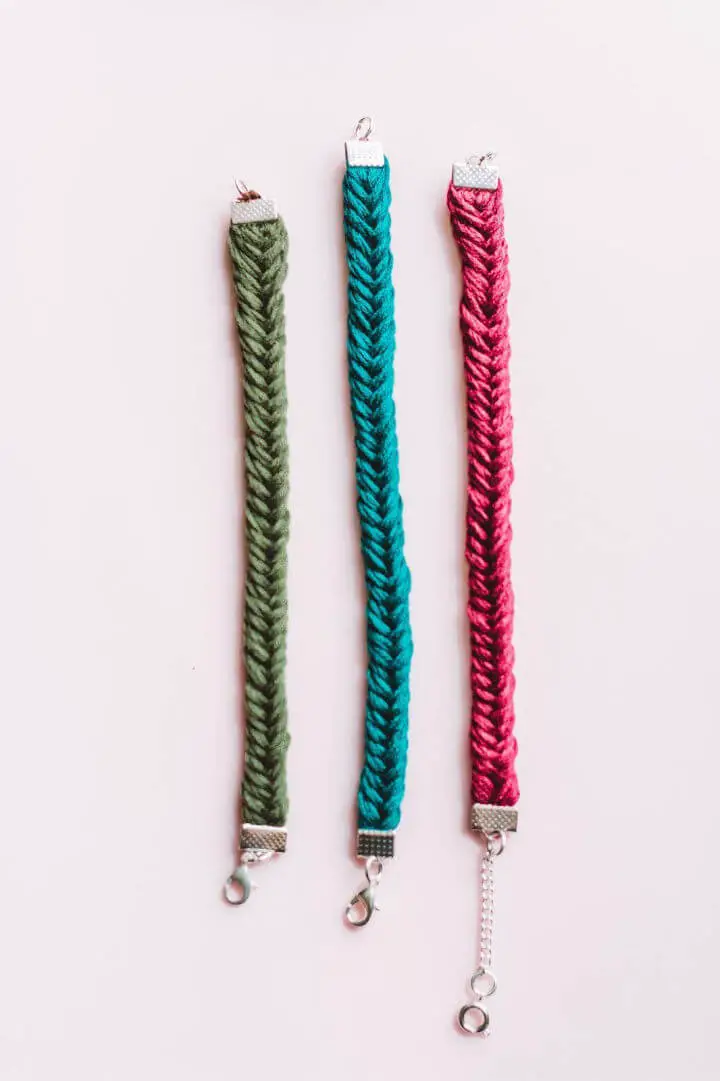
DIY Ladder Stitch Friendship Bracelet
Crafting a ladder stitch friendship bracelet offers a delightful experience for those who enjoy straightforward and enjoyable projects. At its core, this technique is surprisingly simple yet produces stunning results. With just four threads and basic tools like scissors, tape, and yarn or thread of your choice, you can create a striking two-toned accessory that’s sure to garner attention. And the best part? This versatile method isn’t limited to bracelets – it can be used to craft bookmarks, keychains, and even headbands, allowing you to personalize your accessory collection with unique and eye-catching pieces.
Simple DIY Leather Friendship Bracelets
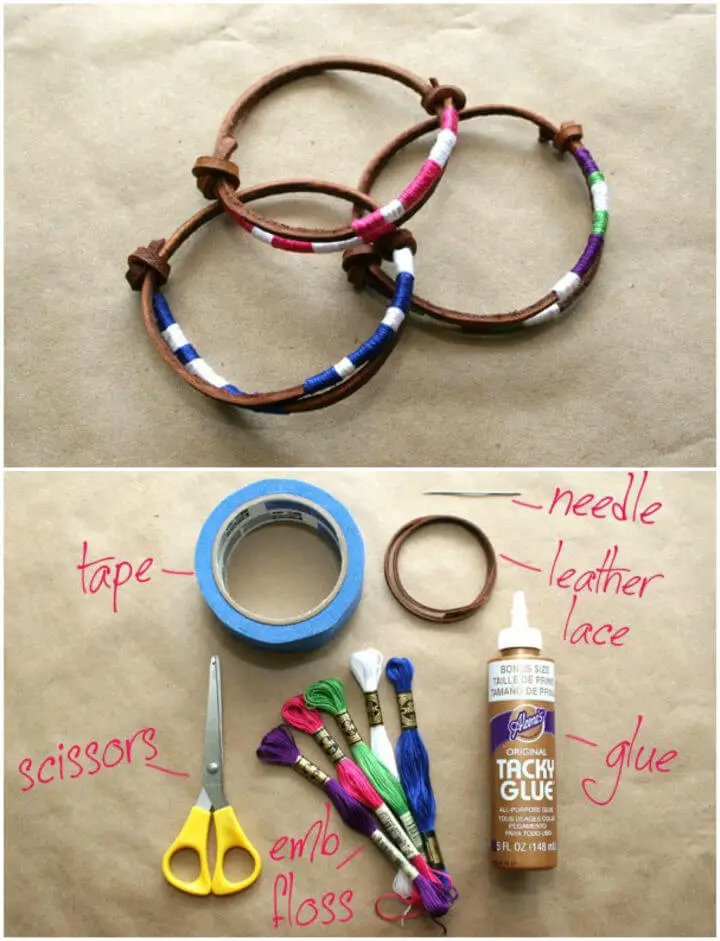
Add a touch of handmade elegance to your jewelry collection by creating a DIY Leather Friendship Bracelet, courtesy of Trinkets in Bloom. This comprehensive tutorial takes the traditional appeal of friendship bracelets and gives it a modern twist. With just a few simple materials like leather laces, embroidery floss, and basic tools, you can craft a range of vibrant designs that are perfect for gifting or adding to your own accessory collection. The step-by-step guide ensures a seamless crafting experience, providing clear instructions and expert tips to help you achieve a stunning DIY project. Immerse yourself in this creative activity and make a fashion statement with your one-of-a-kind leather friendship bracelets.
Make Your Own Friendship Bracelet
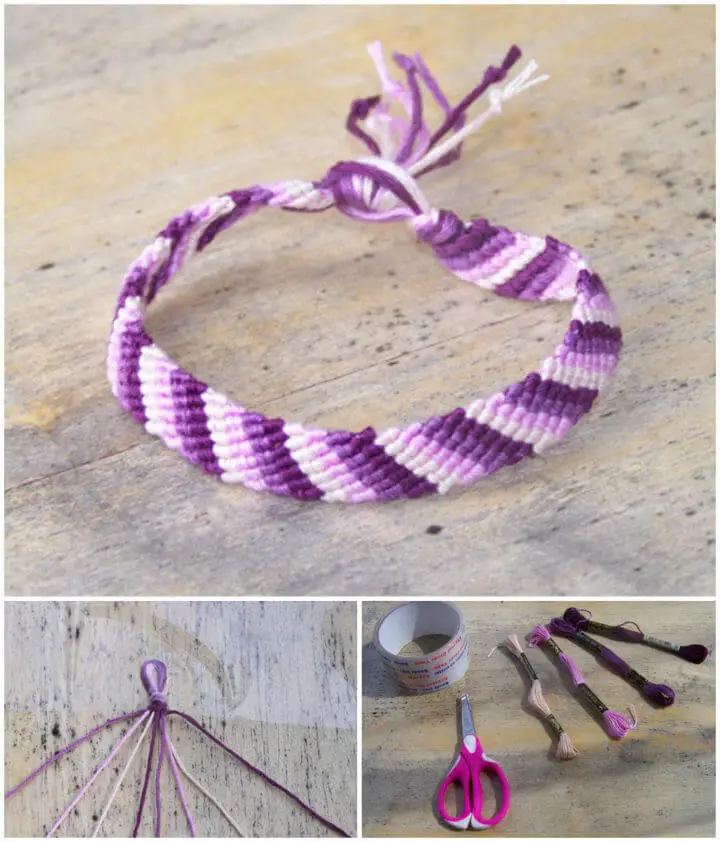
Transforming a simple token of friendship into an exquisite piece of art is now within your grasp. By following Nicola Kendall’s comprehensive tutorial on FeltMagnet, you can effortlessly create a beautiful friendship bracelet with a classic straight-line design. This straightforward guide, accompanied by step-by-step instructions and visual aids, simplifies the process for crafting enthusiasts of all ages. With just three essential materials – embroidery floss, scissors, and tape – you’re ready to embark on this budget-friendly project that’s perfect for sharing with friends or adding a new skill to your creative repertoire. As you work through this calming and meditative activity, not only will you be creating a meaningful keepsake but also fostering a deeper appreciation for the art of crafting.
Making a Leather Studded Wrap Bracelet
Want to add a touch of personal flair to your accessory collection? With just a few simple materials, including leather strips and brass paper fasteners, you can create a stunning leather stud bracelet that reflects your unique style. Our step-by-step DIY guide walks you through the process of measuring, marking, cutting, and securing the studs onto the leather with ease. Whether you’re looking to add a touch of elegance or a dash of edginess, this tutorial empowers you to customize your creation to suit your taste and personality. As you follow these straightforward steps, you’ll be thrilled to showcase your handcrafted masterpiece and elevate your wardrobe with a one-of-a-kind piece that’s all yours.
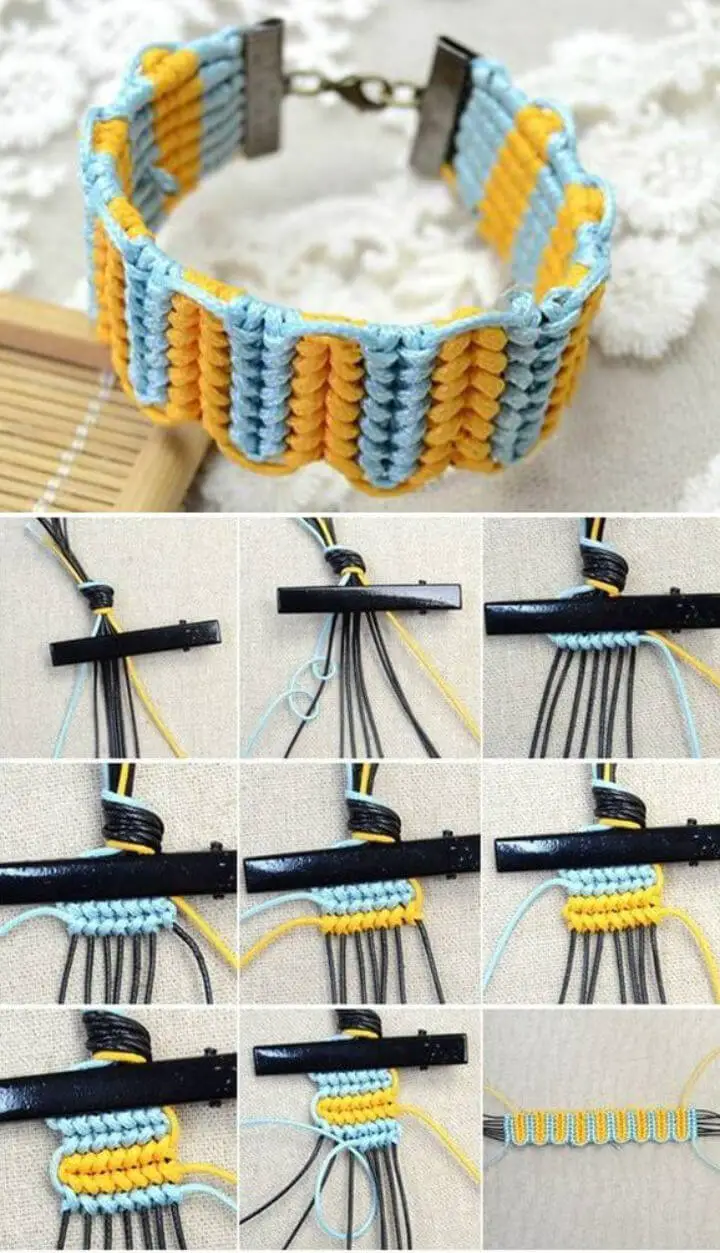
Pretty DIY Macrame Friendship Bracelet
Transform your jewelry game with Ciera Design Studio’s DIY friendship bracelet guide. With just a few simple materials – waxed cotton cord or embroidery thread, connector charms, scissors, tape, ruler, and super glue – you can create personalized accessories perfect for festival season or as thoughtful gifts. The step-by-step instructions walk you through securing cords, tying precise knots, and finishing with a secure sliding closure. This engaging guide makes it easy to add a handmade touch to your jewelry collection, allowing you to get creative with colors and proudly wear your unique creations.
DIY Infinity Beaded Bracelet
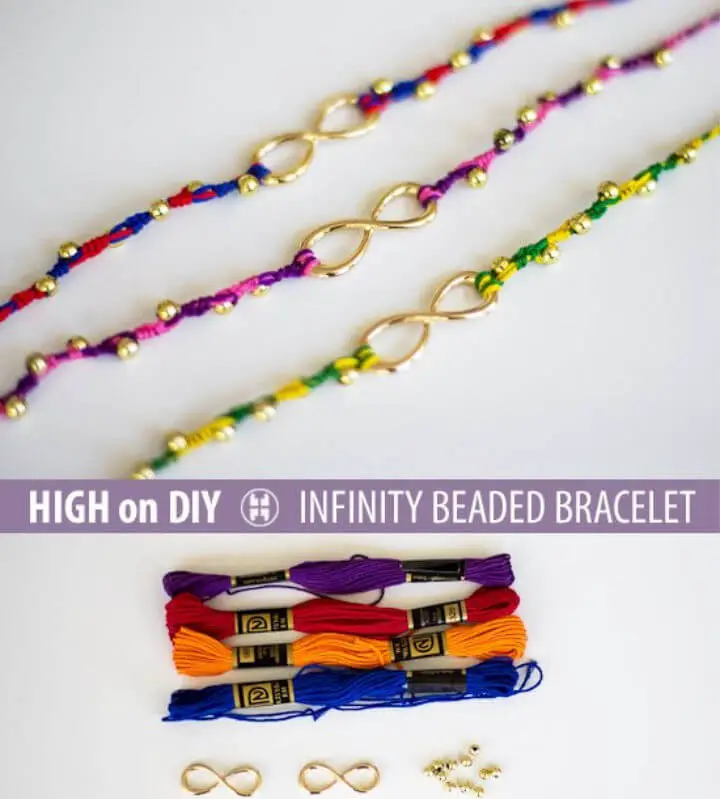
Embark on a creative adventure by crafting your own mesmerizing DIY infinity beaded bracelet. This straightforward guide is designed specifically for beginners, teaching the art of harmoniously combining embroidery thread, delicate infinity charms, and radiant gold beads into a breathtaking piece of jewelry. Not only will you create a stunning accessory to adorn yourself, but this project’s charm lies in its versatility – it makes an exceptional gift for loved ones or a treasured keepsake. Get ready to be hooked on crafting and discover the joy of creating something truly special.
Netted Stone Friendship Bracelets

To infuse your jewelry collection with a touch of personality, create a unique DIY netted stone friendship bracelet. This easy-to-follow project requires minimal materials, including waxed cotton cord, small stones, scissors, and a button. Begin by cutting multiple strands of cord and securing them at the center with a knot, leaving room for the button to slide through. Next, wrap the longer cords around the shorter ones, gradually building up the design.
Square Knot Bracelets with Jade Beads
Crafting a square knot bracelet with jade beads is a delightful DIY adventure that effortlessly elevates any outfit with its understated elegance. With this clear-cut guide, transforming plain leather cords and beads into a stunning accessory becomes an enjoyable experience. Begin by setting the foundation with leather cords and beads, then follow the straightforward steps to create a secure loop closure. Next, weave in the beads using square knots, carefully crafting a pattern that showcases the vibrant colors and sleek design. Seal off the look with another loop closure for a polished finish. This charming bracelet design strikes the perfect balance between refinement and handmade charm, making it an excellent gift or a beautiful addition to your jewelry collection. By following this easy-to-follow tutorial, you’ll find that crafting becomes an approachable and enjoyable experience, allowing you to create a chic square knot bracelet with ease.
Handmade Heart Friendship Bracelet
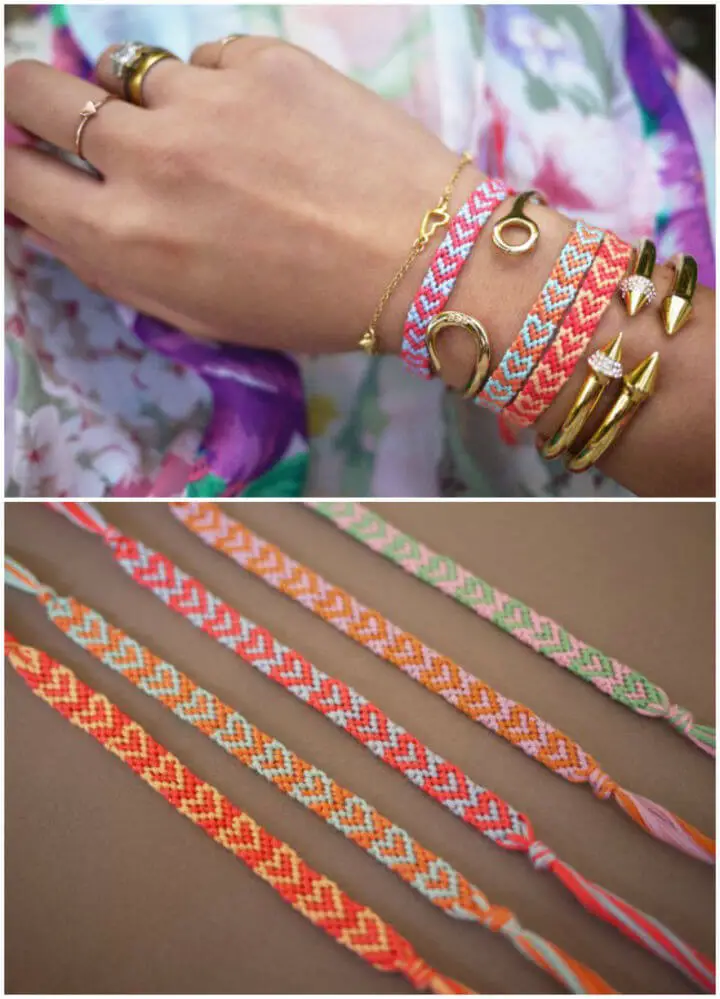
Indulge in the warmth of friendship by crafting a delightful DIY Heart Friendship Bracelet, ideal for Valentine’s Day or any occasion you want to share love. Our step-by-step guide takes you through an effortless process, converting embroidery floss into a thoughtful token. Begin by preparing strands of two colors, alternating them to establish the chevron pattern foundation. Next, master simple knotting techniques to create the charming heart shapes that give these bracelets their distinctive charm. To ensure durability, be sure to knot twice for each step and complete with a secure knot and trimmed ends. Whether as a gift or personal treat, these handmade bracelets are a vibrant way to convey care and add a splash of color to your wristwear collection.
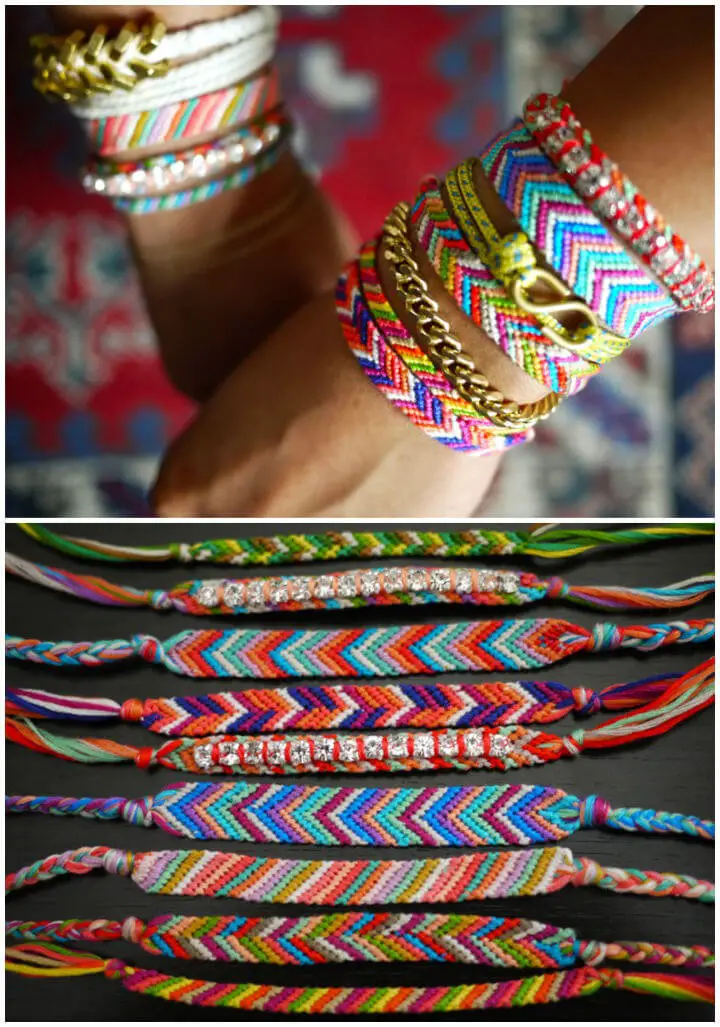
Easy DIY Rainbow Friendship Bracelet Patterns
Unleash your creativity and craft a whimsical rainbow friendship bracelet with this step-by-step tutorial inspired by Stars for streetlights. To bring this nostalgic charm to life, gather a few essential materials: leather cording, vibrant paint, a treasured bead, and Fabric Mod Podge. Begin by securing the bead within a knotting system, followed by an artistic expression of colorful splashes on the leather. Seal your handiwork with a layer of Fabric Mod Podge for added durability and flexibility. With this unique accessory in tow, get ready to bask in the warmth of summer with a personalized touch that exudes joy and whimsy.
Beautiful DIY Fine Chain Friendship Bracelet
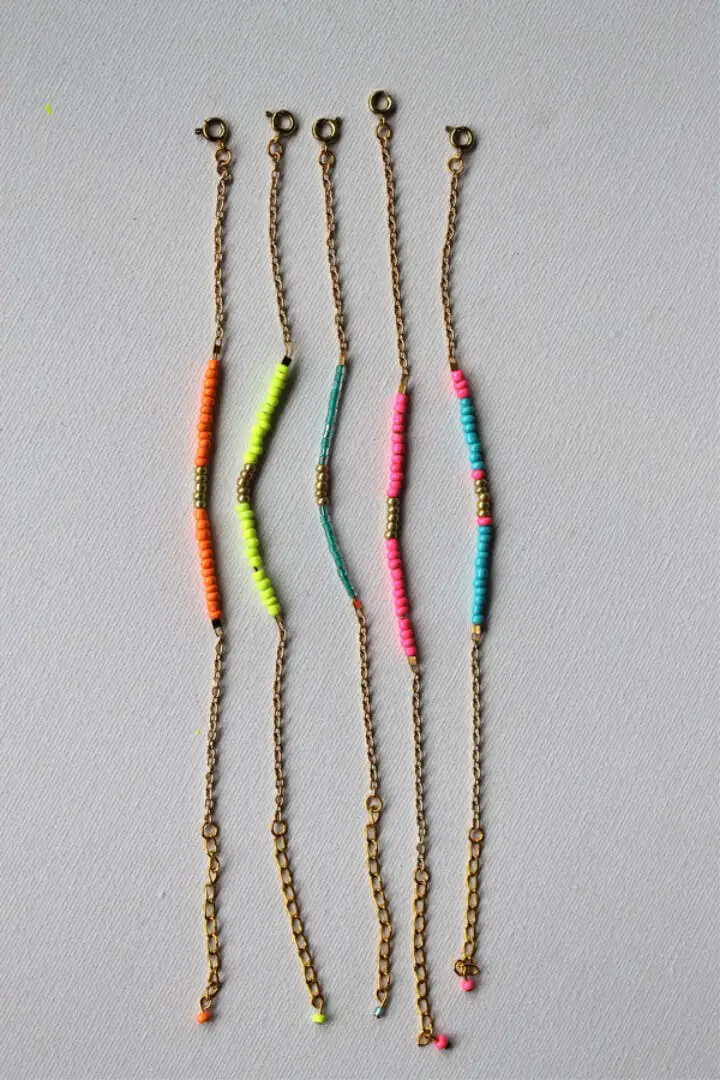
Create a stunning fine chain friendship bracelet with ease by following this step-by-step guide on Envato Tuts. This comprehensive tutorial takes you through the process of selecting vibrant seed beads, working with delicate chains, and securing clasps with precision. The instructions are crystal clear, making it enjoyable to craft your own unique piece. Whether gifting or adding a personal touch to your accessory collection, this project offers endless possibilities for customization. With a range of colors and materials at your fingertips, the only limit is your imagination. Give it a try and experience the satisfaction of crafting a truly one-of-a-kind fine chain friendship bracelet.
DIY Monochrome Friendship Bracelets

Get ready to elevate your craft game with Purl soho’s comprehensive guide on creating one-of-a-kind monochrome friendship bracelets featuring a stunning diamond pattern turned upside down. This unique design is reminiscent of intricate beading and requires just a single color of 1mm Chinese knotting cord, making it the perfect challenge for crafty enthusiasts. To keep track of each strand, simply use overhand knots to stay organized throughout your project. With this engaging and instructive guide, you’ll have everything you need to create a stylish and singular accessory that will add a special touch to any friendship bracelet collection.
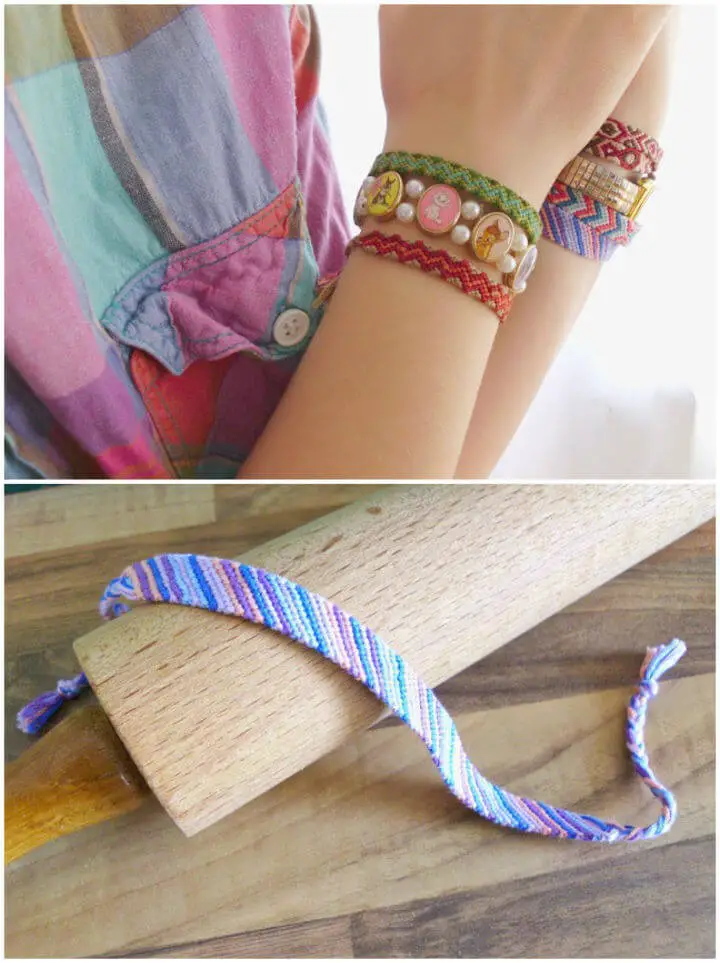
Fishtail Braid Friendship Bracelets
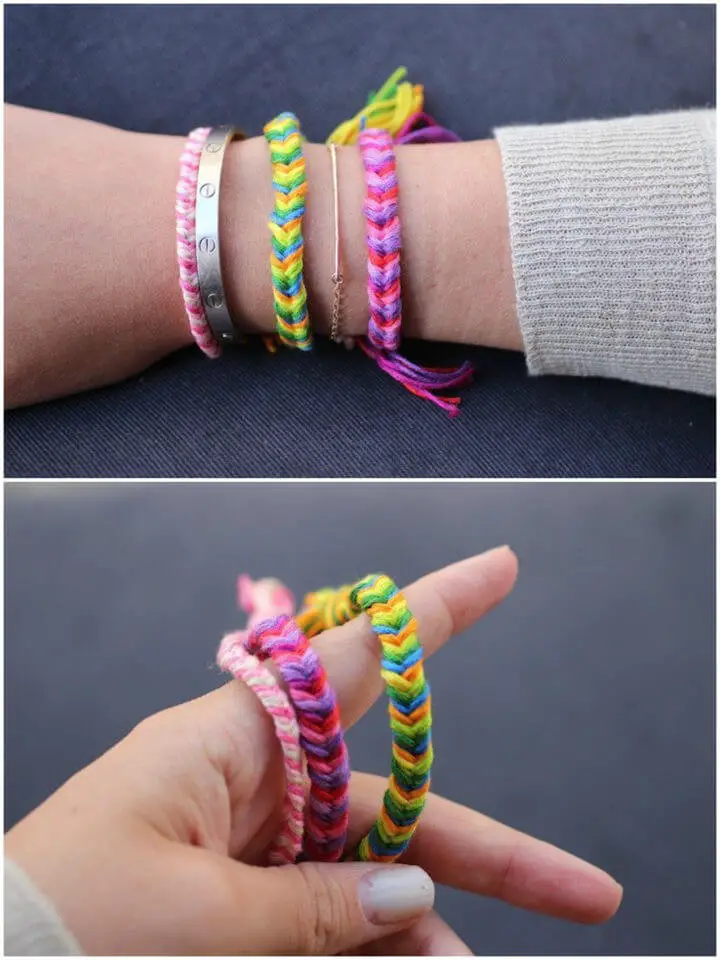
Crafting DIY friendship bracelets is an excellent way to inject some personal flair into your summer accessories. By following this simple yet stylish fishtail braid friendship bracelet tutorial from The Stripe, you can create a beautiful chevron pattern that belies its ease. With just embroidery floss and a few straightforward steps, you’ll be on your way to crafting a stunning design that looks more complex than it actually is. The option to blend similar shades for an ombre effect adds a unique twist to the classic design. Once you’ve sorted your 15 strands of floss into colors and knotted them at the top, the process is a breeze: simply crisscross the strands, tighten as you go, and watch the chevron pattern take shape. Complete the bracelet to your desired length, tie it off, and trim the ends for a chic, handmade summer staple that’s sure to turn heads.
DIY Yarn-Wrapped Slap Bracelets
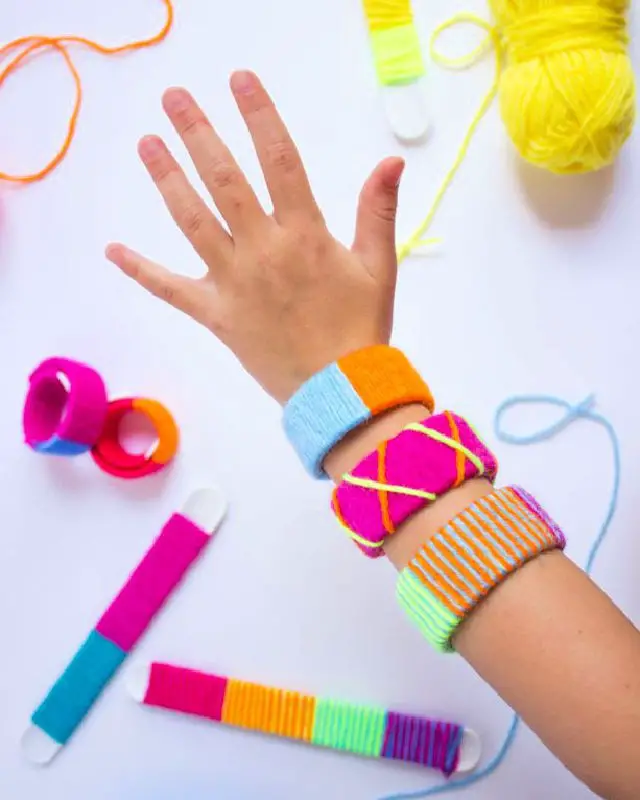
Prepare for a delightful fusion of vintage charm and contemporary flair! Our latest summer project combines the classic appeal of DIY slap bracelets with the modern twist of yarn-wrapping. This engaging activity is perfect for keeping young minds busy and creative, as kids can experiment with various yarn colors to create one-of-a-kind patterns or vibrant contrasts. And the best part? The wrapped bracelets still retain their signature snap feature, providing a satisfying wrist-wrap experience. To get started, gather white silicone slap bracelets, an assortment of yarns, and scissors. Then, follow the easy-to-follow step-by-step instructions on Fun365.com, brought to you by Oriental Trading, as kids design their very own stylish and functional slap bracelets.
How to Make Gold Tube Bracelets
Create stunning and customizable jewelry with a personal touch by following Honestly WTF’s comprehensive guide to crafting gold tube bracelets. This DIY-friendly project requires just a few simple materials, including curved noodle tube beads, knotting cord, an embroidery needle, spacer beads, leather cord, and clasps. With these basic components, you can create adjustable or wrap bracelets that not only reflect your personal style but also serve as a unique gift for friends and loved ones. The process is remarkably straightforward, allowing you to learn the art of crafting sliding closures and securing beads in place with ease. As you work through this rewarding DIY jewelry project, you’ll be delighted by the end result: a beautiful, one-of-a-kind accessory that adds a touch of personality to any outfit.
Awesome DIY Friendship Bracelets
Create a meaningful gift for your friend by crafting a handmade friendship bracelet. With its simplicity and versatility, this DIY project is perfect for anyone who loves making something special for someone they care about. Using basic materials like waxed polyester cord and gold wax cord, you can create a beautiful accessory that reflects your personal style.
To get started, cut and knot the cords together, then weave them using half hitch knots to achieve a unique pattern of color. Once you’ve reached the desired length, secure the ends with knots, trim any excess cord, and add a lobster claw clasp for easy wear. You can also customize your bracelet by using different colors and patterns, making it an even more thoughtful gift.
By putting a little bit of yourself into this handmade creation, you’ll be sharing a piece of your heart with your friend.
Conclusion
Mastering the art of creating 25 simple friendship bracelet patterns for beginners is a rewarding experience that combines personal fulfillment with meaningful expressions of affection. As you navigate the process of choosing colors, adding unique touches like beads, and tying knots, you’ll discover a deeper connection with those around you. Whether you’re crafting a special heart-shaped bracelet for Valentine’s Day or exploring other charming patterns, remember that each thread you weave is a symbol of your love and care for others. So, let your creativity flow as you embark on this vibrant journey, knowing that every knot you tie brings you closer to the people who matter most.
