Why Make Your Own Wind Chimes?
Crafting your own wind chimes is a multi-faceted experience that not only allows for creative expression but also fosters personal connections, reduces waste, and saves costs. By repurposing or recycling materials, you can create a unique piece of art that reflects your personality while promoting sustainability. This DIY project offers numerous benefits, including the ability to tailor the design to match your outdoor décor, make it budget-friendly by using inexpensive materials, and even bond with family and friends over this fun activity. Additionally, the therapeutic effects of creating something with your hands can help relieve stress and increase feelings of accomplishment. As a result, handmade wind chimes not only bring joy to the recipient but also serve as a meaningful and personalized gift. Ultimately, crafting your own wind chimes is a rewarding experience that combines creativity, sustainability, and personal expression, resulting in a one-of-a-kind decoration that brings serenity and delight to any outdoor space.
Make Your Own Wind Chimes – The Great Outdoors
Creating a unique and melodious addition to any outdoor space is within reach with this simple yet satisfying DIY project. Wind chimes are an excellent way to add some musical flair to your home’s exterior, and with readily available materials and a straightforward process, anyone can craft their own beautiful wind chimes. This comprehensive guide will take you through each step of the crafting journey, guaranteeing that even those new to DIY projects can create something truly special.
Supplies Needed
To create the foundation of your wind chime, you’ll need a few essential materials. Start by gathering two 10-foot sections of 3/4 inch electrical conduit, which will serve as the primary structure. Next, acquire a pipe cutter or hacksaw to shape the conduit into the desired form. For fine-tuning the edges, bring in a round file to smooth out any rough spots. A punch and hammer are also necessary for creating holes and tapping them into place. To drill precise holes, use an 1/8 inch drill bit. For added stability, you’ll need a piece of redwood lumber (or any similar material) to serve as the wind chime’s base. Additionally, don’t forget a compass for drawing accurate circles and a saw for cutting through materials. Finally, secure your wind catcher with nylon string and use plastic, lucite, plexiglass, or lightweight wood for this purpose.
Step 1: Cutting Conduit to Size
To begin, you’ll need to carefully measure and cut the electrical conduit into specific lengths to achieve the desired tones. The required lengths are 20.5 inches, 12.5/8 inches, 15.5 inches, 12.3/8 inches, 18 inches, 14.25 inches, 16.75 inches, and 11 inches. To ensure accuracy, secure the conduit in a vise and use your pipe cutter or hacksaw to make precise cuts. Once cut, take the time to file down any sharp edges to prevent injury.
Step 2: Drilling Holes
To prepare your pipes for hanging the chimes, start by drilling a quarter-inch hole about one-quarter of the way from each end. Begin by using a punch to mark the spot where you’ll be drilling, then secure the pipe in a vise and carefully drill through. The resulting holes will serve as the mounting points for your chimes.
Step 3: Preparing the Wooden Parts
To create the base for your wind chimes, start by drawing two concentric circles on the wood – an outer circle with a diameter of 5.75 inches and an inner circle that is 4.5 inches in diameter. On the inner circle, mark intervals at regular distances (about three-quarters of an inch, followed by one inch) where you’ll need to drill holes later. For the clapper that will strike the chimes, draw a third circle with a diameter of 3.25 inches. Once these circles are drawn, cut them out and prepare the larger circle for drilling by marking the previously designated hole locations.
Step 4: Assembling the Chimes
When it comes to creating your wind chime, consider using nylon string for its durability and ease of handling. To secure the string to the pipes and wooden top, thread it through the drilled holes, tying each one with a square knot that’s tightened from the inside of the conduit to maintain a clean appearance. As you adjust the length of the string, make sure the chimes hang at varying lengths around the circle without touching one another, creating a visually appealing display.
Step 5: Attaching the Wind Catcher
Securely attach the wind catcher to the base of the clapper, opting for lightweight yet sturdy materials such as plastic or fine-grained wood. Optimal size is crucial – the wind catcher should be substantial enough to effectively harness airflow while remaining agile and responsive to changes in breeze direction.
Conclusion
By combining patience and precision, you’ve successfully crafted your unique wind chimes at an affordable price point of under $10, significantly lower than what you’d expect to pay in-store. As you hang your new creation in a location that catches the breeze, be treated to the calming sounds that infuse your outdoor space with serenity.
Video Tutorial
To further enhance your understanding and skillset in crafting wind chimes, I recommend supplementing this guide with a step-by-step video tutorial on YouTube. This visual aid will not only provide a comprehensive overview of the techniques outlined here but also cater to learners who absorb information better through visual demonstrations. By following along with the video, you’ll be able to see firsthand how each technique is applied, making it easier to replicate and achieve impressive results.
FAQS on Making Your Own Wind Chimes
Embarking on the creative journey of crafting your own wind chimes can be an incredibly fulfilling experience. To guide you through this process, I’ve compiled responses to frequently asked questions that will give you a solid foundation to begin with.
What materials can I use to make wind chimes?
When it comes to crafting a unique sounding wind chime, you have a multitude of creative options at your disposal. Consider incorporating materials with distinct characteristics, such as metal tubes or pipes that produce a crisp, classic sound, or wooden rods or bamboo that impart a softer, earthier tone. Alternatively, think outside the box and repurpose items like keys, cutlery, or CDs to add a touch of whimsy to your design. Additionally, beads and crystals can be strategically used to inject decorative flair into your wind chime creation.
Do I need any special tools to make wind chimes?
To get started, you’ll need a range of basic tools that can help you shape and prepare your materials. Some essential items include: drills, which are perfect for creating precise holes; saws or pipe cutters, which allow you to trim and customise your materials to the desired size; sandpaper, which is great for smoothing out rough edges and giving your project a professional finish; and finally, pliers and wire cutters, which come in handy when working with metal or beading, allowing you to bend, shape and cut your way through even the most stubborn materials.
How can I tune my wind chimes?
When it comes to crafting harmonious wind chimes, precision is key. To achieve the perfect pitch, you’ll need a solid understanding of musical notes and the right tools for measuring and cutting materials. The process can be broken down into three simple steps:
Firstly, select a scale or note sequence that resonates with you. This will serve as the foundation for your chime’s melodic structure.
Next, calculate the exact length of material required for each individual note. Online resources and charts are available to aid in this process, ensuring accurate measurements.
Finally, put your tools to use by cutting and fine-tuning each piece until you reach the desired tone. This may involve trimming excess material in small increments to achieve the perfect resonance.
What is the best way to hang wind chimes?
When it comes to hanging your wind chimes, the key considerations are their weight and size. To ensure they’re displayed effectively, follow these guidelines: Start by selecting sturdy hooks or nails for heavy chimes to prevent them from falling or getting damaged. Next, evaluate the load-bearing capacity of the hanging spot – whether it’s a branch or beam – to guarantee it can support the chime’s weight without compromising its structural integrity. Finally, take into account the prevailing wind direction and position your chimes in a way that allows them to catch the breeze freely, thereby maximizing their musical potential.
How can I maintain my wind chimes?
To maintain the aesthetic appeal and melodious quality of your wind chimes, heed these guidelines:
Firstly, schedule regular inspections to identify and address any signs of wear and tear, particularly on the strings or wires.
Next, employ gentle soap-and-water cleaning methods for metal or glass components to avert rust formation or water spots. This will help preserve their original sheen.
Finally, consider bringing your wind chimes indoors during periods of extreme weather conditions to prolong their overall lifespan.
Can making wind chimes be a good family activity?
For many families, creating wind chimes together is an excellent bonding experience that combines creativity, learning, and adding a personal touch to their outdoor spaces. As long as the tasks are suitable for all ages, with proper consideration given to tool usage, this activity can be enjoyed by everyone. It’s a great way to spend quality time together while developing valuable skills in crafting.
30 Homemade DIY Wind Chimes to Make Your Own
Transform the ambiance of your surroundings with the calming sounds of handmade wind chimes. Explore 30 innovative and easy-to-create DIY projects that will allow you to craft one-of-a-kind wind chime designs, tailored to your personal style and preferences.
DIY Recycled Wind Chime – Family Summer Craft
Transform your summer days into a harmonious blend of creativity and adventure by crafting a unique wind chime using recycled materials. This eco-friendly project is perfect for families looking to instill a love for the environment in their children, while also promoting creativity and bonding. Begin by embarking on a fun scavenger hunt around the house and yard to gather materials like old keys, tin cans, and wooden beads. Then, with a touch of paint and some string, assemble your finds into a one-of-a-kind wind chime that sings in the breeze. Not only does this project provide an enjoyable and instructive way to repurpose items, but it also adds a charming touch to your outdoor space. As you work together as a family, you’ll be contributing to a greener planet while creating memories that will last a lifetime.
Handmade Wooden Spoons Wind Chime
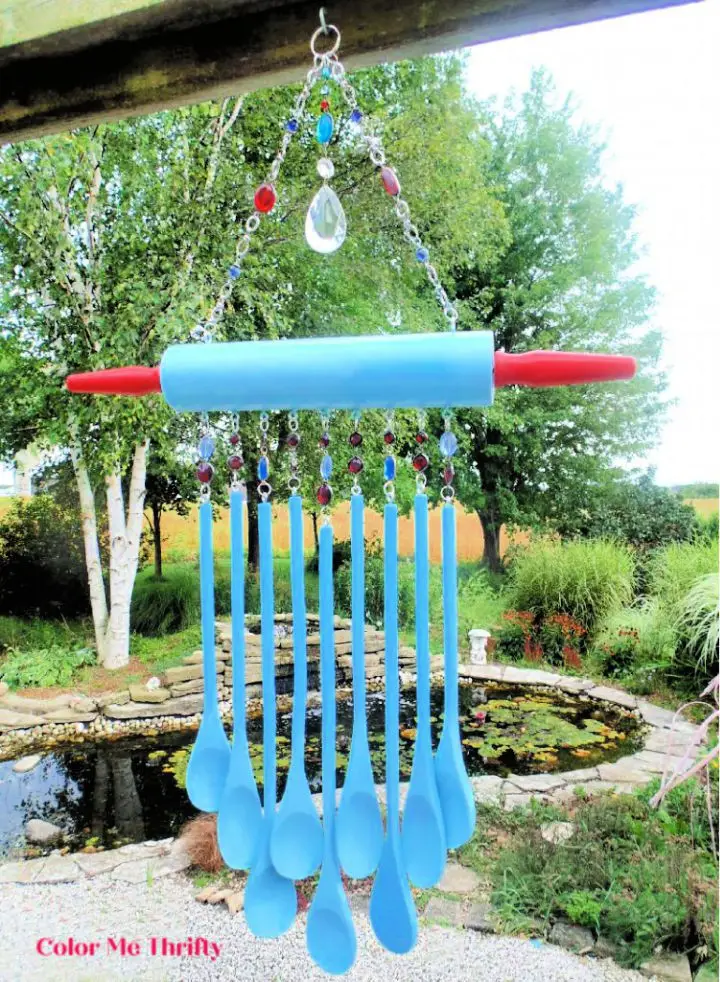
Transform the gentle clinking of wooden spoons into an enchanting soundscape for your garden by repurposing old or thrifted utensils into a unique DIY wind chime project. Begin by sanding down the spoons and applying a weather-resistant stain or paint to give them a durable, personalized finish. Next, drill small holes at the handles’ ends and use sturdy twine or fishing line to suspend the spoons from a robust circular base such as a wooden embroidery hoop or salvaged piece of driftwood. Arrange the spoons at varying lengths to create a harmonious cascade of tones that will serenade your outdoor living space with every breeze. This creative upcycle not only adds a touch of whimsy but also enhances your garden’s ambiance with its soothing sounds.
Easy DIY Summer Wind Chime
Summer’s here, and it’s the perfect time to craft a lively wind chime that reflects your unique style. With Creative Lifestyles’ step-by-step guide, you can transform everyday washers and Rustoleum spray paints into a vibrant decoration that adds a pop of color to any outdoor space. By following simple instructions, you’ll be able to weave yarn and optional beads together to create a one-of-a-kind piece that exudes your personality. This DIY project not only results in a melodious wind chime but also offers an opportunity for quality family time, making it an excellent way to spend a sunny afternoon together. As you hang your handmade wind chime, you’ll be greeted with the soothing sounds of nature and the satisfaction of having created something truly special.
Make Your Own Wind Chimes

Transform your outdoor space into a serene oasis with a captivating stick craft project that harmoniously blends visual appeal and soothing sounds. Inspired by nature’s abundance, this simple yet engaging activity invites creativity and encourages quality time spent under the sun. Gather an assortment of sturdy sticks, a splash of color from paint, and a few fundamental materials to craft a one-of-a-kind masterpiece that comes alive with each gentle breeze. As your creation clinks softly in the wind, you’ll be treated to a symphony of calming tones that will transport you to a state of tranquility.
Kid Friendly DIY Wind Chime Project
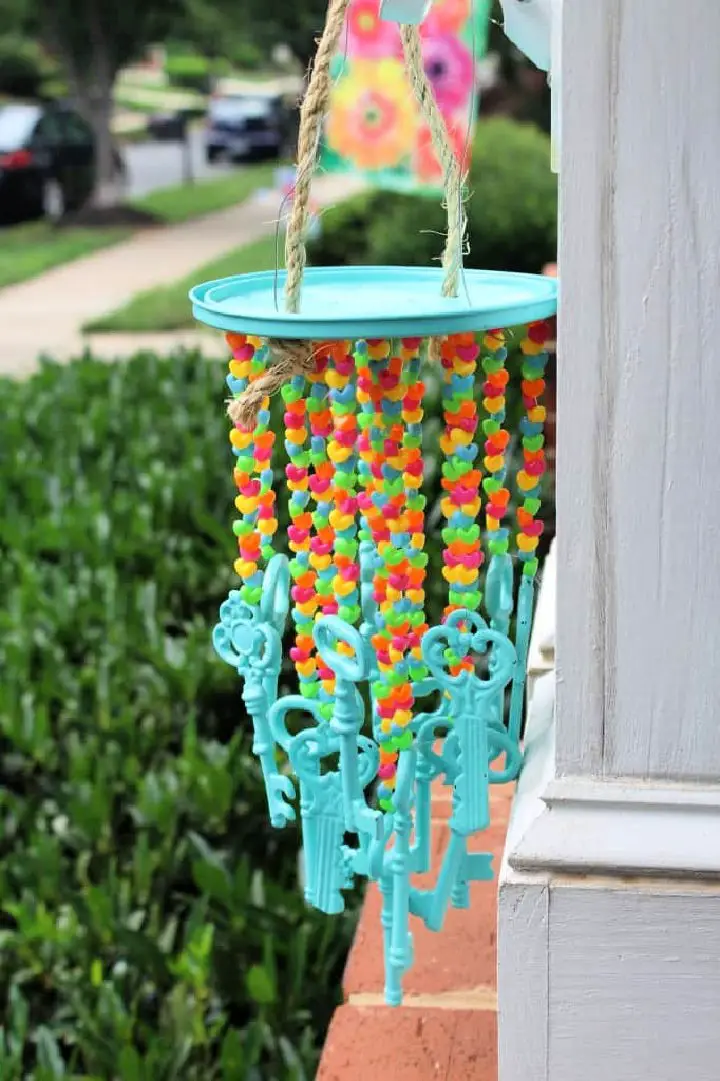
Transform ordinary objects into a harmonious piece of art with Simple Stylings’ DIY wind chime tutorial. Perfect for families or crafty enthusiasts seeking a fun and interactive project to enjoy together, this step-by-step guide shows how to upcycle metal keys and a paint can lid into a melodious garden accessory. By incorporating spray paint and beaded strings, you’ll add a personal touch and playful aesthetic to your creation. As you work through this hands-on activity, not only will you foster your creativity, but you’ll also end up with a one-of-a-kind, homemade decoration that brings a unique charm to any outdoor space.
Awesome DIY Wind Chimes

Transform your outdoor or indoor space into a serene oasis with a harmonious DIY wind chime project from the Hallmark Channel. With just a few simple materials, including 1/2-inch diameter pipes, wooden craft plaques, leather lacing, beads, feathers, and basic tools like a pipe cutter and drill, you can create your own unique melodic masterpiece. Begin by drilling holes in the plaques for hanging and cutting the pipes to the desired length for chimes. Then, assemble the structure using cords and beads, adding a decorative touch with feathers to give your wind chime a distinctive flair. Hang your personalized creation and let its soothing sounds bring tranquility to your surroundings.
Beaded Rainbow Wind Chime Kids Craft

Transform your backyard into a harmonious haven with a whimsical DIY wind chime project, effortlessly crafted with everyday dollar store beads and simple materials. This engaging activity not only sparks creativity but also yields a functional decoration that adds a touch of melody to your patio or garden. With just a few essential items such as vibrant jumbo craft sticks, an assortment of beads, jewelry wire, and pliers, you and your little ones can collaborate on creating a one-of-a-kind piece that brings joy to any outdoor space. By following our step-by-step guide, you’ll be able to assemble a breathtakingly beautiful beaded wind chime that dances in the breeze, filling your surroundings with sweet serenades.
How to Make Practical Wind Chimes
Turn ordinary terra cotta pots into unique wind chimes with this effortless DIY project from we know stuff. Begin by shielding the rims of the pots with painter’s tape and applying a layer of Plasti Dip Craft in crisp white. For added durability and shine, incorporate Plasti Dip Craft Glossifier. Next, thread garden twine through the pot’s holes, securing it with washers to produce a melodious sound. Once dry, tie a sturdy knot and suspend your creation outdoors. Feel free to get creative and give your garden a personalized touch with these easy-to-create, weather-resistant wind chimes that will add a charming ambiance to your outdoor space.
DIY Key Wind Chime – Recycled Crafts for Kids

Discover the joy of upcycling through Inner Child Fun’s DIY key wind chime project, a delightful craft perfect for sharing with kids while teaching them about the importance of recycling. By transforming old keys, driftwood, and string into a charming wind chime, you’ll create a thoughtful gift for any occasion that not only adds a melodious touch to your garden or balcony but also promotes eco-friendly creativity.
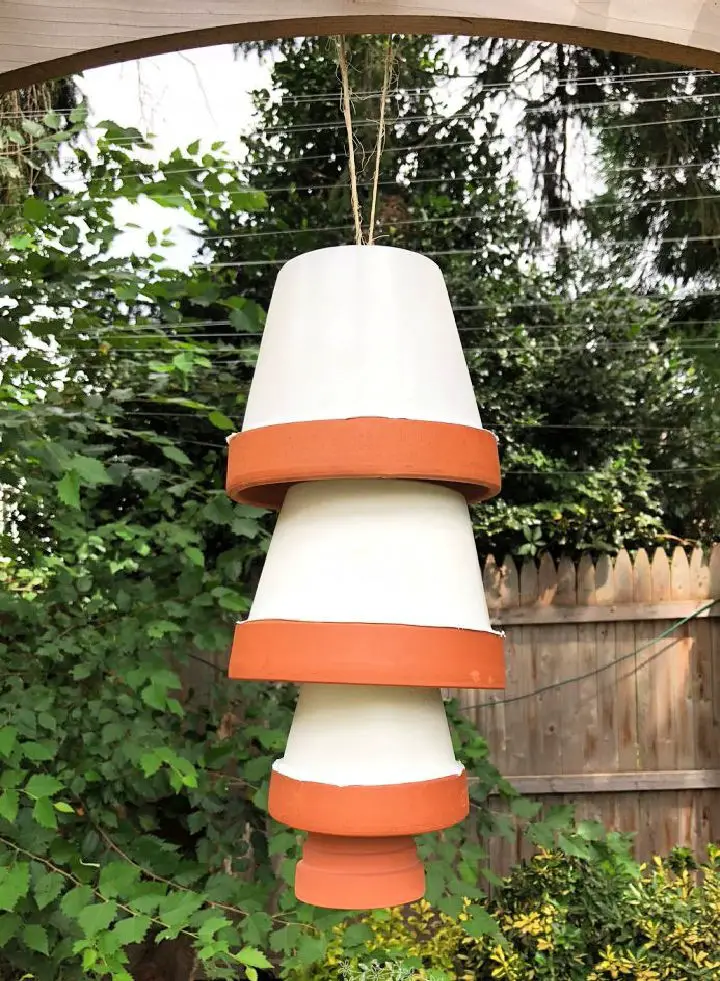
Making a Terracotta Flower Pot Wind Chime
Create a serene oasis in your garden by crafting a one-of-a-kind terracotta flower pot wind chime. This DIY project is perfect for a fun family activity or a calming solo pursuit. Gather a collection of terracotta pots, acrylic paints, wooden beads, and jute twine to get started. The process of painting these pots can be meditative, allowing you to let your creativity shine while creating a charming polka dot design that requires no advanced artistic skills.
To assemble the wind chime, use the pots themselves as ringers for a soothing sound when the breeze blows. Add a personal touch, such as a sentimental baby spoon, to make your creation truly special. As you craft this delightful wind chime with enthusiasm, let its gentle tinkling bring joy and serenity to your outdoor space.
How to Make Mason Jar Chimes

Transforming a mason jar into a set of charming wind chimes is a unique way to add a personalized touch to your outdoor décor while upcycling materials. With a few simple supplies, including a bottle cutter, beads, and a rotary tool, you’ll be able to create a one-of-a-kind piece that reflects your personal style. The process begins with cutting and drilling the mason jar using these tools, ensuring a smooth finish and safety precautions. A key step in this DIY project is sanding the edges to guarantee a professional-looking result. To take it to the next level, you can design a custom piece by drilling holes and stringing beads and charms. The tutorial also covers securing the lid with a wooden disk and eye screws, ensuring your finished chimes are ready to sway gently in the spring breeze. Once complete, hang your new wind chimes and enjoy the melodic addition they bring to your garden. For those interested in exploring more creative projects, the site offers a wealth of ideas for mason jar crafts and DIY chimes.
DIY Skeleton Keys Wind Chimes

Unleash your creativity by transforming thrifted metal skeleton keys into a charming DIY wind-chime that adds a touch of whimsy to any outdoor space. With just a few simple materials like embroidery hoops, jute twine, and glue, you can repurpose these vintage finds into a one-of-a-kind ornament that will delight both the eyes and ears. As the breeze whispers through the keys, they’ll create a soothing melody that’s sure to charm anyone who hears it. This engaging project is perfect for crafting enthusiasts looking to breathe new life into old treasures.
DIY Ice Cream Spoon Wind Chimes

Unleash your creativity and transform a peaceful nature walk into a unique crafting experience with our DIY wind chimes guide. Using everyday materials like ice cream spoons, rubber bands, and more, you’ll create a charming wind chime that serenades the breeze. This project is perfect for little ones aged three and up, offering a delightful way to develop knot-tying skills while having fun. Simply follow our clear, step-by-step instructions to cut, knot, and assemble your one-of-a-kind wind chime, ensuring an engaging and rewarding experience. Whether you’re decorating your own space or gifting someone special, these handmade windchimes add a personal touch to any environment. Get ready to craft a piece of harmonious decor that will bring joy to anyone’s face with every gentle gust.
How to Make Silver Goblet Wind Chimes
Transform your backyard into an idyllic retreat by creating DIY silver goblet wind chimes, inspired by Tuula McPhee’s tutorial on Color Me Thrifty. This guide provides a step-by-step approach to crafting a captivating outdoor ornament using thrifted silver goblets, complete with expert advice on selecting the right materials and tools. With minimal investment and a dash of creativity, you can craft a one-of-a-kind piece that refracts light, exudes sophistication, and produces soothing melodies as each breeze whispers through. Perfect for crafty individuals seeking to infuse their outdoor space with a personalized touch, this project is both engaging and rewarding. Start crafting today and revel in the sweet satisfaction of your own garden oasis.
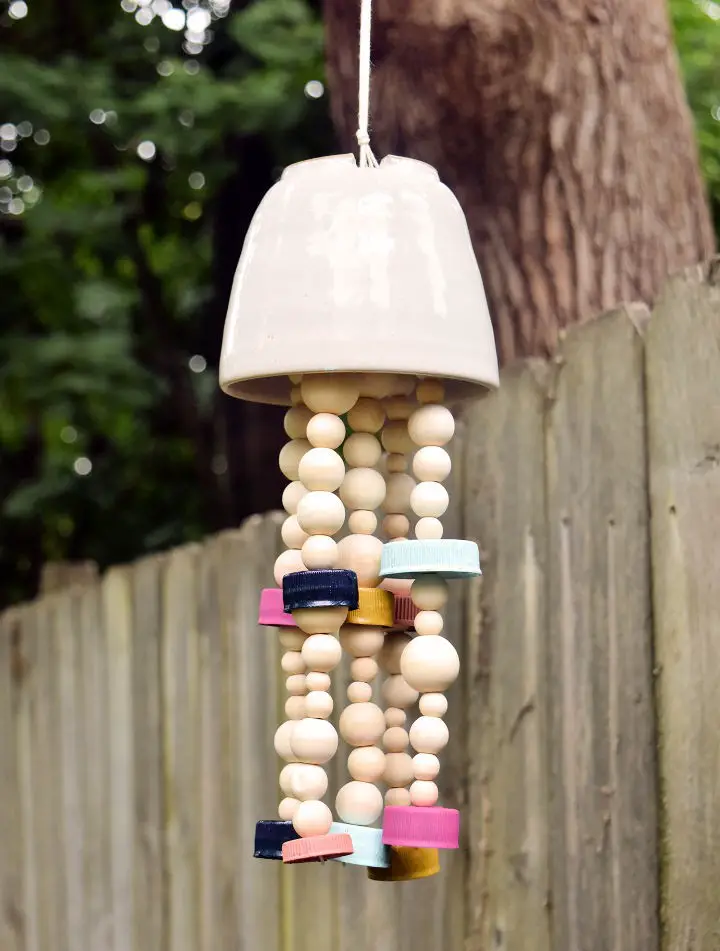
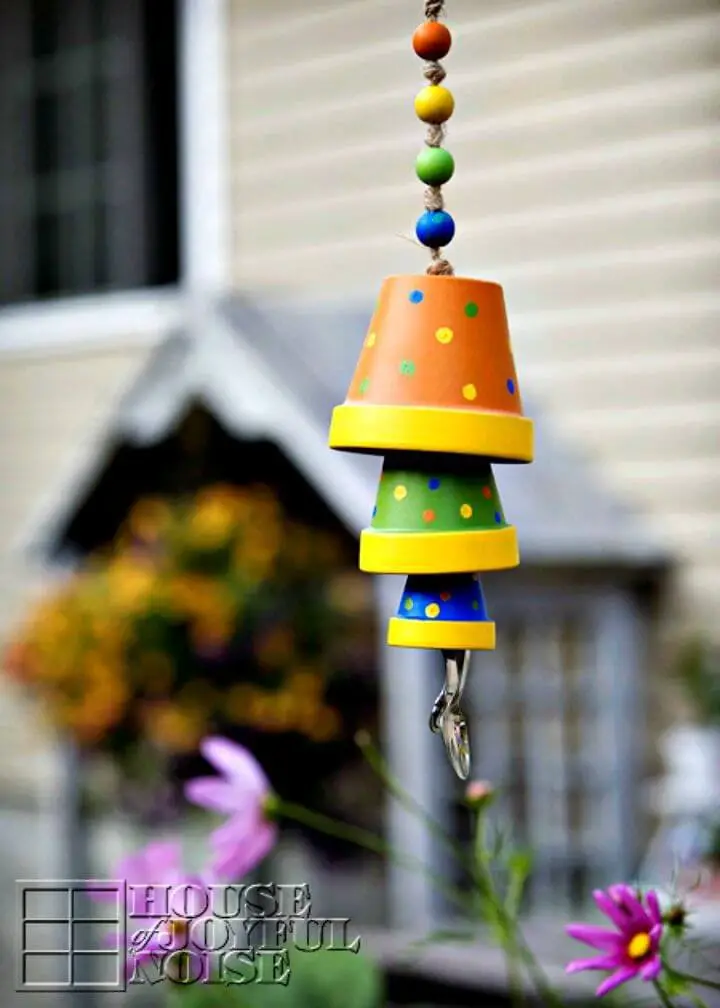
Cute DIY Ombre Wind Chimes

Add a dash of personality to your outdoor haven by creating your own DIY ombre wind chimes with ease. Our comprehensive tutorial will walk you through the process, requiring minimal materials such as mini clay pots, acrylic paint, twine, and a few other simple supplies. The result is a vibrant and charming addition to your patio that not only enhances the visual appeal but also fills the air with the melodious sounds of gently tinkling chimes. With step-by-step instructions designed for success, you’ll be inspired to unleash your creativity and give your garden a one-of-a-kind decoration this Spring.
DIY Star Wars Wind Chimes
Elevate your geeky decor with a DIY Star Wars-inspired wind chime project that’s out of this world! In under a day, you can create a set of unique chimes showcasing the majesty of Jabba’s Palace. To get started, gather some PVC pipes, balsa wood, chain, and a few other easy-to-source materials. Bring your creative vision to life by painting the pieces to match Jabba’s eclectic aesthetic, then add a dash of intergalactic flair with some strategically placed decorations. Perfect for outdoor spaces or rooms dedicated to all things Star Wars, these wind chimes will make a statement without disrupting the peace. So why wait? Channel the Force and transform your home with a one-of-a-kind piece that’s sure to delight fellow fans.
How to Make a Candy Hearts Wind Chime

Transform your home decor into a whimsical wonderland this Valentine’s Day by crafting charming candy hearts wind chimes and ornaments. Perfect for those who adore working with American Decor Chalky Finish Paint, this project will guide you through the process of creating a one-of-a-kind piece that captures the essence of classic conversation hearts. Start by gathering your materials: heart molds, plaster of Paris, wire, ribbon, and a 12-inch wood molding piece. Then, follow these easy steps to bring your creation to life: mix plaster with water, fill the molds halfway, add wire loops, and let them dry. Once set, paint your hearts with a palette reminiscent of classic conversation hearts, prepare the wood molding, and thread the ribbon through to assemble your wind chime. With this step-by-step guide, you’ll be able to create a beautiful piece that will charm your guests and become a delightful addition to your home.
Making Balsa Wood Fall Wind Chimes

Immerse yourself in the creative process of crafting balsa wood fall wind chimes with expert guidance from Meri Cherry. Learn how to harness the unique properties of lightweight balsa wood sourced from South American balsa trees to create personalized, melodious art pieces that bring a touch of nature indoors. This engaging project is ideal for young artists, requiring only basic painting skills and an eye for creative expression. By following step-by-step instructions, you’ll discover how to transform vibrant liquid watercolors into stunning works of art, as you string beads and painted balsa wood onto a lanyard. Add the finishing touch with a bell for a charming jingle, making your wind chime a lovely addition to any outdoor space.
Homemade Spindle Wind Chimes
Transform old spindles into enchanting wind chimes with ease using Confessions of a Serial Do-It-Yourselfer’s straightforward tutorial. This comprehensive guide is tailored for craft enthusiasts who relish upcycling and creating one-of-a-kind garden ornaments. By following clear, step-by-step instructions and utilizing basic tools like a drill and minimal supplies, you’ll be able to craft your own harmonious outdoor accents that add a touch of whimsy to your garden.
DIY Fairy Garden Wind Chimes

Transform your outdoor space into an enchanting oasis with this whimsical fairy garden wind-chime project from Instructables. This DIY guide is the perfect way to tap into your creative side, resulting in a charming wind chime that will captivate both children and adults alike. By following clear, easy-to-follow steps, you can turn simple materials into a magical creation that not only adds beauty to your garden but also invites a peaceful ambiance through its soothing melodies.
How to Make Pressed Penny Wind Chime
Transform your living space with a personalized wind chime crafted from pressed pennies, a simple DIY project that combines creativity with serenity. In regions where pressing coins is legal, such as the US, you can infuse a personal touch into your handmade chime. With just a few basic supplies like a wooden stick, fishing line, and some essential tools, you can assemble a captivating, melodious decoration for any outdoor or indoor setting. To add an extra layer of visual appeal, incorporate beads that catch the light, creating a soothing accompaniment to the gentle clinking of your handcrafted wind chime. This engaging craft is perfect for introducing a touch of tranquility into your surroundings.
DIY Garden Plate Flower Wind Chime

Transforming ordinary objects into an extraordinary piece of art is the essence of this DIY craft project. With just a few simple materials like spoons, glass candle holders, and a plate, you can create a garden plate flower wind chime that not only adds a charming touch to your outdoor space but also serenades you with its gentle melodic sound. By using Marine GOOP adhesive for a sturdy build and following the step-by-step instructions for drilling and assembling, you’ll have a whimsical wind chime ready in just a day. Hang it on your porch or in your garden and let the joy it brings be carried away by every breeze.
How to Make a Sweet Sounding Silver Sugar

Transform your outdoor space with a one-of-a-kind wind chime crafted from repurposed materials, specifically a salvaged silver sugar bowl and discarded cutlery. With Color Me Thrifty’s comprehensive step-by-step guide, you’ll discover the art of creating a melodious sugar bowl wind chime that produces a soothing serenade. The project requires minimal materials, including thrifted chain links, metalware, split rings, and a drill, as well as some basic DIY know-how for drilling precise holes and assembling the unique chime. Perfect for patio decor or gifting to friends and family, this creative endeavor adds a dash of whimsy to any setting, while providing an immersive experience with the gentle clinking of metal on breezy days.
Beautiful DIY Beaded Wind Chime

Transform your outdoor space with a charming beaded wind chime, crafted from driftwood, beads, and bells through a simple DIY project inspired by garden therapy. This delightful decoration not only adds visual interest but also creates a soothing melody on breezy days. Perfect for utilizing spare beads and charms, this personalized project brings a touch of sparkle and sound to your backyard oasis, making it an ideal activity for crafters of all levels.
Repurposed Junk Owl Wind Chime Tutorial
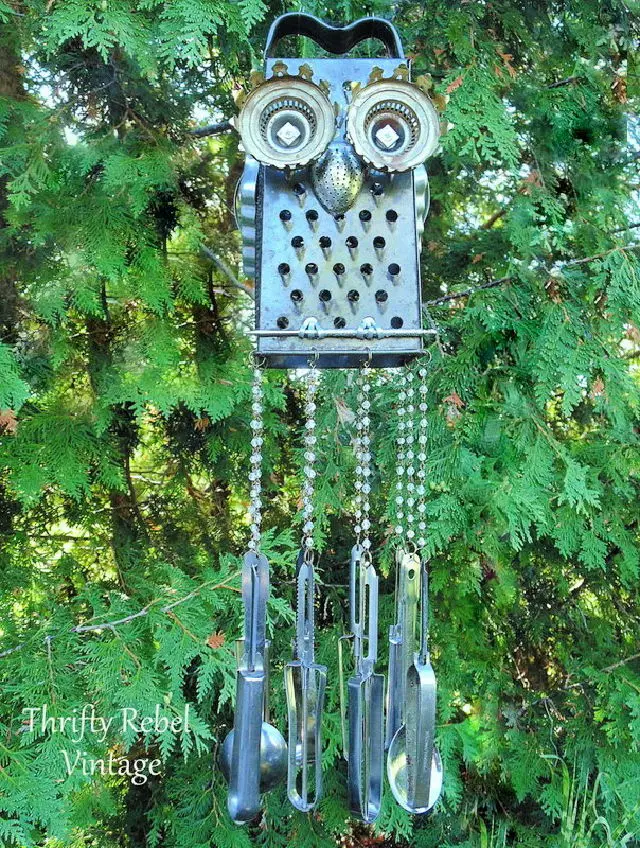
Transform a metal cheese grater and some unconventional kitchen items into a captivating owl wind chime with this creative guide from Color Me Thrifty. Tuula McPhee’s step-by-step instructions make it easy to upcycle everyday objects, resulting in a visually stunning garden accessory that also produces a soft, melodic tune when the breeze stirs. By combining vintage cookie cutters, vegetable peelers, and unexpected finds, you can create a whimsical addition to your outdoor space that embodies both sustainability and creativity.
DIY Jellyfish Clay Pot Wind Chime
Transform your outdoor space with the whimsical charm of a jellyfish clay pot wind chime. This DIY project from The Keeper of Cheerios is an ideal way to add a playful touch while showcasing your creativity. Begin by priming a clay pot and canning lids, followed by a layer of glitter spray for a radiant sparkle. Next, bring whimsy to life by gluing wiggle eyes, buttons for mouths, and seashells onto the lids, securing two with a string between them. Create the wind chime’s centerpiece by stringing glass beads together and attaching your fish creations to a washer. A sturdy twine will connect the washer to the clay pot, with an additional washer ensuring its secure position. Hang your handmade masterpiece and enjoy the melodic sounds of nature while adding a touch of nautical whimsy to any outdoor setting.
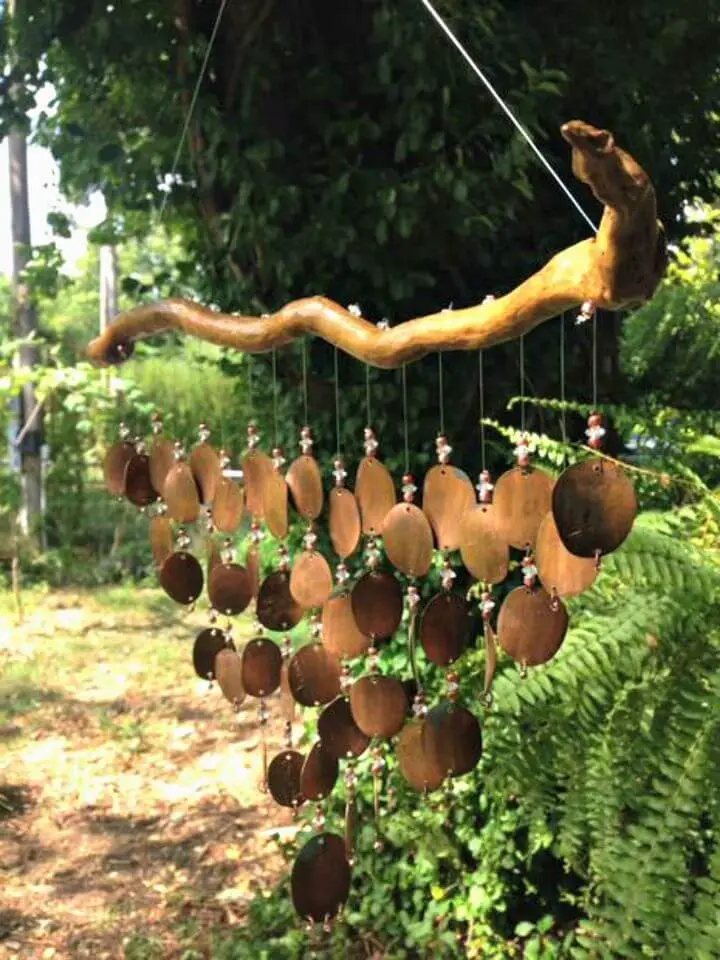
Make Your Own Coiled Copper Wind Chimes
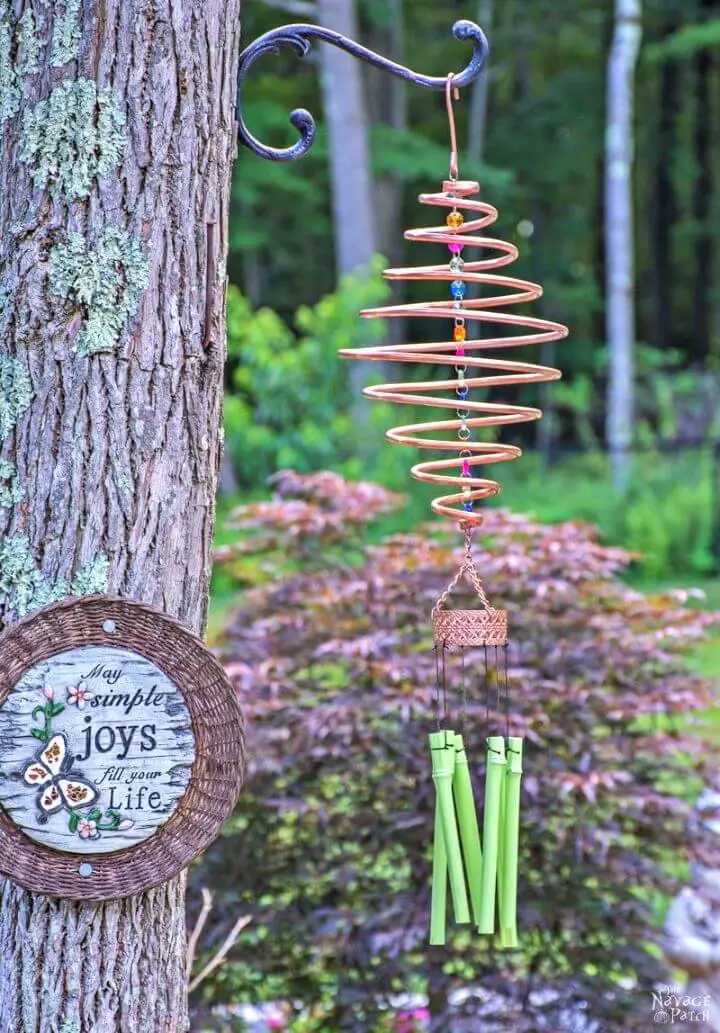
Get ready to create an enchanting garden feature with this comprehensive tutorial on making coiled copper wind chimes! Handan from The Navage Patch takes you through the step-by-step process of transforming a simple refrigeration copper coil into a stunning piece of decor that’s perfect for DIY enthusiasts. You’ll learn how to bend copper, craft wind chimes from bamboo, and add a personal touch with decorative elements. This guide also highlights the importance of coil length and shares helpful tips on maintaining the chime’s shape using beads. With this engaging tutorial, you’ll be able to create a harmonious charm that adds beauty and serenity to your outdoor space.
How to Make a Rainbow Button Wind Chime

Create a melodious masterpiece with Amanda’s button wind chime tutorial. This upcycling project transforms discarded buttons and canning lids into a vibrant, harmonious decoration that adds a pop of color to your outdoor setting. Start by gathering essential materials like sturdy plastic lids, strings, pony beads, tri-beads, and an assortment of colorful buttons. With simple tools such as hammers, nails, and scissors, you’ll be able to assemble this visually striking wind chime. To add an extra layer of personality, paint the lids for a unique splash of color. Then, indulge in the satisfying process of threading and securing the buttons to achieve a tiered, rainbow effect. Once completed, hang your handmade chime outside and delight in the whimsical sounds it brings to your garden or patio. This crafting adventure not only provides a fun activity but also offers an opportunity to personalize your space with a touch of handmade charm.
DIY Recycled Plastic Lid Wind Chime
Combine creative reuse and environmental sustainability by transforming plastic lids that can’t be recycled into a vibrant and melodious wind chime. This accessible DIY project not only breathes new life into materials destined for landfills but also fosters a fun and engaging activity for all ages. With a few basic household tools like hammers, nails, needles, and strings, along with an array of plastic lids and beads, you can craft a one-of-a-kind wind chime that adds a whimsical touch to any outdoor setting. By embracing the joy of crafting with recycled materials, you’ll not only be reducing waste but also celebrating the beauty of creative expression.
DIY Driftwood Wind Chime

Transform your outdoor space into a serene oasis with the driftwood wind chime project from homemade heather. Heather Painchaud skillfully guides you through a straightforward, yet captivating step-by-step process to transform beachcombed treasures into a calming decor piece that harmoniously responds to the breeze. To create this one-of-a-kind wind chime, gather driftwood, beads, a pendant, and twine, then assemble them in a way that resonates with your personal style. This DIY endeavor is ideally suited for enhancing patios, gardens, or as a thoughtful gift, allowing you to add a unique touch to your surroundings. The tutorial’s concise language, crystal-clear instructions, and practical advice ensure that even the most novice crafters can confidently create this enchanting decor piece.
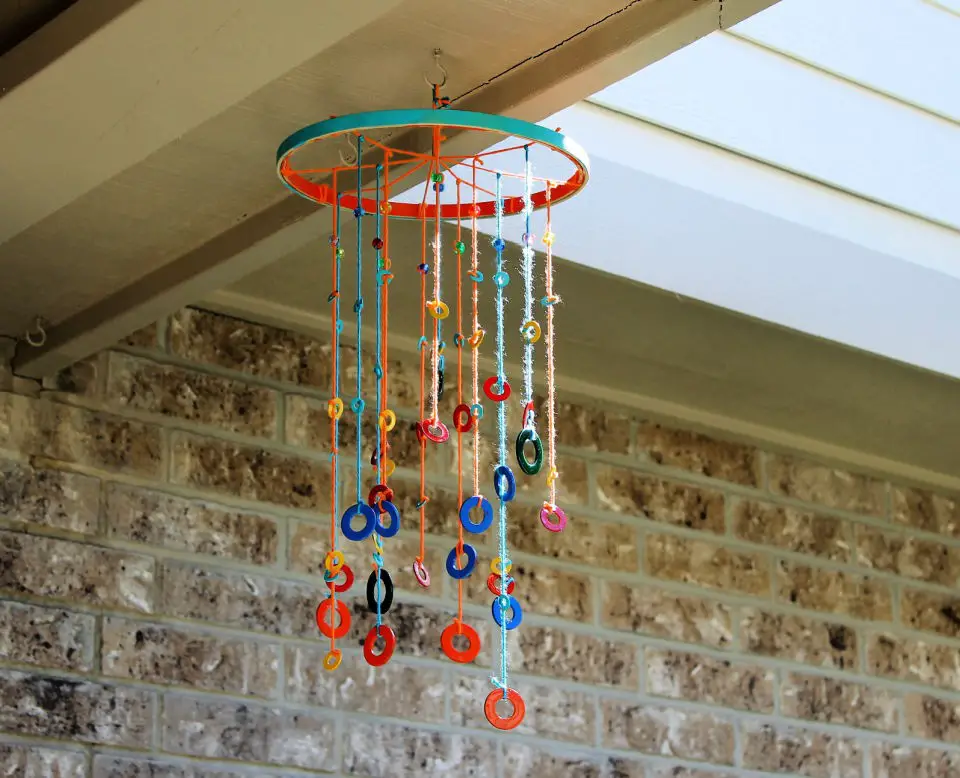
Colorful Metal Washer Wind Chime Tutorial
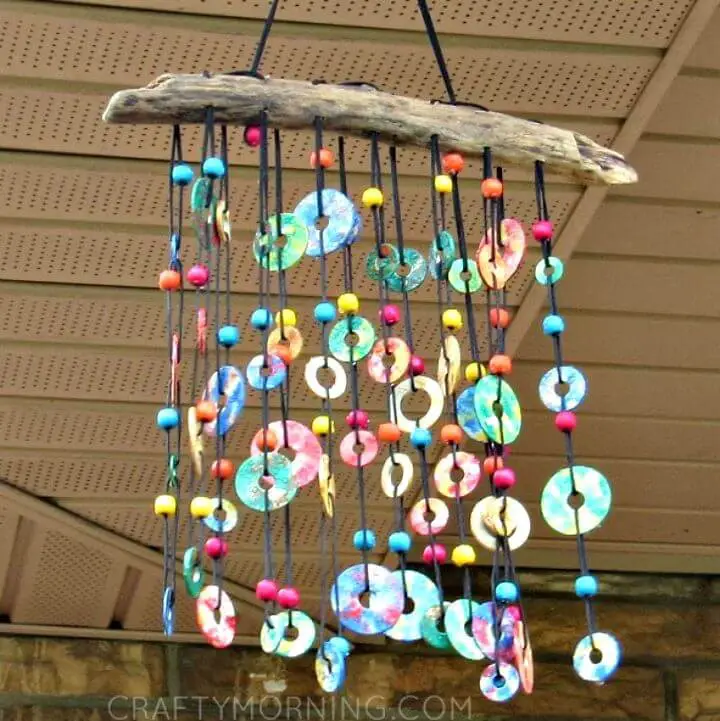
Transform ordinary metal washers into an extraordinary wind chime by following Crafty Morning’s easy-to-follow steps. Start by collecting a medley of materials, including spray paint, a sturdy wooden base, metal washers, beads, and string. To give your creation a personalized touch, unleash your inner artist and paint the washers in a kaleidoscope of vibrant hues. Seal your masterpiece with a clear coat to ensure it withstands the elements. Next, drill holes into the wood and weave the painted washers together with string, carefully incorporating beads for an added layer of charm. This enchanting project is perfect for adding a dash of whimsy to any outdoor space, as each gentle breeze will serenade you with the melodic sounds of your handcrafted wind chime.
Conclusion:
Crafting 30 homemade DIY wind chimes is an incredibly rewarding experience that not only adds a touch of elegance to your living space, but also fills it with harmonious melodies. This comprehensive guide has equipped you with the essential knowledge and steps necessary to create these charming pieces, allowing each wind chime to reflect your personal style and ambiance preferences. Whether you’re looking to adorn your garden, balcony, or seeking a thoughtful gift, these DIY wind chimes promise a captivating blend of visual appeal and soothing sounds. By embracing the joy of making your own wind chimes, you’ll be treated to a unique melody that resonates with your very home.
