Why Glitter Crafts?
Imagination knows no bounds when it comes to crafting with glitter! This sparkly material has the power to ignite creativity, fine-tune dexterity, and bring a sense of joy and accomplishment to any project.As you delve into the world of glitter crafts, you’ll discover that this versatile medium is not only affordable but also widely available. Whether you’re a seasoned crafter or just starting out, glitter is an inclusive material that invites everyone to get creative.The tactile experience of handling glitter can be incredibly therapeutic, allowing your mind and hands to wander into new territories. And the best part? Glitter crafts have the ability to elevate ordinary objects into extraordinary pieces that radiate beauty and charm.When it comes to gifting or personalizing items, handmade glitter crafts take on a whole new level of significance. They become more than just a thoughtful gesture – they’re a declaration of love, care, and attention to detail.Ultimately, crafting with glitter is about embracing the magic within each project. It’s an invitation to let your imagination run wild, to get lost in the sparkly world of creativity, and to emerge with a sense of pride and accomplishment.
Getting Started with Glitter Crafts
Transform your creative endeavors with the magic of glitter crafts! With its ability to elevate even the most mundane objects into dazzling displays of artistry, it’s no wonder that working with glitter has become a beloved pastime for craft enthusiasts and newcomers alike. Whether you’re seeking inspiration or looking to take your skills to the next level, this comprehensive guide will walk you through the process of incorporating glitter into your projects, guaranteeing a radiant outcome.
Choosing Your Glitter
When it comes to adding some sparkle to your project, the type of glitter you select is crucial. The first decision to make is whether you want a subtle shimmer or a bold, eye-catching statement piece. Fine glitters offer a delicate sheen, while chunky glitters provide a more dramatic effect. For those looking for an eco-friendly option, biodegradable glitter is a great choice.
Gathering Supplies
To create dazzling decorations with glitter, you’ll need a few fundamental materials beyond the sparkly stuff itself. These essentials typically comprise three key components: adhesive, base item, and sealant. The first, adhesive, can be glue, Mod Podge, or spray adhesive – anything that helps the glitter stick to your surface of choice. Next, select the base item you want to decorate. This could be a humble mason jar, a pair of shoes, or anything in between. Finally, use a clear sealant or additional Mod Podge to ensure your masterpiece remains intact and prevents the glitter from shedding off prematurely.
Planning Your Project
When it comes to getting started with crafting, the first step is often selecting a project that aligns with your interests and skill level. If you’re feeling unsure, consider beginning with simple yet satisfying projects like glittered mason jars, custom phone cases, or sparkly hair clips. These projects typically require minimal materials and are ideal for newcomers to the world of crafting. Not only do they provide a sense of accomplishment, but they also allow you to develop your skills without feeling overwhelmed.
Execution: Step-by-Step
To embark on your sparkly project, start by creating a protective barrier for your workspace. Cover it with newspaper or a cloth to contain any stray glitter particles. If your venture involves painting, get that step out of the way first and allow the paint to dry thoroughly before proceeding.
Next, carefully apply your adhesive across the designated area. For optimal precision, consider using a paintbrush to ensure an even coat. This will provide a solid foundation for the glittering fun to come.
Now it’s time to add some sparkle! Sprinkle glitter liberally over the adhesive-covered surface, taking care to tap off any excess material that may not have adhered. For intricate designs or patterns, consider utilizing stencils or masking tape to guide your application and achieve the desired level of detail.
Finally, once both the adhesive and glitter have fully dried, seal the deal with a layer of protective sealant. This will prevent any stray glitter particles from shedding off over time.
Tips for Success
When tackling a large decoration, divide the process into manageable sections to prevent the adhesive from drying before you can apply the glitter. This approach will help you maintain control and achieve a smooth finish. To add depth and visual interest, combine different hues and sizes of glitter, allowing each layer to dry completely before moving on to the next step. Patience is key in this process, as rushing can lead to smudges or uneven coverage.
Cleaning Up
To tame the chaos, it’s essential to have a plan in place for containing and cleaning up the aftermath of your craft session. This starts with having a reliable tool at your disposal – whether that’s a trusty vacuum cleaner or a handy lint roller. These devices can help you swiftly pick up any stray glitter particles, saving you time and frustration in the long run.
In addition to these tools, it’s also helpful to have a damp cloth on hand. This can be used to gently sweep away any remaining sparkles that manage to evade your initial cleaning efforts.
Inspiration and Creativity
Unleash the creative potential of glitter crafts by embracing experimentation! Don’t be afraid to push boundaries and combine this versatile medium with others, such as paint, markers, or even fabric. The possibilities are endless when you take a chance and see where your imagination takes you. As you explore new combinations and projects, you’ll discover that the beauty of glitter crafts lies in its ability to spark creativity and inspire unique expressions.
Safety First
To ensure a safe and enjoyable crafting experience when working with fine glitter, take necessary precautions such as wearing a mask to prevent inhalation and creating in a well-ventilated area. By following these guidelines and embracing your creativity, you’ll be well on your way to mastering the art of glitter crafts. As you delve into this world of sparkle and shine, remember that the key lies not only in the techniques but also in having fun. Glitter crafts offer a versatile and engaging medium for self-expression, whether you’re creating gifts, personalizing belongings, or adding a touch of elegance to your home decor.
FAQs on Glitter Crafts
To facilitate your exploration of the mesmerizing realm of glitter crafts, I’ve compiled a thoughtful and detailed FAQ section, addressing a range of frequently asked questions that will equip you with the knowledge to create dazzling masterpieces.
What type of glitter is best for crafting?
When it comes to choosing the ideal glitter for crafting, the perfect selection depends on the specific project you have in mind. If you’re aiming for a delicate, understated sparkle, fine glitter is an excellent choice. On the other hand, chunky glitter offers a more eye-catching and dramatic visual impact. For those looking for eco-friendly alternatives, biodegradable glitter provides a responsible option that aligns with environmentally conscious crafting practices.
How can I prevent glitter from falling off my crafts?
For long-lasting glitter effects, start by securing the crafting surface with a robust adhesive such as Mod Podge or spray adhesive. Following the application of glitter, reinforce your design by applying a clear sealant or an additional layer of Mod Podge, effectively preventing stray sparkles from detracting from your finished piece.
What kind of adhesive should I use for glitter crafts?
When it comes to choosing the right adhesive for your project, there are several options to consider. For instance, glue is often a suitable choice for bonding lightweight materials like paper, as well as more delicate surfaces that require a gentle hold. On the other hand, Mod Podge stands out for its dual functionality – not only can it effectively adhere various materials, but also seal and protect them from damage or wear, making it particularly useful when working with glittery elements. Meanwhile, spray adhesive proves to be an excellent solution for covering larger areas consistently and evenly, making it a great option for projects that require a broad surface application.
Can glitter crafts be eco-friendly?
When it comes to glitter crafts, many people are unaware that they can actually make a positive impact on the environment. One way to achieve this is by using biodegradable glitter, which is crafted from plant-based materials that naturally break down in the environment, thereby reducing microplastic pollution. This eco-friendly approach not only helps preserve our planet’s delicate ecosystem but also promotes sustainable practices.
How do I clean up glitter after crafting?
When it comes to cleaning up glitter, there are several effective methods you can use depending on the scale of the mess. For larger spills, a vacuum cleaner is an excellent tool to have at your disposal. It’s capable of sucking up large quantities of glitter in no time, leaving your surfaces looking spotless. If you’re dealing with smaller amounts of glitter or trying to remove it from surfaces and clothing, a lint roller is a great option. Its adhesive properties make quick work of picking up even the smallest particles. And for those pesky loose glitter particles that seem to go flying everywhere, damp cloths are your best friend. Simply wipe down the area with a slightly moist cloth and watch as the glitter gets caught and contained, making cleanup a breeze.
Can I make my glitter adhere to fabric?
To achieve successful adhesion of glitter to fabric, follow these steps: Apply a fabric glue or Mod Podge specifically designed for fabric to your chosen material. Next, sprinkle the desired amount of glitter over the adhesive surface. Allow the glitter to dry completely before securing it with a sealant or applying gentle heat using a cloth and iron set on a low temperature (for glitters that are heat-resistant).
What safety precautions should I take when working with glitter?
To ensure a safe and enjoyable experience when working with fine glitter, consider implementing the following precautions:
Firstly, it’s essential to wear a mask to prevent inhaling glitter particles that can exacerbate respiratory issues. Additionally, work in a well-ventilated area to guarantee good air circulation, which helps to dissipate any lingering sparkles.
Furthermore, consider donning protective eyewear to shield your eyes from the possibility of glitter getting into them. By taking these simple yet effective measures, you’ll be well-equipped to tackle your glitter craft projects with confidence and creativity, ultimately allowing your imagination to truly sparkle!
25 Easy Glitter Crafts and Projects (Sparkle Crafts)
Unleash the magic of DIY crafting by discovering 25 effortless ways to add a pinch of sparkle to your creative endeavors. Whether you’re making ornaments, cards, or something entirely new, get ready to unleash your imagination and transform ordinary projects into extraordinary works of art that shimmer with glittering charm.
DIY Glitter Tube Bracelets

Transform your child’s wardrobe into a dazzling spectacle with this easy-to-follow tutorial from Made To Be A Momma. By combining plastic vinyl tubing, vibrant glitter, ribbon, and hot glue, you can create stunning accessories that add a touch of magic to their outfits or playtime ensembles. The process is surprisingly simple: measure and cut the tubing to desired lengths, secure the ends with a few strategic dabs of hot glue, sprinkle on some dazzling glitter for added visual appeal, and finish it all off with a decorative ribbon that adds a pop of color. This fun and creative activity is perfect for a cozy afternoon spent crafting together, yielding not only a delightful piece of jewelry but also cherished memories to treasure.
How to Make Glitter Hair Clips
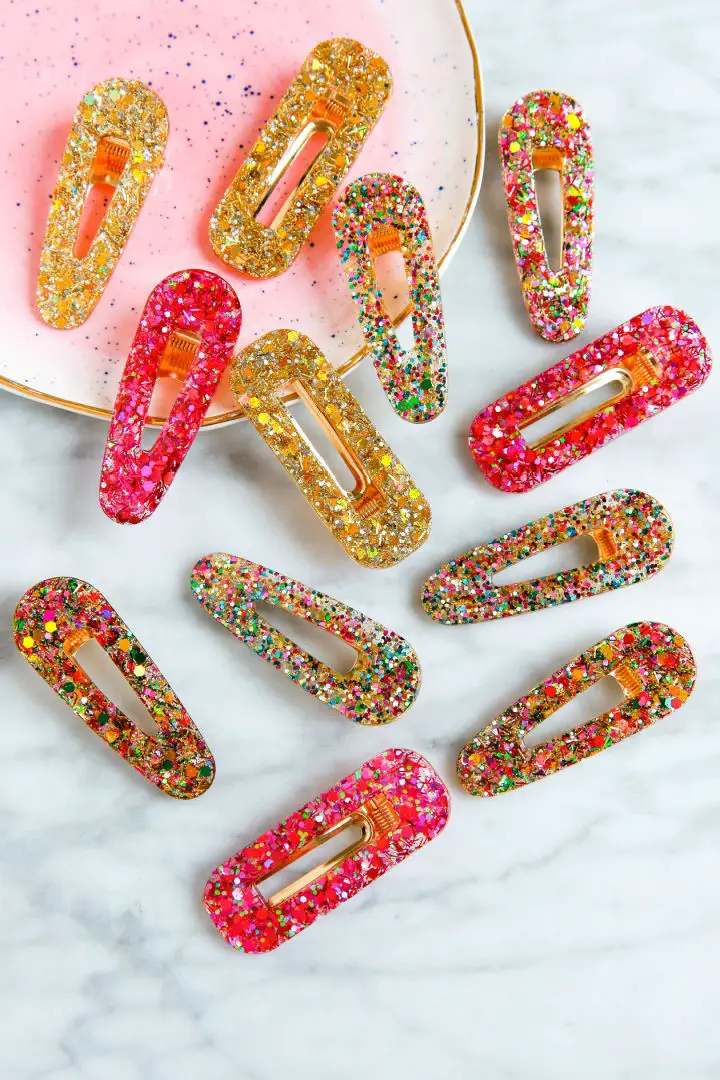
Transform ordinary hair clips into extraordinary pieces of jewelry by following Rachel Mae Smith’s straightforward DIY guide at The Crafted Life. With a few essential materials like resin, a clip mold, glitter, E-6000 glue, gloves, and a stirring stick, you can create custom accessories that reflect your personal style. Whether you’re making gifts for friends or adding a touch of glamour to your own wardrobe, this project offers endless possibilities for creativity and self-expression. By mixing resin with glitter, pouring the mixture into the mold, and allowing it to set, you’ll be crafting a one-of-a-kind hair accessory that’s sure to turn heads. Once cured, simply attach the resin to the clip using glue, let it dry, and your bespoke beauty is ready to shine.
Homemade Faux Druzy Magnets
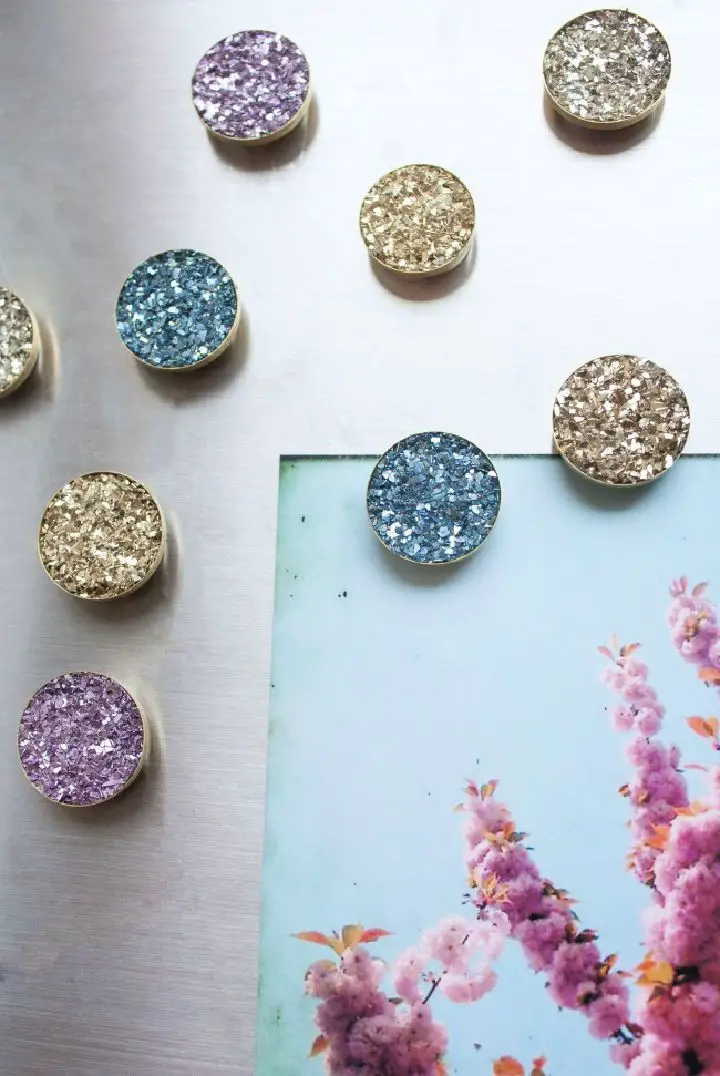
Add a pinch of magic to your home decor by crafting stunning faux druzy magnets that combine sleek design with organic texture. This easy DIY project requires just a few simple materials: brass round bezels, glass glitter, Mod Podge, a paintbrush, strong magnets, and E6000 glue. By following our step-by-step guide at sisoo.com, you’ll learn how to layer the glitter and secure the magnets for a polished finish that will leave your refrigerator looking like a work of art.
DIY Glitter Paint Mason Jar
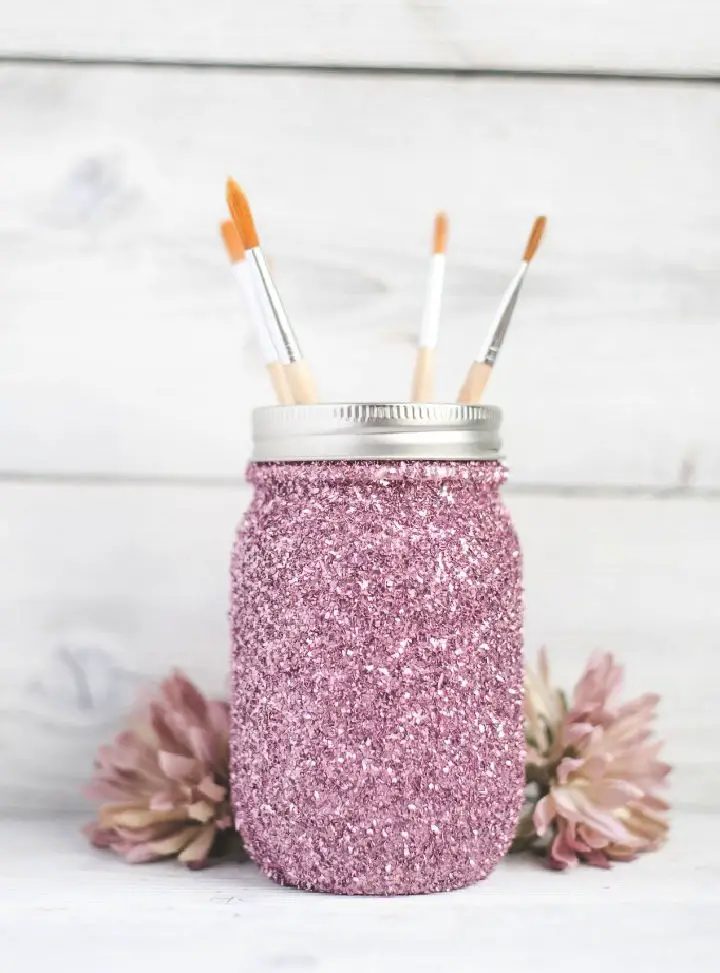
Transform plain mason jars into dazzling masterpieces by infusing them with a touch of glamour using a glitter paint mason jar craft. Perfect for those who crave a dash of sophistication, these sparkly containers can be used to store makeup brushes or add a pop of color to your workspace. To achieve this show-stopping effect, you’ll need to combine paint, glue, and an abundance of glitter, but the key to success lies in mastering the art of keeping the sparkles in place.
nThe secret to ensuring the glitter adheres to the jars without scattering everywhere can be found in a detailed tutorial by Kelly at KA Styles, which provides crystal-clear step-by-step instructions for achieving this dazzling look. With these expert tips, you can create stunning, glittering mason jars that make exceptional gifts or stylish organizational tools. So why not indulge in this sparkly craft and add some magic to your day?
Make a Glitter Speckled Mug
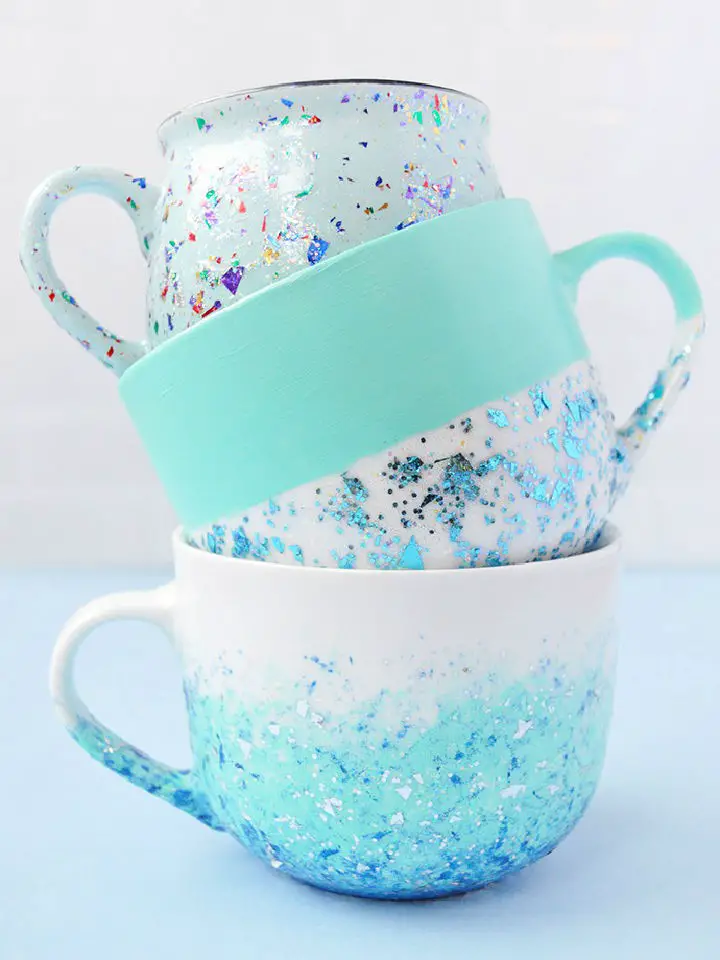
Indulge in the whimsical world of glitter crafts and unlock a universe of creative possibilities. The DIY Glitter Speckled Mugs tutorial by Handmade Charlotte offers an enchanting journey, transforming ordinary mugs into dazzling masterpieces with the aid of Folk Art’s Glitterific Acrylic Paint. Begin with clean ceramics from your local store, apply a base coat of multi-surface acrylic paint if desired, and then unleash the magic of glitter paint. As these mugs are intended for decorative purposes only due to the nature of the glitter paint, they’re perfect for housing succulents or organizing desk supplies. By following the simple and engaging instructions, you’ll create a set of dazzling, speckled mugs that will illuminate any shelf or table. Embark on this creative adventure and add a pinch of sparkle to your home décor!
Easy Glitter Leaves Craft
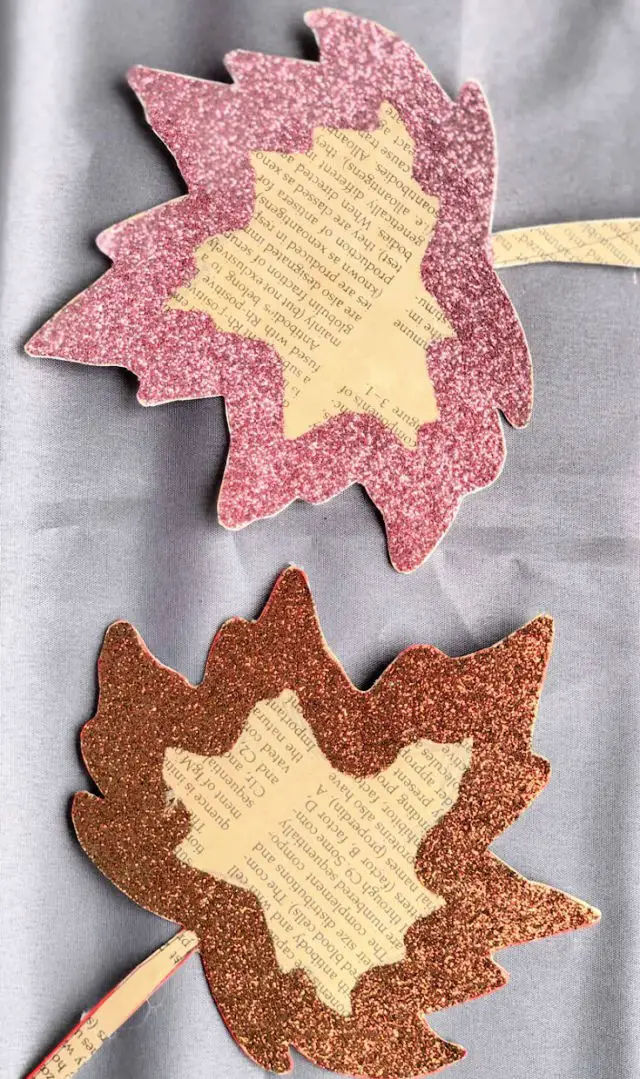
Transform old book pages into dazzling glitter leaves with this step-by-step guide from Moms & Crafters. These shimmering creations are perfect for elevating your fall decor, whether you’re looking to craft elegant garlands or unique greeting cards. To get started, collect torn book pages, eco-friendly glitter, and white school glue. Once you have these materials, you can begin tracing a leaf shape, cutting it out, and adding a glitter outline – the perfect foundation for making breathtaking decorations that evoke the magic of autumn. Whether displayed in a vase or strung across your mantel, these glitter leaves bring a touch of glamour to any space. With this guide, you’ll be able to dive into crafting these eye-catching embellishments and add a sparkle to your seasonal celebrations.
Make Your Own Glitter Shoes
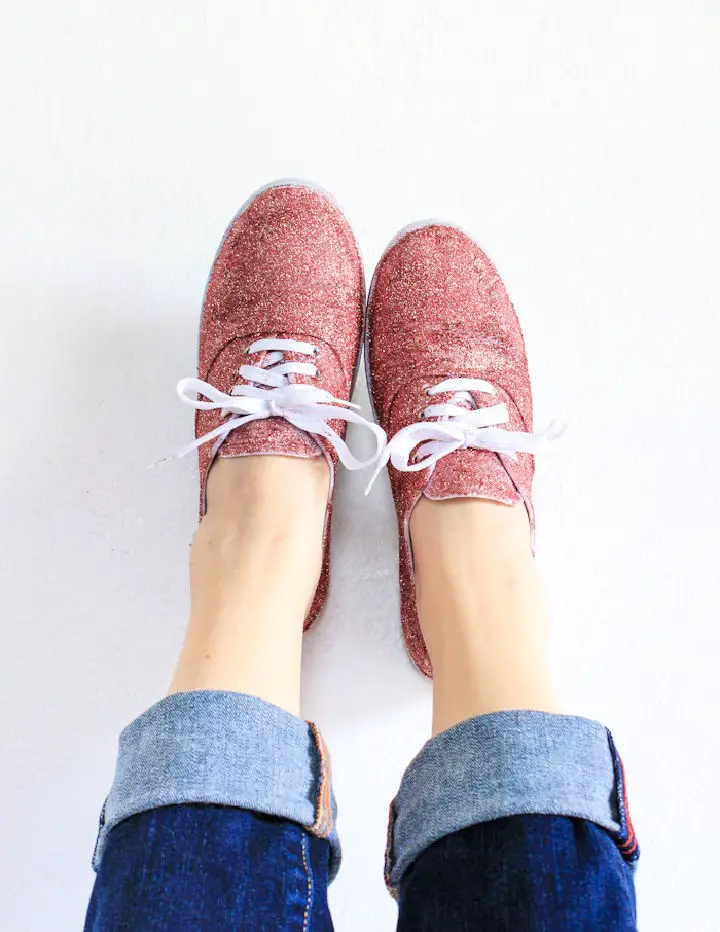
Want to elevate your shoe game? With The Crafted Life’s straightforward and innovative approach, you can turn plain footwear into dazzling showstoppers. A simple tutorial will guide you through the process of combining decoupage with glitter and applying it to your shoes in just a few easy steps. Keep in mind that some drying time is required, so be patient – but the end result is well worth the wait: a one-of-a-kind pair of shoes that gleams with every step. Just remember to protect non-canvas areas before getting started to ensure a pristine finish. Get ready to strut your stuff in style with your very own DIY glitter shoes!
Simple DIY Glitter White Boards
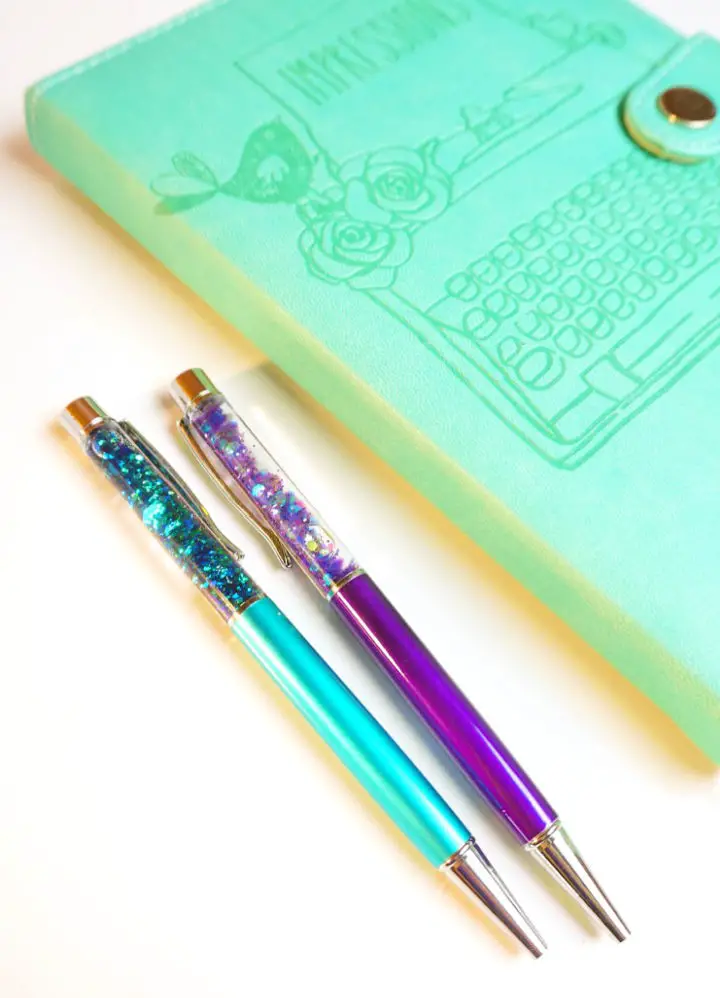
Unleash your creativity with a fun DIY project from Happiness is Homemade! In just under 10 minutes, you can transform empty tube pens into shimmering, one-of-a-kind writing instruments. Perfect as a thoughtful gift or an exciting addition to your stationery collection, these glitter pens are sure to spark joy. To get started, gather a few simple materials like clear glue, assorted glitters, and waterproof adhesive. Then, follow our step-by-step guide to mix, fill, and assemble your pen for a truly eye-catching result. With these sparkly writing instruments, you’ll be adding a touch of glamour to every written word.
DIY Ombre Glittery Iced Tea Tumblers
Transform the way you enhance your beverage experience with a dash of creative flair. If you’re looking to elevate your summer refreshments, consider the Ombre Glittery Iced Tea Tumblers DIY guide from Club Chica Circle. This engaging tutorial will walk you through each step in transforming ordinary plastic cups into eye-catching masterpieces. By utilizing dishwasher-safe Mod Podge and a variety of glitters, you’ll be able to add a splash of sparkle to your drinkware. The best part? This project is both practical and stylish, making it an excellent activity for craft enthusiasts seeking to create something unique. As you work through the tutorial, grab your supplies and get ready to unleash your creativity, perfecting those delicious Keurig Brew Over Ice drinks served in your very own glittery tumblers.
Making a Glitter Phone Case
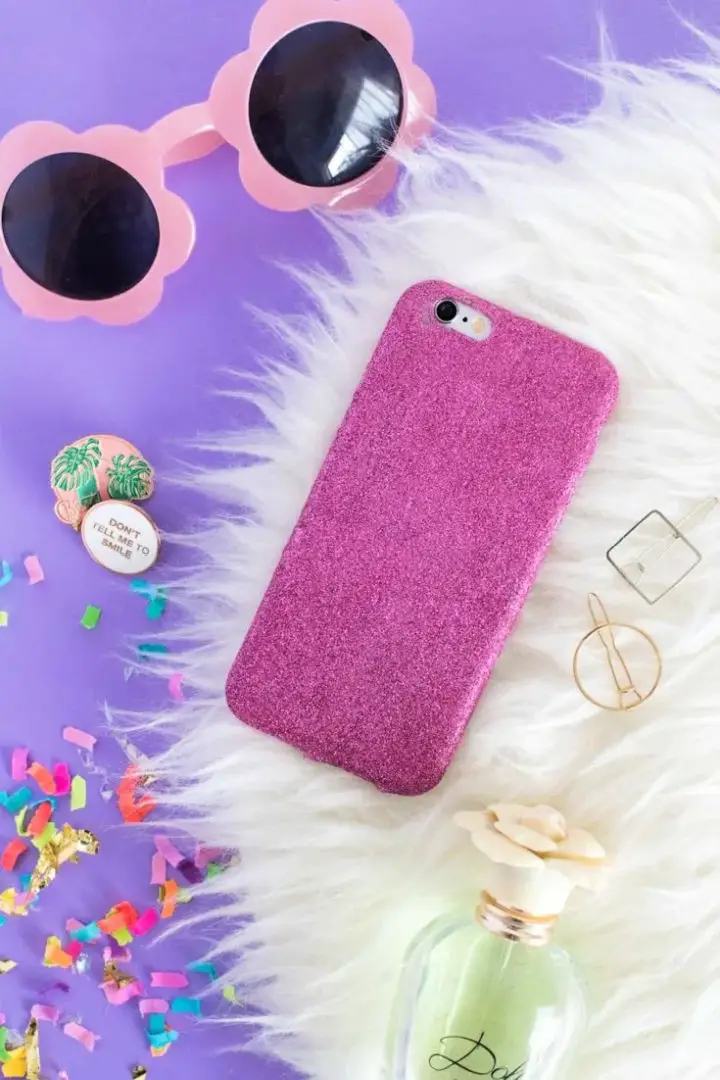
Transforming a clear phone case into a dazzling accessory is a fun and simple project that can add a touch of glamour to your everyday life. At its core, the process involves applying Mod Podge Gloss, glitter, and basic crafting tools to create a one-of-a-kind design. This DIY endeavor is perfect for anyone who enjoys customizing their belongings or seeking unique gift ideas. With clear instructions, you can follow along and create a personalized glitter phone case that’s both eye-catching and practical. The step-by-step process ensures a seamless application, resulting in a glittery finish that’s sealed to minimize shedding. As you work on this engaging DIY craft, get ready to make your phone shimmer and shine with a unique accessory that reflects your personal style.
How to Make Photo Glitter Globes
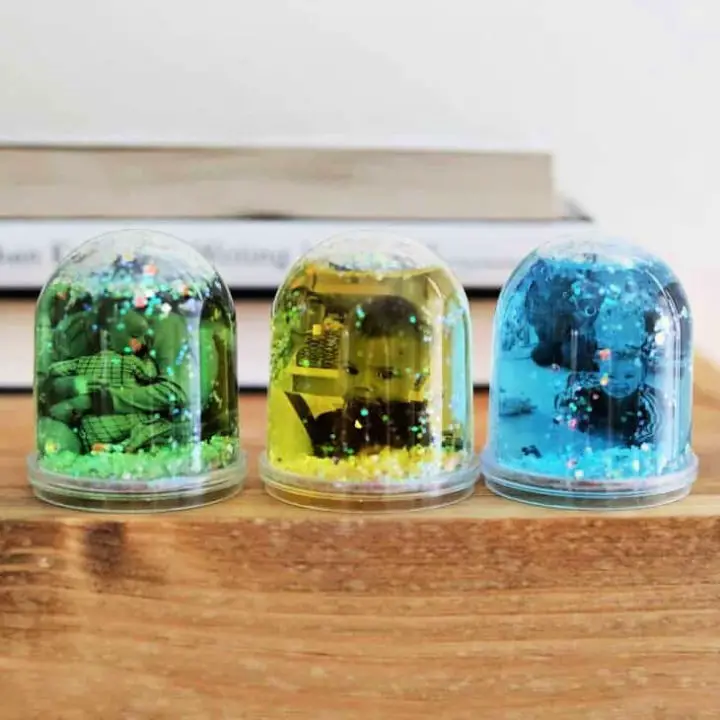
Transforming everyday moments into mesmerizing photo glitter globes is an artful way to infuse personal touches throughout your space or create thoughtful gifts. By following Emma Chapman’s straightforward guide on A Beautiful Mess, you can master the process of printing cherished snapshots directly from your phone using the Canon IVY mini printer. The addition of just a few materials – including glitter, glycerin, and optional food coloring – enables you to craft these captivating globes in no time. As you work through the step-by-step tutorial, accompanied by an informative video, you’ll find the project accessible and enjoyable. Whether you’re celebrating special occasions like Mother’s Day or Father’s Day, or simply seeking a unique decor element for your home, this DIY adventure is sure to delight.
Easy to Make Glitter Slime
For a creative and mesmerizing DIY project that’s equally delightful for kids and adults alike, The Best Ideas for Kids presents an uncomplicated recipe for making glitter slime. This hands-on activity not only yields a sparkly, oozy treat but also serves as an engaging introduction to the fundamental science behind polymers. With just a few straightforward ingredients like clear glue, glitter, baking soda, and contact lens solution containing boric acid and sodium borate, you can effortlessly craft your own batch of this shimmering slime. Feel free to customize the color to suit your preferences, and don’t forget to keep a watchful eye on children during the process for a safe and enjoyable crafting experience. Moreover, when stored properly in an airtight container, your glitter slime can retain its mesmerizing quality for up to a week or more, providing extended opportunities for creative expression and playtime.
DIY Glitter Dipped Clipboards
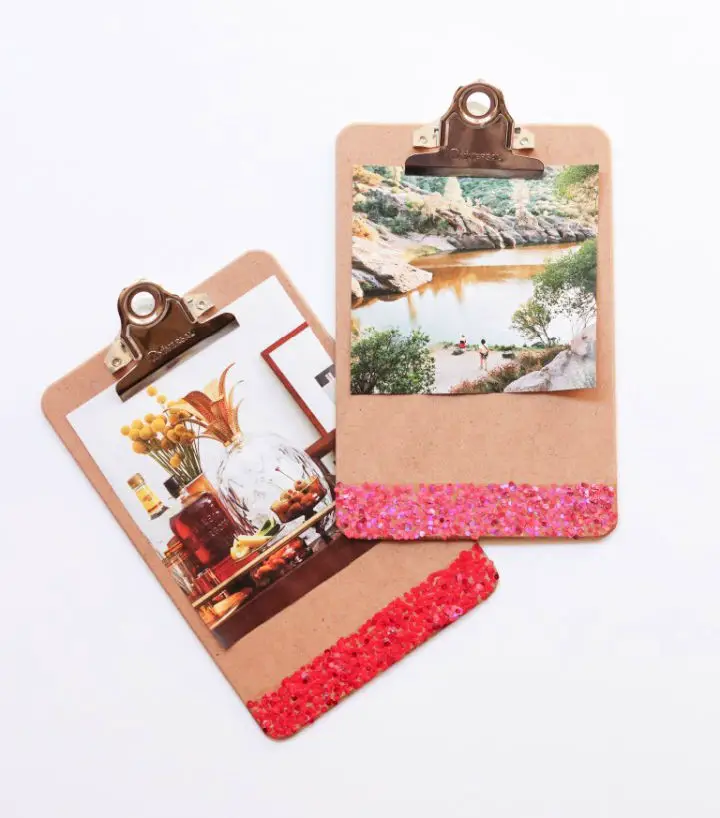
Transform a dull workspace into a sparkling oasis with this easy DIY project from The Crafted Life! With just 40 minutes and a few simple supplies like clipboards, mod podge, tape, glitter, and a sponge brush, you can turn a mundane clipboard into a dazzling accessory. Start by sectioning off the area you want to glitter using tape, then apply mod podge with the sponge, sprinkle on your favorite sparkles, and let it sit. Remember to shake off any excess and remove the tape before the glue sets. Finish off the look with a final layer of mod podge once dry. The end result is not only functional but also visually stunning, making this project perfect for both crafting novices and enthusiasts.
Glitter Word Art Painted Rocks
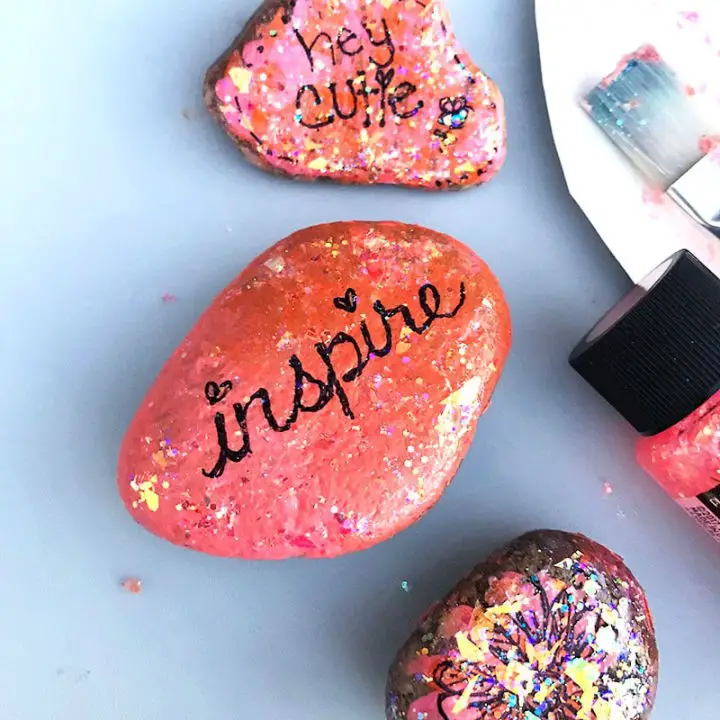
Transform ordinary stones into dazzling works of art by following this step-by-step guide. With just a few simple materials – a clean rock, vibrant paints, and some sparkle-inducing glitter – you can create one-of-a-kind masterpieces perfect for gifting or decorating. Begin by applying a base coat in your chosen color, allowing it to dry completely before moving on to the next step. Once the paint is dry, select a word that speaks to you and use a marker to carefully inscribe it onto the stone. To add an extra layer of visual interest, apply a glittery finish and seal your design with a weatherproof coating. By following these easy steps, you can craft a unique piece that adds a personal touch to any space. Feel free to get creative, experiment with color blending, and let your imagination shine through your rock art.
Glitter Ombré Champagne Bottle
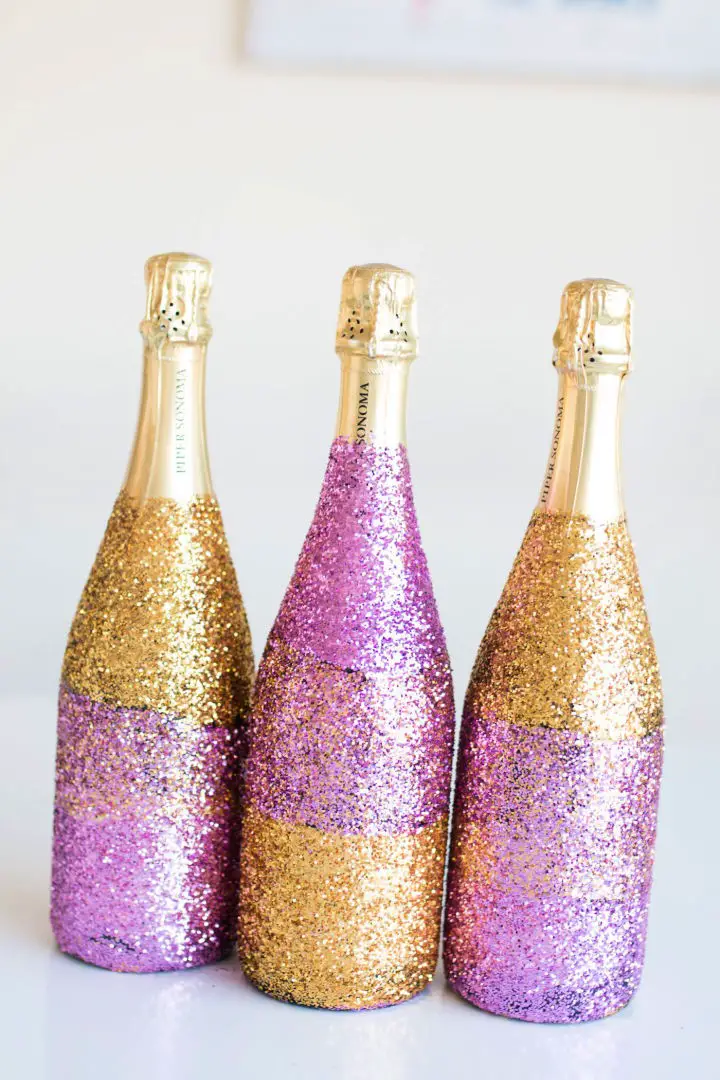
Elevate your DIY game with glitter crafts that exude sophistication. One such masterpiece can be created by transforming a standard champagne bottle into an ombré work of art using a simple, step-by-step process from Baubles to Bubbles. This stunning piece not only serves as a unique decorative accent for your bar cart but also makes for a personalized gift or an elegant party centerpiece. With the tutorial’s clear guidance and minimal materials like Mod Podge, a sponge brush, and your chosen glitter hues, you’ll be able to replicate this dazzling project with ease. Just remember to protect your workspace from the inevitable glitter fallout, and get ready to mesmerize onlookers with the flowing transition from the bottle’s foil to a sparkling base. This project is perfect for adding a touch of glamour and charm to any occasion.
Glitter Clothespin Snowflakes Craft

Transform your home into a winter wonderland by crafting DIY Glitter Clothespin Snowflakes, perfect for Christmas ornaments or festive decor. This delightful project turns ordinary clothespins into dazzling snowflakes that shimmer and shine. With Mom Spark’s clear instructions, you can create these charming decorations by assembling clothespins, adding a touch of glue, and sprinkling them with your chosen glitter. These unique additions to your holiday setup can be customized to match any color scheme, making them a thoughtful way to add some homemade sparkle to your surroundings.
Simple DIY Glitter Peg Butterflies
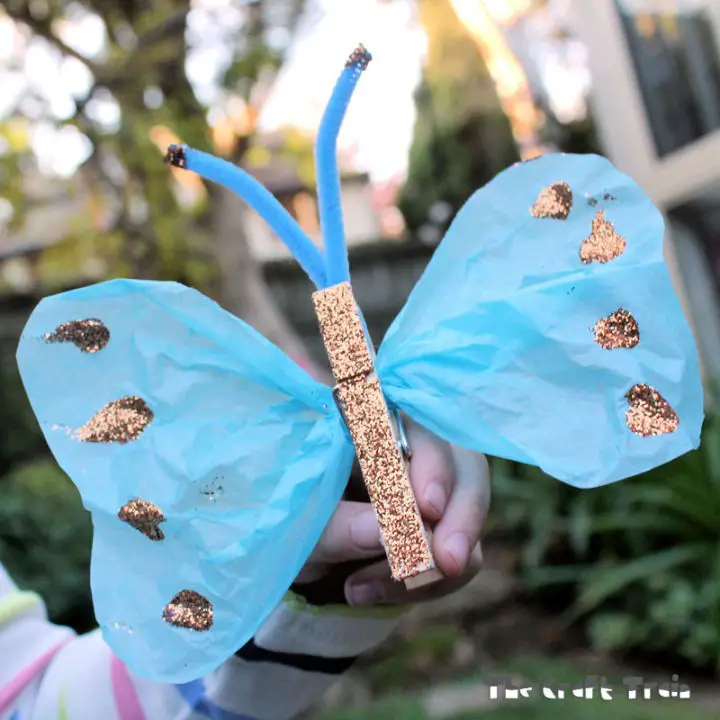
Transform ordinary wooden clothes pegs into extraordinary butterflies that sparkle with a dash of creativity! With minimal materials like wooden clothes pegs, pipe cleaners, tissue paper, glue, and glitter, you can create an enchanting collection of butterflies alongside the little ones. The step-by-step guide ensures a fun-filled crafting experience, as you paint, sprinkle, and design your unique creations. Showcase your shimmering masterpieces to capture the sun’s rays or add them to your space for a touch of whimsy. For more craft inspiration, explore the wealth of ideas on The Craft Train.
Make a Glitter Flower Pot
Transform any space into a dazzling oasis with DIY Glitter Flower Pots! These radiant planters require minimal effort but yield maximum impact, making them perfect for celebrating special occasions or simply adding a touch of glamour to your home decor. Begin by selecting a paintable flower pot and infusing it with vibrancy using FolkArt Color Shift Metallic Paint, which boasts an mesmerizing color shift effect. Once dry, apply Glitterific paint to achieve a stunning, mess-free glitter finish that doesn’t necessitate additional sealing. Experiment with diverse paint and glitter combinations to create one-of-a-kind looks, or opt for FloraCraft succulent picks as a low-maintenance, vibrant alternative. To complete the look, add floral foam, arrange your picks, and top it off with river rocks. These sparkling creations are sure to spread joy whether you place them indoors or use them to decorate your outdoor spaces. Which color combination will you choose for your very own Glitter Flower Pots?
DIY Glitter Mason Jars Pen Holder
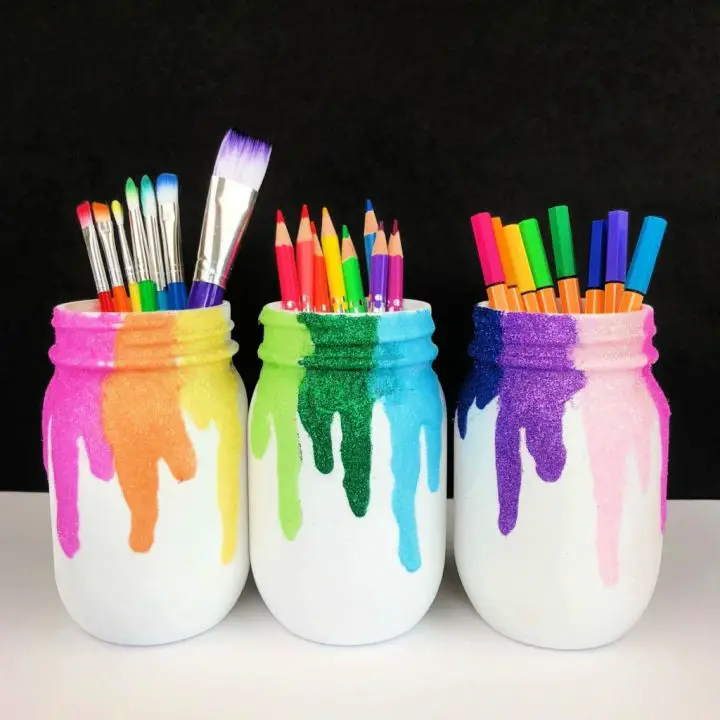
Elevate your crafting expertise by infusing your creations with an array of glitter craft ideas. One such project is transforming humble glass jars into dazzling storage solutions through a DIY Glitter Mason Jar tutorial, reminiscent of Color Made Happy’s inspiration. This eye-catching piece can serve as a unique holder for art supplies, flowers, or even as a one-of-a-kind brush holder for your artistic pursuits.
To create this sparkling masterpiece, begin by priming the jars with white primer and then apply fine glitter using E6000 glue, working in sections. For added durability, consider sealing the glitter with a mixture of glossy Mod Podge or a clear spray sealant. The result is a shimmering, functional piece that can effortlessly elevate the charm of any desk, art room, or classroom, bringing a touch of sparkle to your space.
DIY Glitter Earrings at Home
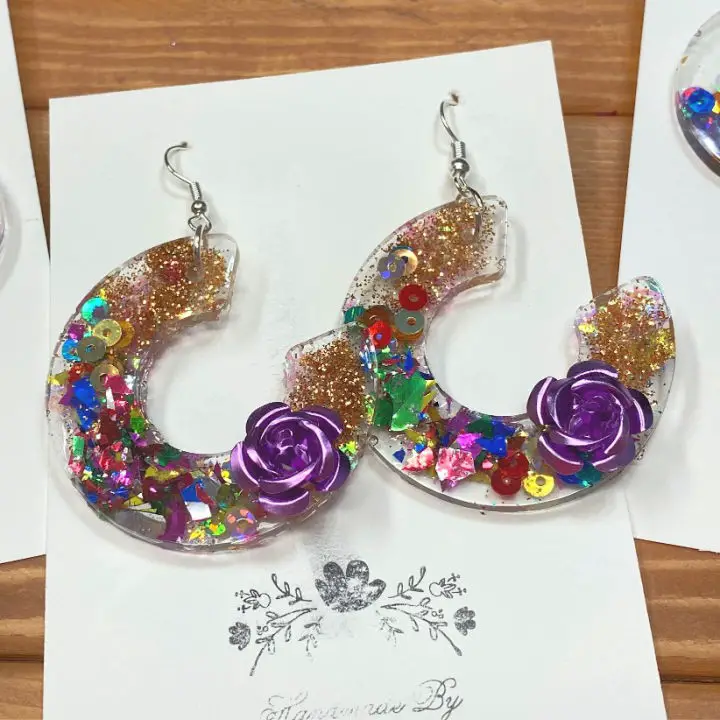
Inspired by Kathy Cano-Murillo’s tutorial on crafting DIY glitter earrings at Crafty Chica, this sparkly project is a must-try for anyone captivated by the allure of resin and glitter. With a straightforward set of materials, including a 2-part resin kit, silicone earring molds, and an array of glitters and sequins, you’ll be guided through the process of creating your own unique Sparkle Collage Hoops. Kathy’s clear instructions ensure a seamless crafting experience, from mixing and pouring the resin to embedding the sparkles and finishing the earrings with precision. Whether it’s for personal use or as a thoughtful gift, these glitter resin earrings are sure to shine in any jewelry collection.
Easy DIY Glitter Computer Case
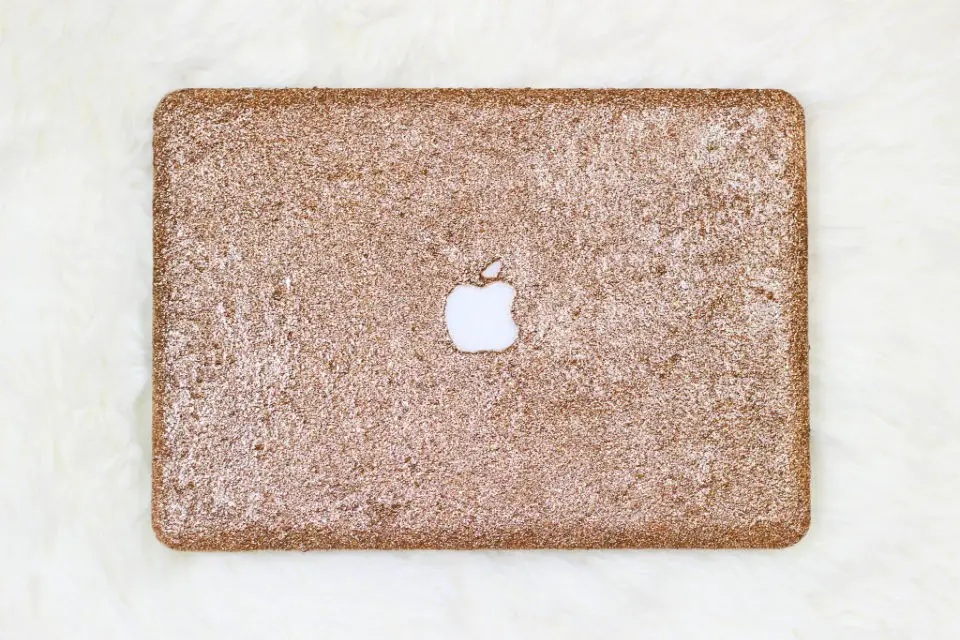
Add a touch of glamour to your MacBook by creating a one-of-a-kind glitter computer case, inspired by the creative minds at Twinspiration. Britta Garsow’s DIY tutorial provides an affordable and stylish way to protect and personalize your laptop. The process begins with a clear MacBook case, which is then transformed using everyday materials like adhesive spray, Mod Podge, glitter, and basic crafting tools. By following Britta’s easy-to-follow instructions, you can achieve a unique, sparkling design that won’t dent your wallet. To make this project even more budget-friendly, be sure to take advantage of coupons for your craft supplies. With patience and imagination, you’ll end up with a dazzling, homemade case that’s sure to spark conversations.
DIY Glittered Cake Toppers

Transform everyday items into dazzling creations with glitter, the perfect way to add a touch of magic to special occasions. Take inspiration from A Bubbly Life’s sparkly cake toppers and learn how to elevate ordinary lollipops from your local dollar store into show-stopping decorations for your desserts. Remember, these decorative toppings are for visual appeal only and should not be consumed. For an added wow factor, consider repurposing oversized flamingos from thrift stores as unique cake embellishments. With these easy DIY hacks, you’ll be able to craft personalized cake toppers that combine fun with functionality, ensuring a safe and stylish celebration.
How to Make Galaxy Jars
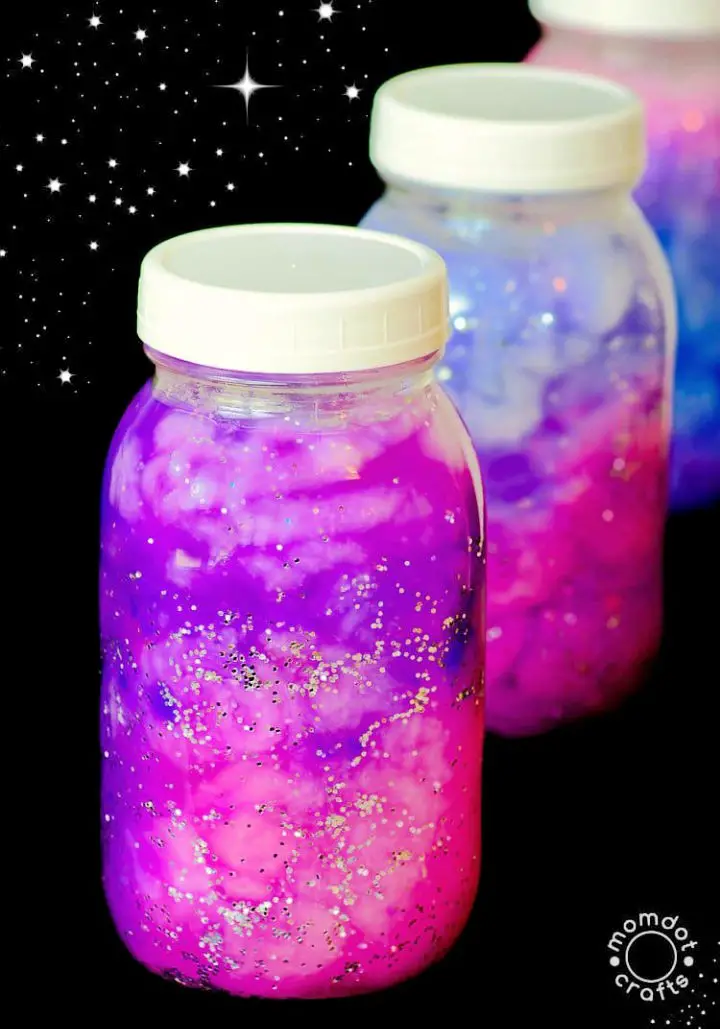
Create a stunning cosmic masterpiece with Momdot.com’s comprehensive Galaxy Jars DIY guide. By combining basic supplies like jars, water, glitter, paint, and cotton balls, you can bring the universe to life in the palm of your hand. This mesmerizing project is perfect for all ages, serving as an interactive activity or a soothing sensory bottle that can add a touch of tranquility to any space. With simple, step-by-step instructions, you’ll master the art of layering colors and adding just the right amount of sparkle to replicate the breathtaking beauty of a star-filled galaxy. Assemble your materials and get ready to craft a one-of-a-kind jar that’s as unique and awe-inspiring as the cosmos itself.
Simple DIY Glitter White Boards
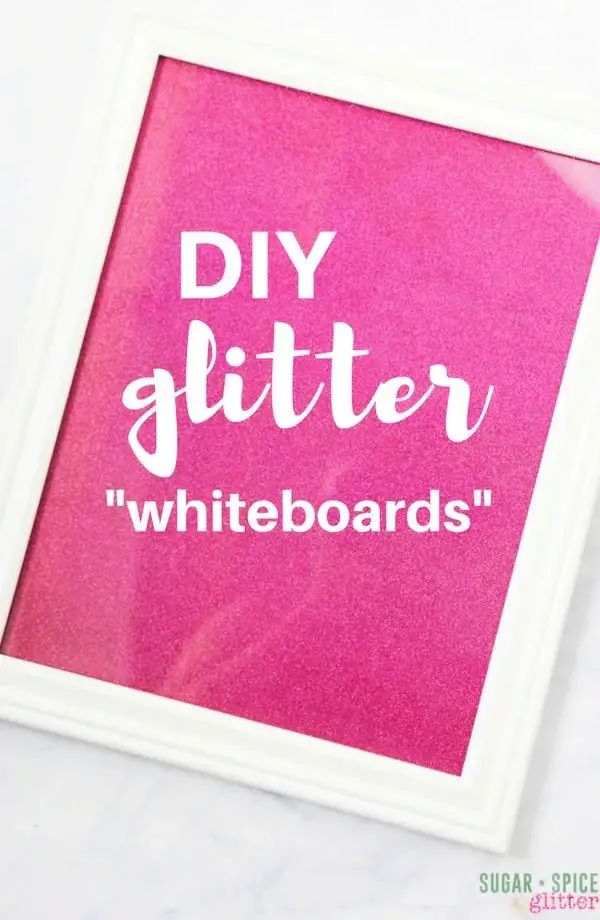
Elevate your workspace with a dash of personal flair by crafting DIY Glitter Boards! At Sugar, Spice and Glitter, we’ll walk you through the simple steps to create stunning glitter-covered whiteboards that seamlessly blend form and function. These customizable boards are perfect for jotting down to-do lists, planning menus, or displaying motivational quotes – offering endless possibilities. To get started, all you need is a picture frame, some dazzling wrapping paper, and basic crafting tools. Write away with colorful markers and easily refresh your board using gentle glass wipes. This creative and practical DIY project will transform your office or kitchen into a haven of efficiency and style, where inspiration meets functionality.
Homemade Glitter Pen
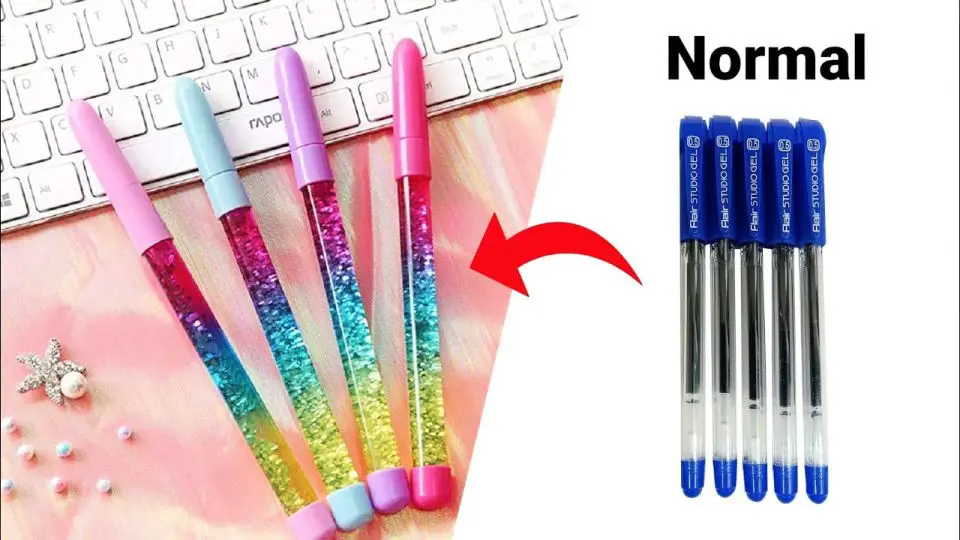
Elevate your stationery game by infusing creativity into your craft. With a few simple steps, you can create a show-stopping Lava Glitter Pen that’s as much a conversation starter as it is a functional writing instrument. This DIY tutorial on YouTube guides you through the process of crafting this eye-catching pen at home, perfect for those who crave customization and uniqueness. Not only will your handmade glitter pen add a touch of whimsy to your daily writing routine, but it also makes for a thoughtful gift for loved ones. The instructions are straightforward, making it accessible to crafters of all skill levels. So, gather your materials and let the creative juices flow as you bring a dash of glamour to your everyday tasks.
Conclusion:
As we conclude our exploration of 25 easy glitter crafts and projects, it’s clear that the path to creativity and sparkle is wide open. With a solid understanding of the right types of glitter and adhesives to use, combined with the step-by-step guides provided, you’re now equipped to infuse your craft projects with a radiant shimmer and shine. The key to achieving success lies in careful planning, meticulous execution, and adherence to safety guidelines that ensure not only the beauty but also the durability and eco-friendliness of your sparkle crafts. As you embark on this creative journey, may your projects dazzle with the enchanting magic of glitter, bringing joy and inspiration to all who behold them.
