Why Choose DIY Pendant Lights?
When it comes to adding a personal touch to your home’s décor, choosing to make your own DIY pendant lights can be a game-changer. Not only will you be able to tailor each piece to your unique style and preferences, but you’ll also reap the benefits of cost-effectiveness, a sense of accomplishment, and even eco-friendliness. By opting for a DIY approach, you’re not only creating something beautiful that reflects your personality, but you’re also learning new skills, reducing waste, and making environmentally conscious choices.
The flexibility to select materials, colors, and designs allows you to infuse your personality into every aspect of the light fixture. This means you can create a one-of-a-kind piece that perfectly complements your home’s aesthetic.
In addition to the creative benefits, making your own pendant lights can also be a cost-effective way to achieve the look you want. By choosing materials that fit your budget, you won’t have to compromise on style or quality.
But perhaps one of the most rewarding aspects of taking the DIY route is the sense of accomplishment that comes with completing a project. Seeing the finished product and knowing that you had a hand in creating it can be incredibly fulfilling.
And let’s not forget about the eco-friendly benefits. By repurposing materials or upcycling old items, you’ll be reducing waste and making environmentally conscious choices that benefit your community and the planet.
Ultimately, opting for DIY pendant lights is a great way to express your creativity, learn new skills, reduce waste, and create unique lighting solutions that perfectly reflect your personal style.
How to Make a Hanging Lamp
Transforming a space with a personalized touch has never been more accessible than with a DIY pendant light project. Not only does it save you money, but it also allows you to infuse your personality into the room’s design. This comprehensive guide is inspired by the TwoFeetFirst YouTube channel and will walk you through the steps necessary to create a stylish pendant light fixture that reflects your unique style.
What You’ll Need:
To assemble the lighting fixture, you’ll need a range of materials. Start by gathering the essential components, including a light socket, shade holder, and threaded pipe – ideally 18 inches long to ensure proper installation. Additionally, you’ll require wire strippers to prepare the electrical wire, which should be cut to a length that accommodates your ceiling height. A straight cylinder coupling and hollow nipple will also come in handy, as well as a sturdy canopy to support the overall structure. For added stability, consider investing in steel washers, slip star locks, and hex nuts. Finally, don’t forget the crossbar kit for securing the attachment to your ceiling. To complete the installation, you’ll need a screwdriver and pliers – the latter optional, but useful for tightening any loose components.
Step By Step Instructions:
To begin creating your pendant light, start by attaching the light socket to the shade holder. This will serve as the foundation of your design. Next, disassemble the socket by loosening and removing the screw that holds the cap in place. This will give you access to the inner area where you’ll attach your electrical wires.Once the socket is open, ensure the top part is properly aligned before attaching the threaded pipe. To do this, unscrew the side screw on the socket’s top portion, allowing the pipe to screw on securely. Once attached, retighten the side screw to keep everything in place.Next, prepare your electrical wires by stripping about three-quarters of an inch of insulation from the end using wire strippers. Twist the exposed wires together to prevent fraying and ensure a secure connection.To connect the wires to the socket, form a hook with the exposed wires that can be wrapped around the screws on the socket. Make sure to orient the wires in the direction they’ll be tightened, as this won’t affect the overall functionality of your design.Once the wires are securely attached, reassemble the socket by placing it back into its main area and threading the electrical wire through the top of the socket and pipe.To complete the pendant light, attach the coupling, nipple, and canopy to the pipe. Start by threading the wire through the straight cylinder coupling, then attach it to the pipe. Next, thread the hollow nipple over the wire and secure it to the cylinder. Finally, place the canopy over the wire and assemble the steel washer, slip star lock, and hex nut on top. Tighten using a wrench or pliers.Finally, prepare your pendant light for ceiling mounting by using a crossbar kit. Thread the included studs through the crossbar and insert them through the canopy. Secure everything in place with the provided acorn nuts.
Installation
When it comes time to install a new light fixture, it’s essential to follow the electrical guidelines specific to your home to ensure a safe and successful process. Before beginning, confirm that the power is fully off to prevent any potential accidents or hazards. This crucial step will help you avoid any costly mistakes and keep yourself and others out of harm’s way.
Video Tutorial
For those who prefer learning through visual aids, a YouTube video provides an excellent accompaniment to this written guide. The video offers a comprehensive step-by-step walkthrough of the assembly process, making it easy for DIY enthusiasts to follow along and gain a deeper understanding of how to create a stylish pendant light. As you work through these steps, you’ll be able to confidently craft your own custom light fixture, adding a touch of warmth and character to any room in your home. Whether you’re looking to create a cozy atmosphere or simply want to add some unique flair to your decor, this project is sure to provide endless possibilities for creative expression.
How to Hang Your DIY Pendant Light
To ensure your newly crafted DIY pendant light shines brightly for years to come, it’s crucial to properly install it. The following steps will lead you through a secure and safe hanging process, guaranteeing a sturdy and functional lighting fixture that not only adds a touch of elegance but also meets safety standards.
Preparing to Hang
Before embarking on the installation of your pendant light, it’s essential to prioritize safety by ensuring the main power supply is switched off. This crucial step will prevent any accidents or mishaps during the process. Once you’ve secured the electrical panel, you’ll need to gather a few essential tools, including a screwdriver, wire strippers, and a ladder. Depending on your ceiling type, you may also require a drill. Next, identify the location where you want to suspend your pendant light. This could be above a dining table, kitchen island, or even a cozy reading nook. To ensure a secure installation, verify that there is an electrical box in the ceiling at this location, capable of supporting the weight and power requirements of your new lighting fixture.
Installation Steps
To install a pendant light, start by attaching the crossbar or mounting bracket to the ceiling’s electrical box. This will serve as the foundation for your fixture. Next, prepare the wires by stripping about 3/4 inch of insulation from each wire using wire strippers. This will expose the metal beneath.Once the wires are prepared, connect them according to their functions: black to black (hot), white to white (neutral), and green or bare copper to green or bare (ground). Twist the corresponding wires together and secure them with wire nuts. Be mindful of the correct connections, as this is crucial for ensuring the safe and proper operation of your fixture.After connecting the wires, push them into the electrical box and then align the canopy (the decorative plate that covers the box) with the mounting bracket. Secure it using the provided screws or nuts. If your pendant light comes equipped with an adjustable cord or chain, adjust it to your desired length. Typically, pendant lights are hung 30 to 36 inches above a surface, but be sure to adjust the height according to your space’s specific needs.Finally, install the recommended type of bulb, preferably an LED bulb for its energy efficiency and lower heat output. Once the fixture is securely mounted, turn the power back on at the main electrical panel and test your pendant light to ensure it’s functioning correctly.
Final Touches
Before proceeding with hanging your DIY pendant light, take a moment to double-check that all connections are secure and the fixture isn’t wobbly. Safety should be your top priority at all times. Once you’ve ensured everything is in order, you can move on to fine-tuning the ambiance of your space. To achieve this, consider adjusting the light bulb’s brightness or color to suit the mood you want to create. Dimmer switches offer a great way to customize lighting levels and add to the overall aesthetic. By following these steps, you’ll be able to successfully hang your DIY pendant light and bring a personal touch to your home. As always, if you’re unsure about any electrical aspects of the process, consulting a professional electrician is the safest course of action.
FAQs on DIY Pendant Light
Crafting a pendant light from scratch can be an incredibly fulfilling DIY endeavor. To ensure a seamless experience, here’s a rundown of commonly encountered queries and concerns that may arise during the process.
What materials do I need to make a DIY pendant light?
To complete the installation of a light socket, you’ll need a variety of materials. Start by gathering a shade holder, threaded pipe (18 inches is typically recommended), wire strippers, and electrical wire that matches your ceiling height. Additionally, you’ll require straight cylinder couplings, hollow nipples, and a canopy to cover the fixture. To ensure secure installation, don’t forget steel washers, slip star locks, and hex nuts for mounting the fixture to your ceiling. If desired, a crossbar kit can be used for added support. Finally, have a screwdriver on hand as well as pliers (optional) for making any necessary adjustments once the fixture is in place.
How do I wire a DIY pendant light safely?
To prepare the electrical wire, first strip about three-quarters of an inch of insulation from one end using a reliable pair of wire strippers. Next, twist the exposed wires together gently to prevent fraying and minimize the risk of electrical shorts. Following this, shape the twisted wires into a hook-like formation that will allow you to easily wrap them around the screws on the socket. The order in which you attach each wire to its respective screw is inconsequential for the purposes of this project. Finally, ensure that the power supply is completely disconnected at your main electrical panel before proceeding with the installation and attachment of the light fixture to your ceiling, thereby mitigating the risk of accidents or electrical shocks.
Can I make a pendant light without wiring or electrical work?
For those looking to avoid the hassle of electrical wiring, it’s possible to create a wireless pendant light using battery-operated LED lights or remote-controlled lighting solutions. These options offer an effortless way to bring ambient illumination into your space without having to navigate complex wiring scenarios.
What are some creative materials I can use for my pendant light shade?
When it comes to crafting a unique pendant light shade, the possibilities are endless. One can opt for an earthy vibe by using rattan baskets or air drying clay. For a more whimsical approach, consider papier-mâché, crepe paper, or origami folded brown paper grocery bags. Upcycle old straw hats or use jute yarn to add a touch of rustic charm. Alternatively, go for a natural look with bamboo roman shades or opt for a modern feel by incorporating pine wood.
How can I customize my DIY pendant light?
Transform your pendant light into a one-of-a-kind masterpiece by experimenting with different materials and designs. Start by selecting a unique shade material that reflects your personal style, whether it’s a bold metal finish, a natural wood tone, or a delicate glass texture. Next, unleash your creativity by painting the shade or light fixture in a color that resonates with you – think of it as giving your pendant light a personalized touch. For added flair, incorporate decorative elements such as tassels, beads, or fabric to create a truly eye-catching piece. Finally, complete the look with a bulb that complements your design, like an Edison bulb for a vintage-inspired glow or a colorful LED for a modern pop of color.
What safety precautions should I take when making a DIY pendant light?
When embarking on an electrical project, it’s crucial to prioritize safety above all else. Start by ensuring the main power is switched off at the electrical panel before commencing work. This fundamental step will prevent any accidental start-ups or electrical shocks. Additionally, consider utilizing LED bulbs, which generate minimal heat and are particularly beneficial when paired with paper or fabric shades that may be prone to ignition. Furthermore, it’s essential to adhere to local electrical guidelines to guarantee a safe installation process. If you’re unsure about the technical aspects of the project, don’t hesitate to seek professional assistance from a qualified electrician. Their expertise will ensure your electrical setup is not only functional but also meets the necessary safety standards.
20 DIY Pendant Light Ideas (How to Make a Hanging Lamp)
Transform the ambiance of your space by crafting one-of-a-kind DIY pendant lights that reflect your unique style. Explore an array of creative ideas, from simple to sophisticated, and get started with clear, step-by-step guidance.
How to Make a Pendant Light With No Wires
Transform your living space with a stunning DIY pendant light that’s easy to make, requiring no wiring or electrical expertise. By following the step-by-step guide from The Navage Patch, you can turn simple rattan items into a chic, remote-controlled lighting piece that adjusts colors to match your mood. This innovative craft offers a fun and rewarding project that brings both style and functionality to your home, perfect for adding a personalized touch to any room.
Making an Outdoor Pendant Light
Transform your outdoor living space into an inviting evening retreat with this creative and budget-friendly project! Using simple materials like baskets, light kits, and rope, you can craft unique hanging lights that add warmth and ambiance to your gatherings. The installation process is quick and easy, allowing for effortless removal in case of inclement weather. This DIY pendant light guide offers a practical and stylish way to elevate your outdoor space, perfect for those who love a challenge and appreciate the charm of handcrafted details.
Easy DIY Papier mâché Pendant
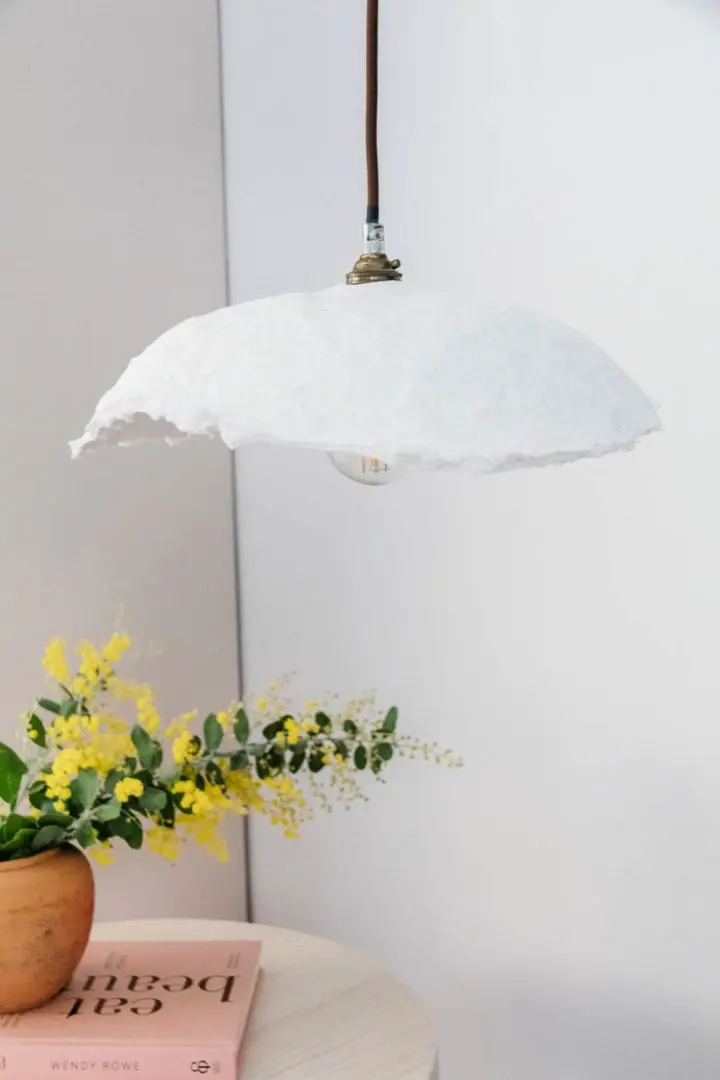
Elevate your home’s ambiance and add a touch of creativity with a DIY hanging light fixture that’s perfect for beginners. Transform ordinary toilet paper into a unique papier-mâché pendant, defying expectations and adding warmth to any room. Our step-by-step guide will walk you through the simple process, which takes approximately 30 minutes to complete and requires only cost-effective materials. The result is a one-of-a-kind light fixture that showcases your resourcefulness and style. You can customize it with paint for a pop of color or leave it in its natural state for an earthy, organic look. This project encourages you to think outside the box and repurpose everyday items into beautiful home decor pieces.
DIY Crepe Paper Flower Pendant Light
Get ready to unleash your creativity and illuminate your space with a one-of-a-kind crepe paper flower pendant light! With Lia Griffith’s comprehensive guide, you’ll discover the joy of crafting this stunning piece without prior experience working with crepe paper. Perfect for adding a touch of whimsy to your decor or setting the tone for a romantic wedding ambiance, this project is sure to delight. Simply gather your essential materials – scissors, glue, crepe paper, and a few other simple supplies – and embark on this creative journey. As you carefully shape each petal and add a hint of glamour with gold foil, your pendant light will blossom into a dazzling display that’s sure to captivate all who see it.
Make a Pendant Light With Origami Lampshade
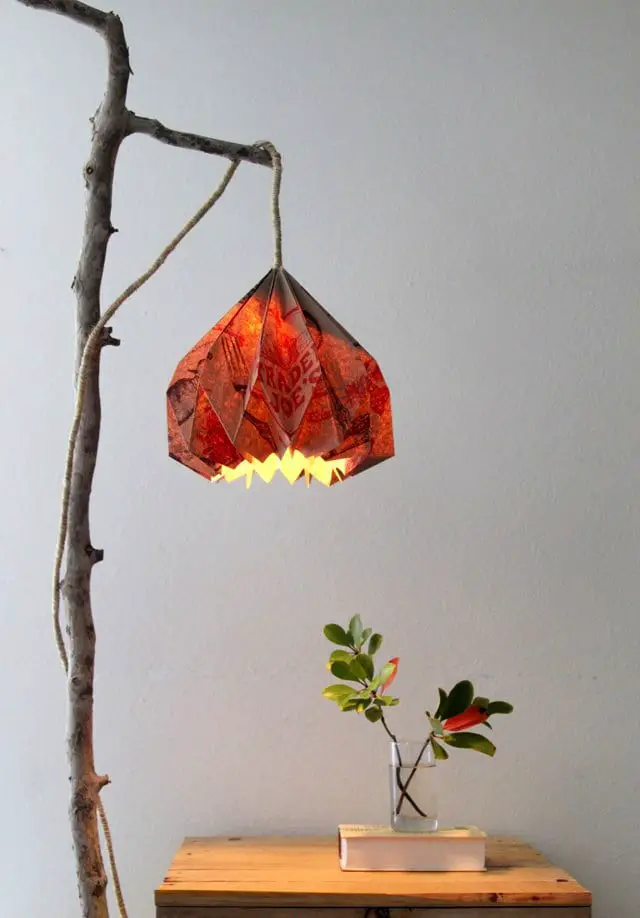
Transform plain brown paper grocery bags into a sophisticated DIY pendant light by creating an origami lampshade, thanks to A Piece Of Rainbow’s comprehensive guide. This engaging tutorial takes you through the process of crafting a stylish lighting piece, covering the art of folding the perfect lampshade, selecting the ideal pendant light kit, and assembling a one-of-a-kind hanging light fixture. As a safety precaution, the guide emphasizes the importance of using LED bulbs to prevent excessive heat near paper. Perfect for home decor enthusiasts seeking a sustainable design approach, this resource enables you to create a stunning addition to your space by upcycling materials and adding a dash of creativity.
Handmade Yarn Fringe Pendant Light

Create a one-of-a-kind ambiance in any room by crafting a custom DIY pendant light shade that embodies your unique personal style. For those seeking to infuse their home decor with a touch of handmade charm, A Kailo Chic Life presents an engaging DIY project: a yarn fringe pendant light that seamlessly combines a laser-cut wood base with vibrant omegacryl yarn tassels in colors of your choice. This thoughtful craft requires only basic tools like wire cutters and scissors to assemble the components, including a customizable light kit. The end result is a bespoke lighting fixture sure to spark conversations. With a clear, step-by-step guide at hand, you can transform any room into a stunning space that reflects your individual flair.
DIY Pendant Lights With Air Drying Clay
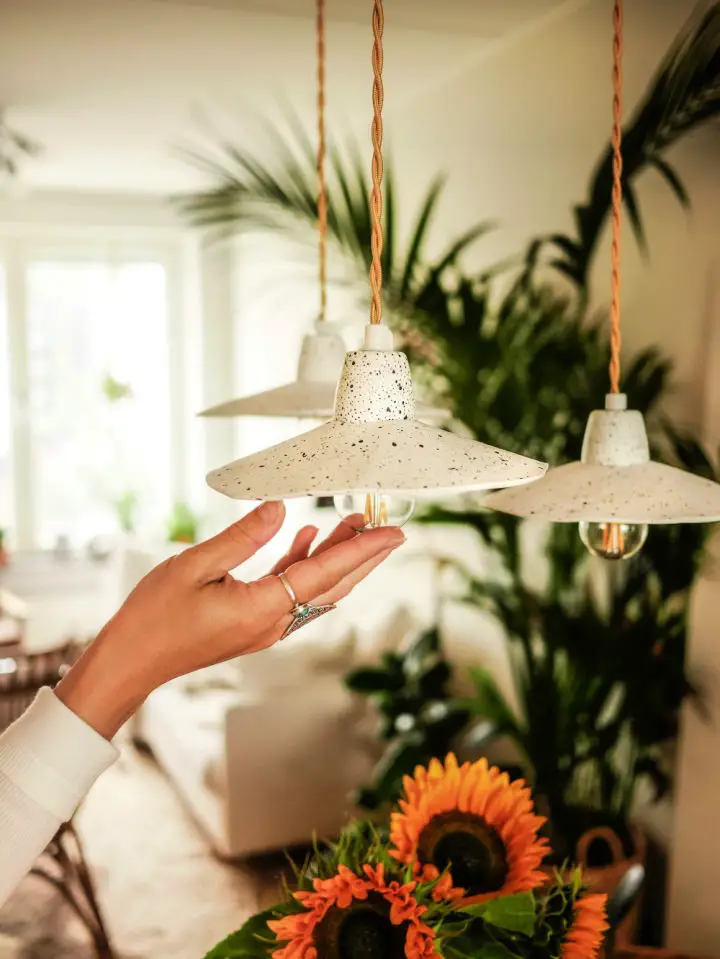
Discover the joy of DIY crafting with Fanny Zedenius’ comprehensive guide to creating bespoke pendant lights using air drying clay. This engaging tutorial from Makeaholic is perfect for crafters who crave unique and personalized home decor solutions. With a focus on safety and a meticulous step-by-step approach, Fanny’s instructions empower you to design and construct stylish lampshades that transform any dining space into a warm and inviting atmosphere. As you follow her helpful tips and guidance, from shaping the clay to adding the final touches to your custom-made lamp, you’ll be delighted by the sense of accomplishment that comes with creating something truly handmade.
Unique DIY Pendant Light With Hat
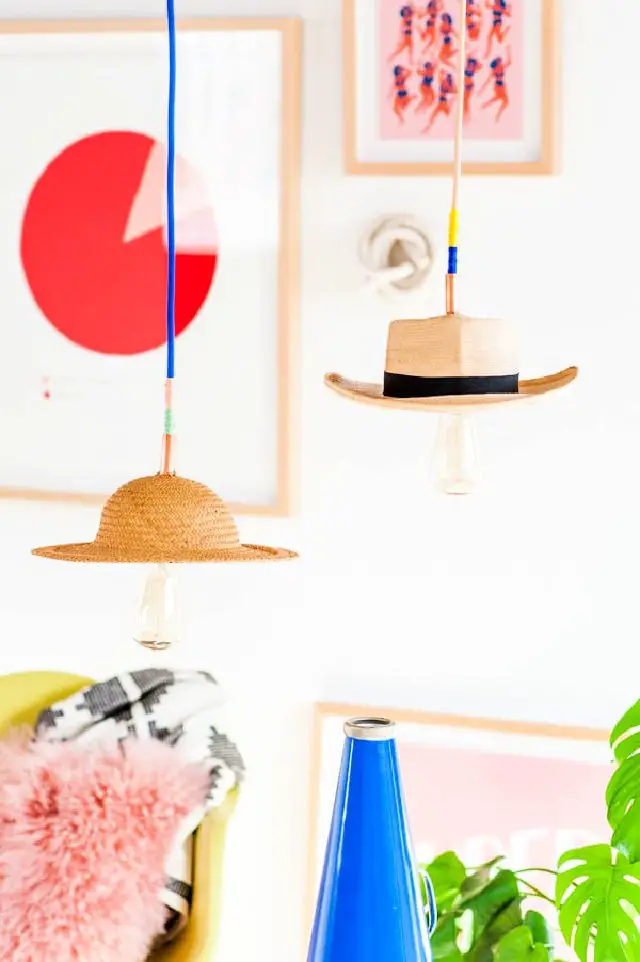
Add a handmade touch to your living space by transforming a simple straw hat into a unique pendant light, perfect for infusing warmth and character into any room. With Paper and Stitch’s step-by-step guide, you can create a one-of-a-kind light fixture with just a few materials, including a vintage hat, colorful fabric wire, and basic electrical components. As you wrap embroidery thread around the wire or customize the hat, you’ll add a personalized touch to your décor. Don’t forget to take necessary precautions and consider adding a protective lining inside the hat for safety when using the light for extended periods. With this craft project, you’ll not only create a stunning home addition but also experience a sense of accomplishment and satisfaction.
Rustic Farmhouse Style Hanging Light Fixture
Transform your space with creative DIY hanging lamp ideas that bring an eco-friendly touch to your home decor. With this step-by-step guide from Jaime Costiglio, you’ll learn how to craft a stunning rustic farmhouse-style hanging light fixture without requiring any electrical expertise. Simply gather prewired light kits, wood boards, and basic supplies, and you’re ready to create warm, ambient lighting that complements both traditional and modern styles. The process is surprisingly simple, budget-friendly, and perfect for those who appreciate the charm of DIY projects. With an estimated cost of around $80 (excluding the pulley), you can achieve a custom, handcrafted look without breaking the bank. This beautiful addition to your home’s decor is sure to be a conversation starter.
Make a Glass Pendant Light Fixture
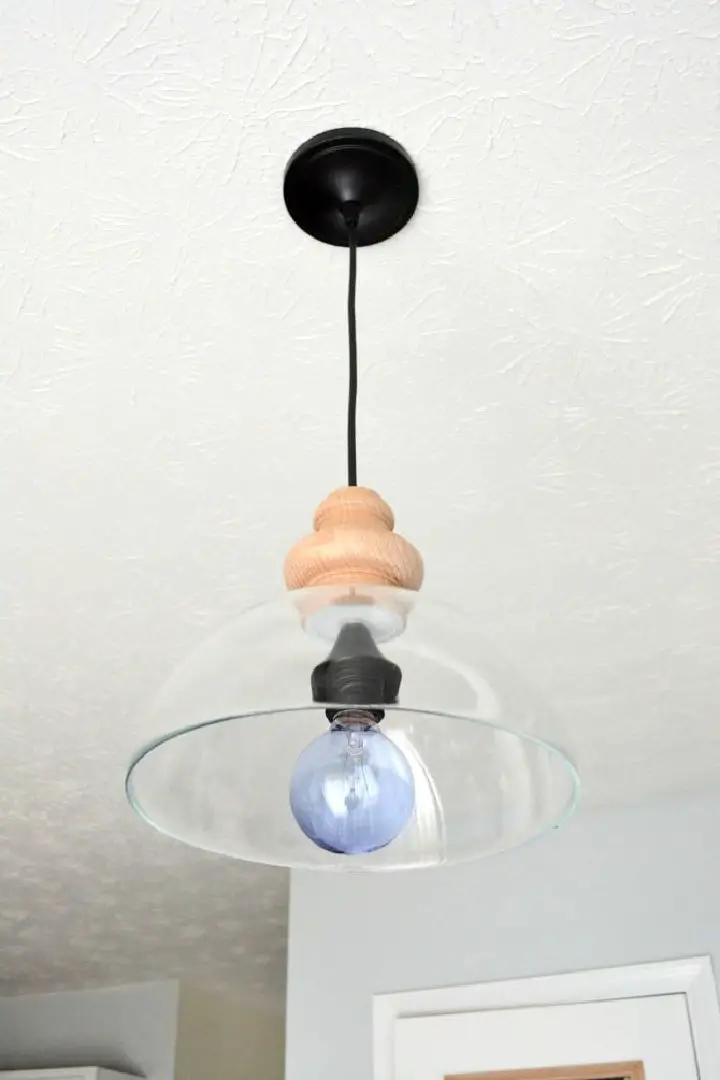
Get ready to shed the frustration of trying to find a pendant light for your kitchen that fits your style and budget! At Ugly Duckling House, we’ve got a game-changing DIY solution that saved us around $100. Our step-by-step guide will walk you through creating your own stunning glass pendant light fixture from scratch, complete with a list of essential materials and tools. You’ll learn how to pick the perfect glass bowl, craft a wooden bun foot, and bring everything together for a one-of-a-kind lighting piece that adds personality to any room. With our easy-to-follow instructions and practical tips, you can turn an ordinary glass bowl into an extraordinary focal point that highlights your creativity and illuminates your space with unique charm.
Geometric Hanging Light Ideas

Transform your home’s atmosphere with a sophisticated DIY project! Our comprehensive guide at Dunn DIY will walk you through creating a stunning geometric hanging light that not only provides excellent illumination but also serves as a show-stopping decorative piece. By following our straightforward, step-by-step instructions, you’ll effortlessly cut, sand, and assemble the light’s multiple tiers, featuring an energy-efficient LED bulb for added safety and convenience. With our expert tips and advice, you’ll craft a one-of-a-kind fixture that elevates the ambiance of any room, making it perfect for anyone looking to add a touch of elegance to their space.
Making A Hanging Cage Light
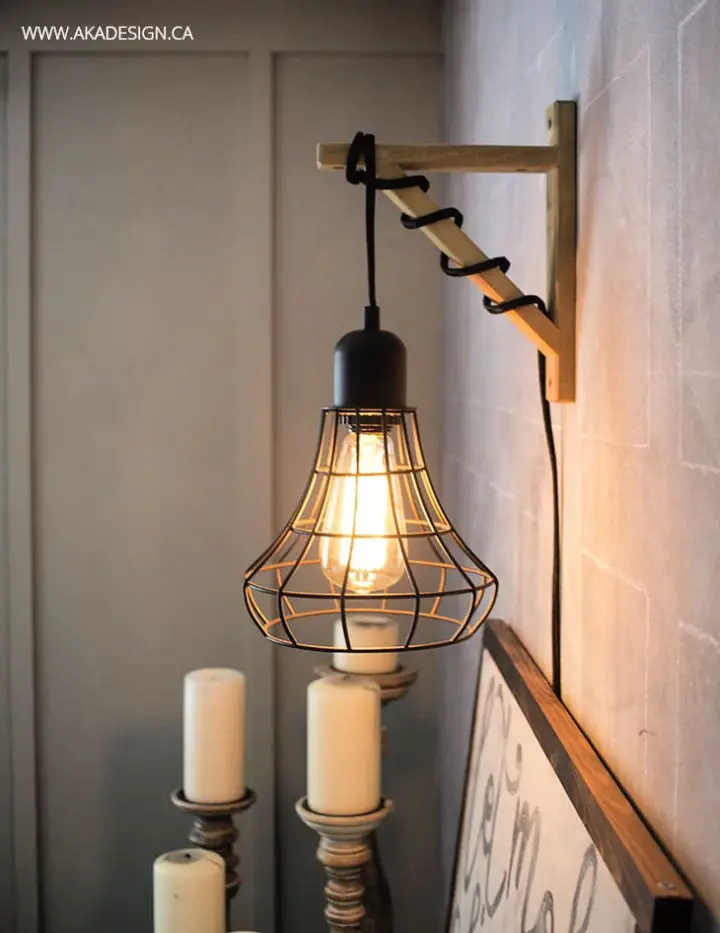
Transform your living space with the ease of DIY pendant lighting. By incorporating a plug-in pendant and wood bracket, you can create a modern, stylish hanging cage light that’s sure to impress. With Home Made Lovely’s Shannon Acheson as your guide, you’ll be led through a straightforward process that requires only basic supplies like a drill, mounting screws, and a level. Begin by ensuring the bracket placement is precise and level on the wall, then move on to drilling the holes and securing the bracket. Finally, wrap the light cord around the bracket to your desired height, plug it in, and enjoy the warm glow of your new, chic illumination. This project’s versatility makes it a perfect addition to any home decor, allowing you to choose from various light and bracket styles to suit your unique taste.
How to Make Pendant Light With Jute Yarn
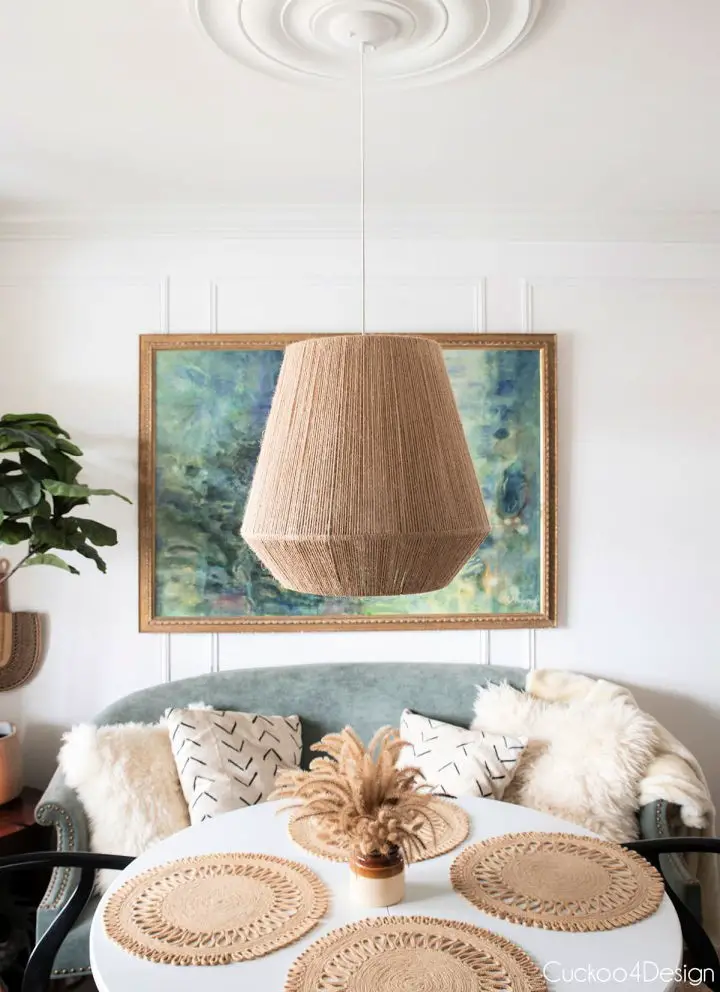
Without breaking the bank, you can create a trendy pendant light that reflects your personal style. Julia’s comprehensive tutorial on Cuckoo4Design is an excellent resource for making an affordable yet stylish jute yarn pendant light. By following her clear and detailed step-by-step guide, even those new to DIY projects can confidently produce a one-of-a-kind decor accent that adds a unique touch to any room. The satisfaction of creating something with your own hands is undeniable when you transform a space with your very own hand-wrapped jute pendant light.
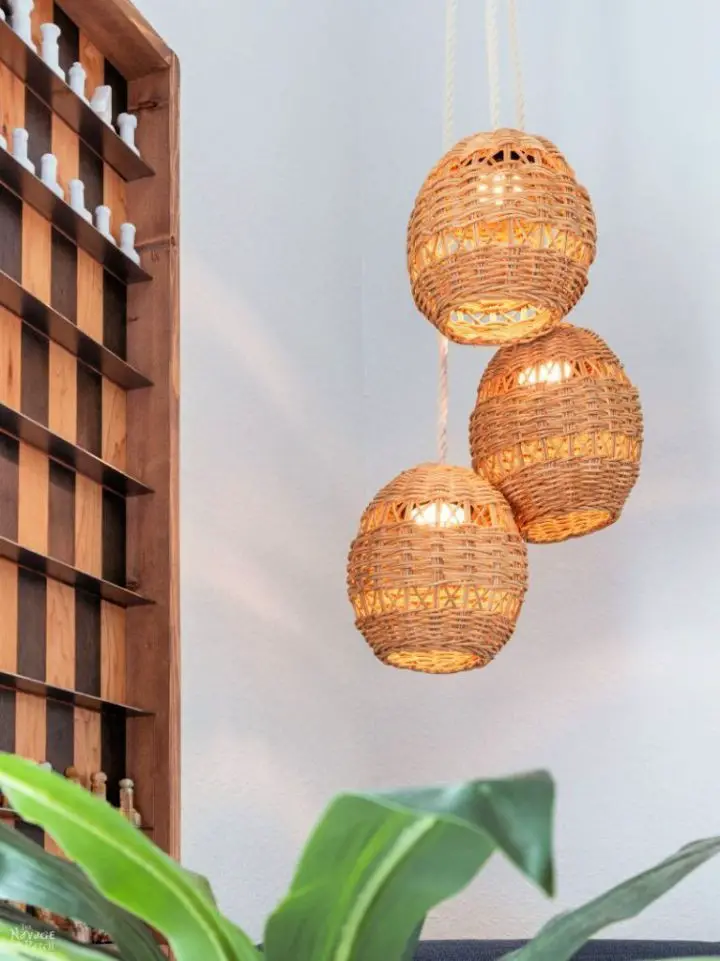
Simple DIY Bamboo Orb Pendant Lights
Transform your home’s decor with the unique charm of handmade bamboo orb pendant lights. In this comprehensive tutorial, you’ll learn how to elevate a simple bamboo roman shade into a sophisticated lighting fixture that rivals high-end designs. This budget-friendly project is perfect for those seeking an affordable alternative to expensive store-bought options. With easy-to-follow step-by-step instructions, crafting these pendant lights becomes a rewarding and enjoyable experience. Whether adding ambiance to your bedroom or brightening up your living room, this DIY creation is sure to bring character to any space.
Modern DIY Wood Pendant Lamp
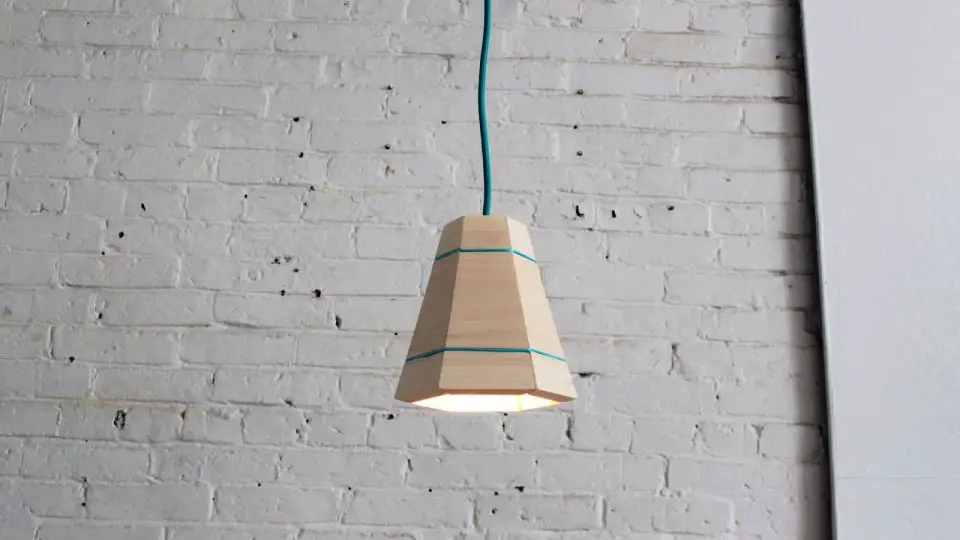
Brighten up any room with innovative hanging lamp ideas that infuse your space with a personal touch. For DIY enthusiasts, embarking on a woodworking project can be an incredibly fulfilling experience. The HomeMade Modern DIY Wood Pendant Lamp tutorial on Instructables is a fantastic resource for crafting a stunning lighting fixture from pine wood. With easy-to-follow step-by-step instructions, even those new to working with a compound miter saw can achieve precise cuts and a professional-looking result. The process of creating this elegant lamp, including making the six sides of a hexagon with 30-degree bevel cuts, may seem intimidating at first. However, this guide makes it accessible and rewarding for DIYers of all skill levels. By adding this custom, handcrafted lamp to your space, you’ll not only add a unique touch to your decor but also experience the satisfaction of creating something beautiful with your own hands.
Homemade Pendant Light Hack

Elevate your home decor with a creative pendant light hack from Emily Jean’s latest project. By transforming standard builder-grade lights into stylish brass pendants on a budget, you can say goodbye to expensive fixtures and professional installation. With her step-by-step guide, you’ll learn how to add a personalized touch to your kitchen ambiance using simple tools and affordable materials from Lowe’s. Perfect for DIY enthusiasts, Emily’s blog offers practical tips and inspiration for refreshing your space without breaking the bank. By embracing the warmth of brass, you can let your kitchen shine with this clever lighting update.
Making a Rattan Basket Pendant Light
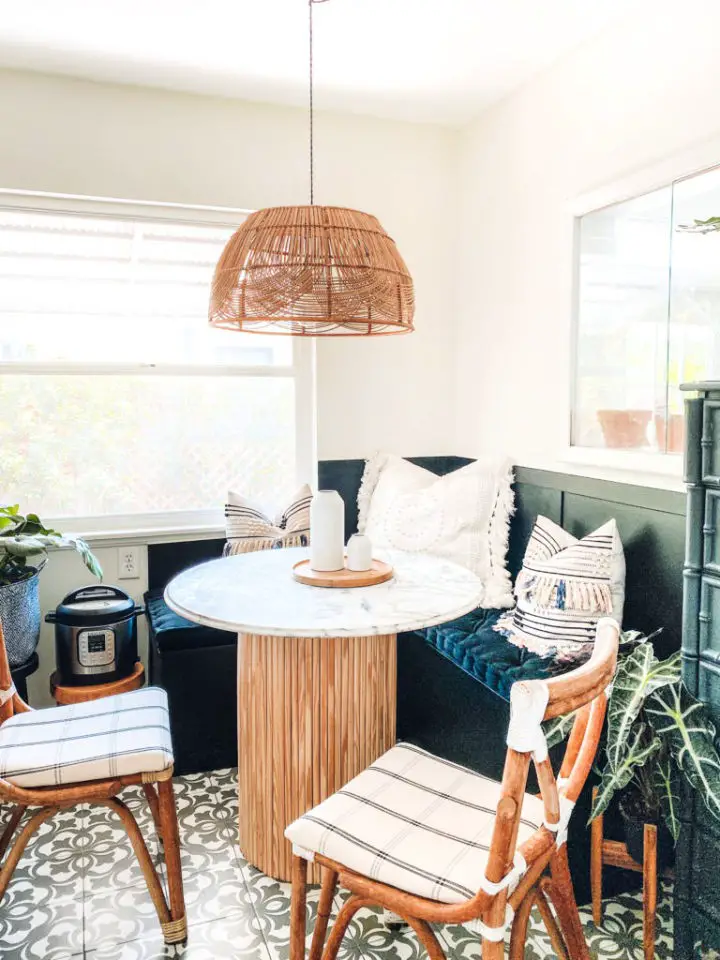
Elevate the ambiance of your breakfast nook with a dash of DIY flair by creating a unique Rattan Basket Pendant Light, as inspired by Madison Bess’s creative endeavors on Blushing Bungalow. By combining a simple rattan basket with a light kit, you can craft an affordable, stylish, and personalized lighting fixture that adds a touch of elegance to your home. For a more dramatic transformation, consider painting your banquette in a bold, eye-catching hue like Tricorn Black from Sherwin Williams. This refreshing update can revolutionize the look and feel of your dining space, allowing you to infuse your personal style into every aspect of your home décor.
Pendant Grow Lights Tutorial
By transforming ordinary pendant lights into grow lights, plant enthusiasts can now bring some greenery into their low-light living spaces. With the guidance of Simply Handmade Studios, you’ll be able to create a thriving plant wall or desk area that not only benefits your plants but also adds a touch of sophistication to your decor. The process begins with peel-and-stick grow lights for the initial tier, before moving on to install chic plug-in pendant lights featuring custom-painted shades that harmonize seamlessly with your surroundings. This DIY project offers not only a cost-effective solution but also an opportunity to infuse personal touches and ensure your plants receive the light they need to flourish in challenging conditions. Through this informative guide, you’ll gain actionable insights for crafting an environment where both you and your plants can thrive.
Easy Hanging Pendant Light
Transform your living area into a cozy oasis by crafting a unique DIY hanging light on a budget. With our step-by-step guide, you can turn an old lampshade into a modern masterpiece using minimal tools and under $50. Perfect for upcycling enthusiasts and those who crave customized home decor, this project combines creativity with functionality. By spray painting, cutting foam dowels, and assembling your pendant light, you’ll achieve a high-end look without breaking the bank.
Make a Pendant Light
Transforming your home’s ambiance into a charming haven is just a DIY project away. At Scratch and Stitch, we’re thrilled to share a unique approach to creating a personalized pendant light that showcases your personal style. By combining honeycomb globes, swag cord light kits, and jute twine, you’ll craft a stunning lighting fixture that radiates warmth and sophistication. With Cathi’s clear guidance, navigating the process from material gathering to installation is effortless. The wrapping of cords with jute infuses a nautical charm, while braiding them adds an artisanal touch. Once complete, proudly hang your handmade pendant light and bask in the soft glow that fills the room.
Conclusion:
As you complete your exploration of 20 DIY pendant light ideas, you’ll discover a harmonious blend of aesthetics, innovation, and practicality for your home’s décor. By creating your own hanging lamp, not only will you illuminate your space, but you’ll also infuse it with a unique personality that store-bought options can’t replicate. This enriching project not only enhances your living environment but also hones your crafting skills. As you navigate the process of selecting materials and following step-by-step instructions for safe installation, remember that safety is paramount. With careful consideration and attention to detail, you’ll bring your DIY pendant light ideas to life and revel in the sense of accomplishment.
