Why Make Your Own Jewelry Organizer?
When it comes to creating a functional and visually appealing space, making your own jewelry organizer can be a game-changer. By taking on this DIY project, you’ll not only enhance the aesthetic appeal of your area but also simplify your daily routine. Here are some compelling reasons why embarking on this journey is worth considering:
Flexibility: A homemade jewelry organizer allows for complete customization, enabling you to tailor it to fit your specific collection and decor. You can adjust the size, color, and layout to perfectly accommodate all your pieces, from delicate earrings to chunky necklaces.
Budget-Friendly: DIY projects like this often prove more cost-effective than purchasing pre-made organizers. With materials readily available at home or purchased at affordable prices, you can create a personalized organizer without breaking the bank.
Organization Expertise: Having a designated spot for each piece of jewelry minimizes clutter and keeps your precious items in top condition. An organized space translates to a clearer mind, making it easier to find what you’re looking for.
Creative Expression: Crafting your own jewelry organizer provides an opportunity to express your creativity and add a personal touch to your space. It’s a satisfying project that allows experimentation with designs and materials.
Thoughtful Gift: A handmade jewelry organizer makes for a unique and thoughtful gift, showcasing that you took the time and effort to create something special just for someone.
In summary, making your own jewelry organizer is an enjoyable, cost-effective, and practical way to ensure your jewelry is neatly displayed and easily accessible, all while adding a personal touch to your home decor.
How to Get Started with DIY Jewelry Organizers
Creating a bespoke jewelry organizer is an engaging and fulfilling DIY endeavor that not only offers a tailored means of storing and showcasing your treasured accessories but also imbues your home décor with a unique, personal flair. Whether you’re an experienced DIY aficionado or just starting out, this comprehensive guide will empower you to craft a jewelry organizer that perfectly aligns with your needs and aesthetic preferences.
Understanding Your Jewelry Organization Needs
To embark on crafting a DIY jewelry organizer, it’s essential to first evaluate your current jewelry collection and envision how you’d like to organize it. This involves considering three key factors: the type and quantity of pieces you own, the available space where the organizer will reside, and your personal style and home décor. The type and quantity of jewelry dictate the kind of organizer that would be most suitable for you. Are you a fan of statement necklaces or do you have an extensive collection of earrings? Knowing this information will guide your decision-making process when selecting materials and designing your organizer. The space where the organizer will go also plays a crucial role in determining its size, shape, and overall aesthetic appeal. Will it be mounted on a wall, nestled in a closet, or perched on a dresser? Your personal style and home décor should also influence your design choices. For instance, if you prefer a minimalist approach to decorating, you may opt for a sleek, modern organizer that blends seamlessly into the surrounding environment.
Gathering Materials
To build a DIY jewelry organizer that meets your specific needs, you’ll need to gather the necessary materials. A common starting point is to compile a list of essential supplies. Here’s a rundown of some frequently used materials in DIY jewelry organizers: Wood or frames provide structure for wall hangings and standing displays, while hooks and knobs are crucial for hanging necklaces and bracelets. Chicken wire or mesh is perfect for displaying earrings and dangle pieces. Fabric or leather can be used to create rolls or pouches for travel storage. Finally, paint, stain, or decals allow you to personalize and decorate your organizer. The best part is that many of these materials are readily available at local craft stores or hardware stores, often at affordable prices.
Selecting a Project
When selecting a project, consider one that aligns with your skill level and caters to your needs. To get you started, here are some straightforward ideas worth exploring:
For those looking to create a functional piece, consider the Wall Jewelry Organizer – a space-saving solution for showcasing various jewelry pieces.
Alternatively, if you’re short on time or looking for a quick DIY fix, an Earring Holder is a great option. A simple frame with chicken wire or mesh can elegantly organize your earrings and keep them tidy.
Finally, the Travel Jewelry Roll offers a practical solution for keeping your jewelry organized while on-the-go. Use fabric or leather to create a compact, portable organizer that will keep your jewelry pieces secure and easy to find.
Step-by-Step Creation
To bring your jewelry organizer to life, start by creating a comprehensive design plan that takes into account the dimensions of your space and the number of pieces you need to store. This will help ensure a functional and visually appealing final product. Once you have a solid understanding of what you want to create, it’s time to prepare your materials for assembly. This may involve cutting, sanding or painting them to achieve the desired look and fit. With all the necessary components at the ready, follow your design plan to bring your organizer together. This might entail attaching hooks, applying fabric or assembling frames, among other tasks. Finally, put the finishing touches on your creation by adding personal flourishes such as paint, decals or other decorations that reflect your unique style.
Tips for Success
When embarking on a DIY project, it’s essential to lay the foundation for success by adopting a few key habits. First, take the time to measure twice and cut once – this simple mantra can help you avoid costly mistakes and ensure a precise fit. Next, start small and build your way up to more complex designs. This approach allows you to develop your skills and gain confidence without feeling overwhelmed. Finally, don’t be afraid to think outside the box and get creative with your materials and design choices. By embracing experimentation and taking calculated risks, you can bring your unique vision to life and create an organizer that truly serves your needs.
Conclusion
Crafting a DIY jewelry organizer is an engaging and practical project that not only streamlines your space but also allows you to express your creativity. With the guidance of these steps and tips, you’ll be able to design and build a jewelry organizer that seamlessly blends functionality with style.
FAQS on DIY Jewelry Organizer Ideas
Crafting your own jewelry organizer is an engaging project that not only allows you to express your creativity but also provides a practical solution for keeping your treasured accessories neatly organized. As you embark on this endeavor, it’s essential to address some common queries to ensure a successful and enjoyable experience. For instance…
What materials do I need to make a DIY jewelry organizer?
When it comes to crafting your own organizers, the materials you need can significantly differ depending on the design you have in mind. However, there are some common materials that are often used to create functional and stylish storage solutions. These include wood for building frames, stands, or boards; chicken wire for adding earring holders or other small item displays; corkboard for creating a surface for pinning up important notes or reminders; fabric or leather for crafting rolls or pouches to store small items like jewelry or accessories; hooks and knobs for hanging jewelry or other small items from the ceiling or a wall; small boxes or trays for compartmentalizing items into separate categories; and, finally, paint, stain, or decoupage supplies for adding a decorative touch to your organizers.
How can I make a wall jewelry organizer?
To create a functional and visually appealing wall jewelry organizer, you’ll need to start by selecting a suitable base – typically a wooden board or frame. The next step is to prepare this foundation for your organizational masterpiece.
Begin by attaching hooks or knobs evenly spaced across the board, allowing ample room for hanging necklaces and bracelets. If you’re looking to add an extra layer of storage for earrings, now’s the time to attach chicken wire or a mesh screen using a staple gun.
Once your base is set up, it’s time to add some personality with a coat of paint, stain, or decoupage. Let your creativity shine and give your organizer a unique touch.
Finally, ensure that your wall jewelry organizer is securely fastened to the wall to prevent any accidents or damage.
Can I make a jewelry organizer without any woodworking skills?
When it comes to DIY jewelry making, you don’t necessarily need a plethora of specialized tools to get started. In fact, many projects can be completed without any tools at all, simply by repurposing everyday objects found around the house. For instance, transforming a picture frame into an innovative earring display using chicken wire is a great way to showcase your creativity. Alternatively, turning a corkboard covered in fabric into a unique pinning surface for jewelry organization is another fantastic example of how you can breathe new life into discarded materials.
How do I make a travel-friendly jewelry organizer?
A travel-friendly jewelry roll is a thoughtful accessory to consider. To create one, you can work with either fabric or leather. The process involves several key steps: first, cut your material to the desired dimensions; next, design and add compartments tailored to specific types of jewelry (for instance, a dedicated strip for earrings and pockets for necklaces); subsequently, sew together the compartments and edges to form a sturdy structure; finally, incorporate a closure mechanism, such as a ribbon or button, to keep everything secure.
What’s a simple DIY jewelry storage for earrings?
To create a unique and functional DIY earring solution, consider repurposing an old picture frame with a mesh screen. Begin by removing the glass and backing from the frame, leaving only the wooden or metal base. Next, stretch a piece of mesh screen across the frame, ensuring it is tight and even. Secure the mesh in place using a staple gun, taking care to anchor the staples firmly so they don’t come loose over time. Once complete, your earrings can be easily attached to the mesh and hung from your earlobe.
How can I ensure my DIY jewelry organizer is durable?
When crafting a durable organizer, prioritize high-quality materials and ensure all components are securely fastened. A crucial consideration for wood-based projects is applying a sealant, which not only protects the material but also imparts a polished appearance. For fabric organizers, opt for robust fabrics and reinforce seams to maximize longevity.
Are there eco-friendly options for building a jewelry organizer?
When it comes to DIY jewelry organizers, going green is not only possible but also incredibly empowering. One of the most effective ways to make your project eco-friendly is to repurpose materials you already have on hand. Old frames, fabric scraps, and wooden boxes can all be transformed into unique and functional organizers. Alternatively, consider shopping at local thrift stores for materials that would otherwise end up in landfills or incinerators. By thinking creatively and making conscious choices about the resources you use, you can create a stunning jewelry organizer that not only adds a touch of elegance to your space but also contributes to a more sustainable future.
How can I make a jewelry organizer as a gift?
Crafting a customized jewelry organizer as a gift infuses it with a unique charm. When selecting a design, consider the recipient’s personal aesthetic and jewelry collection to ensure the final product resonates with them. Incorporating personalized elements, such as their name or initials, or employing colors and materials that harmonize with their interior design, will elevate the gift’s emotional impact. With these guiding principles in mind, you’ll be well-equipped to construct a functional and visually appealing jewelry organizer that reflects your individuality and meets your needs.
30 DIY Jewelry Organizer Ideas (How to Organize Jewelry)
Transforming the chaos into a stunning showcase, discover 30 innovative DIY solutions to beautifully organize your jewelry collection. With these clever ideas, you’ll effortlessly store and display each piece, bringing order to the madness.
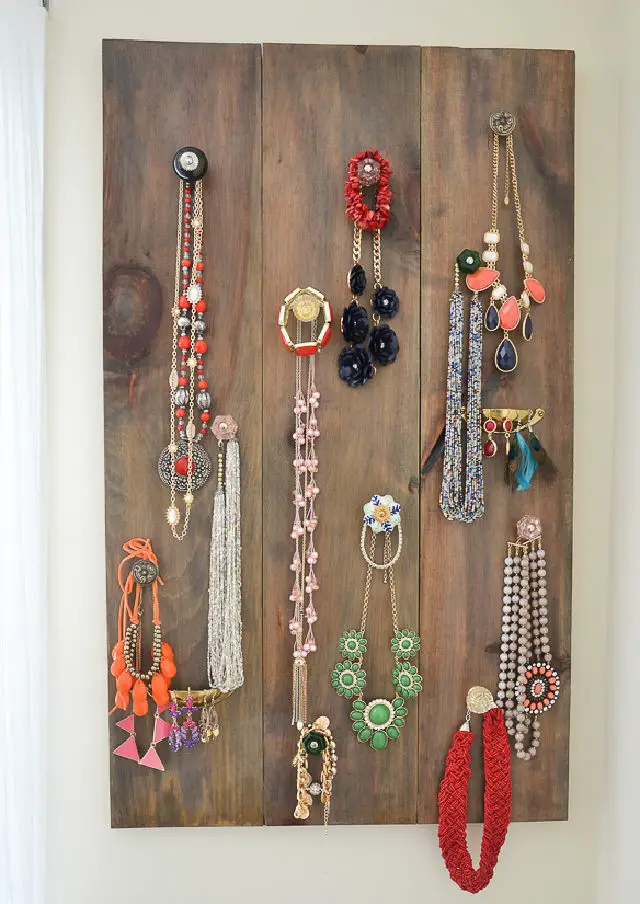
Making a Wall Jewelry Organizer
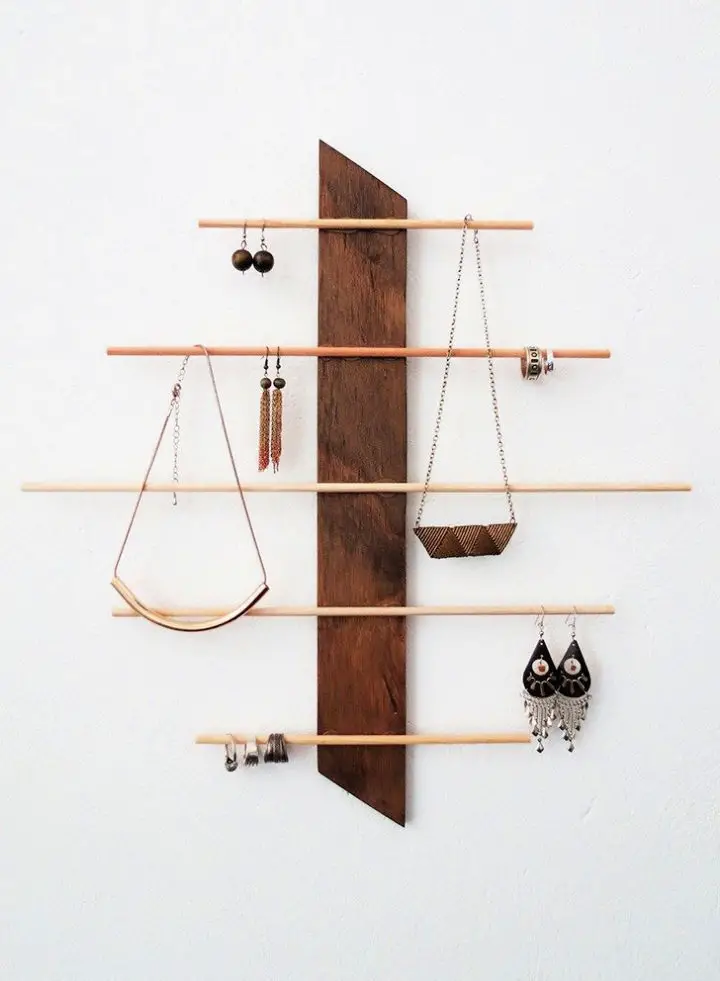
Say goodbye to tangles and hello to effortless jewelry organization with a DIY wall organizer that’s as stylish as it is practical. This versatile solution requires just a few simple materials, including plywood, dowels, and basic tools. With minimal effort required for sanding, staining, and assembly, you’ll be enjoying your clutter-free space in no time. Plus, the finished product serves not only as a functional storage solution but also as a chic decorative piece that adds to the ambiance of any room. So why wait? Get started on creating your dream jewelry display today! Click here for the full tutorial: Dream a Little Bigger.
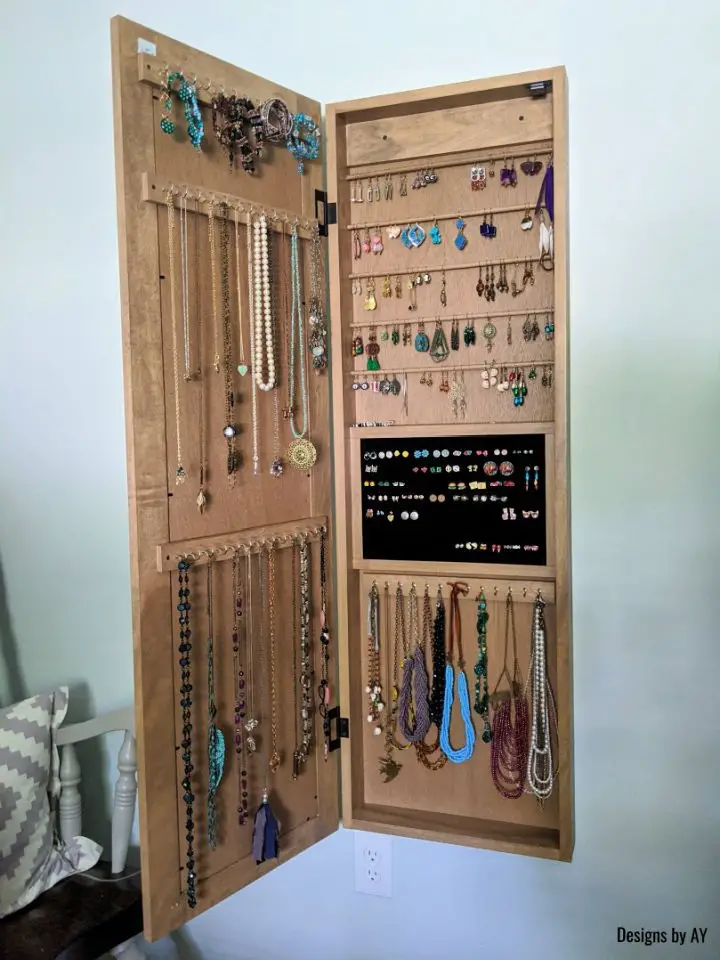
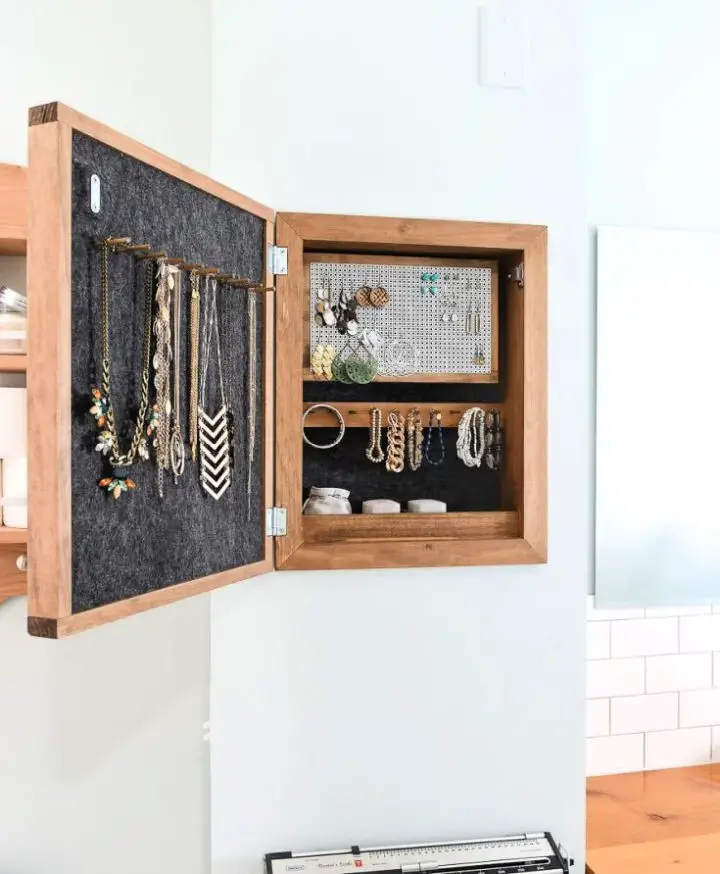
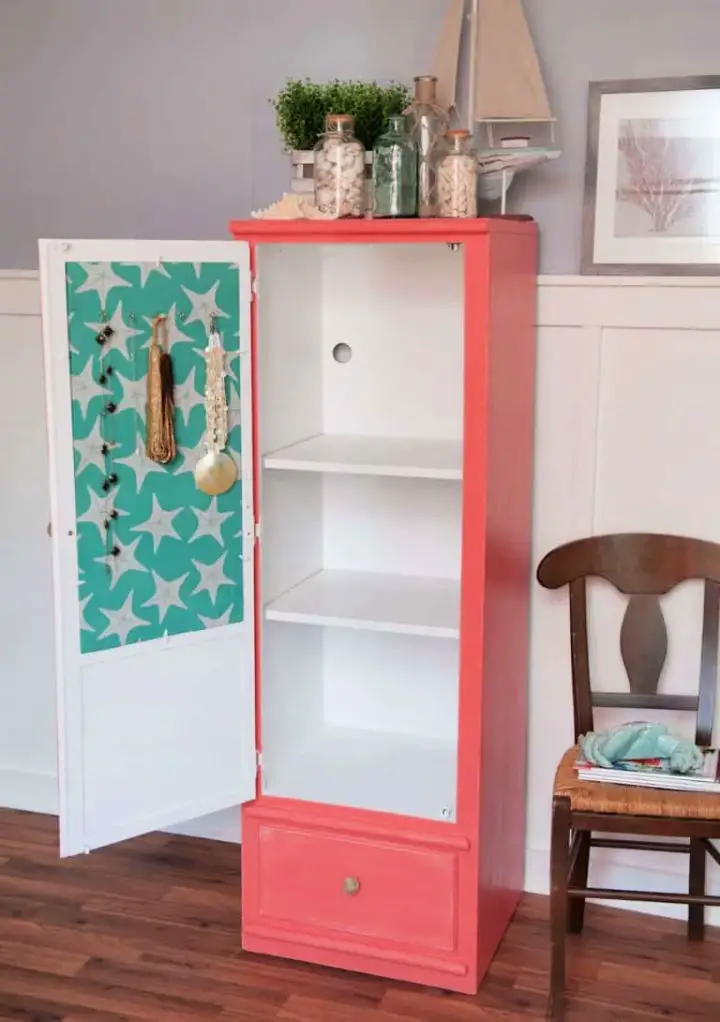
DIY Hidden Jewelry Cabinet
Transform any room into a haven of elegance and practicality with a Hidden Jewelry Cabinet that seamlessly balances style and organization. This multi-functional masterpiece serves as both a decorative wood sign and a secure storage solution for your valuables, effortlessly doubling as a bathroom or bedroom focal point.The cabinet’s interior is meticulously designed to cater to your specific needs, featuring hooks for necklaces and bracelets, an innovative earring rack that makes retrieval a breeze, and thoughtful compartments tailored to store rings and other precious items. For the DIY enthusiasts seeking a unique blend of functionality and visual appeal, this project offers detailed instructions for building and finishing, empowering you to create a personalized and tidy storage solution that harmonizes with your space.
Mother’s Day Clay Jewelry Dish
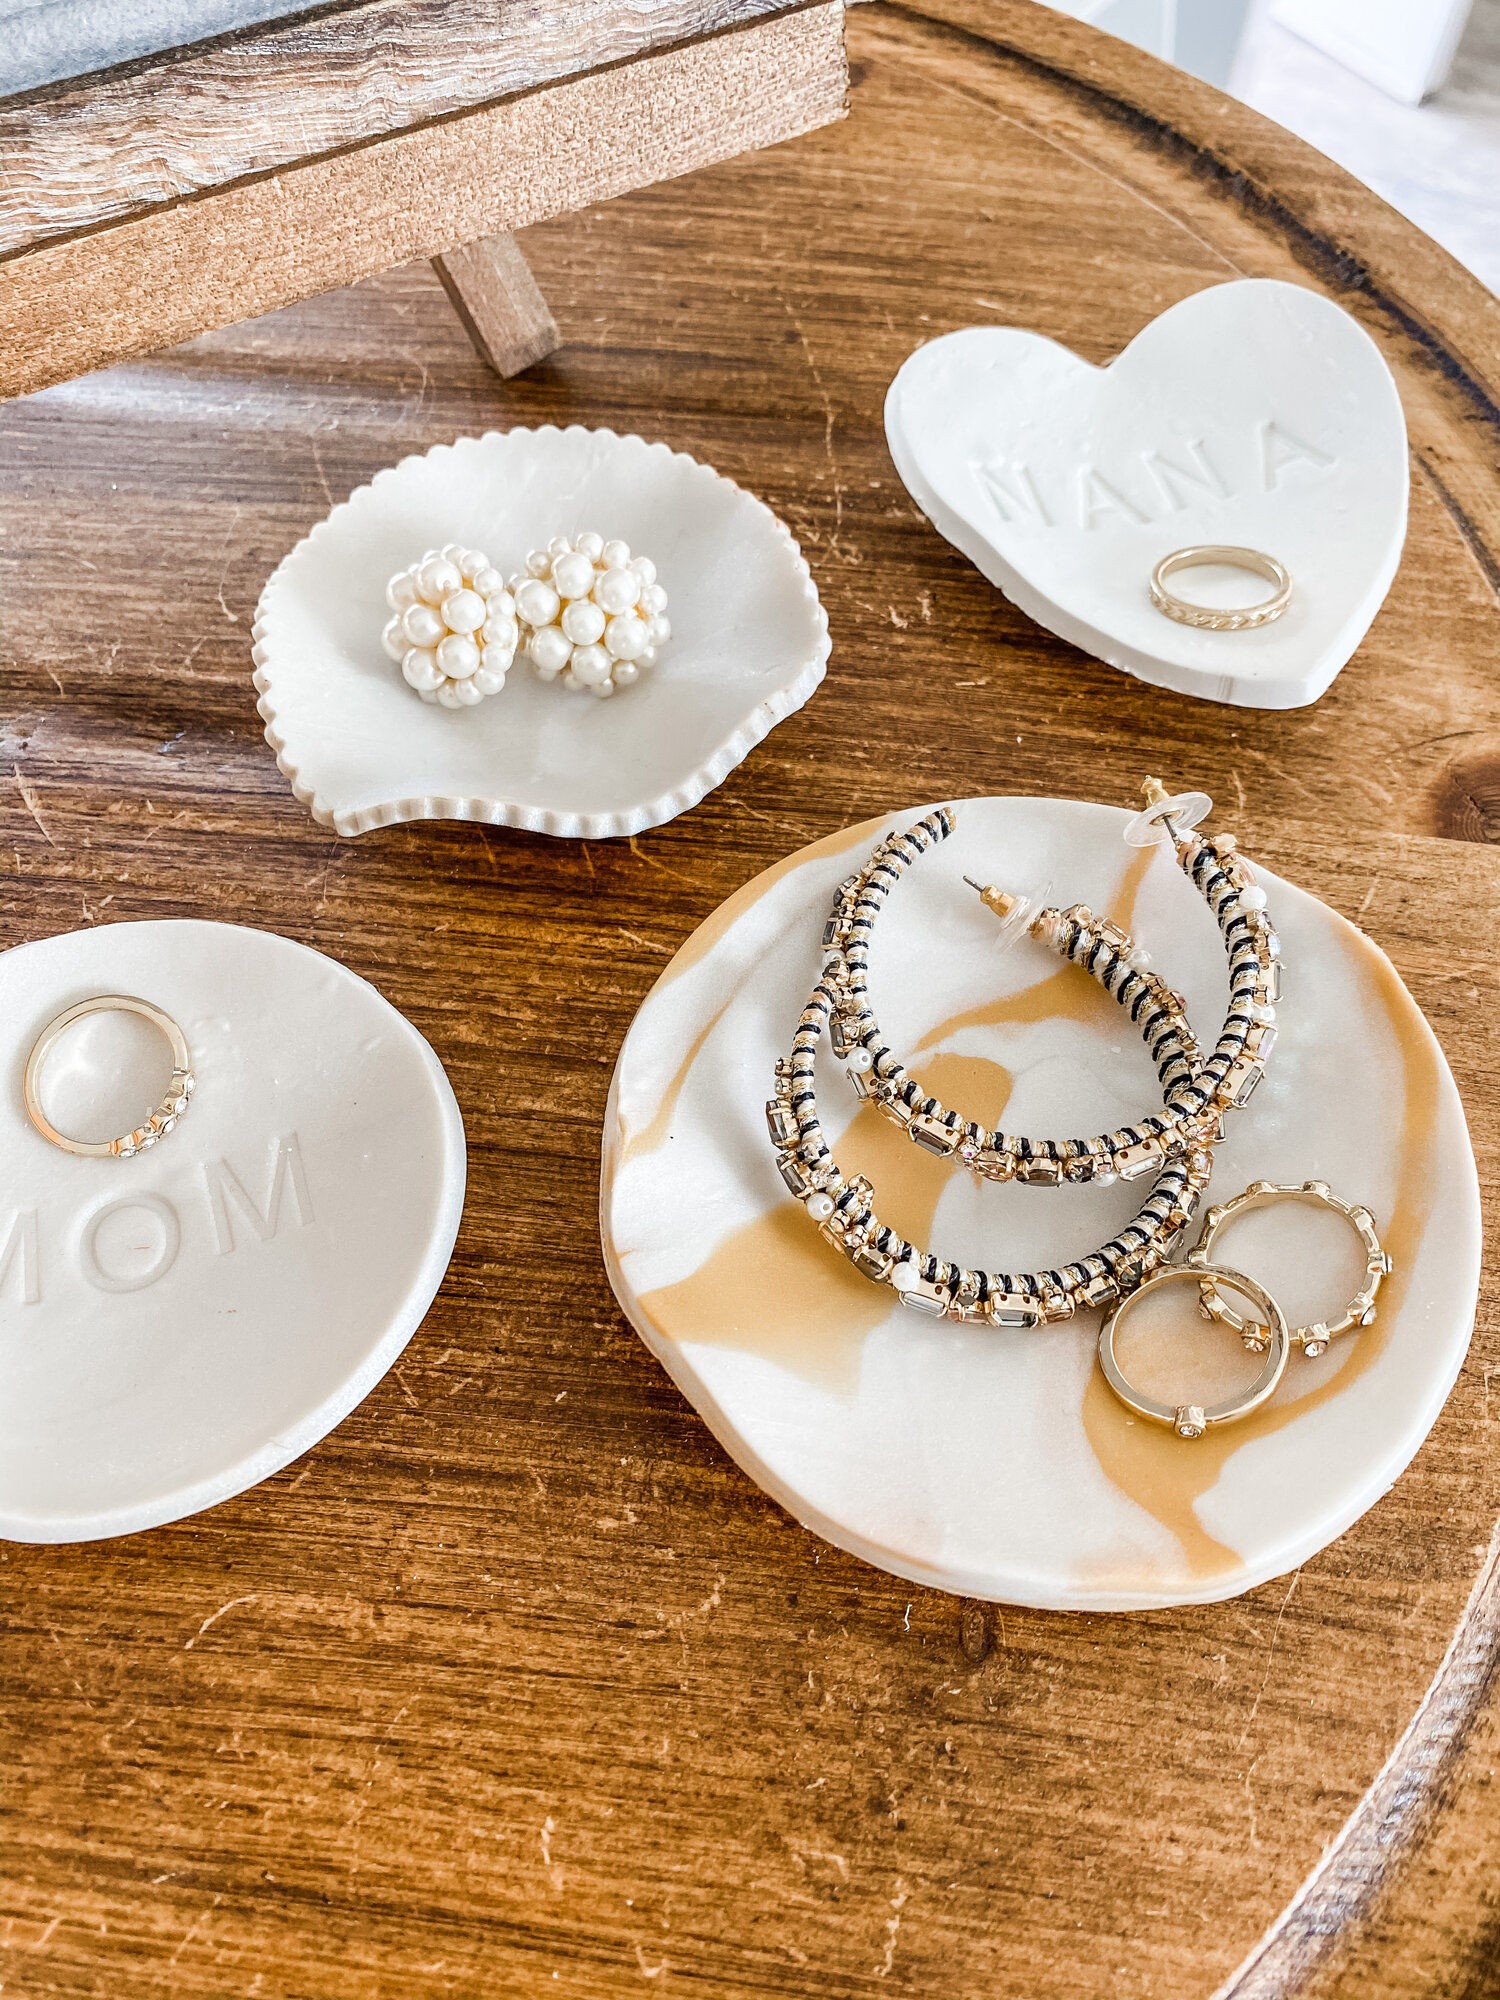
This Mother’s Day, surprise your mom or grandma with a thoughtful and personalized DIY clay jewelry dish that showcases your creativity. A meaningful gift for kids to craft, it not only serves as a beautiful keepsake but also provides a practical solution for keeping jewelry organized and safe. Perfect for those who often take off their rings while cooking, this unique present is sure to bring a smile to her face.
For a step-by-step guide on how to make this special gift, head over to From Scratch with Maria, where you’ll find detailed instructions, helpful tips, and creative ideas to make your project truly unforgettable. With expert guidance on preparing the clay, personalizing it with letter stamps, and more, you’ll be all set to craft a memorable Mother’s Day present that she’ll treasure for years to come.
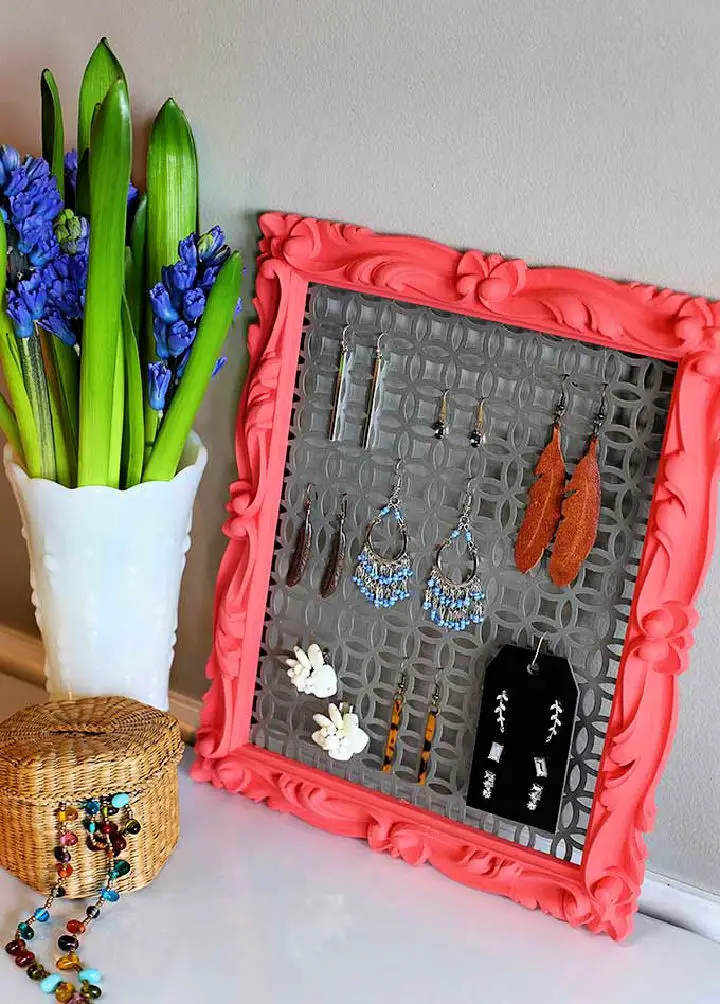
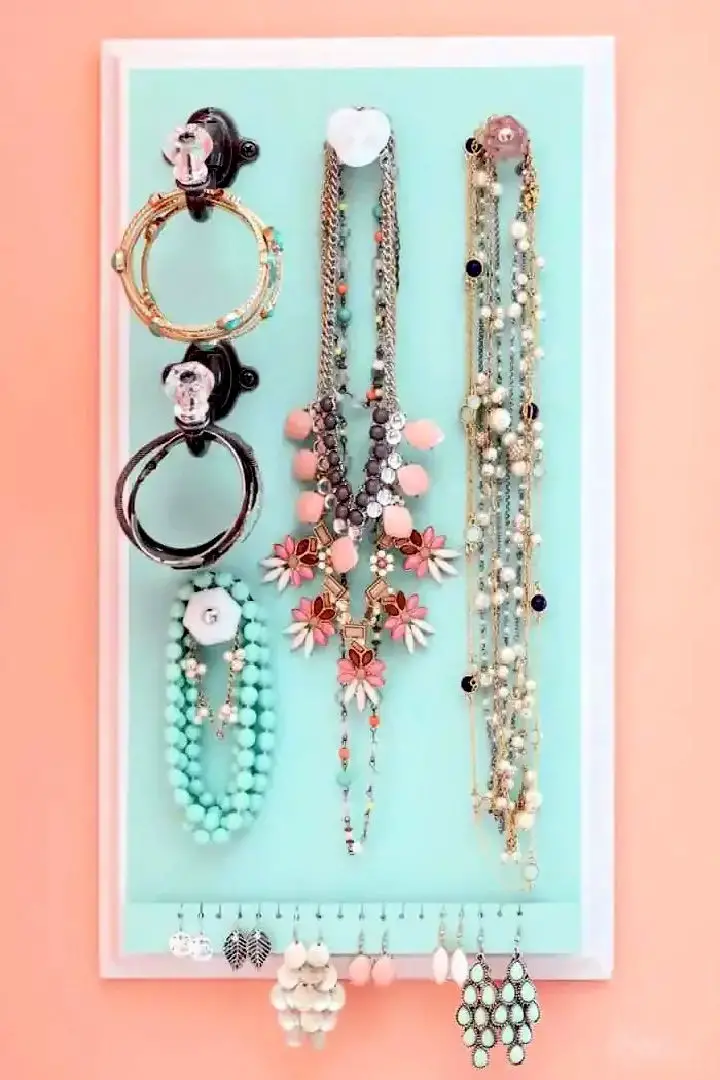
Make a Framed Jewelry and Earring Organizer

Transform your jewelry collection into a stunning display of vintage charm with a DIY framed jewelry and earring organizer. This ingenious solution, requiring only a stylish frame and chicken wire, perfectly addresses the issue of overflowing accessories and limited closet space. Not only does it showcase your jewelry in an eye-catching manner, but it also presents a creative solution that harmoniously blends chic and practicality.
With simple steps to measure, paint, and assemble, you can create an alluring organizer that keeps earrings, necklaces, and bracelets effortlessly within reach. This crafty project is ideal for adding a personal touch to any room, serving as a testament to stylish and efficient storage.
How to Make a Leather Jewelry Roll
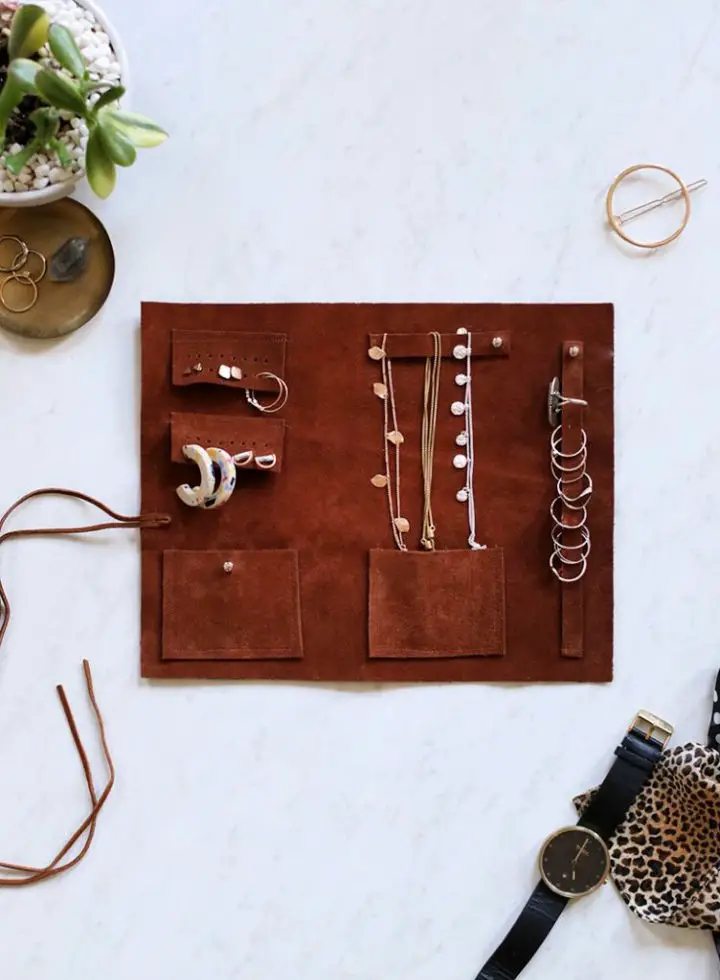
Elevate your travel game by transforming ordinary jewelry storage into a stylish and functional experience with this DIY Leather Jewelry Roll tutorial, courtesy of The Merrythought. Tired of the hassle and frustration that comes with dealing with tangled necklaces and misplaced rings on-the-go? This clever project offers a chic solution to keep your jewelry organized and within reach, requiring only basic tools like a rotary cutter and sewing machine. Whether you’re a seasoned traveler or an enthusiastic crafty person, this easy-to-make leather jewelry roll is the perfect way to add a touch of sophistication and practicality to your travel essentials.
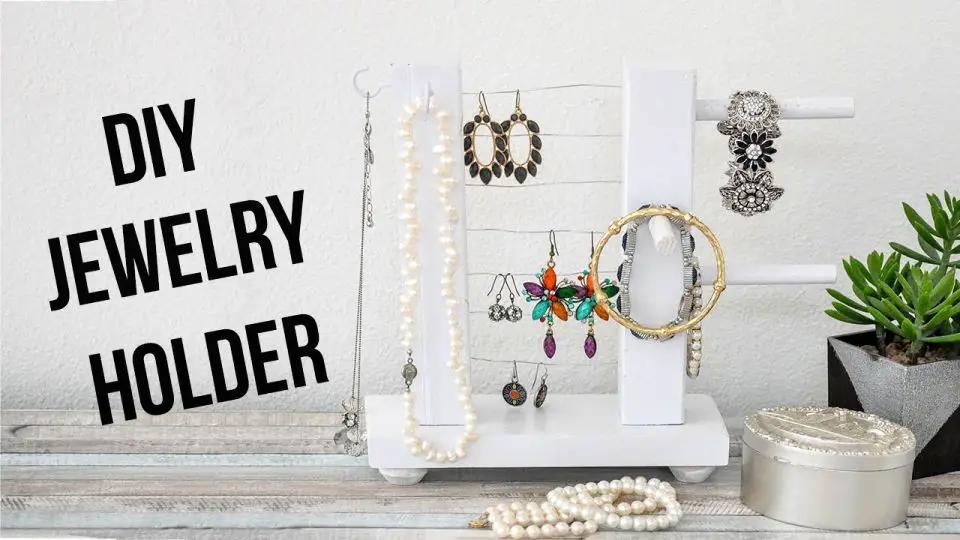
Make Your Own Earring Stand
Transform your jewelry storage with a one-of-a-kind DIY earring stand that effortlessly organizes your treasures. Crafted for simplicity, this elegant display requires only a small wooden board and decorative aluminum sheet, making it an accessible project for all skill levels. By repurposing these materials, you’ll create a chic and space-saving solution that keeps your earrings untangled and ready to wear. Perfect for sprucing up your dresser or vanity, this DIY earring stand is the perfect way to showcase your jewelry collection in style.
DIY Leather and Rope Jewelry Organizer
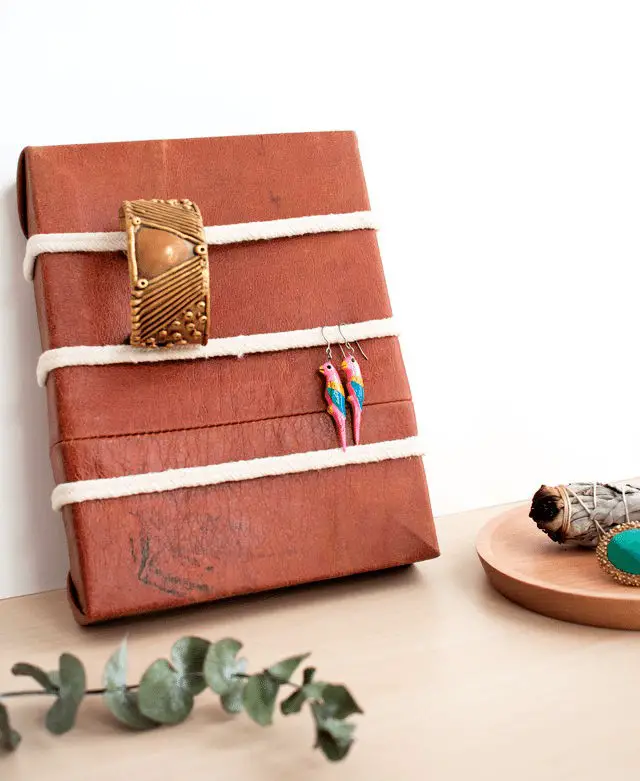
Transform your jewelry organization game with a unique and eco-friendly DIY Leather and Rope Jewelry Organizer, inspired by Shrimp Salad Circus. This creative project repurposes an old leather coat and a thrifted picture frame, making it not only a fun DIY venture but also a sustainable one that reduces waste. With simple steps, you can turn these materials into a stylish organizer that brings harmony and visual appeal to any space.
Painted Rainbox Trinket Box Ideas

Transform an ordinary trinket box into a vibrant masterpiece with this step-by-step guide on creating a DIY painted rainbow box. Perfect for storing cherished jewelry or knick-knacks, this project brings together the whimsical world of deco art’s pastels and pop paint set. With only a few simple supplies and your imagination, you can elevate an ordinary box into an extraordinary work of art. Let your creativity shine by following these easy steps and crafting your own unique pastel rainbow treasure.
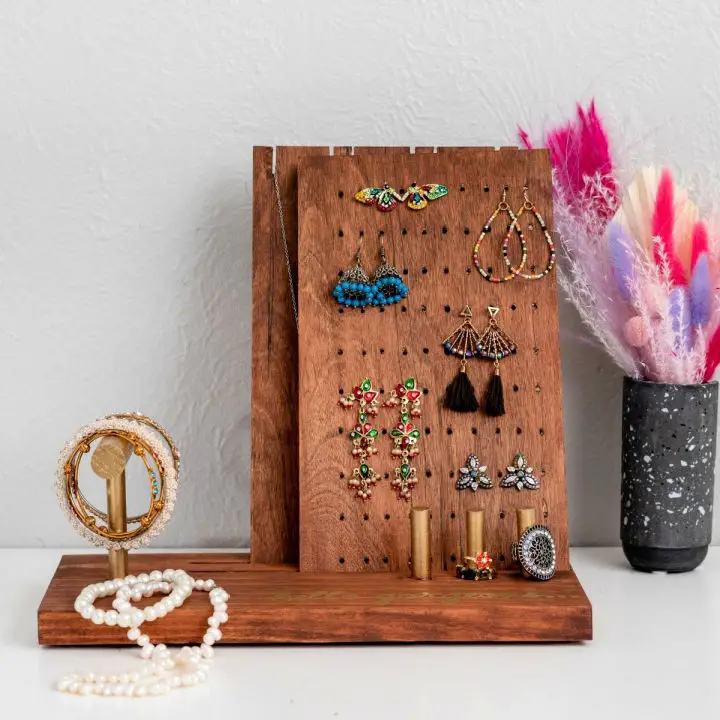
How to Build a Jewelry Organizer
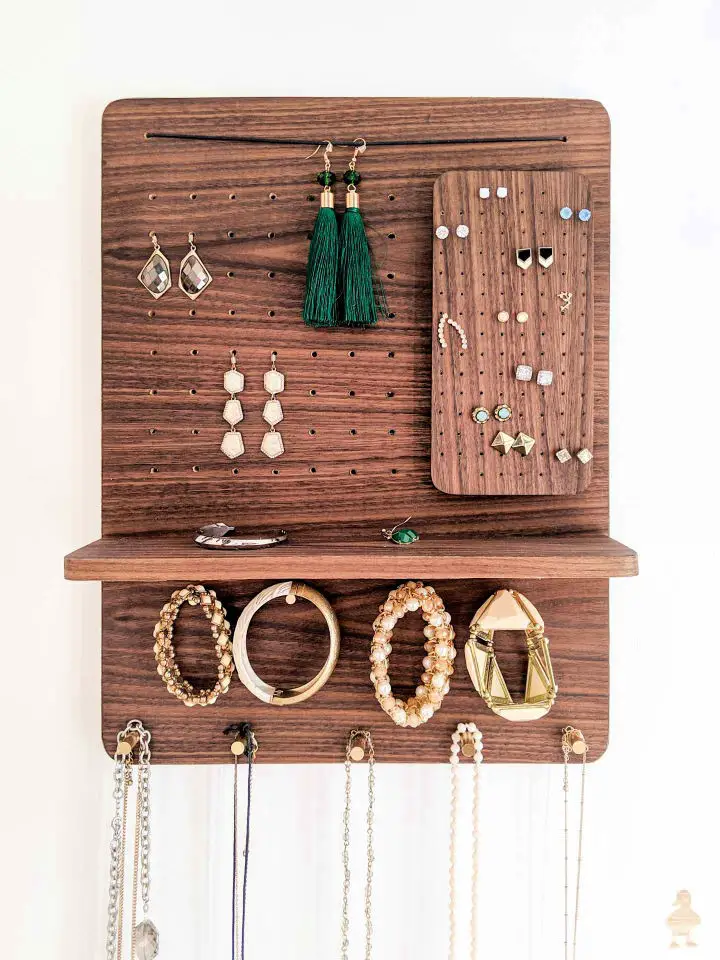
Transforming your jewelry storage just got a whole lot easier with a DIY Magnetic Jewelry Organizer that’s both sleek and modern. Designed by Sarah at Ugly Duckling House, this clever creation combines the natural beauty of walnut plywood with the elegance of brass rods to provide a unique solution for showcasing and storing your earrings, bracelets, and necklaces. Not only does it add a touch of sophistication to any room, but it also keeps your accessories organized, tangle-free, and within easy reach.
Whether you’re working with statement pieces or delicate studs, this organizer has a perfect spot for every accessory. With its clever design, it’s never been easier to give your jewelry the stylish home it deserves.
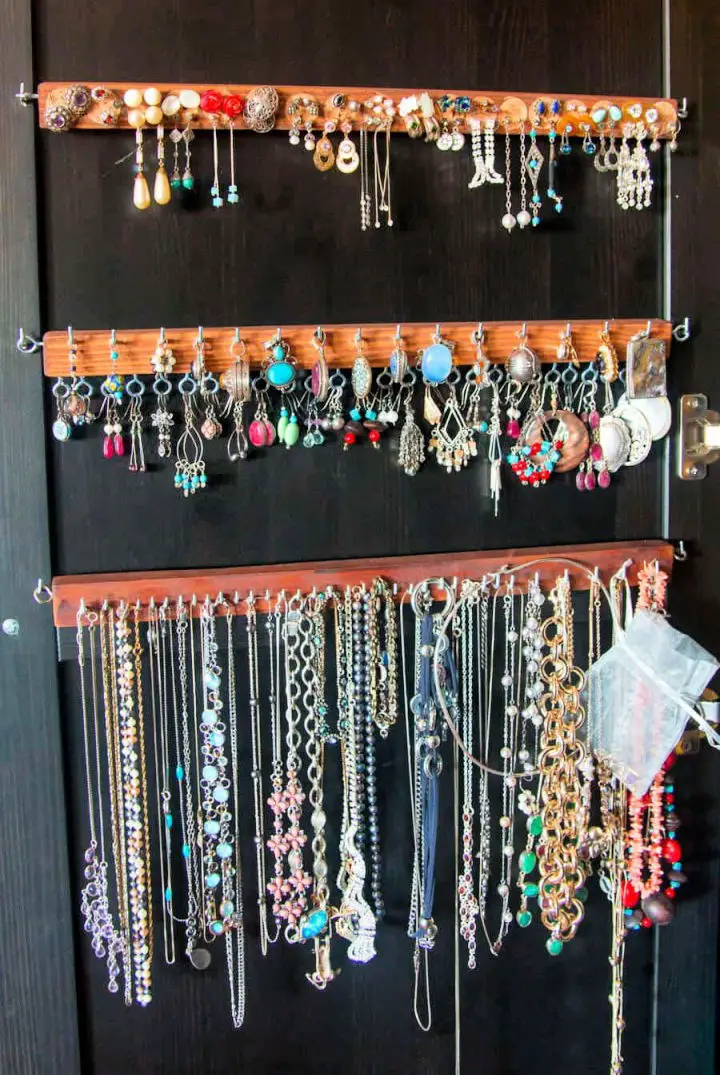
Homemade Wall Mounted Jewelry Organizer
Transform your jewelry collection from cluttered chaos to elegant showcase with our easy-to-make wall-mounted DIY organizer. Perfect for space-conscious enthusiasts, this solution not only declutters but also adds a touch of style to your walls. With a simple combination of wood, cup hooks, and a wooden dowel, you can create a customized display that reflects your personal taste and meets your needs. By following our straightforward steps, you’ll be able to assemble your own jewelry haven, keeping your treasured pieces tangle-free and within easy reach. Ideal for renters, this DIY project uses Command Strips for a secure, damage-free installation. Bid farewell to the frustration of messy, unseen jewelry and hello to a beautifully organized display that’s sure to delight.
How to Make Any Box Into a Jewelry Box
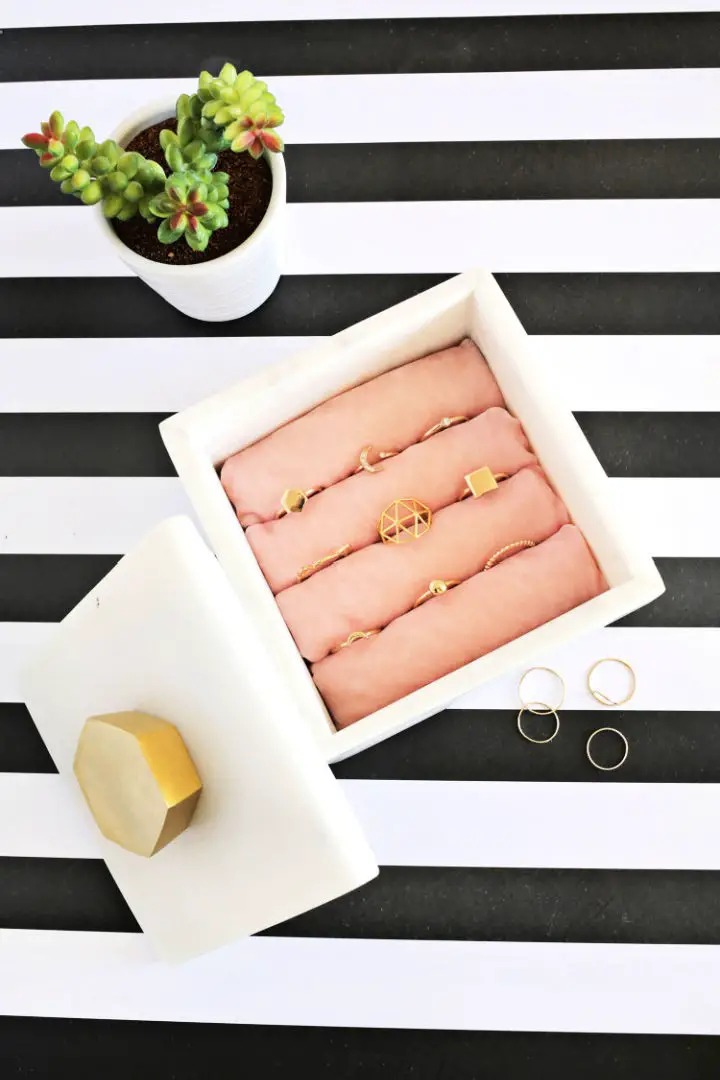
Elevate any ordinary box into an exquisite jewelry storage solution with a simple yet clever DIY project. By repurposing a decorative box, velvet fabric, and basic crafting supplies, you can transform it into a sleek and organized haven for your treasured rings, earrings, and other precious pieces. A perfect blend of form and function, this creative endeavor allows you to give new life to a beloved box while also adding a touch of sophistication to your space. Follow the step-by-step instructions on A Beautiful Mess to bring this project to life and start enhancing your surroundings with this stylish and practical solution today!
Build a Wall Mirror Jewelry Storage
Transform the chaos of your jewelry organization with a unique Wall Mirror Jewelry Storage solution that seamlessly blends function and fashion. Ditch the disarray of scattered earrings and misplaced pieces with this clever design, which not only provides ample space for your entire collection but also incorporates a mirror for effortless styling. A must-have for anyone seeking a stylish and practical way to store their jewelry, this DIY project elevates your space from cluttered to chic, effortlessly turning jewelry chaos into décor gold.
How to Make an Earring Holder
Elevate the way you showcase your earring collection with a creative DIY project. Transforming a thrift store frame into an elegant accessory organizer is a simple yet stylish solution. By following the straightforward steps outlined at House of Hawthornes, you’ll be able to repurpose everyday materials like decorative aluminum sheets and paint to create a functional piece that also adds a personal touch to your decor. This innovative holder can accommodate studs or dangling earrings alike, ensuring your favorite pieces are always within reach and displayed in a beautiful manner.
DIY Wooden Necklace Holder With Vintage Thread Spools
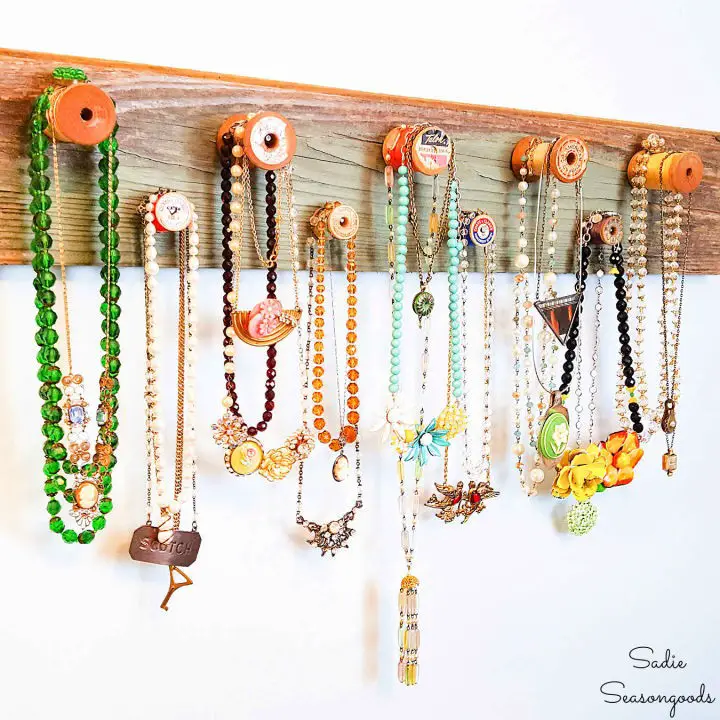
Elevate your jewelry storage game by embracing vintage charm! With a dash of creativity and some salvaged wood, upcycled vintage thread spools, and a pinch of DIY magic, you can transform your necklaces’ storage into a charming display that’s as functional as it is stylish. This unique piece not only keeps your jewelry organized but also adds a touch of whimsy to your bedroom or dressing room. By following the simple steps outlined below, you’ll be able to turn discarded materials into a one-of-a-kind accessory that showcases your personal flair and commitment to sustainability.
Gorgeous DIY Jewelry Display
Transform your morning routine and jewelry collection with a thoughtful DIY creation. By crafting a custom jewelry organizer, you’ll not only streamline your daily routine but also unveil the beauty of your treasured pieces. Inspired by Anika’s DIY Life guide, this project seamlessly blends creativity and utility. Add personal touches like monograms or heartfelt messages to make it an extraordinary gift or unique décor piece that showcases your style. This versatile display is suitable for all types of jewelry, effortlessly organizing and presenting your adornments with flair. A simple yet impactful project that brings a touch of elegance to any space.
Making Travel Jewelry Roll Tutorial
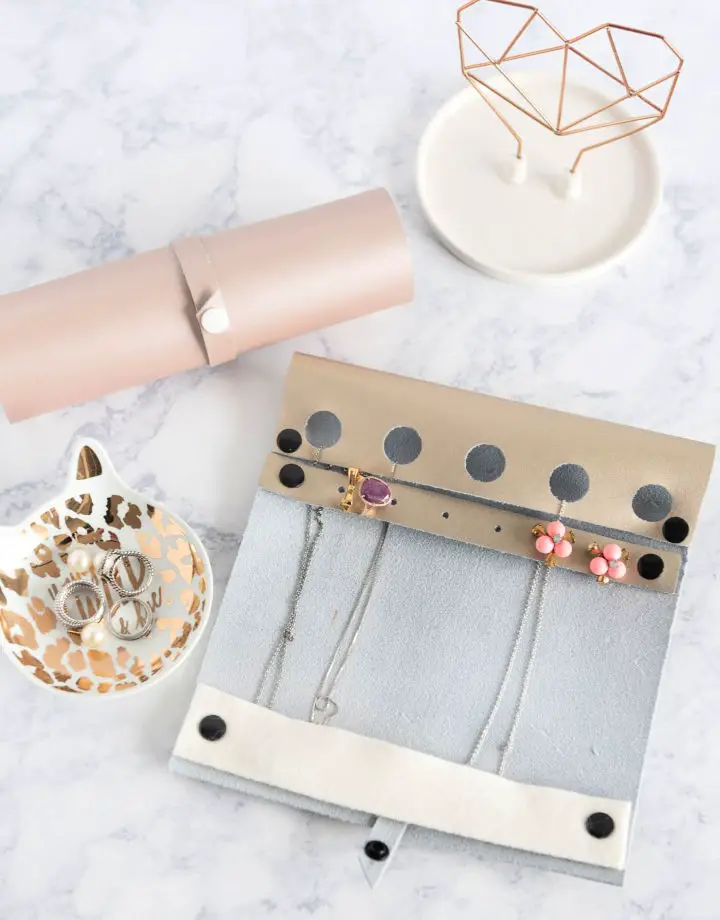
Imagine crafting a one-of-a-kind DIY Travel Jewelry Roll that’s as functional as it is stylish. The Polka Dot Chair shares a step-by-step guide to creating this elegant accessory using a Cricut Maker Machine. By combining simplicity with creativity, you’ll produce a no-sew leather jewelry roll featuring separate compartments for earrings, necklaces, and rings. This travel-friendly treasure prevents tangles and losses while making a thoughtful gift or a lovely treat for yourself. As part of a sponsored collaboration with Cricut, this tutorial offers expert guidance to help you bring your design to life.
Earring Holder for Studs and Display Organizer
Imagine transforming the chaos of your earring collection into a stunning display of organization, crafted from unexpected materials like wine corks. This innovative DIY project invites you to think creatively and turn everyday items into a functional and beautiful way to store your studs and post earrings. As you breathe new life into recycled materials, you’ll not only create an efficient solution to keep your favorite pieces dust-free but also add a charming decorative touch to your space. Say goodbye to cluttered drawers and the frustration of searching for misplaced earrings with this unique holder that effortlessly keeps your jewelry organized and within reach.
DIY Acrylic Earring Holder
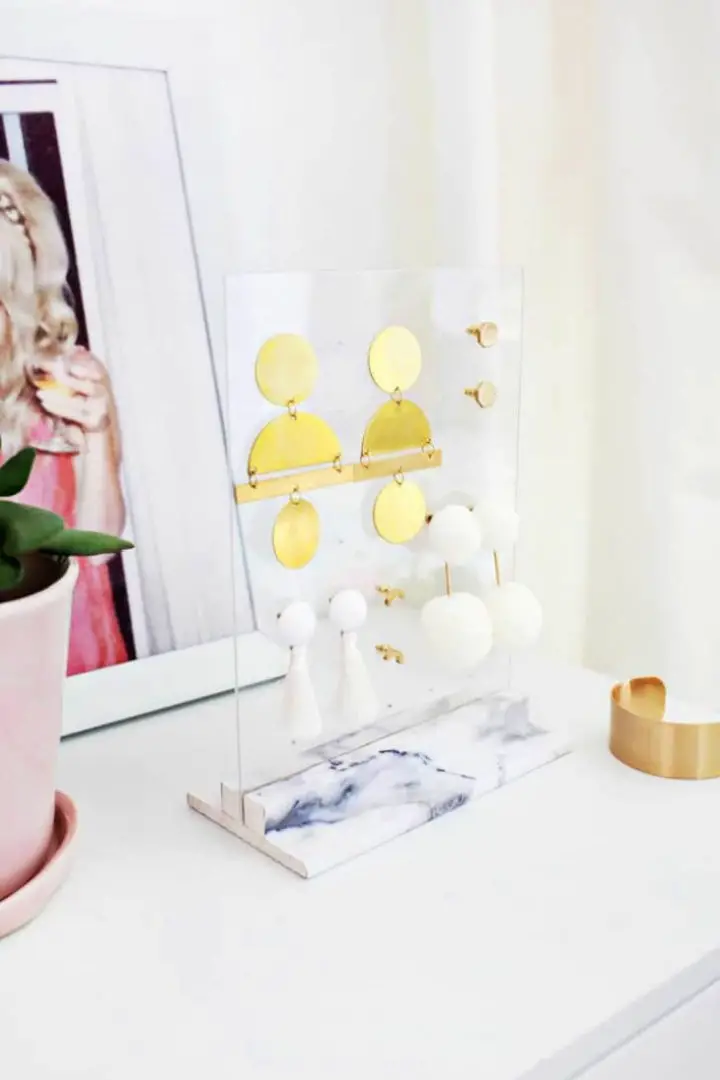
Turn your disorganized earring collection into a stylish display with a DIY acrylic earring holder that’s perfect for both post and hook earrings. Not only will this project declutter your space, but it’ll also double as a chic dresser accessory. To get started, gather some simple supplies like balsa wood, acrylic sheet, and marble paper. As you craft your very own earring stand, feel free to add your personal touch by incorporating patterns or colors that reflect your unique style. Say goodbye to the chaos of tangled earrings and hello to neat, visible beauty that’s sure to impress.
Building a Wall Jewelry Organizer
Transform your space into a haven for jewelry enthusiasts by crafting a custom DIY wall organizer that doubles as a stylish wood sign decor. This clever creation provides a structured and visually appealing storage solution for all types of jewelry, complete with pegs for necklaces and bracelets, and specialized compartments for earrings and rings. With the help of Kreg Tools’ free build plans, this project makes for an enjoyable weekend DIY endeavor. As you discover the joy of clutter-free organization, you’ll appreciate the ingenious way it keeps your treasured accessories neatly in check.
Copper and Marble Jewelry Stand
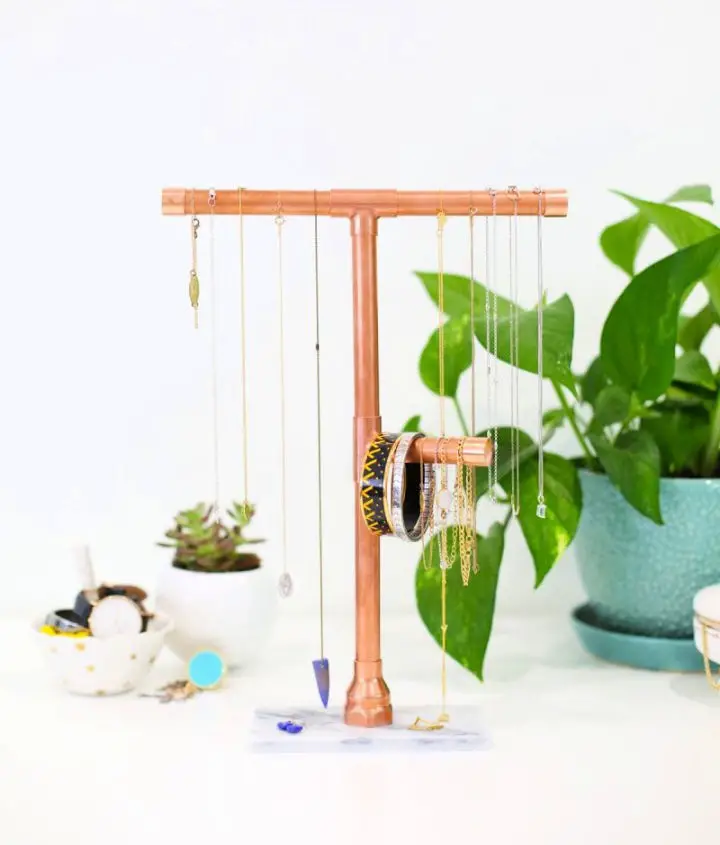
Elevate the aesthetic of your jewelry organization with a chic DIY copper and marble jewelry stand that effortlessly transforms your cluttered space into an elegant display. This charming creation showcases your favorite pieces, combining the sophistication of marble with the warmth of copper for a visually striking showcase.In just a few simple steps, you can turn a trip to the hardware store into a stylish storage solution that banishes chaos and neglect from your jewelry collection. By following our easy DIY guide at Lovely Indeed, you’ll be amazed at how quickly you can create this stunning stand, replacing disorganization with an attractive and functional showcase.
How to Build a Glasses and Jewelry Organizer
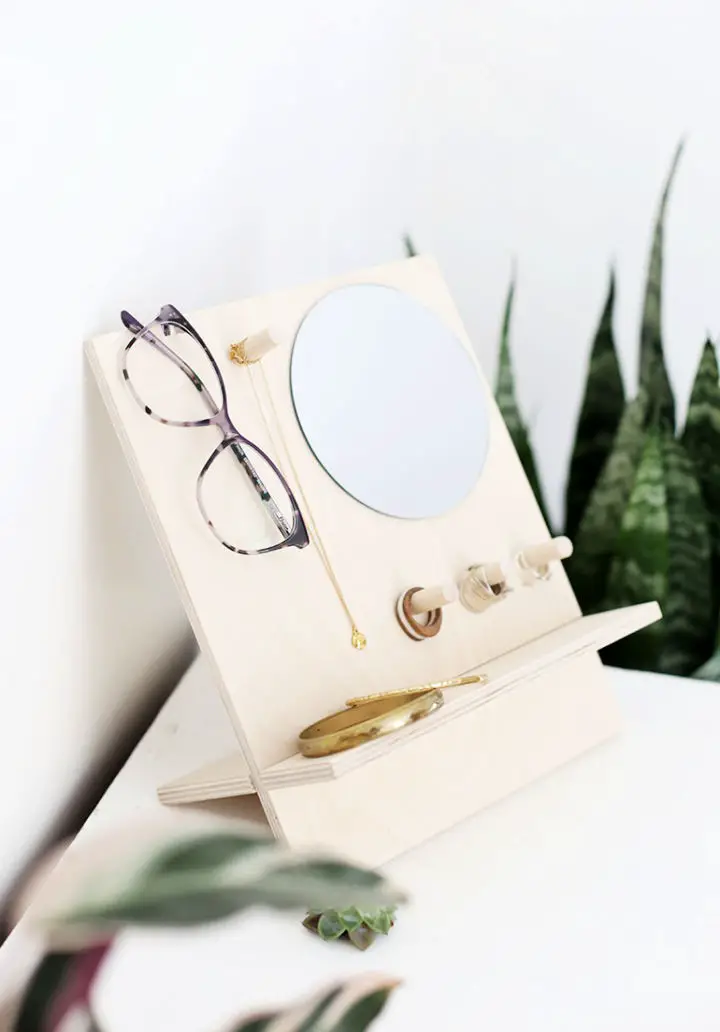
Transform your space into a haven of organization and style with a chic DIY glasses and jewelry organizer, inspired by The Merrythought’s creative genius. This comprehensive guide provides a step-by-step blueprint for crafting a modern masterpiece that effortlessly tames clutter on your dresser or bedside table. With its sturdy birch plywood base and sleek mirror, this ingenious project seamlessly blends form and function to keep your treasured possessions neatly stored and within easy reach.
Make a Tiered Tray Jewelry Stand
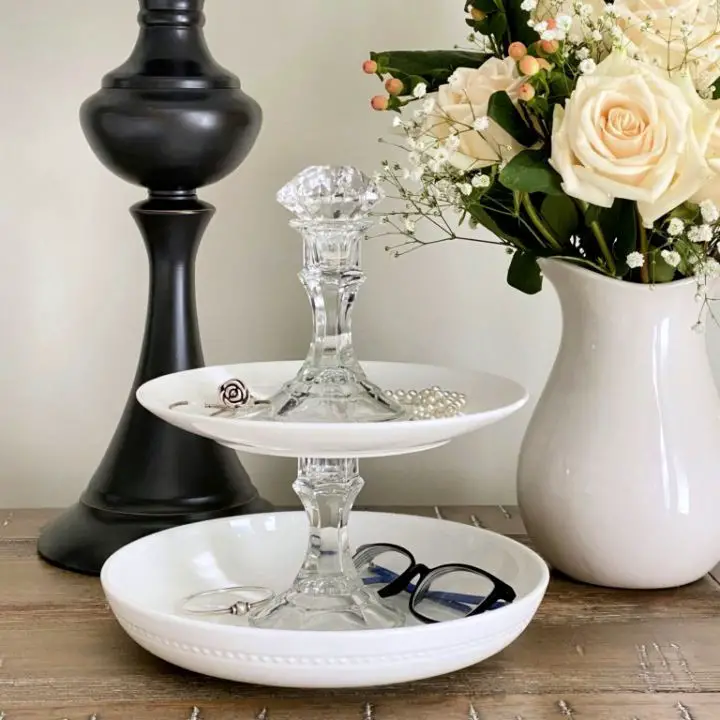
Transform your jewelry storage space with a creative DIY Tiered Tray Jewelry Stand. This ingenious project repurposes everyday items, possibly already stashed away in your home or easily sourced from a thrift store or the local dollar shop. Not only does it provide a clever solution for keeping your treasured pieces organized, but it also brings a touch of elegance to any room’s decor. With simple instructions and a dash of personal style, you can craft a jewelry stand that perfectly reflects your unique aesthetic and meets your organizational needs. For a detailed tutorial on building your one-of-a-kind jewelry stand, head over to Cali Girl in a Southern World for a step-by-step guide.
DIY Hanging Jewelry Holder
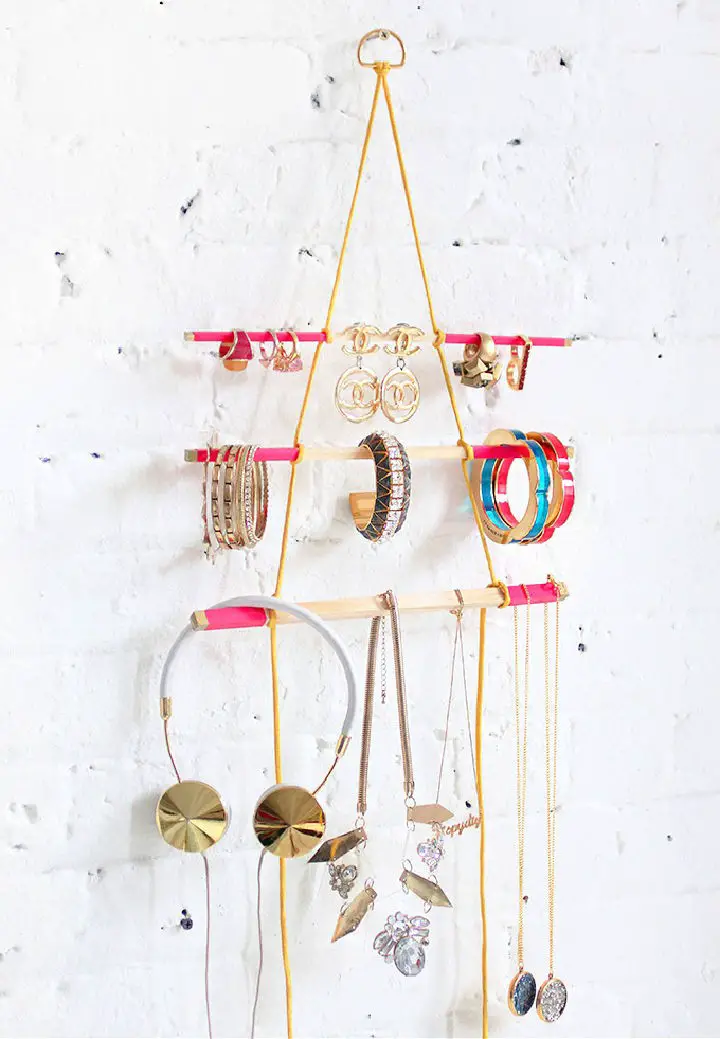
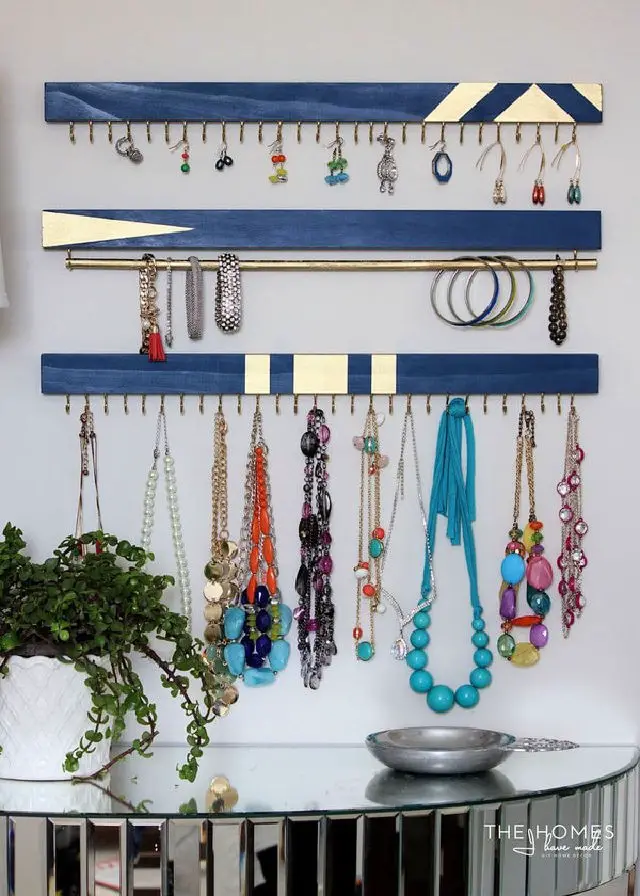
Transform your jewelry storage into a stunning display with a handmade Hanging Jewelry Holder that exudes minimal yet functional chic. This DIY project, inspired by I SPY DIY, takes you through a simple and stylish process of building a jewelry organizer using everyday materials like wood dowels, gold paint markers, washi tape, and paracord. Ditch the frustration of tangled chains and hello to a beautifully curated showcase for your favorite accessories. With just a few easy steps, you can turn your jewelry storage into a decorative masterpiece that reflects your personal style.
Handmade Jewelry Organizer
Transform your space into a harmonious haven by crafting a stunning DIY Jewelry Organizer that’s as effortless as it is effective. Ditch the frustration of tangled necklaces and misplaced earrings for good! This ingenious project requires minimal materials, most likely already stashed away in your home, making it an accessible and budget-friendly endeavor. For a comprehensive walkthrough on constructing this elegant and functional masterpiece, head over to Fynes Designs. Not only will this organizer declutter your bathroom or bedroom, but its sleek design will also elevate your wall with a touch of sophistication.
DIY Cork Board Jewelry Organizer With Fabric
Transforming a mundane bathroom cabinet into a haven for jewelry storage can be achieved through a simple DIY project that’s both affordable and creative. One innovative approach is to repurpose an ordinary cork board into a stylish organizer using fabric and Mod Podge. The beauty of this idea lies in its customizability – you can choose any size cork sheet to fit inside your cabinet or mount it on the wall as a decorative piece, adding a personal touch to your space. All you need is a list of basic supplies, including fabric, Mod Podge, and a few tools. With Courtney’s step-by-step guide and more inspiring ideas, you can visit Mod Podge Rocks Blog for a detailed walkthrough and unlock the full potential of this project.
Necklace Organizer From Driftwood
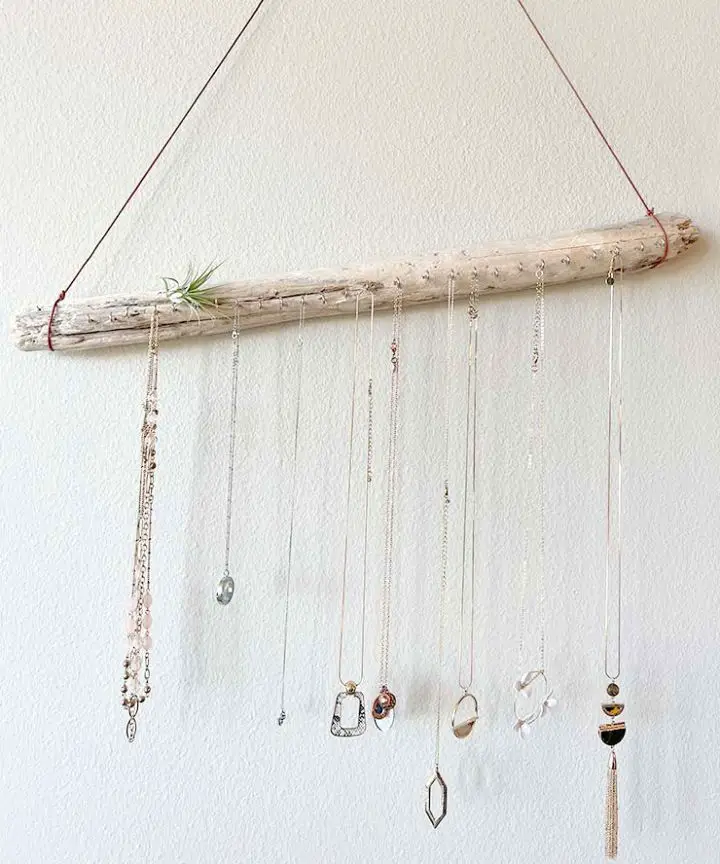
Transform the chaos of tangled necklaces into a serene display with a DIY driftwood necklace organizer. This eco-friendly project elevates a piece of driftwood into a stylish, Boho-inspired jewelry hanger that’s not only easy on the eyes but also functional and quick to make – under 30 minutes! As you create this natural decor element for your space, you’ll be treating yourself to a clutter-free existence, where your favorite pieces are always within reach. No more rummaging through messy boxes or drawers; with this wall-mounted organizer, your jewelry game is about to get a whole lot easier and enjoyable.
Make a Topsy turvy Jewelry Box
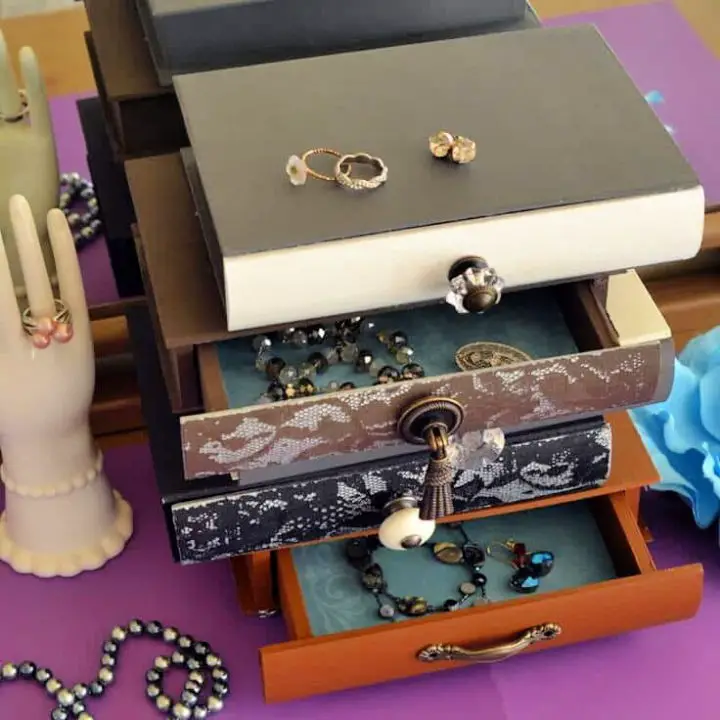
Step into the whimsical world of upcycled decor with a one-of-a-kind topsy-turvy jewelry box crafted by Jennifer and Kitty from Running With Sisters. This creative endeavor showcases the power of repurposing vintage elements, like antique knobs, and innovative techniques, such as lace stenciling, to infuse your space with femininity. Perfect for those seeking to add a playful touch to their decor while keeping their treasures organized, this accessible tutorial leverages simple materials like wooden drawer boxes and acrylic paint. Embrace the charm of mismatched drawers and discover the joy of upcycling at Kenarry.
Cool Geometric Wall Jewelry Organizer
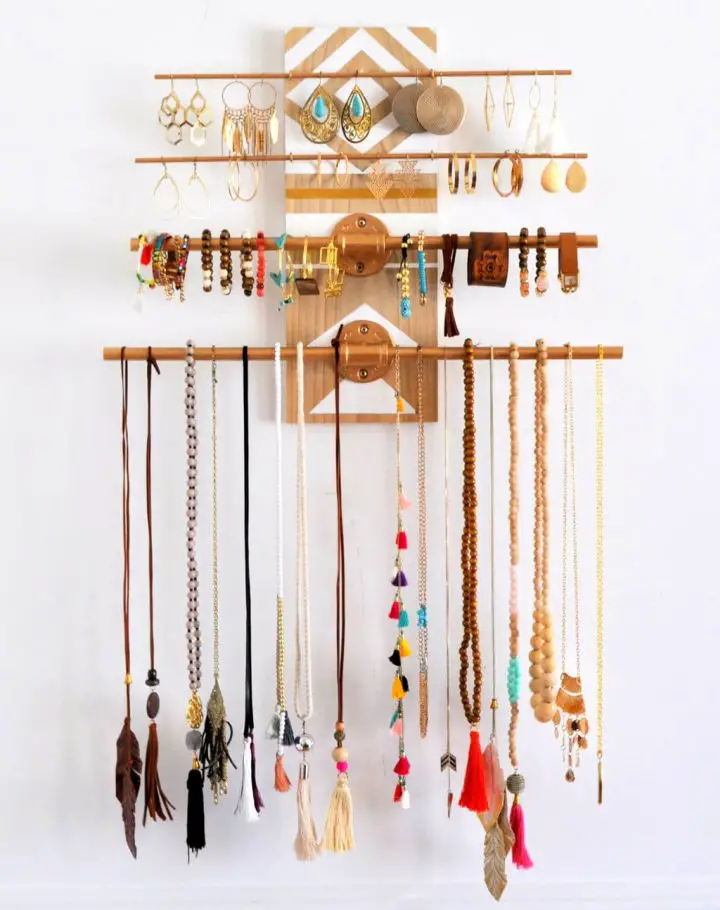
Transform any room into a stylish sanctuary by crafting a DIY jewelry wall organizer that serves as both a functional storage solution and a striking piece of art. This innovative project combines simplicity with elegance, blending industrial chic with subtle glamour to create a unique geometric design that showcases your favorite jewelry pieces.
By following these easy-to-follow steps and utilizing basic supplies, you can create a beautiful display that not only declutters your space but also adds a touch of sophistication to any room. Whether you’re showcasing your summer jewelry collection or keeping everyday essentials within reach, this DIY masterpiece is sure to elevate your decor while providing a convenient way to store your treasured items.
Simple DIY Jewelry Organizer
Transforming a humble piece of wood into a sophisticated jewelry organizer is an achievable DIY goal that can elevate the style of any room. By combining wooden panels, knobs, and pulls with some creativity and elbow grease, you can create a one-of-a-kind storage solution that not only holds your treasured accessories but also reflects your personal taste. With a focus on meticulous planning and attention to detail, this project presents an excellent opportunity for self-expression and spatial improvement. Whether you’re seeking a refined aesthetic or a practical means of keeping your jewelry organized, the versatility of this DIY endeavor ensures a successful outcome. By following the step-by-step guide available at What’s Ur Home Story, you’ll gain valuable insights into material selection and finishing techniques to achieve a polished look that perfectly complements your space.
Jewelry Holder Using Scrap Wood
Transform your space with a customizable DIY jewelry organizer wall that showcases your collection in style. In this project, we’ll be using simple materials like scrap wood and basic tools to create a functional and elegant DIY Jewelry Holder that’s perfect for anyone looking to organize their jewelry in a unique way. This project is not only easy to follow but also immensely satisfying, as it allows you to repurpose leftover wood while adding a personal touch to your decor. With just a few simple steps, you can maximize your creativity and learn the full tutorial by watching the video now.
Conclusion:
In conclusion, creating a custom jewelry organizer is more than just a fun project – it’s also an intelligent approach to keeping your treasured pieces neatly arranged and easily accessible. With 30 DIY jewelry organizer ideas at your disposal, you can explore various solutions, from wall-mounted designs to travel-friendly cases that cater to your specific needs. To ensure success, remember to evaluate your organizational requirements, gather the necessary materials, and follow the step-by-step guides. Moreover, these projects offer a unique chance to create something that reflects your personal style while guaranteeing the condition of your jewelry remains perfect. With this in mind, why not start organizing your jewelry in a creative and functional way today?
