Transform your accessories game with a dash of creativity! Crafting DIY button bracelets is an exciting way to express yourself and tell a story through unique, handmade pieces. Each bracelet becomes a reflection of your personality and tastes, making it a truly personal accessory. This guide will walk you through the process, helping you create stunning button bracelets that showcase your individuality. With simple materials and a little patience, you can make something extraordinary – perfect for self-expression or as a thoughtful gift.
Why Make DIY Button Bracelets?
When you create your own DIY button bracelets, you’re not just crafting a piece of jewelry – you’re unlocking a world of benefits. For one, making your own accessories can be a cost-effective way to update your wardrobe without breaking the bank. With buttons and strings as your primary materials, you’ll have the freedom to design something that perfectly captures your unique style.But beyond the practical benefits, crafting DIY button bracelets offers a range of intangible rewards. By upcycling old garments or using sustainable materials, you’re taking a small but meaningful step towards reducing waste and promoting eco-friendliness. And let’s not forget the therapeutic benefits – the process of making can be meditative, providing a peaceful escape from the digital world and boosting your mood in the process.Of course, DIY button bracelets also make for unique and thoughtful gifts. When you put in the effort to create something by hand, you’re showing the recipient that you care enough to take the time to do it right. And if you involve friends or family in the process, you’ll be building memories and strengthening bonds that will last a lifetime.As you hone your skills and experiment with different designs, you’ll also be developing your fine motor skills, creativity, and maybe even learning a thing or two about jewelry design. So why not give DIY button bracelets a try? It’s an activity that offers a little something for everyone – from the creative and practical benefits to the therapeutic and social rewards.
Button Bracelet Tutorial
Transforming ordinary buttons into an extraordinary button bracelet is a creative outlet that’s perfect for craft enthusiasts and beginners alike. This tutorial will walk you through the process of upcycling your button collection into a stunning accessory, ready to be worn or gifted. With just a few simple steps, you’ll be amazed at how quickly you can turn humble buttons into a statement piece. So, start gathering those buttons and let’s get started on this fun DIY adventure!
What You Need:
To create a unique embellishment for your handmade crafts or DIY projects, you’ll need to gather some essential materials. Start by collecting a variety of buttons in different sizes, colors, and textures to add visual interest. You’ll also require button thread, which is stronger and thicker than regular sewing thread, allowing it to handle the weight and texture of the buttons. Additionally, acquire non-roll elastic bands, ideally 1 inch wide but any width will work, as well as a trusty sewing needle, scissors, and if desired, a sewing machine.
Instructions:
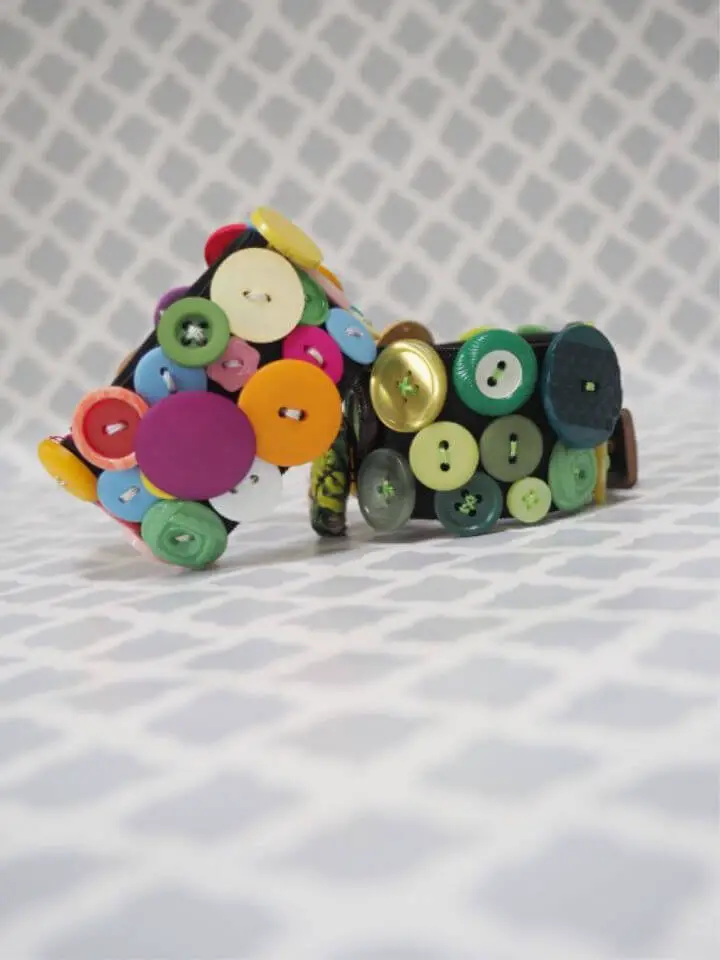
To create a distinctive button bracelet, start by selecting the buttons that fit your style. For this project, we’re combining gold, green, white, and ivory buttons for a eclectic look. Next, measure the size of your bracelet by wrapping the elastic around your wrist. Mark and cut the elastic to your desired length, leaving some extra for sewing overlap.
Once you’ve got your elastic prepared, it’s time to join the ends together. Overlap the edges by about an inch and sew them securely using a sewing machine or hand-stitching. Make sure to reinforce the seam several times for added strength.
Before you start sewing on the buttons, lay out your design on the elastic band. Try to cover as much of the elastic as possible with the buttons to minimize its visibility.
Thread your needle and tie a knot at the end using button thread for durability. Start sewing your buttons onto the elastic, beginning at the seam where you joined the ends. You can arrange them closely or loosely, depending on your desired design.
Continue adding buttons until the entire length of the elastic is covered. Feel free to overlap some buttons slightly for a textured look and ensure there are no gaps where the elastic shows through.
Once all your buttons are sewn on, inspect the bracelet for any loose threads and secure them. Trim any excess thread and your button bracelet is complete! Wear it with pride or give it as a thoughtful handmade gift.
Video Tutorial
To elevate the crafting experience, we’ve created a step-by-step video tutorial that complements our written guide. This visual aid brings the instructions to life, making it easier for you to follow along as you create your button bracelet. With this helpful resource, you’ll be able to craft with confidence and precision. The beauty of handmade crafts lies in their uniqueness, so don’t worry about making mistakes – instead, embrace the imperfections that make each piece truly special. Whether you’re creating something for yourself or gifting it to someone else, your button bracelet is sure to add a touch of personality and charm to any outfit.
FAQS on DIY Button Bracelet Ideas
To facilitate a seamless and enjoyable DIY experience, this section addresses frequently asked questions about creating button bracelets from scratch. The following information is designed to equip you with the necessary insights to tackle any challenges that may arise during your crafting adventure.
What materials do I need to start making a DIY button bracelet?
To get started, you’ll need a diverse array of materials to craft your unique button creations. This includes an assortment of buttons featuring varying sizes, colors, and textures. You’ll also require strong thread suitable for sewing buttons, such as button thread or embroidery floss. For added flexibility, consider incorporating elastic bands or cords into your design. In addition to these essential items, you’ll need a sewing needle and a pair of scissors. If you’re looking to take your creations to the next level, you may also want to have a sewing machine on hand for ease of use. Furthermore, decorative beads or charms can be used to add an extra layer of visual interest to your designs.
Can I use any type of button for my bracelet?
When it comes to creating a unique and eye-catching accessory, the type of button used is entirely up to personal preference. You’re not limited to new buttons, as vintage or repurposed ones from old garments can also be used to great effect. Just make sure they’re free from damage and in good condition. By incorporating different sizes, colors, and textures, you can add depth and visual interest to your bracelet, making it a one-of-a-kind piece that reflects your personal style.
How do I ensure the bracelet fits my wrist?
Prior to trimming any excess material from the elastic or cord, ensure a secure yet comfortable fit by wrapping it around your wrist. Take note of the correct length, leaving enough slack for future adjustments – such as tying knots or sewing seams – and consider making slight adjustments by adding or removing buttons as required.
Is it necessary to have sewing skills for making a button bracelet?
While having basic sewing skills is certainly beneficial, they’re not a prerequisite for crafting with ease. In fact, many designs are refreshingly straightforward and don’t necessitate extensive stitching expertise. Furthermore, the world of crafting also offers no-sew alternatives that cleverly utilize elastic bands or cords, allowing you to thread buttons rather than sew them in place – a convenient solution for those who prefer to keep things simple.
How can I make my button bracelet more durable?
For optimal durability, consider implementing the following strategies: By selecting a robust thread or elastic, you can significantly boost the resistance of your creation. To further enhance its resilience, double the thread when sewing to create an added layer of strength. When securing knots, utilize a clear nail polish or glue to prevent them from coming undone. Additionally, exercise caution when wearing and removing the bracelet to avoid overstretching the elastic, which can compromise its overall durability.
Can I wash my DIY button bracelet?
When it comes to caring for your garments, handwashing is a recommended approach. To effectively clean delicate fabrics, gently apply a small amount of mild soap and warm water without submerging the fabric in the process. It’s essential to avoid using harsh chemicals or intense scrubbing motions, as these can cause damage to buttons, threads, or other sensitive components. Instead, allow the garment to air dry flat, ensuring a gentle and thorough drying process that won’t distort the fabric.
What if I don’t have enough matching buttons?
Unleash your creative flair by combining various button styles to create a unique and eclectic look. Alternatively, think outside the box and paint mismatched buttons in harmonious colors to achieve a cohesive design. The versatility of button bracelets makes them an ideal project for utilizing materials you already have on hand, allowing you to get crafty without breaking the bank.
Can I make a button bracelet with my kids?
When it comes to crafting with kids, button bracelets are an excellent way to foster their creative side while also developing essential fine motor skills. To make the project accessible to younger crafters, opt for larger buttons and a straightforward threading technique. As with any craft project involving sharp objects like needles or scissors, adult supervision is highly recommended to ensure everyone’s safety.
Where can I find inspiration for my button bracelet designs?
When seeking inspiration, one need not look far. It can manifest in the most unexpected places – a stylish magazine spread, a DIY website, social media platforms like Pinterest that are bursting with creativity, or even the natural world and ordinary objects that surround us. The key is to be open-minded and willing to take risks by combining seemingly disparate elements like colors, textures, and patterns.
How can I gift a DIY button bracelet?
When gifting your handmade bracelet, consider elevating the experience by presenting it in a thoughtfully curated package. A beautifully crafted jewelry box, an organza bag, or even wrapping it around a handmade card can add a touch of whimsy and make the gift feel truly special. To take it to the next level, include a handwritten note sharing the inspiration behind the piece or the significance of the buttons used. This personal touch will not only make the gift more memorable but also imbue it with an emotional connection that will be cherished by the recipient.
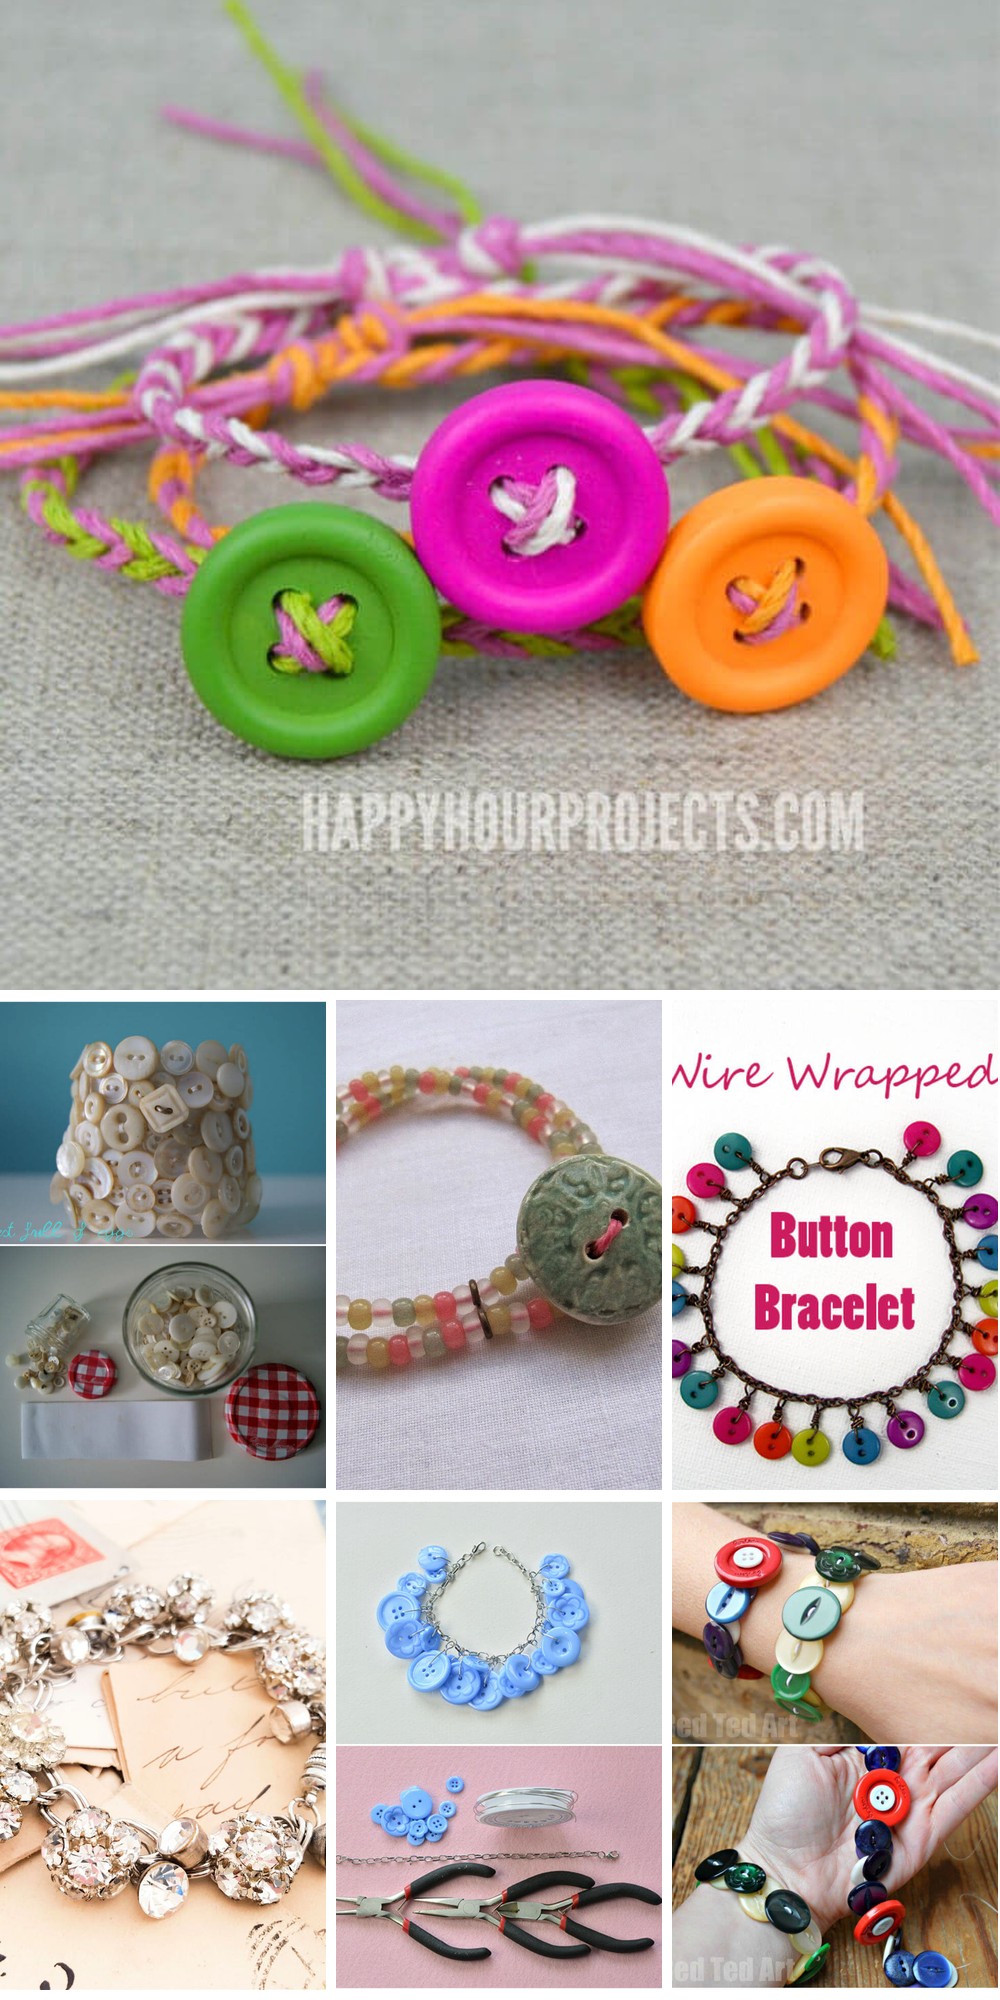
15 Easy DIY Button Bracelet Ideas To Make
Unleash your creativity by exploring 15 innovative DIY button bracelet ideas that can be effortlessly crafted from the comfort of your own home. These charming jewelry projects cater to a wide range of skill levels, making them an ideal activity for anyone looking to express themselves through wearable art.
Gorgeous DIY Button Bracelet for Kids
Crafting a whimsical button bracelet for kids is an excellent way to introduce them to the world of jewelry-making. By following Pandahall’s step-by-step guide, you can create a colorful piece of wearable art using just buttons and some basic materials. The process begins with cutting copper wire into manageable pieces, which are then adorned with acrylic buttons of varying sizes. Secure these button clusters together and attach them to an iron-twisted chain, arranging the design as desired. This project not only offers a fun and engaging crafting experience but also makes for a thoughtful, handmade gift. With its versatility in accommodating different tastes, it’s an ideal craft project for kids (and adults alike). So why not start by grabbing your supplies from Pandahall.com and begin crafting your unique button bracelet today?
Pretty Button Friendship Bracelets
Create vibrant and playful DIY button friendship bracelets with Happy Hour Projects that add a pop of color to your accessory collection. This quick and easy project requires just wooden buttons and hemp cord, making it accessible to crafters of all skill levels. In under 10 minutes, you can learn to cut, thread, and braid your own unique piece of handmade jewelry. Perfect for making multiples to share the joy of handcrafted friendship.
How to Make a Button Bracelet

Transforming ordinary objects into extraordinary accessories is an art form that’s both challenging and rewarding. For those who share this passion, crafting a Chanel-inspired charm bracelet presents a unique opportunity to combine elegance with DIY flair. This comprehensive guide provides a step-by-step approach to creating a sophisticated accessory from readily available materials like buttons, pearls, and chain. With meticulous instructions, you’ll learn how to drill, glue, and assemble the components, ultimately yielding a piece that belies its humble beginnings. Whether you’re looking for a thoughtful gift or a personal indulgence, this bracelet brings designer-inspired sophistication to your jewelry collection. By embracing patience and creativity, you can achieve professional-looking results that will leave onlookers impressed.
Make Wire Wrapped Button Bracelet
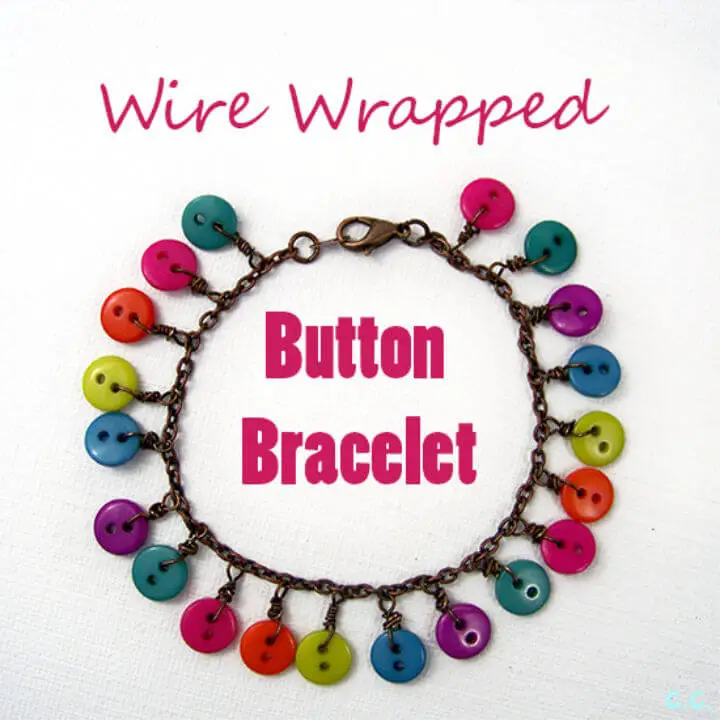
Take your DIY skills to new heights with this delightful wire-wrapped button bracelet project! Our step-by-step guide is perfect for crafting enthusiasts looking to add a one-of-a-kind piece to their jewelry collection. With just a few simple tools like buttons, eye pins, needle-nose pliers, and chain, you’ll be able to create a charming accessory in about 30 minutes. Follow our easy-to-follow instructions to mix and match colors and assemble a bracelet that’s as sweet as candy – perfect for solo crafters or group crafting sessions alike. Stay tuned for next Tuesday’s surprise, which may bring exciting changes to the blog!
DIY Bracelet from Metal Buttons
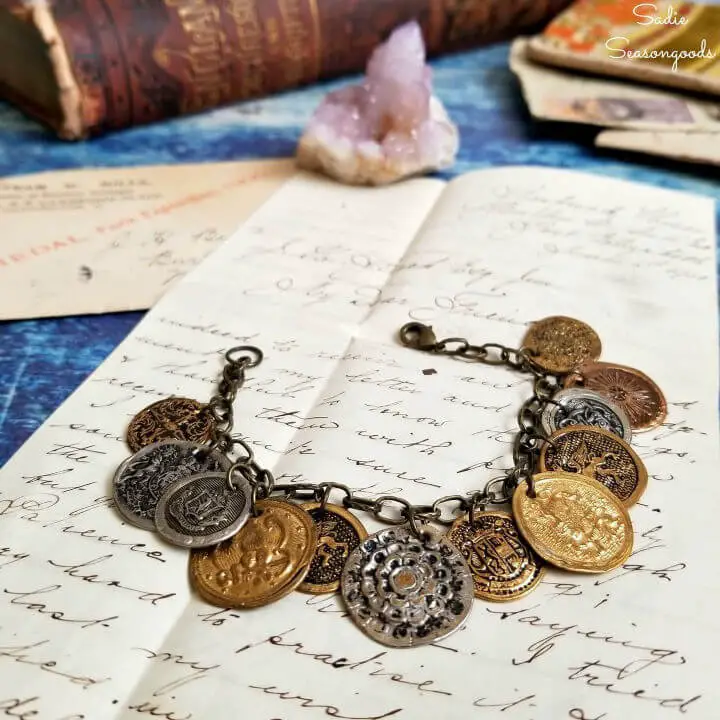
Transform vintage metal buttons into stunning faux gold coins for a bohemian-inspired coin bracelet. With Sadie Seasongoods’ step-by-step guide, you can breathe new life into forgotten items and create a one-of-a-kind accessory that’s both affordable and stylish. Perfect for DIY enthusiasts looking to add a touch of gypsy flair to their wardrobe, this tutorial combines practical tips with creative freedom, ensuring your finished piece is as unique as you are. By following the easy-to-understand instructions, you’ll be able to craft a charming coin bracelet that exudes boho-chic charm and becomes a treasured addition to your jewelry collection.
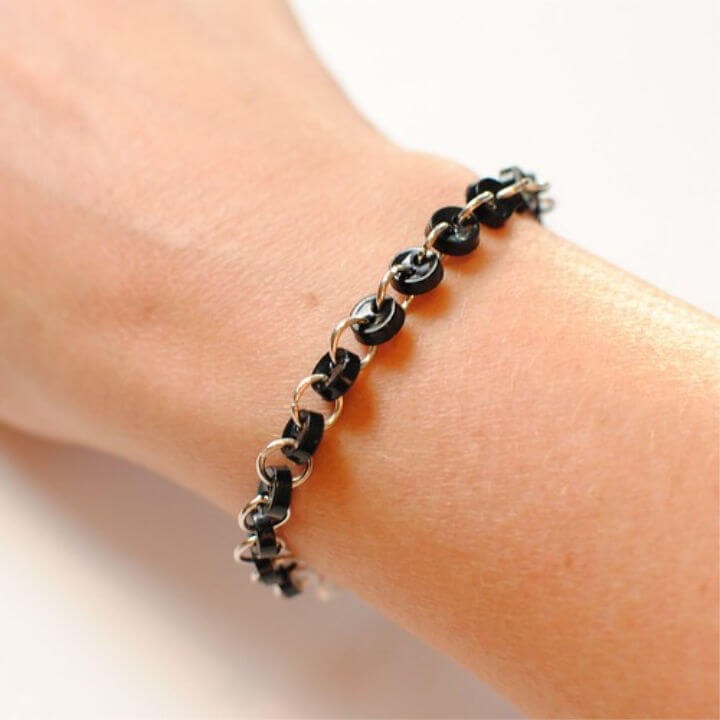
Make an Elastic Repurposed Button Bracelet
Transform worn-out buttons into a trendy elastic bracelet with ease using FeltMagnet’s step-by-step DIY jewelry guide, courtesy of Claudia Porter. This comprehensive tutorial provides detailed instructions and visual aids to help you create a one-of-a-kind accessory that adds a touch of personality to any outfit. With a minimal list of easily accessible supplies, you’ll be inspired to dig into your button collection and let your creativity shine. Whether you’re looking to elevate your own style or seeking a thoughtful gift idea, this rewarding crafting experience is sure to bring a smile.
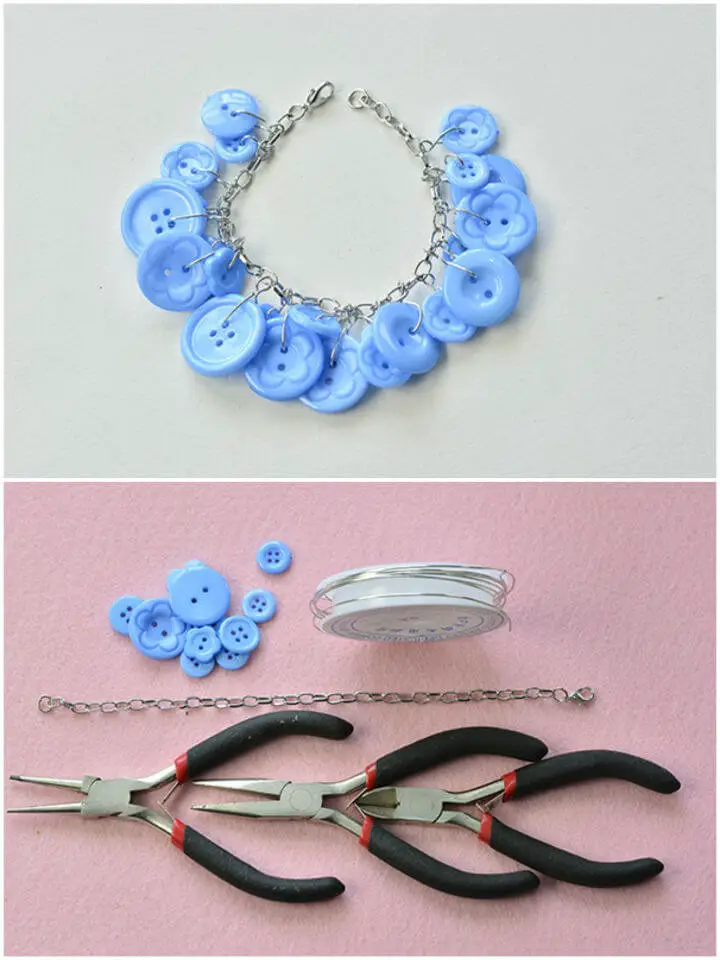
Simple DIY Button Bracelet
With Just Crafty Enough’s comprehensive guide, you’ll be effortlessly guided through the process of creating your own stylish button bracelet. This DIY project is remarkably simple, requiring only basic materials – buttons, jump rings, a clasp, and some fundamental jewelry pliers. The beauty of this craft lies in its adaptability; choose from an array of button designs to create a one-of-a-kind accessory that seamlessly complements any outfit. By following the crystal-clear, step-by-step instructions, you’ll be able to assemble a charming piece that not only adds a personal touch to your jewelry collection but also showcases your creativity and flair. Whether you’re an experienced crafter or just starting out, this engaging and easy-to-understand tutorial from Just Crafty Enough promises a fulfilling experience that will leave you feeling proud of your handmade creation.
How to Make a Pretty Button Bracelet
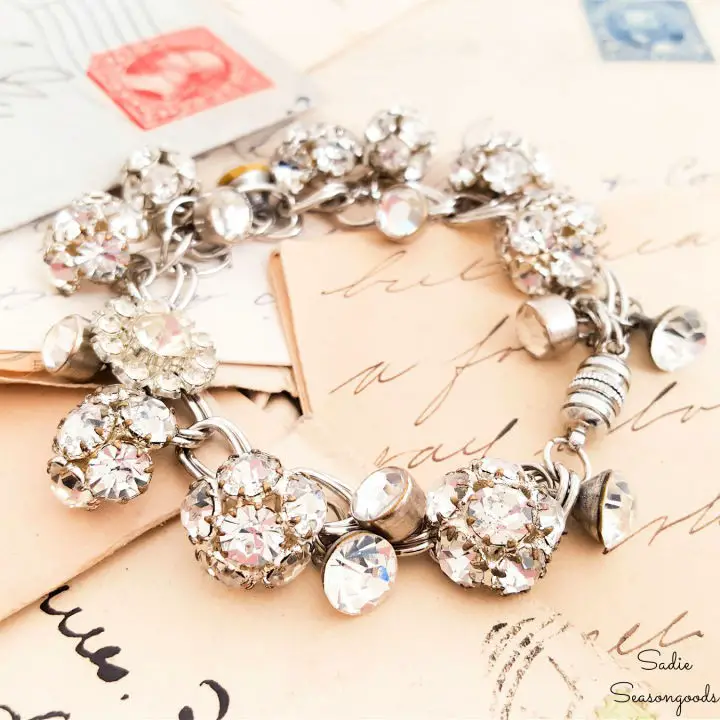
Transforming vintage rhinestone buttons into a custom charm bracelet is an invigorating creative pursuit, allowing you to craft unique jewelry with a personal touch. By following Sadie Seasongoods’ step-by-step guide, anyone can effortlessly turn these eye-catching buttons into a stunning accessory that adds a dash of sparkle to any outfit. With the use of simple jewelry-making supplies and shank buttons, the process is straightforward and rewarding, making it perfect for crafting enthusiasts of all levels. As you work through the tutorial, you’ll be able to create a one-of-a-kind piece that could serve as a thoughtful gift or a treasured addition to your own collection.
Button Bracelets for Kids
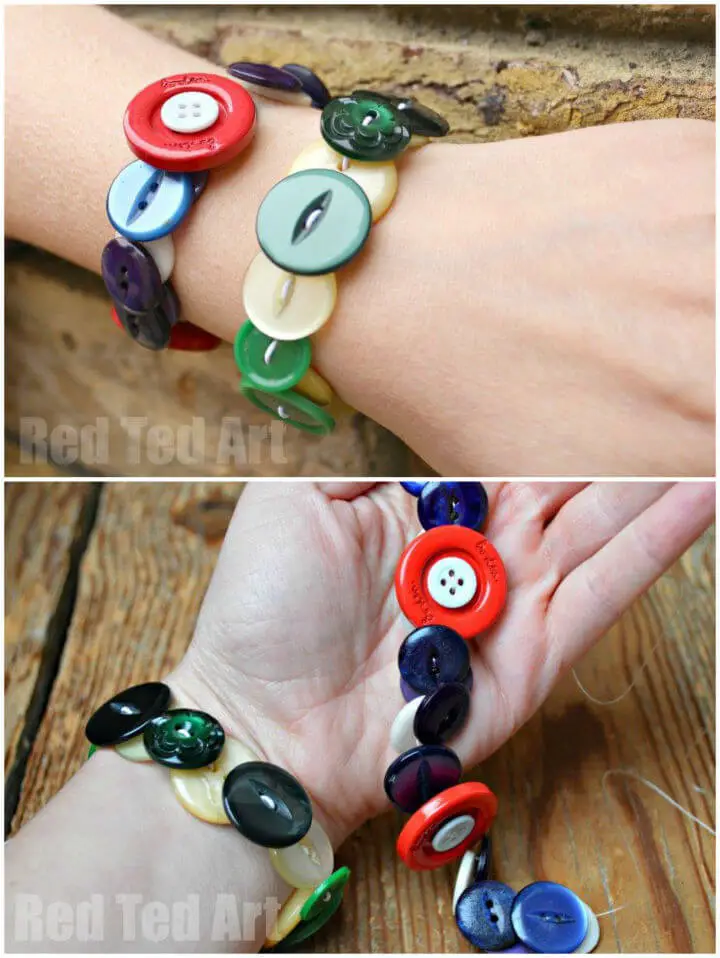
Explore the world of crafting with Red Ted Art as they demonstrate how to create delightful button bracelets. This charming project makes for an excellent gift-giving opportunity on Mother’s Day or any special occasion. With minimal effort and maximum creativity, you can craft a one-of-a-kind piece of jewelry that reflects your personality. Simply gather a variety of colorful buttons and elastic, then thread them together to bring your design to life.
Feel free to let your imagination run wild by mixing and matching different colors, shapes, and sizes. The easy-to-follow instructions and flexibility for experimentation ensure this activity is enjoyable for both kids and adults. As you craft, you’ll be adding a unique touch to your accessories collection that’s sure to spark conversations.
Make a Fabric Cover Button Bracelet
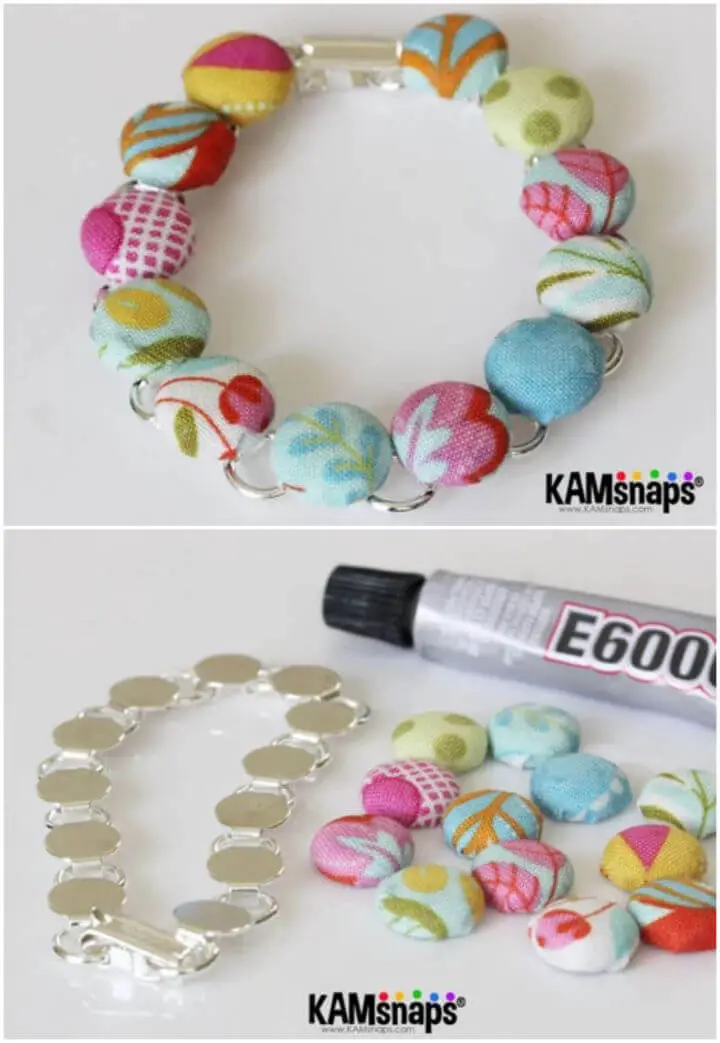
Create a one-of-a-kind fabric cover button bracelet without sewing by following this easy tutorial from KAMsnaps. Delve into your fabric collection to select from an extensive palette of colors and prints that reflect your personal style. Gather the necessary materials: size 20 cover buttons, a disc bracelet, E6000 glue, and felt scraps. Start by removing the wire backs from the buttons and covering them with fabric – a straightforward process. Next, glue a piece of felt to each button for a secure fit on your bracelet. Arrange your buttons in your desired design, attach them using a small amount of glue, and let it set overnight. The result is a charming, handmade accessory that makes a thoughtful gift or a unique addition to your own jewelry collection.
DIY Avocado Pit Button Bracelet
Elevate the humble avocado pit from waste to wonderful by transforming it into charming eco-friendly buttons and crafting a one-of-a-kind bracelet using Salvage Sister and Mister’s comprehensive guide. This DIY endeavour not only breathes new life into materials that might otherwise be discarded, but also invites you to tap into your creative side while cultivating a deeper connection with the environment. With crystal-clear instructions and a list of essential supplies including avocado pit buttons, cord, wood beads, and a small nail, this project is poised to become your go-to guide for crafting a unique accessory or gift that’s as personal as it is meaningful. So why not dive into this engaging activity and wear your sustainable creation with pride?
Make Your Own Button Bracelet
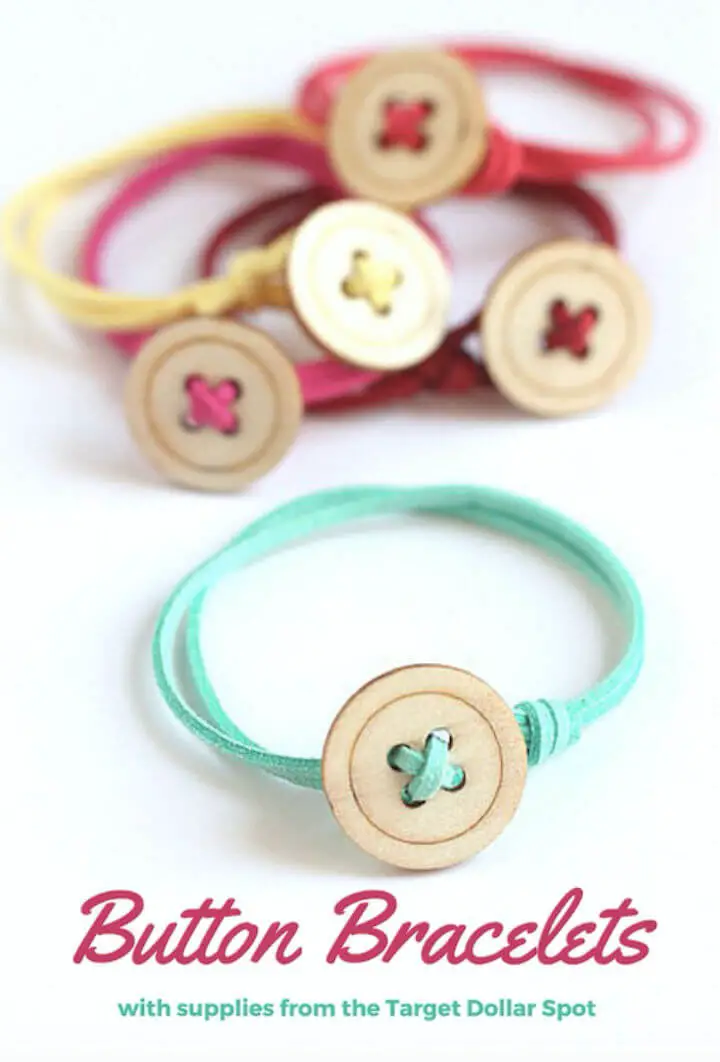
Transform a simple DIY project into a stylish button bracelet using everyday items from All Things Target and Bullseye’s Playground. With just wood buttons and vibrant faux suede cording, you can create a lightweight, fashion-forward accessory that adds a personal touch to your wardrobe or makes for a unique gift. The process is effortlessly straightforward: simply thread the cord, form loops, and secure with a knot. This fun and engaging activity yields a comfortable bracelet perfect for wearing or sharing. By following clear, step-by-step instructions, you’ll be delighted with the chic, handmade addition to your jewelry collection.
Homemade Button Bracelet
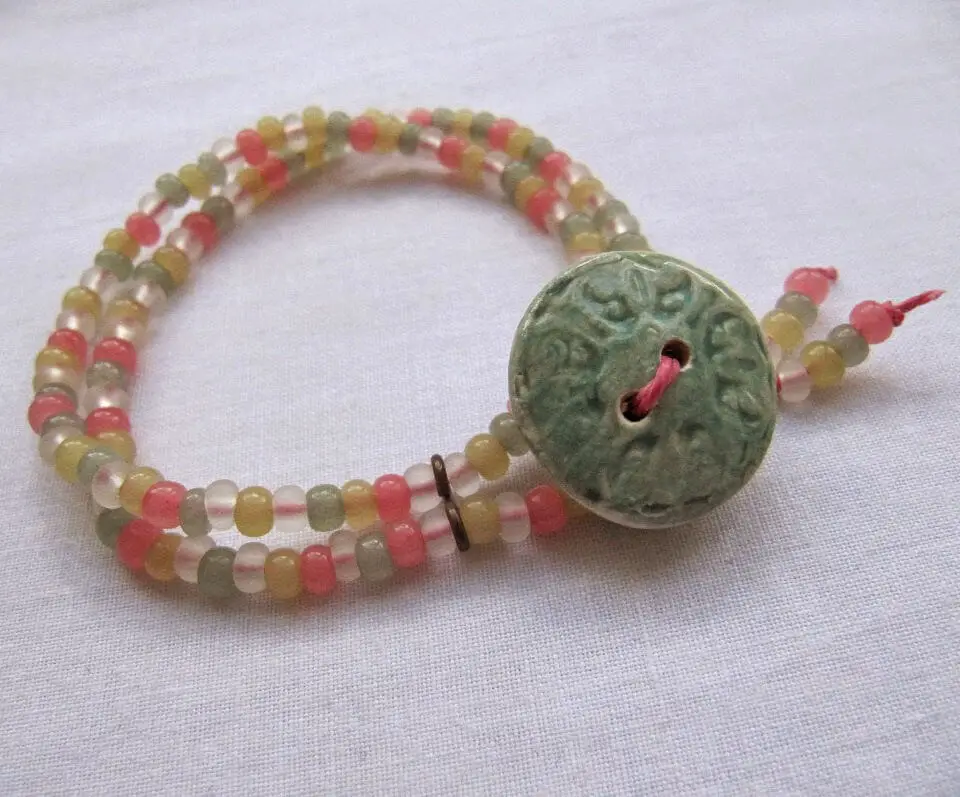
Elevate your jewelry game by crafting a sophisticated button bracelet using these straightforward steps. This project is an excellent opportunity to showcase unique, handmade buttons as the focal point of your design. To get started, gather a few essential materials: a statement button, 4mm seed beads, 4ply Irish waxed linen, and a wire figure-eight link. Begin by threading beads onto the cord, looping them around the button before linking the ends through the figure-eight link. Continue adding beads until the bracelet fits comfortably around your wrist. Secure the button in place with an overhand knot, then finish off the look with beaded tassels for a charming touch. Perfect for adding a personal touch to your accessory collection, this simple yet stylish tutorial promises a rewarding and fashionable crafting experience.
Vintage Button Cuff Bracelet

Transforming vintage treasures into wearable art is an effortless endeavor with this straightforward guide. By combining a simple strip of elastic, an assortment of nostalgic buttons, and fundamental sewing skills, you can create a one-of-a-kind accessory that effortlessly adds a touch of nostalgia to any outfit. This charming project offers unlimited opportunities for personalization, making it an ideal DIY endeavor for both yourself and as a thoughtful gift. Learn the secrets to crafting a vintage-inspired button cuff bracelet that exudes unique character and instantly elevates your style.
Easy to Make Vintage Button Bracelet
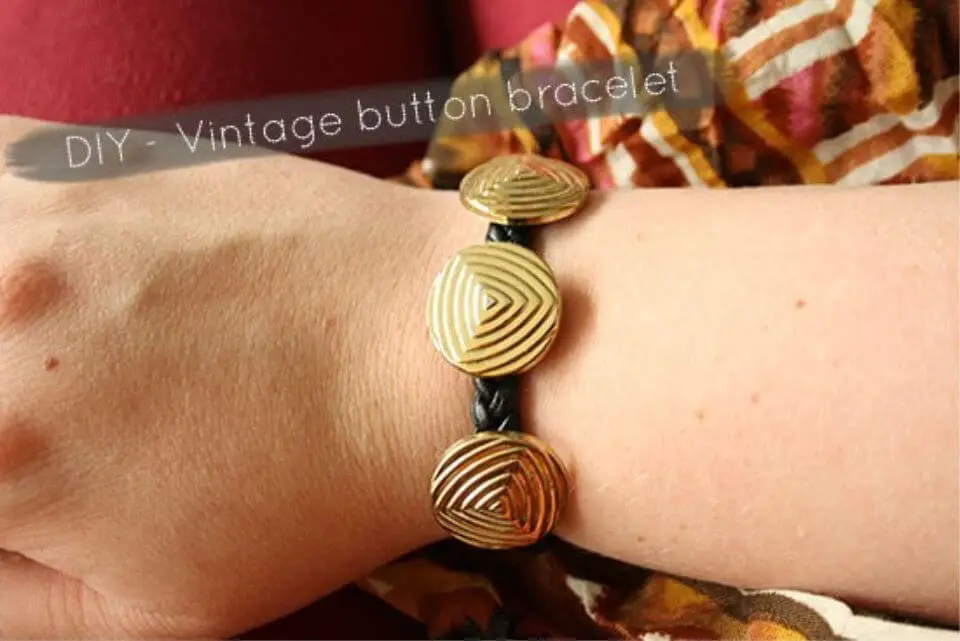
Transform a treasured trove of vintage buttons into a one-of-a-kind piece of jewelry with Wilma Boekholt’s effortless DIY guide on By Wilma. Embark on a creative journey by selecting three favorite buttons to craft a charming bracelet that exudes nostalgia and personal style. To bring your vision to life, gather some leather rope, fundamental jewelry findings, and a pinch of imagination.
By following the step-by-step instructions, you’ll masterfully weave the buttons into a bespoke accessory that not only showcases your upcycling skills but also makes for a thoughtful handmade gift. So why not get crafting and flaunt your unique vintage flair?
How to Organize Your Jewelry?
Transform your space into a stylish haven by creating a one-of-a-kind jewelry organizer that perfectly showcases your treasured accessories. To get started, we’ll explore innovative DIY jewelry organizer ideas that will keep your necklaces, earrings, rings, and bracelets beautifully displayed. You can turn everyday objects into functional pieces of art, giving your room a unique flair.
Conclusion:
As we conclude our exploration of 15 effortless DIY button bracelet ideas, it’s clear that crafting your own jewelry can be an incredibly fulfilling experience. By embracing your creativity and leveraging basic materials, you can turn ordinary buttons into bespoke accessories that reflect your personal style. Whether you’re creating these bracelets for yourself or as thoughtful gifts, the joy lies not just in the finished product, but also in the creative process itself. Our guide has aimed to inspire you to take the leap and craft your own DIY button bracelets, infusing your accessory collection with a touch of uniqueness or gifting someone a heartfelt, handmade present that speaks volumes.